Lexus ES300h 2013 Owner's Manual
ES300h 2013
Lexus
Lexus
https://www.carmanualsonline.info/img/36/12892/w960_12892-0.png
Lexus ES300h 2013 Owner's Manual
Trending: tire pressure, cruise control, fog light bulb, remote start, brake torque, fuel consumption, brake sensor
Page 721 of 910
720
ES350 300h_OM_OM33A01U_(U)
6-3. Do-it-yourself maintenance
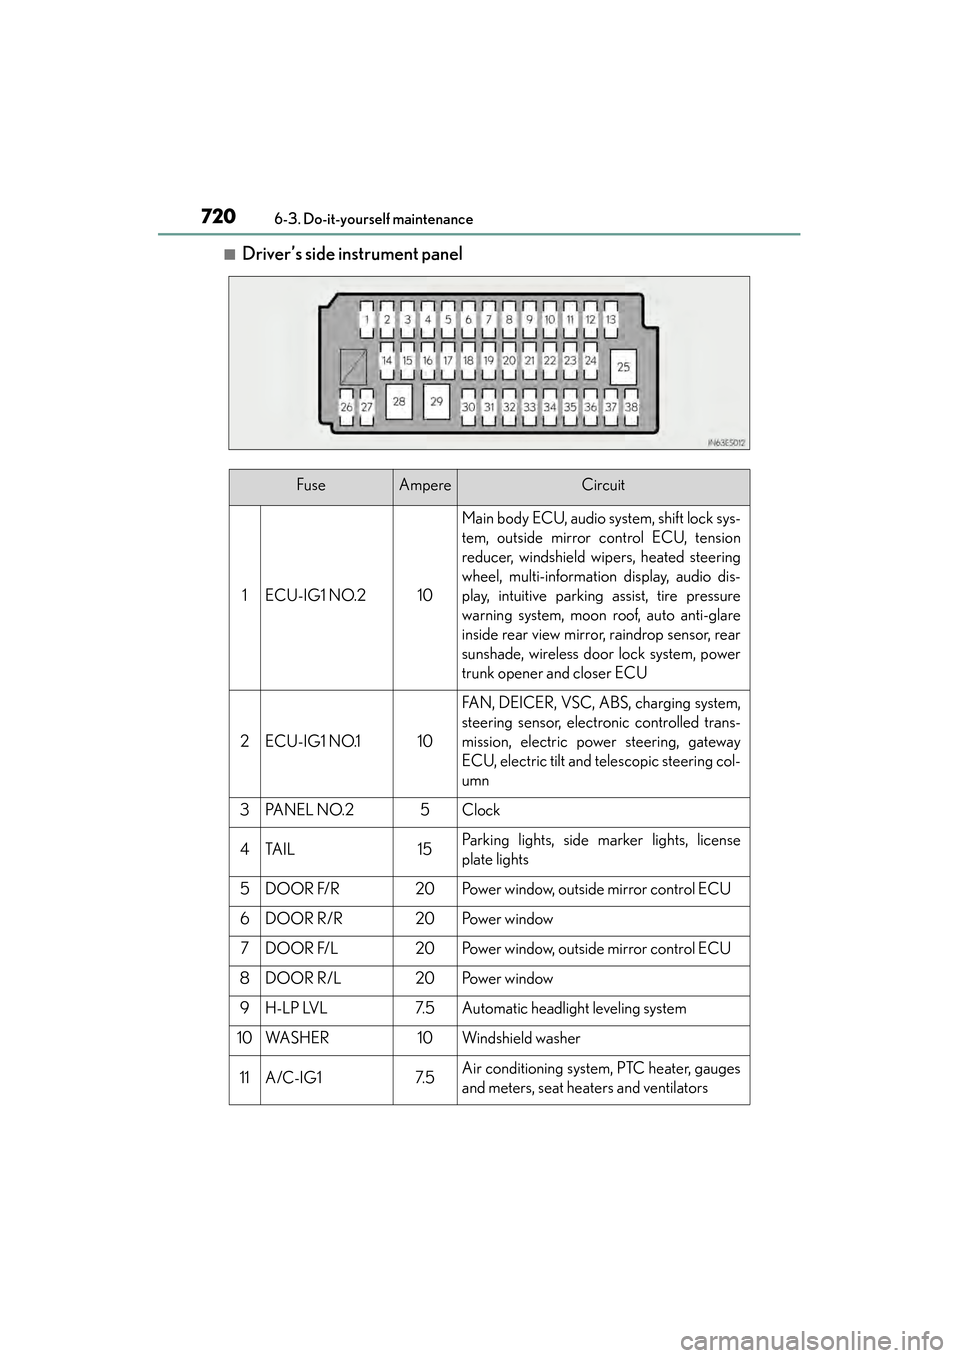
■Driver’s side instrument panel
FuseAmpereCircuit
1ECU-IG1 NO.210
Main body ECU, audio system, shift lock sys-
tem, outside mirror control ECU, tension
reducer, windshield wipers, heated steering
wheel, multi-information display, audio dis-
play, intuitive parking assist, tire pressure
warning system, moon roof, auto anti-glare
inside rear view mirror, raindrop sensor, rear
sunshade, wireless door lock system, power
trunk opener and closer ECU
2ECU-IG1 NO.110
FAN, DEICER, VSC, ABS, charging system,
steering sensor, electronic controlled trans-
mission, electric power steering, gateway
ECU, electric tilt and telescopic steering col-
umn
3PA N E L N O. 25Clock
4TA I L15Parking lights, side marker lights, license
plate lights
5DOOR F/R20Power window, outside mirror control ECU
6DOOR R/R20Po w e r w i n d o w
7DOOR F/L20Power window, outside mirror control ECU
8DOOR R/L20Po w e r w i n d o w
9H-LP LVL7. 5Automatic headlight leveling system
10WA S H E R10Windshield washer
11A/C-IG17. 5Air conditioning system, PTC heater, gauges
and meters, seat heaters and ventilators
Page 722 of 910
ES350 300h_OM_OM33A01U_(U)
7216-3. Do-it-yourself maintenance
6
Maintenance and care
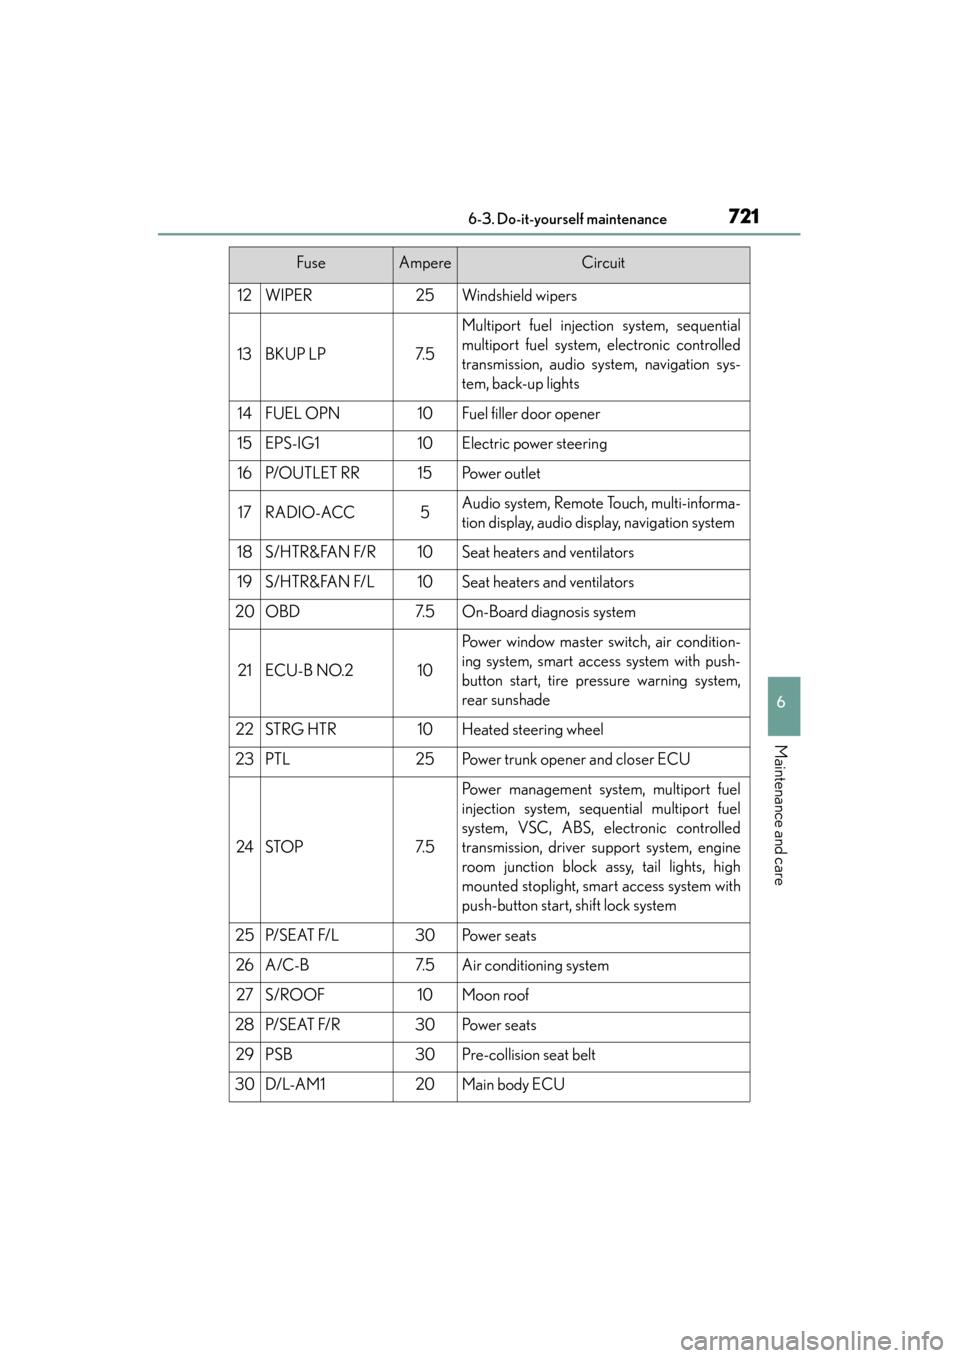
12WIPER25Windshield wipers
13BKUP LP7. 5
Multiport fuel injection system, sequential
multiport fuel system, electronic controlled
transmission, audio system, navigation sys-
tem, back-up lights
14FUEL OPN10Fuel filler door opener
15EPS-IG110Electric power steering
16P/O U T L E T R R15Po w e r o u t l e t
17RADIO-ACC5Audio system, Remote Touch, multi-informa-
tion display, audio display, navigation system
18S / H T R & FA N F/ R10Seat heaters and ventilators
19S / H T R & FA N F/ L10Seat heaters and ventilators
20OBD7. 5On-Board diagnosis system
21ECU-B NO.210
Power window master switch, air condition-
ing system, smart access system with push-
button start, tire pressure warning system,
rear sunshade
22STRG HTR10Heated steering wheel
23PTL25Power trunk opener and closer ECU
24STOP7. 5
Power management system, multiport fuel
injection system, sequential multiport fuel
system, VSC, ABS, electronic controlled
transmission, driver support system, engine
room junction block assy, tail lights, high
mounted stoplight, smart access system with
push-button start, shift lock system
25P/ S E AT F/ L30Po w e r s e a t s
26A/C-B7. 5Air conditioning system
27S/ROOF10Moon roof
28P/ S E AT F/ R30Po w e r s e a t s
29PSB30Pre-collision seat belt
30D/L-A M120Main body ECU
FuseAmpereCircuit
Page 723 of 910
722
ES350 300h_OM_OM33A01U_(U)
6-3. Do-it-yourself maintenance
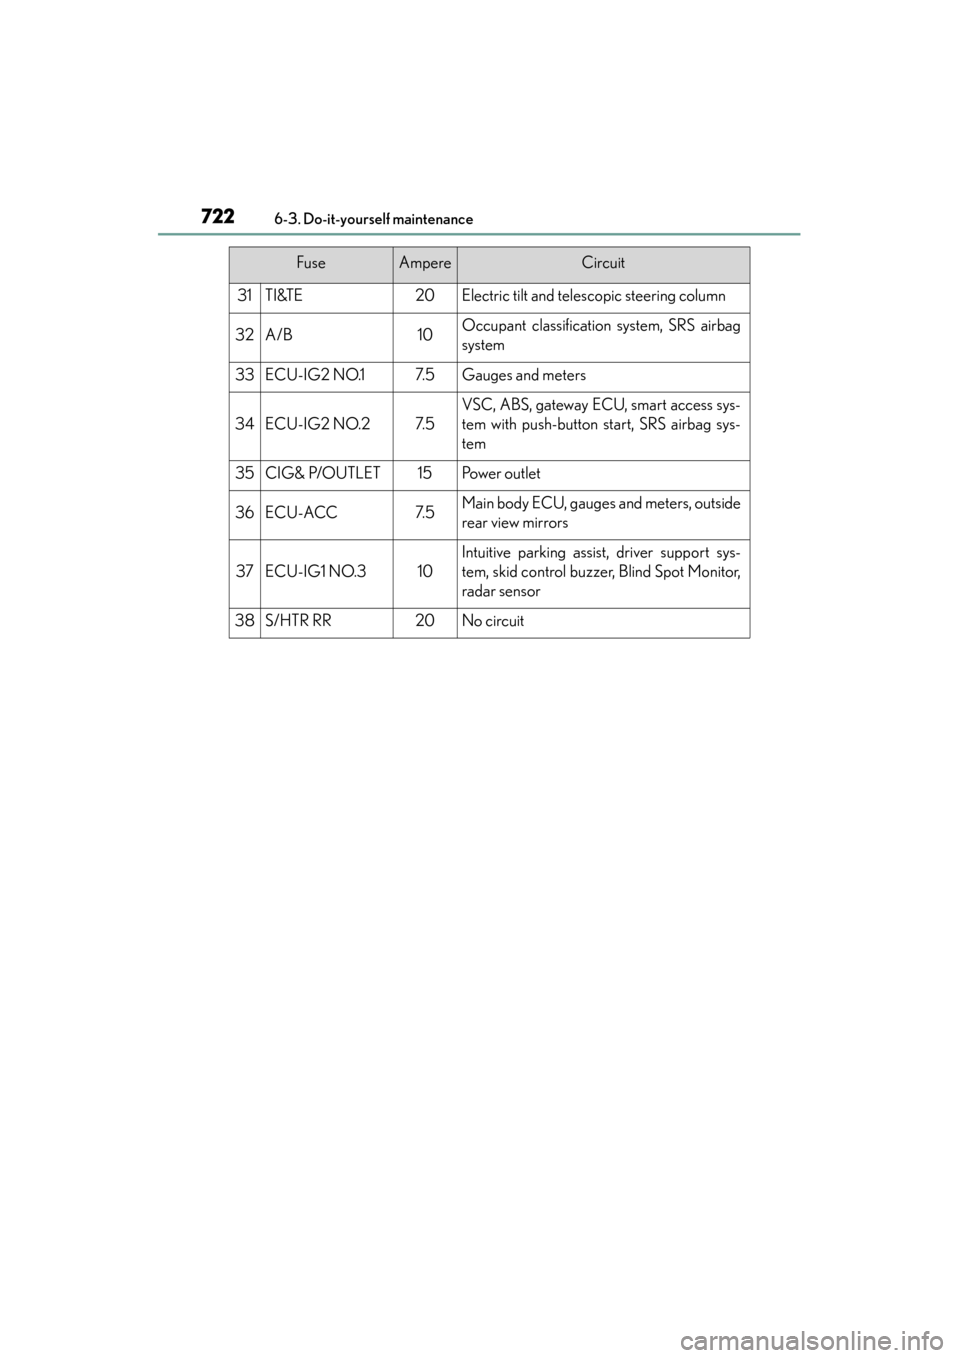
31TI&TE20Electric tilt and telescopic steering column
32A/B10Occupant classification system, SRS airbag
system
33ECU-IG2 NO.17. 5Gauges and meters
34ECU-IG2 NO.27. 5
VSC, ABS, gateway ECU, smart access sys-
tem with push-button start, SRS airbag sys-
tem
35CIG& P/OUTLET15Po w e r o u t l e t
36ECU-ACC7. 5Main body ECU, gauges and meters, outside
rear view mirrors
37ECU-IG1 NO.310
Intuitive parking assist, driver support sys-
tem, skid control buzzer, Blind Spot Monitor,
radar sensor
38S/HTR RR20No circuit
FuseAmpereCircuit
Page 724 of 910
ES350 300h_OM_OM33A01U_(U)
7236-3. Do-it-yourself maintenance
6
Maintenance and care
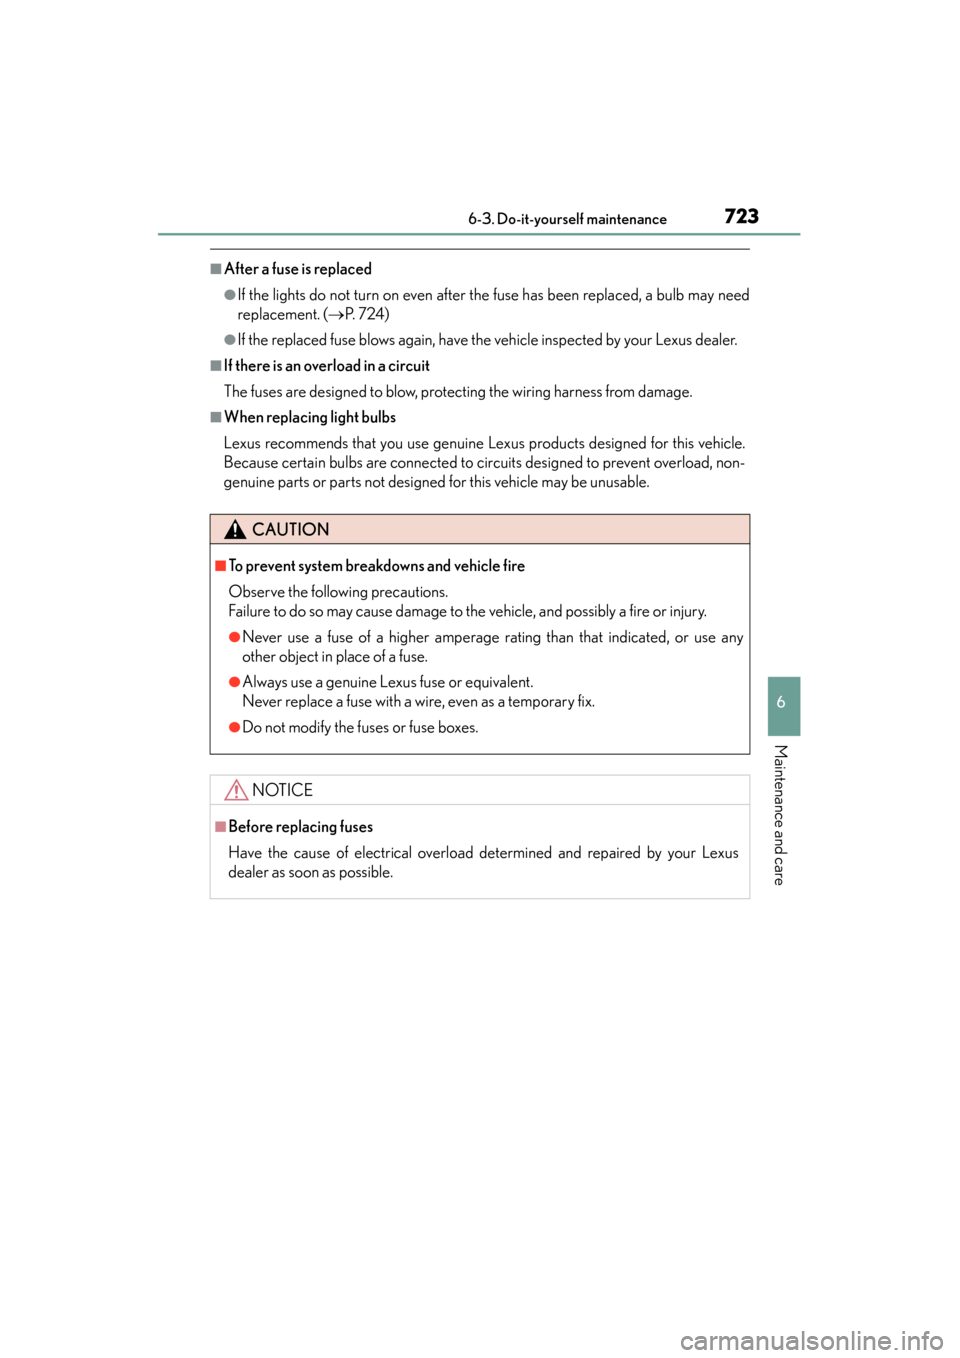
■After a fuse is replaced
●If the lights do not turn on even after the fuse has been replaced, a bulb may need
replacement. (→P. 7 2 4 )
●If the replaced fuse blows again, have the vehicle inspected by your Lexus dealer.
■If there is an overload in a circuit
The fuses are designed to blow, protecting the wiring harness from damage.
■When replacing light bulbs
Lexus recommends that you use genuine Lexus products designed for this vehicle.
Because certain bulbs are connected to circuits designed to prevent overload, non-
genuine parts or parts not designed for this vehicle may be unusable.
CAUTION
■To prevent system breakdowns and vehicle fire
Observe the following precautions.
Failure to do so may cause damage to the vehicle, and possibly a fire or injury.
●Never use a fuse of a higher amperage rating than that indicated, or use any
other object in place of a fuse.
●Always use a genuine Lexus fuse or equivalent.
Never replace a fuse with a wire, even as a temporary fix.
●Do not modify the fuses or fuse boxes.
NOTICE
■Before replacing fuses
Have the cause of electrical overload determined and repaired by your Lexus
dealer as soon as possible.
Page 725 of 910
724
ES350 300h_OM_OM33A01U_(U)
6-3. Do-it-yourself maintenance
Light bulbs
Check the wattage of the light bulb to be replaced. (→P. 8 3 6 )
You may replace the following bulbs by yourself. The difficulty level of
replacement varies depending on the bulb. If necessary bulb replace-
ment seems difficult to perfor m, contact your Lexus dealer.
For more information about replacing other light bulbs, contact your
Lexus dealer.
Preparing for light bulb replacement
Page 726 of 910
ES350 300h_OM_OM33A01U_(U)
7256-3. Do-it-yourself maintenance
6
Maintenance and care
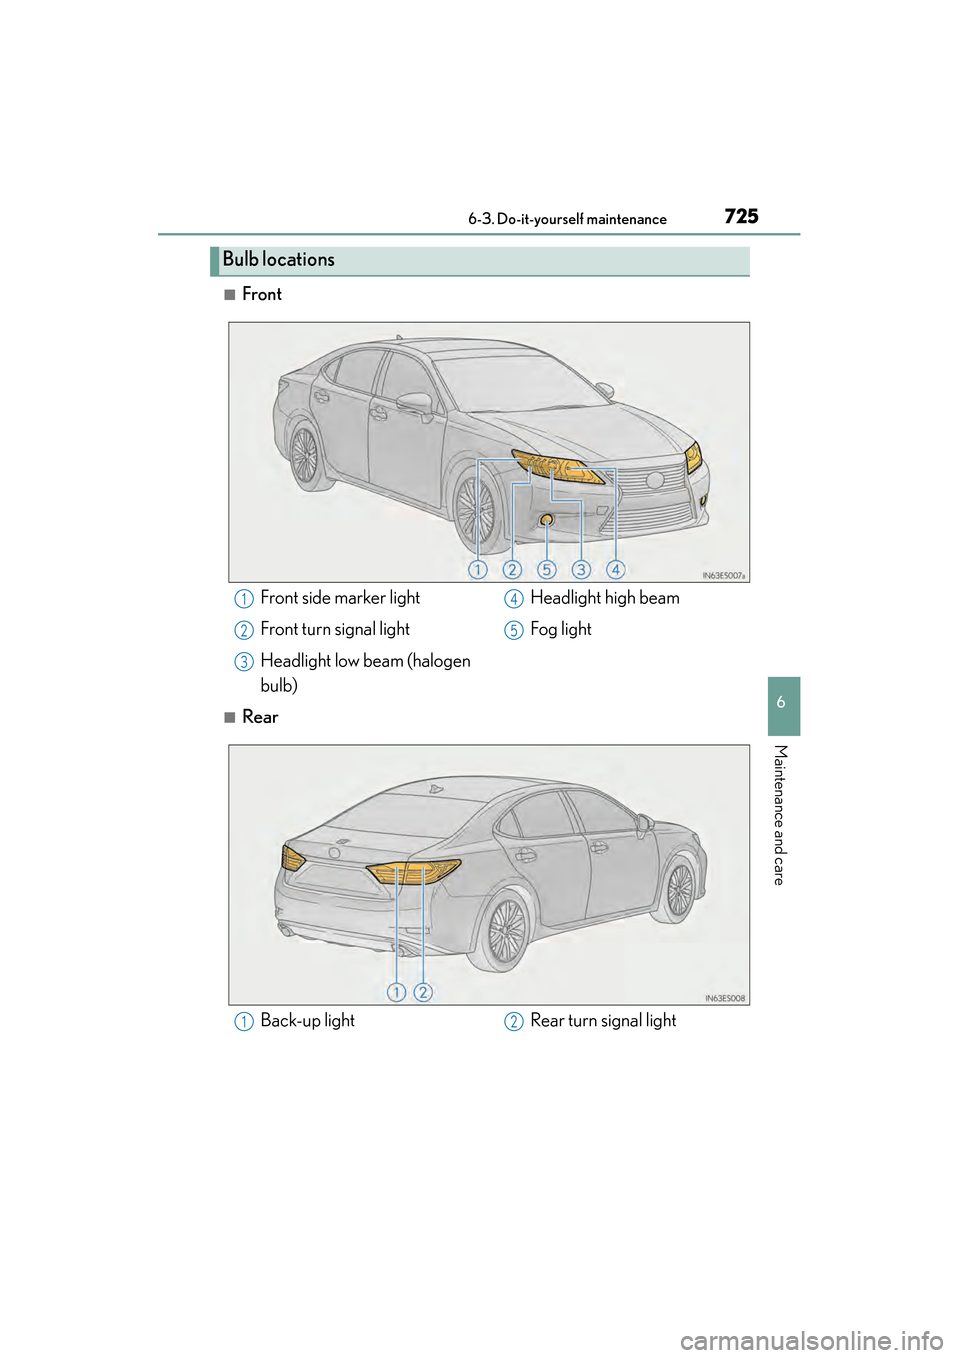
■Front
■Rear
Bulb locations
Front side marker light
Front turn signal light
Headlight low beam (halogen
bulb)Headlight high beam
Fog light1
2
3
4
5
Back-up light
Rear turn signal light12
Page 727 of 910
726
ES350 300h_OM_OM33A01U_(U)
6-3. Do-it-yourself maintenance
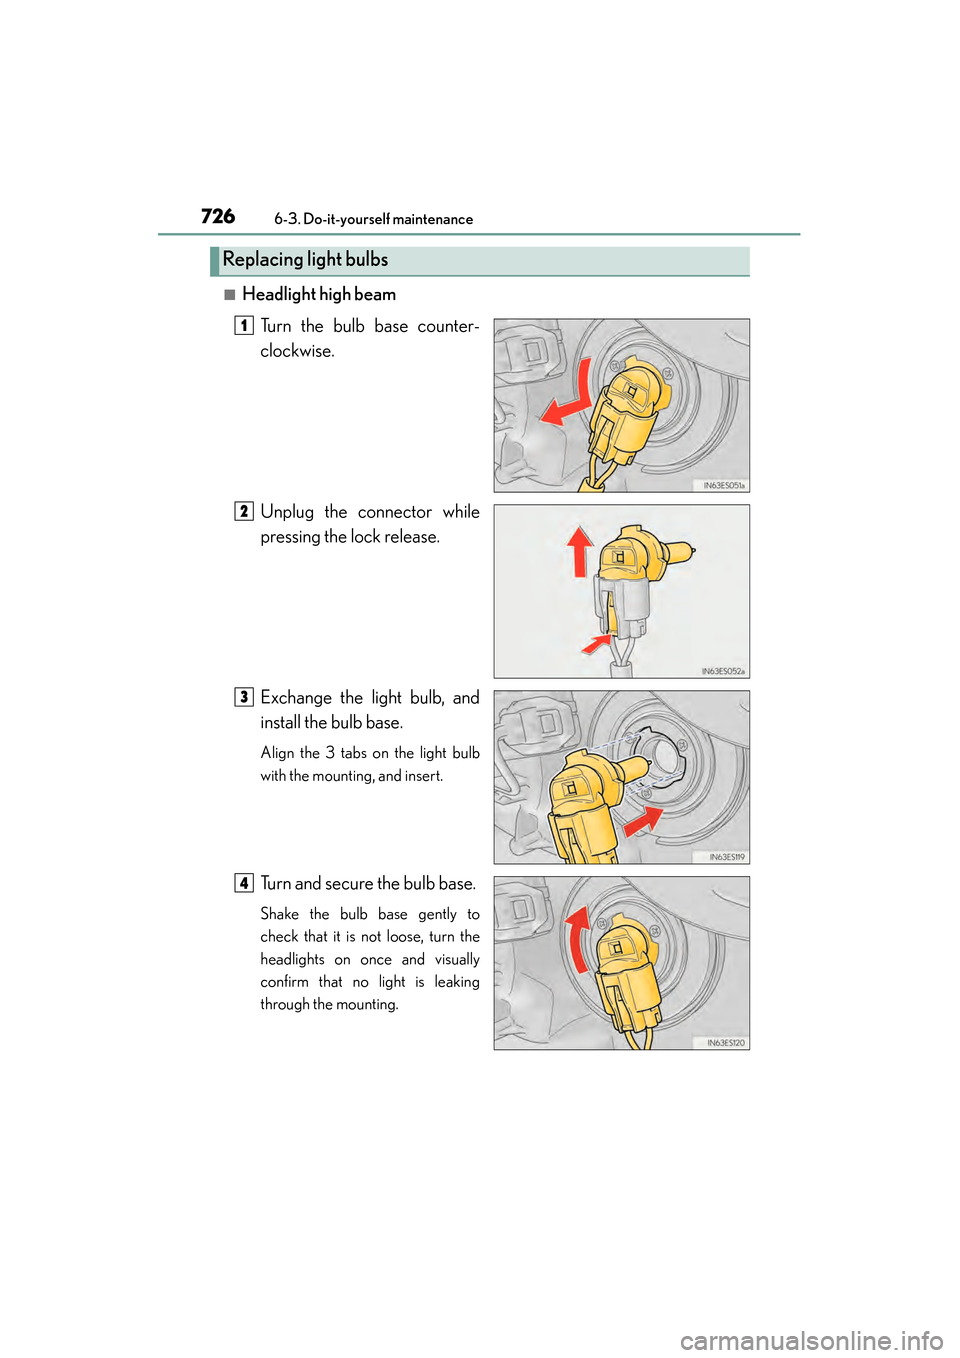
■Headlight high beamTurn the bulb base counter-
clockwise.
Unplug the connector while
pressing the lock release.
Exchange the light bulb, and
install the bulb base.
Align the 3 tabs on the light bulb
with the mounting, and insert.
Turn and secure the bulb base.
Shake the bulb base gently to
check that it is not loose, turn the
headlights on once and visually
confirm that no light is leaking
through the mounting.
Replacing light bulbs
1
2
3
4
Page 728 of 910
ES350 300h_OM_OM33A01U_(U)
7276-3. Do-it-yourself maintenance
6
Maintenance and care
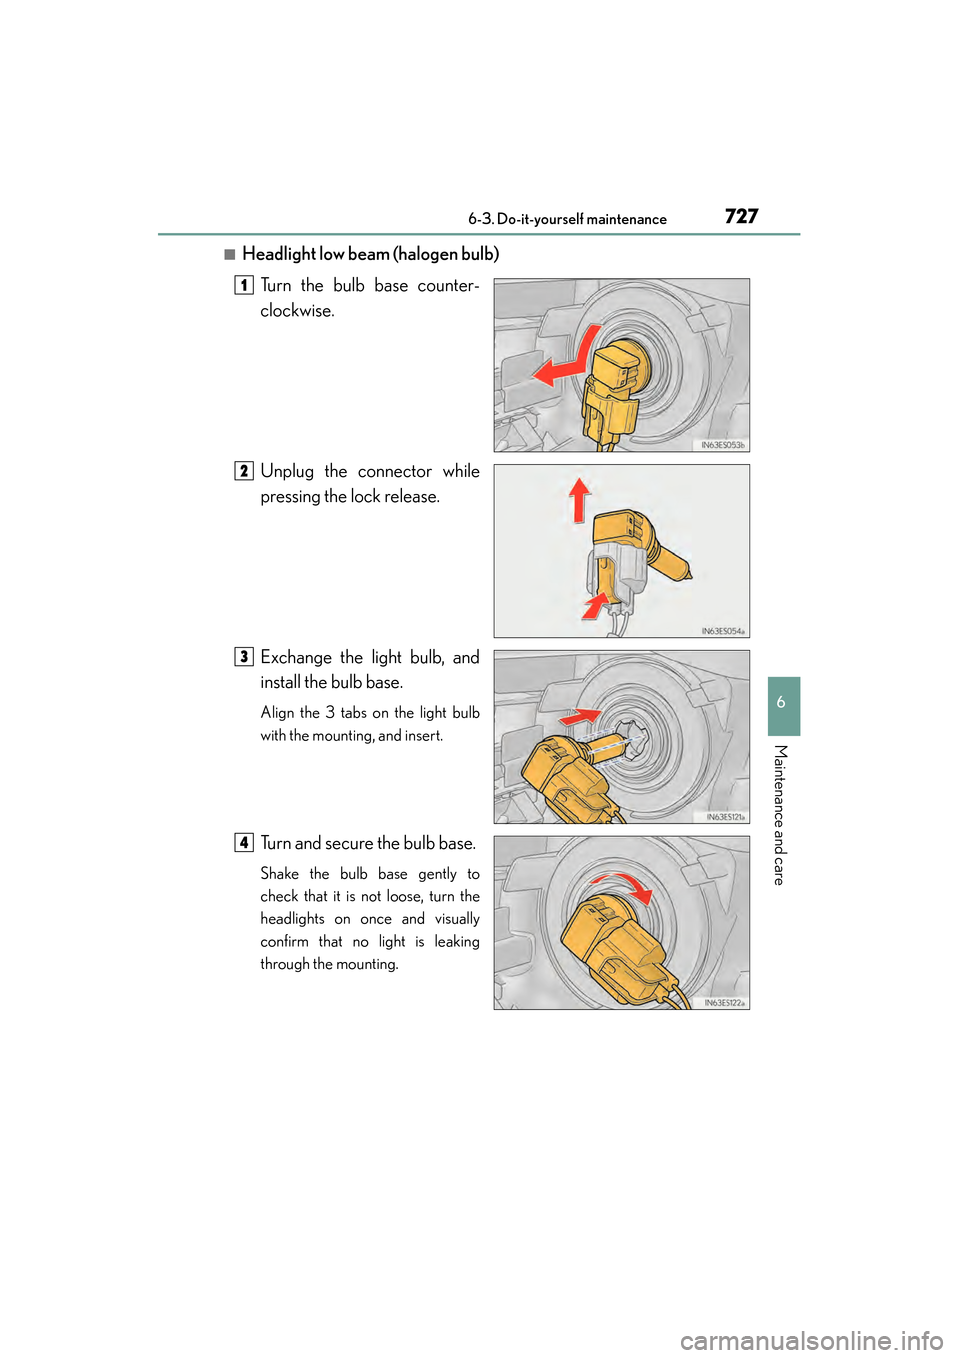
■Headlight low beam (halogen bulb)Turn the bulb base counter-
clockwise.
Unplug the connector while
pressing the lock release.
Exchange the light bulb, and
install the bulb base.
Align the 3 tabs on the light bulb
with the mounting, and insert.
Turn and secure the bulb base.
Shake the bulb base gently to
check that it is not loose, turn the
headlights on once and visually
confirm that no light is leaking
through the mounting.
1
2
3
4
Page 729 of 910
728
ES350 300h_OM_OM33A01U_(U)
6-3. Do-it-yourself maintenance
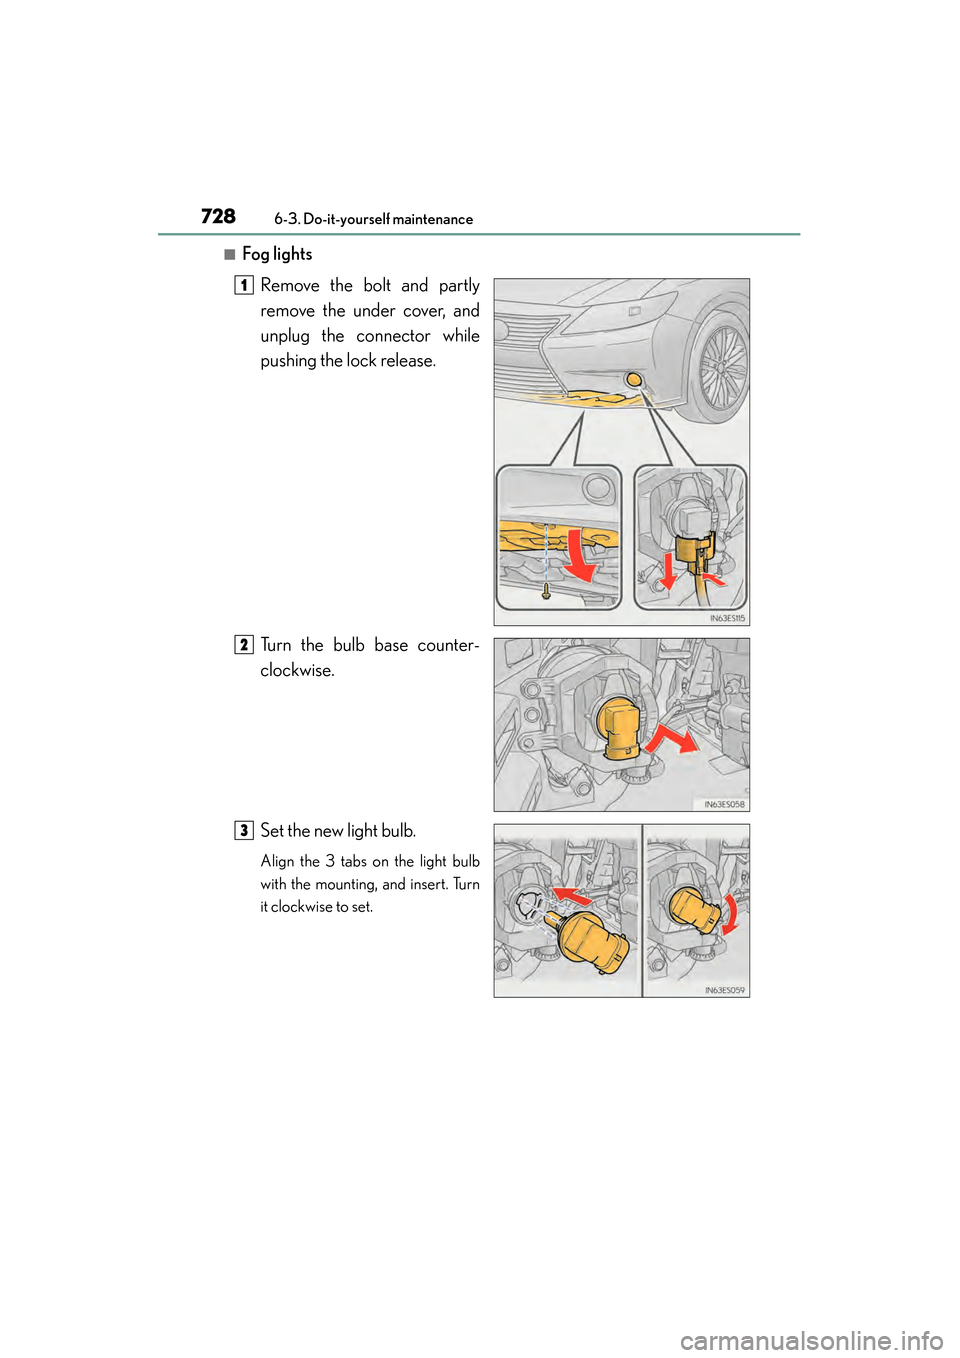
■Fog lightsRemove the bolt and partly
remove the under cover, and
unplug the connector while
pushing the lock release.
Turn the bulb base counter-
clockwise.
Set the new light bulb.
Align the 3 tabs on the light bulb
with the mounting, and insert. Turn
it clockwise to set.
1
2
3
Page 730 of 910
ES350 300h_OM_OM33A01U_(U)
7296-3. Do-it-yourself maintenance
6
Maintenance and care
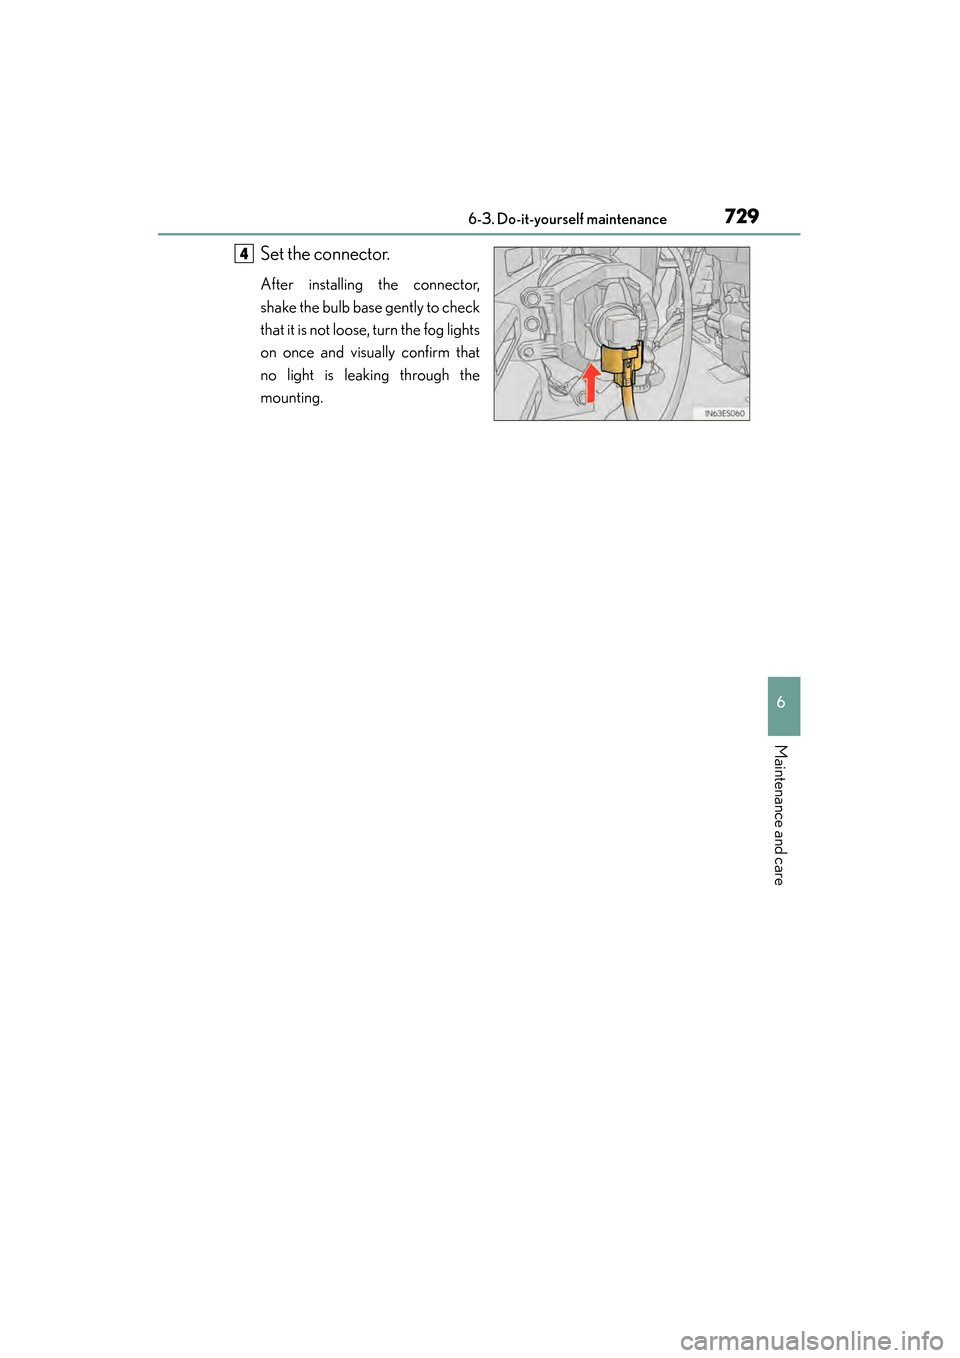
Set the connector.
After installing the connector,
shake the bulb base gently to check
that it is not loose, turn the fog lights
on once and visually confirm that
no light is leaking through the
mounting.
4
Trending: load capacity, battery location, dashboard, start stop button, manual radio set, ad blue, interior lights


