reset Lexus ES300h 2014 Navigation Manual
[x] Cancel search | Manufacturer: LEXUS, Model Year: 2014, Model line: ES300h, Model: Lexus ES300h 2014Pages: 424, PDF Size: 16.46 MB
Page 207 of 424

206
ES350/300h_Navi_OM33A66U_(U)13.07.11 09:52
1. QUICK REFERENCE ........................... 208
2. SOME BASICS .......................................... 210
VOICE COMMAND SYSTEM........................ 210
AUDIO SPLIT SCREEN DISPLAY ................. 210
TURNING THE SYSTEM ON AND OFF ..... 211
SWITCHING BETWEEN FUNCTIONS ....... 211
DSP CONTROL....................................................... 212
TONE AND BALANCE....................................... 213
SELECTING SCREEN SIZE .............................. 214
DVD PLAYER ............................................................ 215
AUX PORT ................................................................. 216
USB PORT ................................................................... 216
3. RADIO OPERATION............................. 217
LISTENING TO THE RADIO ............................ 217
PRESETTING A STATION ................................. 218
SELECTING A STATION ................................... 218
RADIO BROADCAST DATA SYSTEM ...... 219
TRAFFIC ANNOUNCEMENT ...................... 220
4. HD Radio™ TECHNOLOGY INFORMATION .................................... 221
USING HD Radio™ TECHNOLOGY.......... 221
AVAILABLE HD Radio™
TECHNOLOGY ................................................. 222
TROUBLESHOOTING GUIDE ..................... 224
1AUDIO/VIDEO SYSTEM
OPERATION
Page 208 of 424

5
207
1
2
3
4
5
6
7
8
9
ES350/300h_Navi_OM33A66U_(U)13.07.11 09:52
10
5. RADIO OPERATION (XM Satellite Radio BROADCAST) ......................... 226
HOW TO SUBSCRIBE TO AN XM
Satellite Radio......................................................... 226
DISPLAYING THE RADIO ID ......................... 227
LISTENING TO SATELLITE RADIO ............ 227
CHANNEL CATEGORY ................................. 228
PRESETTING A CHANNEL............................ 228
SELECTING A CHANNEL .............................. 228
DISPLAYING THE TITLE AND NAME....... 229
IF THE SATELLITE RADIO TUNER MALFUNCTIONS ............................................ 230
6. RADIO OPERATION (INTERNET RADIO BROADCAST) ..................... 232
LISTENING TO INTERNET RADIO ............. 232
7. DVD PLAYER OPERATION.............. 233
INSERTING A DISC............................................. 233
EJECTING A DISC ............................................... 233
PLAYING A DISC................................................. 233
PLAYING AN AUDIO DISC ........................... 234
PLAYING AN MP3/WMA DISC ................. 236
OPERATING A DVD DISC ............................. 240
PLAYING A DVD DISC....................................... 241
DVD OPTIONS ....................................................... 243
IF THE PLAYER MALFUNCTIONS .............. 251
DVD PLAYER AND DVD VIDEO DISC
INFORMATION.................................................. 252
8. USB MEMORY OPERATION........... 254
CONNECTING A USB MEMORY............. 254
PLAYING A USB MEMORY .......................... 255
9. iPod OPERATION .................................. 260
CONNECTING iPod .......................................... 260
PLAYING iPod .......................................................... 261
10. Bluetooth® AUDIO
OPERATION......................................... 264
CONNECTING A Bluetooth® AUDIO
PLAYER .................................................................. 268
PLAYING Bluetooth
® AUDIO ....................... 269
11. AUDIO/VIDEO REMOTE CONTROLS (STEERING
SWITCHES)............................................ 275
12. AUDIO/VIDEO SYSTEM OPERATING HINTS .......................... 277
RADIO RECEPTION ............................................ 277
iPod ................................................................................ 278
USB MEMORY ........................................................ 279
CARING FOR YOUR DVD PLAYER
AND DISC .............................................................. 279
MP3/WMA FILES ................................................... 281
CD-R AND CD-RW DISCS ............................. 283
TERMS ......................................................................... 284
1. AUDIO SETTINGS ................................. 288
HD Radio™ SYSTEM SETTINGS................... 288
iPod SETTINGS ....................................................... 289
2SETUP
AUDIO/VIDEO SYSTEM
Page 209 of 424

208
ES350/300h_Navi_OM33A66U_(U)13.07.11 10:10
1. AUDIO/VIDEO SYSTEM OPERATION
1. QUICK REFERENCE
Operations such as selecting a preset station and adjusting the sound balance are car-
ried out on the screen.
�X Using the instrument panel
Press the “RADIO” or “MEDIA” button to display the audio/video screen.
�XUsing the Remote Touch
Press the “MENU” button on the Remote Touch, then select “Radio” or “Media” to
display the audio/video screen.
If a Mark Levinson brand audio system is in stalled, the “Mark Levinson” logo is shown
on the panel.
Page 210 of 424

209
1. AUDIO/VIDEO SYSTEM OPERATION
5
AUDIO/VIDEO SYSTEM
ES350/300h_Navi_OM33A66U_(U)13.07.11 10:10
No.NameFunctionPage
Function menu tabSelect the desired radio or media mode screen
tab.211
Function menu
display screenSelect to control the selected radio or media
mode.211
“” buttonPress to mute/unmute or pause/resume the cur-
rent operation.—
“TUNE·SCROLL”
knob
Turn to step up and step down the station band,
change to the next or previous satellite radio
channel, or skip to the next or previous track,
DVD chapter, etc.217, 227,
234, 236, 241, 255, 261, 269
“PRST·TRACK”
button
Press the “” or “” button to preset up or down
for a station or channel, or to change a desired
track, file or chapter.
Press and hold the “” or “” button to seek up or
down for a station or channe l, or to fast forward-
ing/rewinding for a track, file or chapter.218, 228,
234, 236, 241, 255, 261, 269
Disc slotInsert discs into the slot.233
“RADIO” buttonPress to display the radio control screen.211
“MEDIA” buttonPress to display the media control screen.211
“PWR·VOL” knobPress to turn the audio/ video system on and off,
and turn to adjust the volume.211
“” buttonPress to eject a disc.233
Page 219 of 424

218
1. AUDIO/VIDEO SYSTEM OPERATION
ES350/300h_Navi_OM33A66U_(U)13.07.11 10:10
1Tune in the desired station.
2Select one of the left side screen buttons
(1-6 ) and hold it until a beep is heard.
This sets the frequency to the screen
button. The station’ s frequency will be
displayed in the screen button.
�z To change the preset station to a different
one, follow the same procedure.
Preset tuning: Select one of the mix preset
channels on the left side of the screen or
press the “” or “” button of
“PRST·TRACK” to select the desired sta-
tion. The screen button is highlighted and
the station frequency appears on the
screen.
Seek tuning : Press and hold the “” or “”
button of “PRST·TRACK” . The radio will
begin seeking up or down for a station of the
nearest frequency and will stop when a sta-
tion is found. Each time the button is
pressed, the stations will be searched auto-
matically one after another.
To scan all the frequencies : Select
“SCAN”. “SCAN” will appear on the
screen. The radio will find the next station
and stay there for 10 seconds if “A l l ” or “HD
Only” is selected, or 5 seconds if “Analog”
is selected, and then scan again. To stay
tuned to a station and stop the scanning, se-
lect “SCAN” again. (To set HD Radio™
system, see page 288.)
PRESETTING A STATION
Radio mode has a mix preset function,
which can store up to 36 stations (6 sta-
tions per page x 6 pages) from any of the
AM, FM or SAT bands.
SELECTING A STATION
Tune in the desired station using one of
the following methods.
Page 224 of 424

223
1. AUDIO/VIDEO SYSTEM OPERATION
5
AUDIO/VIDEO SYSTEM
ES350/300h_Navi_OM33A66U_(U)13.07.11 10:10
�zTurn on the power of the iPod if it is not
turned on.
�z Once an iPod is connected, the music tag
moves from the radio into the iPod.
�z When the iPod is connected to iTunes, the
“tagged” information of the songs which
were tagged while listening to the radio can
be viewed. Then a user may decide to pur-
chase the song or CD/Album which had
been listened to on their radio.
4Close the console box.
INFORMATION
●
If tagging the music information fails,
“Saving the HD Radio tag failed.” will be
displayed on the screen. If this occurs, tag
the information again.
●HD Radio™ stations can be preset.
Page 225 of 424

224
1. AUDIO/VIDEO SYSTEM OPERATION
ES350/300h_Navi_OM33A66U_(U)13.07.11 10:10
TROUBLESHOOTING GUIDE
ExperienceCauseAction
Mismatch of time align-
ment- a user may hear a
short period of program-
ming replayed or an echo,
stutter or skip.The radio stations analog
and digital volume is not
properly aligned or the sta-
tion is in ballgame mode.
None, radio broadcast issue. A
user can contact the radio station.
Sound fades, blending in
and out.Radio is shifting between
analog and digital audio.Reception issue, may clear-up as
the vehicle continues to be driven.
Selecting “A n a l o g ” can force radio
in an analog audio.
Audio mute condition
when an HD2/HD3 multi-
cast channel had been play-
ing.The radio does not have ac-
cess to digital signals at the
moment.This is normal behavior, wait until
the digital signal returns. If out of
the coverage area, seek a new sta-
tion.
Audio mute delay when se-
lecting an HD2/HD3 mul-
ticast channel preset.
The digital multicast con-
tent is not available until HD
Radio™ broadcast can be
decoded and make the au-
dio available. This takes up
to 7 seconds.
This is normal behavior, wait for the
audio to become available.
Text information does not
match the present song au-
dio.Data service issue by the
radio broadcaster.
Broadcaster should be notified.
Complete the form;
www.ibiquity.com/automotive/
report_radio_station_experiences.
No text information shown
for the present selected fre-
quency.Data service issue by the
radio broadcaster.
Broadcaster should be notified.
Complete the form;
www.ibiquity.com/automotive/
report_radio_station_experiences.
Page 229 of 424

228
1. AUDIO/VIDEO SYSTEM OPERATION
ES350/300h_Navi_OM33A66U_(U)13.07.11 10:10
1Select either “TYPE ” or “ TYPE” to
go to the next or previous category.
1Tune in the desired channel. Make sure
the desired channel is received.
2Select one of the left side screen buttons
( 1-6 ) and hold it until a beep is heard.
This sets the frequency to the screen
button. The channel number will be dis-
played in the screen button.
�z To change the preset channel to a different
one, follow the same procedure.
Preset tuning : Select the channel selector
screen button ( 1-6) or press the “” or “”
button of “PRST·TRACK” to listen to the
desired channel. The selected screen but-
ton ( 1-6) is highlighted and its related infor-
mation appears on the right side of the
screen.
To select a channel within the current cate-
gory : Press and hold the “” or “” button
of “PRST·TRACK” . The radio will change
up or down to a channel within the current
channel category.
To scan the currently selected channel cat-
egory : Select “SCAN” . “SCAN” appears
on the screen. The radio will find the next
channel in the same channel category, stay
there for a few seconds, and then scan
again. To select a channel, select “SCAN”
again.
CHANNEL CATEGORY
PRESETTING A CHANNEL
SELECTING A CHANNEL
Tune in the desired channel using one of
the following methods.
Page 240 of 424

239
1. AUDIO/VIDEO SYSTEM OPERATION
5
AUDIO/VIDEO SYSTEM
ES350/300h_Navi_OM33A66U_(U)13.07.11 10:10
�zEach time “RPT” is selected, the mode
changes as follows:
�X When “RAND” is off
• File Repeat → Folder Repeat → Off
�XWhen “RAND” is on
• File Repeat → Off
�z “RPT” appears on the screen. When the file
is finished, the player will automatically play
it again. To cancel this function, select
“RPT” repeatedly until the repeat mode
turns off.
■ REPEATING A FOLDER
1Select “RPT” repeatedly until
“FLD.RPT” appears on the screen.
�z When the folder is finished, the player will
automatically go back to the beginning of
the folder and play it again. To cancel this
function, select “RPT” again.
■PLAYING FILES FROM ONE
FOLDER IN RANDOM ORDER
1Select “RAND” while the disc is playing.
�zEach time “RAND” is selected, the mode
changes as follows:
•Random (1 Folder Random)
→ Folder Random (1 Disc Random) → Off
�z Once “RAND” appears on the screen, the
system selects a file randomly from the
folder currently being listened to. To cancel
this function, select “RAND” repeatedly
until the random mode turns off.
■ PLAYING THE FILES IN ALL THE
FOLDERS ON THE DISC IN RAN-
DOM ORDER
1Select “RAND” repeatedly until
“FLD.RAND” appears on the screen.
�z Once “FLD.RAND” appears on the screen,
the system selects a f ile randomly from all
of the existing folders. To cancel this func-
tion, select “RAND” again.
RANDOM ORDER
Files or folders can be automatically and
randomly selected.INFORMATION
●
When a file is skipped or the system is
inoperative, select “RAND” to reset.
Page 276 of 424

275
1. AUDIO/VIDEO SYSTEM OPERATION
ES350/300h_Navi_OM33A66U_(U)13.07.11 10:10
5
AUDIO/VIDEO SYSTEM
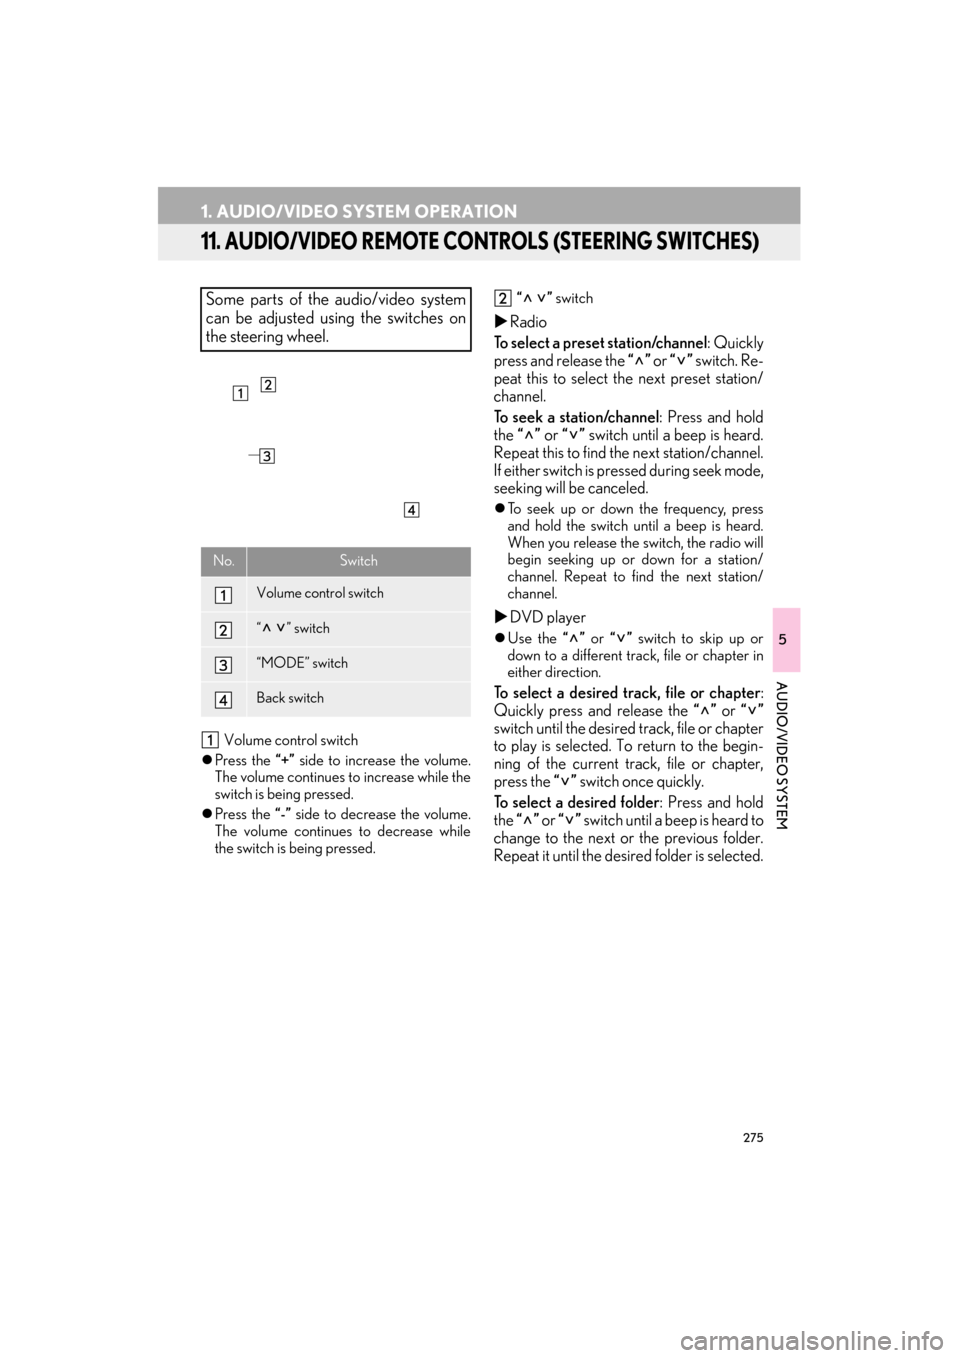
11. AUDIO/VIDEO REMOTE CONTROLS (STEERING SWITCHES)
Volume control switch
�z Press the “+” side to increase the volume.
The volume continues to increase while the
switch is being pressed.
�z Press the “-” side to decrease the volume.
The volume continues to decrease while
the switch is being pressed. “ ”
switch
�XRadio
To select a preset station/channel : Quickly
press and release the “” or “” switch. Re-
peat this to select the next preset station/
channel.
To seek a station/channel : Press and hold
the “” or “” switch until a beep is heard.
Repeat this to find th e next station/channel.
If either switch is pressed during seek mode,
seeking will be canceled.
�z To seek up or down the frequency, press
and hold the switch until a beep is heard.
When you release the switch, the radio will
begin seeking up or down for a station/
channel. Repeat to fi nd the next station/
channel.
�X DVD player
�zUse the “” or “” switch to skip up or
down to a different track, file or chapter in
either direction.
To select a desired track, file or chapter :
Quickly press and release the “” or “”
switch until the desired track, file or chapter
to play is selected. To return to the begin-
ning of the current track, file or chapter,
press the “” switch once quickly.
To select a desired folder : Press and hold
the “” or “” switch until a beep is heard to
change to the next or the previous folder.
Repeat it until the desired folder is selected.
Some parts of the audio/video system
can be adjusted using the switches on
the steering wheel.
No.Switch
Volume control switch
“” switch
“MODE” switch
Back switch