light Lexus ES300h 2014 Navigation Manual
[x] Cancel search | Manufacturer: LEXUS, Model Year: 2014, Model line: ES300h, Model: Lexus ES300h 2014Pages: 424, PDF Size: 16.46 MB
Page 14 of 424
1. NAVIGATION OPERATION
1
QUICK GUIDE
13
ES350/300h_Navi_OM33A66U_(U)13.07.11 10:10
*: Press and hold the “PWR·VOL” knob for 3 seconds or more to tu rn off the screen and restart the
navigation system. Do this when the vehicle- mounted device response is extremely slow.
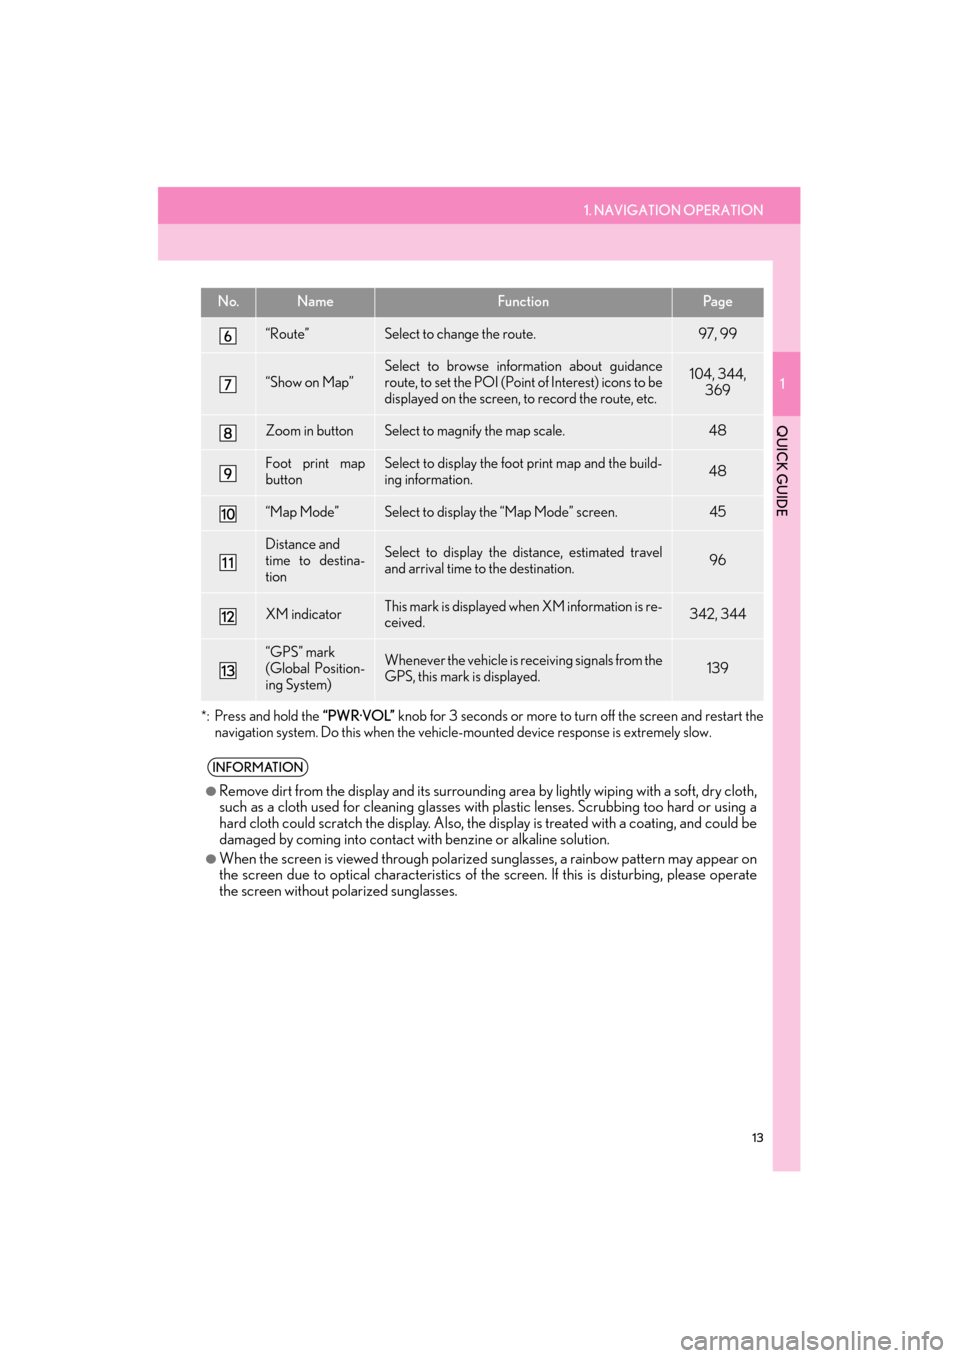
“Route”Select to change the route.97, 99
“Show on Map”
Select to browse information about guidance
route, to set the POI (Point of Interest) icons to be
displayed on the screen, to record the route, etc.104, 344,
369
Zoom in buttonSelect to magnify the map scale.48
Foot print map
buttonSelect to display the foot print map and the build-
ing information.48
“Map Mode”Select to display the “Map Mode” screen.45
Distance and
time to destina-
tionSelect to display the distance, estimated travel
and arrival time to the destination.96
XM indicatorThis mark is displayed when XM information is re-
ceived.342, 344
“GPS” mark
(Global Position-
ing System)Whenever the vehicle is receiving signals from the
GPS, this mark is displayed.139
INFORMATION
●
Remove dirt from the display and its surrounding area by lightly wiping with a soft, dry cloth,
such as a cloth used for cleaning glasses with plastic lenses. Scrubbing too hard or using a
hard cloth could scratch the disp lay. Also, the display is treated with a coating, and could be
damaged by coming into contact with benzine or alkaline solution.
●When the screen is viewed through polarized sunglasses, a rainbow pattern may appear on
the screen due to optical characteristics of the screen. If this is disturbing, please operate
the screen without polarized sunglasses.
No.NameFunctionPa g e
Page 40 of 424

39
1. BASIC INFORMATION BEFORE OPERATION
2
BASIC FUNCTION
ES350/300h_Navi_OM33A66U_(U)13.07.11 10:10
2Select the desired screen button to ad-
just contrast and brightness.
3After adjusting the screen, select “OK”.
�zThe screen goes off when “Screen Off” is
selected. To turn the screen back on, press
any button on the audio panel or on the
Remote Touch. The selected screen
appears.
1To display the screen in day mode, even
with the headlight switch on, select “Day
Mode” for brightness and contrast con-
trol.
�z The displays condition is not changed to
night mode even if headlight switch is
turned on when the vehicle is in a bright
area, such as outside in direct sunlight.
Screen buttonFunction
“Contrast” “+”Select to st rengthen the
contrast of the screen.
“Contrast” “-”Select to weaken the
contrast of the screen.
“Brightness” “+”Select to brighten the
screen.
“Brightness” “-”Select to darken the
screen.
CHANGING BETWEEN DAY
AND NIGHT MODE
Depending on the position of the head-
light switch, the screen changes to day
or night mode.
INFORMATION
●
If the screen is set to day mode with the
headlight switch turned on, this condition
is memorized even with the engine
Page 53 of 424
52
2. SETUP
ES350/300h_Navi_OM33A66U_(U)13.07.11 10:10
No.Function
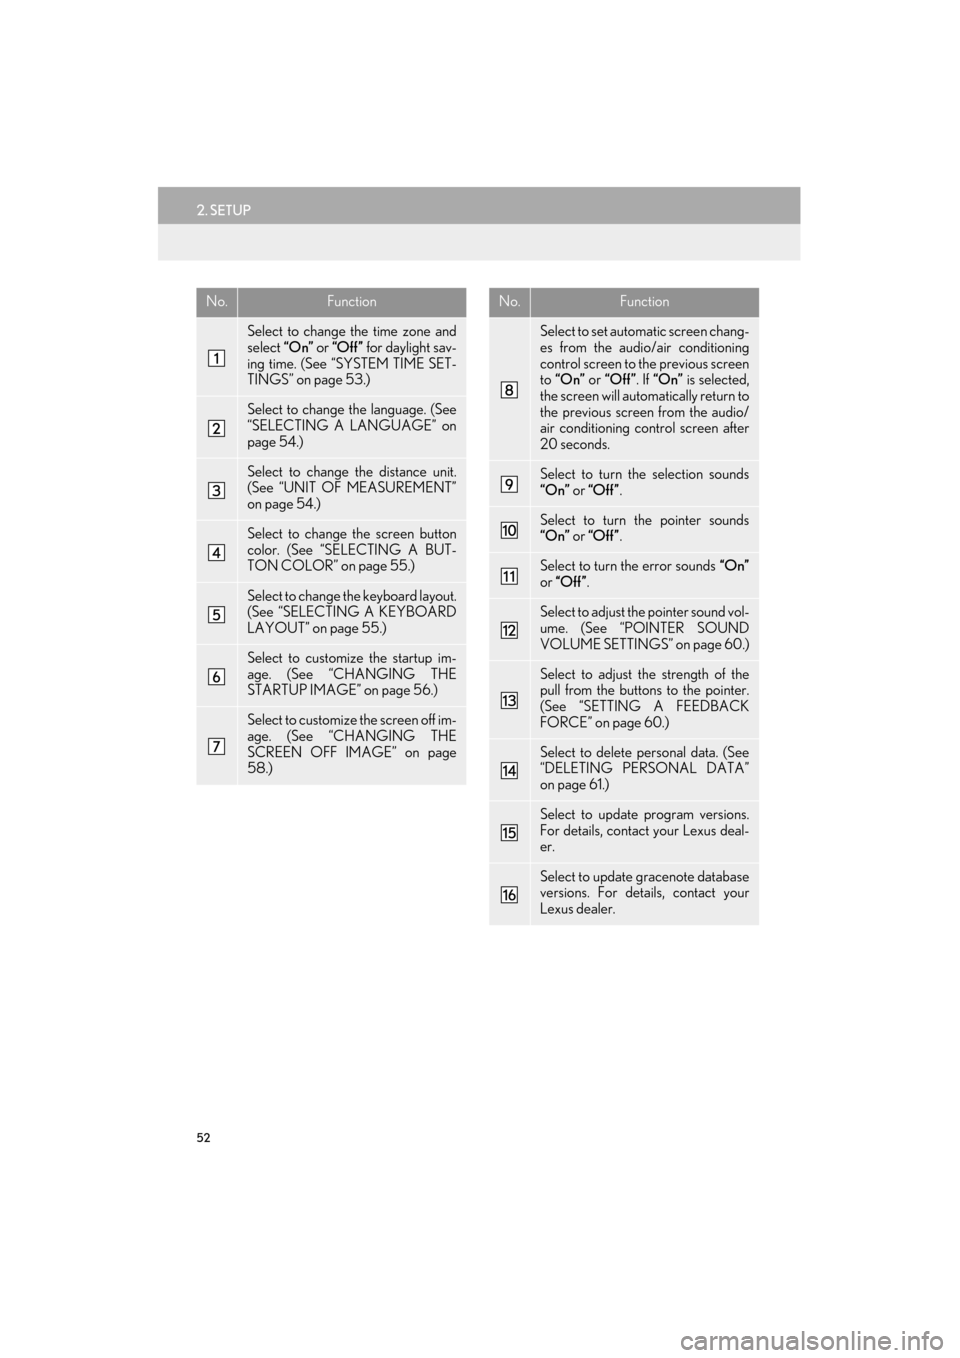
Select to change the time zone and
select “On” or “Off” for daylight sav-
ing time. (See “SYSTEM TIME SET-
TINGS” on page 53.)
Select to change the language. (See
“SELECTING A LANGUAGE” on
page 54.)
Select to change the distance unit.
(See “UNIT OF MEASUREMENT”
on page 54.)
Select to change the screen button
color. (See “SELECTING A BUT-
TON COLOR” on page 55.)
Select to change th e keyboard layout.
(See “SELECTING A KEYBOARD
LAYOUT” on page 55.)
Select to customize the startup im-
age. (See “CHANGING THE
STARTUP IMAGE” on page 56.)
Select to customize the screen off im-
age. (See “CHANGING THE
SCREEN OFF IMAGE” on page
58.)
Select to set automatic screen chang-
es from the audio/air conditioning
control screen to the previous screen
to “On” or “Off” . If “On” is selected,
the screen will automatically return to
the previous screen from the audio/
air conditioning control screen after
20 seconds.
Select to turn the selection sounds
“On” or “Off” .
Select to turn the pointer sounds
“On” or “Off” .
Select to turn the error sounds “On”
or “Off” .
Select to adjust the pointer sound vol-
ume. (See “POINTER SOUND
VOLUME SETTINGS” on page 60.)
Select to adjust th e strength of the
pull from the buttons to the pointer.
(See “SETTING A FEEDBACK
FORCE” on page 60.)
Select to delete personal data. (See
“DELETING PERSONAL DATA”
on page 61.)
Select to update program versions.
For details, contact your Lexus deal-
er.
Select to update gracenote database
versions. For details, contact your
Lexus dealer.
No.Function
Page 54 of 424
53
2. SETUP
ES350/300h_Navi_OM33A66U_(U)13.07.11 10:10
2
BASIC FUNCTION
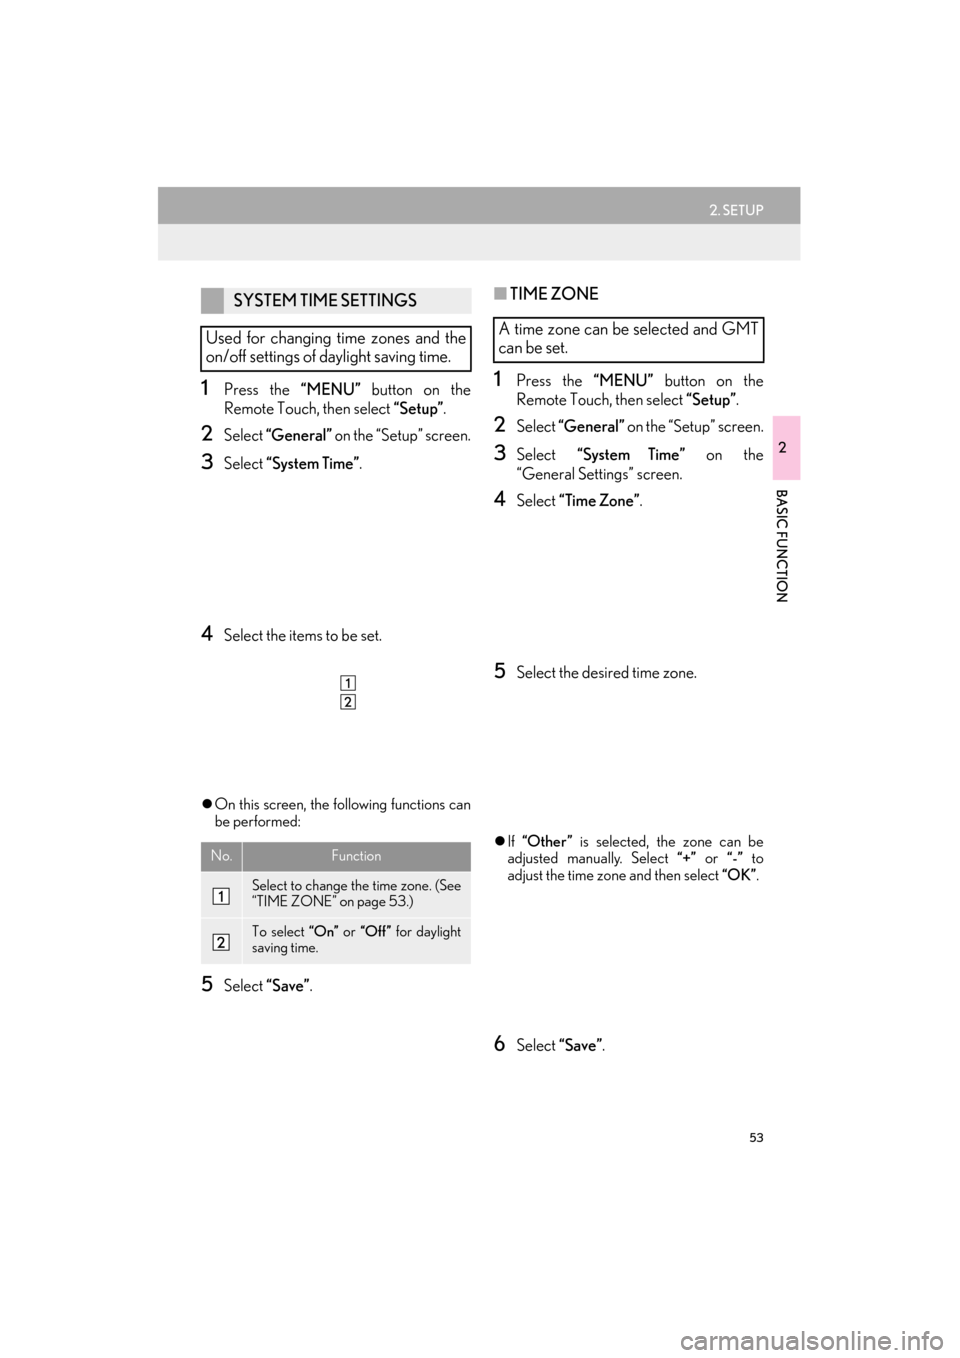
1Press the “MENU” button on the
Remote Touch, then select “Setup”.
2Select “General” on the “Setup” screen.
3Select “System Time” .
4Select the items to be set.
�zOn this screen, the following functions can
be performed:
5Select “Save”.
■TIME ZONE
1Press the “MENU” button on the
Remote Touch, then select “Setup”.
2Select “General” on the “Setup” screen.
3Select “System Time” on the
“General Settings” screen.
4Select “Time Zone” .
5Select the desired time zone.
�zIf “Other ” is selected, the zone can be
adjusted manually. Select “+” or “-” to
adjust the time zone and then select “OK”.
6Select “Save”.
SYSTEM TIME SETTINGS
Used for changing time zones and the
on/off settings of daylight saving time.
No.Function
Select to change the time zone. (See
“TIME ZONE” on page 53.)
To select “On” or “Off” for daylight
saving time.
A time zone can be selected and GMT
can be set.
Page 96 of 424

95
2. ROUTE GUIDANCE
ES350/300h_Navi_OM33A66U_(U)13.07.11 10:10
3
NAVIGATION SYSTEM
■ROUTES INCLUDING IPD ROADS
�zAfter it has made a route calculation, the
system will advise the user whether IPD
roads are included in the route or not.
�z The portion of the route that covers IPD
roads is indicated by light blue.
Even when on IPD roads (roads that are
not completely digi tized in our data-
base), you will be guided along the
searched route via voice guidance.
No.Voice guidance
“On the way to your destination,
there will be roads with incomplete
data.”
“In half of a mile, left turn.”
“Next left. Upcoming roads have in-
complete data. Please carefully ob-
serve the local traffic restrictions, as
they may not match the navigation
guidance.”
�z IPD roads are roads that are not yet com-
pletely digitized in our database. How-
ever, their geometry, name and
administrative coding are already known.
CAUTION
●Be sure to obey the traffic regulations and
keep the road condition in mind espe-
cially when you are driving on IPD roads.
The route guidance may not have the
updated information such as the direction
of a one way street.
Page 108 of 424

107
2. ROUTE GUIDANCE
ES350/300h_Navi_OM33A66U_(U)13.07.11 10:10
3
NAVIGATION SYSTEM
1Select “Show on Map” .
2Select “Route Trace” .
�zThe “Route Trace” indicator is highlighted.
1Select “Show on Map” .
2Select “Route Trace” .
�zSelecting “Yes” stops recording and the
route trace remains displayed on the
screen.
�z Selecting “No” stops recording and the
route trace is erased.
ROUTE TRACE
Up to 124 miles (200 km) of the trav-
eled route can be stored and retraced
on the display.
INFORMATION
●
This feature is available when the map
scale is more than 30 miles (50 km).
TO START RECORDING THE
ROUTE TRACE
TO STOP RECORDING THE
ROUTE TRACE
Page 219 of 424
218
1. AUDIO/VIDEO SYSTEM OPERATION
ES350/300h_Navi_OM33A66U_(U)13.07.11 10:10
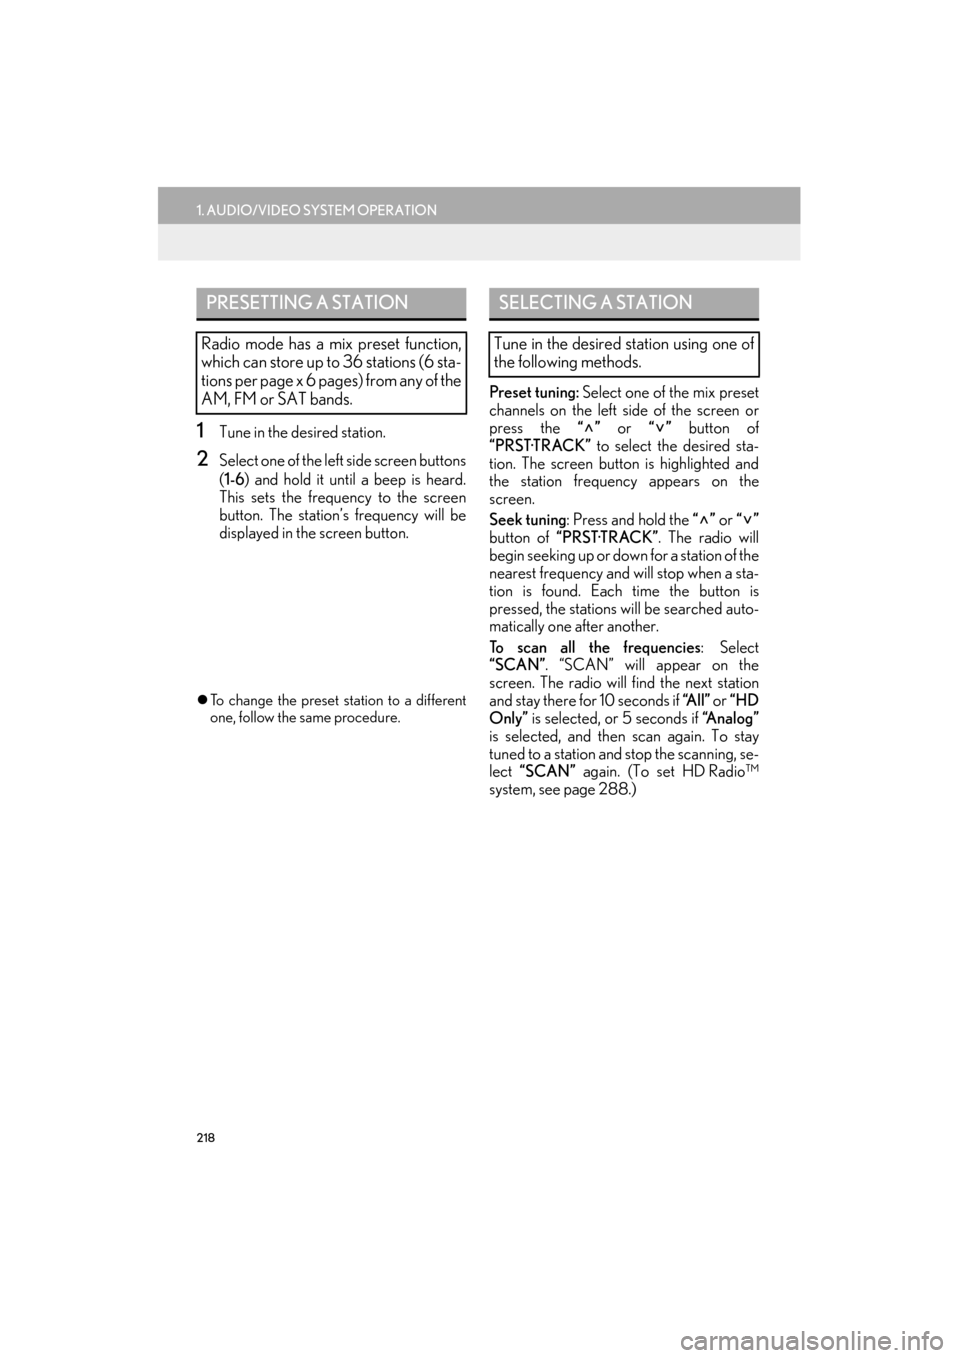
1Tune in the desired station.
2Select one of the left side screen buttons
(1-6 ) and hold it until a beep is heard.
This sets the frequency to the screen
button. The station’ s frequency will be
displayed in the screen button.
�z To change the preset station to a different
one, follow the same procedure.
Preset tuning: Select one of the mix preset
channels on the left side of the screen or
press the “” or “” button of
“PRST·TRACK” to select the desired sta-
tion. The screen button is highlighted and
the station frequency appears on the
screen.
Seek tuning : Press and hold the “” or “”
button of “PRST·TRACK” . The radio will
begin seeking up or down for a station of the
nearest frequency and will stop when a sta-
tion is found. Each time the button is
pressed, the stations will be searched auto-
matically one after another.
To scan all the frequencies : Select
“SCAN”. “SCAN” will appear on the
screen. The radio will find the next station
and stay there for 10 seconds if “A l l ” or “HD
Only” is selected, or 5 seconds if “Analog”
is selected, and then scan again. To stay
tuned to a station and stop the scanning, se-
lect “SCAN” again. (To set HD Radio™
system, see page 288.)
PRESETTING A STATION
Radio mode has a mix preset function,
which can store up to 36 stations (6 sta-
tions per page x 6 pages) from any of the
AM, FM or SAT bands.
SELECTING A STATION
Tune in the desired station using one of
the following methods.
Page 229 of 424
228
1. AUDIO/VIDEO SYSTEM OPERATION
ES350/300h_Navi_OM33A66U_(U)13.07.11 10:10
1Select either “TYPE ” or “ TYPE” to
go to the next or previous category.
1Tune in the desired channel. Make sure
the desired channel is received.
2Select one of the left side screen buttons
( 1-6 ) and hold it until a beep is heard.
This sets the frequency to the screen
button. The channel number will be dis-
played in the screen button.
�z To change the preset channel to a different
one, follow the same procedure.
Preset tuning : Select the channel selector
screen button ( 1-6) or press the “” or “”
button of “PRST·TRACK” to listen to the
desired channel. The selected screen but-
ton ( 1-6) is highlighted and its related infor-
mation appears on the right side of the
screen.
To select a channel within the current cate-
gory : Press and hold the “” or “” button
of “PRST·TRACK” . The radio will change
up or down to a channel within the current
channel category.
To scan the currently selected channel cat-
egory : Select “SCAN” . “SCAN” appears
on the screen. The radio will find the next
channel in the same channel category, stay
there for a few seconds, and then scan
again. To select a channel, select “SCAN”
again.
CHANNEL CATEGORY
PRESETTING A CHANNEL
SELECTING A CHANNEL
Tune in the desired channel using one of
the following methods.
Page 282 of 424

281
1. AUDIO/VIDEO SYSTEM OPERATION
5
AUDIO/VIDEO SYSTEM
ES350/300h_Navi_OM33A66U_(U)13.07.11 10:10
�zHandle discs carefully, especially when
inserting them. Hold them on the edge and
do not bend them. Avoid getting finger-
prints on them, partic ularly on the shiny
side.
�z Dirt, scratches, warping, pin holes or other
disc damage could cause the player to skip
or to repeat a section of a track. (To see a
pin hole, hold the disc up to the light.)
�z Remove discs from the players when not in
use. Store them in their plastic cases away
from moisture, heat and direct sunlight.
To c l e a n a d i s c : Wipe it with a soft, lint-free
cloth that has been dampened with water.
Wipe in a straight line from the center to the
edge of the disc (not in circles). Dry it with
another soft, lint-free cloth. Do not use a
conventional record cleaner or anti-static
device.
�z MP3 (MPEG Audio Layer 3) and WMA
(Windows Media Audio) are audio com-
pression standards.
�z The MP3/WMA player can play MP3 and
WMA files on CD-ROM, CD-R and CD-
RW discs.
�z The unit can play disc recordings compati-
ble with ISO 9660 level 1 and level 2 and
with the Romeo and Joliet file system.
�z When naming an MP3 or WMA file, add
the appropriate file extension (.mp3 or
.w m a ) .
�z The MP3/WMA player plays back files
with .mp3 or .wma file extensions as MP3
or WMA files. To prevent noise and play-
back errors, use the appropriate file exten-
sions.
�z The MP3/WMA player can play only the
first session when using multi-session com-
patible CDs.
NOTICE
●Do not use special shaped, transparent/
translucent, low quality or labeled discs
such as those shown in the illustrations.
The use of such discs may damage the
player, or it may be impossible to eject the
disc.
●This system is not designed for use of
DualDiscs. Do not use DualDiscs
because they may cause damage to the
player.
●Do not use discs with a protection ring.
The use of such discs may damage the
player, or it may be impossible to eject the
disc.
●Do not use printable discs. The use of
such discs may damage the player, or it
may be impossible to eject the disc.
Correct Wrong
MP3/WMA FILES
Page 284 of 424

283
1. AUDIO/VIDEO SYSTEM OPERATION
5
AUDIO/VIDEO SYSTEM
ES350/300h_Navi_OM33A66U_(U)13.07.11 10:10
�zIt is not possible to ch eck folders that do not
include MP3/WMA files.
�z MP3/WMA files in folders up to 8 levels
deep can be played. However, the start of
playback may be delayed when using discs
containing numerous levels of folders. For
this reason, we recommend creating discs
with no more than 2 levels of folders.
�z The play order of the compact disc with the
structure shown above is as follows:
�z MP3/WMA player: It is possible to play up
to 192 folders or 255 files on one disc.
�z USB memory: It is possible to play up to
3000 folders, 255 f iles per folder or
9999 files in the device.
�z The order changes depending on the per-
sonal computer and MP3/WMA encoding
software you use. �z
CD-R/CD-RW discs that have not been
subject to the “finalizing process” (a pro-
cess that allows discs to be played on a
conventional CD player) cannot be played.
�z It may not be possible to play CD-R/CD-
RW discs recorded on a music CD
recorder or a personal computer because
of disc characteristics, scratches or dirt on
the disc, or dirt, condensation, etc. on the
lens of the unit.
�z It may not be possible to play discs
recorded on a personal computer depend-
ing on the application settings and the envi-
ronment. Record with the correct format.
(For details, contact the appropriate appli-
cation manufacturers of the applications.)
�z CD-R/CD-RW discs may be damaged by
direct exposure to sunlight, high tempera-
tures or other storage conditions. The unit
may be unable to play some damaged
discs.
�z If you insert a CD-RW disc into the MP3/
WMA player, playback will begin more
slowly than with a conventional CD or CD-
R disc.
�z Recordings on CD-R/CD-RW cannot be
played using the DDCD (Double Density
CD) system.
001.mp3
002.wma
Folder 1
003.mp3
Folder 2
004.mp3
005.wma
Folder 3006.mp3
001.mp3 002.wma . . . 006.mp3
CD-R AND CD-RW DISCS