Lexus ES350 2016 Owner's Manuals / LEXUS 2016 ES350 (OM33B64U) Manual Online
Manufacturer: LEXUS, Model Year: 2016, Model line: ES350, Model: Lexus ES350 2016Pages: 576, PDF Size: 8.3 MB
Page 81 of 576
ES350_OM_OM33B64U_(U)
812. Instrument cluster
2
Instrument cluster
The settings of the following items can be changed, refer to P. 533
For functions that can be enabled or disabled, the function switches between on and
off each time is pressed.
● (Lane Departure Alert with steering control) (if
equipped) ( P. 1 9 6 )
● (Pre-Collision System) (if equipped) ( P. 1 8 3 )
●AFS (Adaptive Front-lighting System) (if equipped) ( P. 1 6 2 )
●Clock
Adjusts the hour and minute of the cl ock on the multi-information display.
●Ambient illumin.
Select to turn the ornament lights on and off.
●Vehicle Settings
• Scheduled Maintenance (P. 4 1 5 )
• Oil Maintenance ( P. 4 2 9 )
●Meter Settings
• Language
Select to change the la nguage on the display.
•Units Select to change the unit of measure.
• Eco Driving Indicator Light
Select to activate/deactivate the Eco Driving Indicator Light
• switch
Displays a procedure to register a desired screen to .
You can register 1 screen as a shortcut , which can be displayed by pressing .
• Drive information 1 /2 /3 Select to select up to 2 items that w ill be displayed on a Drive information
screen, up to 3 Drive information screens can be set.
•Pop-up display Select to set the pop-up displays, which may appear in some situations, on/off.
• Accent color Select to change the accent colors on the screen, such as the cursor color.
• Default settings
Registered or changed meter settings w ill be deleted or returned to their
default setting.
Settings display
Page 82 of 576
82
ES350_OM_OM33B64U_(U)2. Instrument cluster
■System check display
After turning the engine switch to IGNITI
ON ON mode, opening image is displayed
while system operation is checked. When the system check is complete, the normal
screen will return.
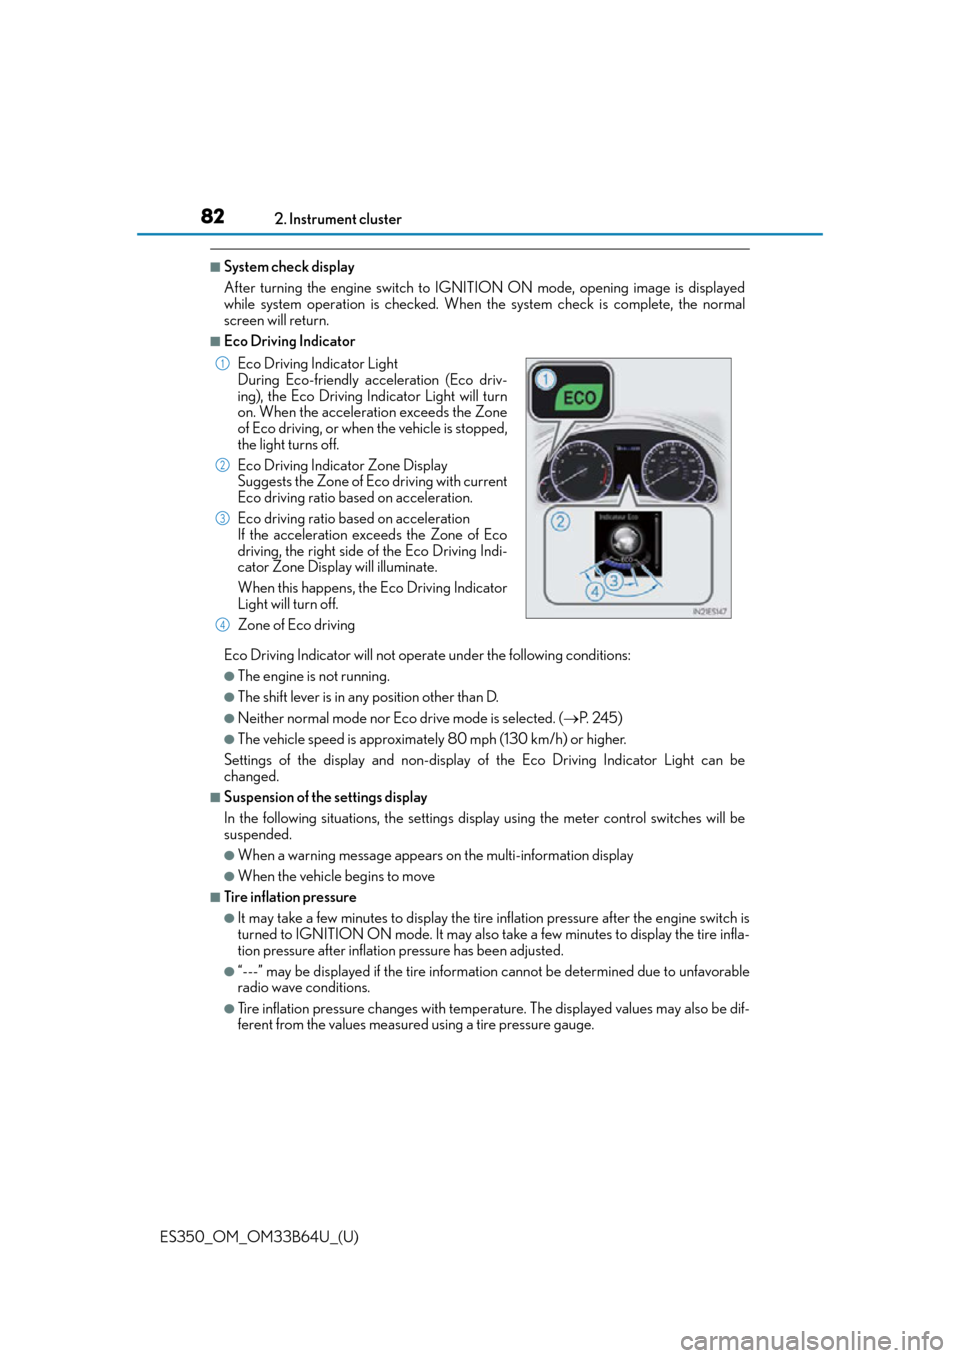
■Eco Driving Indicator
Eco Driving Indicator will not operat e under the following conditions:
●The engine is not running.
●The shift lever is in any position other than D.
●Neither normal mode nor Eco drive mode is selected. (P. 2 4 5 )
●The vehicle speed is approximately 80 mph (130 km/h) or higher.
Settings of the display and non-display of the Eco Driving Indicator Light can be
changed.
■Suspension of the settings display
In the following situations, th e settings display using the meter control switches will be
suspended.
●When a warning message appears on the multi-information display
●When the vehicle begins to move
■Tire inflation pressure
●It may take a few minutes to display the tire inflation pressure after the engine switch is
turned to IGNITION ON mode. It may also take a few minutes to display the tire infla-
tion pressure after inflation pressure has been adjusted.
●“---” may be displayed if the tire information cannot be determined due to unfavorable
radio wave conditions.
●Tire inflation pressure changes with temperat ure. The displayed values may also be dif-
ferent from the values measured using a tire pressure gauge.
Eco Driving Indicator Light
During Eco-friendly acceleration (Eco driv-
ing), the Eco Driving Indicator Light will turn
on. When the acceleration exceeds the Zone
of Eco driving, or when the vehicle is stopped,
the light turns off.
Eco Driving Indicator Zone Display
Suggests the Zone of Eco driving with current
Eco driving ratio based on acceleration.
Eco driving ratio based on acceleration
If the acceleration exceeds the Zone of Eco
driving, the right side of the Eco Driving Indi-
cator Zone Display will illuminate.
When this happens, the Eco Driving Indicator
Light will turn off.
Zone of Eco driving
1
2
3
4
Page 83 of 576
ES350_OM_OM33B64U_(U)
832. Instrument cluster
2
Instrument cluster
■When disconnecting and reconnecting battery terminals
The drive information will be reset.
■Liquid crystal display
P. 76
WA R N I N G
■Caution for use while driving
For safety, avoid operating the meter control switch while driving as much as possible,
and do not look continuously at the multi- information display while driving. Stop the
vehicle and operate the meter control switch. Failure to do so may cause a steering
wheel operation error, resultin g in an unexpected accident.
■Cautions during setting up the display
As the engine needs to be operating during setting up the display, ensure that the vehi-
cle is parked in a place with adequate vent ilation. In a closed area such as a garage,
exhaust gases including harmful carbon mo noxide (CO) may collect and enter the
vehicle. This may lead to death or a serious health hazard.
NOTICE
■During setting up the display
To prevent battery discharge, ensure that th e engine is operating while setting up the
display features.
Page 84 of 576
84
ES350_OM_OM33B64U_(U)2. Instrument cluster
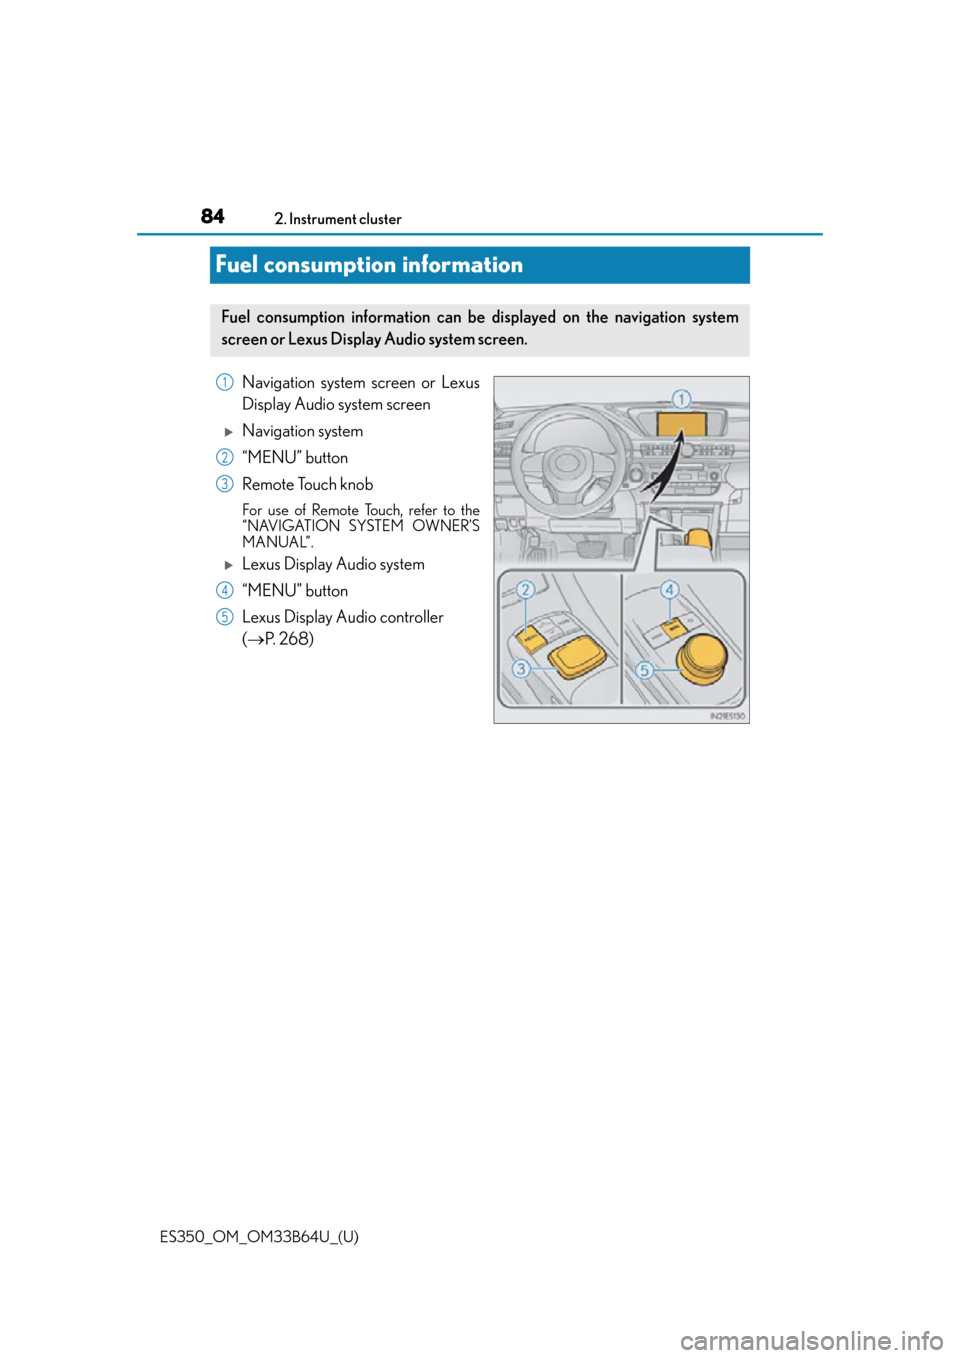
Fuel consumption information
Navigation system screen or Lexus
Display Audio system screen
Navigation system
“MENU” button
Remote Touch knob
For use of Remote Touch, refer to the
“NAVIGATION SYSTEM OWNER’S
MANUAL”.
Lexus Display Audio system
“MENU” button
Lexus Display Audio controller
(
P. 2 6 8 )
Fuel consumption information can be displayed on the navigation system
screen or Lexus Display Audio system screen.
1
2
3
4
5
Page 85 of 576
ES350_OM_OM33B64U_(U)
852. Instrument cluster
2
Instrument cluster
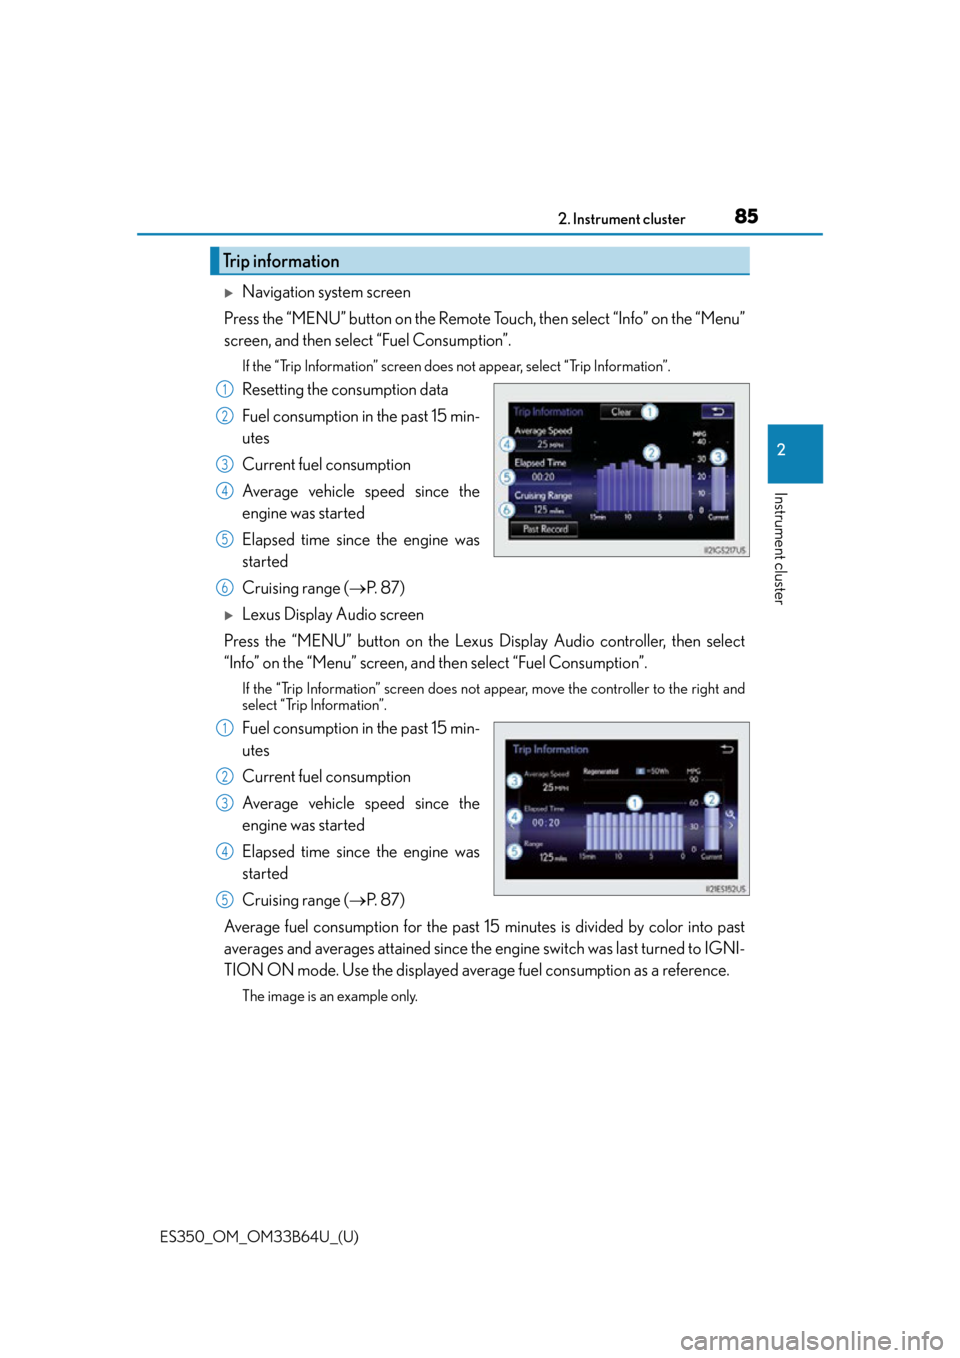
Navigation system screen
Press the “MENU” button on the Remote To uch, then select “Info” on the “Menu”
screen, and then select “Fuel Consumption”.
If the “Trip Information” screen does not appear, select “Trip Information”.
Resetting the consumption data
Fuel consumption in the past 15 min-
utes
Current fuel consumption
Average vehicle speed since the
engine was started
Elapsed time since the engine was
started
Cruising range ( P. 8 7 )
Lexus Display Audio screen
Press the “MENU” button on the Lexus Display Audio controller, then select
“Info” on the “Menu” screen, and then select “Fuel Consumption”.
If the “Trip Information” screen does not appear, move the controller to the right and
select “Trip Information”.
Fuel consumption in the past 15 min-
utes
Current fuel consumption
Average vehicle speed since the
engine was started
Elapsed time since the engine was
started
Cruising range (P. 8 7 )
Average fuel consumption for the past 15 minutes is divided by color into past
averages and averages attained since the engine switch was last turned to IGNI-
TION ON mode. Use the displayed average fuel consumption as a reference.
The image is an example only.
Trip information
1
2
3
4
5
6
1
2
3
4
5
Page 86 of 576
86
ES350_OM_OM33B64U_(U)2. Instrument cluster
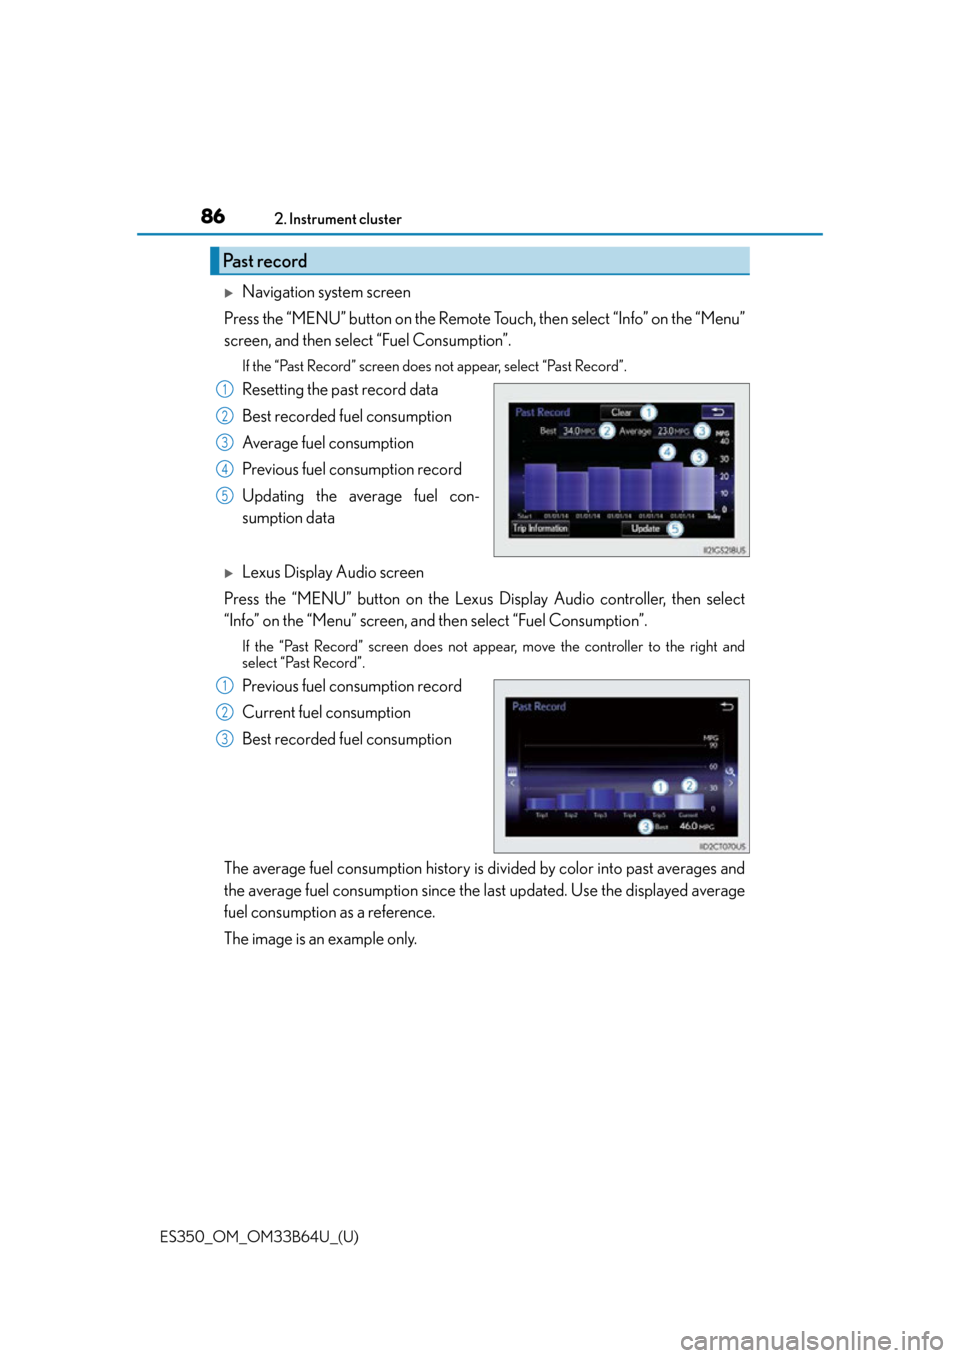
Navigation system screen
Press the “MENU” button on the Remote To uch, then select “Info” on the “Menu”
screen, and then select “Fuel Consumption”.
If the “Past Record” screen does not appear, select “Past Record”.
Resetting the past record data
Best recorded fuel consumption
Average fuel consumption
Previous fuel consumption record
Updating the average fuel con-
sumption data
Lexus Display Audio screen
Press the “MENU” button on the Lexus Display Audio controller, then select
“Info” on the “Menu” screen, and then select “Fuel Consumption”.
If the “Past Record” screen does not appe ar, move the controller to the right and
select “Past Record”.
Previous fuel consumption record
Current fuel consumption
Best recorded fuel consumption
The average fuel consumption history is di vided by color into past averages and
the average fuel consumption since the la st updated. Use the displayed average
fuel consumption as a reference.
The image is an example only.
Past record
1
2
3
4
5
1
2
3
Page 87 of 576

ES350_OM_OM33B64U_(U)
872. Instrument cluster
2
Instrument cluster
■Updating the past record data
Vehicles with navigation system
Update the average fuel consumption by selecting “Update” to measure the current fuel
consumption again.
Vehicles with Lexus Display Audio system
Update the average fuel consumption by moving the controller to the left and select
“Update” to measure the current fuel consumption again.
■Resetting the data
Vehicles with navigation system
The fuel consumption data can be deleted by selecting “Clear”.
Vehicles with Lexus Display Audio system
The fuel consumption data can be deleted by moving the controller to the left and select
“Clear ”.
■Cruising range
Displays the estimated maximum distance that can be driven with the quantity of fuel
remaining.
This distance is computed based on your average fuel consumption.
As a result, the actual distance that can be driven may differ from that displayed.
Page 88 of 576

88
ES350_OM_OM33B64U_(U)2. Instrument cluster
Page 89 of 576

89
ES350_OM_OM33B64U_(U)
3
Operation of
each component
3-1. Key information
Keys .................................................... 90
3-2. Opening, closing and locking the doors and trunk
Doors ................................................. 93
Trunk ................................................... 99
Smart access system with push-button start ............ 106
3-3. Adjusting the seats Front seats ........................................ 114
Driving position memory ........... 115
Head restraints .............................. 119
3-4. Adjusting the steering wheel and mirrors
Steering wheel ..............................122
Inside rear view mirror............... 124
Outside rear view mirrors ........126
3-5. Opening, closing the windows and moon roof
Power windows .............................129
Moon roof ...................................... 132
Page 90 of 576
90
ES350_OM_OM33B64U_(U)3-1. Key information
Keys
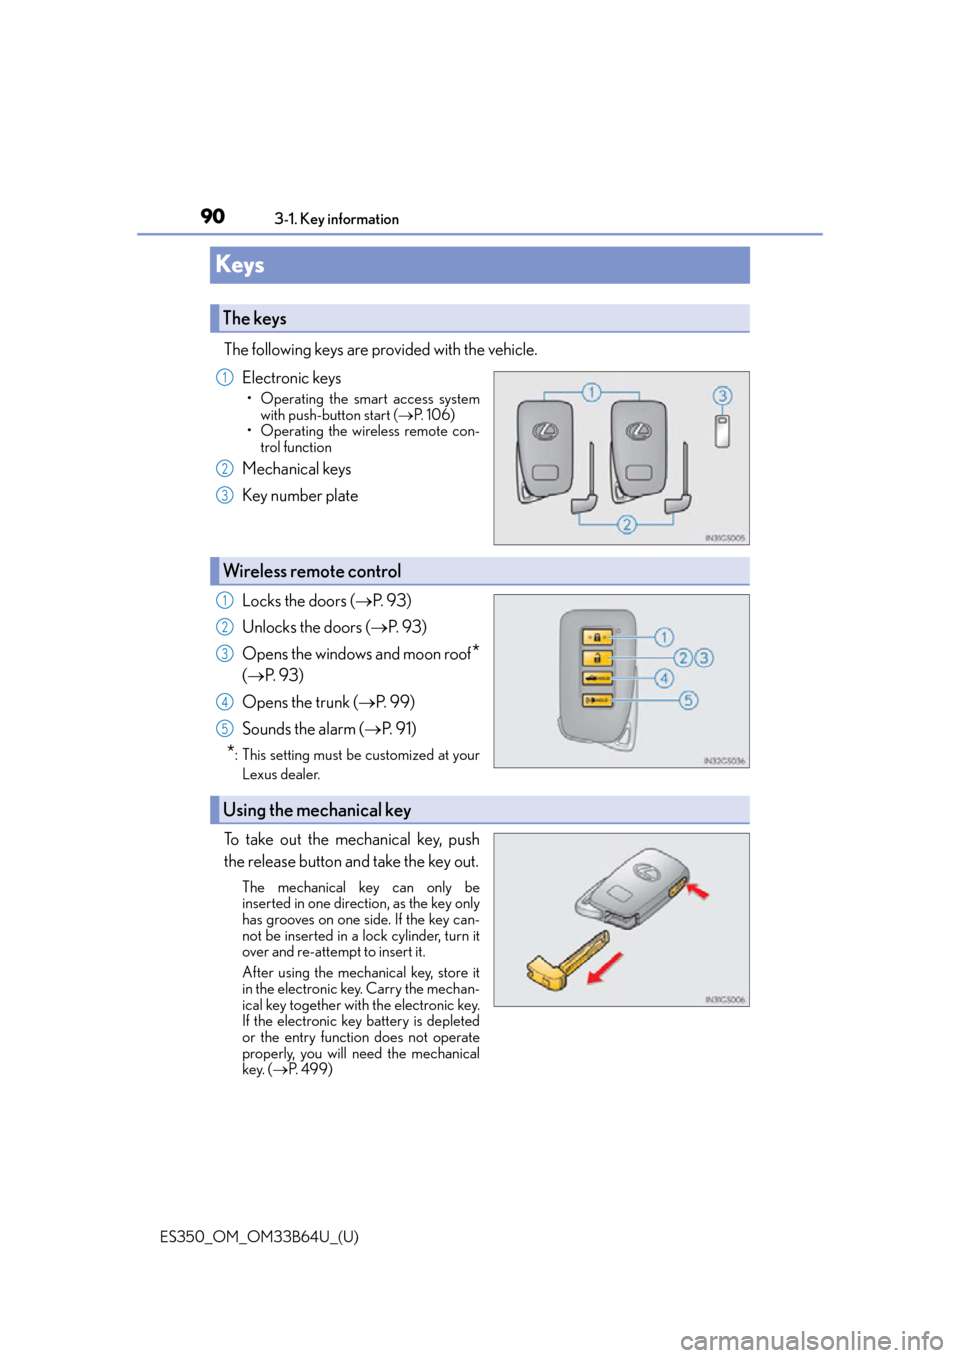
The following keys are provided with the vehicle.
Electronic keys
• Operating the smart access systemwith push-button start ( P. 1 0 6 )
• Operating the wireless remote con-
trol function
Mechanical keys
Key number plate
Locks the doors ( P. 9 3 )
Unlocks the doors ( P. 9 3 )
Opens the windows and moon roof
*
( P. 9 3 )
Opens the trunk ( P. 99)
Sounds the alarm ( P. 9 1 )
*: This setting must be customized at your
Lexus dealer.
To take out the mechanical key, push
the release button and take the key out.
The mechanical key can only be
inserted in one direction, as the key only
has grooves on one side. If the key can-
not be inserted in a lock cylinder, turn it
over and re-attempt to insert it.
After using the mechanical key, store it
in the electronic key. Carry the mechan-
ical key together with the electronic key.
If the electronic key battery is depleted
or the entry function does not operate
properly, you will need the mechanical
key. ( P. 499)
The keys
1
2
3
Wireless remote control
1
2
3
4
5
Using the mechanical key