display Lexus ES350 2016 Quick Guide /
[x] Cancel search | Manufacturer: LEXUS, Model Year: 2016, Model line: ES350, Model: Lexus ES350 2016Pages: 112, PDF Size: 2.11 MB
Page 26 of 112
26
ES350_QG_OM33B82U_(U)
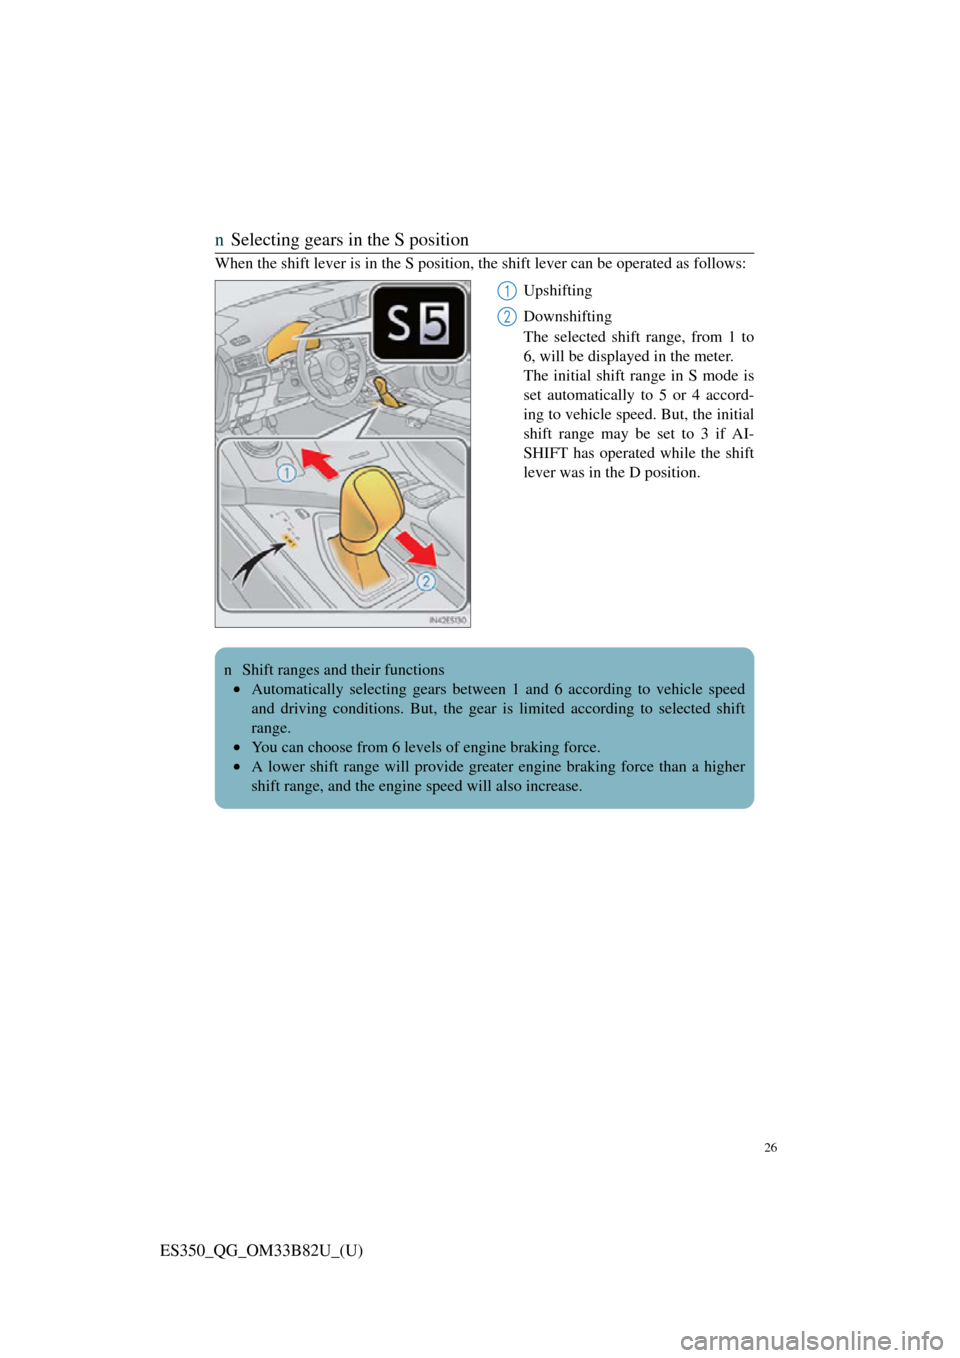
nSelecting gears in the S position
When the shift lever is in the S position, the shift lever can be operated as follows:
Upshifting
Downshifting
The selected shift range, from 1 to
6, will be displayed in the meter.
The initial shift range in S mode is
set automatically to 5 or 4 accord-
ing to vehicle speed. But, the initial
shift range may be set to 3 if AI-
SHIFT has operated while the shift
lever was in the D position.
1
2
n Shift ranges and their functions • Automatically selecting gears between 1 and 6 according to vehicle speed
and driving conditions. But, the gear is limited according to selected shift
range.
• You can choose from 6 levels of engine braking force.
• A lower shift range will provide greater engine braking force than a higher
shift range, and the engine speed will also increase.
Page 28 of 112
28
ES350_QG_OM33B82U_(U)
Multi-information Display
Drive information
Select to display various drive data.
Navigation system-linked display (if equipped)
Select to display the following navigation system-linked information.
• Route guidance
• Compass display (north-up display/heading-up display)
Audio system-linked display
Select to enable selection of an audio source or track on the display
using the meter control switches.
Driving assist information
Select to display the cruise contro l or dynamic radar cruise control/
LDA (Lane Departure Alert with st eering control) information, when
the system is used. ( →P.37, 39, 43)
Warning message display
Select to display warning messages and measures to be taken if a mal-
function is detected.
Settings display
Select to change the meter display settings.
The multi-information display presents the driver with a variety of vehicle data.
Page 29 of 112
29
ES350_QG_OM33B82U_(U)
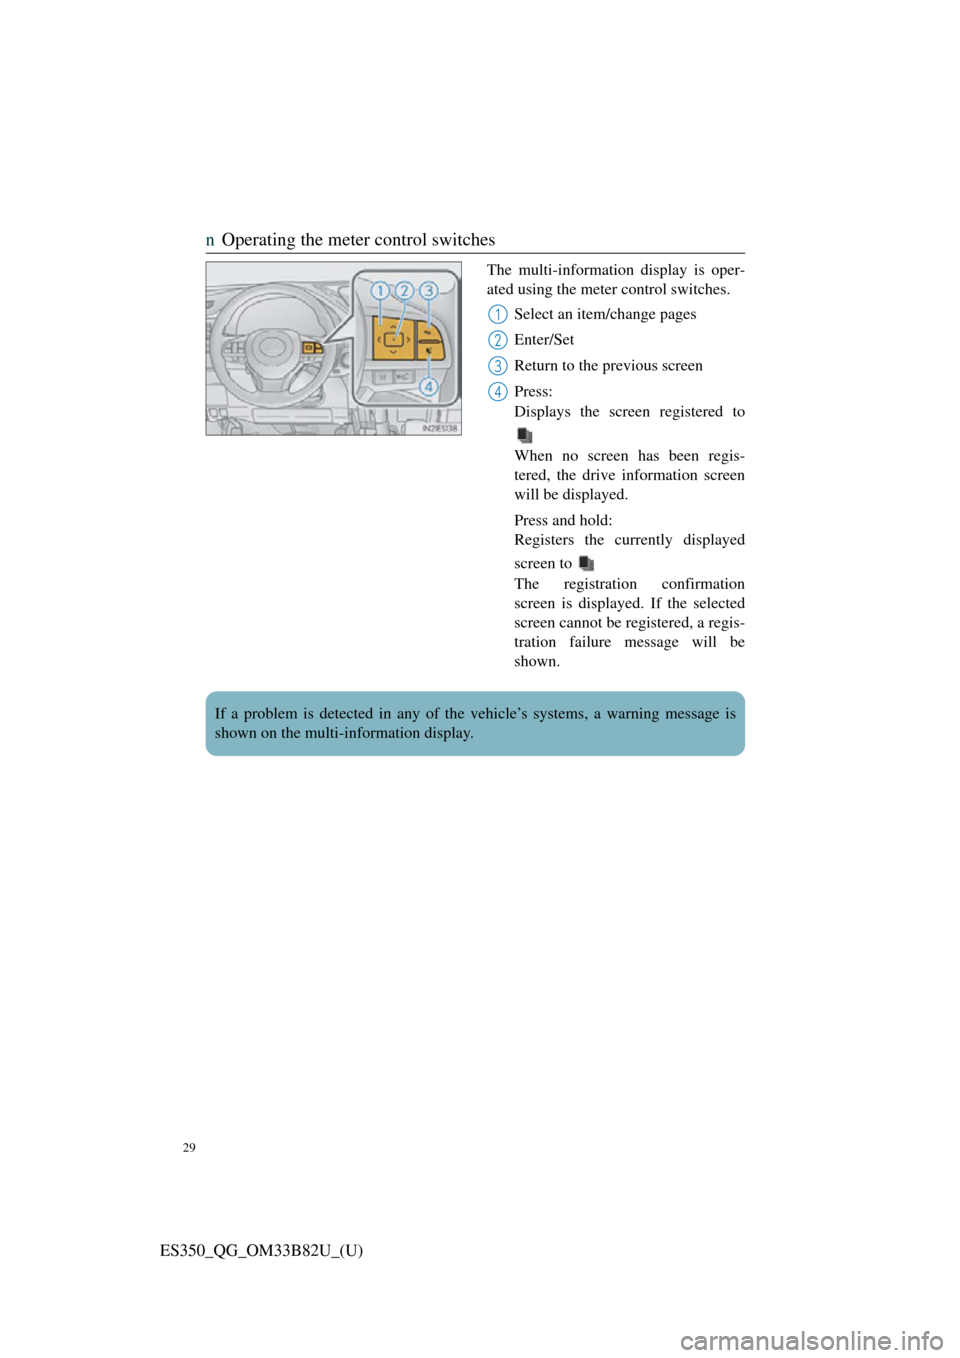
nOperating the meter control switches
The multi-information display is oper-
ated using the meter control switches.
Select an item/change pages
Enter/Set
Return to the previous screen
Press:
Displays the screen registered to
When no screen has been regis-
tered, the drive information screen
will be displayed.
Press and hold:
Registers the currently displayed
screen to
The registration confirmation
screen is displayed. If the selected
screen cannot be registered, a regis-
tration failure message will be
shown.
1
2
3
4
If a problem is detected in any of th e vehicle’s systems, a warning message is
shown on the multi-information display.
Page 30 of 112
30
ES350_QG_OM33B82U_(U)
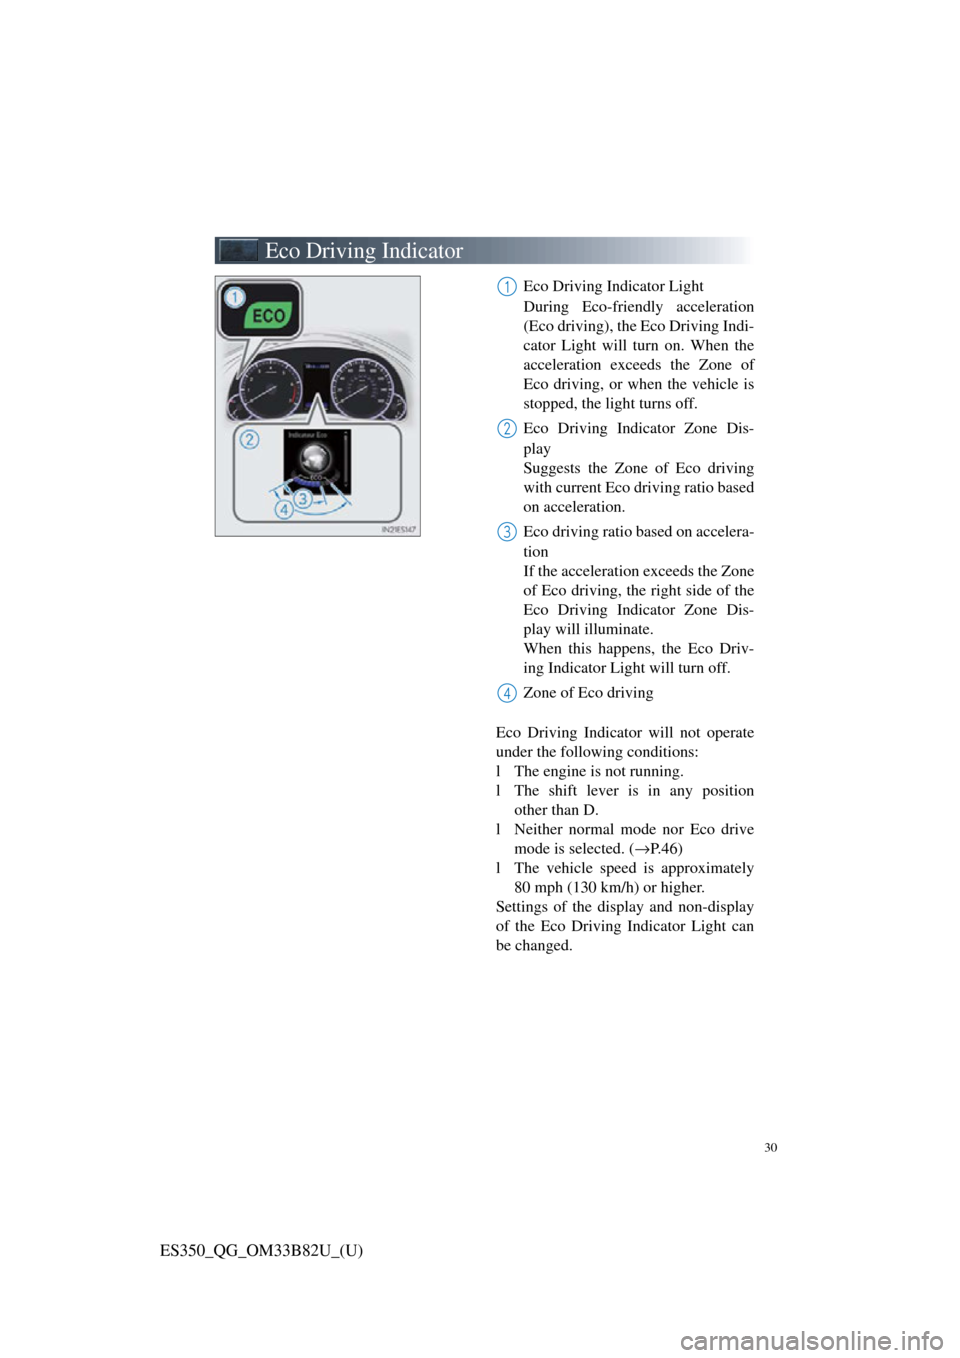
Eco Driving Indicator
Eco Driving Indicator Light
During Eco-friendly acceleration
(Eco driving), the Eco Driving Indi-
cator Light will turn on. When the
acceleration exceeds the Zone of
Eco driving, or when the vehicle is
stopped, the light turns off.
Eco Driving Indicator Zone Dis-
play
Suggests the Zone of Eco driving
with current Eco driving ratio based
on acceleration.
Eco driving ratio based on accelera-
tion
If the acceleration exceeds the Zone
of Eco driving, the right side of the
Eco Driving Indicator Zone Dis-
play will illuminate.
When this happens, the Eco Driv-
ing Indicator Light will turn off.
Zone of Eco driving
Eco Driving Indicator will not operate
under the following conditions:
l The engine is not running.
l The shift lever is in any position other than D.
l Neither normal mode nor Eco drive mode is selected. ( →P. 4 6 )
l The vehicle speed is approximately
80 mph (130 km/h) or higher.
Settings of the display and non-display
of the Eco Driving Indicator Light can
be changed.1
2
3
4
Page 31 of 112

31
ES350_QG_OM33B82U_(U)
Headlights
The side marker, parking,
daytime running, tail, license
plate and instrument panel
lights turn on.
The headlights, parking and
all lights listed above (except
daytime running lights) turn
on.
The headlights, daytime
running lights and all the
lights listed above turn on
and off automatically.
(When the engine switch is
in IGNITION ON mode.)
Off
The daytime running lights
turn on.
nTurning on the high beam headlights
With the headlights on, push the
lever away from you to turn on the
high beams.
Pull the lever toward you to the
center position to turn the high
beams off.
Pull the lever toward you and
release it to fl ash the high beams
once.
You can flash the high beams with
the headlights on or off.
n AFS (Adaptive Front-lighting System) (if equipped)
AFS (Adaptive Front-lighting System) improves visibility at intersections and on
curves by automatically ad justing the lateral angle of the headlights according to
vehicle speed and the degree of the tire angle that are controlled by steering input.
Operates at speed of 6 mph (10 km/h) or higher.
nDeactivating AFS
Select “AFS” on (settings display) of the multi-information display.
(Canada)
(U.S.A
1
2
3
4
(U.S.A
(Canada)
1
2
1
Page 40 of 112
40
ES350_QG_OM33B82U_(U)
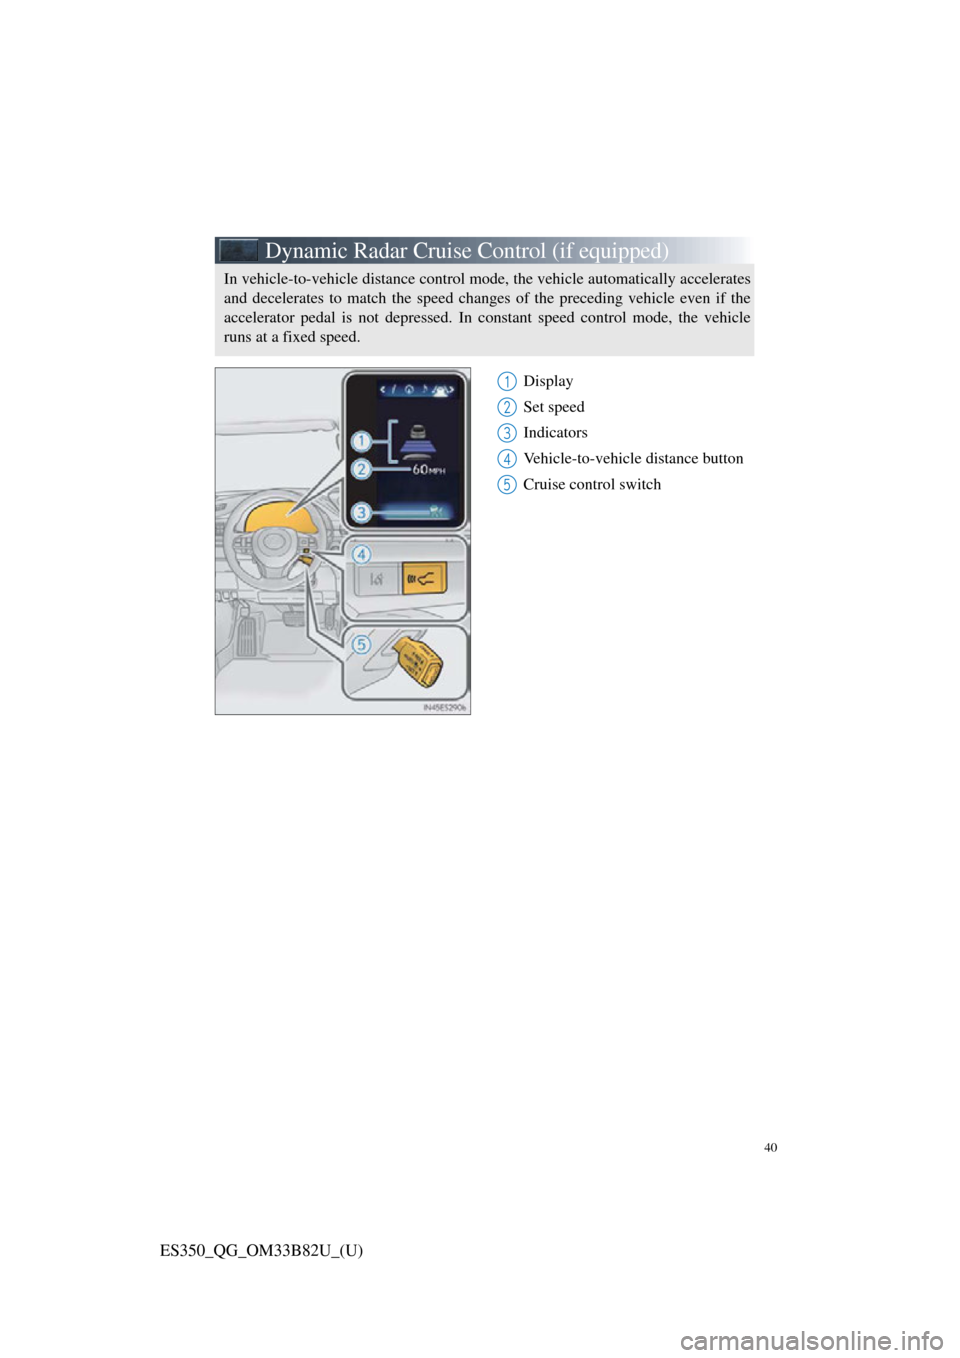
Dynamic Radar Cruise Control (if equipped)
Display
Set speed
Indicators
Vehicle-to-vehicle distance button
Cruise control switch
In vehicle-to-vehicle distance control mode, the vehicle automatically accelerates
and decelerates to match the speed change s of the preceding vehicle even if the
accelerator pedal is not depressed. In c onstant speed control mode, the vehicle
runs at a fixed speed.
1
2
3
4
5
Page 41 of 112

41
ES350_QG_OM33B82U_(U)
nSetting the vehicle speed (vehicle -to-vehicle distance control mode)
Press the “ON/OFF” button to acti-
vate the cruise control.
Radar cruise control indicator will
come on and a message will be
displayed on the multi-informa-
tion display.
Press the button again to deacti-
vate the cruise control.
Accelerate or decelerate, with
accelerator pedal operation, to the
desired vehicle speed (above
approximately 30 mph [50 km/h])
and push the lever down to set the
speed. Cruise control “SET” indicator
will come on.
The vehicle speed at the moment
the lever is released becomes the
set speed.1
2
Page 42 of 112

42
ES350_QG_OM33B82U_(U)
nAdjusting the set speed
Increases the speed
Decreases the speed
Fine adjustment: Momentarily
move the lever in the desired direc-
tion.
Large adjustment: Hold the lever
up or down to change the speed,
and release when the desired speed
is reached.
nChanging the vehicle-to-vehicle di stance (vehicle-to-vehicle distance
control mode)
Pressing the button changes the vehicle-
to-vehicle distance as follows:
Long
Medium
Short
The vehicle-to-vehicle distance is
set automatically to long mode
when the engine switch is turned to
IGNITION ON mode.
If a vehicle is running ahead of you,
the preceding vehicle mark will
also be displayed.
1
2
Preceding
vehicle mark
1
2
3
The vehicle-to-vehicle distance control mo de maintains the preset cruising speed
as long as no vehicle is detected ahead.
Page 44 of 112

44
ES350_QG_OM33B82U_(U)
LDA (Lane Departure Alert with
steering control) (if equipped)
nTurning LDA system on
Press the LDA switch to turn the LDA
system on.
The LDA indicator illuminates and
a message is displayed on the multi-
information display.
Press the LDA switch again to turn
the LDA system off.
When the LDA system is turned on
or off, operation of the LDA system
continues in the same condition the
next time the engine is started.
When driving on highways and freeways with white or yellow lines, this func-
tion alerts the driver when the vehicle might depart from its lane and provides
assistance by operating th e steering wheel to keep the vehicle in its lane.
The LDA system recognizes vi sible white or yellow lines with the camera sensor
on the upper portion of the front windshield.
Page 45 of 112

45
ES350_QG_OM33B82U_(U)
Intuitive Parking Assist (if equipped)
nTurning the system on and off
Turns the intuitive parking assist on/off
When on, the indi cator light comes
on to inform the driver that the sys-
tem is operational.
The distance from your vehicle to near by obstacles when parallel parking or
maneuvering into a garage is measured by the sensors and communicated via the
multi-information display, navigation system screen or Lexus Display Audio sys-
tem screen and a buzzer. Always check the surrounding area when using this sys-