high LEXUS ES350 2021 Owner's Manual
[x] Cancel search | Manufacturer: LEXUS, Model Year: 2021, Model line: ES350, Model: LEXUS ES350 2021Pages: 464, PDF Size: 9.61 MB
Page 152 of 464
1524-2. Driving procedures
The selected shift range, from D1 to D8,
will be displaye d in the meter.
■Automatic deactivation of shift range
selection in the D position
Shift range selection in the D position will
be deactivated in the following situations:
●The “+” paddle shift switch is held down
for a period of time
●When the vehicle comes to a stop
●If the accelerator pedal is depressed for
more than a certain period of time
●When the shift lever is shifted to a posi-
tion other than D
■Downshifting restriction warning
buzzer
To help ensure safety and driving perfor-
mance, downshifting operation may some-
times be restricted. In some circumstances,
downshifting may not be possible even
when the shift lever or paddle shift switch is
operated. (A buzzer will sound twice.)
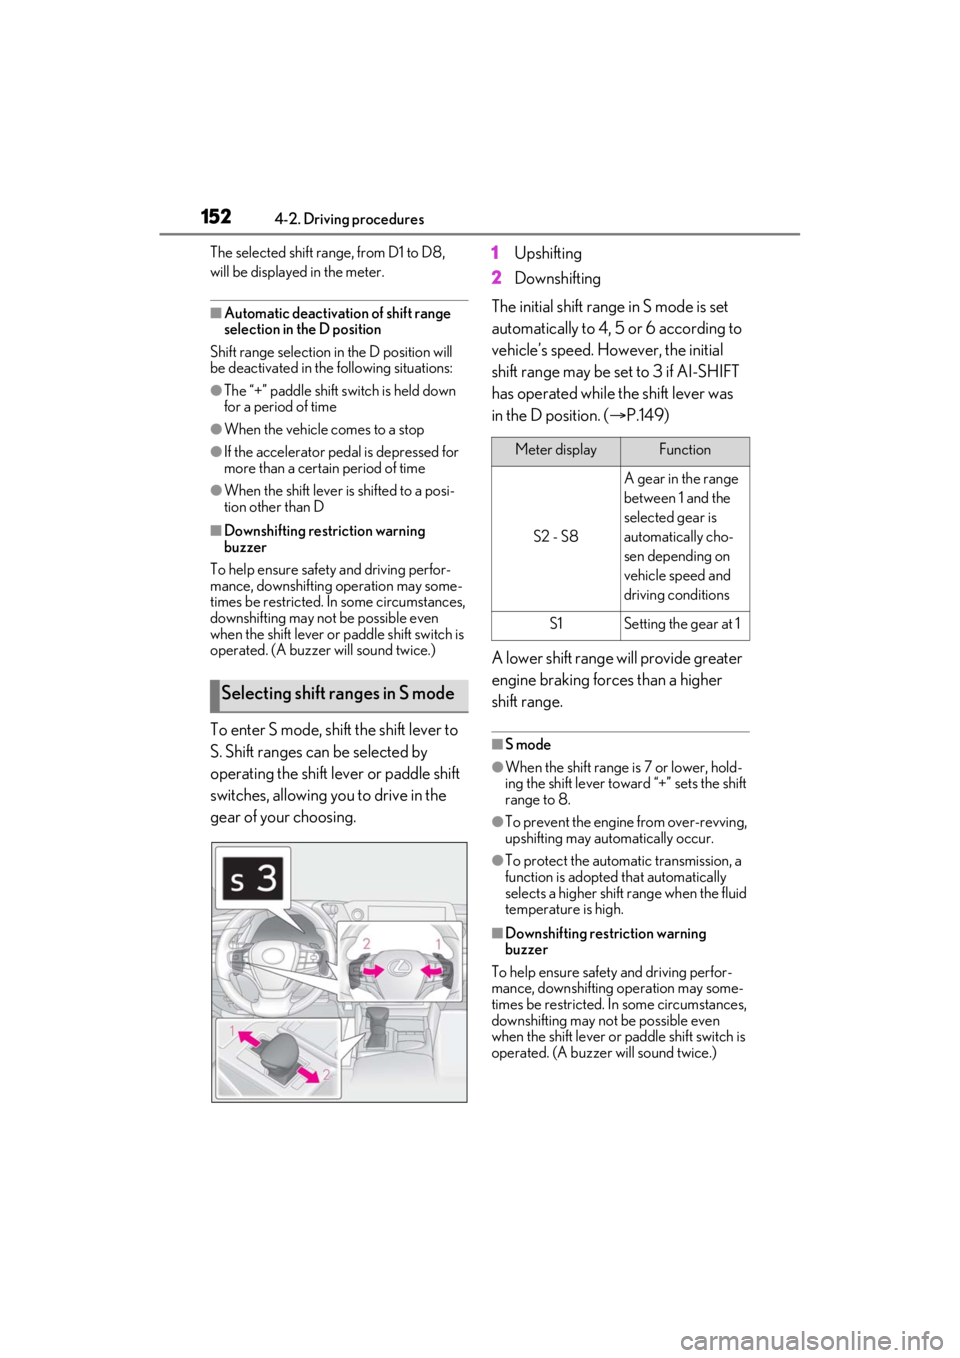
To enter S mode, shift the shift lever to
S. Shift ranges can be selected by
operating the shift lever or paddle shift
switches, allowing you to drive in the
gear of your choosing. 1
Upshifting
2 Downshifting
The initial shift range in S mode is set
automatically to 4, 5 or 6 according to
vehicle’s speed. However, the initial
shift range may be set to 3 if AI-SHIFT
has operated while the shift lever was
in the D position. ( P.149)
A lower shift range will provide greater
engine braking forces than a higher
shift range.■S mode
●When the shift range is 7 or lower, hold-
ing the shift lever toward “+” sets the shift
range to 8.
●To prevent the engine from over-revving,
upshifting may automatically occur.
●To protect the automatic transmission, a
function is adopted that automatically
selects a higher shift range when the fluid
temperature is high.
■Downshifting restriction warning
buzzer
To help ensure safety and driving perfor-
mance, downshifting operation may some-
times be restricted. In some circumstances,
downshifting may not be possible even
when the shift lever or paddle shift switch is
operated. (A buzzer will sound twice.)
Selecting shift ranges in S mode
Meter displayFunction
S2 - S8
A gear in the range
between 1 and the
selected gear is
automatically cho-
sen depending on
vehicle speed and
driving conditions
S1Setting the gear at 1
Page 160 of 464
1604-3. Operating the lights and wipers
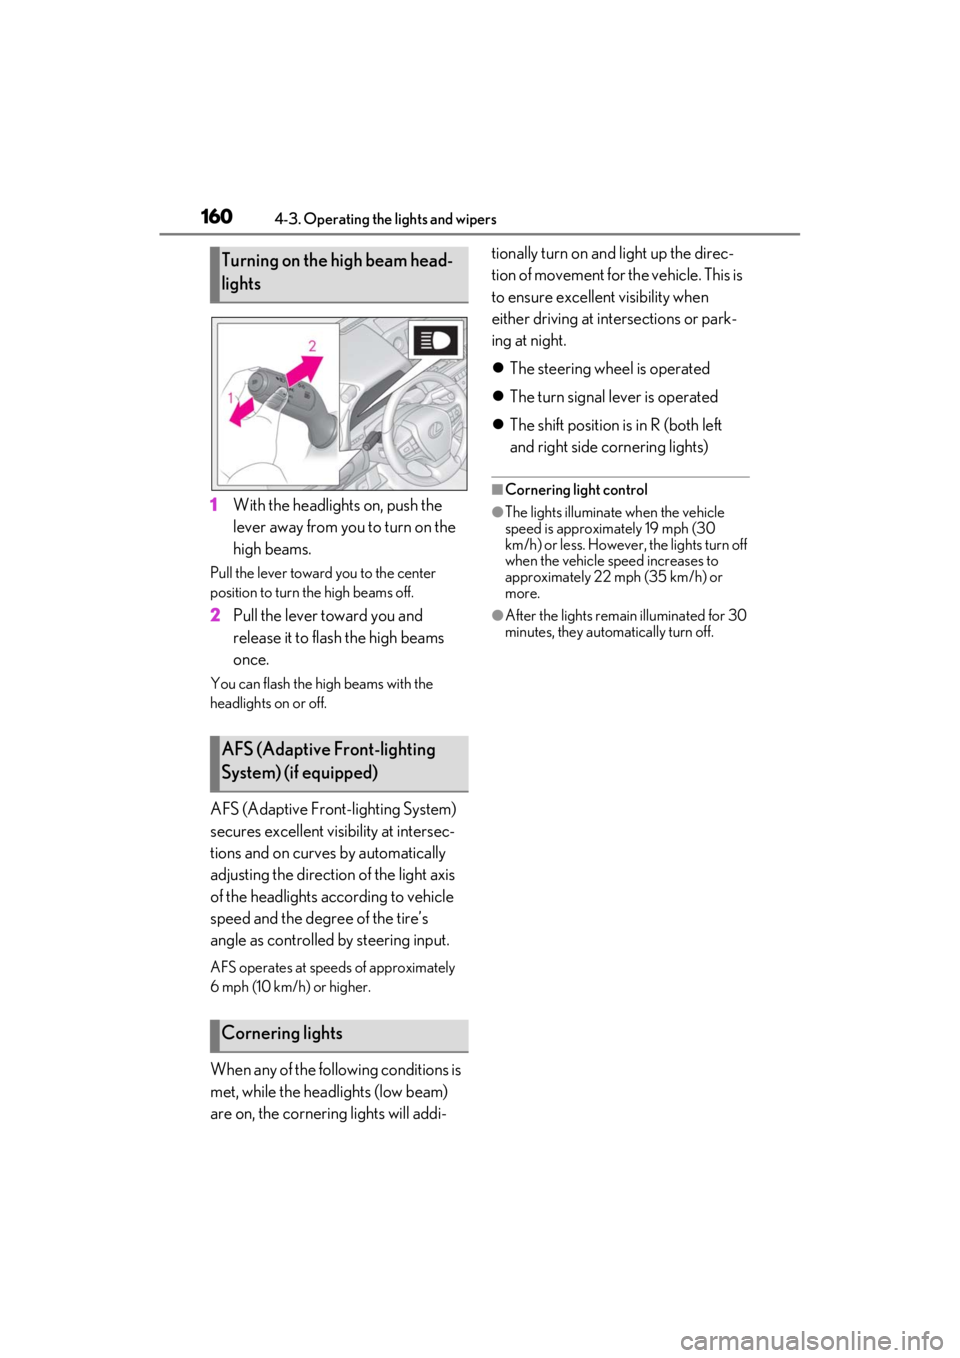
1With the headlights on, push the
lever away from you to turn on the
high beams.
Pull the lever toward you to the center
position to turn the high beams off.
2Pull the lever toward you and
release it to flash the high beams
once.
You can flash the high beams with the
headlights on or off.
AFS (Adaptive Front-lighting System)
secures excellent visibility at intersec-
tions and on curves by automatically
adjusting the direction of the light axis
of the headlights according to vehicle
speed and the degree of the tire’s
angle as controlled by steering input.
AFS operates at speed s of approximately
6 mph (10 km/h) or higher.
When any of the following conditions is
met, while the headlights (low beam)
are on, the cornering lights will addi- tionally turn on and light up the direc-
tion of movement for the vehicle. This is
to ensure excellent visibility when
either driving at intersections or park-
ing at night.
The steering wheel is operated
The turn signal lever is operated
The shift position is in R (both left
and right side cornering lights)
■Cornering light control
●The lights illuminate when the vehicle
speed is approximately 19 mph (30
km/h) or less. However, the lights turn off
when the vehicle speed increases to
approximately 22 mph (35 km/h) or
more.
●After the lights remain illuminated for 30
minutes, they automatically turn off.
Turning on the high beam head-
lights
AFS (Adaptive Front-lighting
System) (if equipped)
Cornering lights
Page 161 of 464
1614-3. Operating the lights and wipers
4
Driving
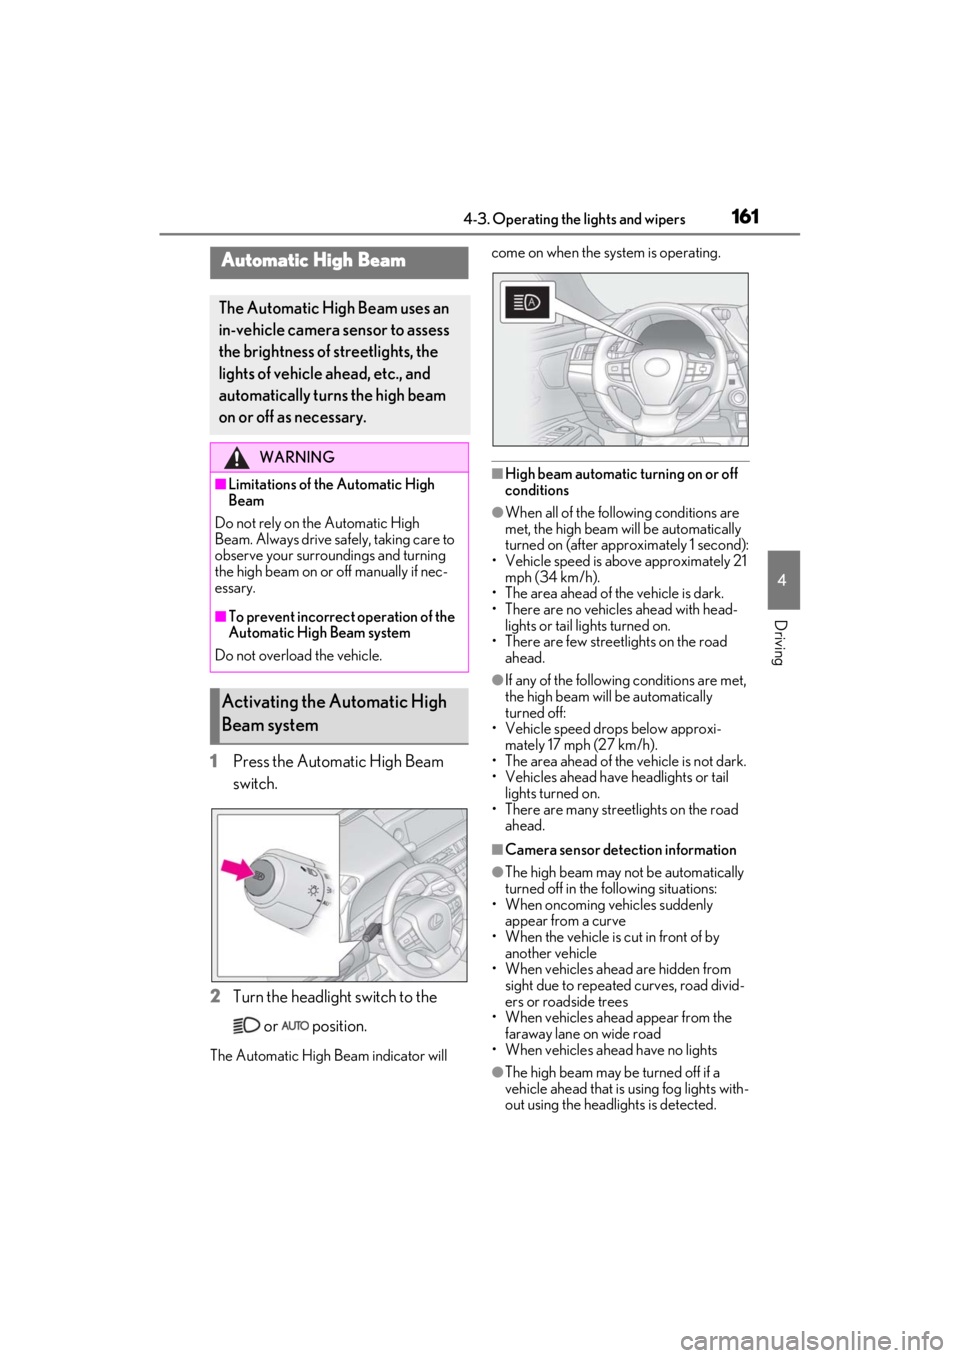
1Press the Automatic High Beam
switch.
2 Turn the headlight switch to the
or position.
The Automatic High Beam indicator will come on when the system is operating.
■High beam automatic turning on or off
conditions
●When all of the follo
wing conditions are
met, the high beam will be automatically
turned on (after approximately 1 second):
• Vehicle speed is above approximately 21 mph (34 km/h).
• The area ahead of the vehicle is dark.
• There are no vehicles ahead with head-
lights or tail lights turned on.
• There are few streetlights on the road
ahead.
●If any of the following conditions are met,
the high beam will be automatically
turned off:
• Vehicle speed drops below approxi-
mately 17 mph (27 km/h).
• The area ahead of the vehicle is not dark.
• Vehicles ahead have headlights or tail lights turned on.
• There are many streetlights on the road ahead.
■Camera sensor dete ction information
●The high beam may not be automatically
turned off in the following situations:
• When oncoming vehicles suddenly appear from a curve
• When the vehicle is cut in front of by
another vehicle
• When vehicles ahead are hidden from sight due to repeated curves, road divid-
ers or roadside trees
• When vehicles ahead appear from the faraway lane on wide road
• When vehicles ahead have no lights
●The high beam may be turned off if a
vehicle ahead that is using fog lights with-
out using the headlig hts is detected.
Automatic High Beam
The Automatic High Beam uses an
in-vehicle camera sensor to assess
the brightness of streetlights, the
lights of vehicle ahead, etc., and
automatically turns the high beam
on or off as necessary.
WARNING
■Limitations of the Automatic High
Beam
Do not rely on the Automatic High
Beam. Always drive sa fely, taking care to
observe your surroundings and turning
the high beam on or off manually if nec-
essary.
■To prevent incorrect operation of the
Automatic High Beam system
Do not overload the vehicle.
Activating the Automatic High
Beam system
Page 162 of 464

1624-3. Operating the lights and wipers
●House lights, street lights, traffic signals,
and illuminated billboards or signs may
cause the high beam to switch to the low
beams, or the low beams to remain on.
●The following factors may affect the
amount of time taken to turn the high
beam on or off:
• The brightness of headlights, fog lights,
and tail lights of vehicles ahead
• The movement and direction of vehicles ahead
• When a vehicle ahead only has opera- tional lights on one side
• When a vehicle ahead is a two-wheeled
vehicle
• The condition of the road (gradient, curve, condition of the road surface etc.)
• The number of passengers and amount of luggage
●The high beam may be turned on or off
when the driver does not expect it.
●Bicycles or similar objects may not be
detected.
●In the situations show n below, the system
may not be able to accurately detect sur-
rounding brightness levels. This may
cause the low beams to remain on or the
high beams to cause problems for pedes-
trians, vehicles ahead or other parties. In
these cases, manually switch between the
high and low beams.
• In bad weather (rain, snow, fog, sand-
storms etc.)
• The windshield is obscured by fog, mist, ice, dirt etc.
• The windshield is cracked or damaged.
• The camera sensor is deformed or dirty.
• When the temperature of the camera sensor is extremely high
• Surrounding brightness levels are equal to those of headlights, tail lights or fog
lights.
• When headlights or tail lights of vehicles ahead are turned off, dirty, changing
color, or not aimed properly
• When the vehicle is hit by water, snow, dust, etc. from a preceding vehicle
• When driving through an area of inter-
mittently changing brightness and dark-
ness.
• When frequently and repeatedly driving
ascending/descending roads, or roads with rough, bumpy or uneven surfaces
(such as stone-paved roads, gravel tracks
etc.).
• When frequently and repeatedly taking curves or driving on a winding road.
• There is a highly re flective object ahead
of the vehicle, such as a sign or a mirror.
• The back of a vehicle ahead is highly reflective, such as a container on a truck.
• The vehicle’s headlights are damaged or dirty.
• The vehicle is listing or tilting, due to a flat
tire, a trailer being towed etc.
• The high beam and low beam are repeat- edly being switched between in an
abnormal manner.
• The driver believes that the high beam may be causing problems or distress to
other drivers or pedestrians nearby.
■Temporarily lowering sensor sensitivity
The sensitivity of the sensor can be tempo-
rarily lowered.
1 Turn the engine switch off while the fol-
lowing conditions are met.
• The headlight swit ch is in or .
• The headlight switch lever is in low beam
position.
• Automatic High Be am switch is on.
2 Turn the engine switch to IGNITION
ON mode.
3 Within 60 seconds after 2, repeat pull-
ing the headlight switch lever to the
original position then pushing it to the
high beam position quickly 10 times,
then leave the lever in high beam posi-
tion.
4 If the sensitivity is changed, the Auto-
matic High Beam indicator turns on and
off 3 times.
Automatic High Beam (headlights) may
turn on even the vehicle is stopped.
■Switching to high beam
Push the lever away from you.
Turning the high beam on/off
manually
Page 163 of 464
1634-3. Operating the lights and wipers
4
Driving
The Automatic High Beam indicator will
turn off and the high beam indicator will
turn on.
Pull the lever to its original position to acti-
vate the Automatic High Beam system
again.
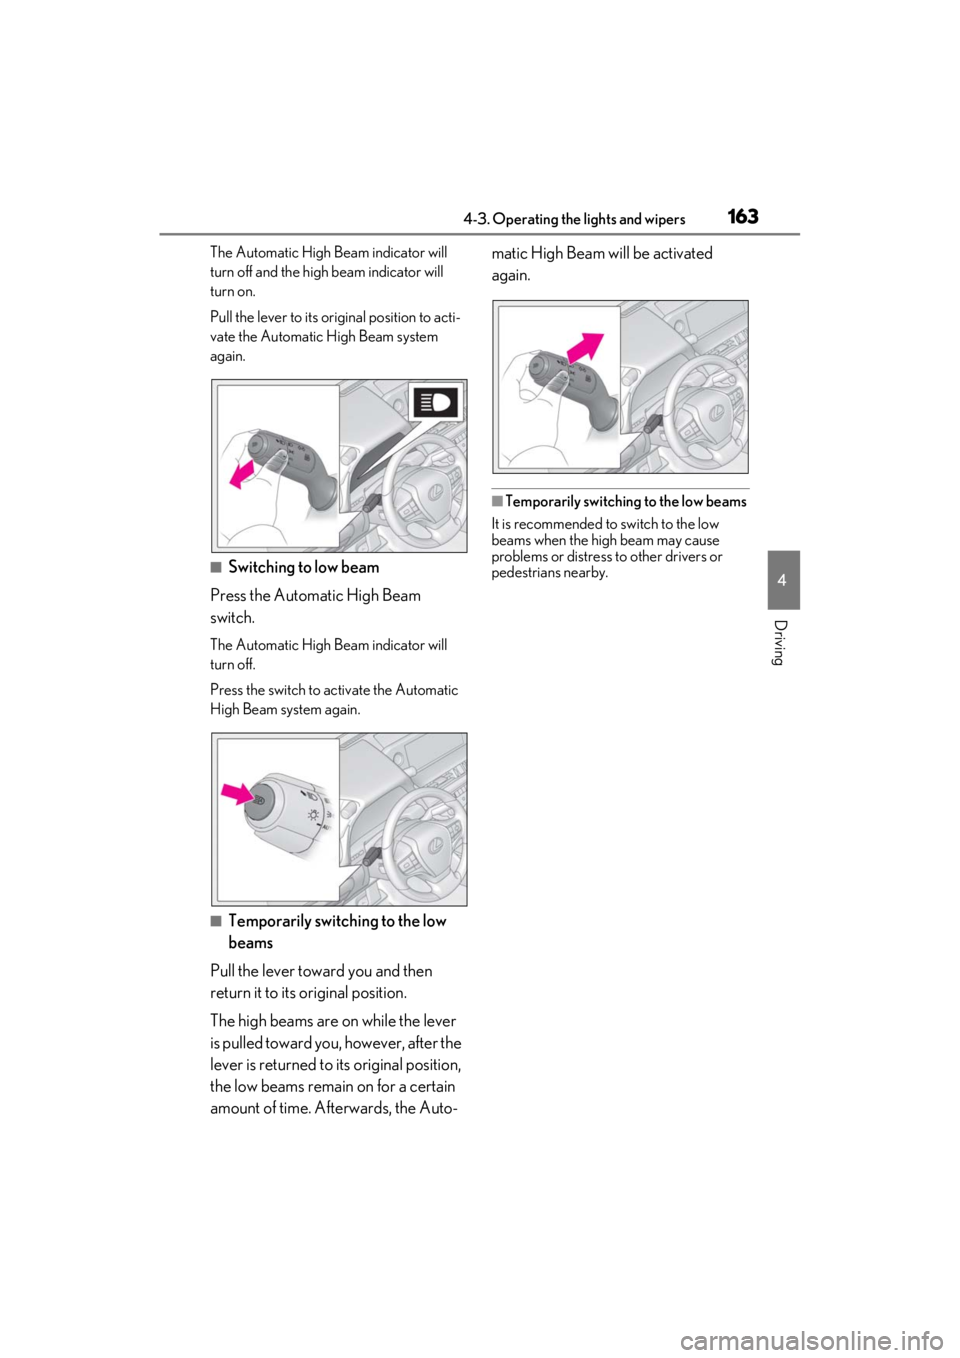
■Switching to low beam
Press the Automatic High Beam
switch.
The Automatic High Beam indicator will
turn off.
Press the switch to activate the Automatic
High Beam system again.
■Temporarily switching to the low
beams
Pull the lever toward you and then
return it to its original position.
The high beams are on while the lever
is pulled toward you, however, after the
lever is returned to its original position,
the low beams remain on for a certain
amount of time. Afterwards, the Auto- matic High Beam will be activated
again.
■Temporarily switchin
g to the low beams
It is recommended to switch to the low
beams when the high beam may cause
problems or distress to other drivers or
pedestrians nearby.
Page 164 of 464
1644-3. Operating the lights and wipers
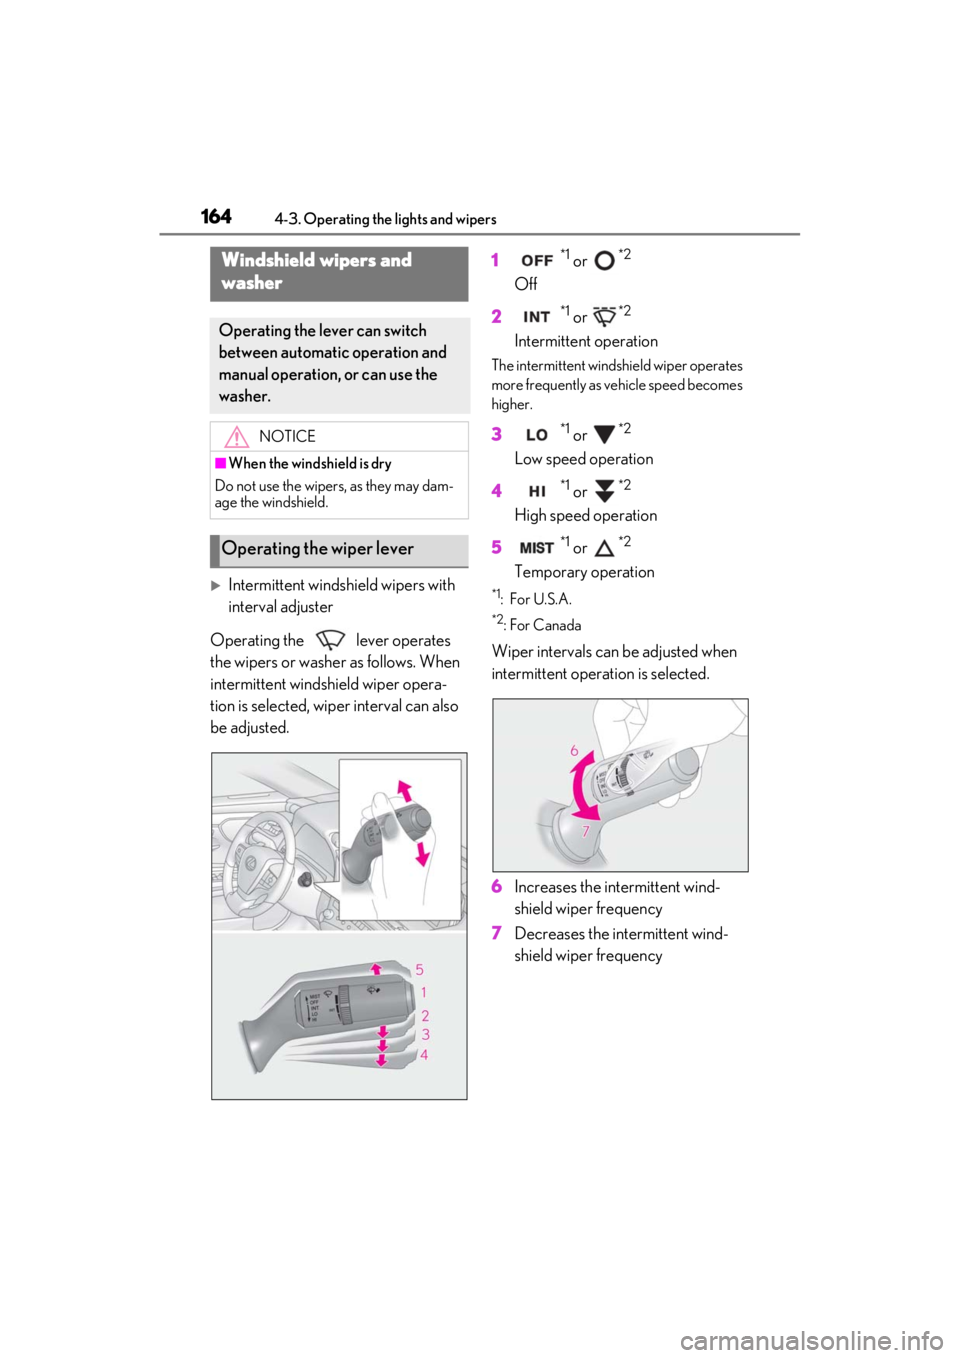
Intermittent windshield wipers with
interval adjuster
Operating the lever operates
the wipers or washer as follows. When
intermittent windshield wiper opera-
tion is selected, wiper interval can also
be adjusted. 1
*1 or *2
Off
2
*1 or *2
Intermittent operation
The intermittent windshield wiper operates
more frequently as vehicle speed becomes
higher.
3*1 or *2
Low speed operation
4
*1 or *2
High speed operation
5
*1 or *2
Temporary operation
*1: For U.S.A.
*2:For Canada
Wiper intervals can be adjusted when
intermittent operation is selected.
6 Increases the intermittent wind-
shield wiper frequency
7 Decreases the intermittent wind-
shield wiper frequency
Windshield wipers and
washer
Operating the lever can switch
between automatic operation and
manual operation, or can use the
washer.
NOTICE
■When the windshield is dry
Do not use the wipers, as they may dam-
age the windshield.
Operating the wiper lever
Page 165 of 464
1654-3. Operating the lights and wipers
4
Driving
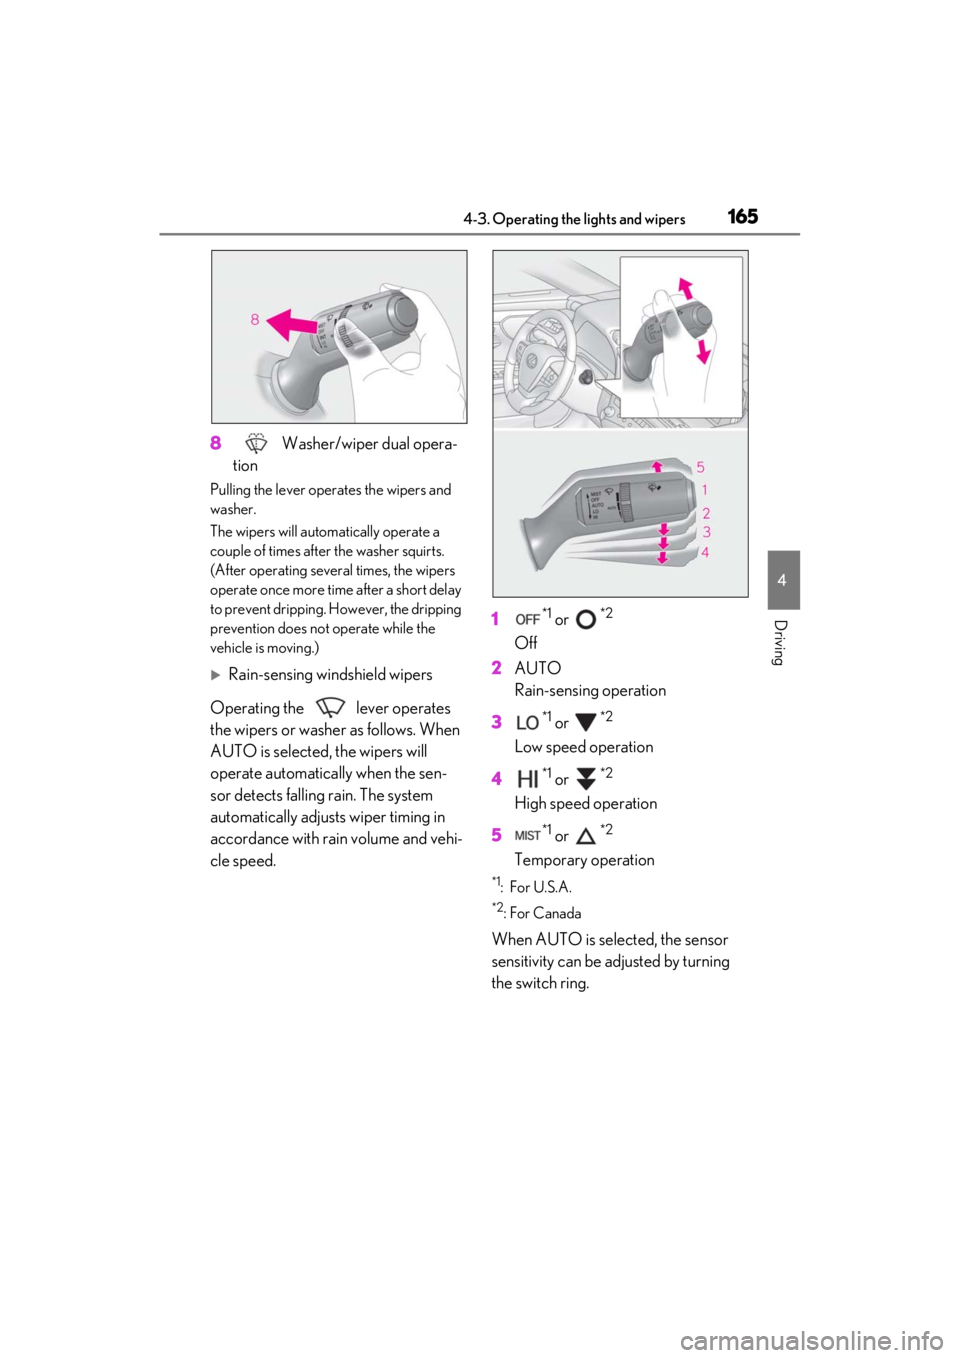
8 Washer/wiper dual opera-
tion
Pulling the lever operates the wipers and
washer.
The wipers will automatically operate a
couple of times afte r the washer squirts.
(After operating severa l times, the wipers
operate once more time after a short delay
to prevent dripping. However, the dripping
prevention does not operate while the
vehicle is moving.)
Rain-sensing windshield wipers
Operating the lever operates
the wipers or washer as follows. When
AUTO is selected, the wipers will
operate automatically when the sen-
sor detects falling rain. The system
automatically adjusts wiper timing in
accordance with rain volume and vehi-
cle speed. 1
*1 or *2
Off
2 AUTO
Rain-sensing operation
3
*1 or *2
Low speed operation
4
*1 or *2
High speed operation
5
*1 or *2
Temporary operation
*1: For U.S.A.
*2:For Canada
When AUTO is selected, the sensor
sensitivity can be adjusted by turning
the switch ring.
Page 166 of 464
1664-3. Operating the lights and wipers
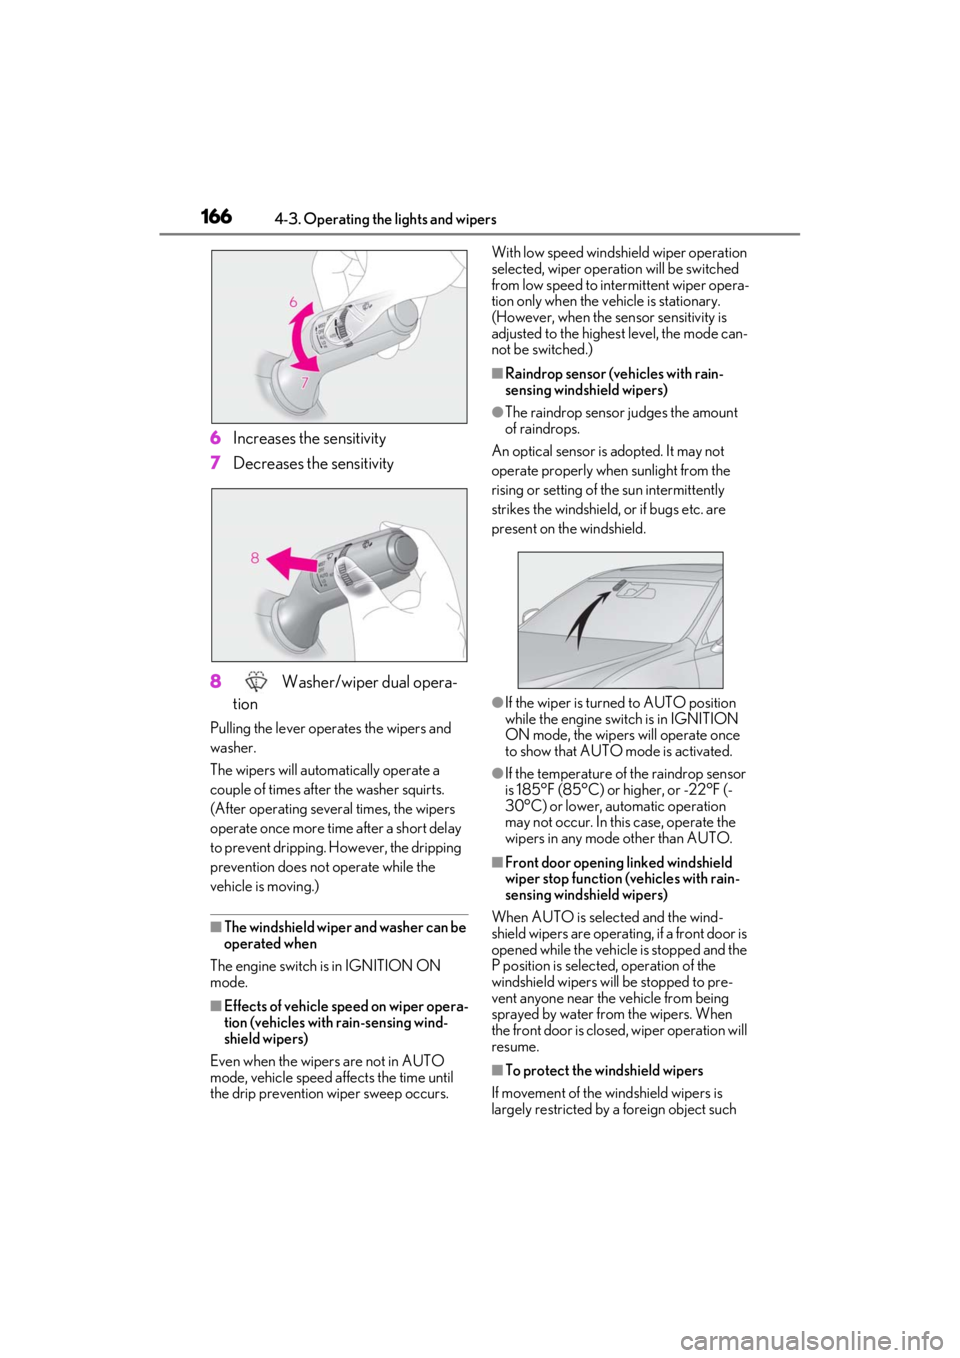
6Increases the sensitivity
7 Decreases the sensitivity
8 Washer/wiper dual opera-
tion
Pulling the lever operates the wipers and
washer.
The wipers will automatically operate a
couple of times after the washer squirts.
(After operating severa l times, the wipers
operate once more time after a short delay
to prevent dripping. However, the dripping
prevention does not operate while the
vehicle is moving.)
■The windshield wiper and washer can be
operated when
The engine switch is in IGNITION ON
mode.
■Effects of vehicle speed on wiper opera-
tion (vehicles with rain-sensing wind-
shield wipers)
Even when the wipers are not in AUTO
mode, vehicle speed affects the time until
the drip prevention wiper sweep occurs. With low speed windsh
ield wiper operation
selected, wiper operation will be switched
from low speed to intermittent wiper opera-
tion only when the vehicle is stationary.
(However, when the sensor sensitivity is
adjusted to the highes t level, the mode can-
not be switched.)
■Raindrop sensor (vehicles with rain-
sensing windshield wipers)
●The raindrop sensor judges the amount
of raindrops.
An optical sensor is adopted. It may not
operate properly when sunlight from the
rising or setting of the sun intermittently
strikes the windshield, or if bugs etc. are
present on the windshield.
●If the wiper is turned to AUTO position
while the engine swit ch is in IGNITION
ON mode, the wipers will operate once
to show that AUTO mode is activated.
●If the temperature of the raindrop sensor
is 185°F (85°C) or higher, or -22°F (-
30°C) or lower, automatic operation
may not occur. In this case, operate the
wipers in any mode other than AUTO.
■Front door opening linked windshield
wiper stop function (vehicles with rain-
sensing windshield wipers)
When AUTO is selected and the wind-
shield wipers are operating, if a front door is
opened while the vehicle is stopped and the
P position is select ed, operation of the
windshield wipers will be stopped to pre-
vent anyone near th e vehicle from being
sprayed by water from the wipers. When
the front door is closed, wiper operation will
resume.
■To protect the windshield wipers
If movement of the windshield wipers is
largely restricted by a foreign object such
Page 167 of 464

1674-3. Operating the lights and wipers
4
Driving
as snow, the operation of the windshield
wipers may be stopped automatically to
protect the windshield wipers. In this case,
turn the windshield wiper switch off and
remove the foreign object, and then use the
windshield wipers.
■When stopping the engine in an emer-
gency while driving
If the windshield wipers are operating when
the engine is stopped, the windshield wipers
will operate in high speed operation. After
the vehicle is stopped, operation will return
to normal when the engi ne switch is turned
to IGNITION ON mode, or operation will
stop when the driver’s door is opened.When the windshield wipers are not
being used, they retract to below the
hood. To enable the windshield wipers
to be lifted when parking in cold condi-
tions or when replacing a windshield
wiper insert, change the rest position of
the windshield wipers to the service
position using the wiper lever.
■Raising the wipers to the service
position
Within approximately 45 seconds of
turning the engine switch off, move the
wiper lever to the (U.S.A.) or
(Canada) position and hold it for
approximately 2 seconds or more.
The wipers will move to the service posi-
tion.
WARNING
■Caution regarding the use of wind-
shield wipers in AUTO mode (vehi-
cles with rain-sen sing windshield
wipers)
The windshield wipers may operate
unexpectedly if the sensor is touched or
the windshield is subject to vibration in
AUTO mode. Take ca re that your fin-
gers or anything else do not become
caught in the windshield wipers.
■Caution regarding the use of washer
fluid
When it is cold, do not use the washer
fluid until the windshield becomes warm.
The fluid may freeze on the windshield
and cause low visibility. This may lead to
an accident, resulting in death or serious
injury.
NOTICE
■When there is no washer fluid spray
from the nozzle
Damage to the washer fluid pump may
be caused if the lever is pulled toward
you and held continually.
■When a nozzle becomes blocked
In this case, contact your Lexus dealer.
Do not try to clear it with a pin or other
object. The nozzle will be damaged.
Changing the windshield wiper
rest position/Lifting the wind-
shield wipers
Page 171 of 464
1714-5. Using the driving support systems
4
Driving
4-5.Using the driving support systems
■PCS (Pre-Collision System)
P.177
■LTA (Lane Tracing Assist)
P.184
■AHB (Automatic High Beam)
P.161
■RSA (Road Sign Assist) (if
equipped)
P.193
■Dynamic radar cruise control with
full-speed range
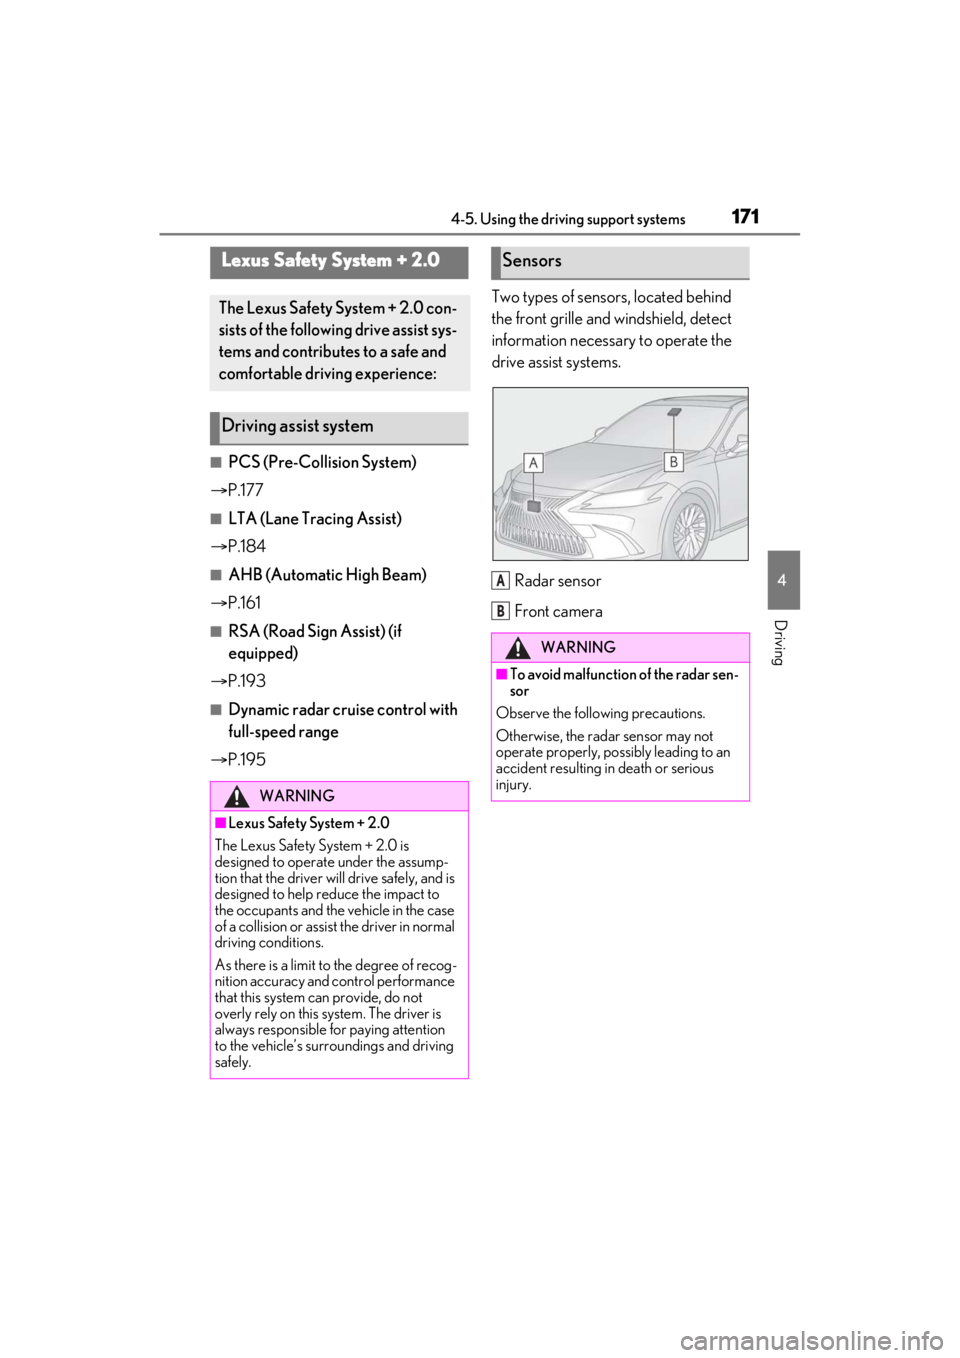
P.195 Two types of sensors, located behind
the front grille and windshield, detect
information necessary to operate the
drive assist systems.
Radar sensor
Front camera
Lexus Safety System + 2.0
The Lexus Safety System + 2.0 con-
sists of the following drive assist sys-
tems and contributes to a safe and
comfortable driving experience:
Driving assist system
WARNING
■Lexus Safety System + 2.0
The Lexus Safety System + 2.0 is
designed to operate under the assump-
tion that the driver wi ll drive safely, and is
designed to help reduce the impact to
the occupants and the vehicle in the case
of a collision or assist the driver in normal
driving conditions.
As there is a limit to the degree of recog-
nition accuracy and control performance
that this system can provide, do not
overly rely on this system. The driver is
always responsible for paying attention
to the vehicle’s surro undings and driving
safely.
Sensors
WARNING
■To avoid malfunction of the radar sen-
sor
Observe the following precautions.
Otherwise, the radar sensor may not
operate properly, possibly leading to an
accident resulting in death or serious
injury.
A
B