check LEXUS ES350 2022 Repair Manual
[x] Cancel search | Manufacturer: LEXUS, Model Year: 2022, Model line: ES350, Model: LEXUS ES350 2022Pages: 468, PDF Size: 26.96 MB
Page 309 of 468

3076-2. Maintenance
6
Maintenance and care
The OBD system determines that a
problem exists somewhere in the emis-
sion control system. Your vehicle may
not pass the I/M test and may need to
be repaired. Contact your Lexus
dealer to service the vehicle.
When the battery is disconnected
or discharged
Readiness codes that are set during
ordinary driving are erased.
Also, depending on your driving
habits, the readiness codes may not
be completely set.
When the fuel tank cap is loose
The malfunction indicator lamp
comes on indicating a temporary
malfunction and your vehicle may
not pass the I/M test. The error code in the OBD system will
not be cleared unless the vehicle is
driven 40 or more times.
Contact your Lexus dealer to prepare
the vehicle for re-testing.
Emission inspection and
maintenance (I/M) pro-
grams
Some states have vehicle emission
inspection programs which include
OBD (On Board Diagnostics)
checks. The OBD system monitors
the operation of the emission con-
trol system.
If the malfunction indicator lamp
comes on
Your vehicle may not pass the
I/M test in the following situa-
tions:
When the malfunction indicator
lamp still remains on after sev-
eral driving trips
If your vehicle does not pass the
I/M test
Page 312 of 468
3106-3. Do-it-yourself maintenance
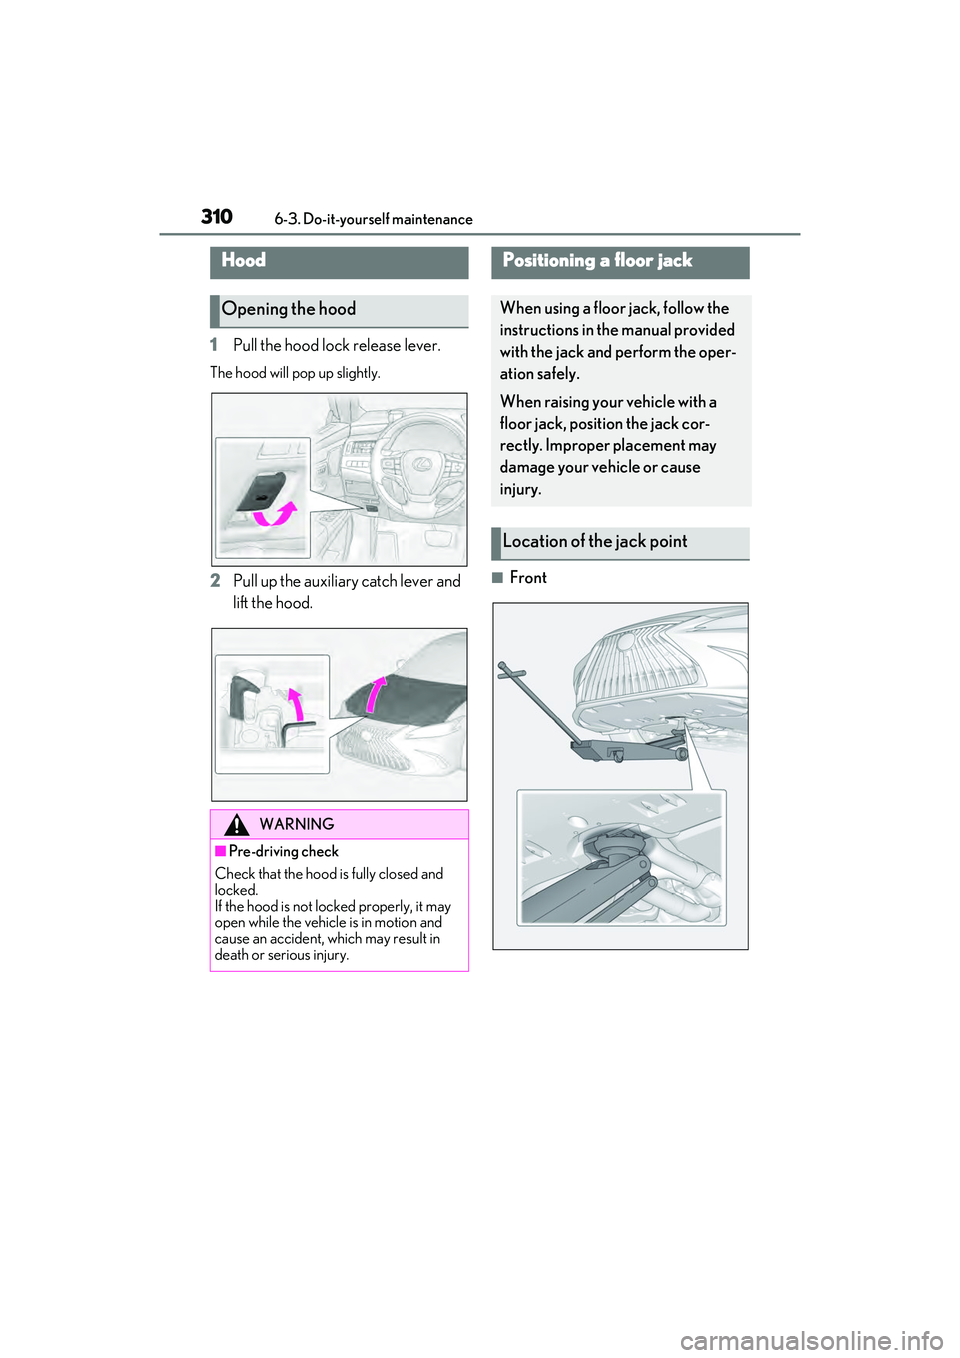
1Pull the hood lock release lever.
The hood will pop up slightly.
2Pull up the auxiliary catch lever and
lift the hood.■Front
Hood
Opening the hood
WARNING
■Pre-driving check
Check that the hood is fully closed and
locked.
If the hood is not locked properly, it may
open while the vehicle is in motion and
cause an accident, which may result in
death or serious injury.
Positioning a floor jack
When using a floor jack, follow the
instructions in the manual provided
with the jack and perform the oper-
ation safely.
When raising your vehicle with a
floor jack, position the jack cor-
rectly. Improper placement may
damage your vehicle or cause
injury.
Location of the jack point
Page 315 of 468

3136-3. Do-it-yourself maintenance
6
Maintenance and care
A25A-FKS engineFuse boxes ( P.335)
Engine oil filler cap ( P.314)
Engine oil level dipstick ( P.313)
Battery ( P.317)
Brake fluid reservoir ( P.317)
Radiator ( P.316)
Electric cooling fan
Condenser ( P.316)
Engine coolant reservoir ( P.316)
Washer fluid tank ( P.319)
With the engine at operating tempera-
ture and turned off, check the oil level
on the dipstick.
■Checking the engine oil
1 Park the vehicle on level ground.
After warming up the en gine and turning it
off, wait more than 5 minutes for the oil to
drain back into the bottom of the engine.
2 Holding a rag under the end, pull
the dipstick out.
A
B
C
D
E
F
G
H
I
J
Checking and adding the engine
oil
Page 316 of 468

3146-3. Do-it-yourself maintenance
2GR-FKS engine
A25A-FKS engine
3 Wipe the dipstick clean.
4 Reinsert the dipstick fully.
5 Holding a rag under the end, pull
the dipstick out and check the oil
level.
Low
Normal
Excessive
The shape of the dipstick may differ
depending on the type of vehicle or engine.
6
Wipe the dipstick and reinsert it
fully.
■Checking the oil type and prepar-
ing the items needed
Make sure to check the oil type and
prepare the items needed before add-
ing oil.
Engine oil selection
P.390
Oil quantity (Low Full)
2GR-FKS engine:
1.9 qt. (1.8 L, 1.6 Imp.qt.)
A25A-FKS engine:
1.6 qt. (1.5 L, 1.3 Imp. qt.)
Item
Clean funnel
■Adding engine oil
If the oil level is below or near the low
level mark, add engine oil of the same
type as that already in the engine.
2GR-FKS engine
A
B
C
Page 317 of 468

3156-3. Do-it-yourself maintenance
6
Maintenance and care
A25A-FKS engine
1 Remove the oil filler cap by turning
it counterclockwise.
2 Add engine oil slowly, checking the
dipstick.
3 Install the oil filler cap by turning it
clockwise.
■Engine oil consumption
A certain amount of engine oil will be con-
sumed while driving. In the following situa-
tions, oil consumption may increase, and
engine oil may need to be refilled in
between oil maintenance intervals.
●When the engine is new, for example
directly after purchasing the vehicle or
after replacing the engine
●If low quality oil or o il of an inappropriate
viscosity is used
●When driving at high engine speeds or
with a heavy load, or when driving while
accelerating or decelerating frequently
●When leaving the engine idling for a long
time, or when driving frequently through
heavy traffic
■After changing the engine oil
The engine oil maintenance data should be
reset. Perform the following procedures:
1 While the vehicle is stopped, press
of the meter control switches.
2 Press or of the meter control
switches, and select . 3
Press or of the meter control
switches, select “Veh icle Settings”, and
then press “OK”.
4 Press or of the meter control
switches, select “Oil Maintenance”, and
then press “OK”.
5 Select “Yes” and then press “OK”.
A message will be displayed on the multi-
information display when the reset proce-
dure has been completed.
WARNING
■Used engine oil
●Used engine oil contains potentially
harmful contaminants which may
cause skin disorders such as inflamma-
tion and skin cancer, so care should be
taken to avoid prolonged and
repeated contact. To remove used
engine oil from your skin, wash thor-
oughly with soap and water.
●Dispose of used oil an d filters only in a
safe and acceptable manner. Do not
dispose of used oil and filters in house-
hold trash, in sewers or onto the
ground.
Call your Lexus dealer, service station
or auto parts store for information
concerning recycling or disposal.
●Do not leave used engine oil within the
reach of children.
NOTICE
■To prevent serious engine damage
Check the oil level on a regular basis.
■When replacing the engine oil
●Be careful not to spill engine oil on the
vehicle components.
●Avoid overfilling, or the engine could
be damaged.
●Check the oil level on the dipstick
every time you refill the vehicle.
Page 318 of 468

3166-3. Do-it-yourself maintenance
The coolant level is satisfactory if it is
between the “F” and “L” lines on the
reservoir when the engine is cold.Reservoir cap
“F” line
“L” line
If the level is on or below the “L” line, add
coolant up to the “F” line. ( P.382)
■Coolant selection
Only use “Toyota Super Long Life Coolant”
or a similar high quality ethylene glycol
based non-silicate, non-amine, non-nitrite,
and non-borate coolant with long-life
hybrid organic acid technology.
U.S.A.:
“Toyota Super Long Life Coolant” is a mix-
ture of 50% coolant and 50% deionized
water. (Minimum temperature: -31°F [-
35°C])
Canada:
“Toyota Super Long Life Coolant” is a mix-
ture of 55% coolant and 45% deionized
water. (Minimum temperature: -44°F [-
42°C])
For more details about engine coolant, con-
tact your Lexus dealer.
■If the coolant level drops within a short
time of replenishing
Visually check the radiator, hoses, engine
coolant reservoir cap, drain cock and water
pump.
If you cannot find a leak, have your Lexus
dealer test the cap and check for leaks in
the cooling system.
Check the radiator and condenser and
clear away any foreign objects.
If either of the above parts is extremely
dirty or you are not sure of their condi-
tion, have your vehicle inspected by
your Lexus dealer.
NOTICE
●Be sure the engine oil filler cap is prop-
erly tightened.
Checking the engine coolant
A
B
C
WARNING
■When the engine is hot
Do not remove the engine coolant reser-
voir cap or the radiator cap. ( P.384)
The cooling system may be under pres-
sure and may spray hot coolant if the cap
is removed, causing serious injuries, such
as burns.
NOTICE
■When adding coolant
Coolant is neither plain water nor
straight antifreeze. The correct mixture
of water and antifreeze must be used to
provide proper lubrication, corrosion
protection and cooling. Be sure to read
the antifreeze or coolant label.
■If you spill coolant
Be sure to wash it off with water to pre-
vent it from damaging parts or paint.
Checking the radiator and con-
denser
Page 319 of 468

3176-3. Do-it-yourself maintenance
6
Maintenance and care
■Checking fluid level
The brake fluid level should be
between the “MAX” and “MIN” lines
on the tank.
■Adding fluid
Make sure to check the fluid type and
prepare the necessary items.
Fluid type
FMVSS No.116 DOT 3 or SAE J1703
brake fluid
FMVSS No.116 DOT 4 or SAE J1704
brake fluid
Item
Clean funnel
■Brake fluid can absorb moisture from
the air
Excess moisture in the brake fluid can
cause a dangerous loss of braking effi-
ciency. Use only newly opened brake fluid.
Check the battery as follows.
■Battery exterior
Make sure that the battery terminals
are not corroded and that there are no
loose connections, cracks, or loose
clamps.
Terminals
Hold-down clamp
WARNING
■When the engine is hot
Do not touch the radiator or condenser
as they may be hot and cause serious
injuries, such as burns.
Checking and adding the brake
fluid
WARNING
■When filling the reservoir
Take care as brake fluid can harm your
hands and eyes and damage painted sur-
faces.
If fluid gets on your hands or in your eyes,
flush the affected area with clean water
immediately.
If you still experience discomfort, see a
doctor.
NOTICE
■If the fluid level is low or high
It is normal for the brake fluid level to go
down slightly as the brake pads wear out
or when the fluid level in the accumulator
is high.
If the reservoir needs frequent refilling,
there may be a serious problem.
Checking the battery
A
B
Page 322 of 468
3206-3. Do-it-yourself maintenance
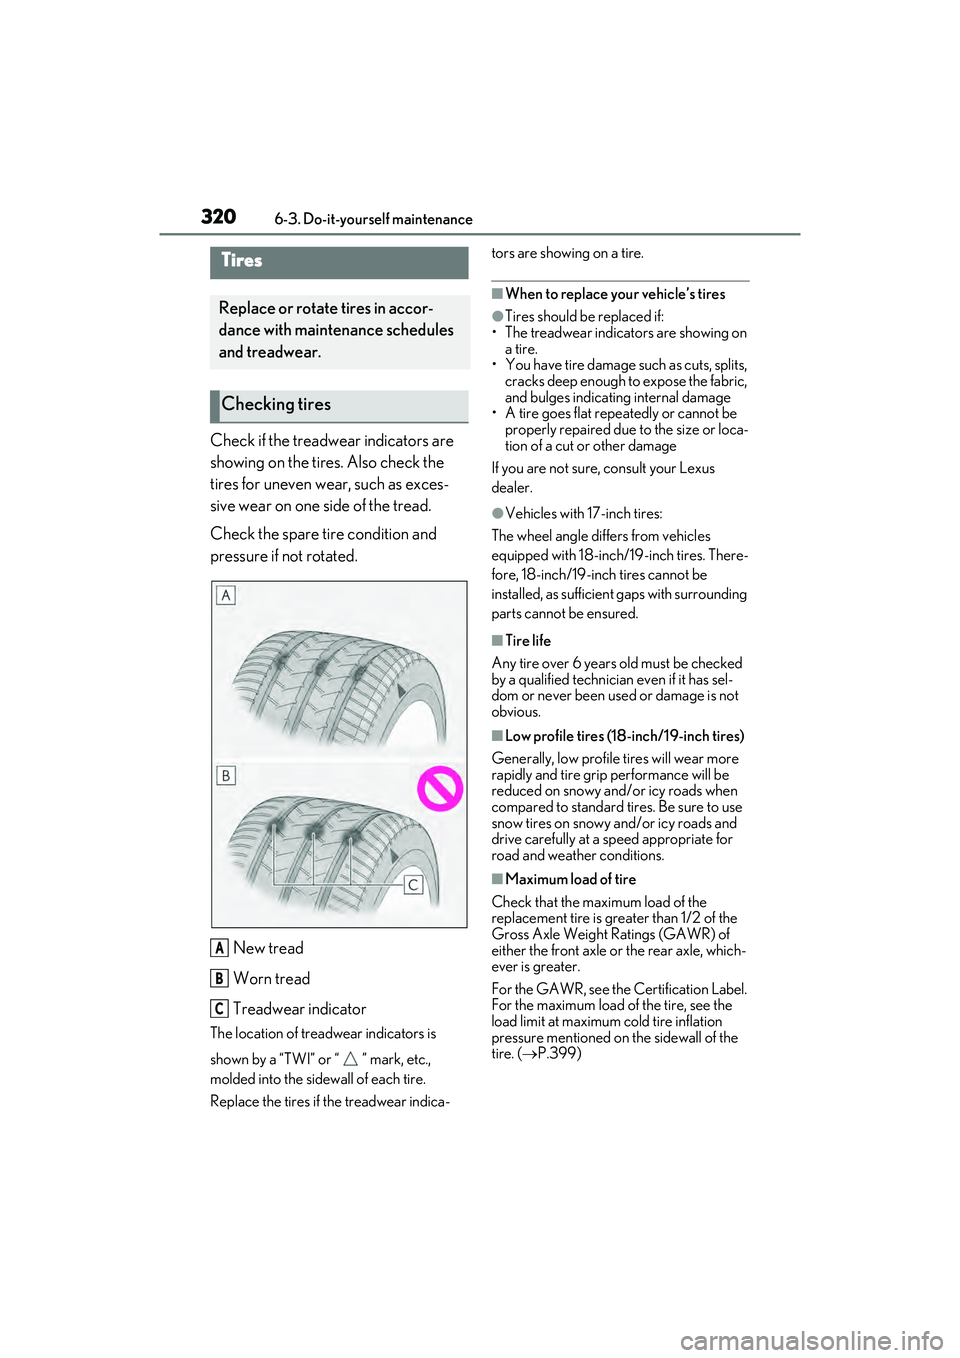
Check if the treadwear indicators are
showing on the tires. Also check the
tires for uneven wear, such as exces-
sive wear on one side of the tread.
Check the spare tire condition and
pressure if not rotated.New tread
Worn tread
Treadwear indicator
The location of treadwear indicators is
shown by a “TWI” or “ ” mark, etc.,
molded into the sidewall of each tire.
Replace the tires if the treadwear indica- tors are showing on a tire.
■When to replace your vehicle’s tires
●Tires should be replaced if:
• The treadwear indicators are showing on
a tire.
• You have tire damage such as cuts, splits, cracks deep enough to expose the fabric,
and bulges indicating internal damage
• A tire goes flat repeatedly or cannot be properly repaired due to the size or loca-
tion of a cut or other damage
If you are not sure, consult your Lexus
dealer.
●Vehicles with 17-inch tires:
The wheel angle differs from vehicles
equipped with 18-inch/19-inch tires. There-
fore, 18-inch/19-inch tires cannot be
installed, as sufficient gaps with surrounding
parts cannot be ensured.
■Tire life
Any tire over 6 years old must be checked
by a qualified technician even if it has sel-
dom or never been used or damage is not
obvious.
■Low profile tires (18-inch/19-inch tires)
Generally, low profile tires will wear more
rapidly and tire grip performance will be
reduced on snowy and/or icy roads when
compared to standard tires. Be sure to use
snow tires on snowy and/or icy roads and
drive carefully at a speed appropriate for
road and weather conditions.
■Maximum load of tire
Check that the maximum load of the
replacement tire is greater than 1/2 of the
Gross Axle Weight Ratings (GAWR) of
either the front axle or the rear axle, which-
ever is greater.
For the GAWR, see the Certification Label.
For the maximum load of the tire, see the
load limit at maximum cold tire inflation
pressure mentioned on the sidewall of the
tire. ( P.399)
Tires
Replace or rotate tires in accor-
dance with maintenance schedules
and treadwear.
Checking tires
A
B
C
Page 323 of 468
3216-3. Do-it-yourself maintenance
6
Maintenance and care
■Tire types
●Summer tires
Summer tires are high-speed perfor-
mance tires best suited to highway driv-
ing under dry conditions. Since summer
tires do not have the same traction per-
formance as snow tires, summer tires are
inadequate for driving on snow-covered
or icy roads. For driving on snow-cov-
ered roads or icy roads, the use of snow
tires is recommended. When installing
snow tires, be sure to replace all four
tires.
●All season tires
All season tires are designed to provide
better traction in snow and to be ade-
quate for driving in most winter condi-
tions as well as for use year-round. All
season tires, however, do not have ade-
quate traction performance compared
with snow tires in heavy or loose snow.
Also, all season tires fall short in accelera-
tion and handling performance com-
pared with summer tires in highway
driving.
●Snow tires
For driving on snow-covered roads or icy
roads, we recommend using snow tires. If
you need snow tires, select tires of the
same size, construction and load capacity
as the originally installed tires. Since your
vehicle has radial tires as original equip-
ment, make sure your snow tires also
have radial construction. Do not install
studded tires without first checking local
regulations for possible restrictions.
Snow tires should be installed on all
wheels. ( P.251)
■If the tread on snow tires wears down
below 0.16 in. (4 mm)
The effectiveness of the tires as snow tires is
lost.
WARNING
■When inspecting or replacing tires
Observe the following precautions to
prevent accidents.
Failure to do so may cause damage to
parts of the drivetrain as well as danger-
ous handling characteristics, which may
lead to an accident resulting in death or
serious injury.
●Do not mix tires of different makes,
models or tread patterns.
Also, do not mix tires of remarkably
different treadwear.
●Do not use tire sizes other than those
recommended by Lexus.
●Do not mix differently constructed
tires (radial, bias-belted or bias-ply
tires).
●Do not tow if your vehicle has a com-
pact spare tire installed.
●Do not mix summer, all season and
snow tires.
●Do not use tires that have been used
on another vehicle.
Do not use tires if you do not know
how they were used previously.
NOTICE
■Driving on rough roads
Take particular care when driving on
roads with loose surfaces or potholes.
These conditions may cause losses in tire
inflation pressure, reducing the cushion-
ing ability of the tires. In addition, driving
on rough roads may cause damage to
the tires themselves, as well as the vehi-
cle’s wheels and body.
■Low profile tires (18-inch/19-inch
tires)
Low profile tires may cause greater dam-
age than usual to the tire wheel when
sustaining impact from the road surface.
Therefore, pay attention to the following:
Page 324 of 468

3226-3. Do-it-yourself maintenance
Rotate the tires in the order shown.
To equalize tire wear and extend tire life,
Lexus recommends that tire rotation is car-
ried out at the same interval as tire inspec-
tion.
Do not fail to initialize the tire pressure
warning system after tire rotation.
■When rotating the tires
Make sure that the engine switch is off. If the
tires are rotated while the engine switch is
in IGNITION ON mode, the tire position
information will not be updated.
If this accidentally occurs, either turn the
engine switch to off and then to IGNITION
ON mode, or initialize the system after
checking that the tire pressure is properly
adjusted.
Your vehicle is equipped with a tire
pressure warning system that uses tire
pressure warning valves and transmit-
ters to detect low tire inflation pressure
before serious problems arise.
If the tire pressure drops below a
predetermined level, the driver is
warned by a screen display and a
warning light. ( P.355)
The tire pressure detected by the
tire pressure warning system can be
displayed on the multi-information
display. ( P.76)
The illustration used is intended as an
example, and may differ from the image
that is actually displayed on the multi-infor-
mation display.
■Routine tire inflation pressure checks
The tire pressure warning system does not
replace routine tire inflation pressure
checks. Make sure to check tire inflation
pressure as part of your routine of daily
vehicle checks.
■Tire inflation pressure
●It may take a few minutes to display the
tire inflation pressure after the engine
switch is turned to IGNITION ON
mode.
It may also take a few minutes to display
the tire inflation pressure after inflation
pressure has been adjusted.
NOTICE
●Be sure to use proper tire inflation
pressure. If tires are under-inflated,
they may be damaged more severely.
●Avoid potholes, uneven pavement,
curbs and other road hazards. Failure
to do so may lead to severe tire and
wheel damage.
■If tire inflation pressure of each tire
becomes low while driving
Do not continue driving, or your tires
and/or wheels may be ruined.
Tire rotation
Tire pressure warning system