check LEXUS ES350 2022 Manual PDF
[x] Cancel search | Manufacturer: LEXUS, Model Year: 2022, Model line: ES350, Model: LEXUS ES350 2022Pages: 468, PDF Size: 26.96 MB
Page 330 of 468
3286-3. Do-it-yourself maintenance
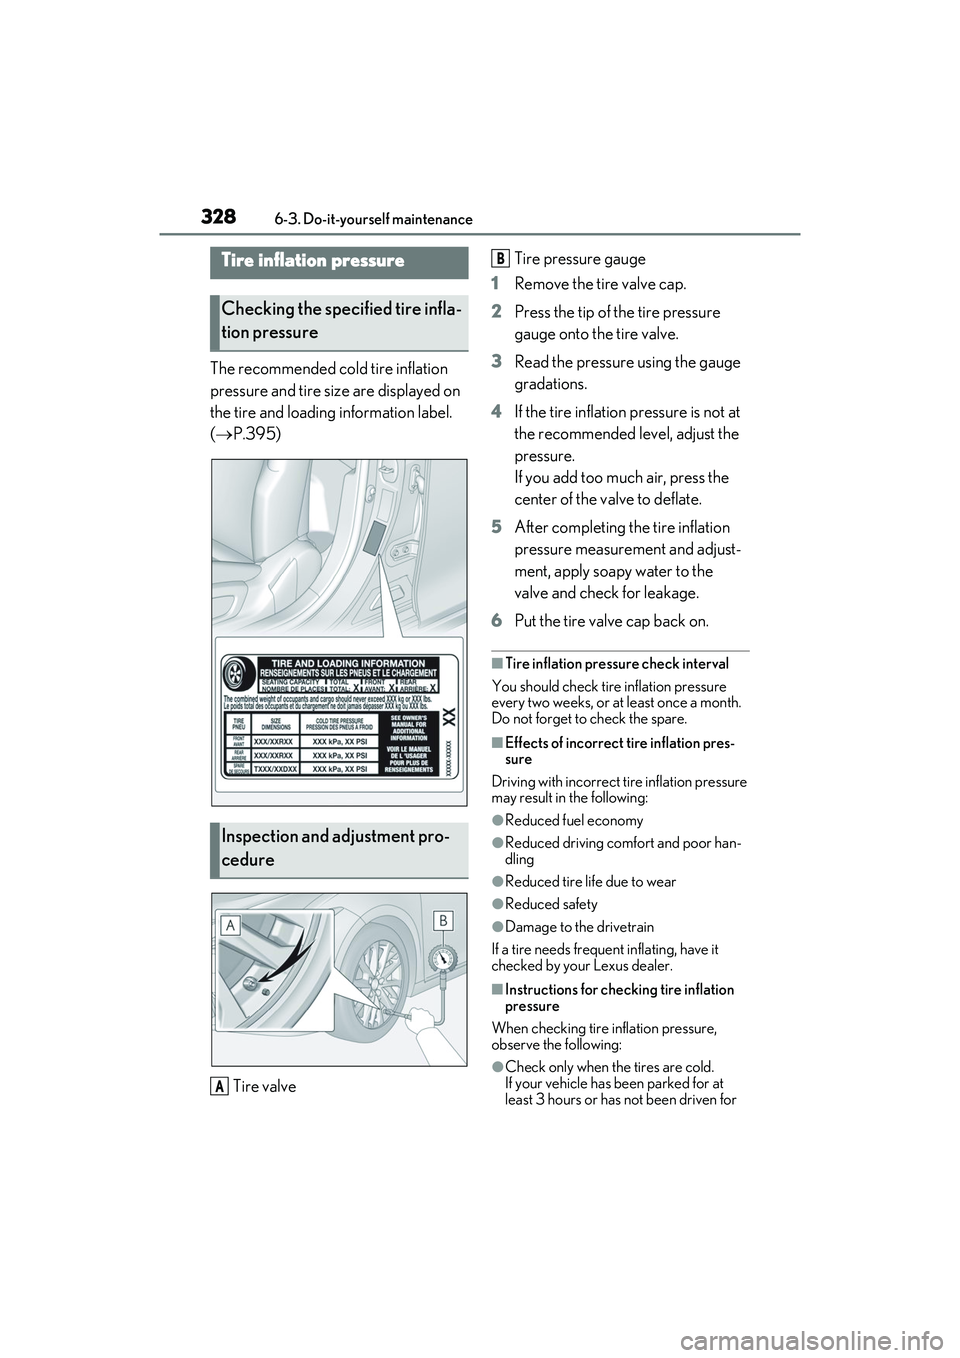
The recommended cold tire inflation
pressure and tire size are displayed on
the tire and loading information label.
( P.395)
Tire valve Tire pressure gauge
1 Remove the tire valve cap.
2 Press the tip of the tire pressure
gauge onto the tire valve.
3 Read the pressure using the gauge
gradations.
4 If the tire inflation pressure is not at
the recommended level, adjust the
pressure.
If you add too much air, press the
center of the valve to deflate.
5 After completing the tire inflation
pressure measurement and adjust-
ment, apply soapy water to the
valve and check for leakage.
6 Put the tire valve cap back on.
■Tire inflation pressure check interval
You should check tire inflation pressure
every two weeks, or at least once a month.
Do not forget to check the spare.
■Effects of incorrect tire inflation pres-
sure
Driving with incorrect tire inflation pressure
may result in the following:
●Reduced fuel economy
●Reduced driving comfort and poor han-
dling
●Reduced tire life due to wear
●Reduced safety
●Damage to the drivetrain
If a tire needs frequent inflating, have it
checked by your Lexus dealer.
■Instructions for checking tire inflation
pressure
When checking tire inflation pressure,
observe the following:
●Check only when the tires are cold.
If your vehicle has been parked for at
least 3 hours or has not been driven for
Tire inflation pressure
Checking the specifi ed tire infla-
tion pressure
Inspection and adjustment pro-
cedure
A
B
Page 332 of 468
3306-3. Do-it-yourself maintenance
When replacing wheels, care should
be taken to ensure that they are equiv-
alent to those removed in load capac-
ity, diameter, rim width and inset
*.
Replacement wheels are available at
your Lexus dealer.
*: Conventionally referred to as offset.
Lexus does not recommend using the
following:
Wheels of different sizes or types
Used wheels
Bent wheels that have been
straightened
■When replacing wheels
The wheels of your vehicle are equipped
with tire pressure warning valves and trans-
mitters that allow the tire pressure warning
system to provide advance warning in the
event of a loss in tire inflation pressure.
Whenever wheels are replaced, tire pres-
sure warning valves and transmitters must
be installed. ( P.323) Use only Lexus wheel nuts and
wrenches designed for use with
your aluminum wheels.
When rotating, repairing or chang-
ing your tires, check that the wheel
nuts are still tight after driving 1000
miles (1600 km).
Vehicles with 17-inch tires: Be care-
ful not to damage the aluminum
wheels when using tire chains.
Use only Lexus genuine balance
weights or equivalent and a plastic
or rubber hammer when balancing
Wheels
If a wheel is bent, cracked or heav-
ily corroded, it should be replaced.
Otherwise, the tire may separate
from the wheel or cause a loss of
handling control.
Wheel selection
WARNING
■When replacing wheels
●Do not use wheels that are a different
size from those recommended in the
Owner’s Manual, as this may result in a
loss of handling control.
●Never use an inner tube in a leaking
wheel which is designed for a tubeless
tire. Doing so may result in an acci-
dent, causing death or serious injury.
■Use of defective wheels prohibited
Do not use cracked or deformed wheels.
Doing so could cause the tire to leak air
during driving, possibly causing an acci-
dent.
NOTICE
■Replacing tire pressure warning
valves and transmitters
●Because tire repair or replacement
may affect the tire pressure warning
valves and transmitters, make sure to
have tires serviced by your Lexus
dealer or other qualified service shop.
In addition, make sure to purchase
your tire pressure warning valves and
transmitters at your Lexus dealer.
●Ensure that only genuine Lexus wheels
are used on your vehicle.
Tire pressure warning valves and
transmitters may not work properly
with non-genuine wheels.
Aluminum wheel precautions
Page 334 of 468
3326-3. Do-it-yourself maintenance
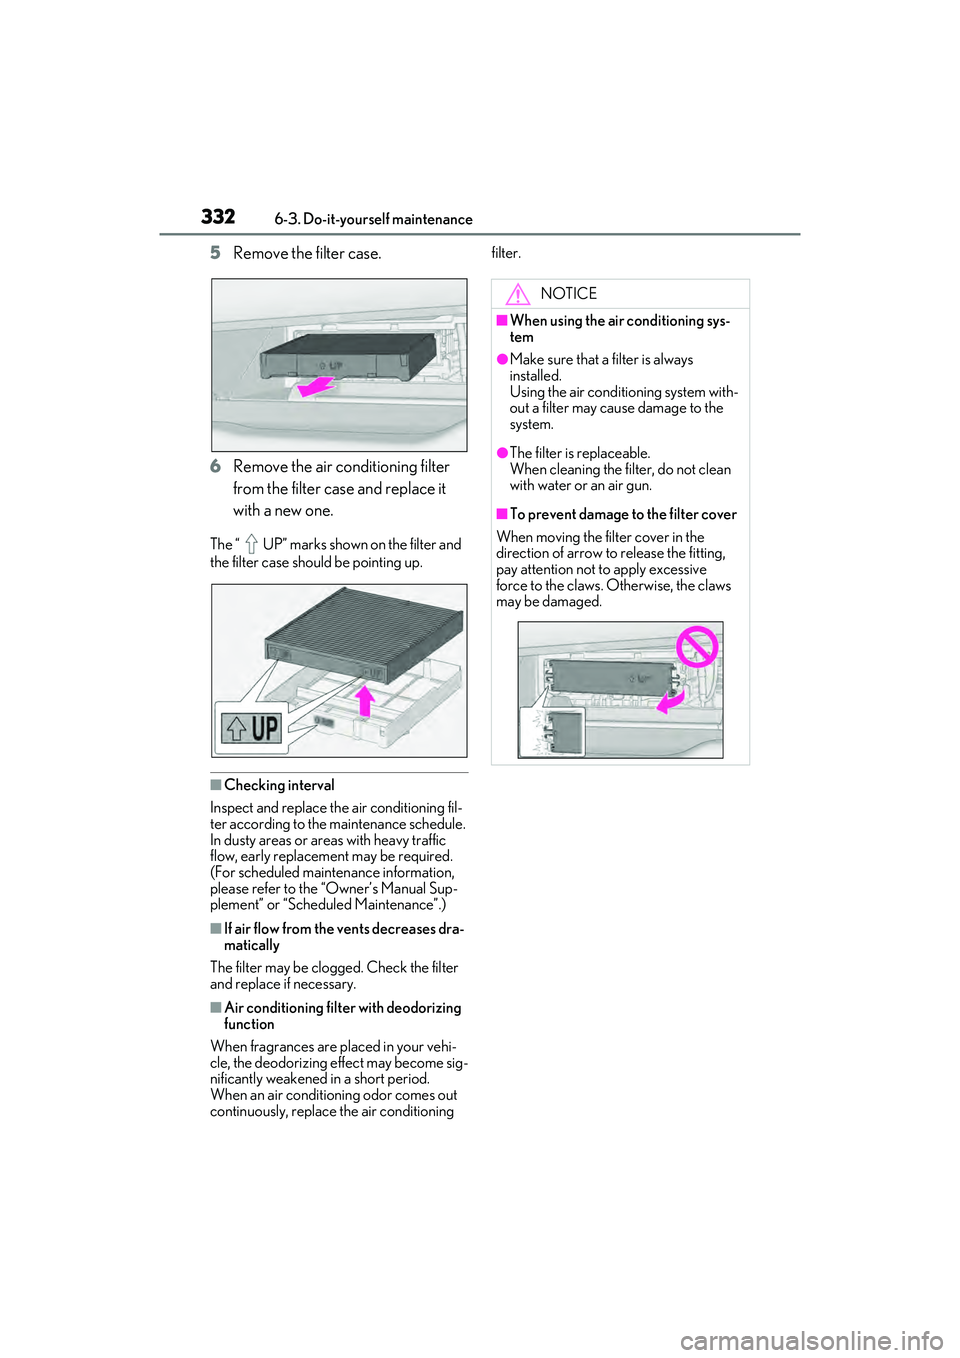
5Remove the filter case.
6 Remove the air conditioning filter
from the filter case and replace it
with a new one.
The “ UP” marks shown on the filter and
the filter case should be pointing up.
■Checking interval
Inspect and replace the air conditioning fil-
ter according to the maintenance schedule.
In dusty areas or areas with heavy traffic
flow, early replacement may be required.
(For scheduled maintenance information,
please refer to the “Owner’s Manual Sup-
plement” or “Scheduled Maintenance”.)
■If air flow from the vents decreases dra-
matically
The filter may be clogged. Check the filter
and replace if necessary.
■Air conditioning filter with deodorizing
function
When fragrances are placed in your vehi-
cle, the deodorizing effect may become sig-
nificantly weakened in a short period.
When an air conditioning odor comes out
continuously, replace the air conditioning filter.
NOTICE
■When using the air conditioning sys-
tem
●Make sure that a filter is always
installed.
Using the air conditioning system with-
out a filter may cause damage to the
system.
●The filter is replaceable.
When cleaning the filter, do not clean
with water or an air gun.
■To prevent damage to the filter cover
When moving the filter cover in the
direction of arrow to release the fitting,
pay attention not to apply excessive
force to the claws. Otherwise, the claws
may be damaged.
Page 337 of 468

3356-3. Do-it-yourself maintenance
6
Maintenance and care
1Turn the engine switch off.
2 Open the Fuse box cover.
Engine compartment: type A fuse
box
Push the tab in and lift the lid off.
Engine compartment: type B fuse
box
Push the tab in and lift the lid off.
Driver’s side instrument panel
Push the tab in and remove the lid. Make sure to push the tab in during
removal or installation.
3
Remove the fuse with the pullout
tool.
Only type A fuses can be removed using
the pullout tool.
4Check if the fuse is blown.
Type A and B:
Replace the blown fuse with a new fuse of
an appropriate amperage rating. The
amperage rating can be found on the fuse
box lid.
Type C:
Contact your Lexus dealer.
Type A
Checking and replacing
fuses
If any of the electrical components
do not operate, a fuse may have
blown. If this happens, check and
replace the fuses as necessary.
Checking and replacing fuses
Page 339 of 468
3376-3. Do-it-yourself maintenance
6
Maintenance and care
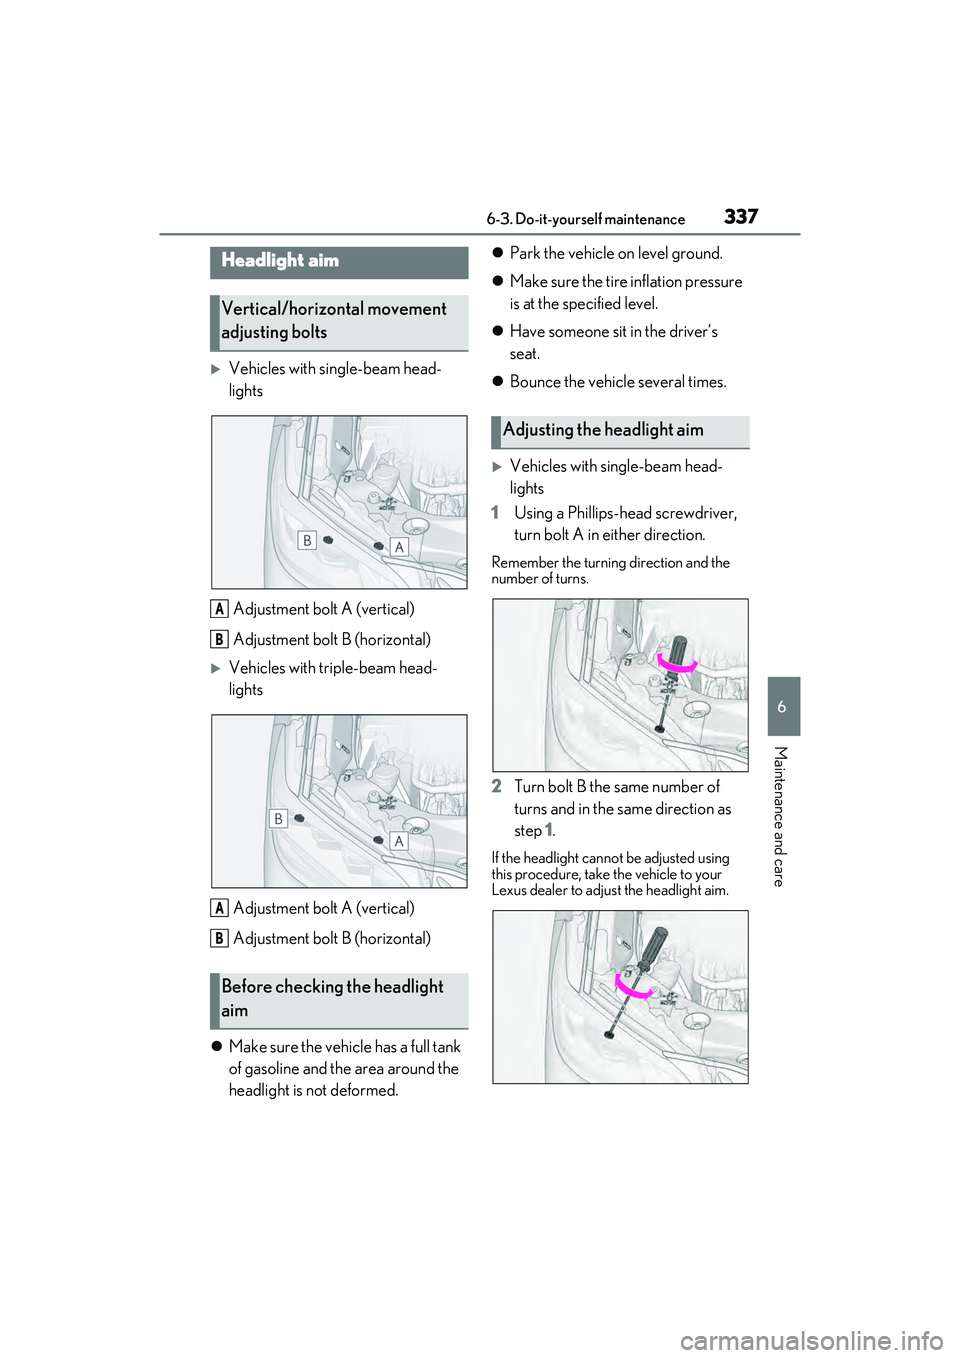
Vehicles with single-beam head-
lightsAdjustment bolt A (vertical)
Adjustment bolt B (horizontal)
Vehicles with triple-beam head-
lightsAdjustment bolt A (vertical)
Adjustment bolt B (horizontal)
Make sure the vehicle has a full tank
of gasoline and the area around the
headlight is not deformed.
Park the vehicle on level ground.
Make sure the tire inflation pressure
is at the specified level.
Have someone sit in the driver’s
seat.
Bounce the vehicle several times.
Vehicles with single-beam head-
lights
1 Using a Phillips-head screwdriver,
turn bolt A in either direction.
Remember the turning direction and the
number of turns.
2Turn bolt B the same number of
turns and in the same direction as
step 1.
If the headlight cannot be adjusted using
this procedure, take the vehicle to your
Lexus dealer to adjust the headlight aim.
Headlight aim
Vertical/horizontal movement
adjusting bolts
Before checking the headlight
aim
A
B
A
B
Adjusting the headlight aim
Page 340 of 468
3386-3. Do-it-yourself maintenance
Vehicles with triple-beam head-
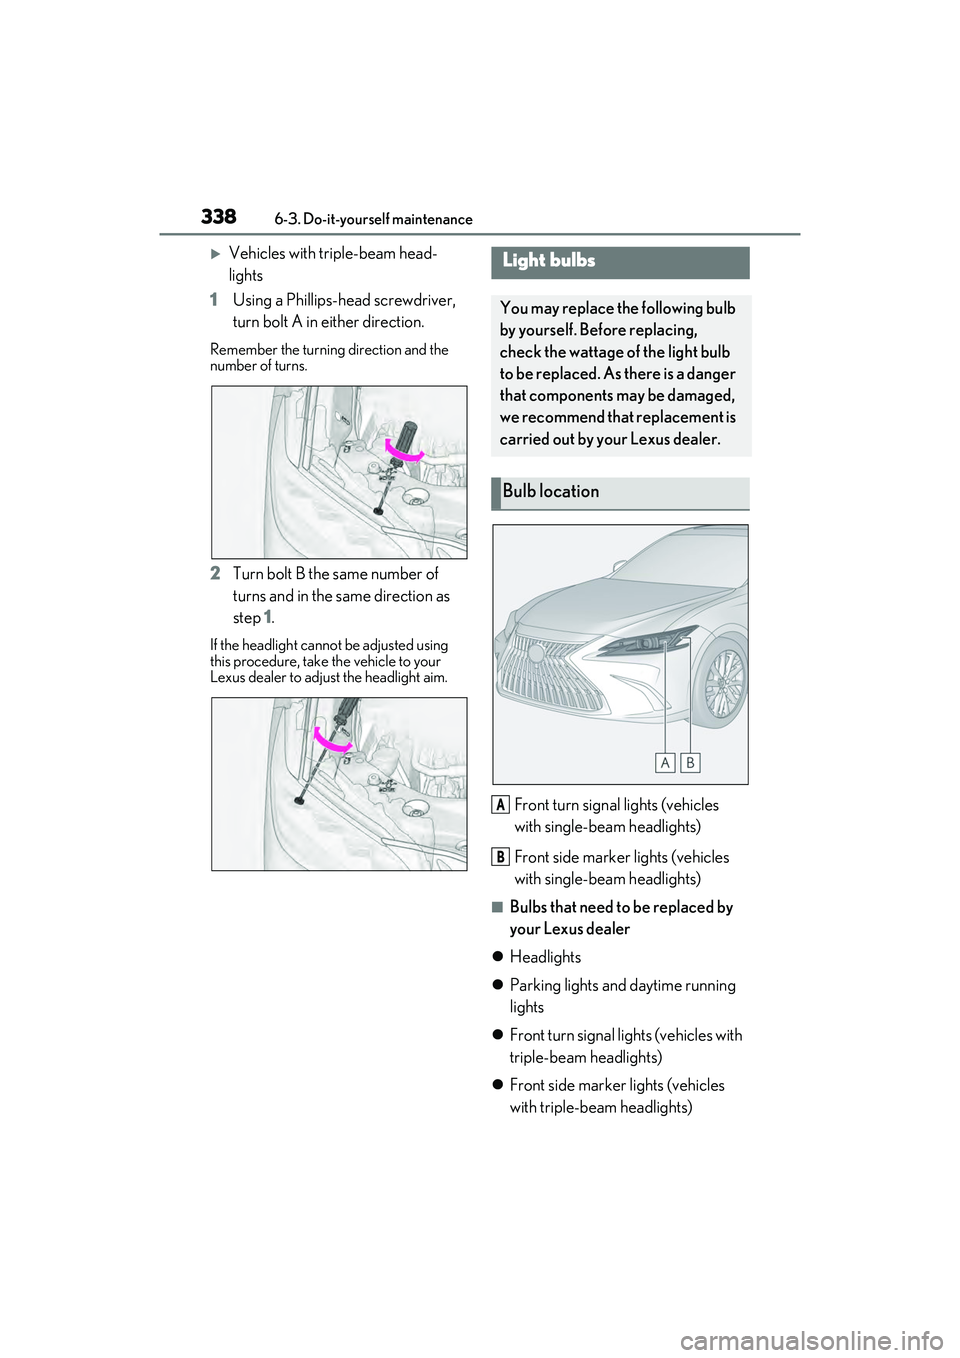
lights
1 Using a Phillips-head screwdriver,
turn bolt A in either direction.
Remember the turning direction and the
number of turns.
2Turn bolt B the same number of
turns and in the same direction as
step 1.
If the headlight cannot be adjusted using
this procedure, take the vehicle to your
Lexus dealer to adjust the headlight aim.
Front turn signal lights (vehicles
with single-beam headlights)
Front side marker lights (vehicles
with single-beam headlights)
■Bulbs that need to be replaced by
your Lexus dealer
Headlights
Parking lights and daytime running
lights
Front turn signal lights (vehicles with
triple-beam headlights)
Front side marker lights (vehicles
with triple-beam headlights)
Light bulbs
You may replace the following bulb
by yourself. Before replacing,
check the wattage of the light bulb
to be replaced. As there is a danger
that components may be damaged,
we recommend that replacement is
carried out by your Lexus dealer.
Bulb location
A
B
Page 343 of 468

3416-3. Do-it-yourself maintenance
6
Maintenance and care
bumper.
8Engage the clips to the front
bumper to install the fender liner,
and then remove the protective
tape.
WARNING
■Replacing light bulb
●Turn off the light. Do not attempt to
replace the bulb immediately after
turning off the light.
The bulb become very hot and may
cause burns.
●Do not touch the glass portion of the
light bulb with bare hands. When it is
unavoidable to hold the glass portion,
use and hold with a clean dry cloth to
avoid getting moisture and oils on the
bulb.
Also, if the bulb is scratched or
dropped, it may blow out or crack.
●Fully install light bulb and any parts
used to secure it. Failure to do so may
result in heat damage, fire, or water
entering the light unit. This may dam-
age the light or cause condensation to
build up on the lens.
■To prevent damage or fire
●Make sure bulb is fully seated and
locked.
●Check the wattage of the bulb before
installing to prevent heat damage.
Page 357 of 468
3557-2. Steps to take in an emergency
7
When trouble arises
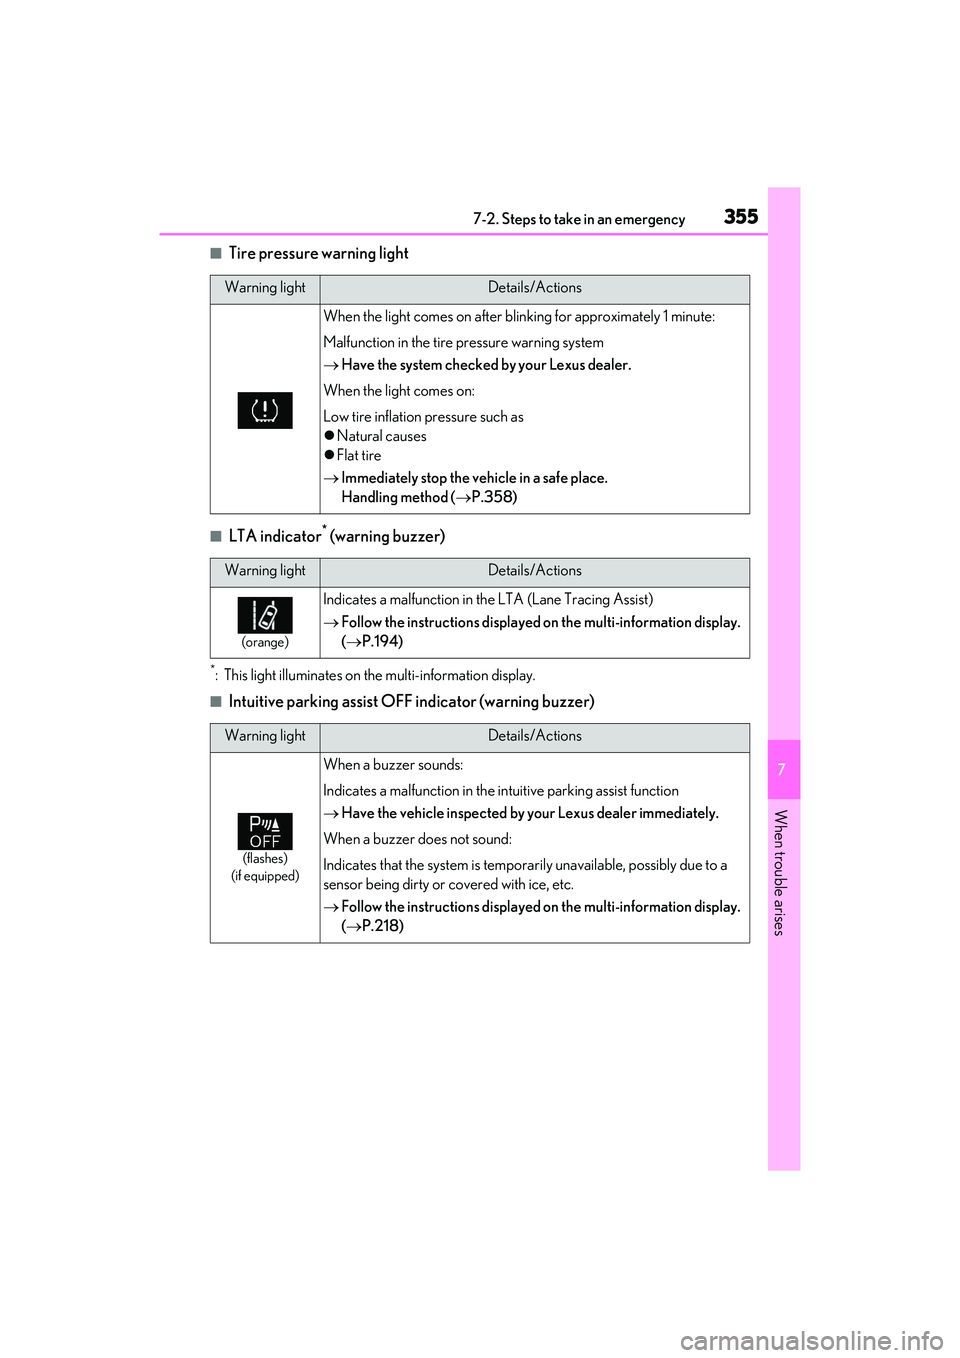
■Tire pressure warning light
■LTA indicator* (warning buzzer)
*: This light illuminates on the multi-information display.
■Intuitive parking assist OFF indicator (warning buzzer)
Warning lightDetails/Actions
When the light comes on after blinking for approximately 1 minute:
Malfunction in the tire pressure warning system
Have the system checked by your Lexus dealer.
When the light comes on:
Low tire inflation pressure such as
Natural causes
Flat tire
Immediately stop the vehicle in a safe place.
Handling method ( P.358)
Warning lightDetails/Actions
(orange)
Indicates a malfunction in the LTA (Lane Tracing Assist)
Follow the instructions displayed on the multi-information display.
( P.194)
Warning lightDetails/Actions
(flashes)
(if equipped)
When a buzzer sounds:
Indicates a malfunction in the intuitive parking assist function
Have the vehicle inspected by your Lexus dealer immediately.
When a buzzer does not sound:
Indicates that the system is temporarily unavailable, possibly due to a
sensor being dirty or covered with ice, etc.
Follow the instructions displayed on the multi-information display.
( P.218)
Page 360 of 468
3587-2. Steps to take in an emergency
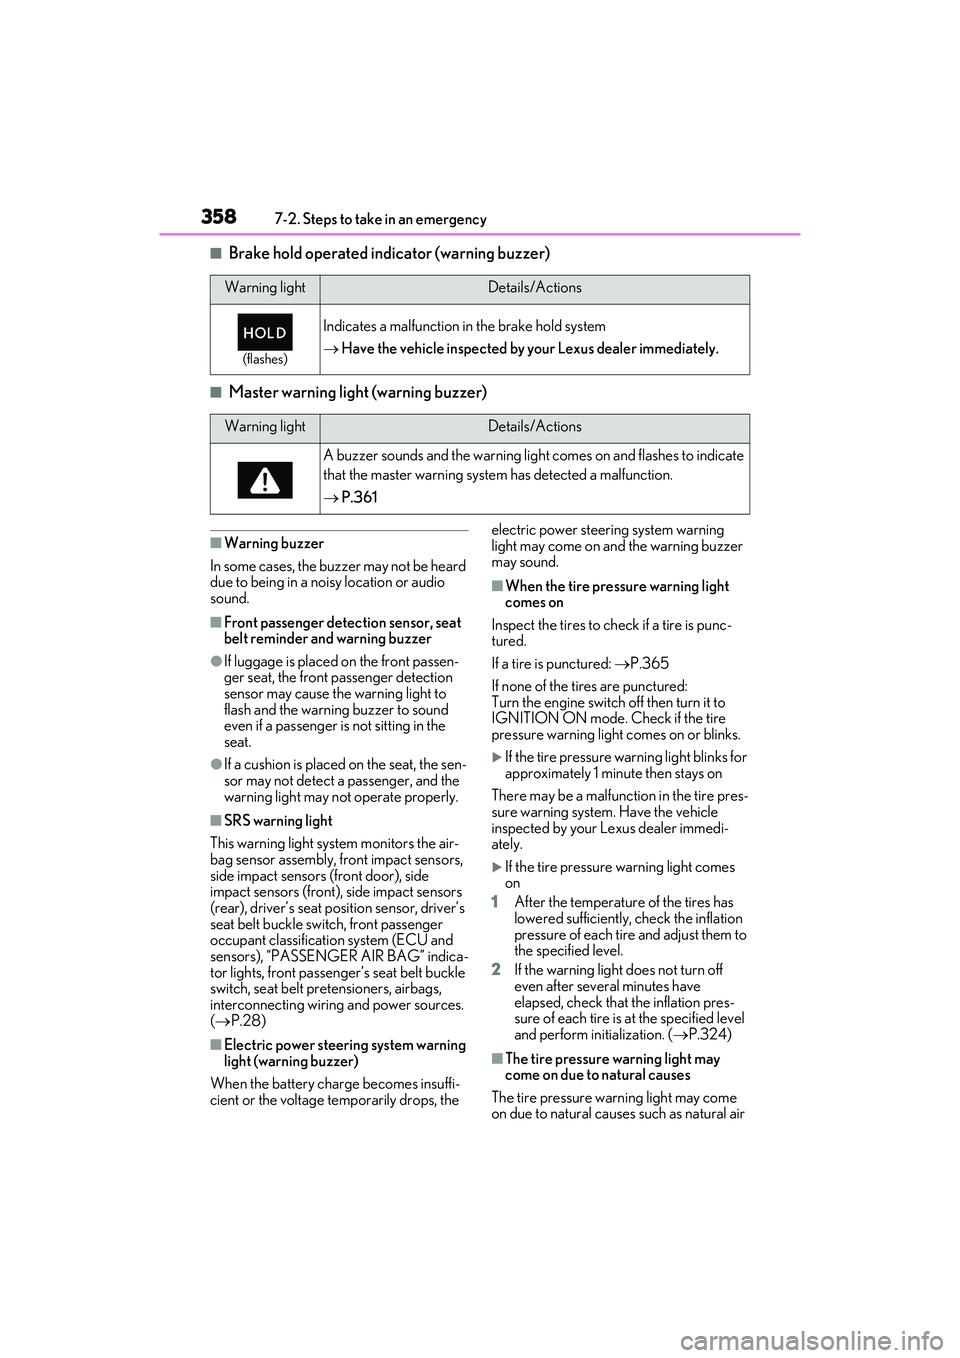
■Brake hold operated indicator (warning buzzer)
■Master warning light (warning buzzer)
■Warning buzzer
In some cases, the buzzer may not be heard
due to being in a noisy location or audio
sound.
■Front passenger detection sensor, seat
belt reminder and warning buzzer
●If luggage is placed on the front passen-
ger seat, the front passenger detection
sensor may cause the warning light to
flash and the warning buzzer to sound
even if a passenger is not sitting in the
seat.
●If a cushion is placed on the seat, the sen-
sor may not detect a passenger, and the
warning light may not operate properly.
■SRS warning light
This warning light system monitors the air-
bag sensor assembly, front impact sensors,
side impact sensors (front door), side
impact sensors (front), side impact sensors
(rear), driver’s seat position sensor, driver’s
seat belt buckle switch, front passenger
occupant classification system (ECU and
sensors), “PASSENGER AIR BAG” indica-
tor lights, front passenger’s seat belt buckle
switch, seat belt pret ensioners, airbags,
interconnecting wiring and power sources.
( P.28)
■Electric power steering system warning
light (warning buzzer)
When the battery charge becomes insuffi-
cient or the voltage temporarily drops, the electric power steering system warning
light may come on and the warning buzzer
may sound.
■When the tire pressure warning light
comes on
Inspect the tires to check if a tire is punc-
tured.
If a tire is punctured: P.365
If none of the tires are punctured:
Turn the engine switch off then turn it to
IGNITION ON mode. Check if the tire
pressure warning light comes on or blinks.
If the tire pressure warning light blinks for
approximately 1 minute then stays on
There may be a malfunction in the tire pres-
sure warning system. Have the vehicle
inspected by your Lexus dealer immedi-
ately.
If the tire pressure warning light comes
on
1 After the temperature of the tires has
lowered sufficiently, check the inflation
pressure of each tire and adjust them to
the specified level.
2 If the warning light does not turn off
even after several minutes have
elapsed, check that the inflation pres-
sure of each tire is at the specified level
and perform initialization. ( P.324)
■The tire pressure warning light may
come on due to natural causes
The tire pressure warning light may come
on due to natural causes such as natural air
Warning lightDetails/Actions
(flashes)
Indicates a malfunction in the brake hold system
Have the vehicle inspected by your Lexus dealer immediately.
Warning lightDetails/Actions
A buzzer sounds and the warning light comes on and flashes to indicate
that the master warning system has detected a malfunction.
P.361
Page 361 of 468
3597-2. Steps to take in an emergency
7
When trouble arises
leaks and tire inflation pressure changes
caused by temperature. In this case, adjust-
ing the tire inflation pressure will turn off the
warning light (after a few minutes).
■When a tire is replaced with a spare tire
The compact spare tire is not equipped with
a tire pressure warnin g valve and transmit-
ter. If a tire goes flat, the tire pressure warn-
ing light will not turn off even though the flat
tire has been replaced with the spare tire.
Replace the spare tire with the repaired tire
and adjust the tire inflation pressure. The
tire pressure warning light will go off after a
few minutes.
■Conditions that the tire pressure warn-
ing system may not function properly
P.323
WARNING
■If both the ABS and the brake system
warning lights remain on
Stop your vehicle in a safe place immedi-
ately and contact your Lexus dealer.
The vehicle will become extremely
unstable during braking, and the ABS
system may fail, which could cause an
accident resulting in death or serious
injury.
■When the electric power steering
system warning light comes on
When the light comes on yellow, the
assist to the power st eering is restricted.
When the light comes on red, the assist
to the power steering is lost and handling
operations of the steering wheel become
extremely heavy.
When steering wheel operations are
heavier than usual, grip the steering
wheel firmly and operate it using more
force than usual.
■If the tire pressure warning light
comes on
Be sure to observe the following precau-
tions.
Failure to do so could cause a loss of
vehicle control and result in death or
serious injury.
●Stop your vehicle in a safe place as
soon as possible. Check and adjust the
tire inflation pressure immediately.
●If the tire pressure warning light comes
on even after tire inflation pressure
adjustment, it is probable that you have
a flat tire. Check the tires. If a tire is flat,
change it with the spare tire and have
the flat tire repaired by the nearest
Lexus dealer.
●Avoid abrupt maneuvering and brak-
ing.
If the vehicle tires deteriorate, you
could lose control of the steering
wheel or the brakes.
■If a blowout or sudden air leakage
should occur
The tire pressure warning system may
not activate immediately.
■Maintenance of the tires
Each tire, including the spare (if pro-
vided), should be checked monthly when
cold and inflated to the inflation pressure
recommended by the vehicle manufac-
turer on the vehicle placard or tire infla-
tion pressure label (tire and load
information label). (If your vehicle has
tires of a different size than the size indi-
cated on the vehicle placard or tire infla-
tion pressure label [tire and load
information label], you should determine
the proper tire inflation pressure for
those tires.)