Lexus GS350 2009 Owner's Manual
Manufacturer: LEXUS, Model Year: 2009, Model line: GS350, Model: Lexus GS350 2009Pages: 622, PDF Size: 17.98 MB
Page 341 of 622
340
3-4. Using the hands-free system (for cellular phone)
GS_G_U (OM30B43U)
April 27, 2009 10:48 am
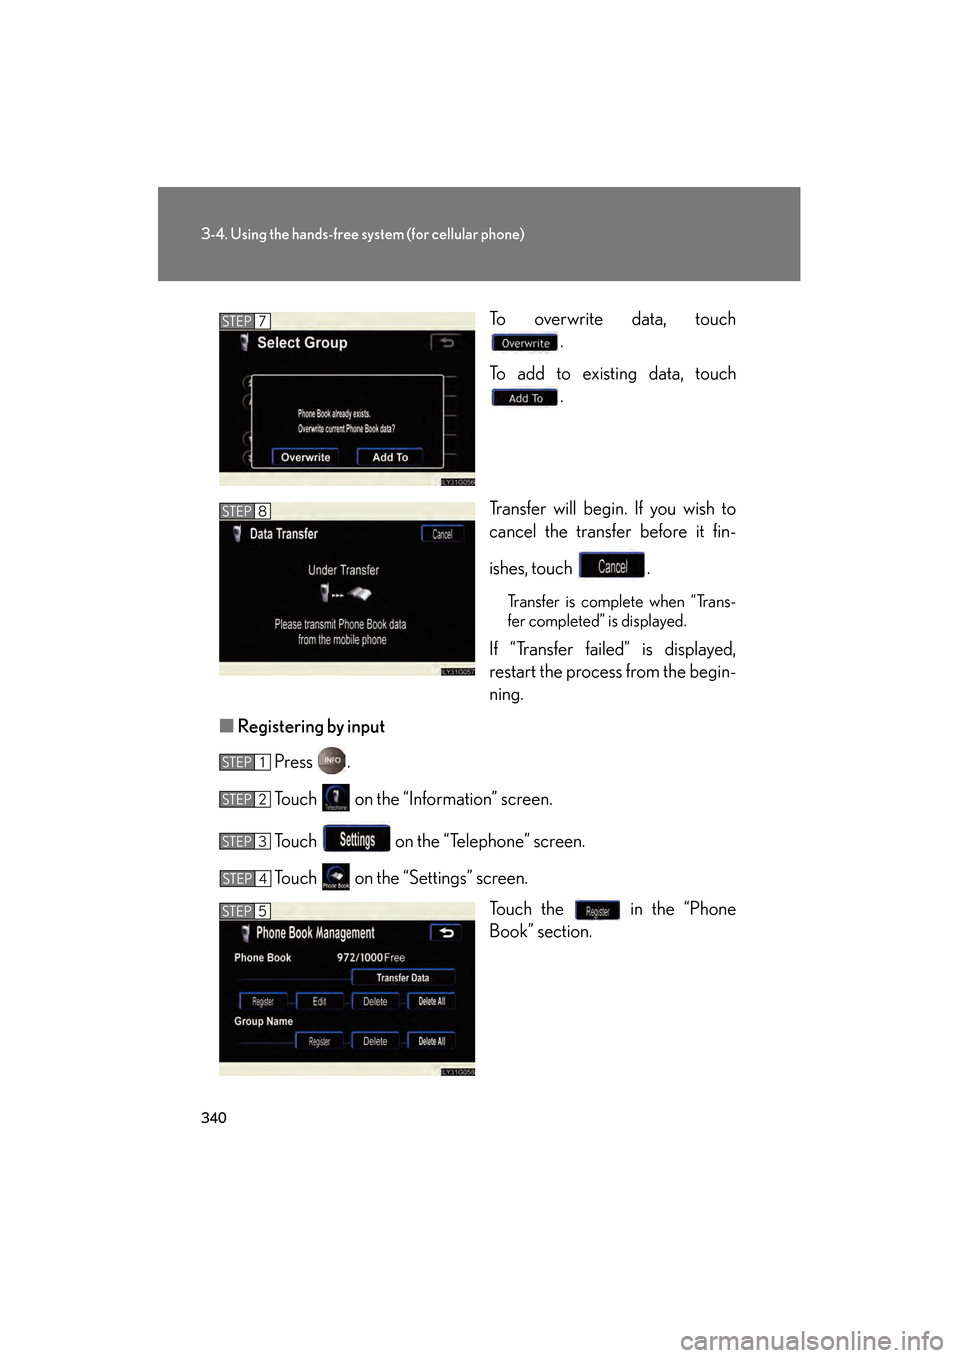
To overwrite data, touch.
To add to existing data, touch .
Transfer will begin. If you wish to
cancel the transfer before it fin-
ishes, touch .
Transfer is complete when “Trans-
fer completed” is displayed.
If “Transfer failed” is displayed,
restart the process from the begin-
ning.
■ Registering by input
Press .
Touch on the “Information” screen.
Touch on the “Telephone” screen.
Touch on the “Settings” screen. Touch the in the “Phone
Book” section.
STEP7
STEP8
STEP1
STEP2
STEP3
STEP4
STEP5
GS_U_G.book Page 340 Monday, April 27, 2009 10:50 AM
Page 342 of 622
341
3-4. Using the hands-free system (for cellular phone)
3
Interior features
GS_G_U (OM30B43U)
April 27, 2009 10:48 am
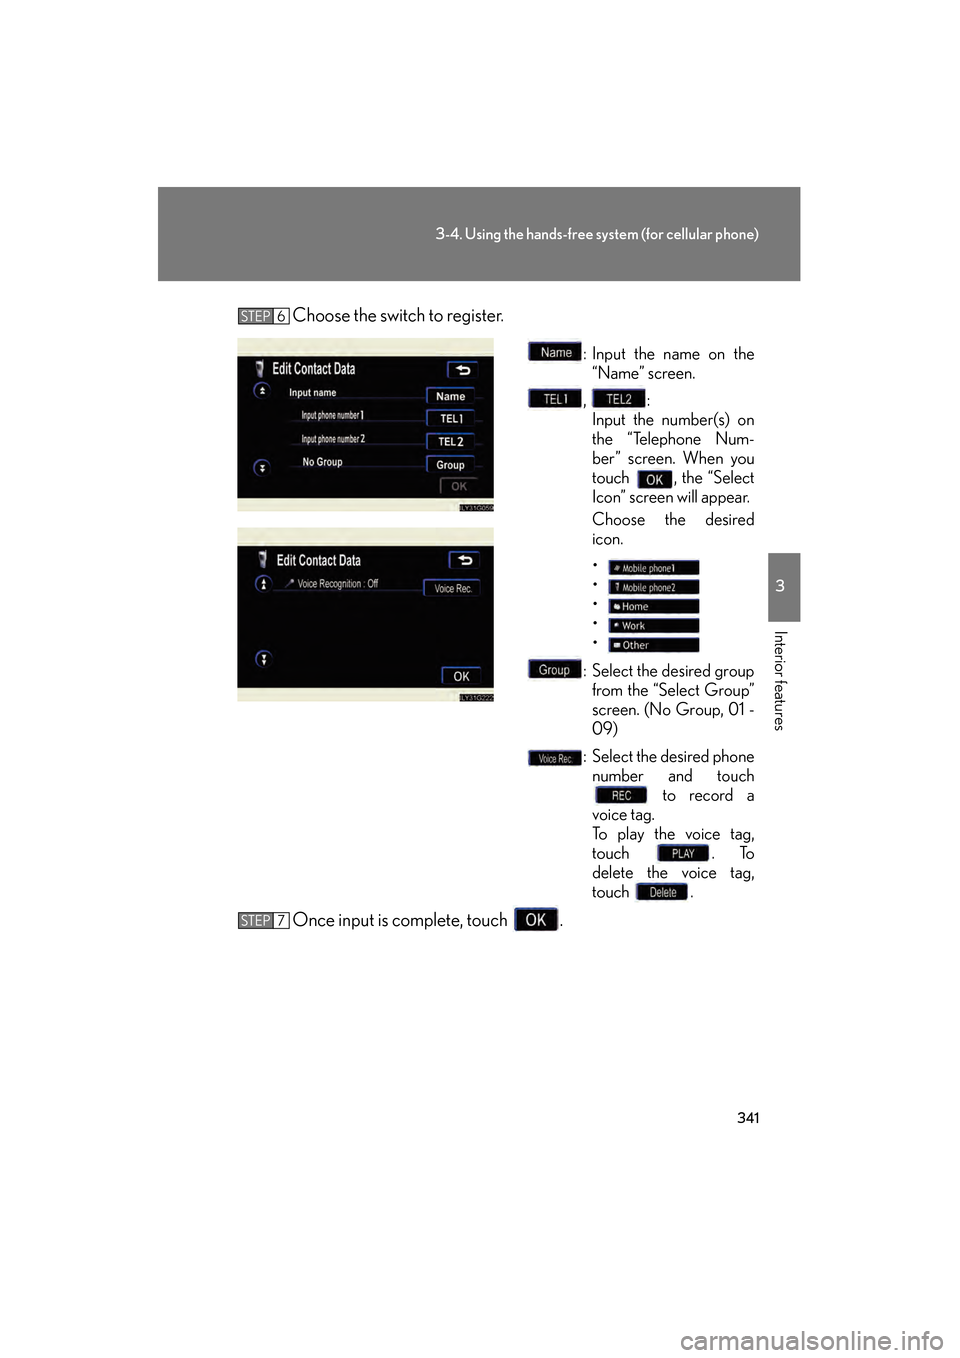
Choose the switch to register.
: Input the name on the“Name” screen.
, : Input the number(s) on
the “Telephone Num-
ber” screen. When you
touch , the “Select
Icon” screen will appear.
Choose the desired
icon.
•
•
•
•
•
: Select the desired group from the “Select Group”
screen. (No Group, 01 -
09)
: Select the desired phone number and touch to record a
voice tag.
To play the voice tag,
touch . To
delete the voice tag,
touch .
Once input is complete, touch .
STEP6
STEP7
GS_U_G.book Page 341 Monday, April 27, 2009 10:50 AM
Page 343 of 622
342
3-4. Using the hands-free system (for cellular phone)
GS_G_U (OM30B43U)
April 27, 2009 10:48 am
■Add history data to a registered entry
Press .
Touch on the “Information” screen.
Touch on the “Telephone” screen.
Choose the desired number from the list.
To choose from the received call history, touch then select the
desired number.
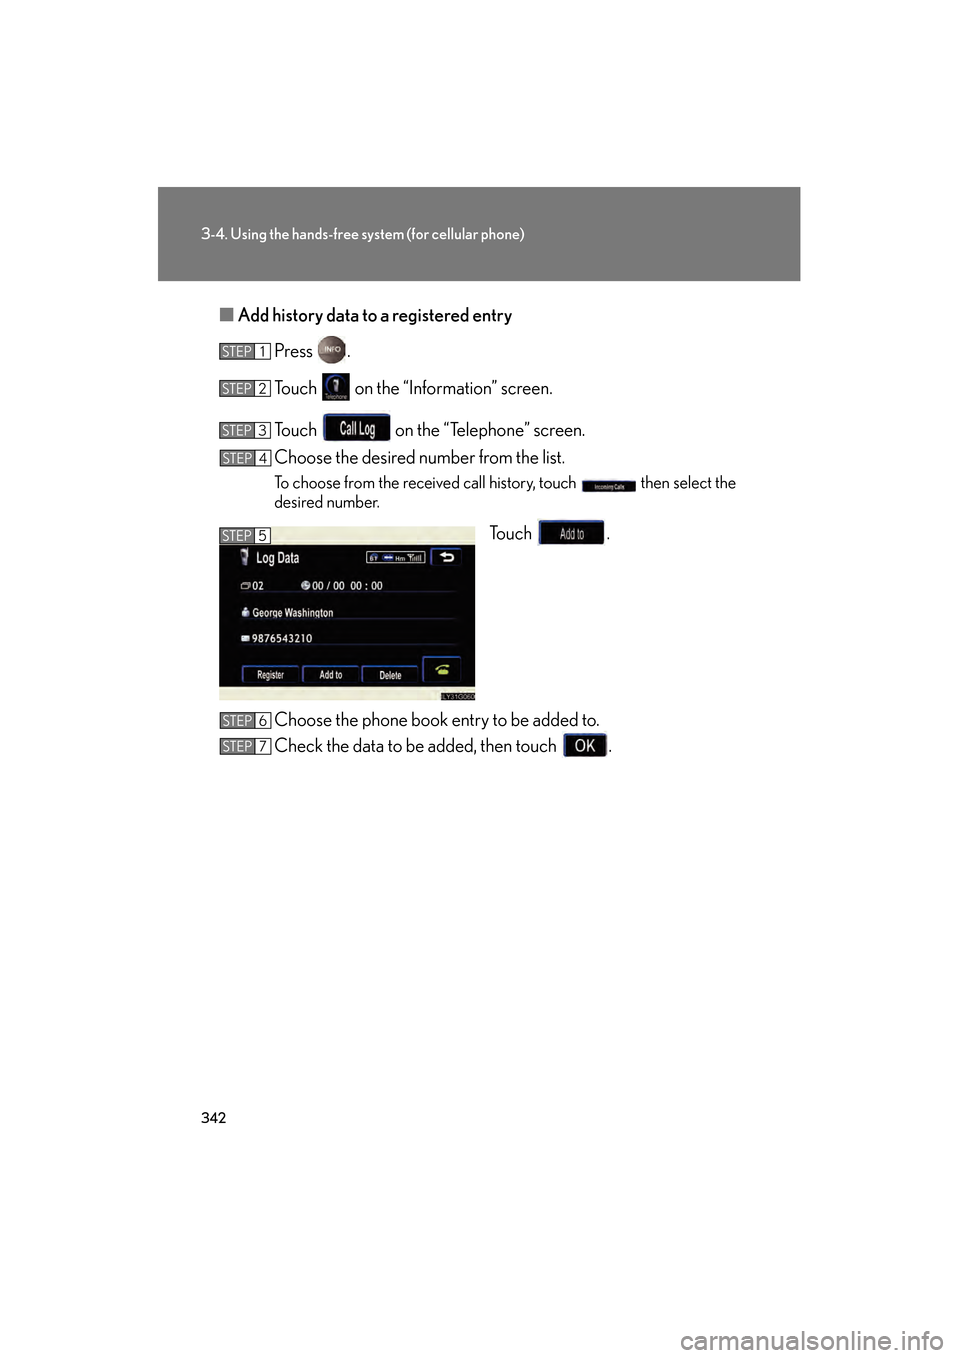
To u c h .
Choose the phone book entry to be added to.
Check the data to be added, then touch .
STEP1
STEP2
STEP3
STEP4
STEP5
STEP6
STEP7
GS_U_G.book Page 342 Monday, April 27, 2009 10:50 AM
Page 344 of 622
343
3-4. Using the hands-free system (for cellular phone)
3
Interior features
GS_G_U (OM30B43U)
April 27, 2009 10:48 am
■Editing phone book data
Press .
Touch on the “Information” screen.
Touch on the “Telephone” screen.
Touch on the “S ettings” screen.
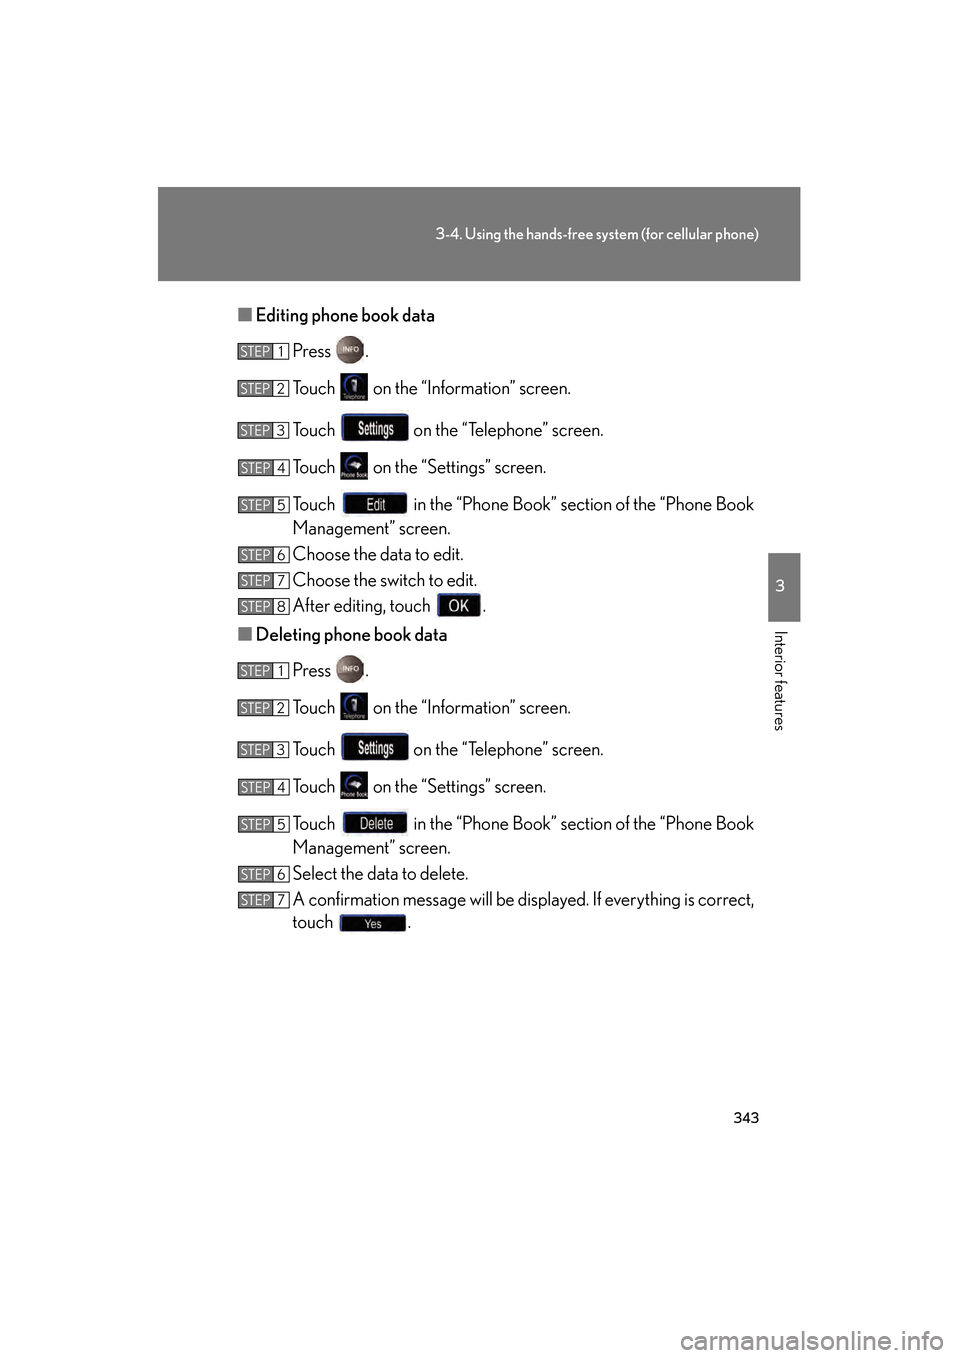
Touch in the “Phone Book” section of the “Phone Book
Management” screen.
Choose the data to edit.
Choose the switch to edit.
After editing, touch .
■ Deleting phone book data
Press .
Touch on the “Information” screen.
Touch on the “Telephone” screen.
Touch on the “S ettings” screen.
Touch in the “Phone Book” section of the “Phone Book
Management” screen.
Select the data to delete.
A confirmation message will be disp layed. If everything is correct,
touch .
STEP1
STEP2
STEP3
STEP4
STEP5
STEP6
STEP7
STEP8
STEP1
STEP2
STEP3
STEP4
STEP5
STEP6
STEP7
GS_U_G.book Page 343 Monday, April 27, 2009 10:50 AM
Page 345 of 622
344
3-4. Using the hands-free system (for cellular phone)
GS_G_U (OM30B43U)
April 27, 2009 10:48 am
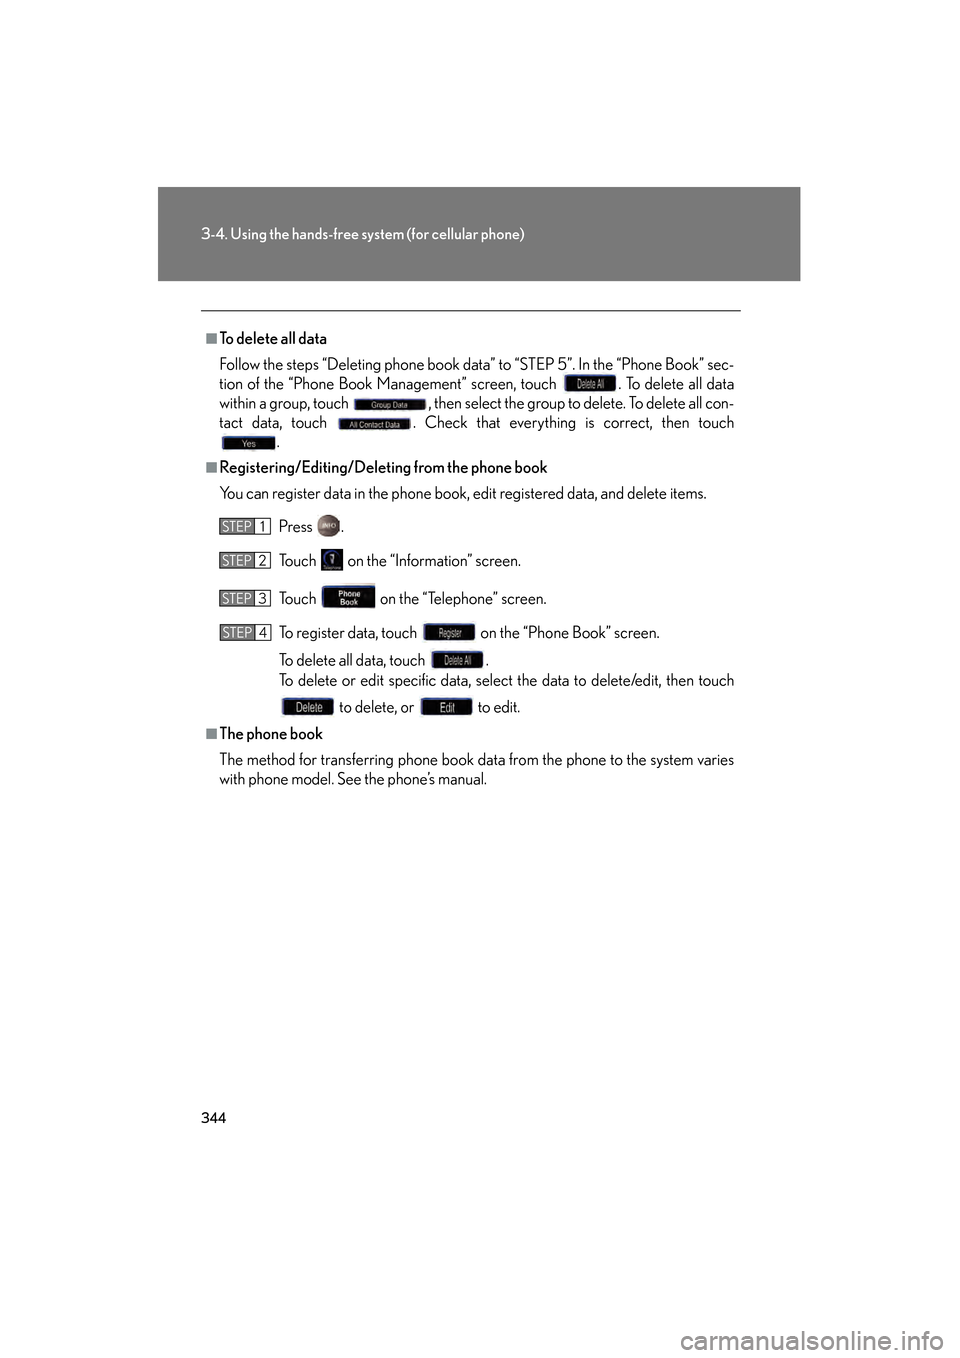
■To delete all data
Follow the steps “Deleting phone book data” to “STEP 5”. In the “Phone Book” sec-
tion of the “Phone Book Management” screen, touch . To delete all data
within a group, touch , then select the group to delete. To delete all con-
tact data, touch . Check that everything is correct, then touch.
■Registering/Editing/Deleting from the phone book
You can register data in the phone book, edit registered data, and delete items.
Press .
Touch on the “Information” screen.
Touch on the “Telephone” screen.
To register data, touch on the “Phone Book” screen.
To delete all data, touch .
To delete or edit specific data, select the data to delete/edit, then touch to delete, or to edit.
■The phone book
The method for transferring phone book da ta from the phone to the system varies
with phone model. See the phone’s manual.
STEP1
STEP2
STEP3
STEP4
GS_U_G.book Page 344 Monday, April 27, 2009 10:50 AM
Page 346 of 622
345
3-4. Using the hands-free system (for cellular phone)
3
Interior features
GS_G_U (OM30B43U)
April 27, 2009 10:48 am
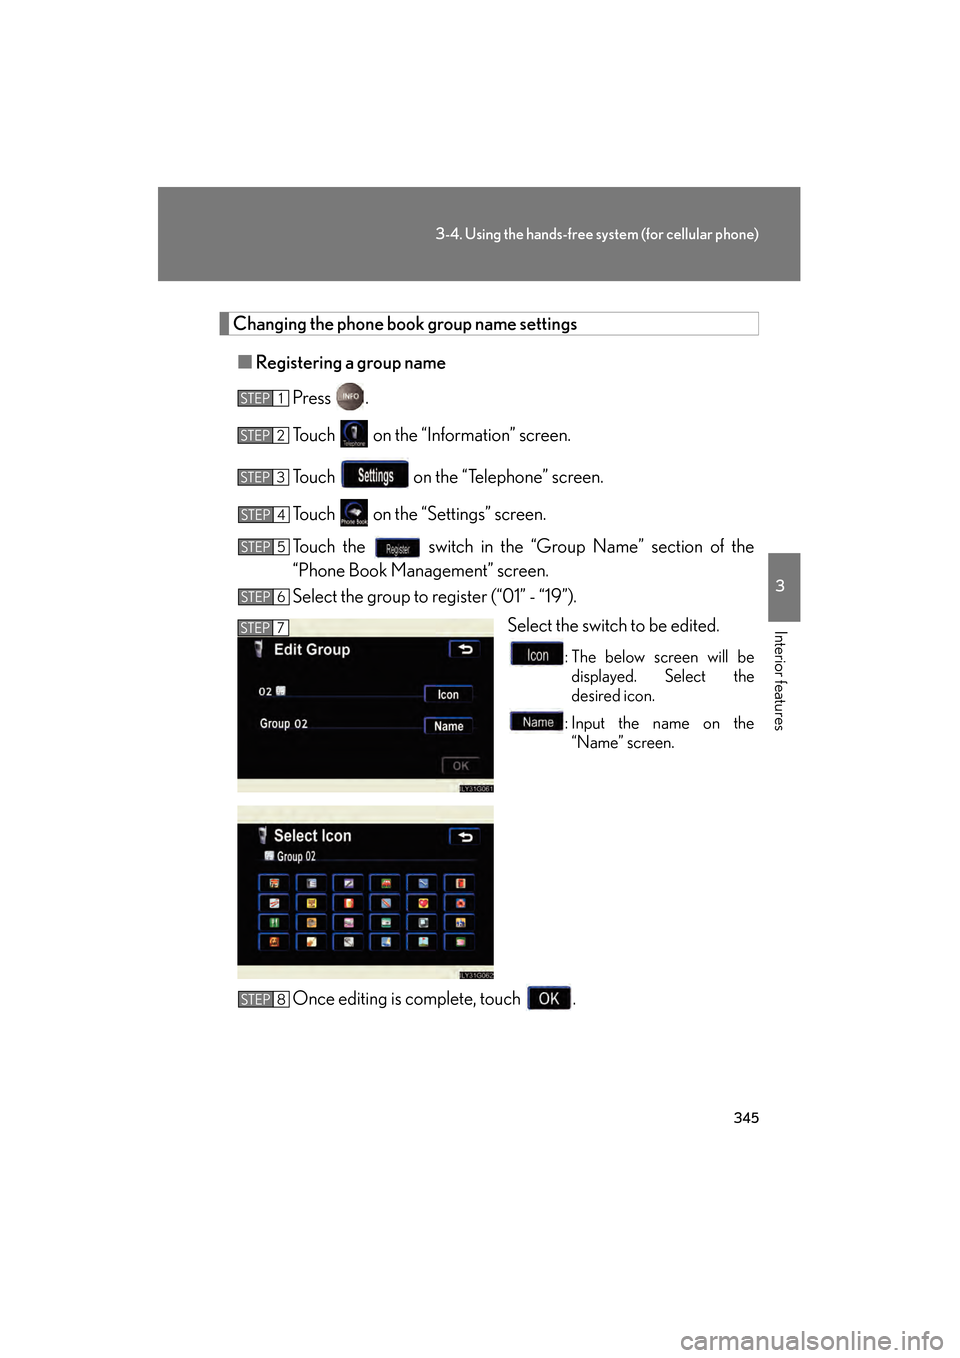
Changing the phone book group name settings■ Registering a group name
Press .
Touch on the “Information” screen.
Touch on the “Telephone” screen.
Touch on the “S ettings” screen.
Touch the switch in the “Group Name” section of the
“Phone Book Management” screen.
Select the group to register (“01” - “19”). Select the switch to be edited.
: The below screen will bedisplayed. Select the
desired icon.
: Input the name on the “Name” screen.
Once editing is complete, touch .
STEP1
STEP2
STEP3
STEP4
STEP5
STEP6
STEP7
STEP8
GS_U_G.book Page 345 Monday, April 27, 2009 10:50 AM
Page 347 of 622
346
3-4. Using the hands-free system (for cellular phone)
GS_G_U (OM30B43U)
April 27, 2009 10:48 am
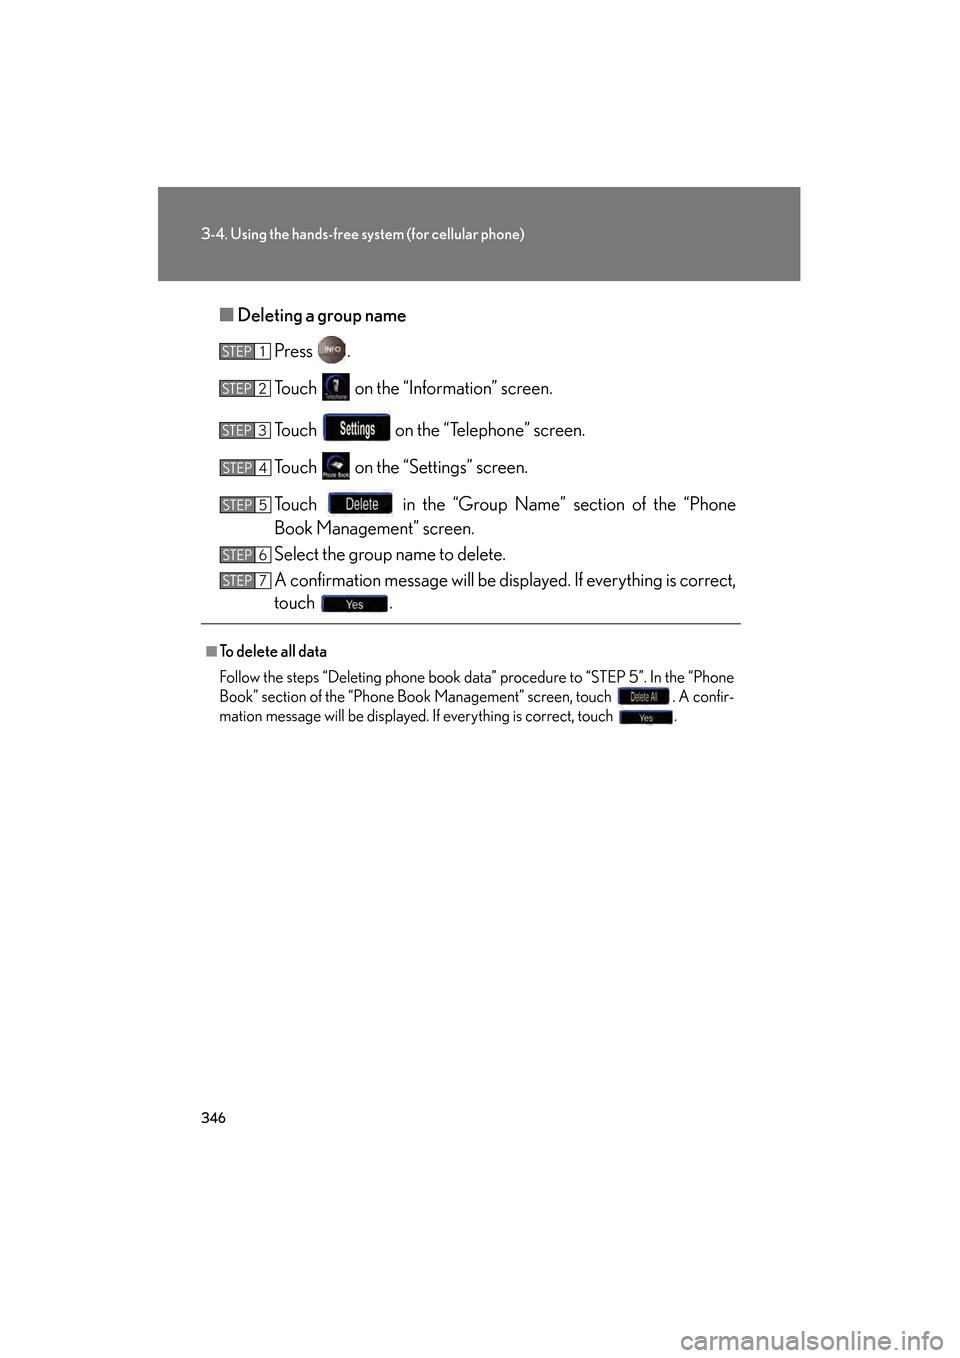
■Deleting a group name
Press .
Touch on the “Information” screen.
Touch on the “Telephone” screen.
Touch on the “Settings” screen.
Touch in the “Group Name” section of the “Phone
Book Management” screen.
Select the group name to delete.
A confirmation message will be disp layed. If everything is correct,
touch .
■To delete all data
Follow the steps “Deleting phone book data” procedure to “STEP 5”. In the “Phone
Book” section of the “Phone Book Management” screen, touch . A confir-
mation message will be displayed. If everything is correct, touch .
STEP1
STEP2
STEP3
STEP4
STEP5
STEP6
STEP7
GS_U_G.book Page 346 Monday, April 27, 2009 10:50 AM
Page 348 of 622
347
3-4. Using the hands-free system (for cellular phone)
3
Interior features
GS_G_U (OM30B43U)
April 27, 2009 10:48 am
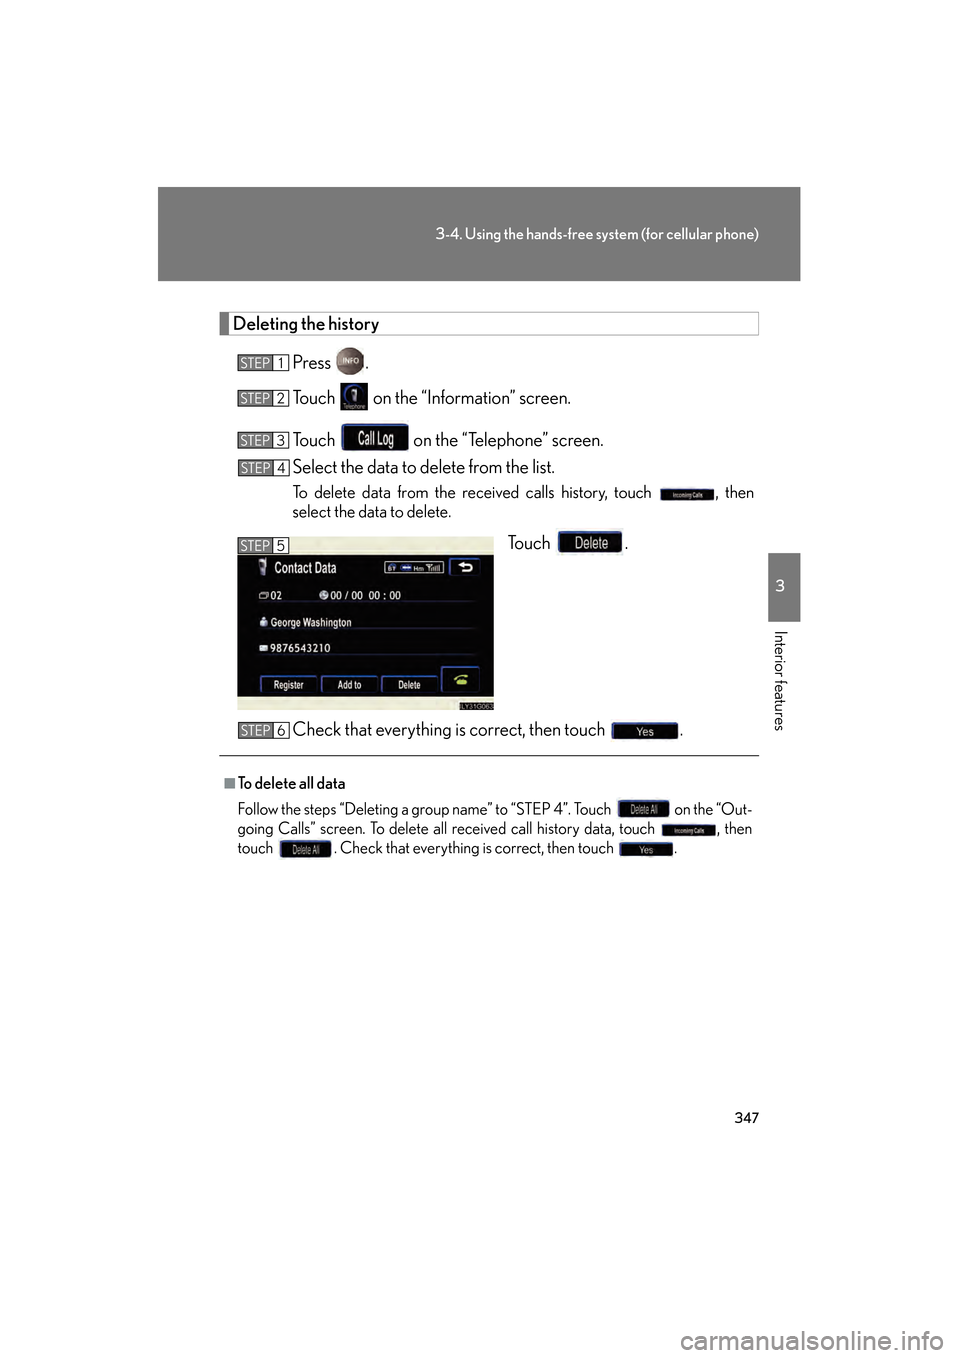
Deleting the historyPress .
Touch on the “Information” screen.
Touch on the “Telephone” screen.
Select the data to delete from the list.
To delete data from the received calls history, touch , then
select the data to delete.
To u c h .
Check that everything is correct, then touch .
STEP1
STEP2
STEP3
STEP4
STEP5
■To delete all data
Follow the steps “Deleting a group name” to “STEP 4”. Touch on the “Out-
going Calls” screen. To delete all received call history data, touch , then
touch . Check that everything is correct, then touch .
STEP6
GS_U_G.book Page 347 Monday, April 27, 2009 10:50 AM
Page 349 of 622
348
3-4. Using the hands-free system (for cellular phone)
GS_G_U (OM30B43U)
April 27, 2009 10:48 am
Changing the security settingsYou can disable certain hands-free sy stem functions. Use the security set-
tings when you do not wish other peop le to see the registered data, for
example when having the vehi cle valet parked at a hotel.
To enable or disable security, the secu rity code (4 digits) is required. The
default code is “0000”. Be sure to ch ange the security code before use.
■ Changing the security code
Press .
Touch on the “Information” screen.
Touch on the “Telephone” screen.
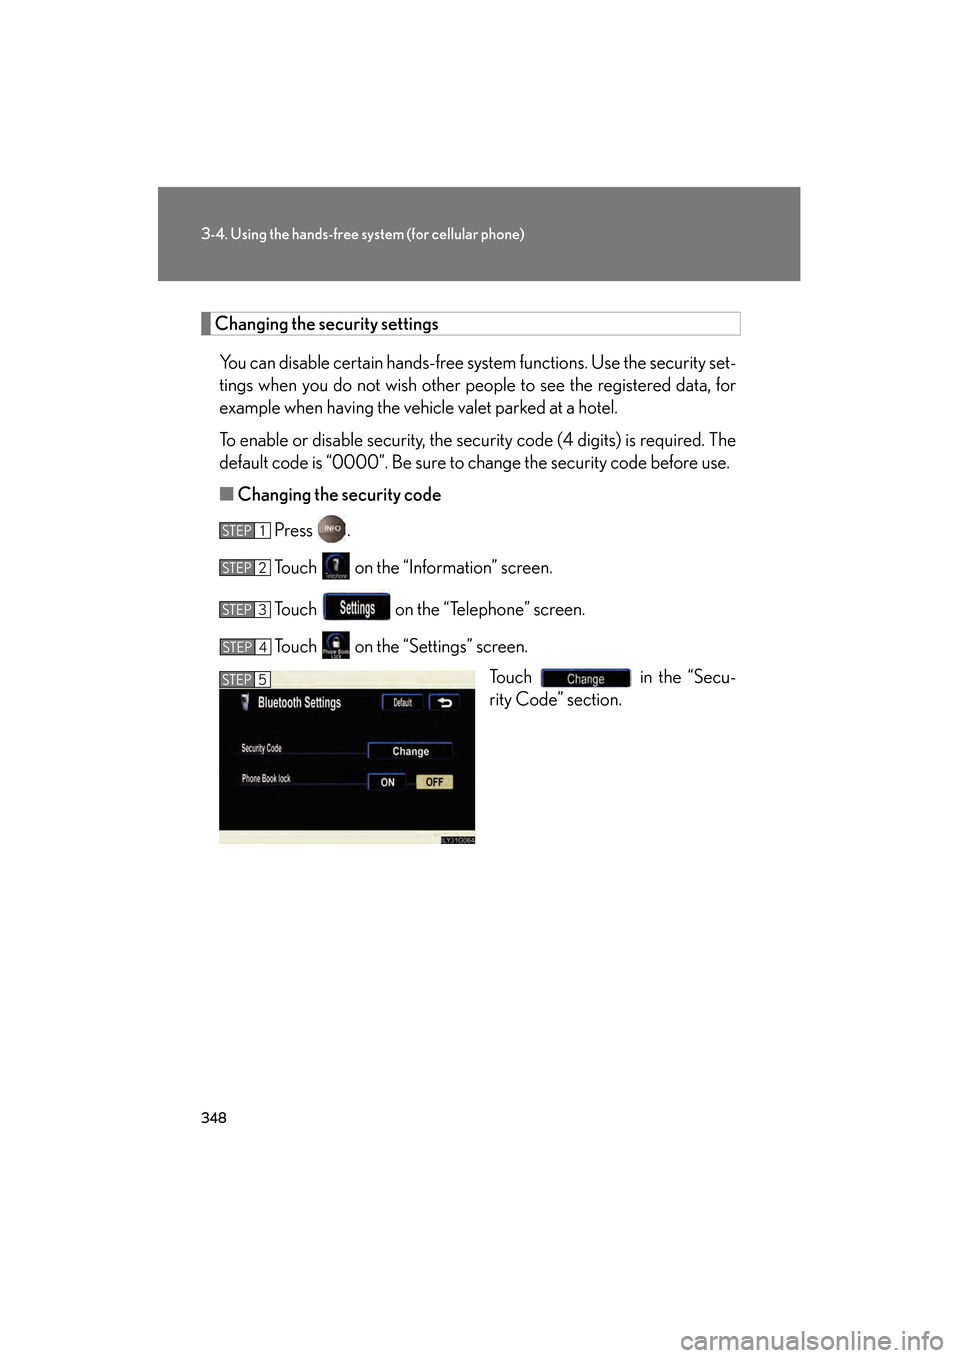
Touch on the “Settings” screen. Touch in the “Secu-
rity Code” section.
STEP1
STEP2
STEP3
STEP4
STEP5
GS_U_G.book Page 348 Monday, April 27, 2009 10:50 AM
Page 350 of 622
349
3-4. Using the hands-free system (for cellular phone)
3
Interior features
GS_G_U (OM30B43U)
April 27, 2009 10:48 am
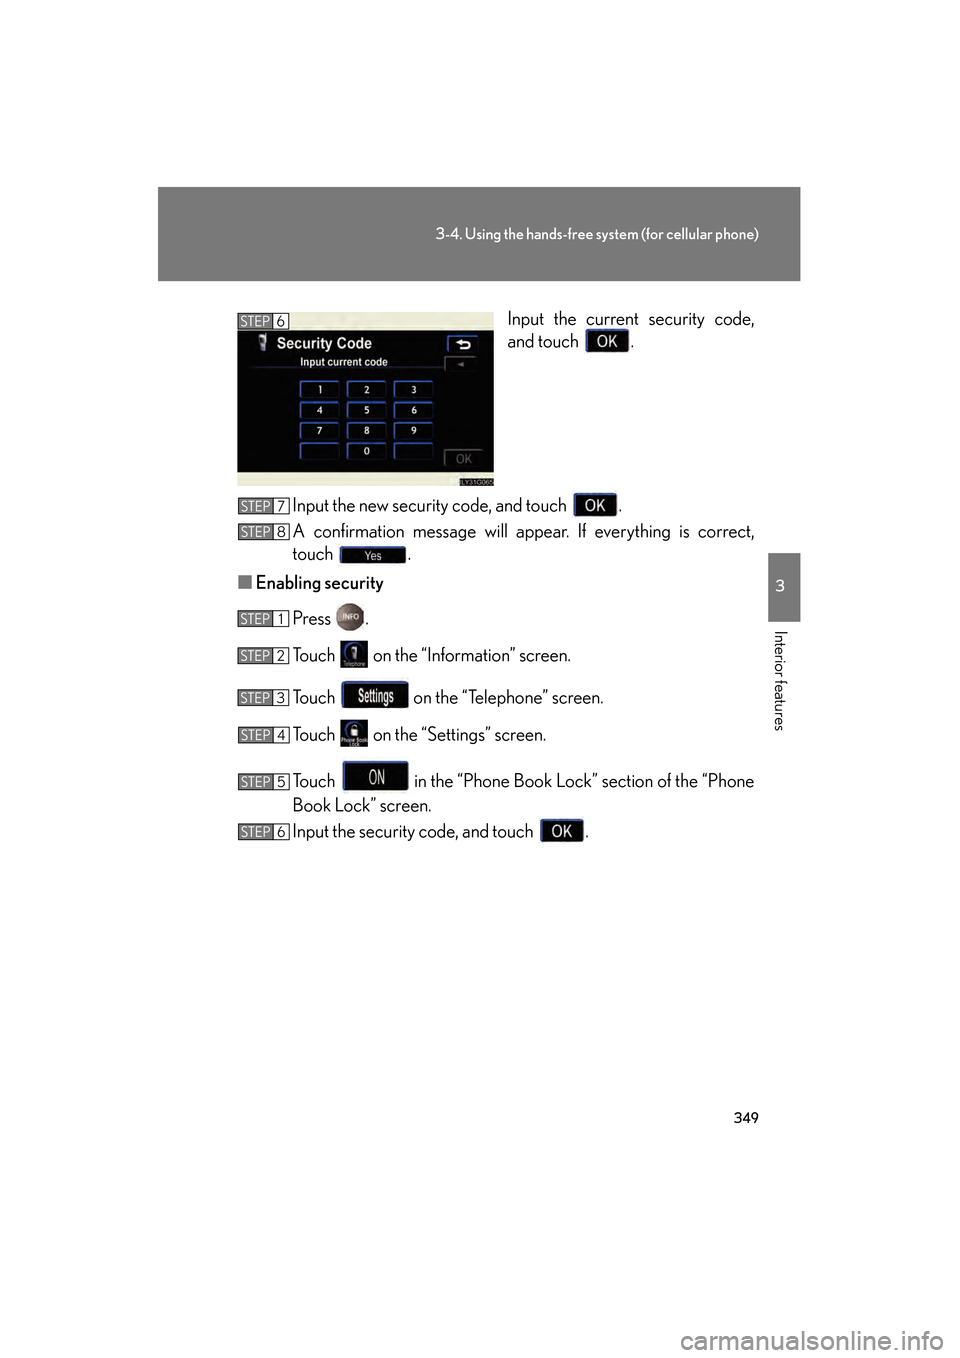
Input the current security code,
and touch .
Input the new security code, and touch .
A confirmation message will appe ar. If everything is correct,
touch .
■ Enabling security
Press .
Touch on the “Information” screen.
Touch on the “Telephone” screen.
Touch on the “S ettings” screen.
Touch in the “Phone Book Lo ck” section of the “Phone
Book Lock” screen.
Input the security code, and touch .STEP6
STEP7
STEP8
STEP1
STEP2
STEP3
STEP4
STEP5
STEP6
GS_U_G.book Page 349 Monday, April 27, 2009 10:50 AM