display Lexus GS350 2010 Using The Audio System / LEXUS 2010 GS460 GS350 OWNERS MANUAL (OM30C80U)
[x] Cancel search | Manufacturer: LEXUS, Model Year: 2010, Model line: GS350, Model: Lexus GS350 2010Pages: 648, PDF Size: 15.57 MB
Page 358 of 648
358
3-4. Using the hands-free system (for cellular phone)
GS_G_U (OM30C80U)
June 29, 2011 10:30 am
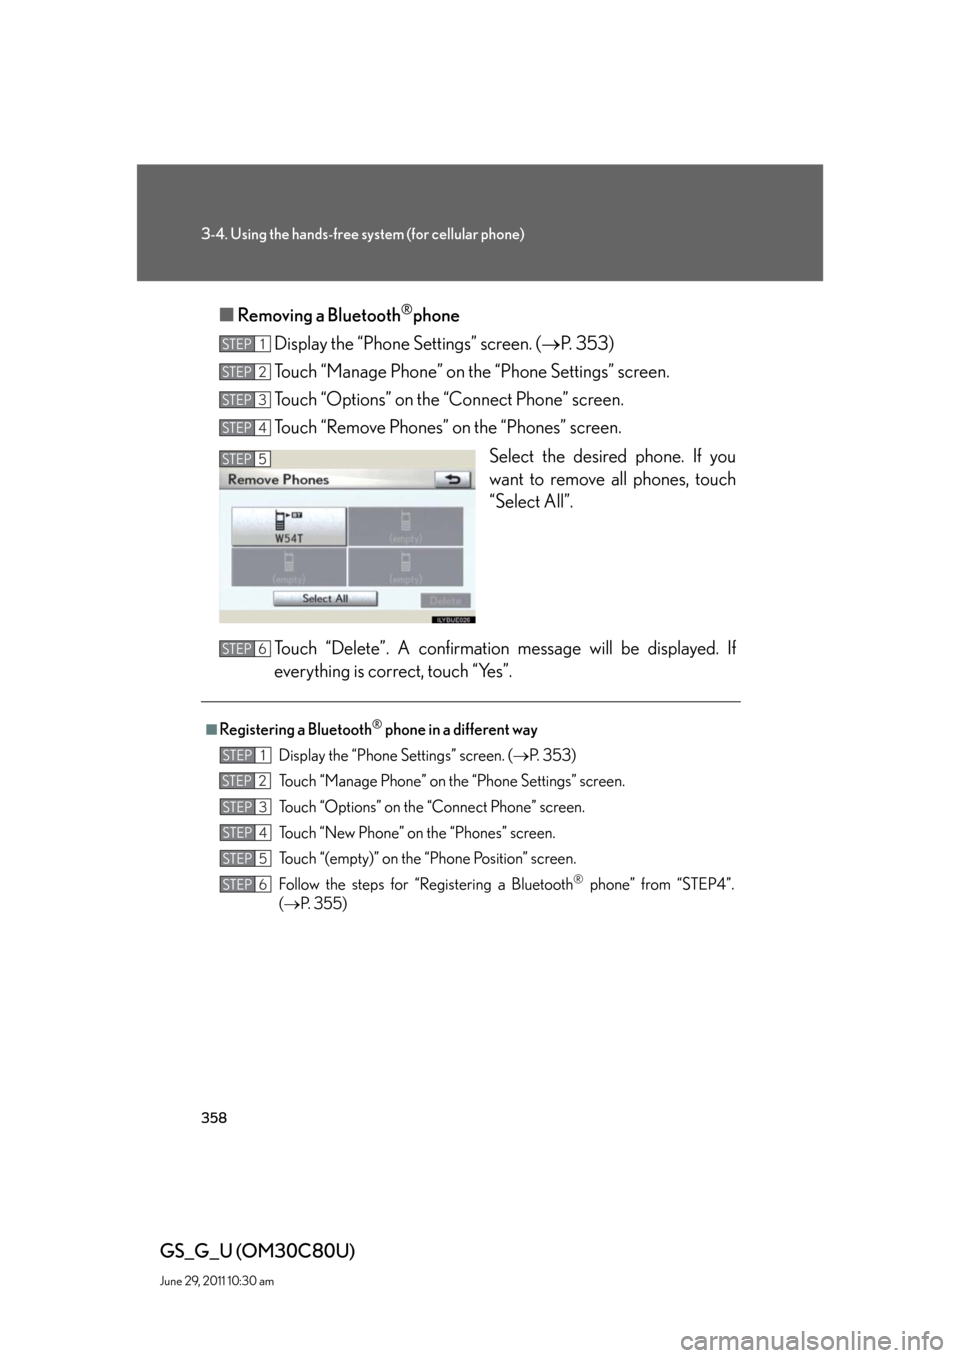
■Removing a Bluetooth®phone
Display the “Phone Settings” screen. (P. 353)
Touch “Manage Phone” on the “Phone Settings” screen.
Touch “Options” on the “Connect Phone” screen.
Touch “Remove Phones” on the “Phones” screen.
Select the desired phone. If you
want to remove all phones, touch
“Select All”.
Touch “Delete”. A confirmation message will be displayed. If
everything is correct, touch “Yes”.
STEP1
STEP2
STEP3
STEP4
STEP5
■Registering a Bluetooth® phone in a different way
Display the “Phone Settings” screen. (P. 3 5 3 )
Touch “Manage Phone” on the “Phone Settings” screen.
Touch “Options” on the “Connect Phone” screen.
Touch “New Phone” on the “Phones” screen.
Touch “(empty)” on the “Phone Position” screen.
Follow the steps for “Registering a Bluetooth
® phone” from “STEP4”.
(P. 355)
STEP6
STEP1
STEP2
STEP3
STEP4
STEP5
STEP6
Page 360 of 648
360
3-4. Using the hands-free system (for cellular phone)
GS_G_U (OM30C80U)
June 29, 2011 10:30 am
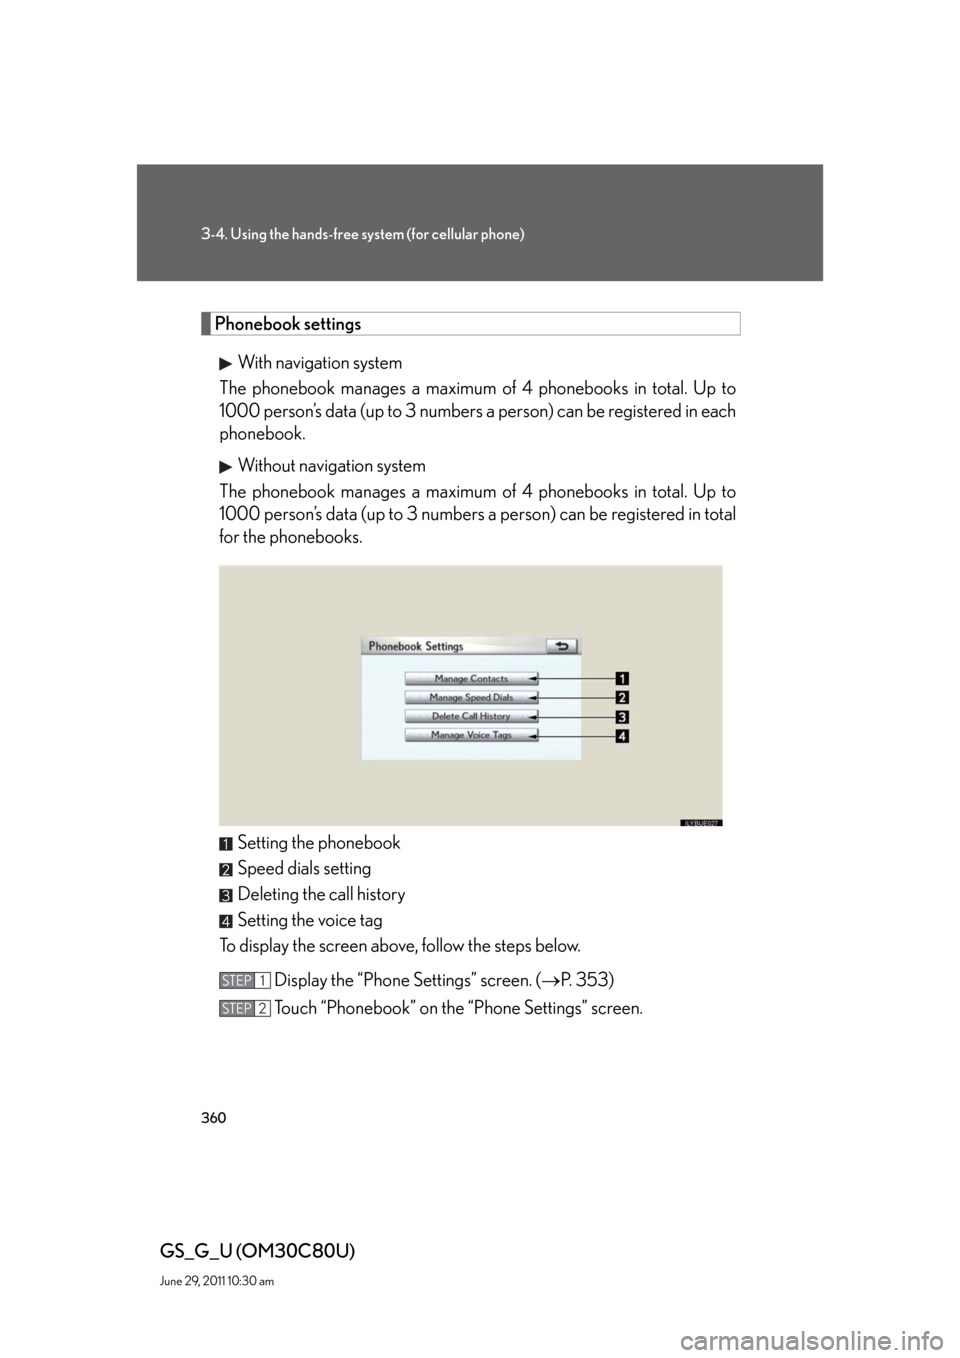
Phonebook settings
With navigation system
The phonebook manages a maximum of 4 phonebooks in total. Up to
1000 person’s data (up to 3 numbers a person) can be registered in each
phonebook.
Without navigation system
The phonebook manages a maximum of 4 phonebooks in total. Up to
1000 person’s data (up to 3 numbers a person) can be registered in total
for the phonebooks.
Setting the phonebook
Speed dials setting
Deleting the call history
Setting the voice tag
To display the screen above, follow the steps below.
Display the “Phone Settings” screen. (P. 353)
Touch “Phonebook” on the “Phone Settings” screen.
STEP1
STEP2
Page 361 of 648
361
3-4. Using the hands-free system (for cellular phone)
3
Interior features
GS_G_U (OM30C80U)
June 29, 2011 10:30 am
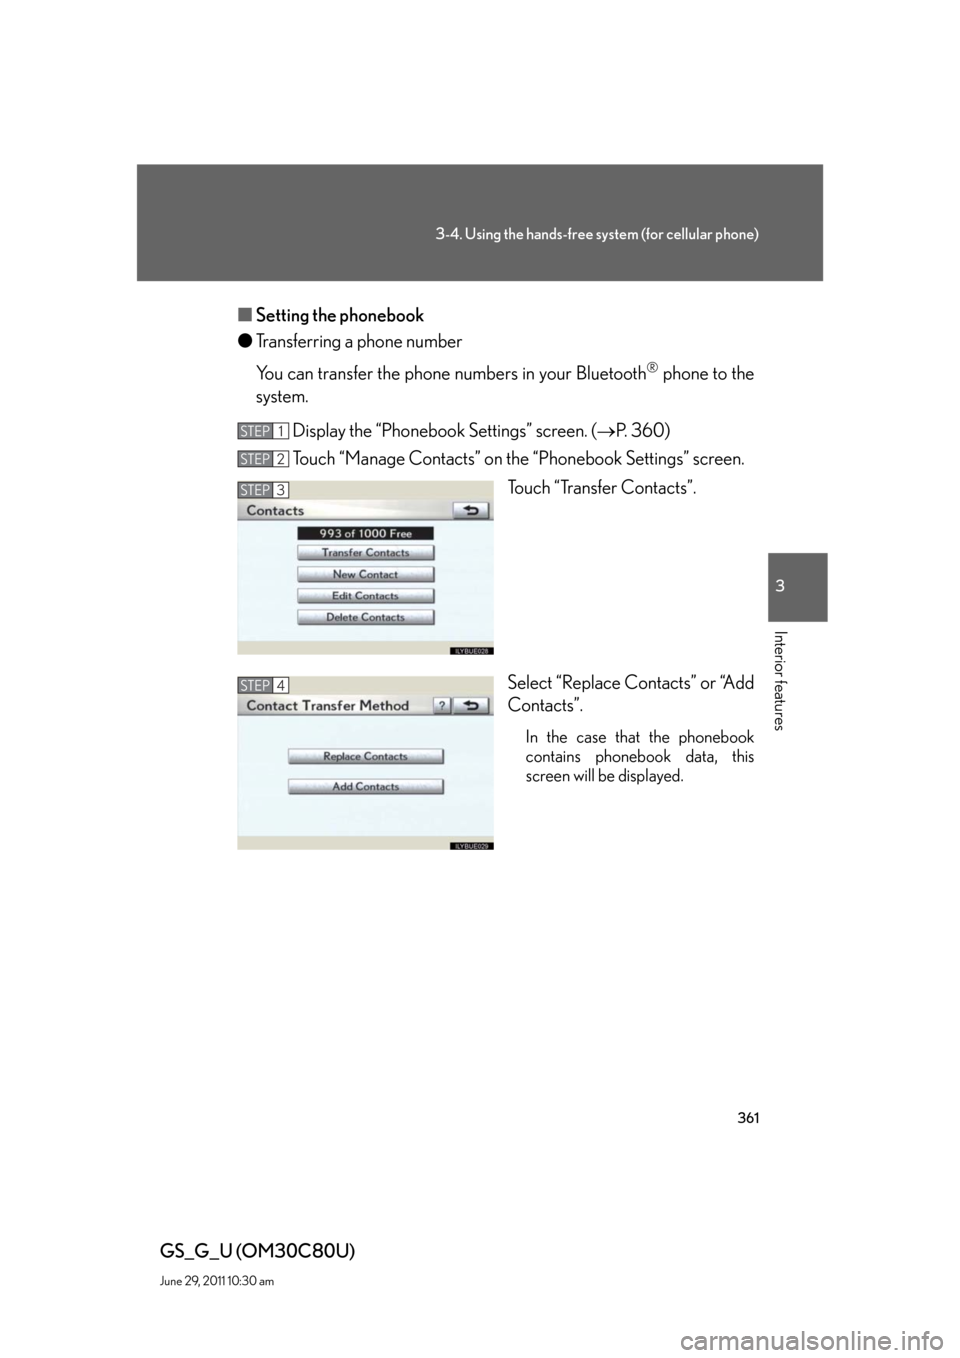
■Setting the phonebook
●Transferring a phone number
You can transfer the phone numbers in your Bluetooth
® phone to the
system.
Display the “Phonebook Settings” screen. (P. 360)
Touch “Manage Contacts” on the “Phonebook Settings” screen.
Touch “Transfer Contacts”.
Select “Replace Contacts” or “Add
Contacts”.
In the case that the phonebook
contains phonebook data, this
screen will be displayed.
STEP1
STEP2
STEP3
STEP4
Page 362 of 648
362
3-4. Using the hands-free system (for cellular phone)
GS_G_U (OM30C80U)
June 29, 2011 10:30 am
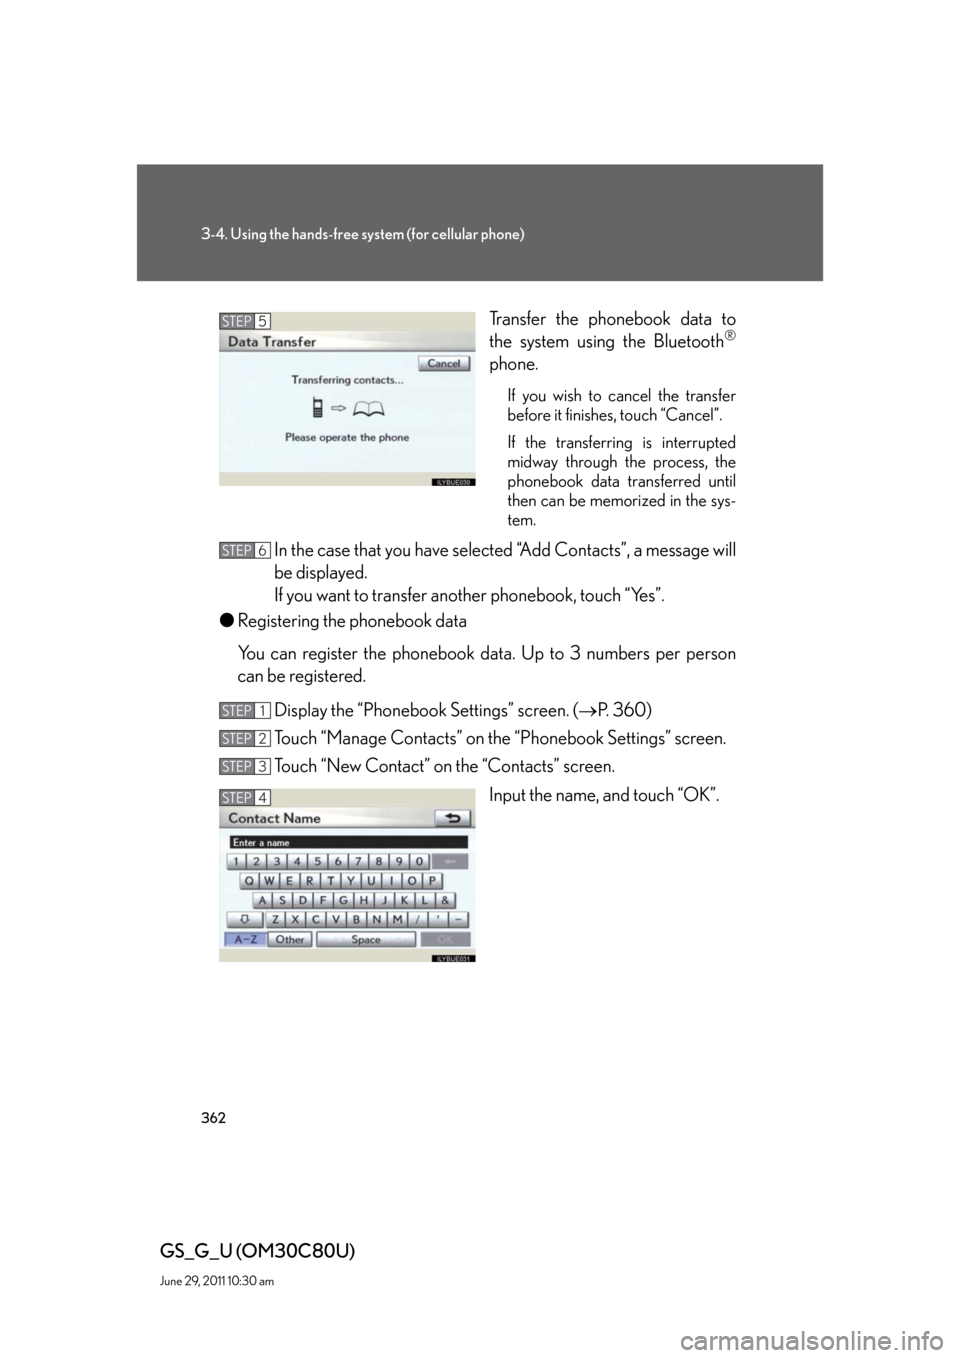
Transfer the phonebook data to
the system using the Bluetooth®
phone.
If you wish to cancel the transfer
before it finishes, touch “Cancel”.
If the transferring is interrupted
midway through the process, the
phonebook data transferred until
then can be memorized in the sys-
tem.
In the case that you have selected “Add Contacts”, a message will
be displayed.
If you want to transfer another phonebook, touch “Yes”.
●Registering the phonebook data
You can register the phonebook data. Up to 3 numbers per person
can be registered.
Display the “Phonebook Settings” screen. (P. 360)
Touch “Manage Contacts” on the “Phonebook Settings” screen.
Touch “New Contact” on the “Contacts” screen.
Input the name, and touch “OK”.
STEP5
STEP6
STEP1
STEP2
STEP3
STEP4
Page 363 of 648
363
3-4. Using the hands-free system (for cellular phone)
3
Interior features
GS_G_U (OM30C80U)
June 29, 2011 10:30 am
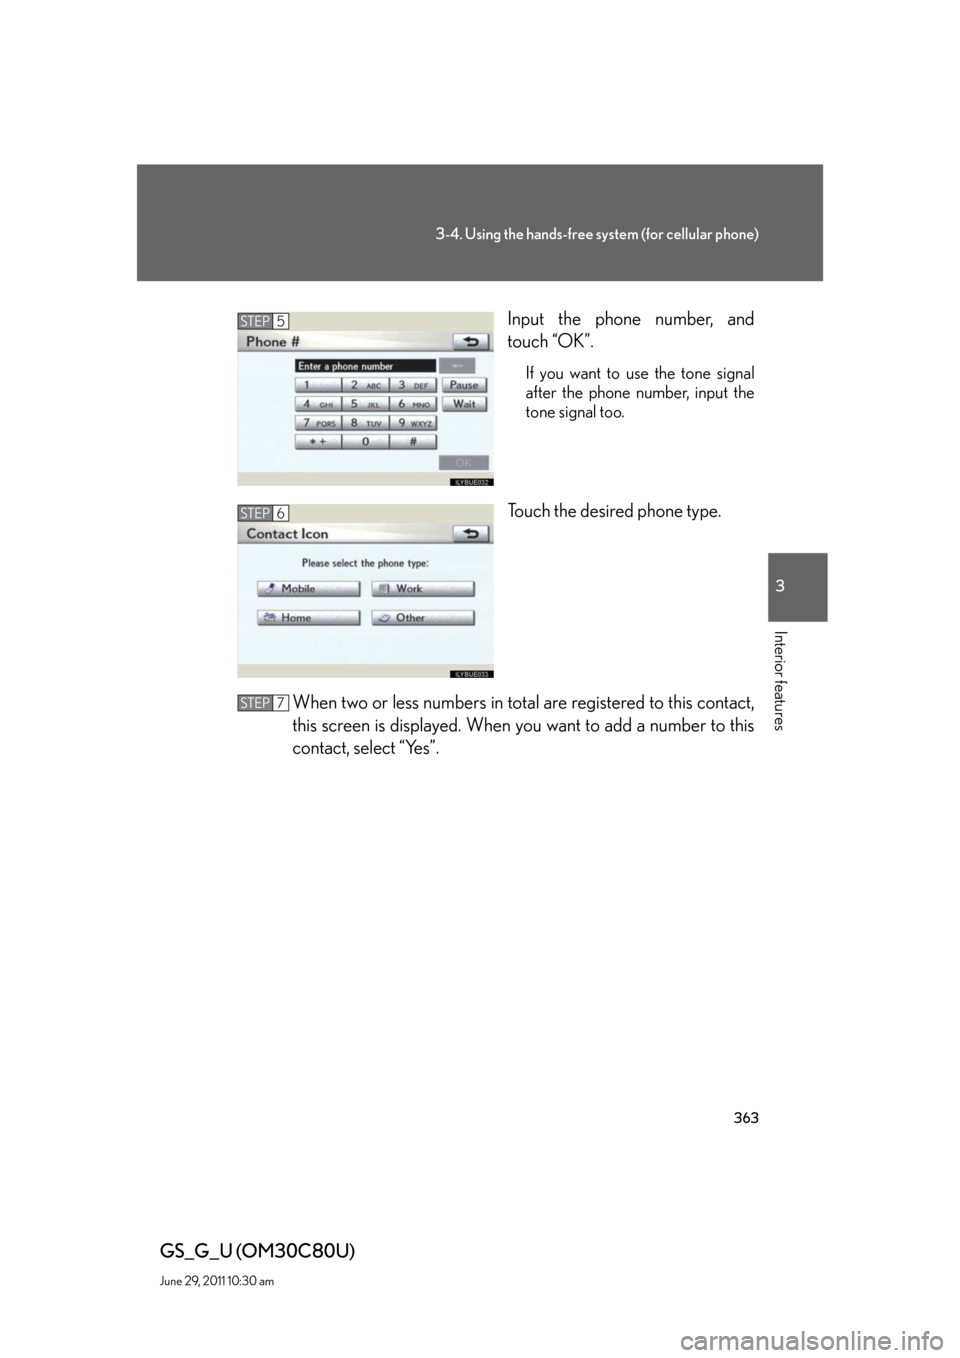
Input the phone number, and
touch “OK”.
If you want to use the tone signal
after the phone number, input the
tone signal too.
Touch the desired phone type.
When two or less numbers in total are registered to this contact,
this screen is displayed. When you want to add a number to this
contact, select “Yes”.
STEP5
STEP6
STEP7
Page 364 of 648
364
3-4. Using the hands-free system (for cellular phone)
GS_G_U (OM30C80U)
June 29, 2011 10:30 am
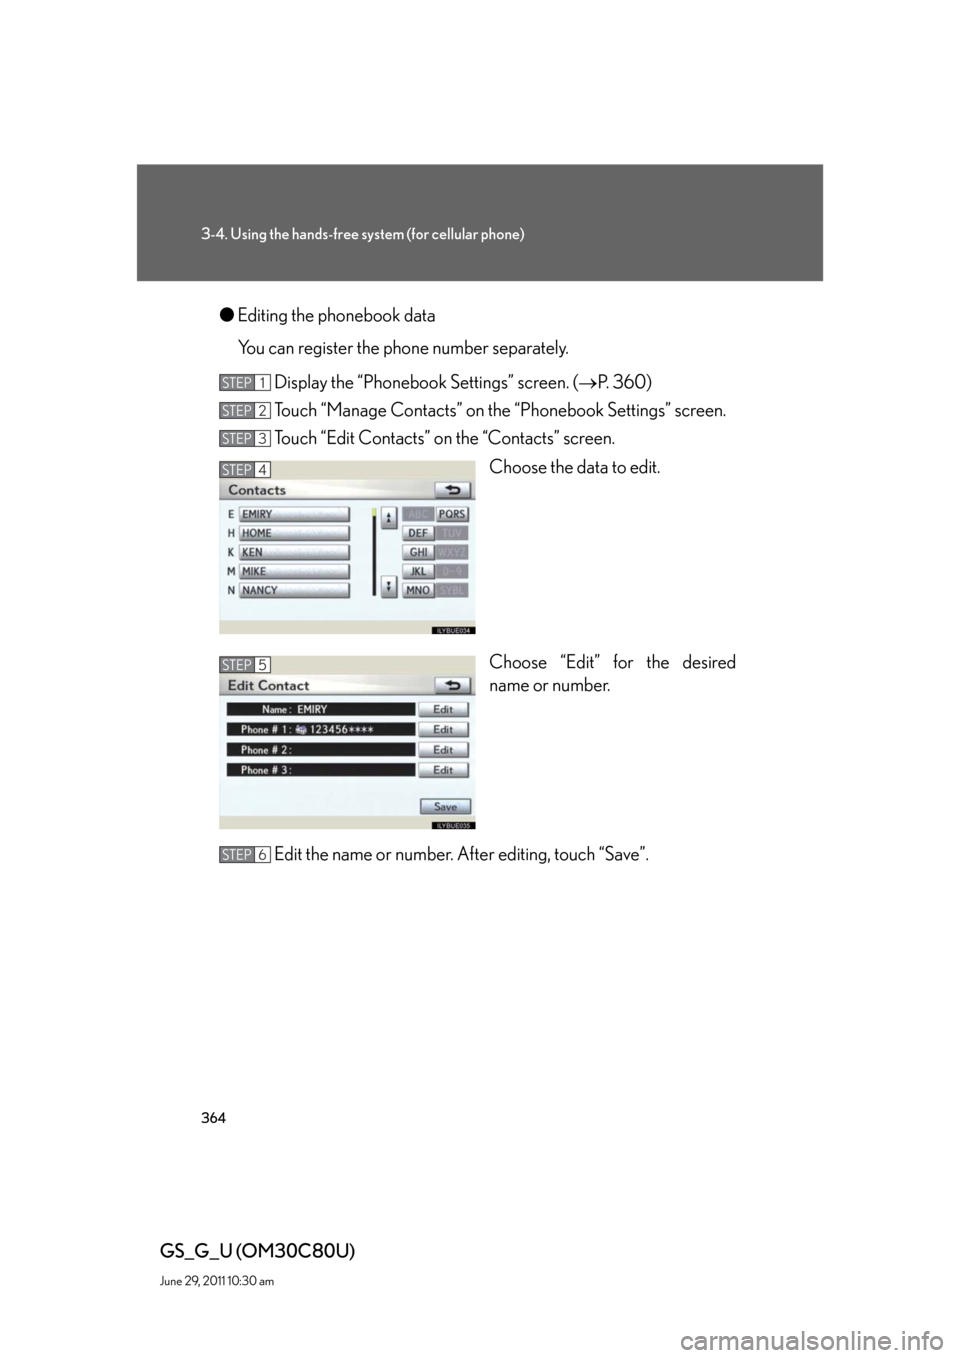
●Editing the phonebook data
You can register the phone number separately.
Display the “Phonebook Settings” screen. (P. 360)
Touch “Manage Contacts” on the “Phonebook Settings” screen.
Touch “Edit Contacts” on the “Contacts” screen.
Choose the data to edit.
Choose “Edit” for the desired
name or number.
Edit the name or number. After editing, touch “Save”.
STEP1
STEP2
STEP3
STEP4
STEP5
STEP6
Page 365 of 648
365
3-4. Using the hands-free system (for cellular phone)
3
Interior features
GS_G_U (OM30C80U)
June 29, 2011 10:30 am
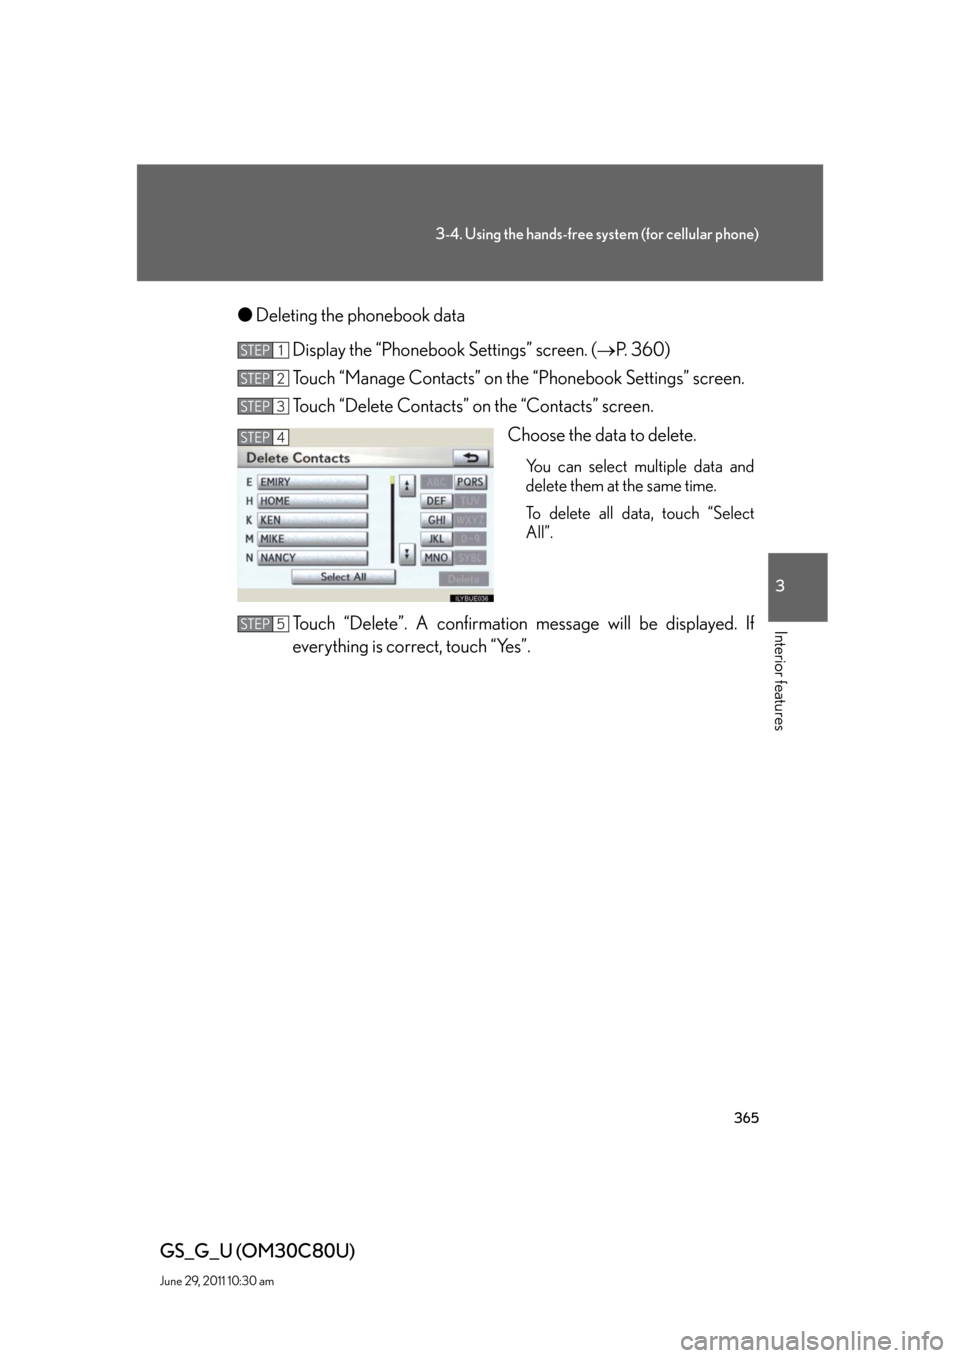
●Deleting the phonebook data
Display the “Phonebook Settings” screen. (P. 360)
Touch “Manage Contacts” on the “Phonebook Settings” screen.
Touch “Delete Contacts” on the “Contacts” screen.
Choose the data to delete.
You can select multiple data and
delete them at the same time.
To delete all data, touch “Select
All”.
Touch “Delete”. A confirmation message will be displayed. If
everything is correct, touch “Yes”.
STEP1
STEP2
STEP3
STEP4
STEP5
Page 366 of 648
366
3-4. Using the hands-free system (for cellular phone)
GS_G_U (OM30C80U)
June 29, 2011 10:30 am
■Phonebook data
Phonebook data is managed for every registered phone. When another phone is
connecting, you cannot read the registered data.
■Setting the phonebook in a different way (To display the “Contacts” screen)
Display the “Phone” screen. (P. 3 3 8 )
Touch “Contacts” on the “Phone” screen.
Touch “Options” on the “Contacts” screen.
Touch “Manage Contacts” on the “Contacts” screen.
■When transferring a phone number
Transfer the phone number while engine is running.
■When you have selected “Replace Contacts” to transfer the phone number
●If your cellular phone does not support PBAP or OPP service, you cannot use
this function.
●If your phone supports PBAP service, you can transfer the phonebook data
without operating your phone.
●If your phone does not support PBAP service, you must transfer the phonebook
data by operating your phone.
■When you have selected “Add Contacts” to transfer the phone number
If your cellular phone does not support OPP service, you can not use this function.
You can transfer the phonebook data only by operating your phone.
■When another Bluetooth® device is connected during transferring a phonebook
When another Bluetooth
® device is connected, a confirmation message will be dis-
played.
If you want to disconnect it, touch “Yes”.
■Transferring the phone number while Bluetooth® audio is playing
Bluetooth
® audio will disconnect. It will reconnect automatically when data transfer
finishes. (It will not be reconnected depending on the phone you are using.)
STEP1
STEP2
STEP3
STEP4
Page 367 of 648
367
3-4. Using the hands-free system (for cellular phone)
3
Interior features
GS_G_U (OM30C80U)
June 29, 2011 10:30 am
■Editing the phonebook data in a different way (From “Contact Data” screen)
Display the “Phone” screen. (P. 3 3 8 )
Touch “Contacts” on the “Phone” screen.
Choose the desired data from the list.
Touch “Options” on the “Contact Data” screen.
Touch “Edit Contact” on the “Contact Data” screen.
Follow the steps “Editing the phonebook data” from “STEP5”. (P. 3 6 4 )
■Editing the phonebook data in a different way (From “Call History” screen)
Display the “Phone” screen. (P. 3 3 8 )
Touch “Call History” on the “Phone” screen.
Choose the desired data from the list.
Touch “Add Contact” or “Update Contact”.
If you touch “Add Contact”, follow the steps “Editing the phonebook data”
from “STEP5”. (P. 3 6 4 )
If you touch “Update Contact”, follow the steps “Editing the phonebook
data” from “STEP4”. (P. 3 6 4 )
■Deleting the phonebook data in a different way
Display the “Phone” screen. (P. 3 3 8 )
Touch “Contacts” on the “Phone” screen.
Choose the desired data from the list.
Touch “Options” on the “Contact Data” screen.
Touch “Delete Contact” on the “Contact Data” screen.
A confirmation message will be displayed. If everything is correct, touch
“Yes”.
STEP1
STEP2
STEP3
STEP4
STEP5
STEP6
STEP1
STEP2
STEP3
STEP4
STEP5
STEP1
STEP2
STEP3
STEP4
STEP5
STEP6
Page 368 of 648
368
3-4. Using the hands-free system (for cellular phone)
GS_G_U (OM30C80U)
June 29, 2011 10:30 am
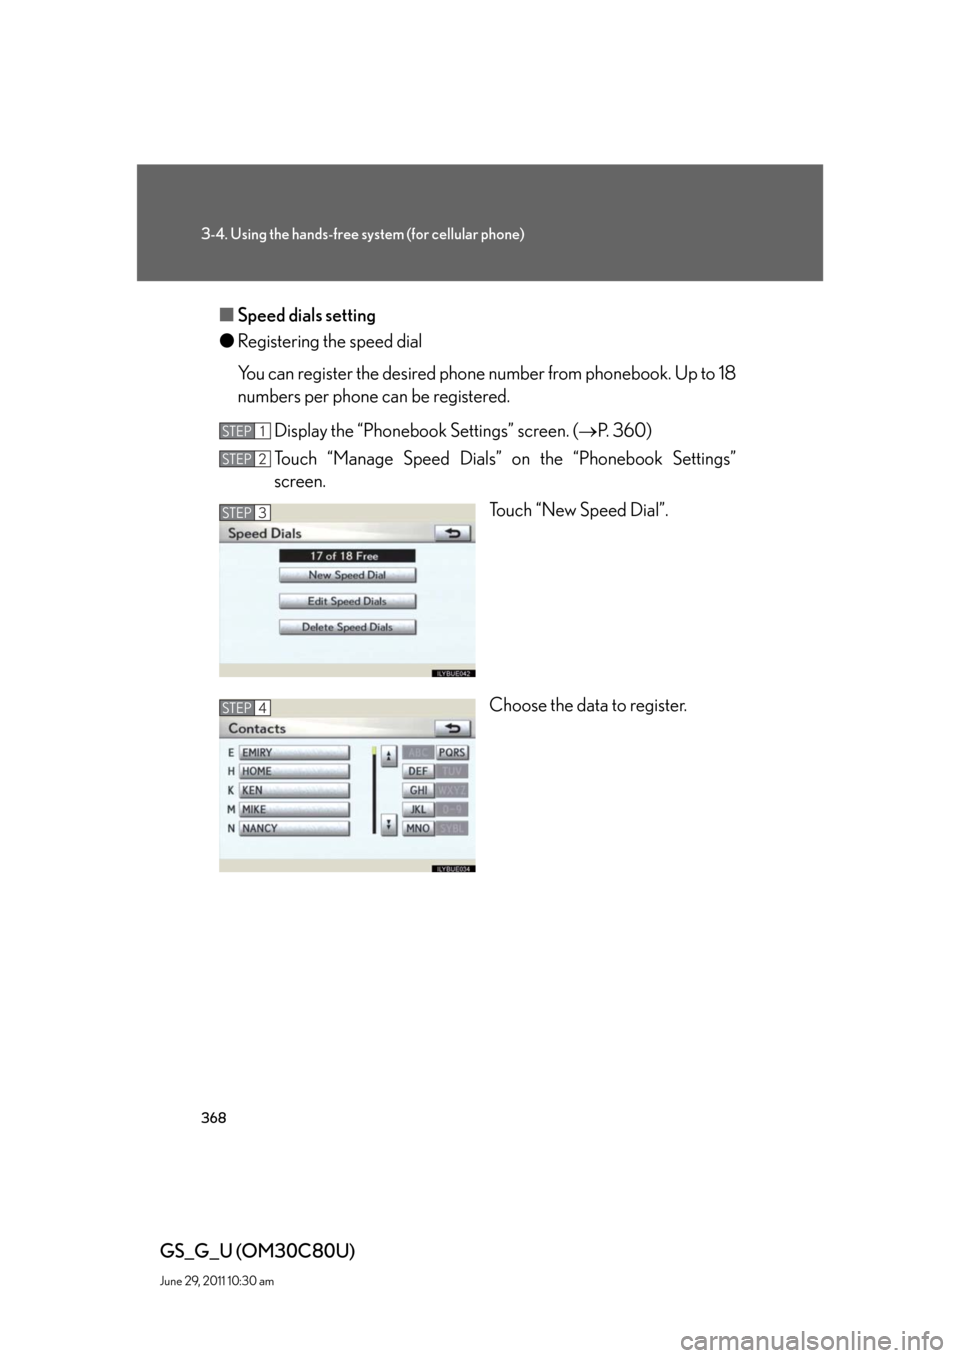
■Speed dials setting
●Registering the speed dial
You can register the desired phone number from phonebook. Up to 18
numbers per phone can be registered.
Display the “Phonebook Settings” screen. (P. 360)
Touch “Manage Speed Dials” on the “Phonebook Settings”
screen.
Touch “New Speed Dial”.
Choose the data to register.
STEP1
STEP2
STEP3
STEP4