display Lexus GS450h 2008 Using the audio system / LEXUS 2008 GS450H (OM30A96U) User Guide
[x] Cancel search | Manufacturer: LEXUS, Model Year: 2008, Model line: GS450h, Model: Lexus GS450h 2008Pages: 596, PDF Size: 9.36 MB
Page 40 of 596
40
1-3. Opening, closing and locking the doors and trunk
GS_HV_U
October 23, 2015 1:02 pm
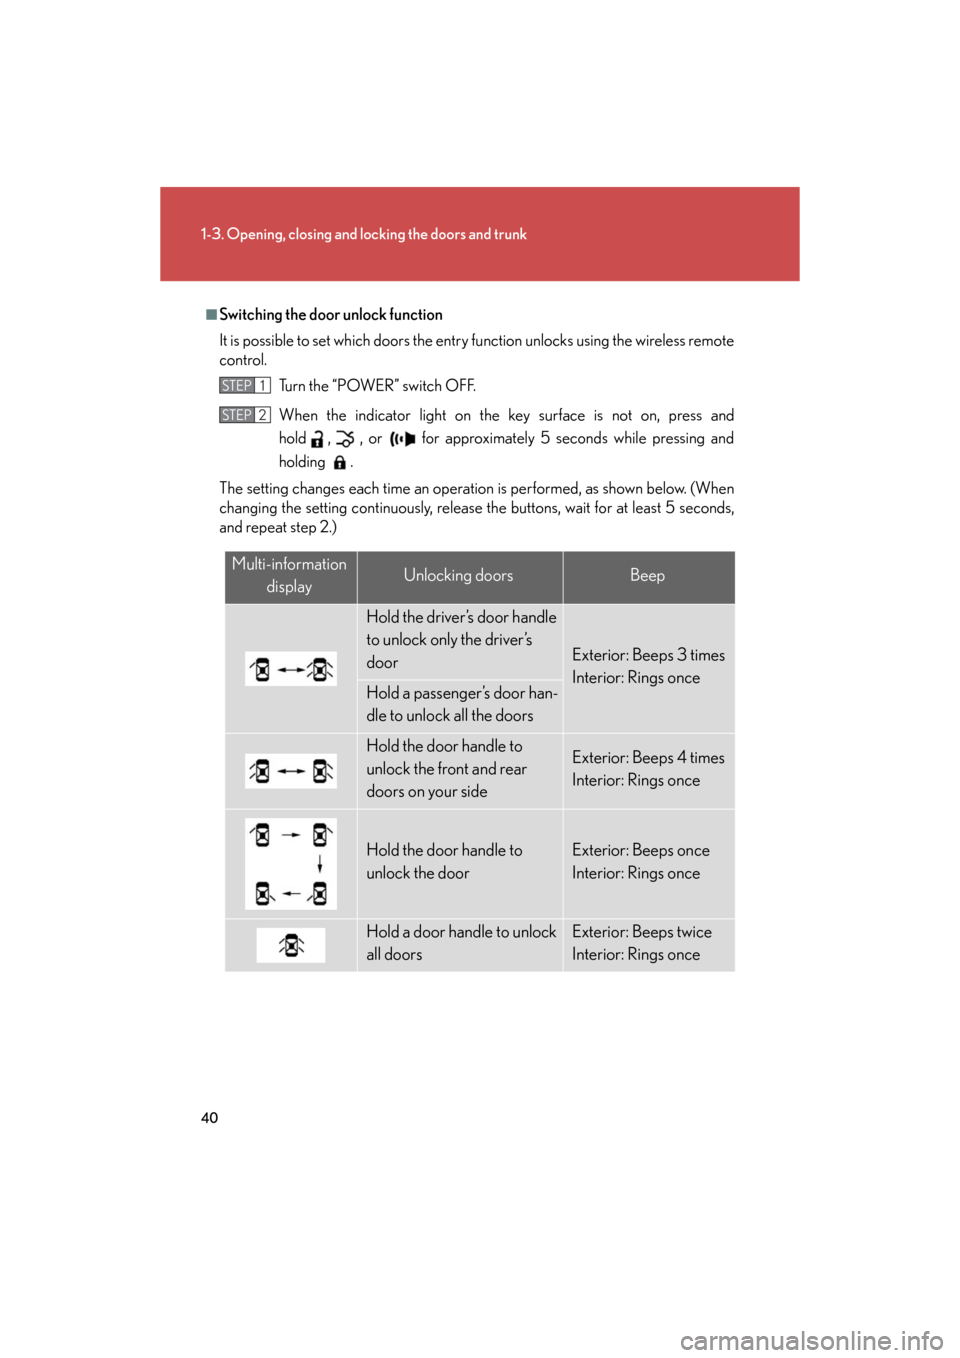
■Switching the door unlock function
It is possible to set which doors the entry function unlocks using the wireless remote
control.
Turn the “POWER” switch OFF.
When the indicator light on the key surface is not on, press and
hold , , or for approximately 5 seconds while pressing and
holding .
The setting changes each time an operatio n is performed, as shown below. (When
changing the setting continuously, release th e buttons, wait for at least 5 seconds,
and repeat step 2.)
STEP1
STEP2
Multi-information
displayUnlocking doorsBeep
Hold the driver’s door handle
to unlock only the driver’s
door
Exterior: Beeps 3 times
Interior: Rings once
Hold a passenger’s door han-
dle to unlock all the doors
Hold the door handle to
unlock the front and rear
doors on your sideExterior: Beeps 4 times
Interior: Rings once
Hold the door handle to
unlock the doorExterior: Beeps once
Interior: Rings once
Hold a door handle to unlock
all doorsExterior: Beeps twice
Interior: Rings once
Page 43 of 596

43
1-3. Opening, closing and locking the doors and trunk
1
Before driving
GS_HV_U
October 23, 2015 1:02 pm
●Gripping the door handle when wearing a glove may not unlock the door.
●If the wireless remote control is used to lock the doors when the electronic key
is near the vehicle, there is a possibility that the door may not be unlocked by the
smart access system with push-button start. (Use the wireless remote control to
unlock the doors.)
●A sudden approach to the effective range or door handle operation may pre-
vent the doors from being unlocked. In this case, return the door handle to the
original position and check that the door s unlock before pulling the door handle
again.
■When the vehicle is not driven for extended periods
To prevent theft of the vehicle, do not leave the electronic key within 6 ft. (2 m) of
the vehicle.
■Security feature
If a door is not opened within approx imately 60 seconds after the vehicle is
unlocked, the theft deterrent system au tomatically locks the vehicle again.
■Alarms and warning indicators
A combination of exterior and interior alarms as well as warnings displayed on the
multi-information display are used to prevent theft of the vehicle and unforeseeable
accidents resulting from erroneous operation. Take appropriate measures in
response to any warning indications on the multi-information display. ( P. 5 1 3 )
The following table describes circumstances and correction procedures when only
alarms are sounded.
Page 117 of 596

117
1
1-8. Safety information
Before driving
GS_HV_U
December 12, 2007 3:50 pm
Installing child restraints
Follow the child restraint system manufacturer’s instructions. Firmly
secure child restraints to the outboard rear seats using a seat belt or a child
restraint lower anchors belt. Attach the top strap when installing a child
restraint.
Seat belts equipped with a
child restraint locking mecha-
nism (ALR/ELR belts except
driver’s seat belt)
Child restraint lower anchors
Lower anchors are provided for
the outboard rear seats. (But-
tons displaying the location of
the anchors are attached to the
seats.)
Anchor bracket
(for top strap)
Anchor brackets are provided
for all rear seats.
Page 127 of 596
When driving2
127
GS_HV_U
December 12, 2007 3:33 pm
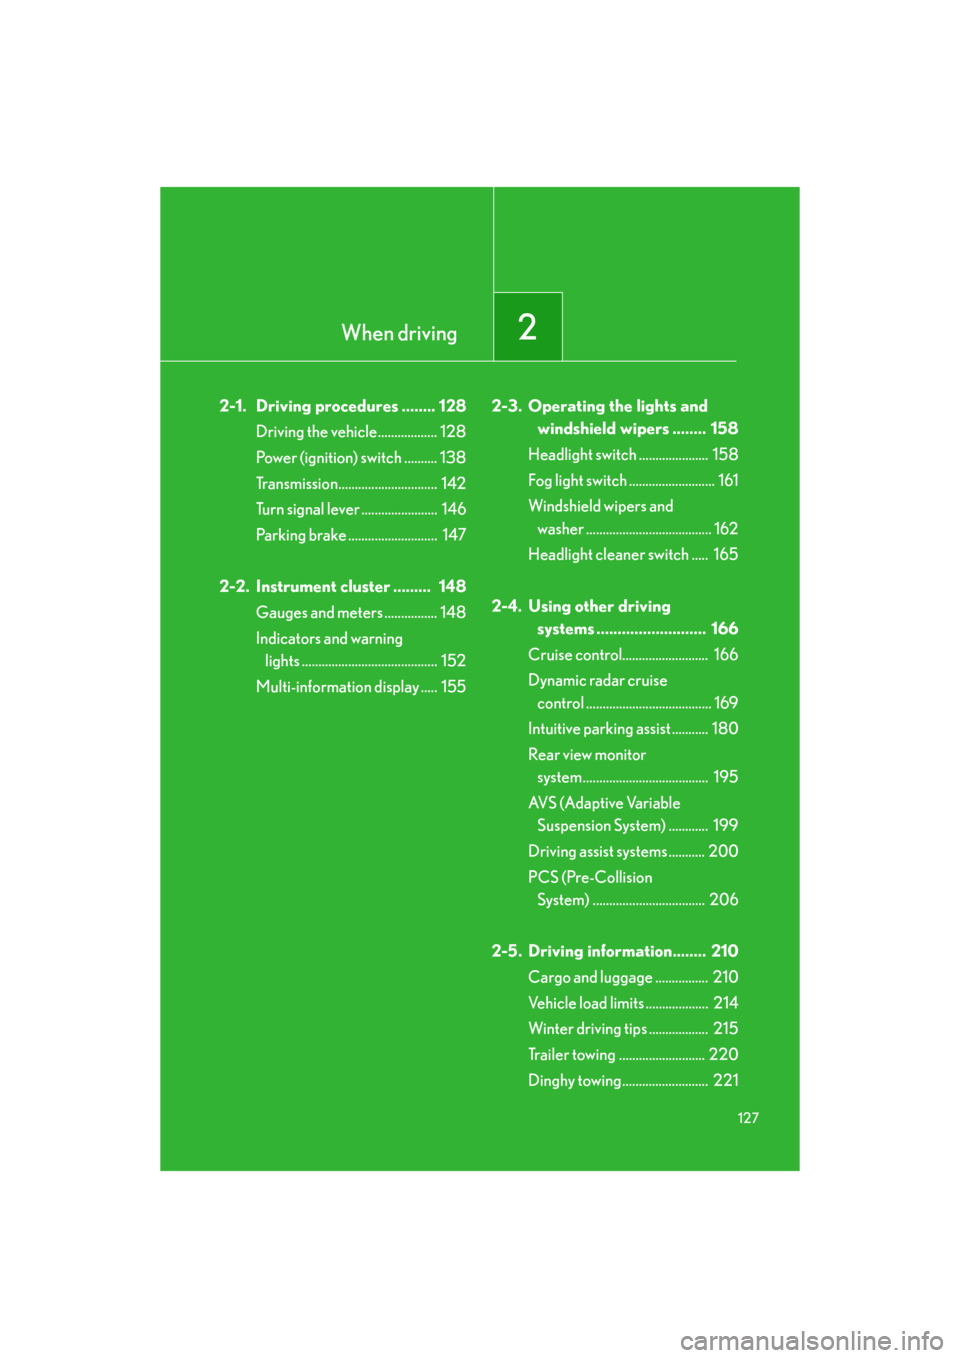
2-1. Driving procedures ........ 128Driving the vehicle.................. 128
Power (ignition) switch .......... 138
Transmission.............................. 142
Turn signal lever ....................... 146
Parking brake ........................... 147
2-2. Instrument cluster ......... 148 Gauges and meters ................ 148
Indicators and warning
lights ......................................... 152
Multi-information display ..... 155 2-3. Operating the lights and
windshield wipers ........ 158
Headlight switch ..................... 158
Fog light switch .......................... 161
Windshield wipers and
washer ...................................... 162
Headlight cleaner switch ..... 165
2-4. Using other driving
systems .......................... 166
Cruise control.......................... 166
Dynamic radar cruise
control ...................................... 169
Intuitive parking assist ........... 180
Rear view monitor
system...................................... 195
AVS (Adaptive Variable
Suspension System) ............ 199
Driving assist systems ........... 200
PCS (Pre-Collision
System) .................................. 206
2-5. Driving information........ 210 Cargo and luggage ................ 210
Vehicle load limits ................... 214
Winter driving tips .................. 215
Trailer towing .......................... 220
Dinghy towing.......................... 221
Page 140 of 596

140
2-1. Driving procedures
GS_HV_U
May 13, 2008 3:11 pm
■If the hybrid system does not start
The immobilizer system may not have been deactivated. (P. 88)
■When the steering lock cannot be released
■When the “POWER” switch indicator flashes in amber
The system may be malfunctioning. Have the vehicle inspected by your Lexus
dealer immediately.
■If the “READY” light does not come on
If the “READY” light does not come on when you press the “POWER” switch with
the shift lever in “P” and the brake pedal pressed, contact your Lexus dealer imme-
diately.
■Auto power OFF function
If the vehicle is left in the ACCESSORY mode for more than an hour with the shift
lever in “P”, the “POWER” switch will automatically turn OFF.
■When the ambient temperature is low
Such as during winter driving conditions, it may take time until the “READY” light
comes on.
■Sounds and vibrations specific to a hybrid vehicle
P. 2 5
■When the hybrid system is malfunctioning
P. 5 0 0
The green indicator light on the “POWER”
switch will flash and a message will be shown
on the multi-information display. Press the
“POWER” switch again while turning the
steering wheel left and right.
Page 148 of 596
148
GS_HV_U
December 12, 2007 3:50 pm
2-2. Instrument cluster
Gauges and meters
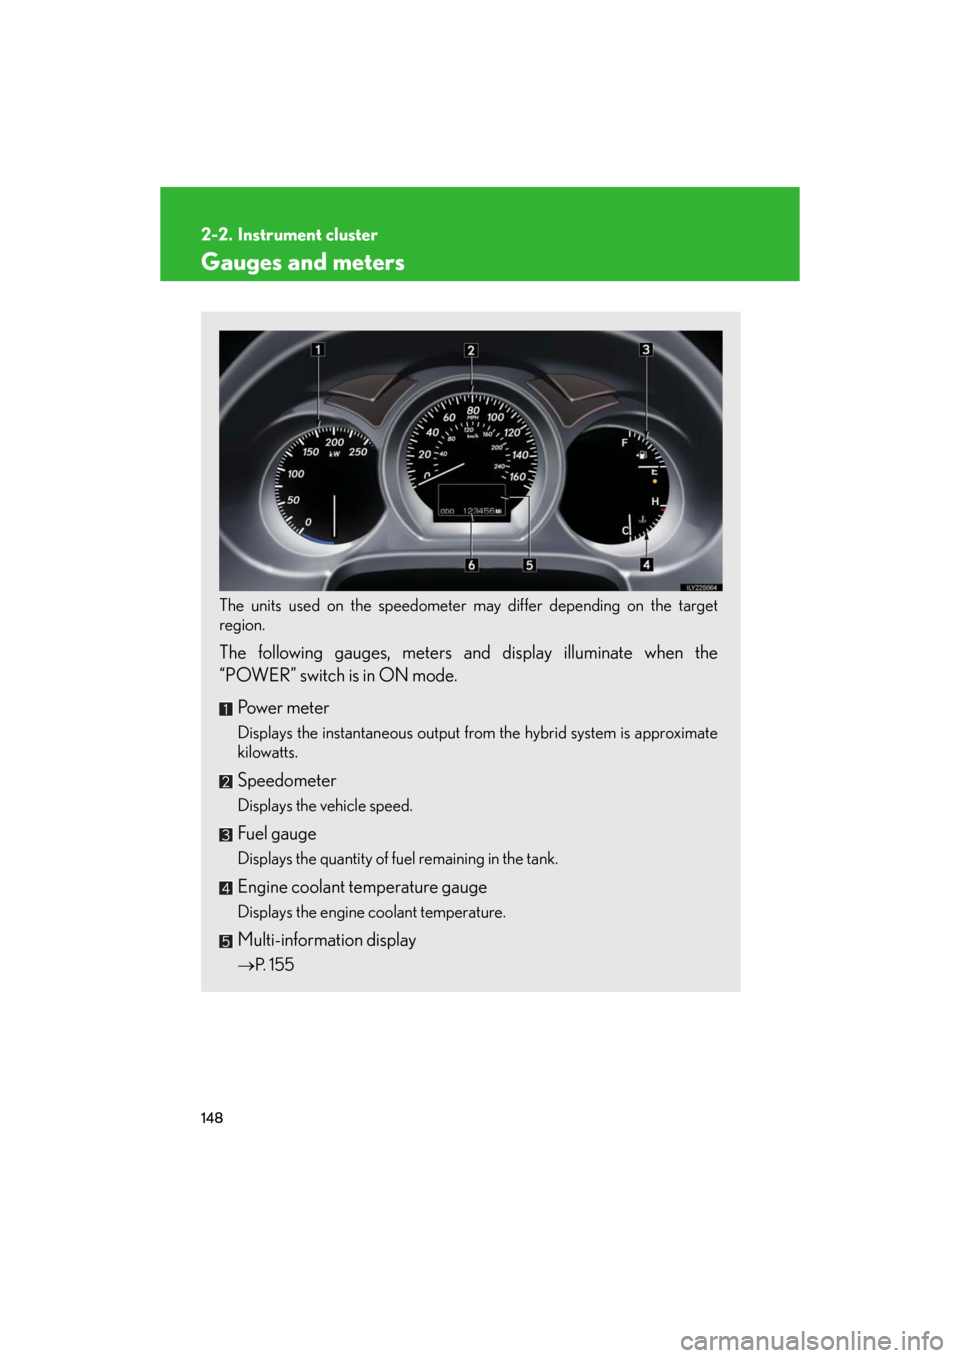
The units used on the speedometer may differ depending on the target
region.
The following gauges, meters and display illuminate when the
“POWER” switch is in ON mode.
Power meter
Displays the instantaneous output from the hybrid system is approximate
kilowatts.
Speedometer
Displays the vehicle speed.
Fuel gauge
Displays the quantity of fuel remaining in the tank.
Engine coolant temperature gauge
Displays the engine coolant temperature.
Multi-information display
P. 1 5 5
Page 149 of 596
149
2-2. Instrument cluster
2
When driving
GS_HV_U
December 12, 2007 3:50 pm
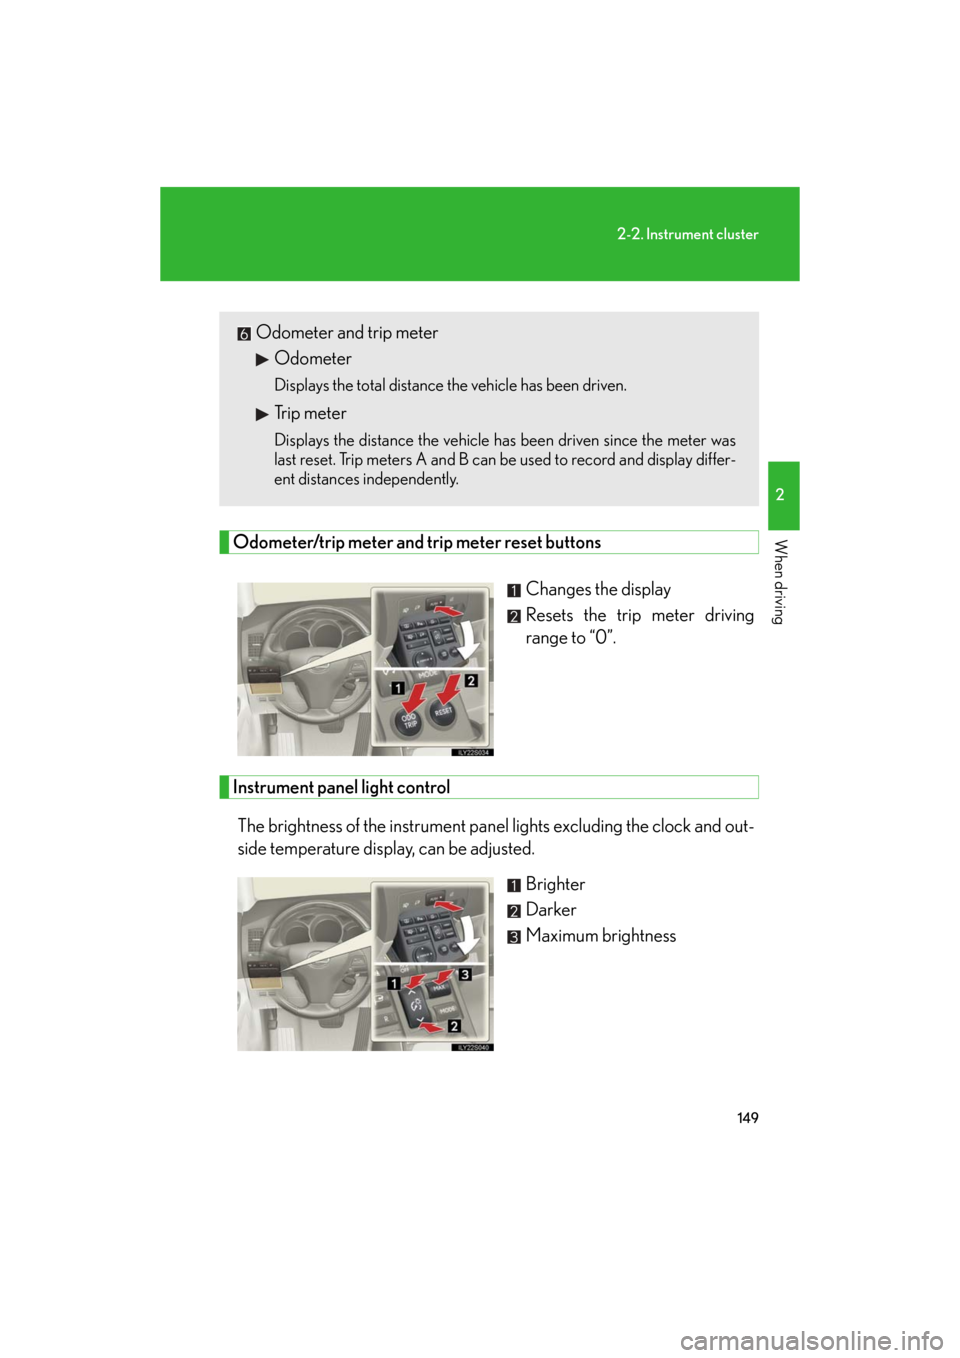
Odometer/trip meter and trip meter reset buttonsChanges the display
Resets the trip meter driving
range to “0”.
Instrument panel light controlThe brightness of the instrument panel lights excluding the clock and out-
side temperature display, can be adjusted. Brighter
Darker
Maximum brightness
Odometer and trip meterOdometer
Displays the total distance the vehicle has been driven.
Trip meter
Displays the distance the vehicle has been driven since the meter was
last reset. Trip meters A and B can be used to record and display differ-
ent distances independently.
Page 150 of 596
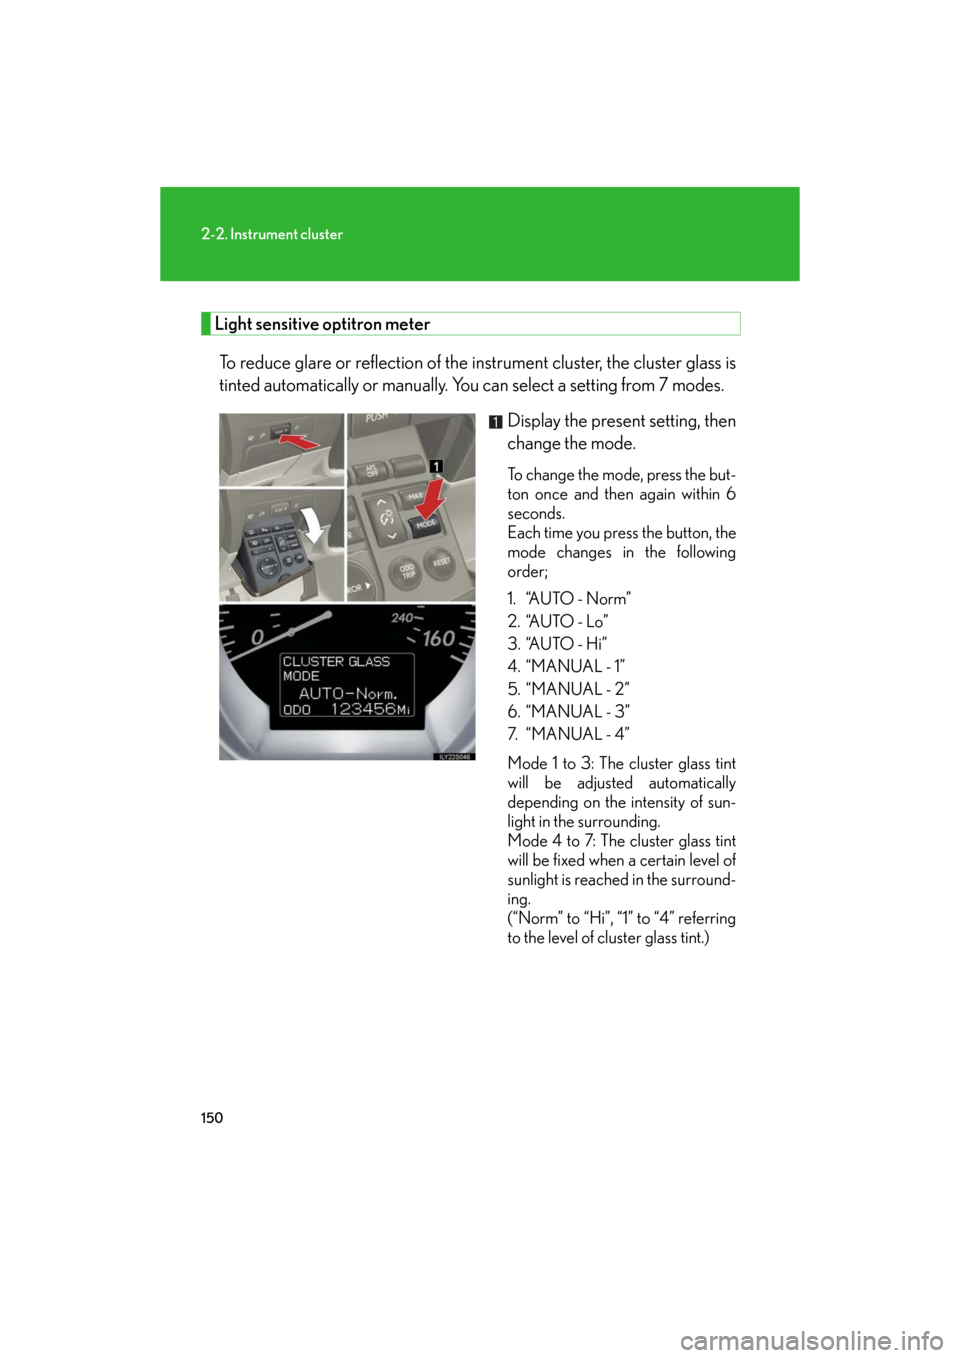
150
2-2. Instrument cluster
GS_HV_U
December 12, 2007 3:50 pm
Light sensitive optitron meterTo reduce glare or reflection of th e instrument cluster, the cluster glass is
tinted automatically or manually. You can select a setting from 7 modes.
Display the present setting, then
change the mode.
To change the mode, press the but-
ton once and then again within 6
seconds.
Each time you press the button, the
mode changes in the following
order;
1. “AUTO - Norm”
2. “AUTO - Lo”
3. “AUTO - Hi”
4. “MANUAL - 1”
5. “MANUAL - 2”
6. “MANUAL - 3”
7. “ M A N U A L - 4 ”
Mode 1 to 3: The cluster glass tint
will be adjusted automatically
depending on the intensity of sun-
light in the surrounding.
Mode 4 to 7: The cluster glass tint
will be fixed when a certain level of
sunlight is reached in the surround-
ing.
(“Norm” to “Hi”, “1” to “4” referring
to the level of cluster glass tint.)
Page 155 of 596

155
2-2. Instrument cluster
2
When driving
GS_HV_U
December 12, 2007 3:50 pm
Multi-information display
The multi-information display presents the driver with a variety of driving-
related data, including the current driving range.
●Trip information ( P. 1 5 6 )
Displays driving range, fuel con-
sumption and other cruising
related information.
●Intuitive parking assist dis-
play (if equipped) ( P. 1 8 2 )
Automatically displayed when
using intuitive parking assist.
●Dynamic radar cruise con-
trol display (if equipped)
( P. 1 6 9 )
Automatically displayed when
using dynamic radar cruise con-
trol.
●Warning messages
( P. 500)
Automatically displayed when a
malfunction occurs in one of the
vehicle’s systems.
●Energy monitor ( P. 2 7 )
Displays the status of the hybrid
system.
Page 156 of 596

156
2-2. Instrument cluster
GS_HV_U
December 12, 2007 3:50 pm
Trip information■ Driving range
■ Average fuel consumption after refueling
■ Current fuel consumption
■ Average vehicle speed
Displays the estimated maximum distance that can
be driven with the quantity of fuel remaining.
• This distance is computed based on your average
fuel consumption. As a result, the actual distance
that can be driven may differ from that displayed.
• When only a small amount of fuel is added to the tank, the display may not be updated.
Displays the average fuel consumption since the
vehicle was last refueled.
Displays the current rate of fuel consumption.
Displays the average vehicle speed since the hybrid
system was last started.
Display items can be switched
by pushing the “DISP” switch.