buttons Lexus GX460 2010 Navigation Manual
[x] Cancel search | Manufacturer: LEXUS, Model Year: 2010, Model line: GX460, Model: Lexus GX460 2010Pages: 428, PDF Size: 6.27 MB
Page 65 of 428
NAVIGATION SYSTEM: DESTINATION SEARCH
64
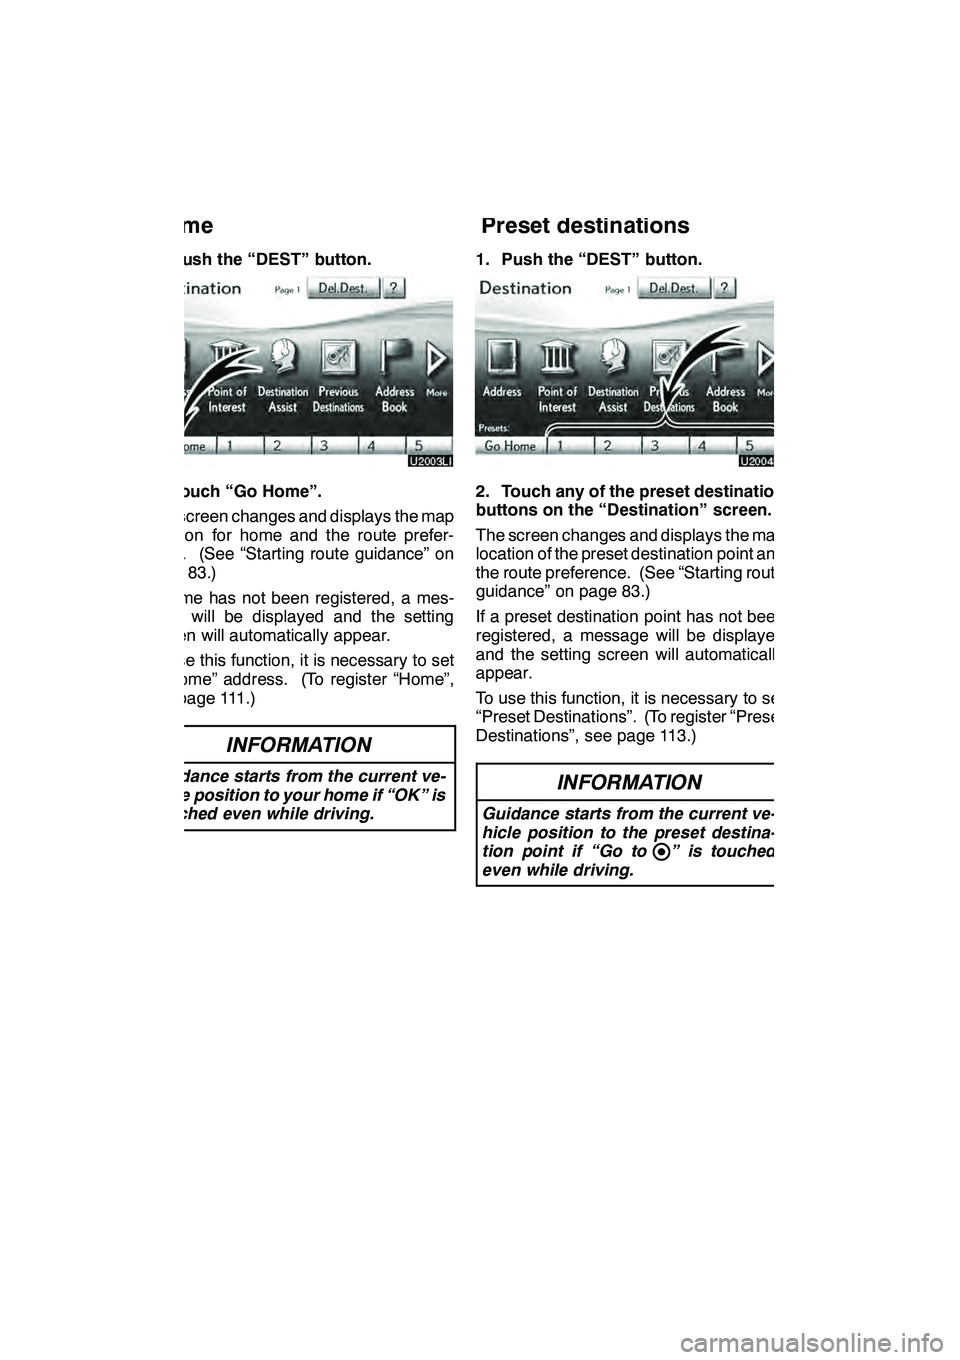
1. Push the “DEST” button.
2. Touch “Go Home”.
The screen changes and displays the map
location for home and the route prefer-
ence. (See “Starting route guidance” on
page 83.)
If home has not been registered, a mes-
sage will be displayed and the setting
screen will automatically appear.
To use this function, it is necessary to set
a “Home” address. (To register “Home”,
see page 111.)
INFORMATION
Guidance starts from the current ve-
hicle position to your home if “OK” is
touched even while driving.
1. Push the “DEST” button.
2. Touch any of the preset destination
buttons on the “Destination” screen.
The screen changes and displays the map
location of the preset destination point and
the route preference. (See “Starting route
guidance” on page 83.)
If a preset destination point has not been
registered, a message will be displayed
and the setting screen will automatically
appear.
To use this function, it is necessary to set
“Preset Destinations”. (To register “Preset
Destinations”, see page 113.)
INFORMATION
Guidance starts from the current ve-
hicle position to the preset destina-
tion point if “Go to ” is touched
even while driving.
GX460 Navi (U)
OM60E73U
Finish
09.09.24— Destination search by
Home — Destination search by
Preset destinations
Page 97 of 428
NAVIGATION SYSTEM: ROUTE GUIDANCE
96
While the route guidance is operating, you
can change the route to detour around a
section of the route where a delay is
caused by road repairs, or an accident,
etc.
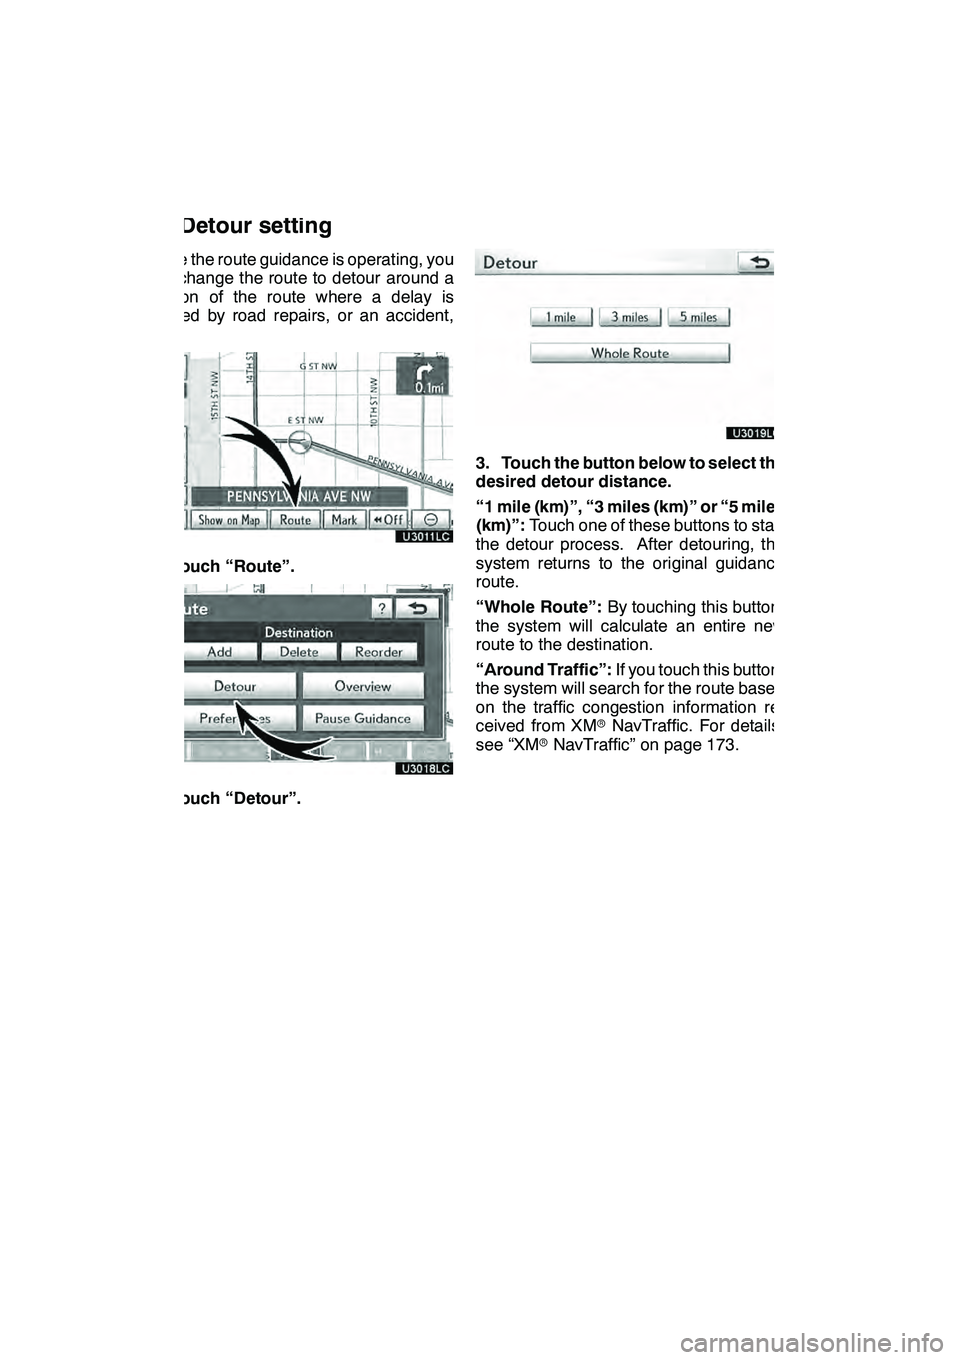
1. Touch “Route”.
2. Touch “Detour”.
3. Touch the button below to select the
desired detour distance.
“1 mile (km)”, “3 miles (km)” or “5 miles
(km)”:Touch one of these buttons to start
the detour process. After detouring, the
system returns to the original guidance
route.
“Whole Route”: By touching this button,
the system will calculate an entire new
route to the destination.
“Around Traffic”: If you touch this button,
the system will search for the route based
on the traffic congestion information re-
ceived from XM rNavTraffic. For details,
see “XM rNavTraffic” on page 173.
GX460 Navi (U)
OM60E73U
Finish
09.09.24
Setting route —
— Detour setting
Page 185 of 428
AUDIO/VIDEO SYSTEM
184
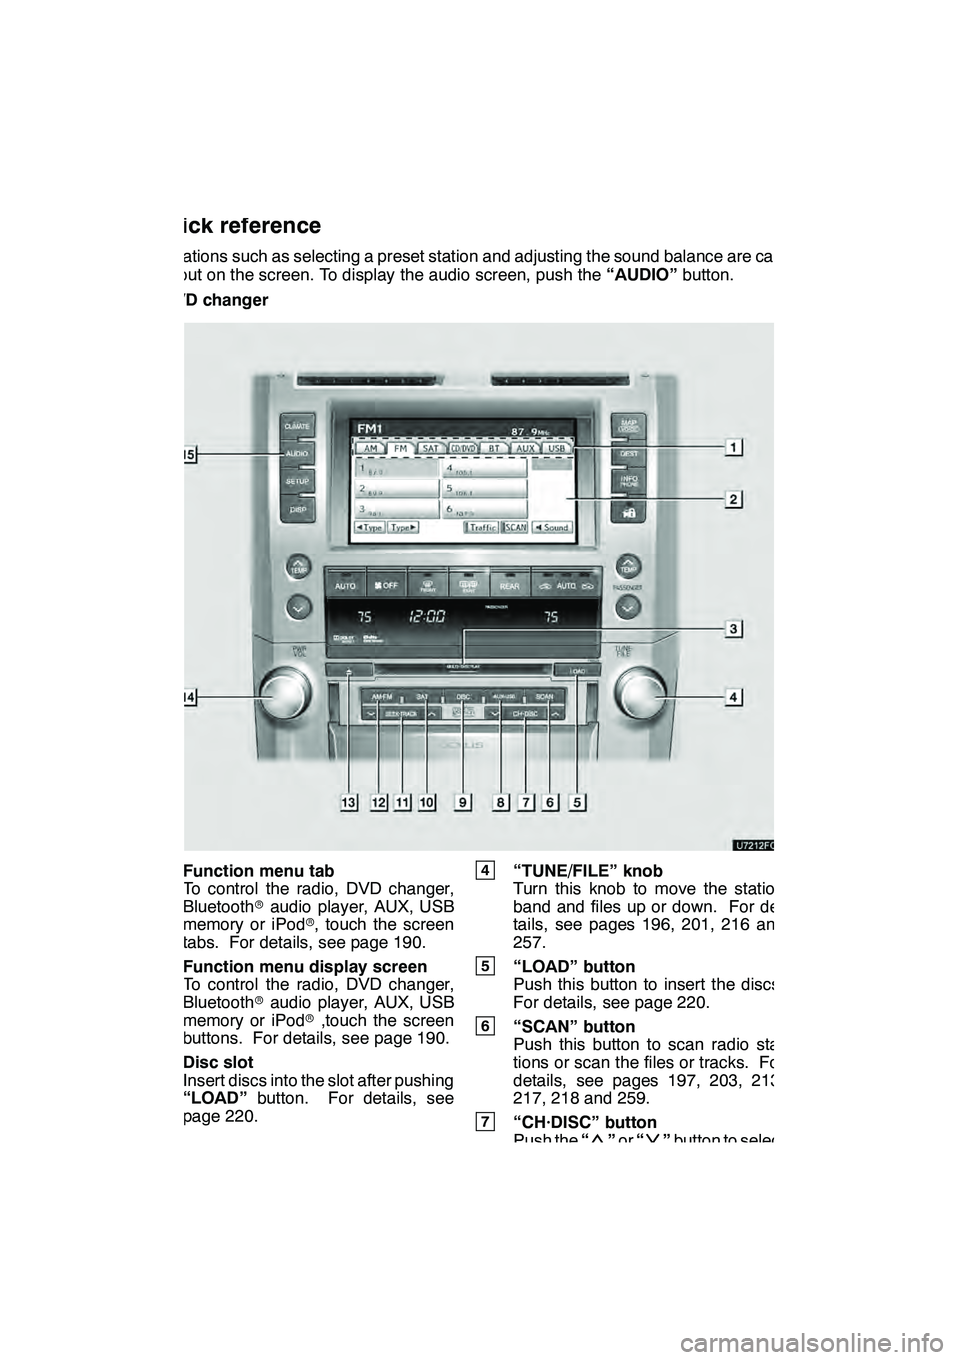
Operations such as selecting a preset station and adjusting the sound balance are car-
ried out on the screen. To display the audio screen, push the“AUDIO”button.
" DVD changer
1Function menu tab
To control the radio, DVD changer,
Bluetooth raudio player, AUX, USB
memory or iPod r, touch the screen
tabs. For details, see page 190.
2Function menu display screen
To control the radio, DVD changer,
Bluetooth raudio player, AUX, USB
memory or iPod r,touch the screen
buttons. For details, see page 190.
3Disc slot
Insert discs into the slot after pushing
“LOAD” button. For details, see
page 220.
4“TUNE/FILE” knob
Turn this knob to move the station
band and files up or down. For de-
tails, see pages 196, 201, 216 and
257.
5“LOAD” button
Push this button to insert the discs.
For details, see page 220.
6“SCAN” button
Push this button to scan radio sta-
tions or scan the files or tracks. For
details, see pages 197, 203, 213,
217, 218 and 259.
7“CH·DISC” button
Push the “”or “”button to select
a preset turning or a selected disc.
For details, see pages 197, 203, 223
and 225.
GX460 Navi (U)
OM60E73U
Finish
09.09.24
Quick reference
Page 187 of 428
AUDIO/VIDEO SYSTEM
186
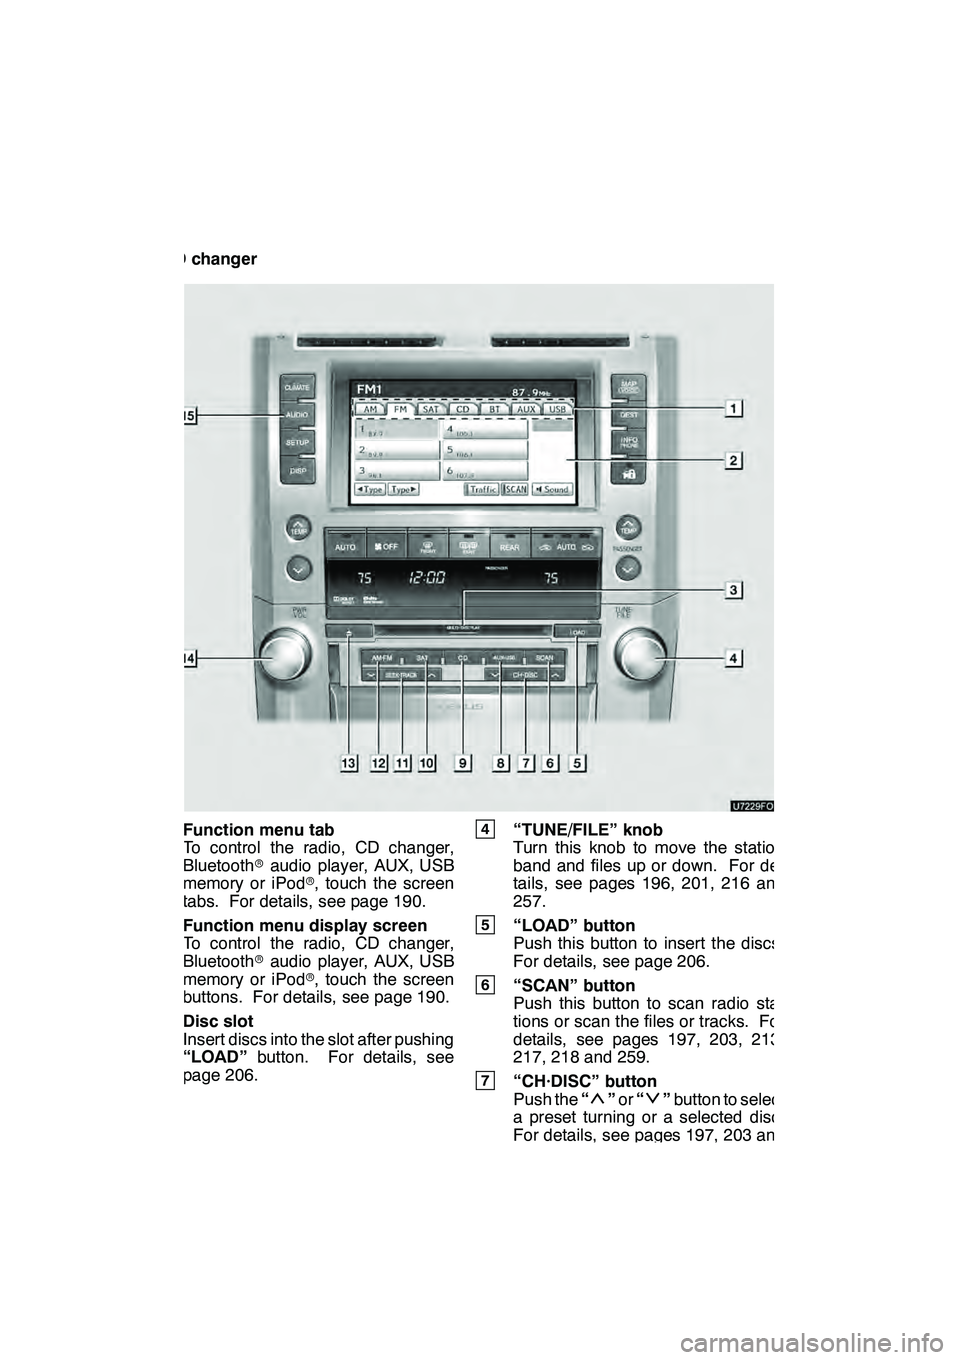
"CD changer
1Function menu tab
To control the radio, CD changer,
Bluetooth raudio player, AUX, USB
memory or iPod r, touch the screen
tabs. For details, see page 190.
2Function menu display screen
To control the radio, CD changer,
Bluetooth raudio player, AUX, USB
memory or iPod r, touch the screen
buttons. For details, see page 190.
3Disc slot
Insert discs into the slot after pushing
“LOAD” button. For details, see
page 206.
4“TUNE/FILE” knob
Turn this knob to move the station
band and files up or down. For de-
tails, see pages 196, 201, 216 and
257.
5“LOAD” button
Push this button to insert the discs.
For details, see page 206.
6“SCAN” button
Push this button to scan radio sta-
tions or scan the files or tracks. For
details, see pages 197, 203, 213,
217, 218 and 259.
7“CH·DISC” button
Push the “”or “”button to select
a preset turning or a selected disc.
For details, see pages 197, 203 and
208.
GX460 Navi (U)
OM60E73U
Finish
09.09.24
Page 190 of 428
AUDIO/VIDEO SYSTEM
189
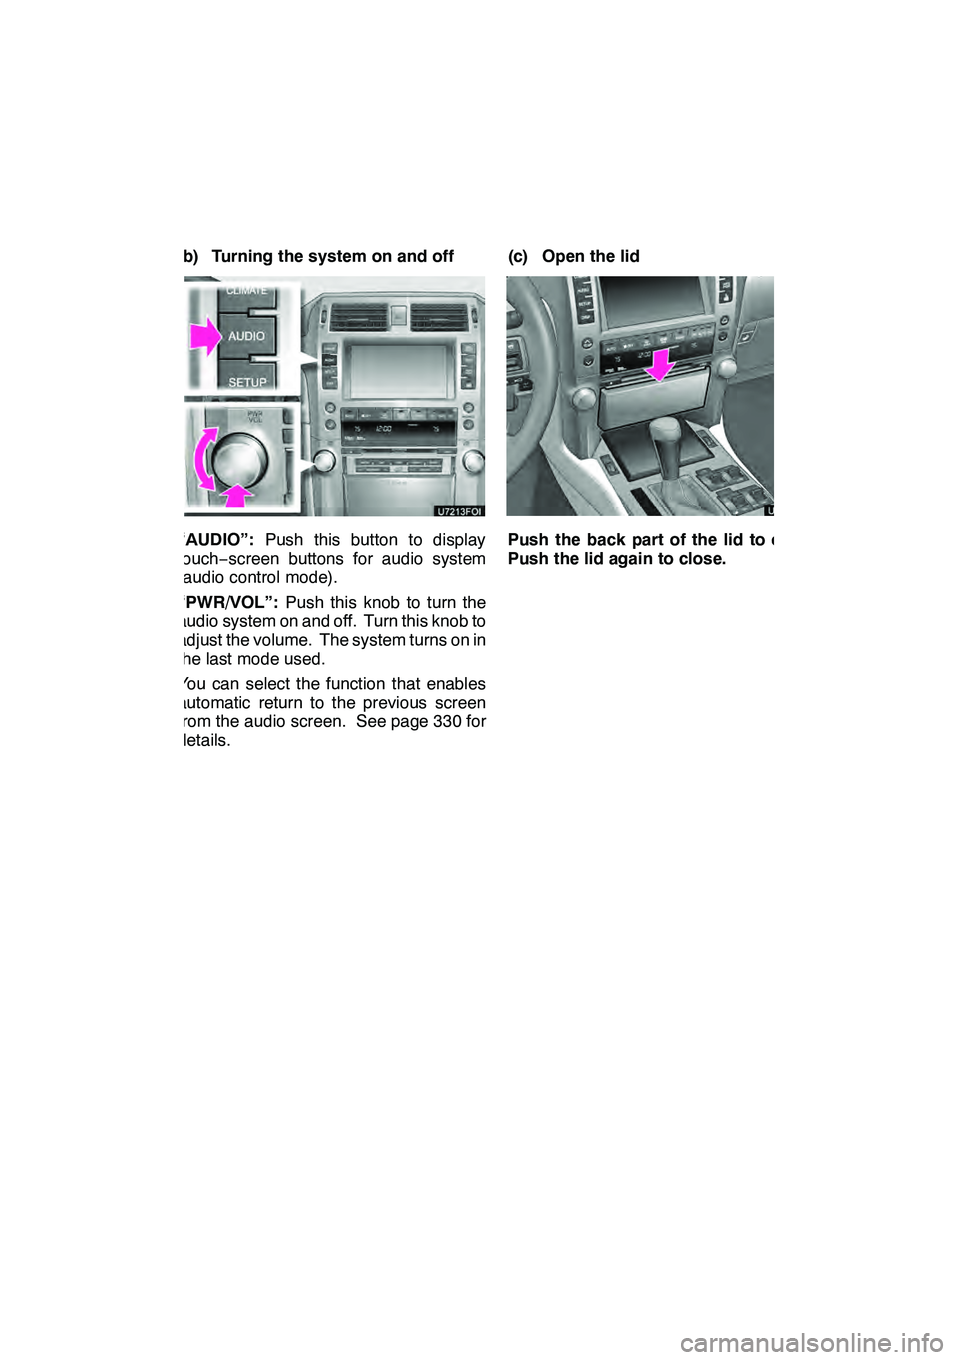
(b) Turning the system on and off
“AUDIO”:Push this button to display
touch− screen buttons for audio system
(audio control mode).
“PWR/VOL”: Push this knob to turn the
audio system on and off. Turn this knob to
adjust the volume. The system turns on in
the last mode used.
You can select the function that enables
automatic return to the previous screen
from the audio screen. See page 330 for
details. (c) Open the lidPush the back part of the lid to open.
Push the lid again to close.
GX460 Navi (U)
OM60E73U
Finish
09.09.24
7
Page 191 of 428
AUDIO/VIDEO SYSTEM
190
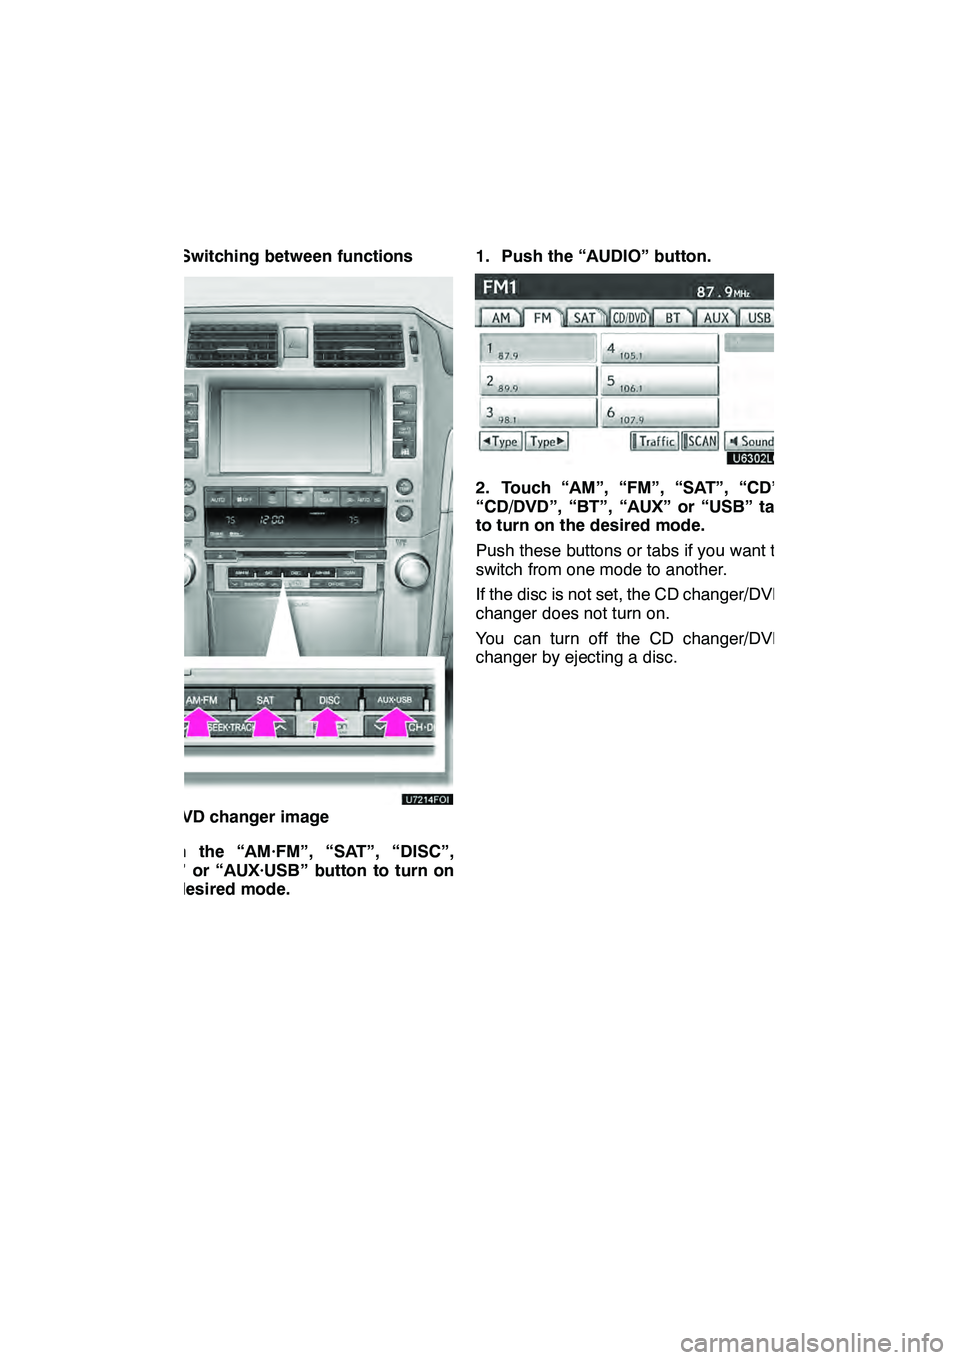
(d) Switching between functions
"DVD changer image
Push the “AM·FM”, “SAT”, “DISC”,
“CD” or “AUX·USB” button to turn on
the desired mode. 1. Push the “AUDIO” button.
2. Touch “AM”, “FM”, “SAT”, “CD”,
“CD/DVD”, “BT”, “AUX” or “USB” tab
to turn on the desired mode.
Push these buttons or tabs if you want to
switch from one mode to another.
If the disc is not set, the CD changer/DVD
changer does not turn on.
You can turn off the CD changer/DVD
changer by ejecting a disc.
GX460 Navi (U)
OM60E73U
Finish
09.09.24
Page 193 of 428
AUDIO/VIDEO SYSTEM
192
The screen buttons for radio, CD
changer, DVD changer, Bluetoothrau-
dio player, AUX, USB memory and
iPod roperation are displayed on the
screen when the audio control mode is
selected.
Touch the tab to select the desired mode
when the audio control mode is selected.
INFORMATION
D If the system does not respond to
a touch of a touch screen button,
move your finger away from the
screen and then touch it again.
D You cannot operate dimmed
touch− screen buttons.
D Wipe off fingerprints using a glass
cleaning cloth. Do not use chemi-
cal cleaners to clean the touch
screen.
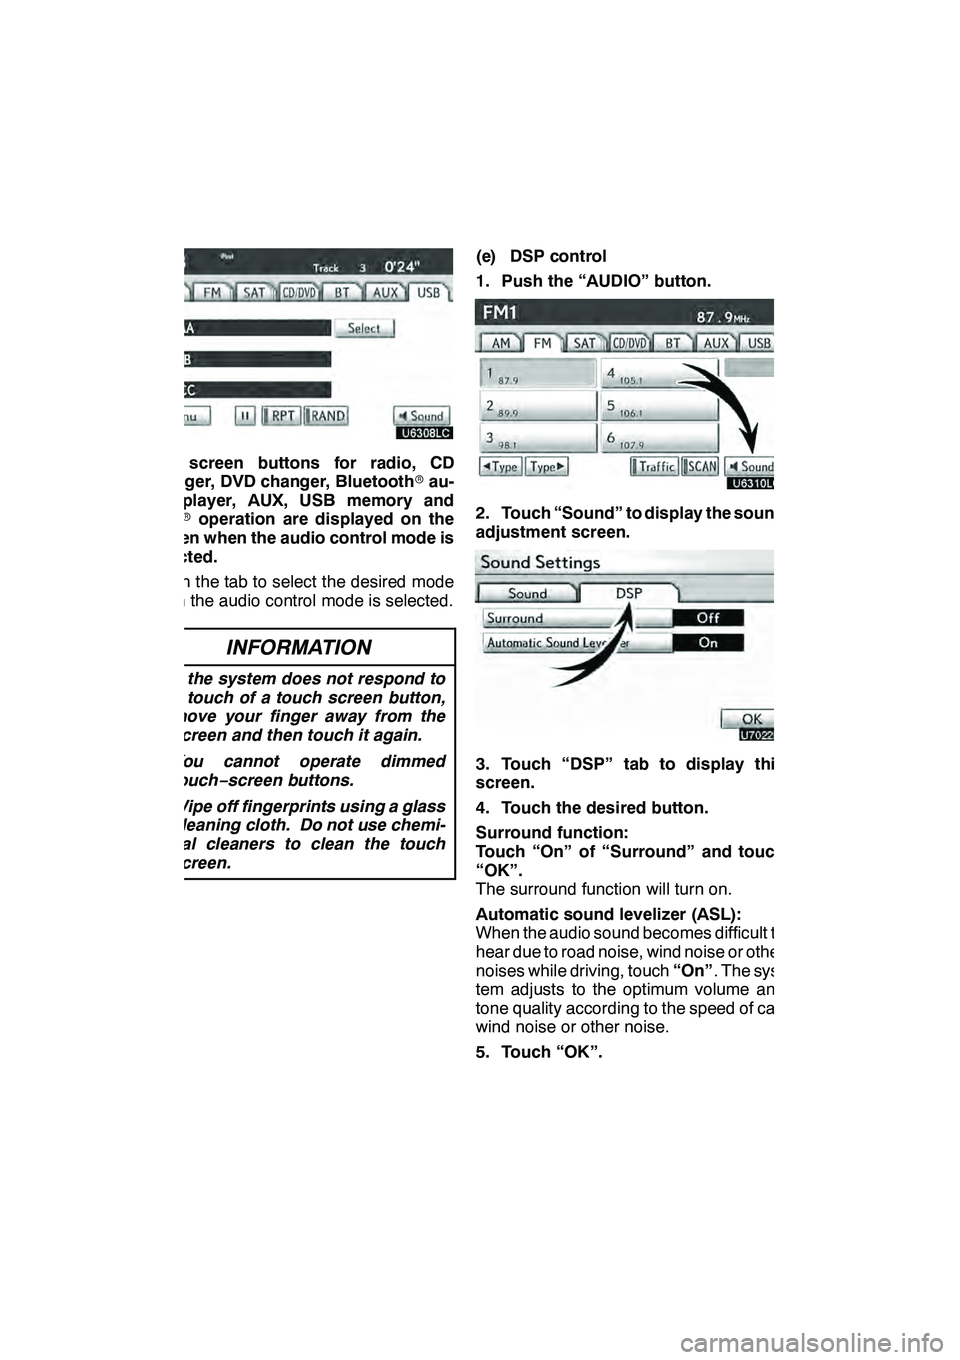
(e) DSP control
1. Push the “AUDIO” button.
2. Touch “Sound” to display the sound
adjustment screen.
3. Touch “DSP” tab to display this
screen.
4. Touch the desired button.
Surround function:
Touch “On” of “Surround” and touch
“OK”.
The surround function will turn on.
Automatic sound levelizer (ASL):
When the audio sound becomes difficult to
hear due to road noise, wind noise or other
noises while driving, touch “On”. The sys-
tem adjusts to the optimum volume and
tone quality according to the speed of car,
wind noise or other noise.
5. Touch “OK”.
GX460 Navi (U)
OM60E73U
Finish
09.09.24
Page 198 of 428
AUDIO/VIDEO SYSTEM
197
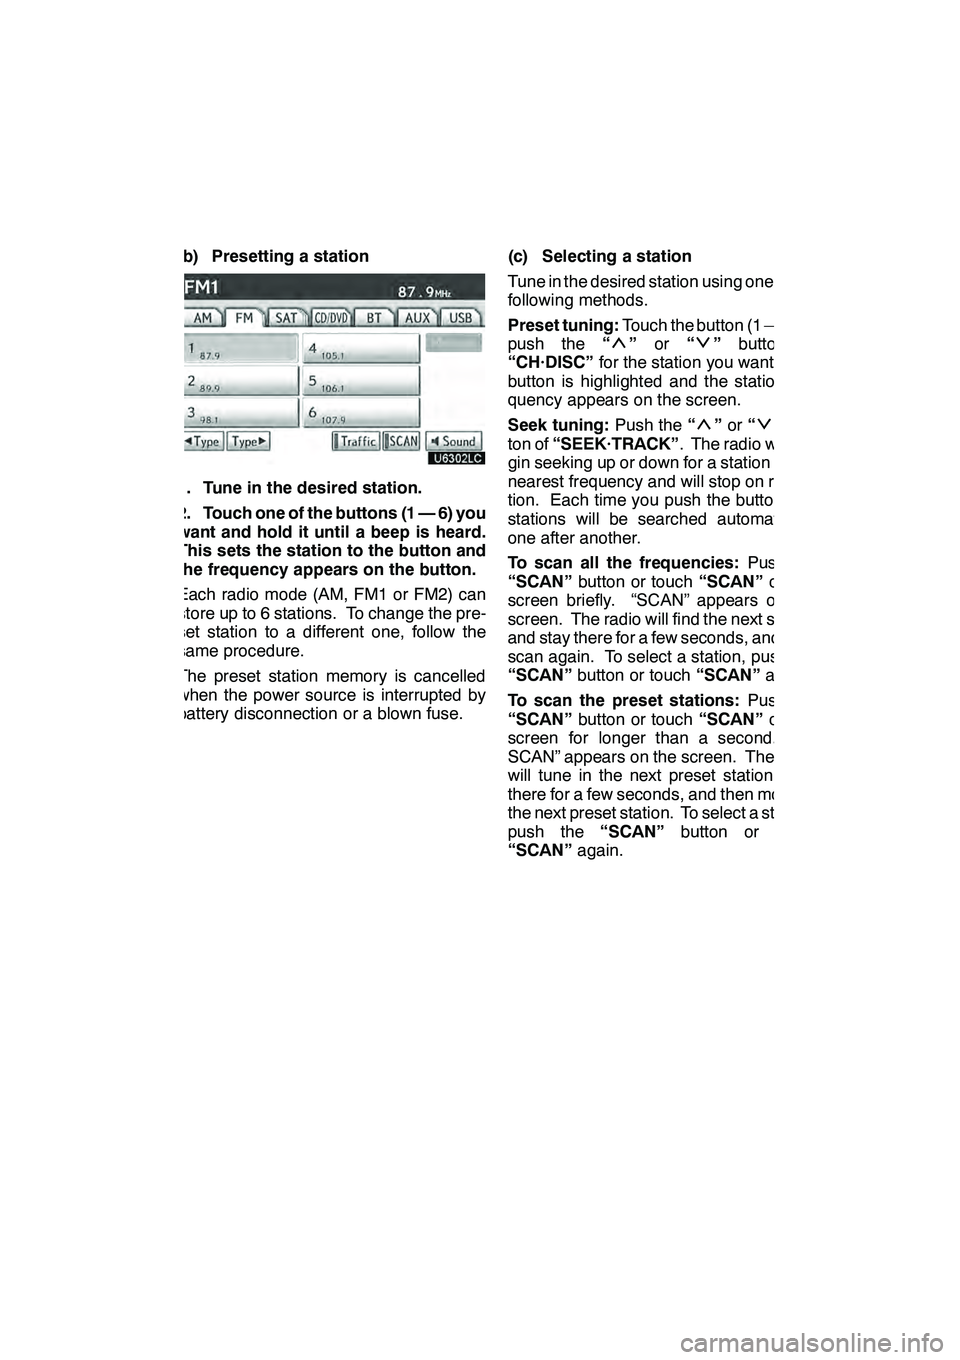
(b) Presetting a station
1. Tune in the desired station.
2. Touch one of the buttons (1 — 6) you
want and hold it until a beep is heard.
This sets the station to the button and
the frequency appears on the button.
Each radio mode (AM, FM1 or FM2) can
store up to 6 stations. To change the pre-
set station to a different one, follow the
same procedure.
The preset station memory is cancelled
when the power source is interrupted by
battery disconnection or a blown fuse.(c) Selecting a station
Tune in the desired station using one of the
following methods.
Preset tuning:
Touch the button (1 — 6) or
push the “
”or “”button of
“CH·DISC” for the station you want. The
button is highlighted and the station fre-
quency appears on the screen.
Seek tuning: Push the“
”or “”but-
ton of “SEEK·TRACK” . The radio will be-
gin seeking up or down for a station of the
nearest frequency and will stop on recep-
tion. Each time you push the button, the
stations will be searched automatically
one after another.
To scan all the frequencies: Push the
“SCAN” button or touch “SCAN”on the
screen briefly. “SCAN” appears on the
screen. The radio will find the next station
and stay there for a few seconds, and then
scan again. To select a station, push the
“SCAN” button or touch “SCAN”again.
To scan the preset stations: Push the
“SCAN” button or touch “SCAN”on the
screen for longer than a second. “P.
SCAN” appears on the screen. The radio
will tune in the next preset station, stay
there for a few seconds, and then move to
the next preset station. To select a station,
push the “SCAN”button or touch
“SCAN” again.
GX460 Navi (U)
OM60E73U
Finish
09.09.24
7
Page 203 of 428

AUDIO/VIDEO SYSTEM
202
(d) Channel category
Touch either“A Type” or“Type "”to go
to the next or previous category. (e) Presetting a channel
1. Tune in the desired channel.
2. Touch one of the channel selector
buttons (1 — 6) and hold it until a beep
is heard.
This sets the channels to the button and
the name and number of the channel ap-
pears on the button.
Each button can store three SAT channels.
To change the preset channel to a different
one, follow the same procedure.
The preset channel memory is cancelled
when the power source is interrupted by
battery disconnection or a blown fuse.
GX460 Navi (U)
OM60E73U
Finish
09.09.24
Page 236 of 428
AUDIO/VIDEO SYSTEM
235
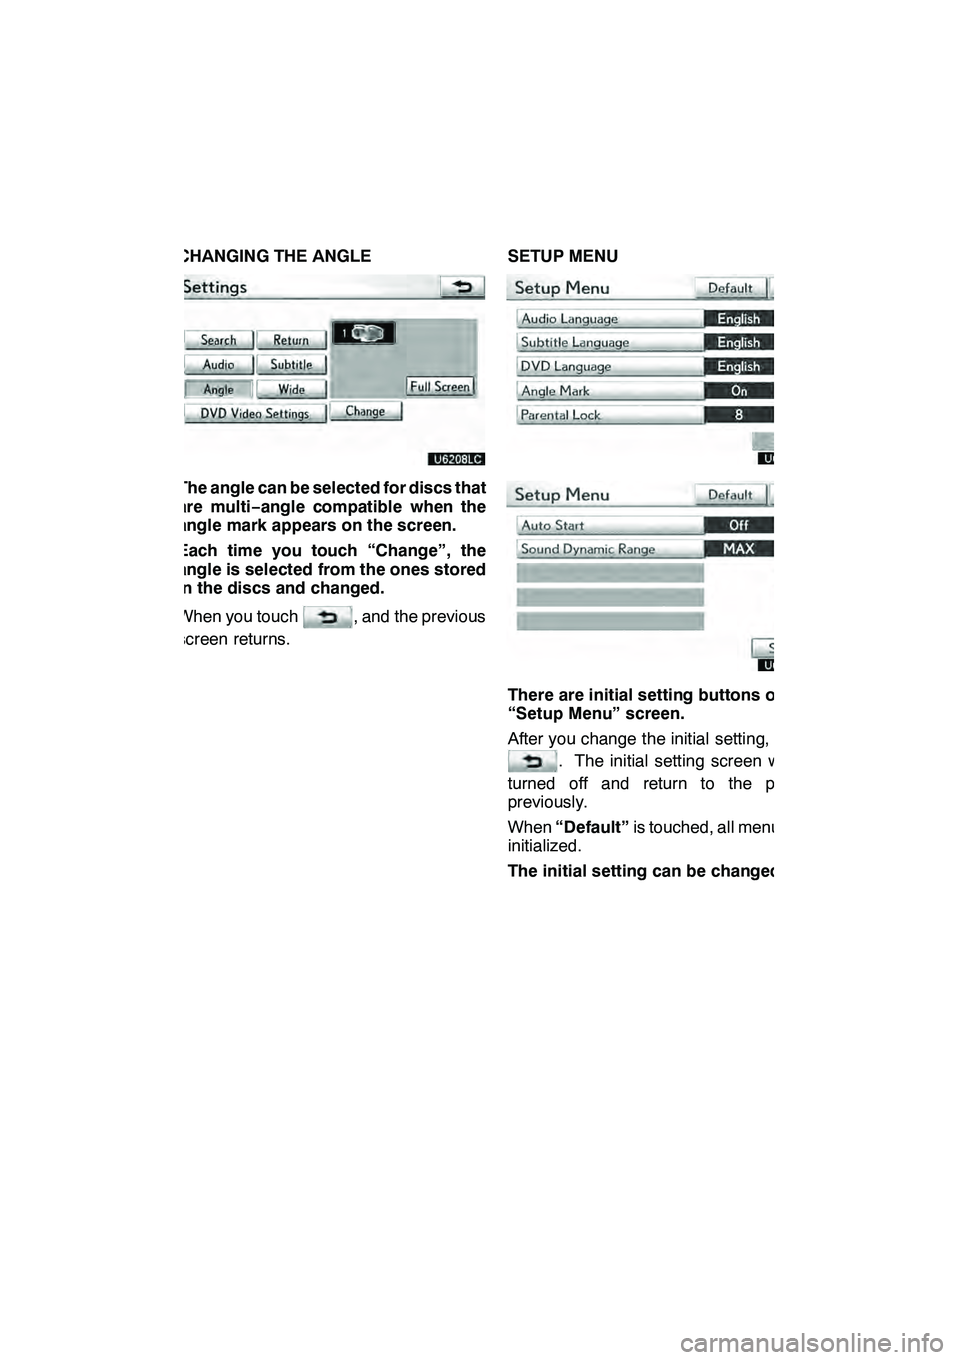
CHANGING THE ANGLE
The angle can be selected for discs that
are multi−angle compatible when the
angle mark appears on the screen.
Each time you touch “Change”, the
angle is selected from the ones stored
in the discs and changed.
When you touch
, and the previous
screen returns. SETUP MENU
There are initial setting buttons on the
“Setup Menu” screen.
After you change the initial setting, touch
. The initial setting screen will be
turned off and return to the picture
previously.
When “Default” is touched, all menus are
initialized.
The initial setting can be changed.
GX460 Navi (U)
OM60E73U
Finish
09.09.24
7