buttons Lexus GX460 2010 Navigation Manual
[x] Cancel search | Manufacturer: LEXUS, Model Year: 2010, Model line: GX460, Model: Lexus GX460 2010Pages: 428, PDF Size: 6.27 MB
Page 265 of 428
AUDIO/VIDEO SYSTEM
264
The rear seat entertainment system can
be used when the “ENGINE START
STOP” switch is in ACCESSORY or IGNI-
TION ON mode.
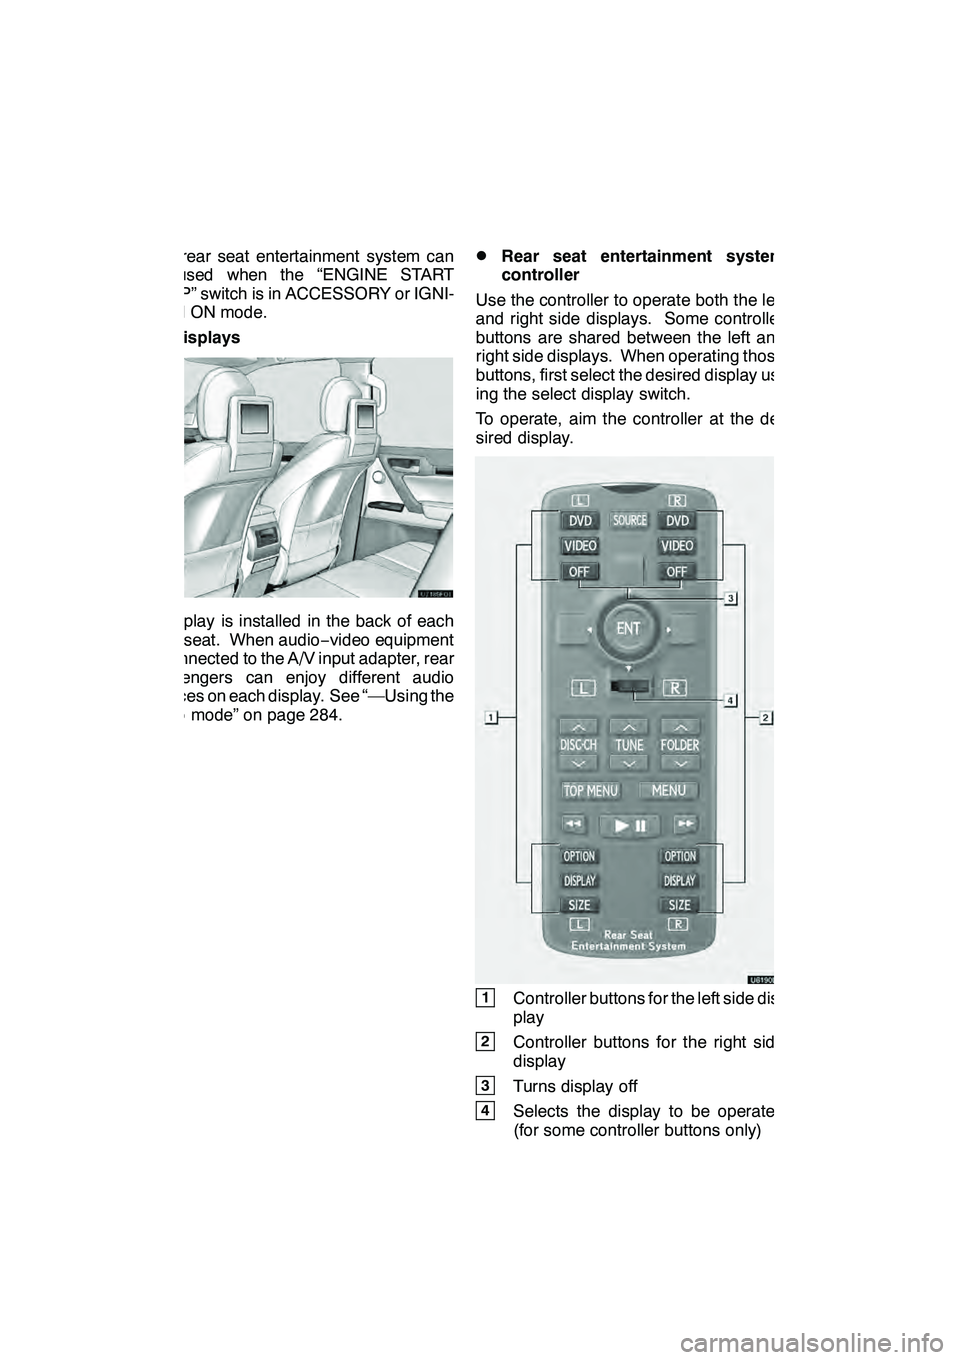
DDisplays
A display is installed in the back of each
front seat. When audio−video equipment
is connected to the A/V input adapter, rear
passengers can enjoy different audio
sources on each display. See “—Using the
video mode” on page 284.
DRear seat entertainment system
controller
Use the controller to operate both the left
and right side displays. Some controller
buttons are shared between the left and
right side displays. When operating those
buttons, first select the desired display us-
ing the select display switch.
To operate, aim the controller at the de-
sired display.
1Controller buttons for the left side dis-
play
2Controller buttons for the right side
display
3Turns display off
4Selects the display to be operated
(for some controller buttons only)
GX460 Navi (U)
OM60E73U
Finish
09.09.24
Page 273 of 428
AUDIO/VIDEO SYSTEM
272
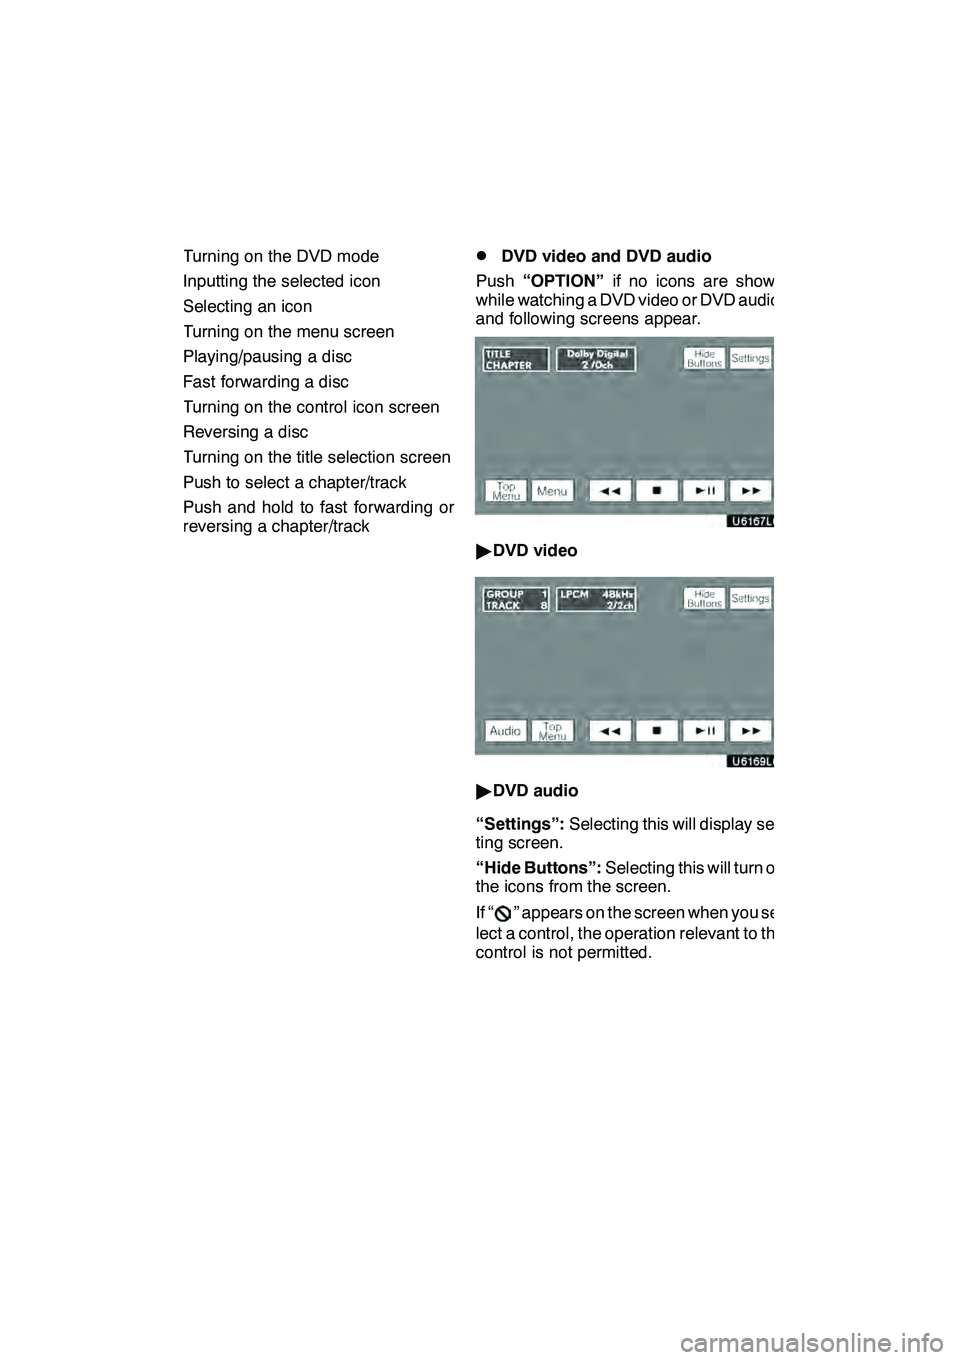
1Turning on the DVD mode
2Inputting the selected icon
3Selecting an icon
4Turning on the menu screen
5Playing/pausing a disc
6Fast forwarding a disc
7Turning on the control icon screen
8Reversing a disc
9Turning on the title selection screen
10Push to select a chapter/trackPush and hold to fast forwarding or
reversing a chapter/track
DDVD video and DVD audio
Push “OPTION” if no icons are shown
while watching a DVD video or DVD audio,
and following screens appear.
" DVD video
"DVD audio
“Settings”: Selecting this will display set-
ting screen.
“Hide Buttons”: Selecting this will turn off
the icons from the screen.
If “
” appears on the screen when you se-
lect a control, the operation relevant to the
control is not permitted.
GX460 Navi (U)
OM60E73U
Finish
09.09.30
Page 280 of 428
AUDIO/VIDEO SYSTEM
279
CHANGING THE ANGLE
Select “Angle” on the settings screen.
The angle can be selected for discs that
are multi−angle compatible when the
angle mark appears on the screen.
Each time you select “Angle”, the angle
is selected from the ones stored in the
discs and changed.
When you select
, and the previous
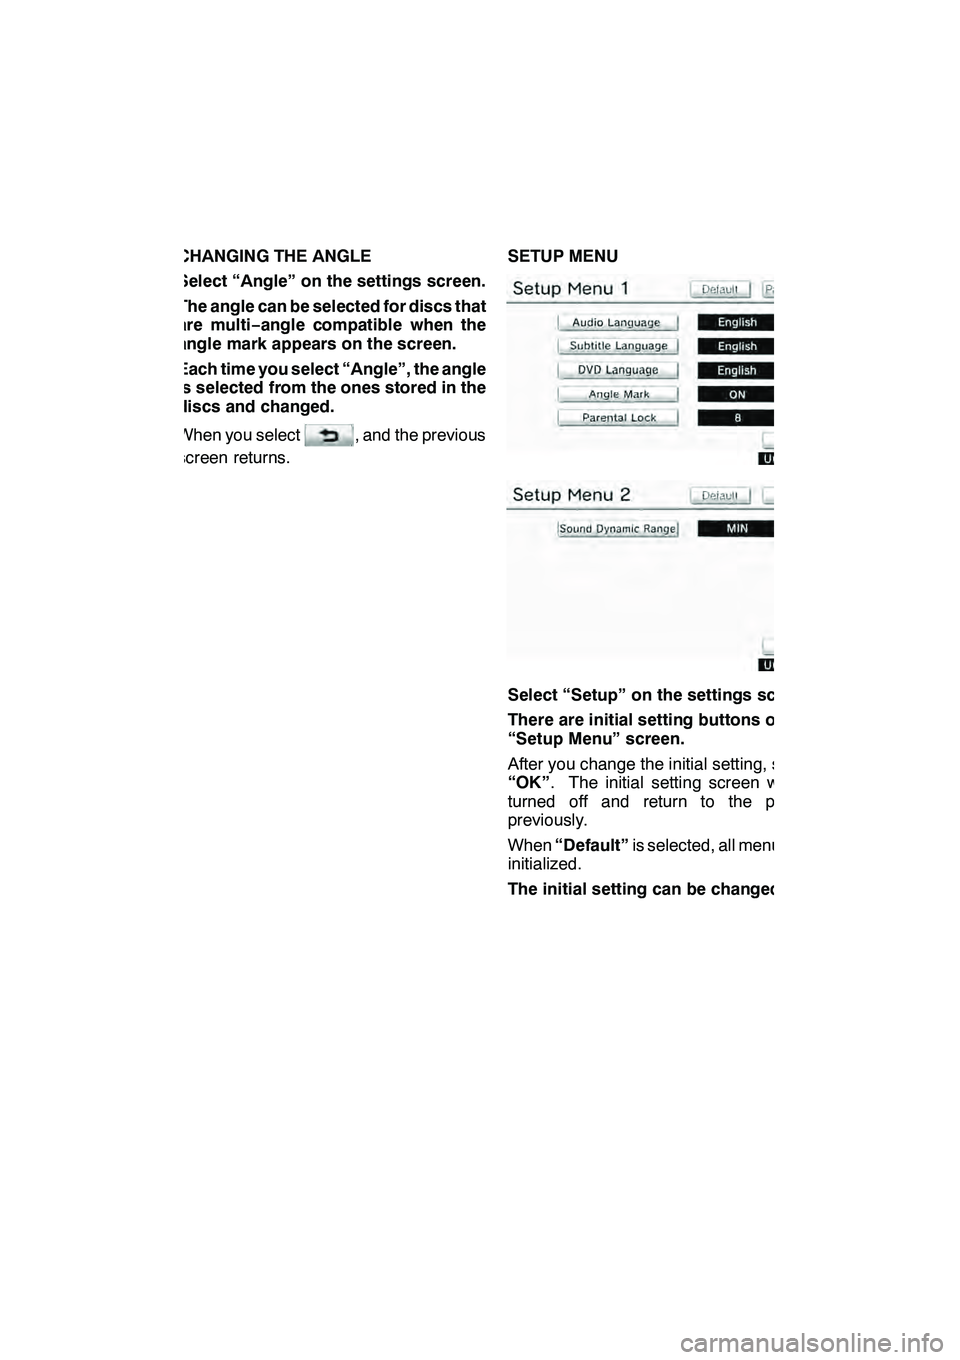
screen returns. SETUP MENU
Select “Setup” on the settings screen.
There are initial setting buttons on the
“Setup Menu” screen.
After you change the initial setting, select
“OK”
. The initial setting screen will be
turned off and return to the picture
previously.
When “Default” is selected, all menus are
initialized.
The initial setting can be changed.
GX460 Navi (U)
OM60E73U
Finish
09.09.24
7
Page 282 of 428
AUDIO/VIDEO SYSTEM
281
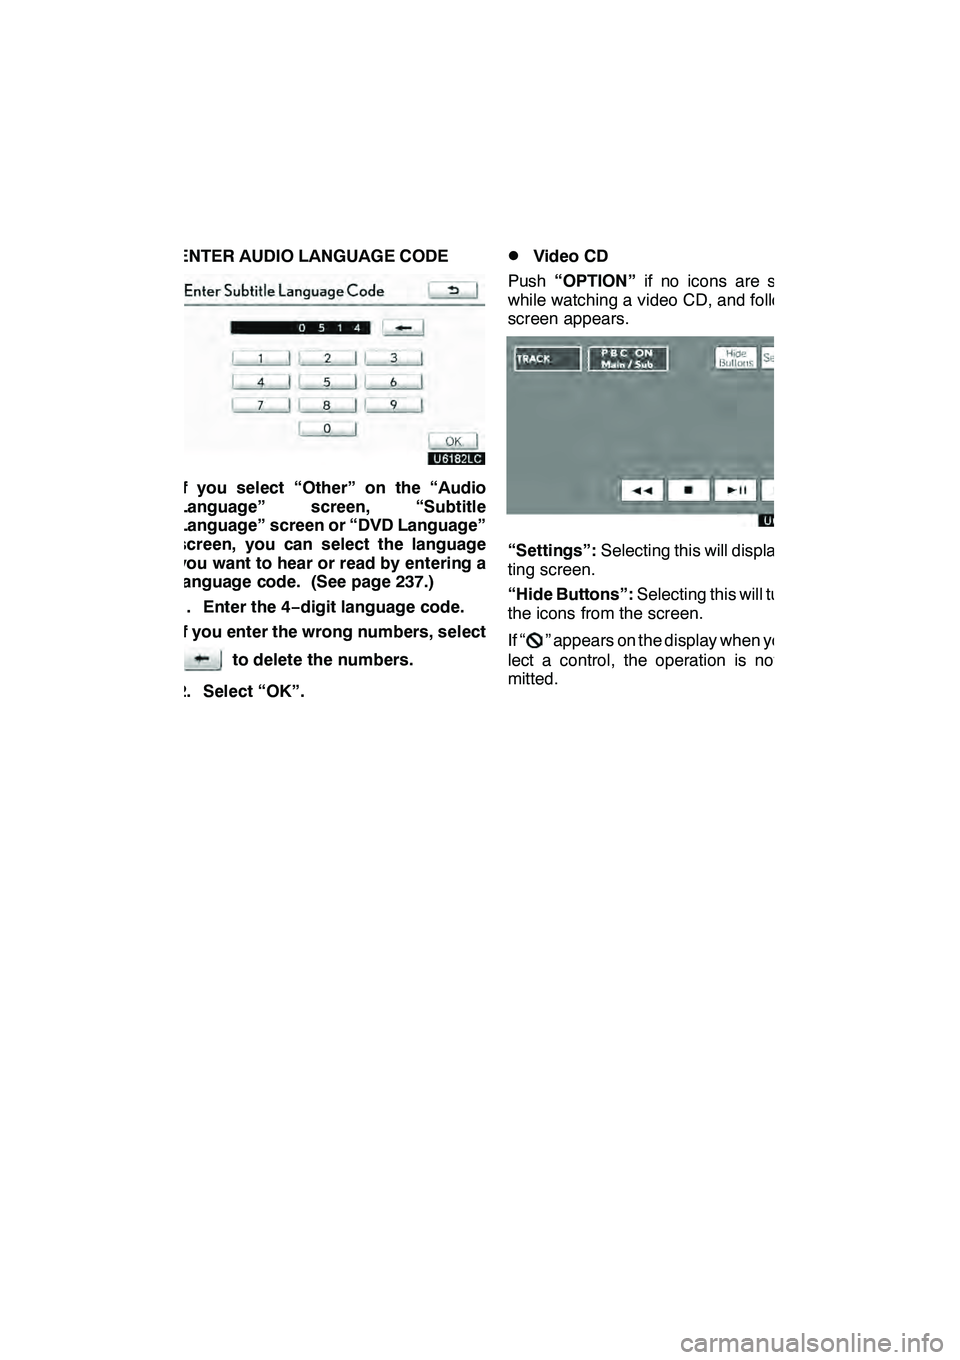
ENTER AUDIO LANGUAGE CODE
If you select “Other” on the “Audio
Language” screen, “Subtitle
Language” screen or “DVD Language”
screen, you can select the language
you want to hear or read by entering a
language code. (See page 237.)
1. Enter the 4−digit language code.
If you enter the wrong numbers, select
to delete the numbers.
2. Select “OK”.
DVideo CD
Push “OPTION” if no icons are shown
while watching a video CD, and following
screen appears.
“Settings”: Selecting this will display set-
ting screen.
“Hide Buttons”: Selecting this will turn off
the icons from the screen.
If “
” appears on the display when you se-
lect a control, the operation is not per-
mitted.
GX460 Navi (U)
OM60E73U
Finish
09.09.24
7
Page 297 of 428

AIR CONDITIONING
296
Operations such as changing the air outlets or fan speed are carried out on the screen.
To display the air conditioning control screen, push the“CLIMATE”button.
" Without rear air conditioning system
1“CLIMATE” button
(Air conditioning operation screen
display button) 299 ..............
2Outside temperature display
(In degrees Fahrenheit or Centi-
grade) 311.....................
3Air flow control buttons 304
....
4Fan speed control buttons
303
...........................
5Windshieled wiper
de− icer button 308
.............
6Micro dust and pollen filter button
310
...........................
7“A/C” 307
.....................
8“PASSENGER TEMP” buttons
(Passenger side temperature control
button)
When you touch this button, the
“DUAL” indicator light will be yellow,
and then mode will be independent
mode. 301, 303 .................
9Air intake control button
302, 305
.......................
10“DUAL”
(Temperature setting mode change
button) 301, 303 ................
11Rear window defogger button
309
...........................
GX460 Navi (U)
OM60E73U
Finish
09.09.24
Automatic air conditioning controls
Page 298 of 428

AIR CONDITIONING
297
12Windshield air flow button306
...........................
13“OFF” button 300, 303
..........
14“AUTO” button 300
............
15“TEMP” buttons
(Driver side temperature control but-
ton) 301, 303 ...................
16Passenger side temperature dis-
play
(In degrees Fahrenheit or Centi-
grade)
17Driver side temperature display
(In degrees Fahrenheit or Centi-
grade)
GX460 Navi (U)
OM60E73U
Finish
09.09.24
8
Page 299 of 428

AIR CONDITIONING
298
"With rear air conditioning system
1“CLIMATE” button
(Air conditioning operation screen
display button) 299 ..............
2Rear air conditioning control
touch−screen button 306
.......
3“3 −ZONE”
(Temperature setting mode change
touch− screen button) 301 ........
4Outside temperature display
(In degrees Fahrenheit or Centi-
grade) 311.....................
5Air flow control buttons 304
....
6Fan speed control buttons
303
...........................
7Windshieled wiper
de− icer button 308
.............
8Micro dust and pollen filter button
310
...........................
9“A/C” 307
.....................
10“PASSENGER TEMP” buttons
(Passenger side temperature control
button)
When you touch this button, the
“3− ZONE” indicator light will be yel-
low, and then mode will be indepen-
dent mode. 301, 303 .............
11Air intake control button
302, 305
.......................
12“REAR” button
Owner’s manual
................
13Rear window defogger button
309
...........................
14Windshield air flow button
306
...........................
15“OFF” button 300, 303
..........
16“AUTO” button 300
............
GX460 Navi (U)
OM60E73U
Finish
09.09.30
Page 300 of 428

AIR CONDITIONING
299
17“TEMP” buttons
(Driver side temperature control but-
ton)301, 303
...................
18Passenger side temperature dis-
play
(In degrees Fahrenheit or Centi-
grade)
19Driver side temperature display
(In degrees Fahrenheit or Centi-
grade) (a) Climate control
Air outlets and fan speed are automati-
cally adjusted according to the temper-
ature setting.
The “ENGINE START STOP” switch must
be in IGNITION ON mode.
Push the “CLIMATE” button to display
the air conditioning control screen.
INFORMATION
When the “ENGINE START STOP”
switch is turn on, the air conditioning
system settings will be set to those
that were in use the last time the “EN-
GINE START STOP” switch was
turned off. Air conditioning system
settings are memorized individually
on each electronic key, so the set-
tings reproduced will be specific to
the key that is used.
NOTICE
To prevent the battery from being dis-
charged, do not leave the air condi-
tioning on longer than necessary
when the engine is not running.
GX460 Navi (U)
OM60E73U
Finish
09.09.24
8
Page 343 of 428
SETUP
342
No.Function
6
Displayed POI icon categories can
be set. (See “DPOI category
change (Select POI icons)” on
page 345.)
7
Buttons displayed on the map
screen when “ AAOff” is selected
can be set. (See “
DScreen layout
function (“ AAOff” function)” on
page 346.)
8
The current vehicle position mark
can be adjusted manually. Miscal-
culation of the distance caused by
tire replacement can also be ad-
justed. (See “
DCurrent position/
tire change calibration” on page
346.)
9
Display of pop −up information can
be set to “On”or“Off” . (See “DPop−up information” on the page
348.)
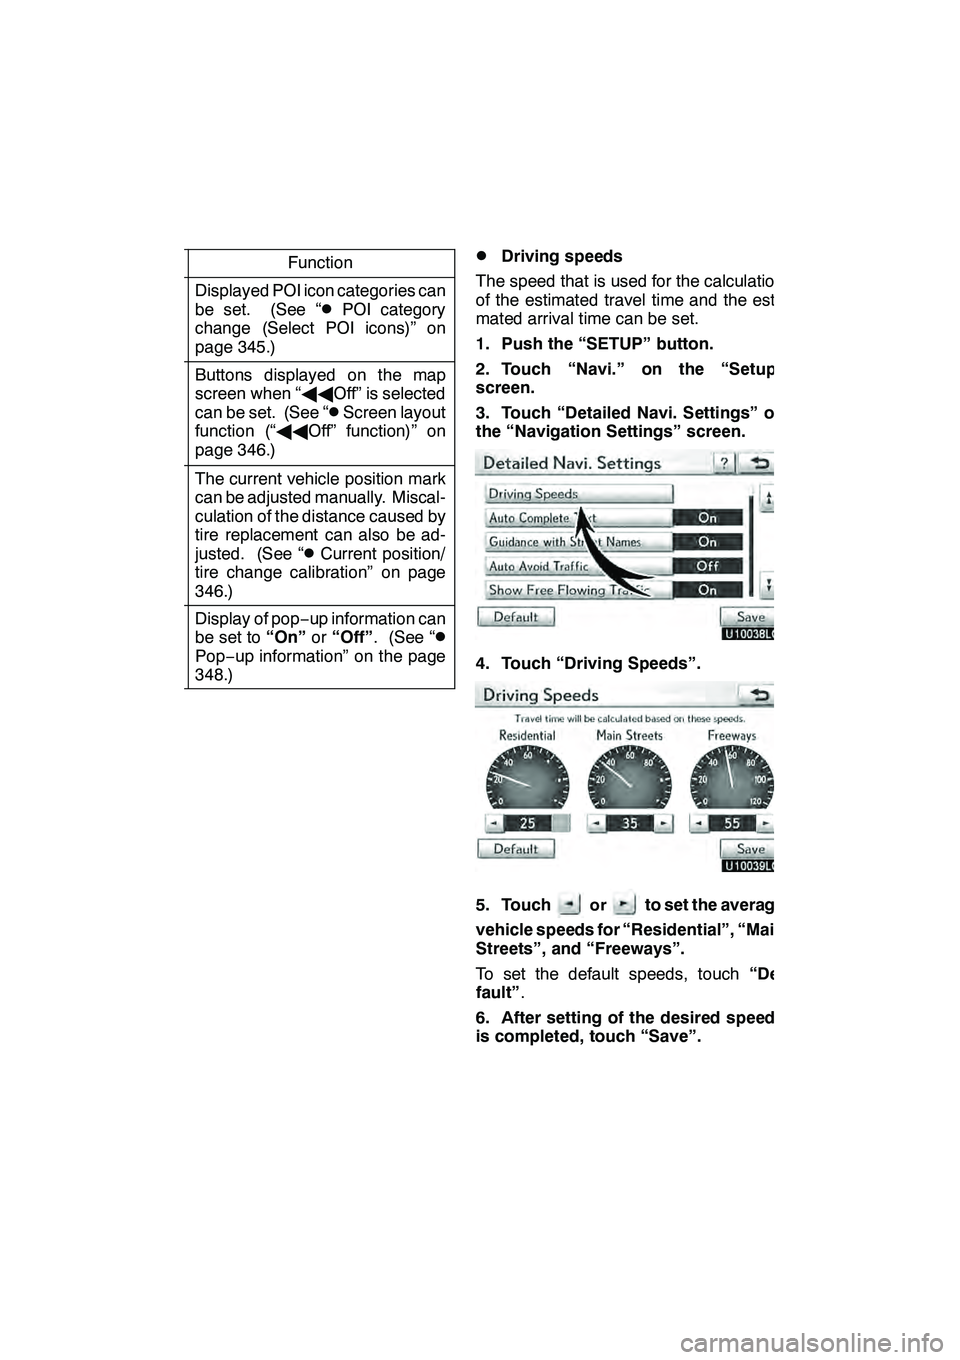
DDriving speeds
The speed that is used for the calculation
of the estimated travel time and the esti-
mated arrival time can be set.
1. Push the “SETUP” button.
2. Touch “Navi.” on the “Setup”
screen.
3. Touch “Detailed Navi. Settings” on
the “Navigation Settings” screen.
4. Touch “Driving Speeds”.
5. Touchorto set the average
vehicle speeds for “Residential”, “Main
Streets”, and “Freeways”.
To set the default speeds, touch “De-
fault” .
6. After setting of the desired speeds
is completed, touch “Save”.
GX460 Navi (U)
OM60E73U
Finish
09.09.24
Page 347 of 428
SETUP
346 D
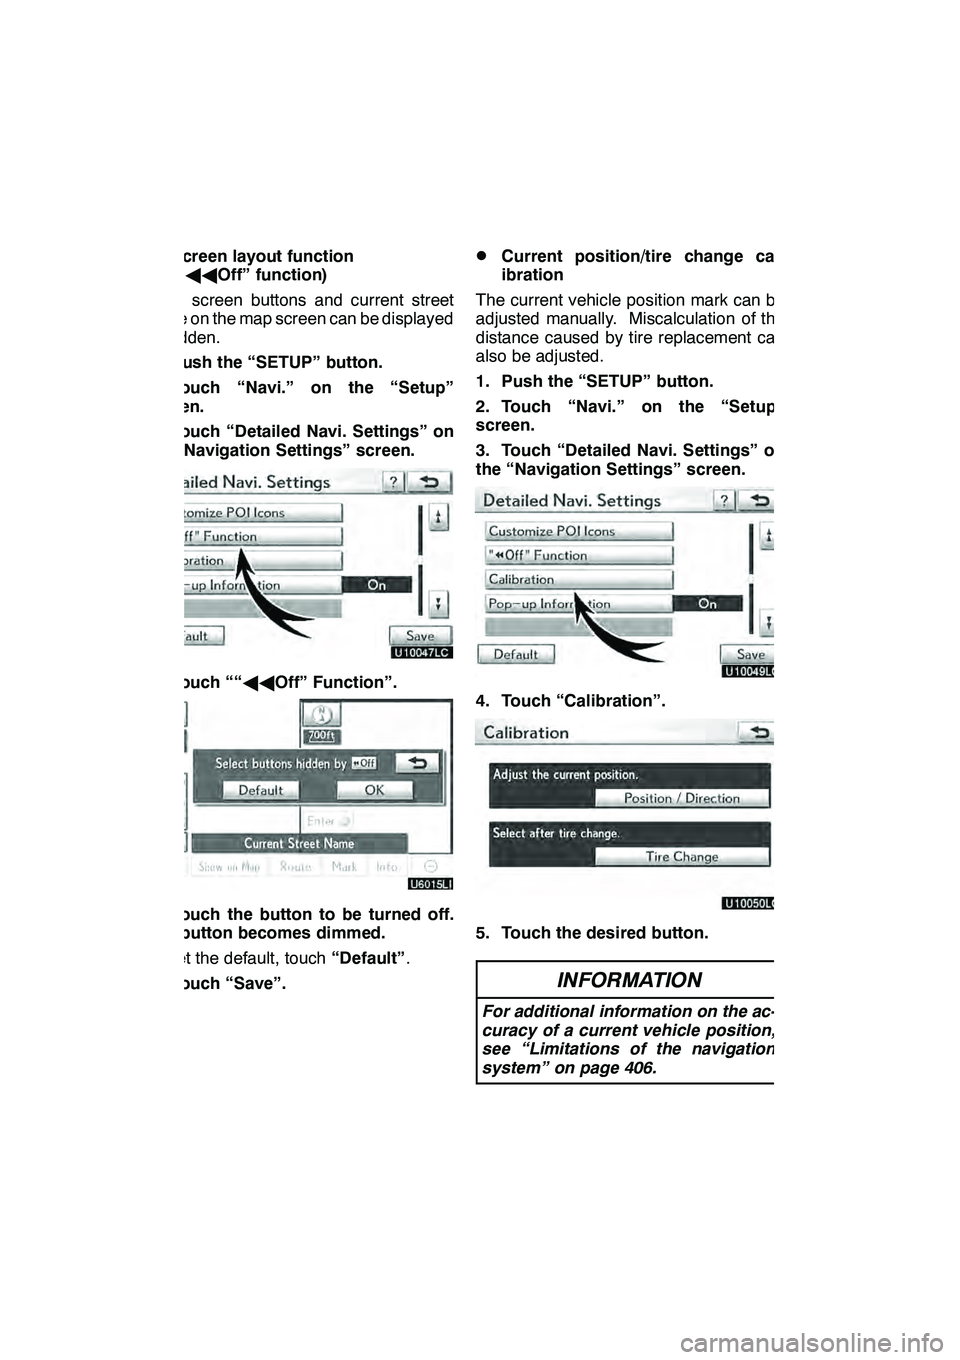
Screen layout function
(“AA Off” function)
Each screen buttons and current street
name on the map screen can be displayed
or hidden.
1. Push the “SETUP” button.
2. Touch “Navi.” on the “Setup”
screen.
3. Touch “Detailed Navi. Settings” on
the “Navigation Settings” screen.
4. Touch ““ AAOff” Function”.
5. Touch the button to be turned off.
The button becomes dimmed.
To set the default, touch “Default”.
6. Touch “Save”.
DCurrent position/tire change cal-
ibration
The current vehicle position mark can be
adjusted manually. Miscalculation of the
distance caused by tire replacement can
also be adjusted.
1. Push the “SETUP” button.
2. Touch “Navi.” on the “Setup”
screen.
3. Touch “Detailed Navi. Settings” on
the “Navigation Settings” screen.
4. Touch “Calibration”.
5. Touch the desired button.
INFORMATION
For additional information on the ac-
curacy of a current vehicle position,
see “Limitations of the navigation
system” on page 406.
GX460 Navi (U)
OM60E73U
Finish
09.09.24