Back up Lexus GX460 2010 Owner's Manual
[x] Cancel search | Manufacturer: LEXUS, Model Year: 2010, Model line: GX460, Model: Lexus GX460 2010Pages: 830, PDF Size: 17.01 MB
Page 590 of 830
589
4-1. Maintenance and care
4
Maintenance and care
GX460_CANADA (OM60F29U)
■Automatic car washes
●Fold the mirrors back before washing the vehicle. Start washing from the front
of the vehicle. Make sure to extend the mirrors before driving.
●Brushes used in automatic car washes may scratch the vehicle surface and
harm your vehicle’s paint.
■High pressure car washes
●Do not allow the nozzles of the car wash to come within close proximity of the
windows and the air suspension unit.
●Before using the car wash, check that the fuel filler door on your vehicle is
closed properly.
■Touch-up paint (if equipped)
Touch-up paint may be used to cover small chips or scratches.
Apply the paint soon after the damage occurs or corrosion may set in. To apply the
touch-up paint so it is hardly noticeable, the trick is to apply it only to the bare spots.
Apply only the smallest amount possible and do not paint the surface around the
scratch or chip.
■Aluminum wheels
●Remove any dirt immediately by using a neutral detergent. Do not use hard
brushes or abrasive cleaners. Do not use strong or harsh chemical cleaners.
Use the same mild detergent and wax as used on the paint.
●Do not use detergent on the wheels when they are hot, for example after driving
for long distance in the hot weather.
●Wash detergent from the wheels immediately after use.
■Bumpers and side moldings
Do not scrub with abrasive cleaners.
GX460_CANADA.book Page 589 Thursday, February 4, 2010 11:54 AM
Page 607 of 830

606
4-3. Do-it-yourself maintenance
GX460_CANADA (OM60F29U)
NOTICE
■If you remove the air cleaner filter
Driving with the air cleaner filter removed may cause excessive engine wear due to
dirt in the air. Also a backfire could cause a fire in the engine compartment.
GX460_CANADA.book Page 606 Thursday, February 4, 2010 11:54 AM
Page 611 of 830
610
4-3. Do-it-yourself maintenance
GX460_CANADA (OM60F29U)
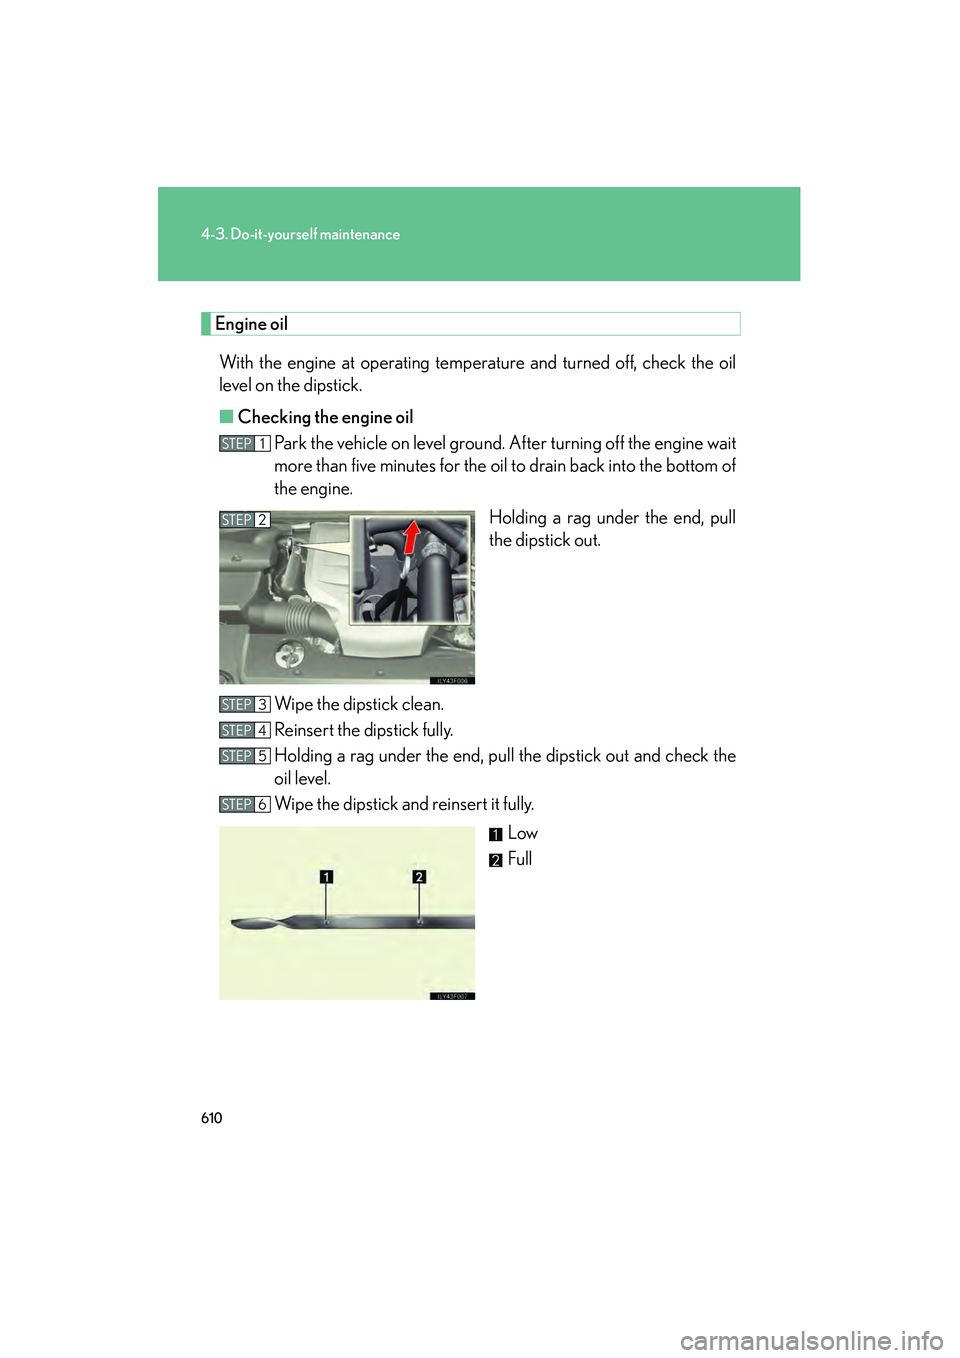
Engine oilWith the engine at operating temperature and turned off, check the oil
level on the dipstick.
■ Checking the engine oil
Park the vehicle on level ground. After turning off the engine wait
more than five minutes for the oil to drain back into the bottom of
the engine.
Holding a rag under the end, pull
the dipstick out.
Wipe the dipstick clean.
Reinsert the dipstick fully.
Holding a rag under the end, pull the dipstick out and check the
oil level.
Wipe the dipstick and reinsert it fully. Low
Full
STEP1
STEP2
STEP3
STEP4
STEP5
STEP6
GX460_CANADA.book Page 610 Thursday, February 4, 2010 11:54 AM
Page 638 of 830

637
4-3. Do-it-yourself maintenance
4
Maintenance and care
GX460_CANADA (OM60F29U)
CAUTION
■Proper inflation is critical to save tire performance
Keep your tires properly inflated. Otherwise, the following conditions may occur
and result in an accident causing death or serious injury.
●Excessive wear
●Uneven wear
●Poor handling
●Possibility of blowouts resulting from overheated tires
●Poor sealing of the tire bead
●Wheel deformation and/or tire separation
●A greater possibility of tire damage from road hazards
NOTICE
■When inspecting and adjusting tire inflation pressure
Be sure to reinstall the tire valve caps back on.
Without the valve caps, dirt or moisture could get into the valve and cause air leak-
age, which could result in an accident. If the caps are lost, replace them as soon as
possible.
GX460_CANADA.book Page 637 Thursday, February 4, 2010 11:54 AM
Page 654 of 830
653
4-3. Do-it-yourself maintenance
4
Maintenance and care
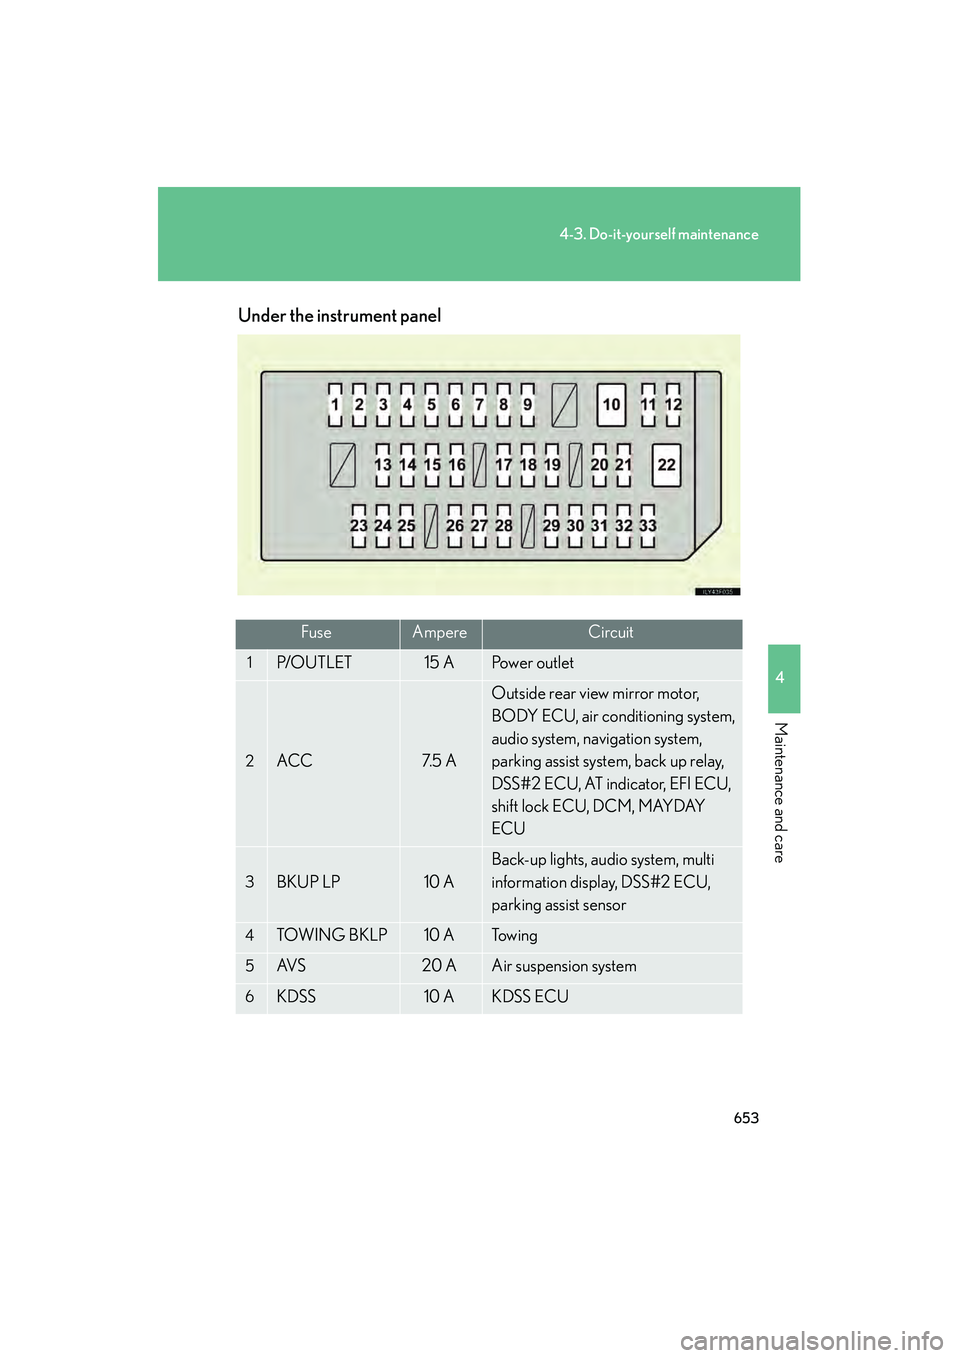
GX460_CANADA (OM60F29U)Under the instrument panel
FuseAmpereCircuit
1P/O U T L E T15 APo w e r o u t l e t
2ACC7. 5 A
Outside rear view mirror motor,
BODY ECU, air conditioning system,
audio system, navigation system,
parking assist system, back up relay,
DSS#2 ECU, AT indicator, EFI ECU,
shift lock ECU, DCM, MAYDAY
ECU
3BKUP LP10 A
Back-up lights, audio system, multi
information display, DSS#2 ECU,
parking assist sensor
4TOW I N G B K L P10 ATo w i n g
5AV S20 AAir suspension system
6KDSS10 AKDSS ECU
GX460_CANADA.book Page 653 Thursday, February 4, 2010 11:54 AM
Page 655 of 830
654
4-3. Do-it-yourself maintenance
GX460_CANADA (OM60F29U)
74WD20 A4WD system, rear differential lock
8P/ S E AT F L30 AFront power seat (left)
9D/ L N O. 225 ADoor lock motor, glass hatch
opener, BODY ECU
10PSB30 APSB ECU
11TI & TE15 ATilt and telescopic steering
12FOG FR15 AFront fog lights
13OBD7. 5 ADLC 3
14A/C7. 5 AAir conditioning system
15AM17. 5 AStarting system
16DOOR RL25 ARear power window (left)
17ECU-IG NO.110 A
Shift lock ECU, VSC ECU, steering
sensor, yaw rate sensor, sequential
switch, auto wiper ECU, back up
relay, tilt & telescopic steering, PSB
ECU, DSS#1 ECU, front radar sensor,
AFS ECU, TIRE PRESS ECU,
DRIVER MON ECU
18IG17. 5 A
Front turn signal light, rear turn signal
light, side turn signal light, meter turn
signal light, trailer light, ALT, VSC, C/
C switch
FuseAmpereCircuit
GX460_CANADA.book Page 654 Thursday, February 4, 2010 11:54 AM
Page 662 of 830
661
4-3. Do-it-yourself maintenance
4
Maintenance and care
GX460_CANADA (OM60F29U)
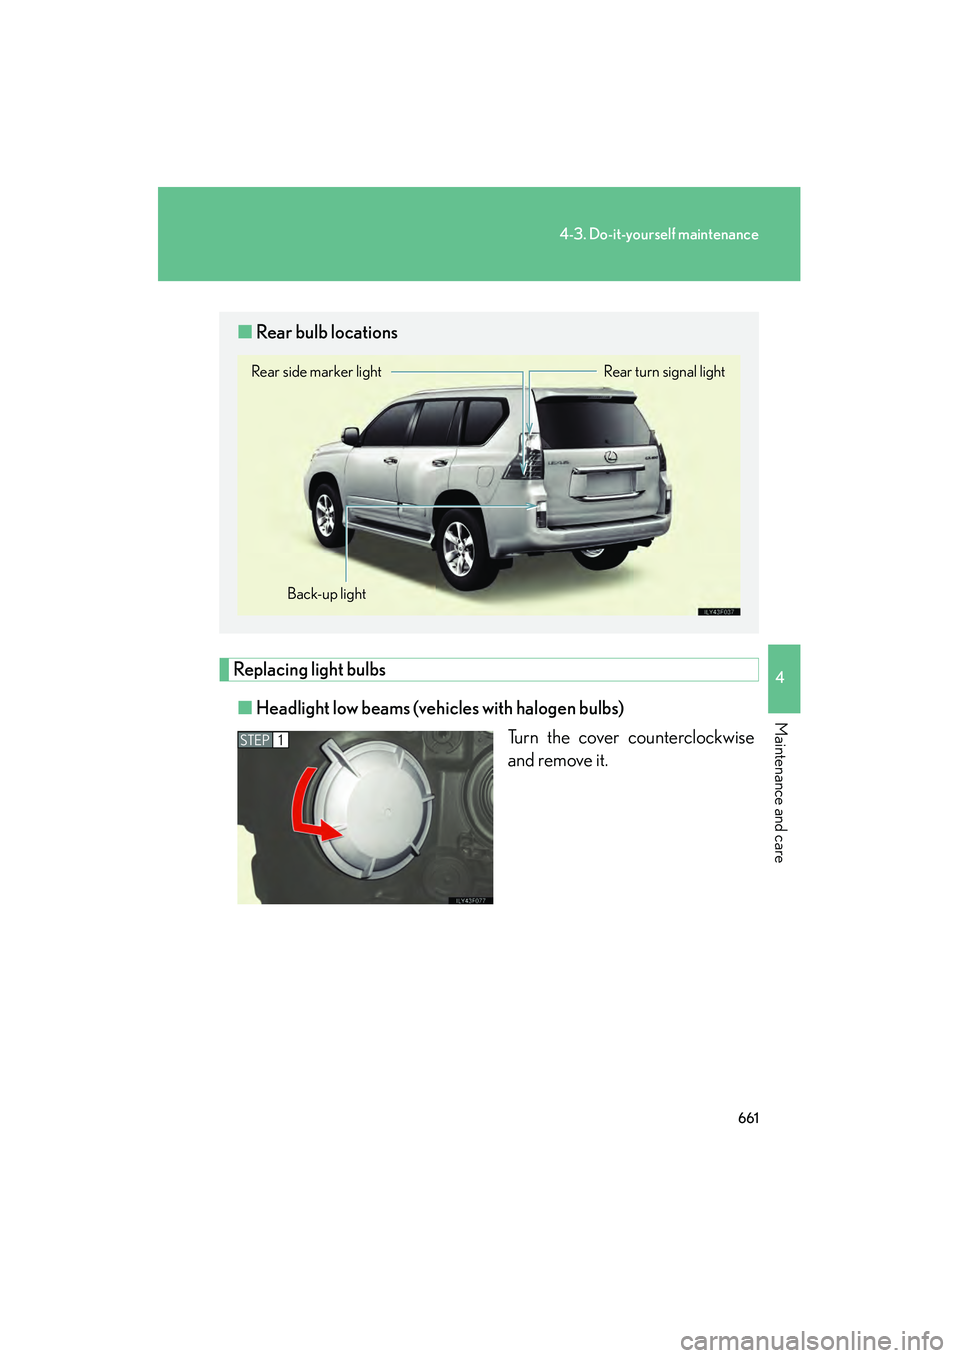
Replacing light bulbs■ Headlight low beams (vehicles with halogen bulbs)
Turn the cover counterclockwise
and remove it.
■Rear bulb locations
Rear turn signal light
Back-up light
Rear side marker light
STEP1
GX460_CANADA.book Page 661 Thursday, February 4, 2010 11:54 AM
Page 668 of 830

667
4-3. Do-it-yourself maintenance
4
Maintenance and care
GX460_CANADA (OM60F29U)■
Rear turn signal and re ar side marker lights
Open the back door.
Left-hand side:
Remove the bolts and lamp assem-
bly.
Right-hand side:
Remove the bolts.
Close the back door half way and
remove the lamp assembly.
STEP1
GX460_CANADA.book Page 667 Thursday, February 4, 2010 11:54 AM
Page 670 of 830

669
4-3. Do-it-yourself maintenance
4
Maintenance and care
GX460_CANADA (OM60F29U)■
Back-up lights
Remove the bolts and pull down
the under cover.
Turn the bulb base counterclock-
wise.
STEP1
STEP2
GX460_CANADA.book Page 669 Thursday, February 4, 2010 11:54 AM
Page 691 of 830
690
5-2. Steps to take in an emergency
GX460_CANADA (OM60F29U)
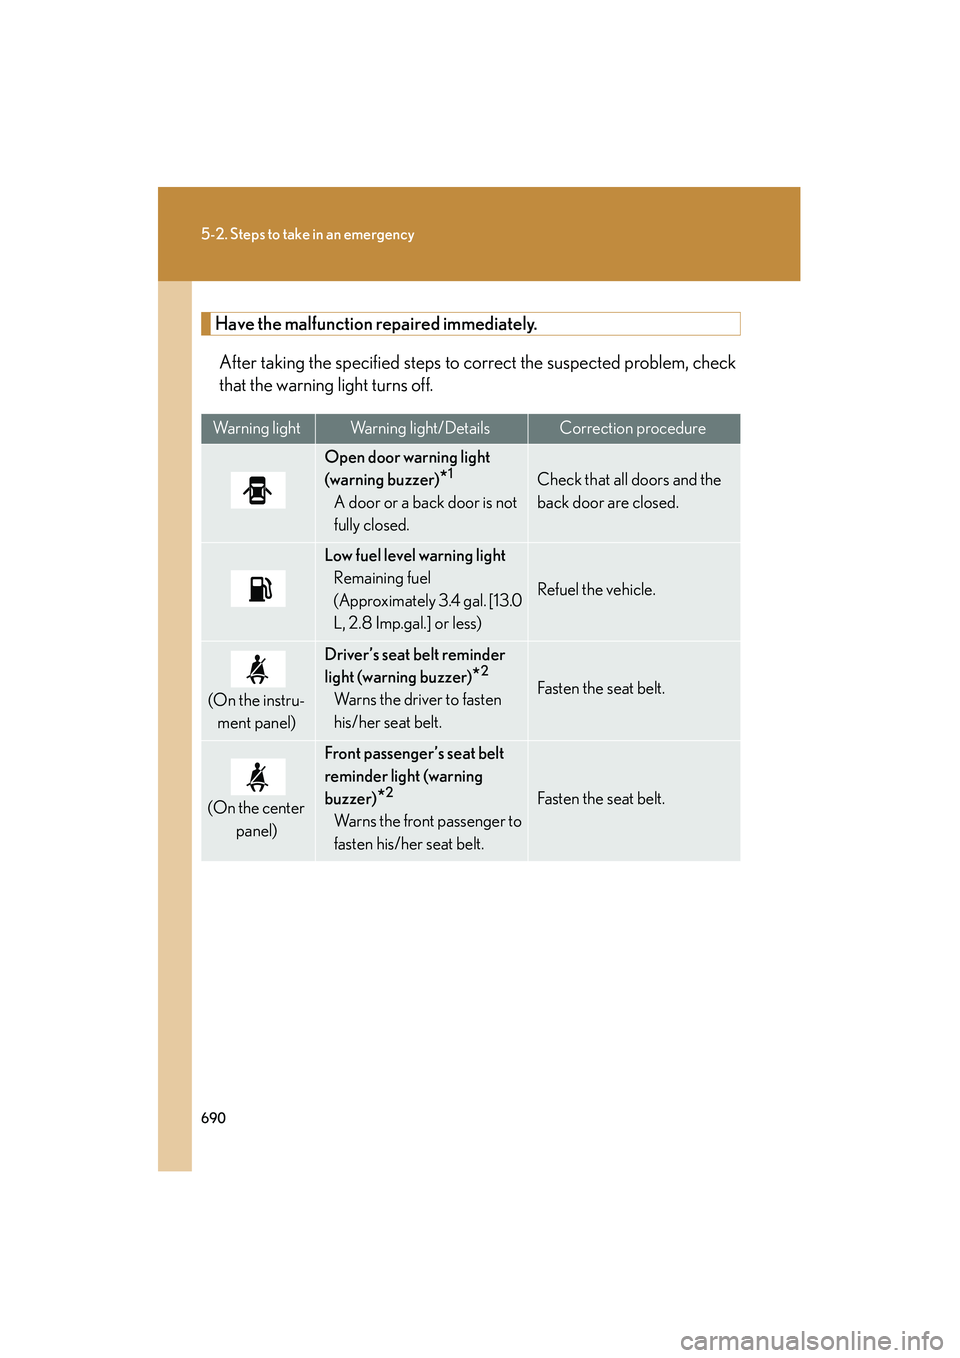
Have the malfunction repaired immediately.After taking the specified steps to correct the suspected problem, check
that the warning light turns off.
Warning lightWarning light/DetailsCorrection procedure
Open door warning light
(warning buzzer)
*1
A door or a back door is not
fully closed.
Check that all doors and the
back door are closed.
Low fuel level warning light Remaining fuel
(Approximately 3.4 gal. [13.0
L, 2.8 Imp.gal.] or less)
Refuel the vehicle.
(On the instru-
ment panel)
Driver’s seat belt reminder
light (warning buzzer)
*2
Warns the driver to fasten
his/her seat belt.Fasten the seat belt.
(On the center panel)
Front passenger’s seat belt
reminder light (warning
buzzer)
*2
Warns the front passenger to
fasten his/her seat belt.
Fasten the seat belt.
GX460_CANADA.book Page 690 Thursday, February 4, 2010 11:54 AM