Lexus GX460 2010 Using The Bluetooth Audio System / LEXUS 2010 GX460 QUICK GUIDE (OM60E77U) Repair Manual
Manufacturer: LEXUS, Model Year: 2010,
Model line: GX460,
Model: Lexus GX460 2010
Pages: 94, PDF Size: 5.4 MB
Lexus GX460 2010 Using The Bluetooth Audio System / LEXUS 2010 GX460 QUICK GUIDE (OM60E77U) Repair Manual
GX460 2010
Lexus
Lexus
https://www.carmanualsonline.info/img/36/29560/w960_29560-0.png
Lexus GX460 2010 Using The Bluetooth Audio System / LEXUS 2010 GX460 QUICK GUIDE (OM60E77U) Repair Manual
Trending: cruise control, cooling, brake light, navigation, brake, parking brake, light
Page 61 of 94
61
GX460_QG_U (OM60E77U)
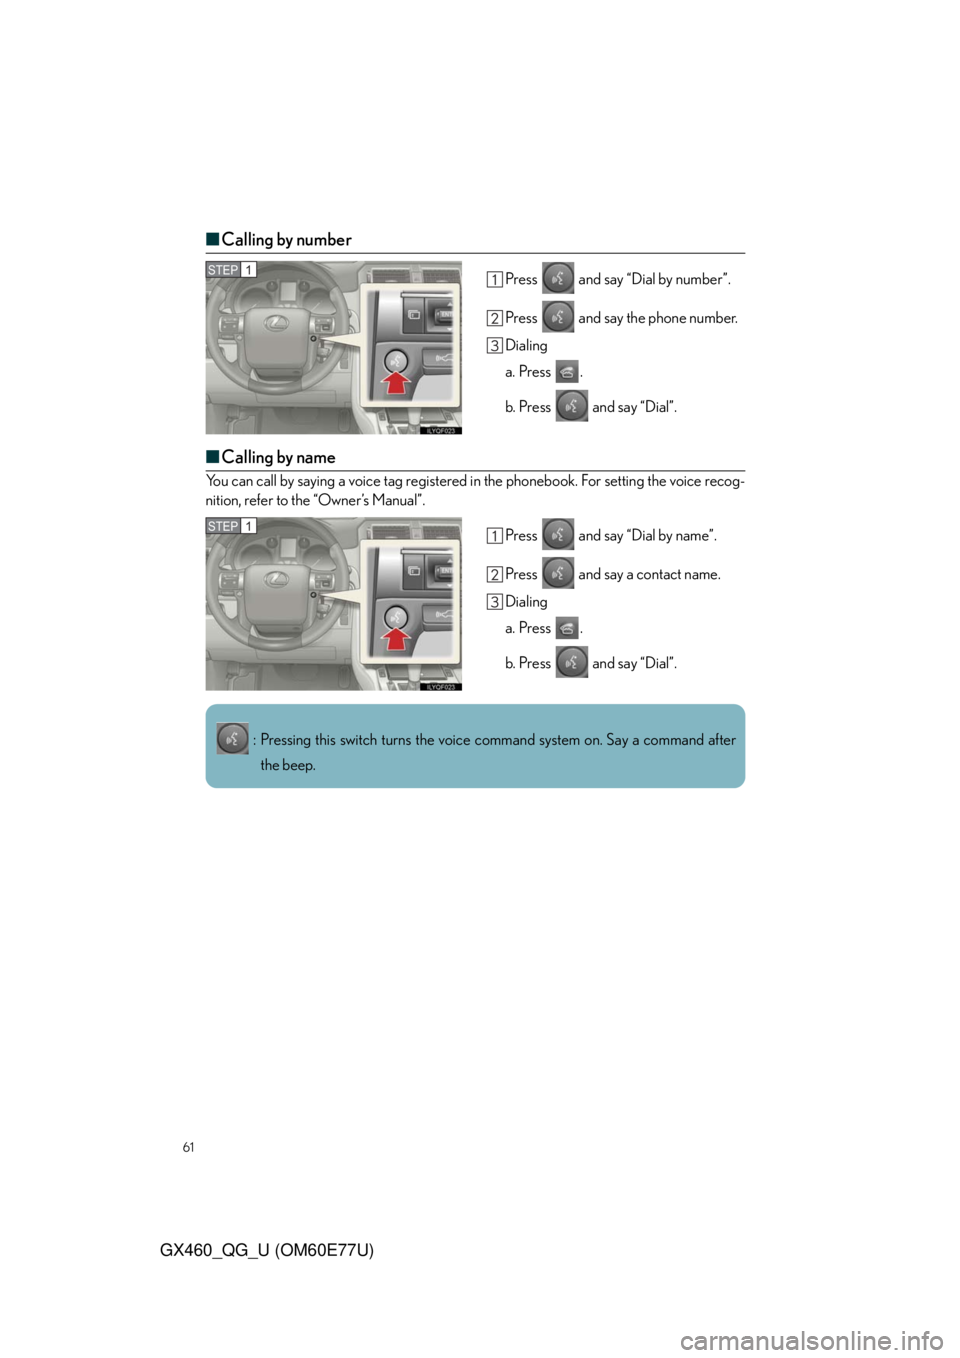
■Calling by number
Press and say “Dial by number”.
Press and say the phone number.
Dialing
a. Press .
b. Press and say “Dial”.
■Calling by name
You can call by saying a voice tag registered in the phonebook. For setting the voice recog-
nition, refer to the “Owner’s Manual”.
Press and say “Dial by name”.
Press and say a contact name.
Dialing
a. Press .
b. Press and say “Dial”.
STEP1
STEP1
: Pressing this switch turns the voice command system on. Say a command after
the beep.
Page 62 of 94
62
GX460_QG_U (OM60E77U)
■Calling by speed dial
Press .
Press the desired preset button.
Press .STEP1
STEP2
Page 63 of 94
63
GX460_QG_U (OM60E77U)
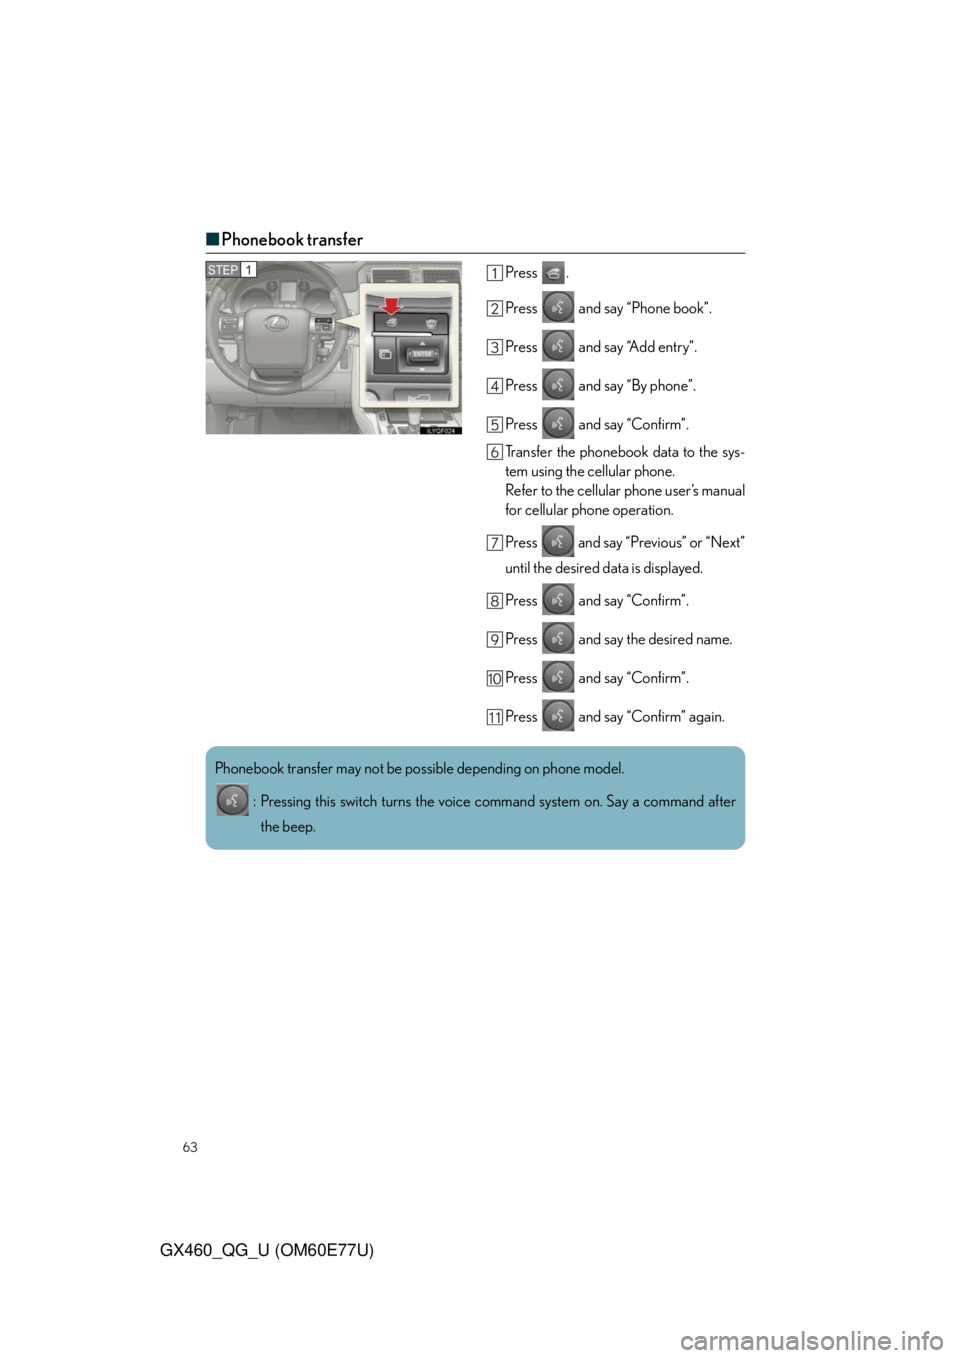
■Phonebook transfer
Press .
Press and say “Phone book”.
Press and say “Add entry”.
Press and say “By phone”.
Press and say “Confirm”.
Transfer the phonebook data to the sys-
tem using the cellular phone.
Refer to the cellular phone user’s manual
for cellular phone operation.
Press and say “Previous” or “Next”
until the desired data is displayed.
Press and say “Confirm”.
Press and say the desired name.
Press and say “Confirm”.
Press and say “Confirm” again.STEP1
Phonebook transfer may not be possible depending on phone model.
: Pressing this switch turns the voice command system on. Say a command after
the beep.
Page 64 of 94
64
GX460_QG_U (OM60E77U)
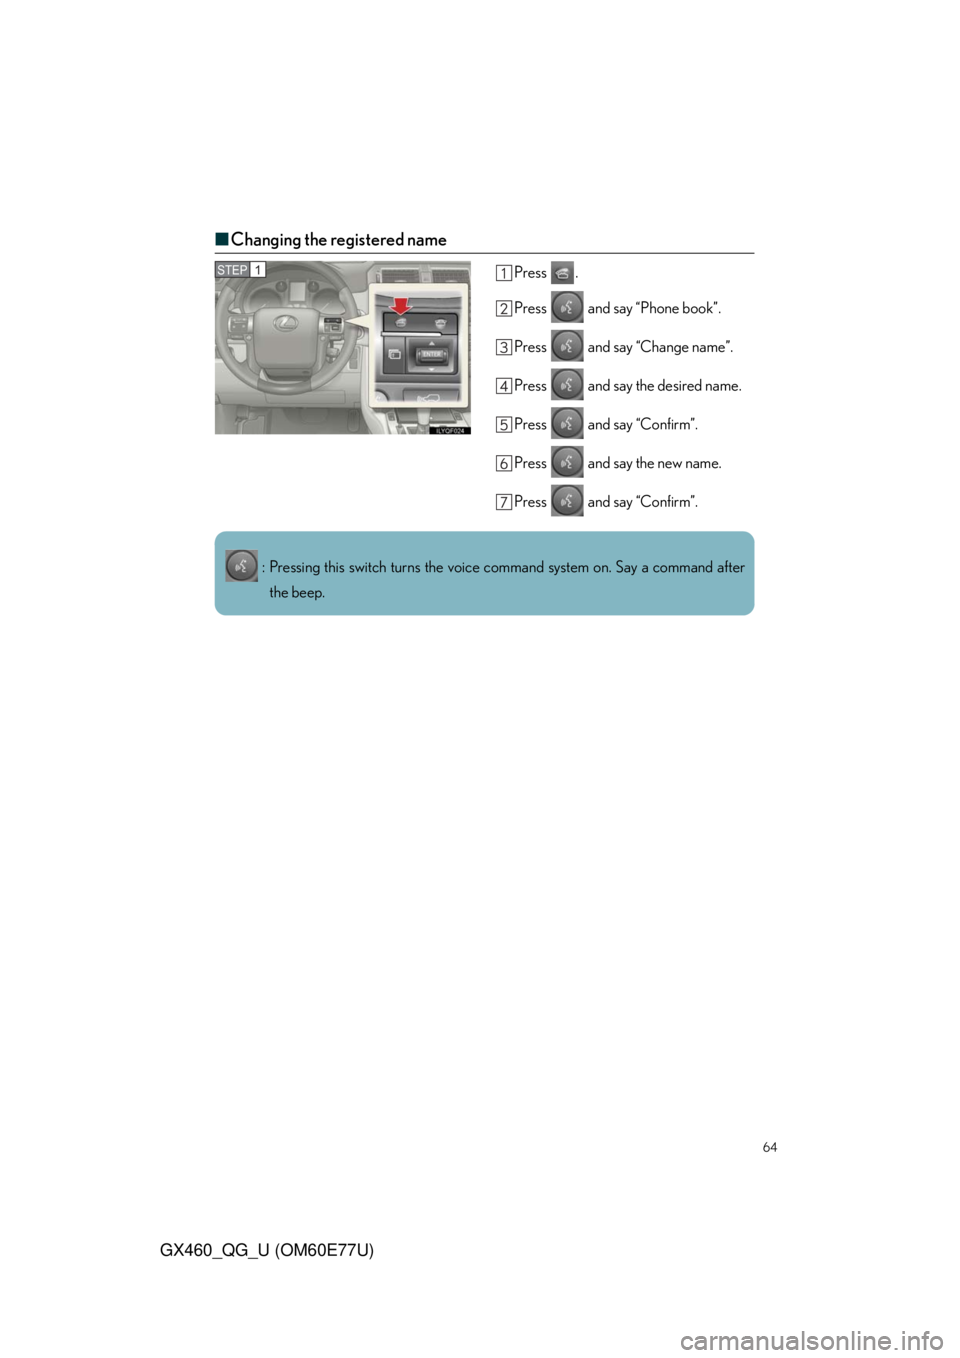
■Changing the registered name
Press .
Press and say “Phone book”.
Press and say “Change name”.
Press and say the desired name.
Press and say “Confirm”.
Press and say the new name.
Press and say “Confirm”.STEP1
: Pressing this switch turns the voice command system on. Say a command after
the beep.
Page 65 of 94
65
GX460_QG_U (OM60E77U)
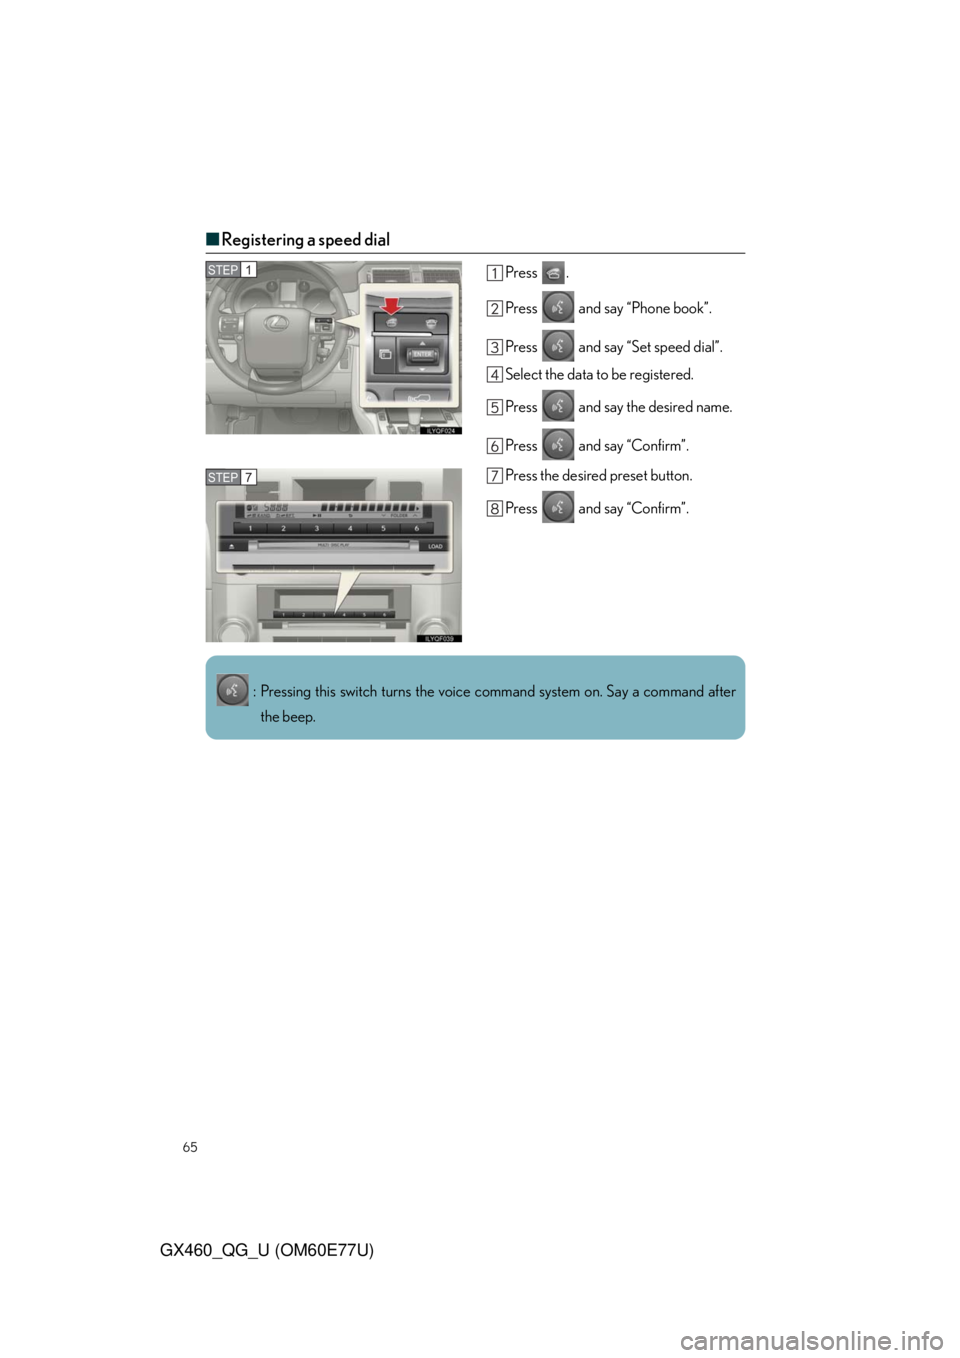
■Registering a speed dial
Press .
Press and say “Phone book”.
Press and say “Set speed dial”.
Select the data to be registered.
Press and say the desired name.
Press and say “Confirm”.
Press the desired preset button.
Press and say “Confirm”.STEP1
STEP7
: Pressing this switch turns the voice command system on. Say a command after
the beep.
Page 66 of 94
66
GX460_QG_U (OM60E77U)
Audio System (Without Navigation System)
■Basic operation Pow e r/ Vo l u m e
Audio sources
AM•FM:AM radio/FM radio
SAT:Satellite radio
CD:CD player
AUX•USB:Auxiliary audio
device/USB memory
/iPod
®/Bluetooth®
audio
Sound quality modes
■Radio
Station presets
Radio tune
Scanning radio stations
Traffic information
RDS genre select
Seek
Te x t m e s s a g e s
■Entering station presets
Select the desired station by using the tune, the seek or the scan function.
Press and hold one of the preset buttons (1-6) until you hear a beep, indicating that the
station is set.
Page 67 of 94
67
GX460_QG_U (OM60E77U)
■CD player
■
Playing an audio CD
Eject
Random playback
Repeat play
Pause/Playback
Disc load
Search playback
Disc select
Track select/rewind/fast-forward
Te x t i n f o r m a t i o n
■Playing a CD with MP3/WMA files
Eject
Random playback
Repeat play
Pause/Playback
Folder select
Disc load
File select
Search playback
Disc select
File select/rewind/fast-forwarding
Te x t i n f o r m a t i o n
■Loading a CD
Press the “LOAD” button.
“WAIT” is shown on the display.
Insert a CD when the indicators on the slot turn from amber to green.
The display changes from “WAIT” to “LOAD”.
Page 68 of 94

68
GX460_QG_U (OM60E77U)
■Loading multiple CDs
Press and hold the “LOAD” button until you hear a beep.
“WAIT” is shown on the display.
Insert a CD when the indicators on the slot turn from amber to green.
The display changes from “WAIT” to “LOAD”.
The indicators on the slot turn to amber when the CD is inserted.
Insert the next CD when the indicators on the slot turn from amber to green again.
Repeat the procedure for the remaining CDs.
To cancel the operation, press the “LOAD” button. If you do not insert a CD within 15
seconds, loading will cancelled automatically.
■Operating an iPod®
Shuffle playback
Repeat play
Pause/Playback
Go back
Menu/Track select
Playback
Track select/rewind/fast-forward
Text information
■Remote control (steering wheel switches)
The audio system can be operated using the remote control located on the steering wheel.
Vo l u m e
Radio mode: radio tuner
CD mode: disc/track/file (MP3/
WMA) select
iPod
mode: track select
Power on/change mode: press
Power off: press and hold
Page 69 of 94
69
GX460_QG_U (OM60E77U)
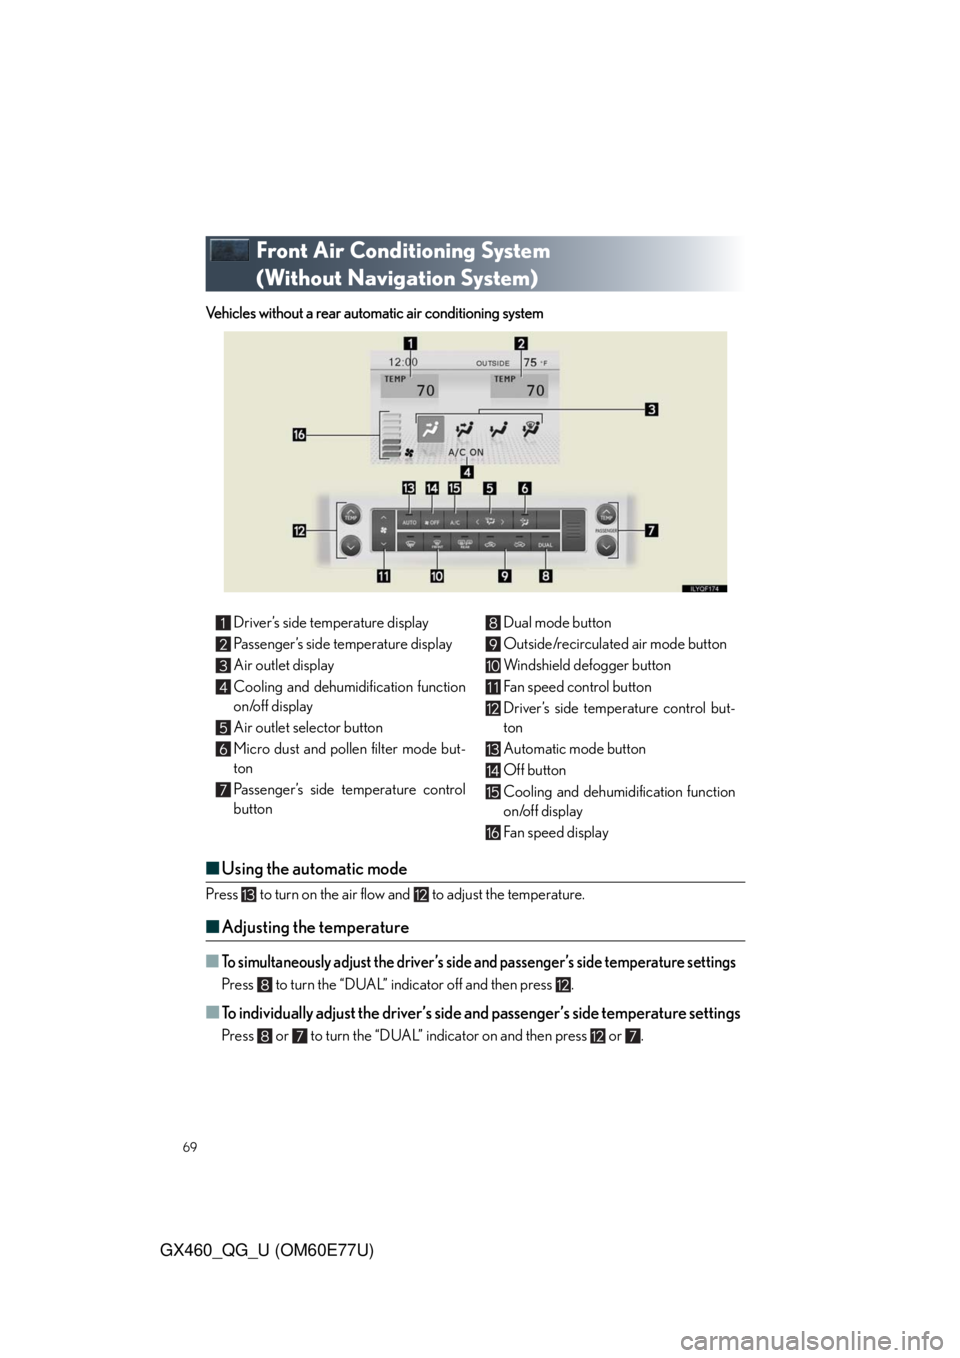
Front Air Conditioning System
(Without Navigation System)
Vehicles without a rear automatic air conditioning system
■Using the automatic mode
Press to turn on the air flow and to adjust the temperature.
■Adjusting the temperature
■To simultaneously adjust the driver’s side and passenger’s side temperature settings
Press to turn the “DUAL” indicator off and then press .
■To individually adjust the driver’s side and passenger’s side temperature settings
Press or to turn the “DUAL” indicator on and then press or .
Driver’s side temperature display
Passenger’s side temperature display
Air outlet display
Cooling and dehumidification function
on/off display
Air outlet selector button
Micro dust and pollen filter mode but-
ton
Passenger’s side temperature control
buttonDual mode button
Outside/recirculated air mode button
Windshield defogger button
Fan speed control button
Driver’s side temperature control but-
ton
Automatic mode button
Off button
Cooling and dehumidification function
on/off display
Fan speed display
Page 70 of 94
70
GX460_QG_U (OM60E77U)
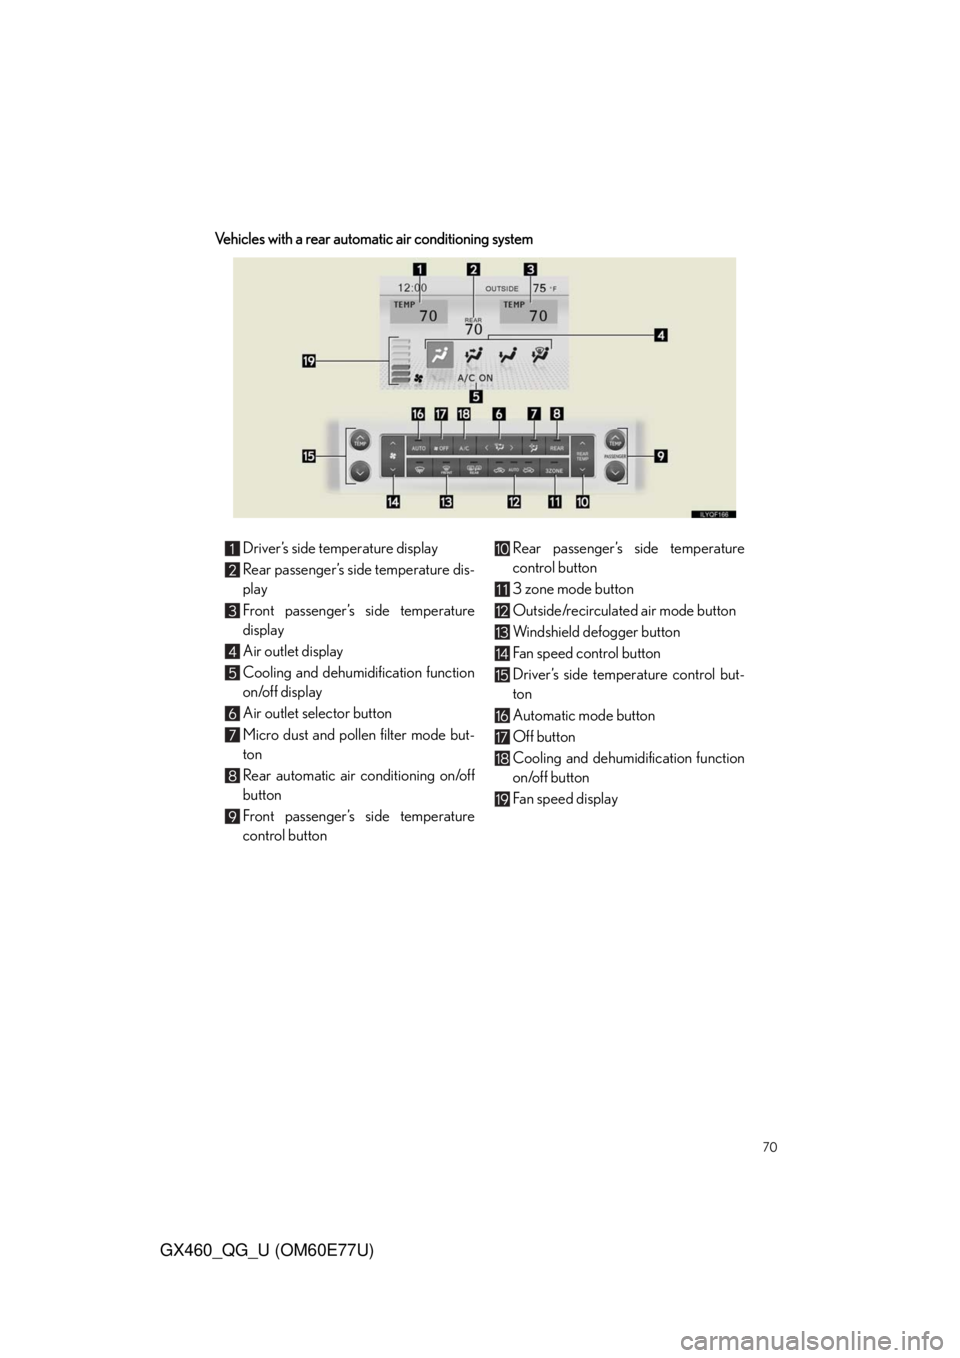
Vehicles with a rear automatic air conditioning system
Driver’s side temperature display
Rear passenger’s side temperature dis-
play
Front passenger’s side temperature
display
Air outlet display
Cooling and dehumidification function
on/off display
Air outlet selector button
Micro dust and pollen filter mode but-
ton
Rear automatic air conditioning on/off
button
Front passenger’s side temperature
control buttonRear passenger’s side temperature
control button
3 zone mode button
Outside/recirculated air mode button
Windshield defogger button
Fan speed control button
Driver’s side temperature control but-
ton
Automatic mode button
Off button
Cooling and dehumidification function
on/off button
Fan speed display
Trending: service indicator, key, CD player, brakes, flat tire, tire size, warning
