ECO mode Lexus GX460 2021 / User Guide
[x] Cancel search | Manufacturer: LEXUS, Model Year: 2021, Model line: GX460, Model: Lexus GX460 2021Pages: 628, PDF Size: 12.51 MB
Page 73 of 628

731-2. LEXUS Enform
GX460_OM_OM60T19U_(U)
1
For safety and security
■Safety Connect Serv ices Information
●Phone calls using the vehicle’s Bluetooth® technology will not be possible during
Safety Connect.
●Safety Connect is available be ginning Fall 2009 on select Lexus models (in the contig-
uous United States only). Contact with th e Safety Connect response center is depen-
dent upon the telematics device being in operative condition, cellular connection
availability, and GPS sa tellite signal reception, which can limit the ability to reach the
response center or receive emergency se rvice support. Enrollment and Telematics
Subscription Service Agreement required. A variety of subscription terms is available;
charges vary by subscription term selected and location.
●Automatic Collision Notification, Emergenc y Assistance and Stolen Vehicle Location
will function in the United States, includin g Hawaii and Alaska, Puerto Rico and in Can-
ada, and Enhanced Roadside Assistance will function in the United States, Puerto Rico
and in Canada.
●Automatic Collision Notification, Emergenc y Assistance, Stolen Vehicle and Enhanced
Road Assistance will not function in the United States Virgin Islands.
For vehicles first sold in the USVI, no Safety Connect services will function in and out-
side the United States Virgin Islands.
●Safety Connect services are not subject to section 255 of the Telecommunications Act
and the device is not TTY compatible.
■Languages
The Safety Connect response ce nter will offer support in multiple languages. The Safety
Connect system will offer voice prompts in En glish, Spanish, and French. Please indicate
your language of ch oice when enrolling.
■When contacting the response center
You may be unable to contact the resp onse center if the network is busy.
When the engine switch is turned to IGNITION ON mode, the red indicator
light comes on for 2 seconds then turns off. Afterward, the green indicator light
comes on, indicating that the service is active.
The following indicator light patterns indicate specific system usage conditions:
●Green indicator light on = Active service
●Green indicator light flashing = Safety Connect call in process
●Red indicator light (except at vehicle start-up) = System malfunction (contact
your Lexus dealer)
●No indicator light (off) = Safety Connect service not active
Safety Connect LED light Indicators
Page 79 of 628
791-3. Theft deterrent system
GX460_OM_OM60T19U_(U)
1
For safety and security
Alarm
The alarm uses light and sound to give an alert when an intrusion is detected.
The alarm is triggered in the following situations when the alarm is set:
●For the U.S.A.: A locked door or glass ha tch is unlocked or opened in any way
other than using the entry function, wi reless remote control or mechanical
key. (The doors will lock again automatically.)
●For Canada: A locked door or glass hatc h is unlocked or opened in any way
other than using the entry function or th e wireless remote control. (The doors
will lock again automatically.)
●The hood is opened.
Close the doors, glass hatch and hood,
and lock all the doors. The system will
be set automatically after 30 seconds.
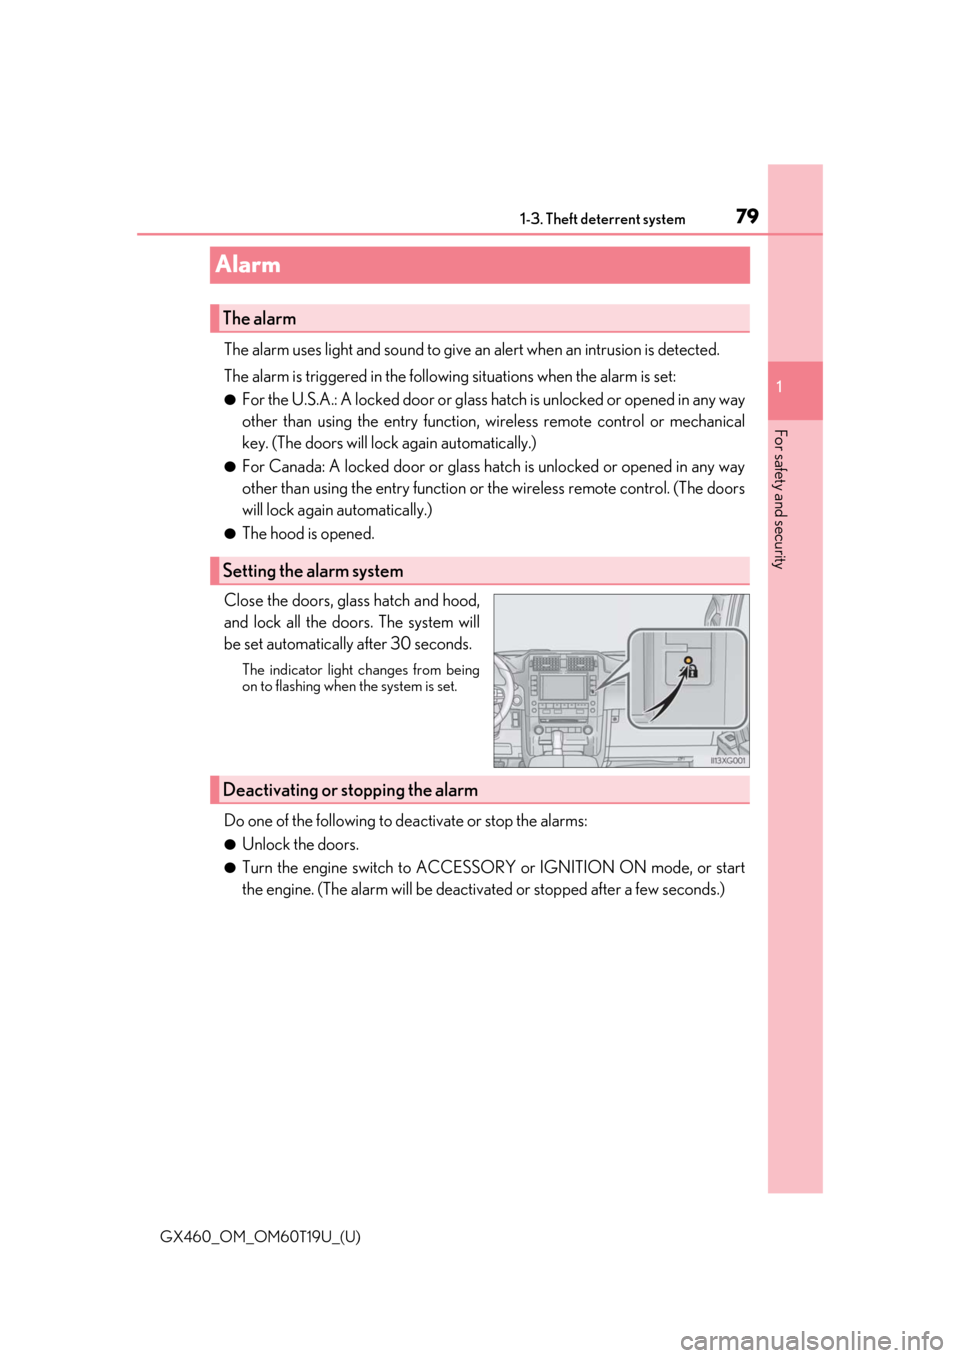
The indicator light changes from being
on to flashing when the system is set.
Do one of the following to de activate or stop the alarms:
●Unlock the doors.
●Turn the engine switch to ACCESSOR Y or IGNITION ON mode, or start
the engine. (The alarm will be deactivat ed or stopped after a few seconds.)
The alarm
Setting the alarm system
Deactivating or stopping the alarm
Page 86 of 628

86
GX460_OM_OM60T19U_(U)2. Instrument cluster
*1: These lights turn on when the engine switch is turned to IGNITION ON mode to
indicate that a system check is being perfor med. They will turn off after the engine is
on, or after a few seconds. There may be a ma lfunction in a system if the lights do not
turn on, or turn off. Have the vehicle inspected by your Lexus dealer.
*2: This light is displayed on the multi-information display.
(flashes)
(U.S.A.)
Parking brake indicator
( P. 519)*2Brake Override System
warning light /Drive-Start
Control warning light
( P. 521)
(flashes)
(Canada)
Parking brake indicator
( P. 519)
Page 89 of 628

GX460_OM_OM60T19U_(U)
892. Instrument cluster
2
Instrument cluster
*1: This light is displayed on the multi-information display.
*2: These lights turn on when the engine switch is turned to IGNITION ON mode toindicate that a system check is being perfor med. They will turn off after the engine is
on, or after a few seconds. There may be a ma lfunction in a system if the lights do not
turn on, or turn off. Have the vehicle inspected by your Lexus dealer.
*3: The light flashes to indicate that the system is operating.
*4: The light comes on when the system is turned off.
*5: In order to confirm operation, the BSM outside rear view mirror indicators illumi-
nate in the following situations:
• When the engine switch is turned to IGNITION ON mode while the system is set to on.
• When the system is set to on while the engine switch is in IGNITION ON mode.
If the system is functioning correctly, th e BSM outside rear view mirror indicators
will turn off after a few seconds.
If the BSM outside rear view mirror indicators do not illuminate or do not turn off,
there may be a malfunction with the system.
If this occurs, have the vehicle inspected by your Lexus dealer.
*6: This light illuminates on the outside rear view mirrors.
*7: When the outside temperature is approximately 37°F (3°C) or lower, the indicator
will flash for approximately 10 seconds, then stay on.
*8: This light illuminates on the center panel.
WARNING
■If a safety system warning light does not come on
Should a safety system light such as th e ABS/Multi Terrain ABS and the SRS warning
light not come on when you start the engine, this could mean that these systems are not
available to help protect you in an accide nt, which could result in death or serious
injury. Have the vehicle inspected by your Lexus dealer immediately if this occurs.
Page 91 of 628
GX460_OM_OM60T19U_(U)
912. Instrument cluster
2
Instrument cluster
Odometer, trip meter and maintenance required information display
Odometer:
Displays the total distance the vehicle has been driven
Trip meter:
Displays the distance the vehicle has been driven since the meter was last reset. Trip
meters A and B can be used to record an d display different distances independently.
Maintenance required information: • Displays the maintenance requ ired information when the engine switch is in IGNI-
TION ON mode.
• It can be reset from of th e multi-information display. (P. 93)
Rear height control air suspension display (if equipped)
Displays the rear height mode selected ( P. 339)
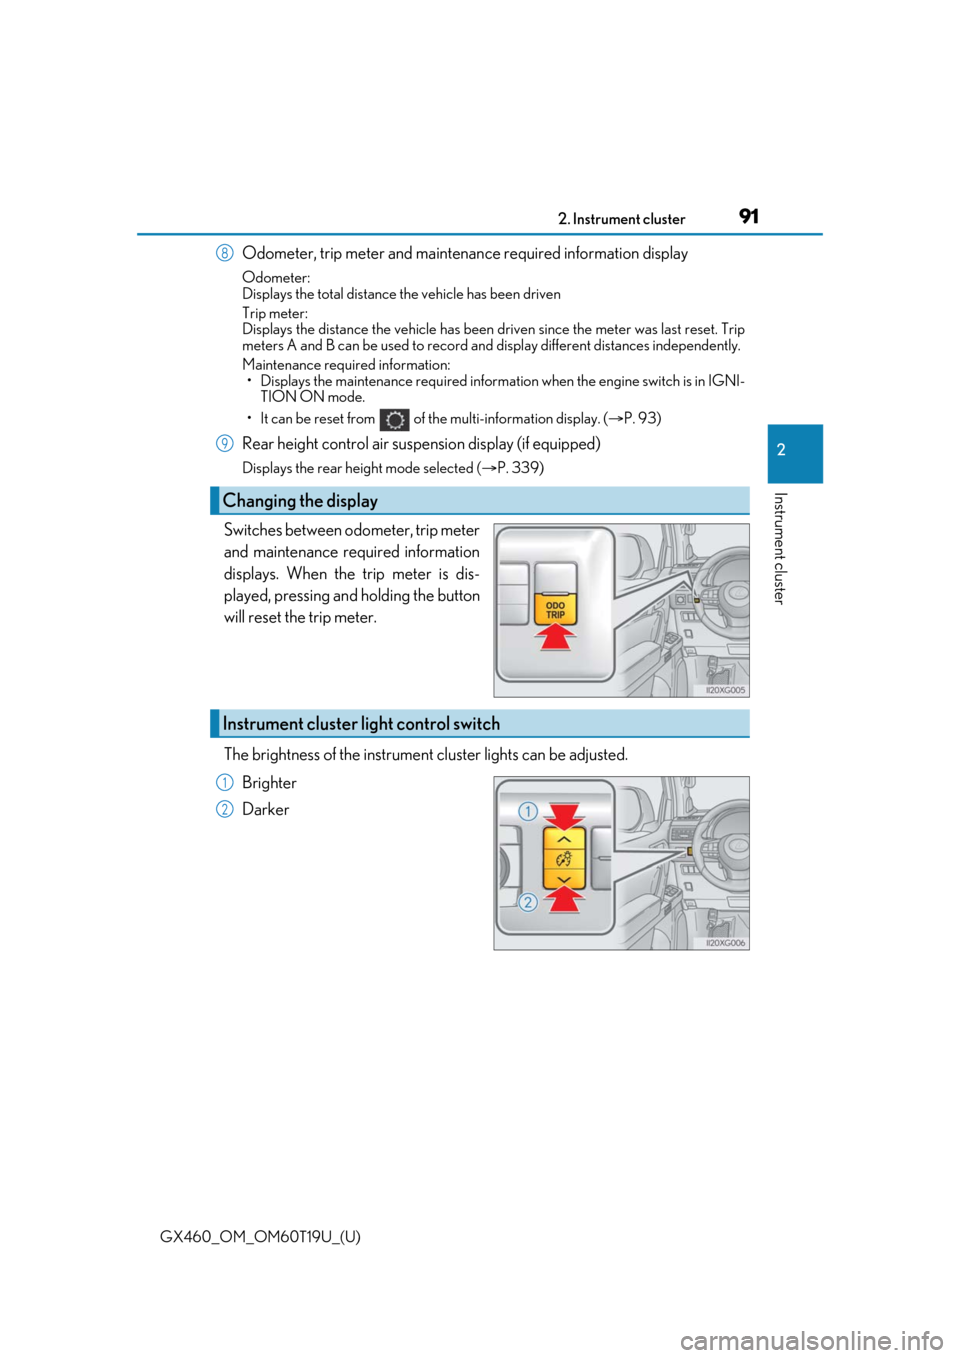
Switches between odometer, trip meter
and maintenance required information
displays. When the trip meter is dis-
played, pressing and holding the button
will reset the trip meter.
The brightness of the instrument cluster lights can be adjusted.
Brighter
Darker
Changing the display
8
9
Instrument cluster light control switch
1
2
Page 98 of 628
98
GX460_OM_OM60T19U_(U)2. Instrument cluster
■Eco Driving Indicator
●The shift lever is in any position other than D.
●Vehicles with adaptive variable suspension
system: The driving mode is set to sport
mode.
●The vehicle speed is approximately 81 mph (130 km/h) or higher.
■When disconnecting and reconnecting battery terminals
The drive information other than the cu rrent fuel consumption will be reset.
■Tire inflation pressure
●It may take a few minutes to display the tire inflation pressure after the engine switch is
turned to IGNITION ON mode. It may also take a few minutes to display the tire infla-
tion pressure after inflation pressure has been adjusted.
●“---” may be displayed if the tire information cannot be determined due to unfavorable
radio wave conditions.
●Tire inflation pressure changes with temperat ure. The displayed values may also be dif-
ferent from the values measured using a tire pressure gauge.
■When setting up the display
Stop the vehicle in a safe place, apply the pa rking brake, and shift the shift lever to P.
■Suspension of the settings display
In the following situations, the settings display using the meter control switches will be
suspended.
●When a warning message appears on the multi-information display
●When the vehicle begins to move
■Liquid crystal display
Small spots or light spots may appear on the display. This phenomenon is characteristic
of liquid crystal displays, and there is no problem continuing to use the display.
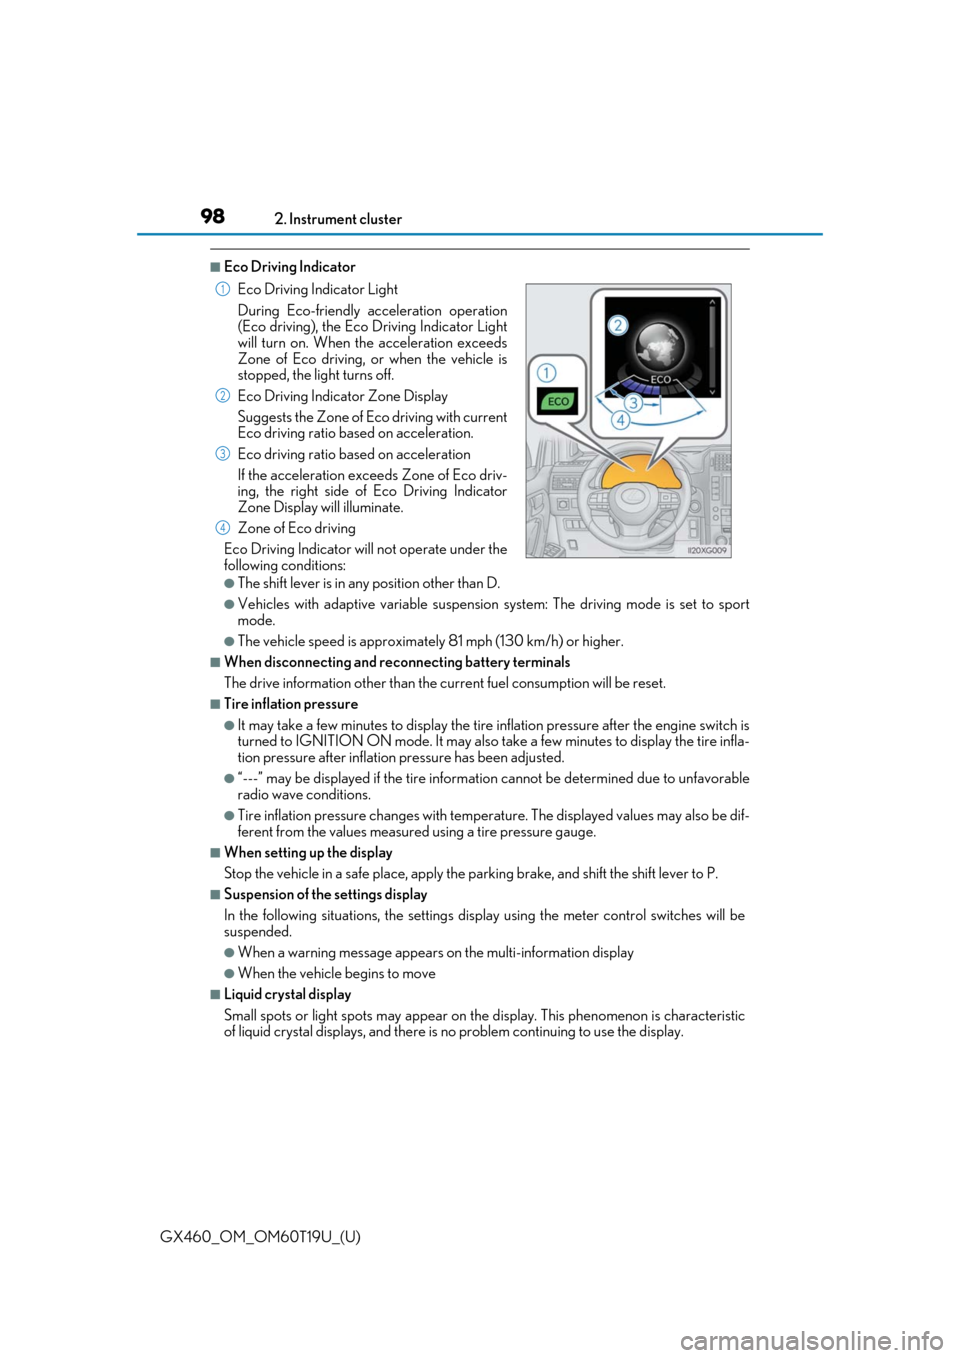
Eco Driving Indicator Light
During Eco-friendly ac
celeration operation
(Eco driving), the Eco Driving Indicator Light
will turn on. When the acceleration exceeds
Zone of Eco driving, or when the vehicle is
stopped, the light turns off.
Eco Driving Indicator Zone Display
Suggests the Zone of Eco driving with current
Eco driving ratio based on acceleration.
Eco driving ratio based on acceleration
If the acceleration exceeds Zone of Eco driv-
ing, the right side of Eco Driving Indicator
Zone Display will illuminate.
Zone of Eco driving
Eco Driving Indicator will not operate under the
following conditions:
1
2
3
4
Page 100 of 628
100
GX460_OM_OM60T19U_(U)2. Instrument cluster
Fuel consumption information
Press the “INFO”/“APPS” button, and then
select “Fuel consumption”/“Eco” on
the screen.
■Trip information
If the “Past Record” screen is displayed, select “Trip Information”.
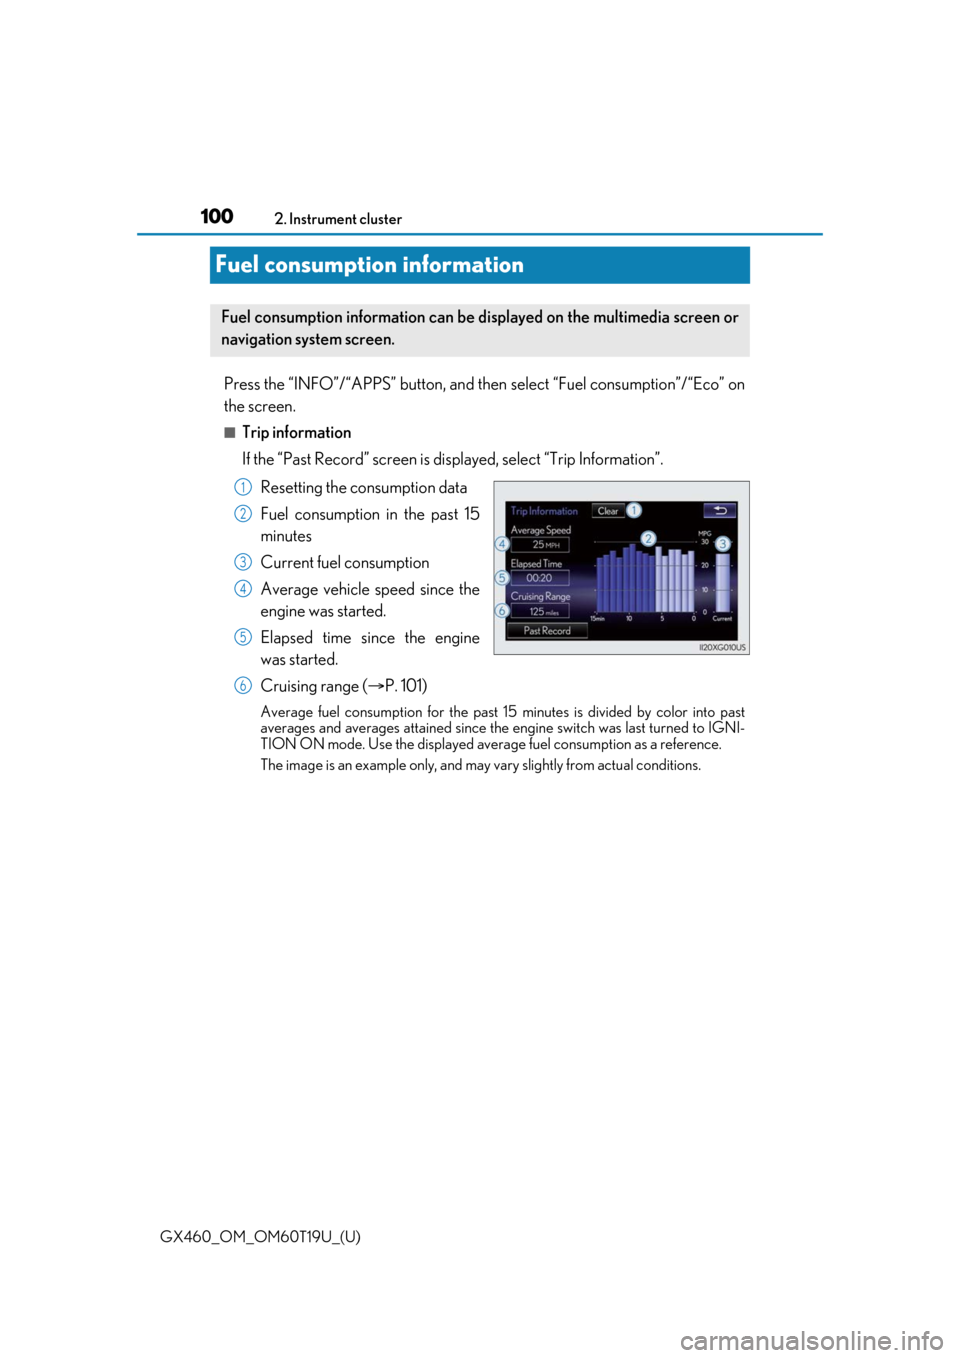
Resetting the consumption data
Fuel consumption in the past 15
minutes
Current fuel consumption
Average vehicle speed since the
engine was started.
Elapsed time since the engine
was started.
Cruising range ( P. 101)
Average fuel consumption for the past 15 minutes is divided by color into past
averages and averages attained since the engine switch was last turned to IGNI-
TION ON mode. Use the displayed average fuel consumption as a reference.
The image is an example only, and may va ry slightly from actual conditions.
Fuel consumption information can be displayed on the multimedia screen or
navigation system screen.
1
2
3
4
5
6
Page 105 of 628
GX460_OM_OM60T19U_(U)
1053-1. Key information
3
Operation of each component
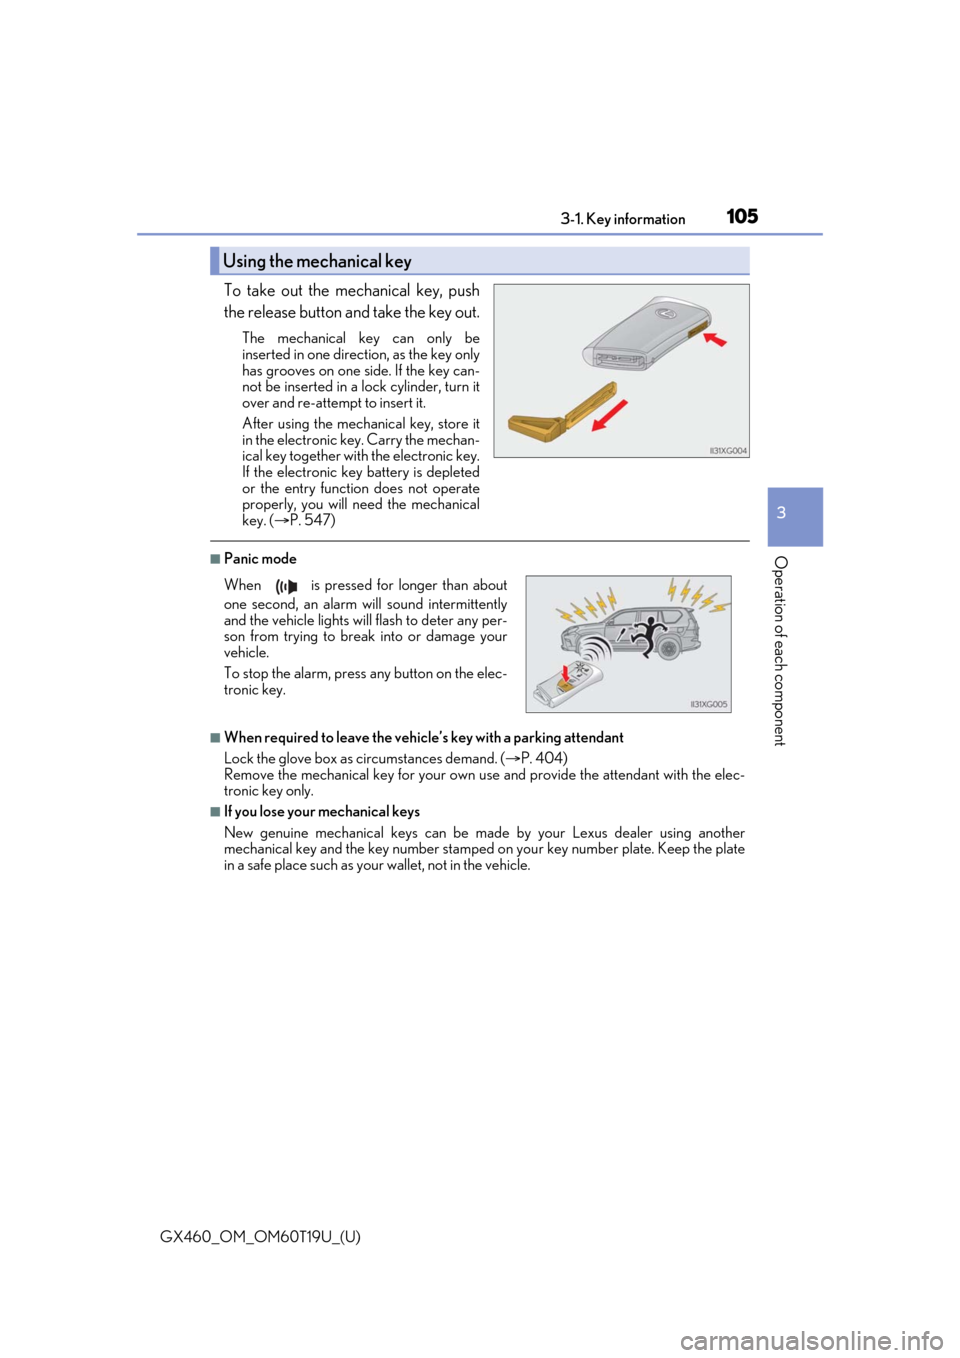
To take out the mechanical key, push
the release button and take the key out.
The mechanical key can only be
inserted in one direction, as the key only
has grooves on one side. If the key can-
not be inserted in a lock cylinder, turn it
over and re-attempt to insert it.
After using the mechanical key, store it
in the electronic key. Carry the mechan-
ical key together with the electronic key.
If the electronic key battery is depleted
or the entry function does not operate
properly, you will need the mechanical
key. ( P. 547)
■Panic mode
■When required to leave the vehicle’s key with a parking attendant
Lock the glove box as circumstances demand. ( P. 404)
Remove the mechanical key for your own use and provide the attendant with the elec-
tronic key only.
■If you lose your mechanical keys
New genuine mechanical keys can be made by your Lexus dealer using another
mechanical key and the key number stamped on your key number plate. Keep the plate
in a safe place such as your wallet, not in the vehicle.
Using the mechanical key
When is pressed for longer than about
one second, an alarm will sound intermittently
and the vehicle lights will flash to deter any per-
son from trying to break into or damage your
vehicle.
To stop the alarm, press any button on the elec-
tronic key.
Page 106 of 628
106
GX460_OM_OM60T19U_(U)3-1. Key information
■When riding in an aircraft
When bringing an electronic key onto an aircraft, make sure you do not press any but-
tons on the electronic key while inside the aircraft cabin. If you are carrying an electronic
key in your bag etc., ensure
that the buttons are not likely to be pressed accidentally.
Pressing a button may cause the electronic key to emit radio waves that could interfere
with the operation of the aircraft.
■Electronic key battery depletion
●The standard battery life is 1 to 2 years.
●If the battery becomes low, an alarm will sound in the cabin when the engine is stopped.
●As the electronic key always receives ra dio waves, the battery will become depleted
even if the electronic key is not used. The following symptoms indicate that the elec-
tronic key battery may be depleted. Replace the battery when necessary. ( P. 492)
• The smart access system with push-button start or the wireless remote control does
not operate.
• The detection area becomes smaller.
• The LED indicator on the key surface does not turn on.
●To avoid serious deterioration, do not leave the electronic key within 3 ft. (1 m) of the
following electrical appliances that produce a magnetic field:
•TVs
• Personal computers
• Cellular phones, cordless phones and battery chargers
• Recharging cellular phones or cordless phones
•Table lamps
• Induction cookers
●Battery-saving mode can reduce the power consumption of electronic keys that are not
used for long periods of time. ( P. 127)
■Replacing the battery
P. 492
■Certification for the wireless remote control
For vehicles sold in the U.S.A., Ha waii, Guam, Saipan and Puerto Rico
Page 126 of 628
126
GX460_OM_OM60T19U_(U)3-2. Opening, closing and locking the doors
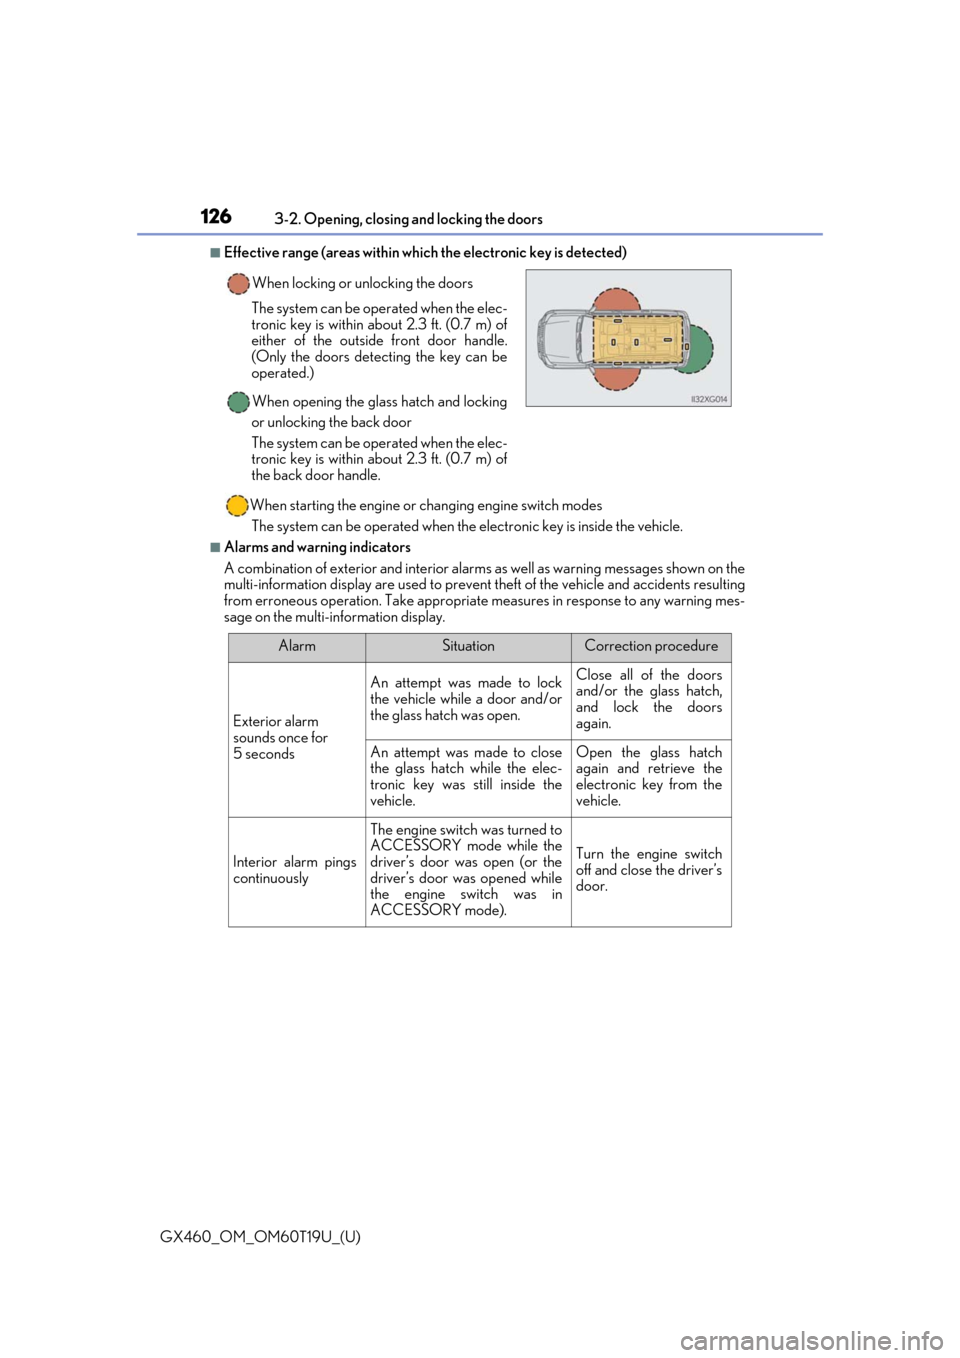
■Effective range (areas within which the electronic key is detected)
When starting the engine or changing engine switch modes
The system can be operated when the electronic key is inside the vehicle.
■Alarms and warning indicators
A combination of exterior and interior alar ms as well as warning messages shown on the
multi-information display are used to prevent theft of the vehicle and accidents resulting
from erroneous operation. Take appropriate measures in response to any warning mes-
sage on the multi-information display. When locking or unlocking the doors
The system can be operated when the elec-
tronic key is within about 2.3 ft. (0.7 m) of
either of the outside front door handle.
(Only the doors detecting the key can be
operated.)
When opening the glass hatch and locking
or unlocking the back door
The system can be operated when the elec-
tronic key is within about 2.3 ft. (0.7 m) of
the back door handle.
AlarmSituationCorrection procedure
Exterior alarm
sounds once for
5 seconds
An attempt was made to lock
the vehicle while a door and/or
the glass hatch was open.Close all of the doors
and/or the glass hatch,
and lock the doors
again.
An attempt was made to close
the glass hatch while the elec-
tronic key was still inside the
vehicle.Open the glass hatch
again and retrieve the
electronic key from the
vehicle.
Interior alarm pings
continuously
The engine switch was turned to
ACCESSORY mode while the
driver’s door was open (or the
driver’s door was opened while
the engine switch was in
ACCESSORY mode).
Turn the engine switch
off and close the driver’s
door.