Lexus GX470 2007 Instrument cluster / LEXUS 2007 GX470 OWNER'S MANUAL (OM60C64U)
Manufacturer: LEXUS, Model Year: 2007, Model line: GX470, Model: Lexus GX470 2007Pages: 436, PDF Size: 11.52 MB
Page 211 of 436
191
3-2. Using the audio system
3
Interior features
●WMA file compatibility
• Compatible standardsWMA Ver. 7, 8, 9
• Compatible sampling frequencies
32, 44.1, 48 (kHz)
• Compatible bit rates Ver. 7, 8: CBR 48, 64, 80, 96, 128, 160, 192 (kbps)
Ver. 9: CBR 48, 64, 80, 96, 128, 160, 192, 256, 320 (kbps)
*: Only compatible with 2-channel playback
●Compatible media
Media that can be used for MP3 and WMA playback are CD-Rs and CD-RWs.
Playback in some instances may not be po ssible, depending on the status of the
CD-R or CD-RW. Playback may not be po ssible or the audio may jump if the disc
is scratched or marked with fingerprints.
●Compatible disc formats
The following disc formats can be used.
• Disc formats: CD-ROM Mode 1 and Mode 2
CD-ROM XA Mode 2, Form 1 and Form 2
• File formats: ISO9660 level 1, level 2, (Romeo, Joliet)
MP3 and WMA files written in any format other than those listed above may
not play correctly, and their file names and folder names may not be dis-
played correctly.
Items related to standards and limitations are as follows:
• Maximum directory hierarchy: 8 levels
• Maximum length of folder names/file names: 32 characters
• Maximum number of folders: 192 (including the root)
• Maximum number of files per disc: 255
●File names
The only files that can be recognized as MP3/WMA and played are those with
the extension .mp3 or .wma.
●Multi-sessions
As the audio system is compatible with multi-sessions, it is possible to play discs
that contain MP3 and WMA files. However, only the first session can be played.
Page 212 of 436
192
3-2. Using the audio system
●ID3 and WMA tags
ID3 tags can be added to MP3 files, making it possible to record the track title
and artist name, etc.
The system is compatible with ID3 Ver. 1.0, 1.1, and Ver. 2.2, 2.3 ID3 tags. (The
number of characters is based on ID3 Ver. 1.0 and 1.1.)
WMA tags can be added to WMA files, making it possible to record the track
title and artist name in the same way as with ID3 tags.
●MP3 and WMA playback
When a disc containing MP3 or WMA files is inserted, all files on the disc are first
checked. Once the file check is finished, the first MP3 or WMA file is played. To
make the file check finish more quickly, we recommend you do not write in any
files other than MP3 or WMA files or create any unnecessary folders.
Discs that contain a mixture of music data and MP3 or WMA format data cannot
be played.
●Extensions
If the file extensions .mp3 and .wma are used for files other than MP3 and WMA
files, they will be mistakenly recognized and played as MP3 and WMA files. This
may result in large amounts of interference and damage to the speakers.
●Playback
• To play MP3 files with steady sound quality, we recommend a fixed bit rate
of 128 kbps and a sampling frequency of 44.1 kHz.
• CD-R or CD-RW playback may not be po ssible in some instances, depend-
ing on the characteristics of the disc.
• There is a wide variety of freeware and other encoding software for MP3 and WMA files on the market, and depend ing on the status of the encoding
and the file format, poor sound quality or noise at the start of playback may
result. In some cases, playback may not be possible at all.
• When files other than MP3 or WMA files are recorded on a disc, it may take
more time to recognize the disc and in some cases, playback may not be
possible at all.
• Microsoft, Windows, and Windows Media are the registered trademarks of
Microsoft Corporation in th e U.S. and other countries.
Page 213 of 436
193
3-2. Using the audio system
3
Interior features
■CD-R and CD-RW discs
●CD-R/CD-RW discs that have not been subject to the “finalizing process” (a
process that allows discs to be played on a conventional CD player) cannot be
played.
●It may not be possible to play CD-R /CD-RW discs recorded on a music CD
recorder or a personal computer because of disc characteristics, scratches or
dirt on the disc, or dirt, condensati on, etc. on the lens of the unit.
●It may not be possible to play discs recorded on a personal computer depend-
ing on the application settings and the environment. Record with the correct
format. (For details, contact the appropriate application manufacturers of the
applications.)
●CD-R/CD-RW discs may be damaged by direct exposure to sunlight, high
temperatures or other storage conditions . The unit may be unable to play dam-
aged discs.
●If you insert a CD-RW disc into the MP3/WMA player, playback will begin
more slowly than with a conventional CD or CD-R disc.
●Recordings on CD-R/CD-RW cannot be played using the DDCD (Double
Density CD) system.
■Unsuitable discs, and player precautions
P. 1 8 6
Page 214 of 436
194
3-2. Using the audio system
Optimal use of the audio system
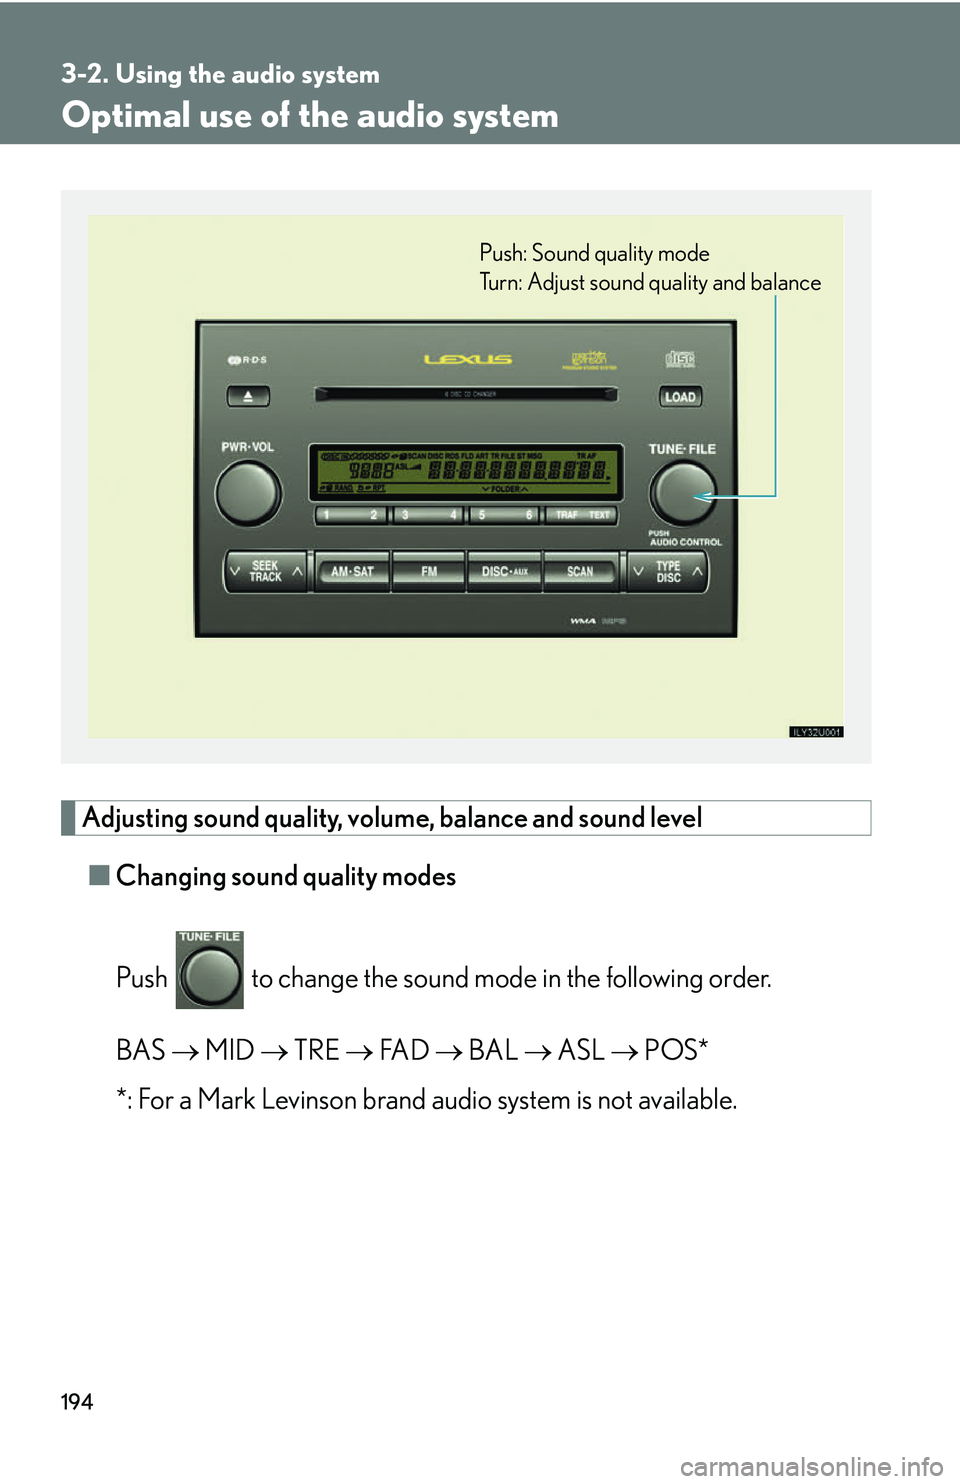
Adjusting sound quality, volume, balance and sound level■ Changing sound quality modes
Push to change the sound mode in the following order.
BAS MID TRE FA D BAL ASL POS*
*: For a Mark Levinson brand audio system is not available.
Push: Sound quality mode
Turn: Adjust sound quality and balance
Page 215 of 436
195
3-2. Using the audio system
3
Interior features
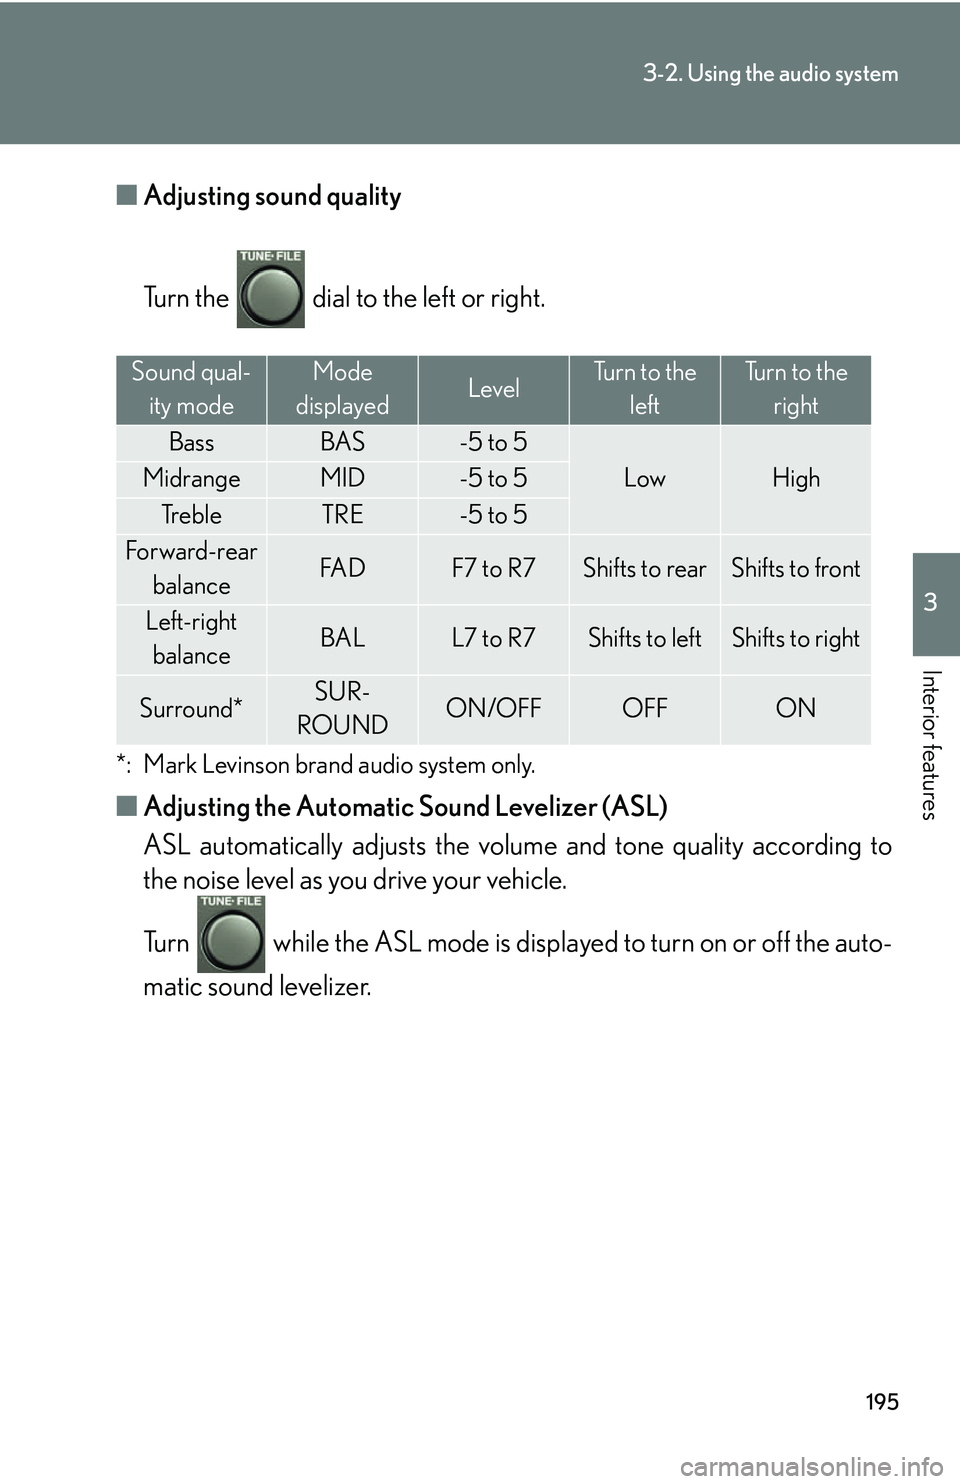
■Adjusting sound quality
Turn the dial to the left or right.
*: Mark Levinson brand audio system only.
■Adjusting the Automatic Sound Levelizer (ASL)
ASL automatically adjusts the volu me and tone quality according to
the noise level as you drive your vehicle.
Turn while the ASL mode is displayed to turn on or off the auto-
matic sound levelizer.
Sound qual-
ity modeMode
displayedLevelTurn to the leftTurn to the right
BassBAS-5 to 5
LowHighMidrangeMID-5 to 5
Tr e b l eTRE-5 to 5
Forward-rear
balanceFA DF7 to R7Shifts to rearShifts to front
Left-right balanceBALL7 to R7Shifts to leftShifts to right
Surround*SUR-
ROUNDON/OFFOFFON
Page 216 of 436
196
3-2. Using the audio system
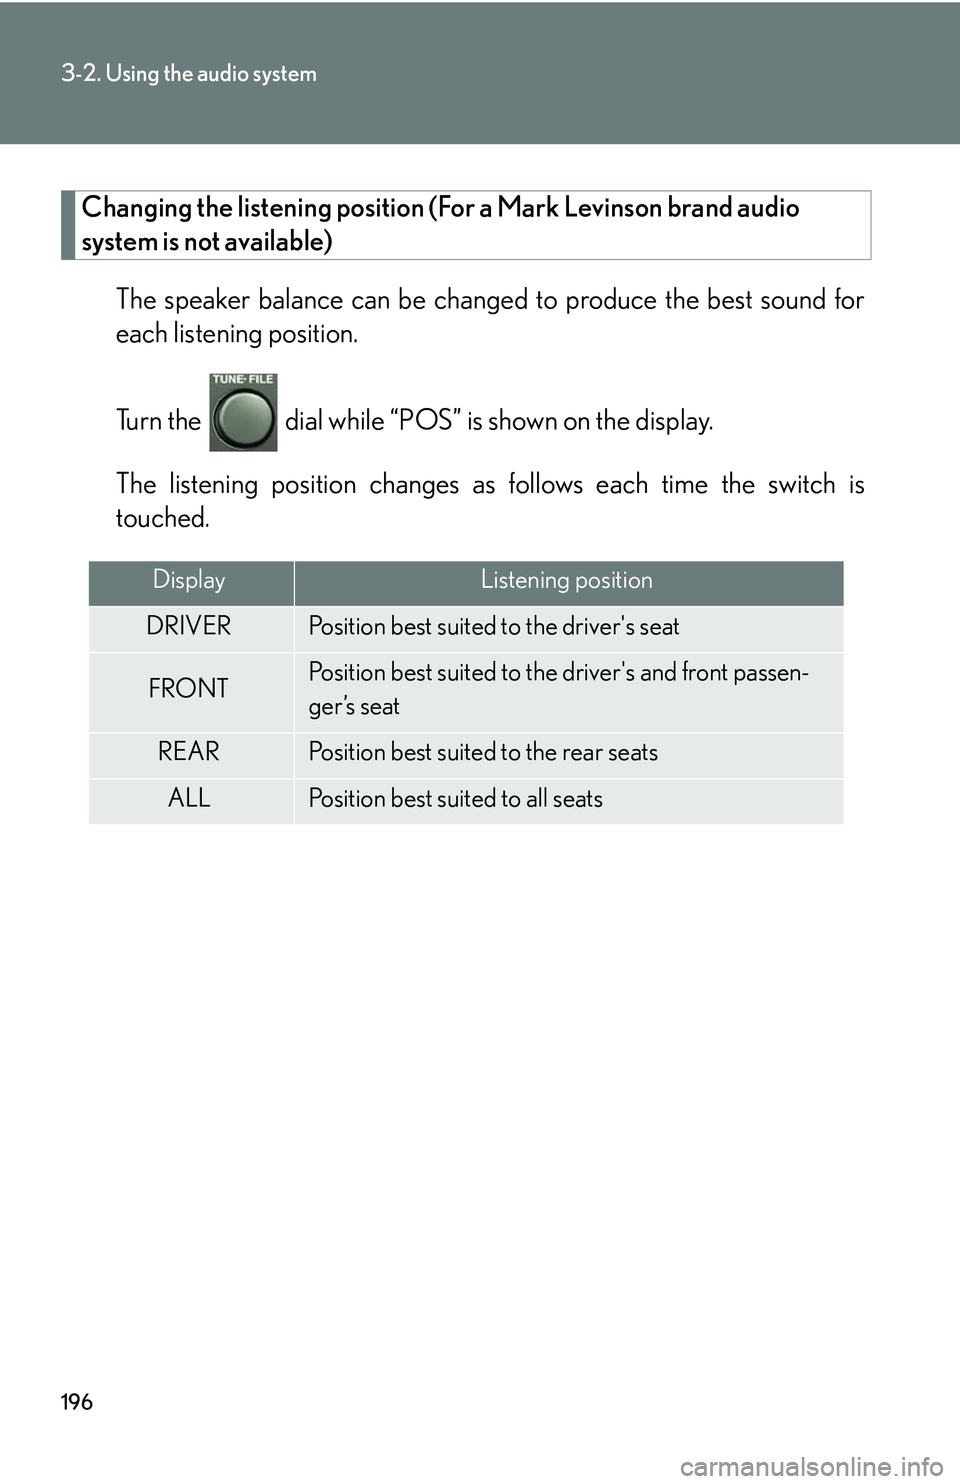
Changing the listening position (For a Mark Levinson brand audio
system is not available)
The speaker balance can be change d to produce the best sound for
each listening position.
Turn the dial while “POS” is shown on the display.
The listening position changes as follows each time the switch is
touched.
DisplayListening position
DRIVERPosition best suited to the driver's seat
FRONTPosition best suited to the driver's and front passen-
ger’s seat
REARPosition best suited to the rear seats
ALLPosition best suited to all seats
Page 217 of 436
197
3-2. Using the audio system
3
Interior features
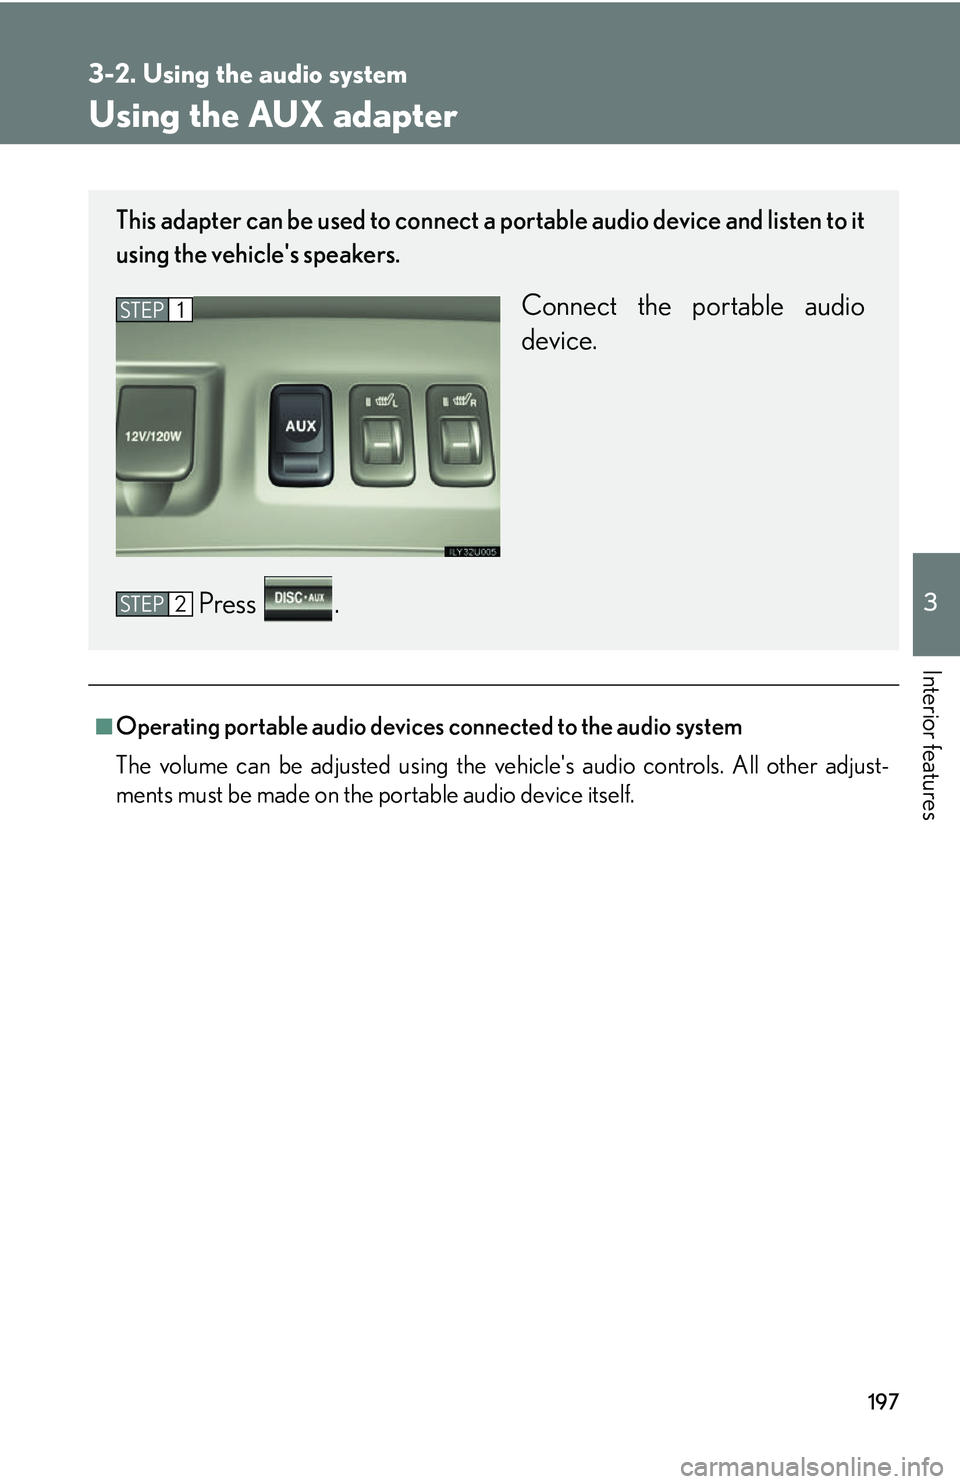
Using the AUX adapter
■Operating portable audio devices connected to the audio system
The volume can be adjusted using the vehicle's audio controls. All other adjust-
ments must be made on the portable audio device itself.
This adapter can be used to connect a portable audio device and listen to it
using the vehicle's speakers.
Connect the portable audio
device.
Press .STEP1
STEP2
Page 218 of 436
198
3-2. Using the audio system
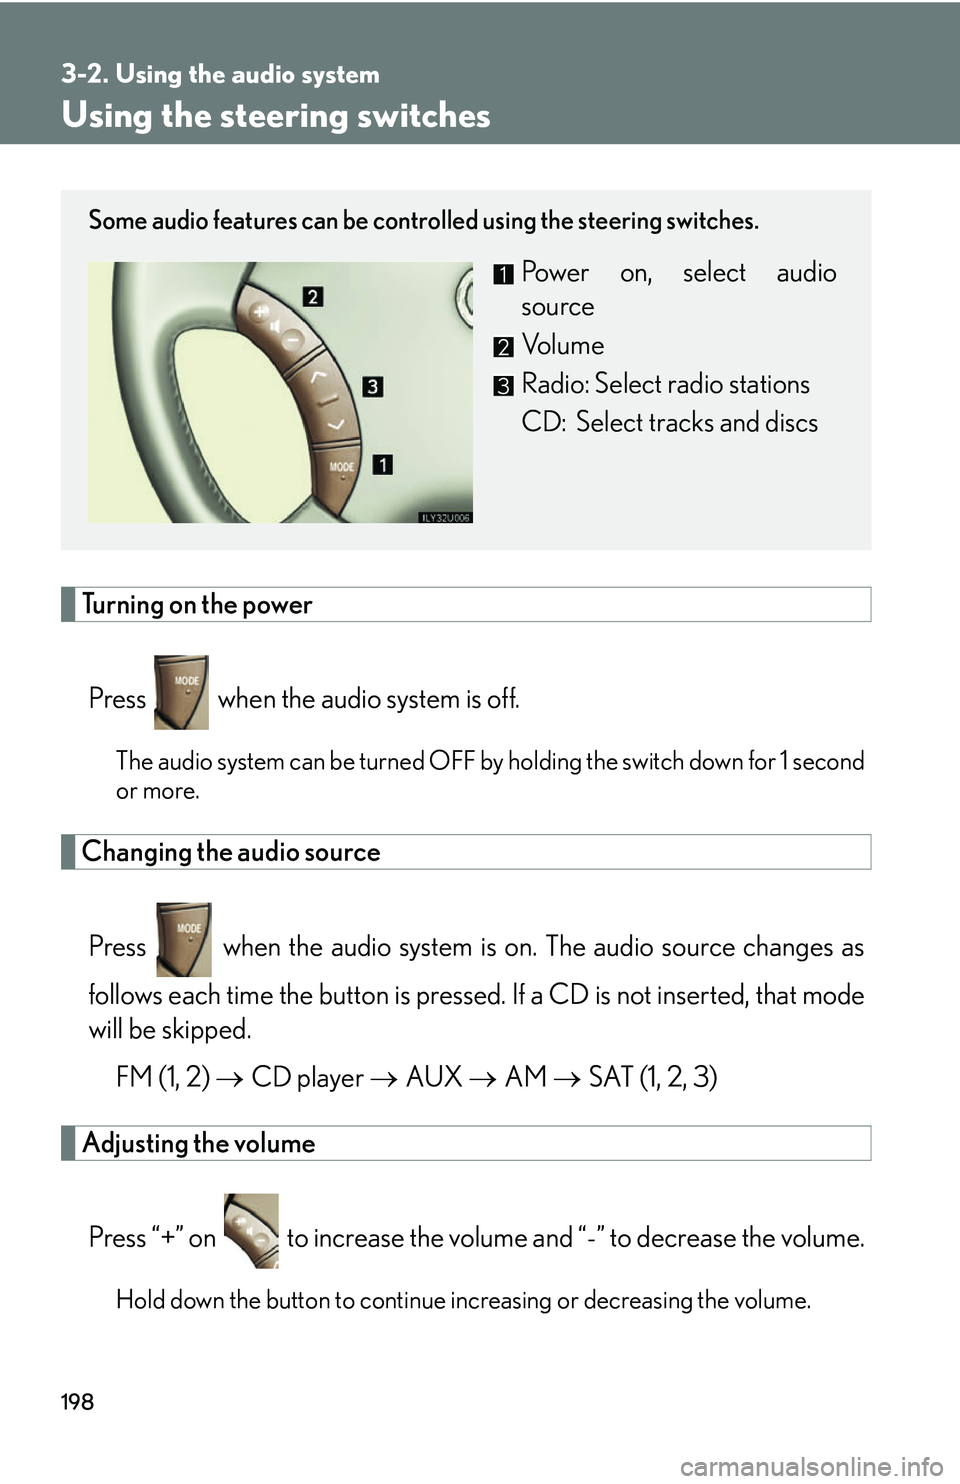
Using the steering switches
Turning on the powerPress when the audio system is off.
The audio system can be turned OFF by holding the switch down for 1 second
or more.
Changing the audio source
Press when the audio system is on. The audio source changes as
follows each time the button is pressed. If a CD is not inserted, that mode
will be skipped.
FM (1, 2) CD player AUX AM SAT (1, 2, 3)
Adjusting the volume
Press “+” on to increase the volu me and “-” to decrease the volume.
Hold down the button to continue increasing or decreasing the volume.
Some audio features can be controlled using the steering switches.
Power on, select audio
source
Vo l u m e
Radio: Select radio stations
CD: Select tracks and discs
Page 219 of 436
199
3-2. Using the audio system
3
Interior features
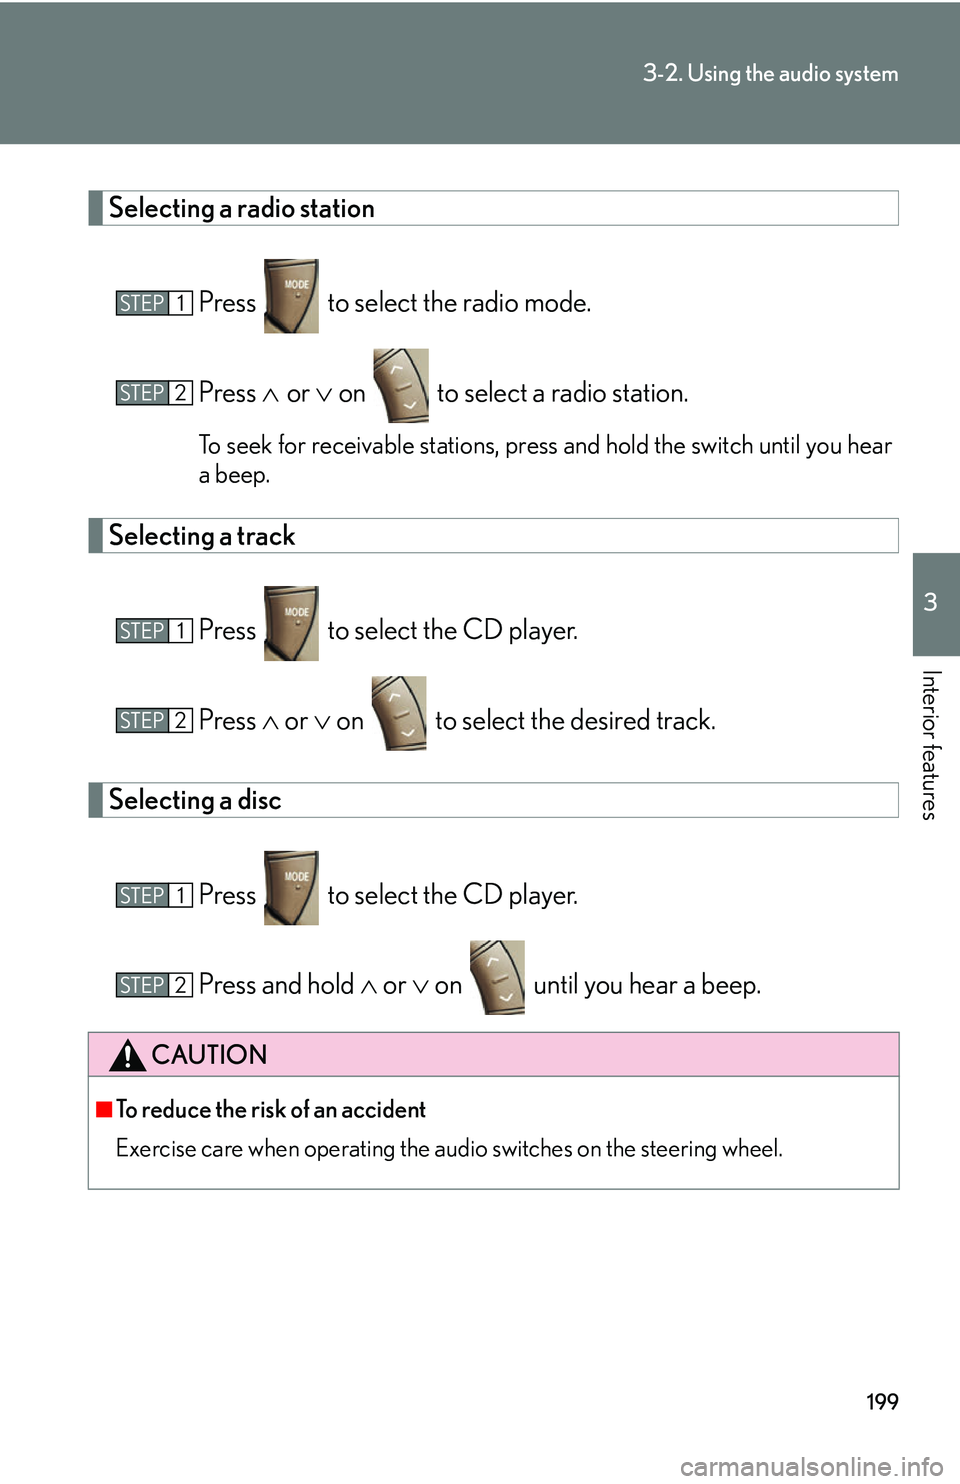
Selecting a radio stationPress to select the radio mode.
Press or on to select a radio station.
To seek for receivable stations, press and hold the switch until you hear
a beep.
Selecting a track
Press to select the CD player.
Press or on to select the desired track.
Selecting a disc
Press to select the CD player.
Press and hold or on until you hear a beep.
CAUTION
■To reduce the risk of an accident
Exercise care when operating the audio switches on the steering wheel.
STEP1
STEP2
STEP1
STEP2
STEP1
STEP2
Page 220 of 436
200
3-3. Using the rear audio system
Rear seat entertainment system features (if equipped)
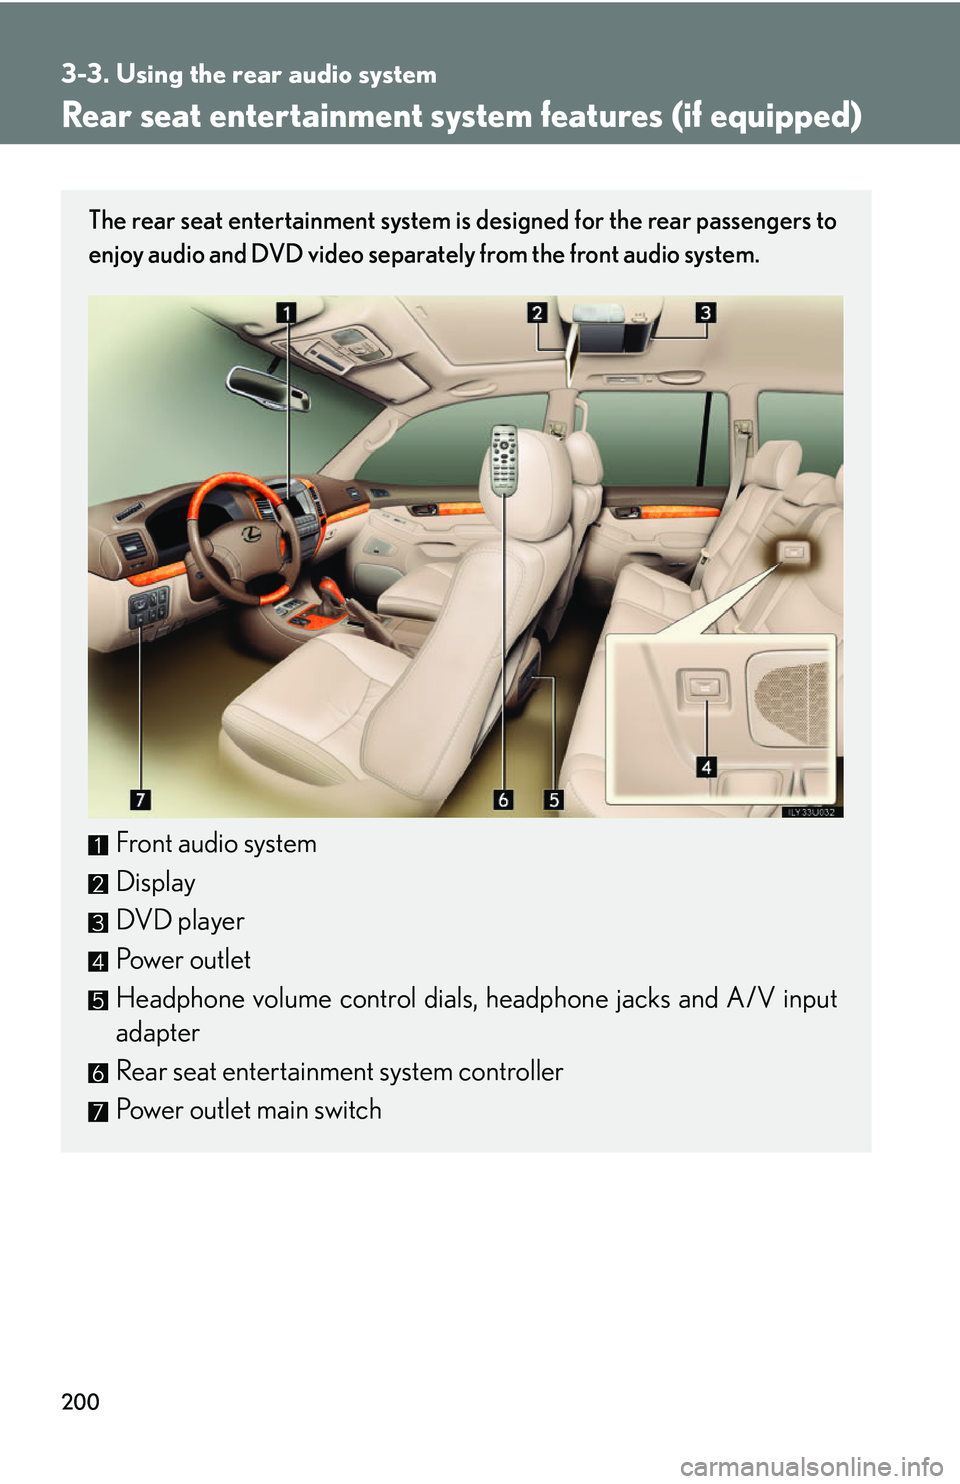
The rear seat entertainment system is designed for the rear passengers to
enjoy audio and DVD video separately from the front audio system.
Front audio system
Display
DVD player
Power outlet
Headphone volume control dials, headphone jacks and A/V input
adapter
Rear seat entertainment system controller
Power outlet main switch