remote control Lexus HS250h 2010 User Guide
[x] Cancel search | Manufacturer: LEXUS, Model Year: 2010, Model line: HS250h, Model: Lexus HS250h 2010Pages: 611, PDF Size: 11 MB
Page 59 of 611

57
1
1-3. Opening, closing and locking the doors
Before driving
HS250h_U_75033U(Canada)
Doors
The vehicle can be locked and unlocked using the entry function, wireless
remote control or door lock switch.
■Entry function
→ P. 4 4
■ Wireless remote control
→ P. 54
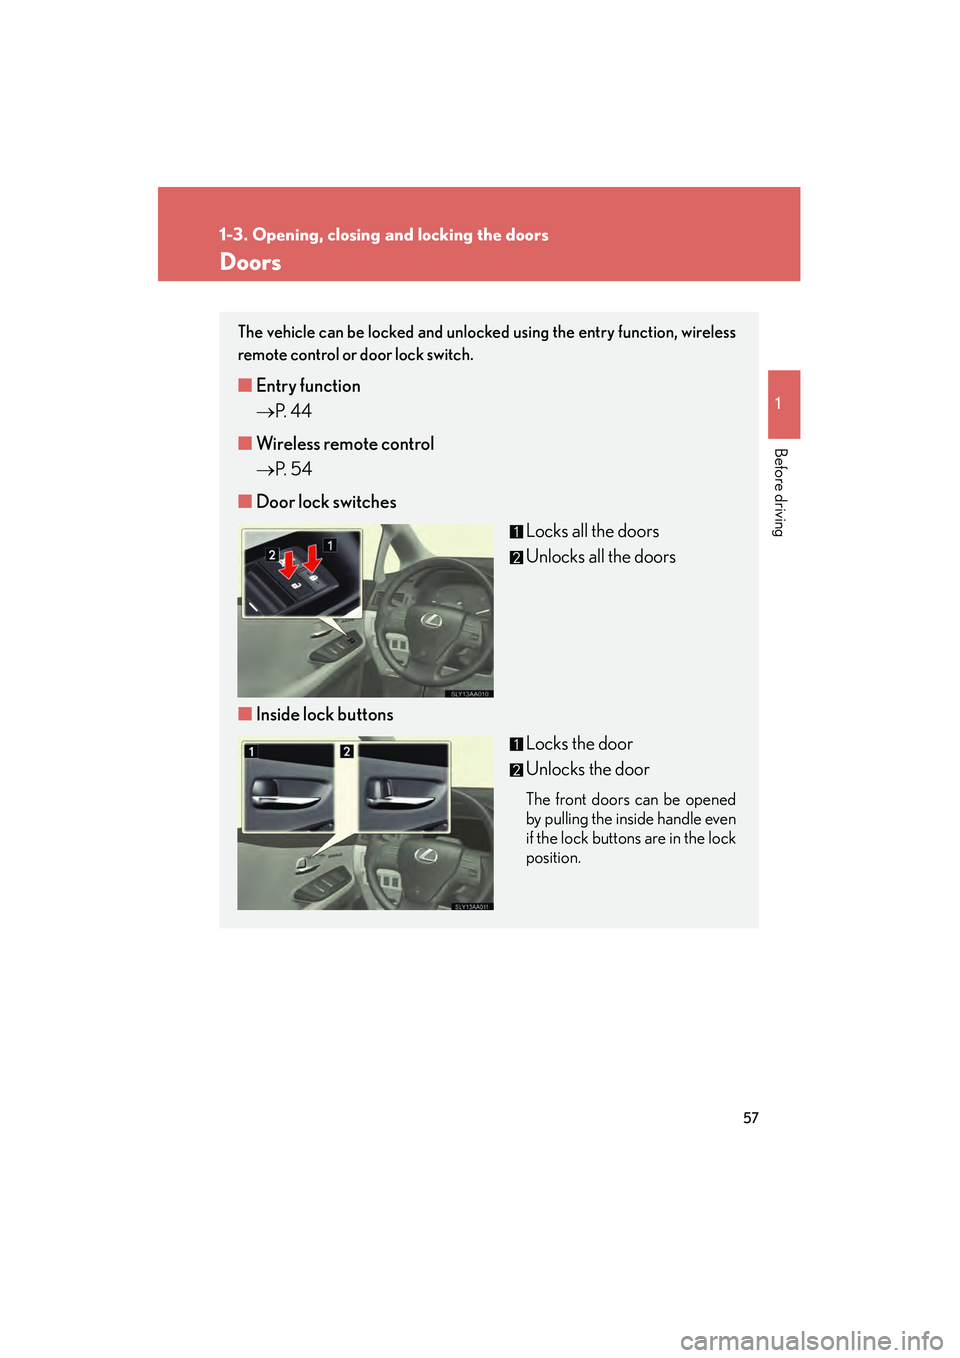
■ Door lock switches
Locks all the doors
Unlocks all the doors
■ Inside lock buttons
Locks the door
Unlocks the door
The front doors can be opened
by pulling the inside handle even
if the lock buttons are in the lock
position.
Page 62 of 611

60
1-3. Opening, closing and locking the doors
HS250h_U_75033U(Canada)
Tr u n k
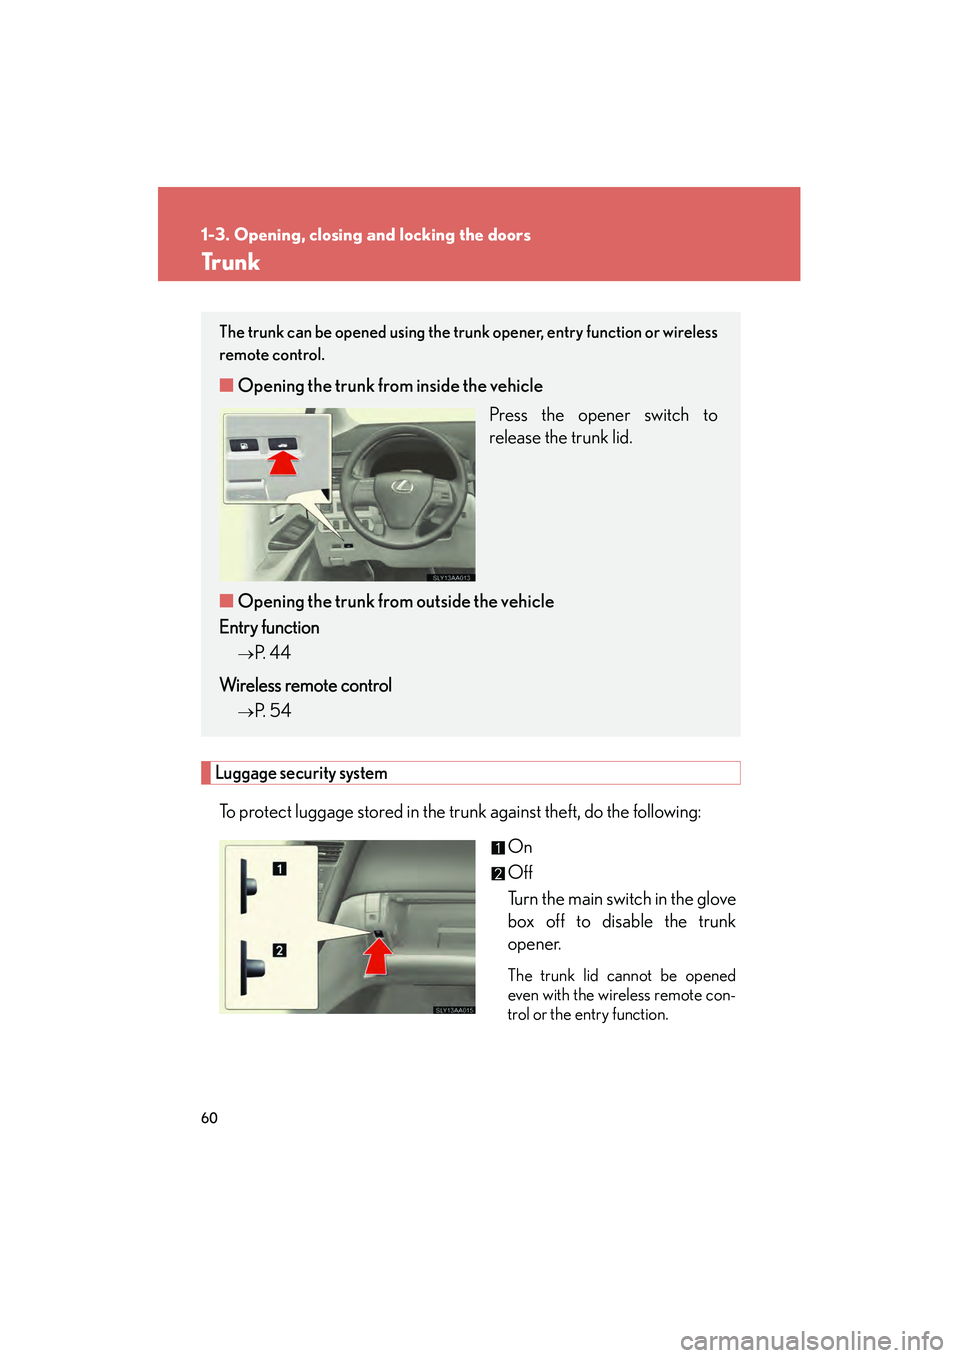
Luggage security system
To protect luggage stored in the trunk against theft, do the following:On
Off
Turn the main switch in the glove
box off to disable the trunk
opener.
The trunk lid cannot be opened
even with the wireless remote con-
trol or the entry function.
The trunk can be opened using the trunk opener, entry function or wireless
remote control.
■Opening the trunk from inside the vehicle
Press the opener switch to
release the trunk lid.
■ Opening the trunk from outside the vehicle
Entry function
→P. 4 4
Wireless remote control
→P. 54
Page 71 of 611

69
1-4. Adjustable components (seats, mirrors, steering wheel)
1
Before driving
HS250h_U_75033U(Canada)
Linking driving position memory with door unlock operation
Record your driving position to button 1, 2 or 3 before performing the fol-
lowing:
Carry only the key (including the card key) to which you want to link the
driving position. If 2 or more keys are in the vehicle, the driving position
cannot be linked properly.
Shift the shift position to P and close the driver’s door. Turn the
“POWER” switch to ON mode. Press the desired button (1, 2 or 3)
to recall the position. Then, while
keep pressing the button, press the
driver’s door lock switches (either
lock or unlock) until the signal
beeps.
The driving position is recalled
when the driver’s door is unlocked
using the entry function or wireless
remote control and the driver ’s
door is opened.
Page 89 of 611

87
1-5. Opening and closing the windows and moon roof
1
Before driving
HS250h_U_75033U(Canada)
■The power windows can be operated when
The “POWER” switch is in ON mode.
■Operating the power windows after turning the hybrid system off
The power windows can be operated for approximately 43 seconds even after the
“POWER” switch is turned to ACCESSORY mode or turned off. They cannot,
however, be operated once either front door is opened.
■Jam protection function
If an object becomes caught between the window and the window frame, window
travel is stopped and the window is opened slightly.
■Door lock linked window operation
●The power windows can be opened and closed using the mechanical key. *
(→ P. 5 3 3 )
●The power windows can be opened using the wireless remote control. *
(→ P. 5 4 )
*: This setting must be customized at your Lexus dealer.
■When the 12-volt battery is disconnected
The window lock switch is disabled. If necessary, press the window lock switch after
reconnecting the battery.
■Customization
Settings (e.g. linked door lock operation) can be changed.
(Customizable features →P. 5 74 )
Page 92 of 611

90
1-5. Opening and closing the windows and moon roof
HS250h_U_75033U(Canada)
■The moon roof can be operated when
The “POWER” switch is in ON mode.
■Operating the moon roof after turning the hybrid system off
The moon roof can be operated for approximately 43 seconds even after the
“POWER” switch is turned to ACCESSORY mode or turned off. It cannot, how-
ever, be operated once either front door is opened.
■Jam protection function
If an object is detected between the moon roof and the frame while the moon roof is
closing or tilting down, travel is stopped and the moon roof opens slightly.
■Sunshade
The sunshade can be opened and closed manually. However, the sunshade will
open automatically when the moon roof is opened.
■Door lock linked moon roof operation
●The moon roof can be opened and closed using the mechanical key.*
(→ P. 5 3 3 )
●The moon roof can be opened using the wireless remote control.* However, this
function is available only when the door windows can be opened and closed
with the wireless remote control. ( →P. 5 4 )
*: This setting must be customized at your Lexus dealer.
■When the moon roof does not close normally
Pressing and holding the “CLOSE” switch will close the moon roof.
■Moon roof open warning buzzer
The buzzer sounds and a message is shown on the multi-information display in the
instrument cluster when the “POWER” switch is turned off and the driver’s door is
opened with the moon roof open.
■Customization
Settings (e.g. linked door lock operation) can be changed.
(Customizable features →P. 5 74 )
Page 100 of 611

98
1-7. Theft deterrent system
HS250h_U_75033U(Canada)
Alarm
The system sounds the alarm and flashes the lights when forced entry is
detected.
■Triggering of the alarm
The alarm is triggered in the following situations when the alarm is
set:
●A locked door or trunk is unlocked or opened in any way other
than using the entry function, wireless remote control or mechan-
ical key. (The doors will lock again automatically.)
● The hood is opened.
■ Setting the alarm system
Without navigation system
Close the doors, trunk and hood,
and lock all the doors using the
entry function or wireless remote
control. The system will be set
automatically after 30 seconds.
The indicator light changes from
being on to flashing when the
system is set.
With navigation system
Close the doors, trunk and hood,
and lock all the doors using the
entry function or wireless remote
control. The system will be set
automatically after 30 seconds.The indicator light changes from
being on to flashing when the
system is set.
Page 314 of 611

312
3-3. Using the Bluetooth® audio system
HS250h_U_75033U(Canada)
■When transferring ownership of the vehicle
Be sure to initialize the system to prevent personal data from being improperly
accessed. (→P. 3 5 3 )
■About Bluetooth®
■Compatible models
●Bluetooth® specifications:
Ver. 1.2, or higher (Recommended: Ver. 2.0+EDR or higher)
●Following Profiles:
• A2DP (Advanced Audio Distribution Profile) Ver. 1.0
• AVRCP (Audio/Video Remote Control Pr ofile) Ver. 1.0 or higher (Ver. 1.3 or
higher recommended)
Portable players must correspond to the above specifications in order to be con-
nected to the Bluetooth
® audio system. However, please note that some functions
may be limited depending on the type of portable player.
■Certification for the Bluetooth® audio system
FCC ID: AJDK018
IC ID: 775E-K018
MADE IN JAPAN
This device complies with Part 15 of the FCC Rules and RSS-210 Rules. Operation
is subject to the following two conditions: (1) This device may not cause harmful
interference, and (2) this device must accept any interference received, including
interference that may cause undesired operation. Bluetooth is a registered trademark of
Bluetooth SIG. Inc.
Page 386 of 611

384
3-7. Other interior features
HS250h_U_75033U(Canada)■
Programming HomeLink
Overhead console type
Point the remote control transmit-
ter for the device 1 to 3 in. (25 to
75 mm) from the HomeLink
but-
tons.
Keep the HomeLink indicator
light in view while programming.
Inside rear view mirror type
Point the remote control transmit-
ter for the device 1 to 3 in. (25 to
75 mm) from the HomeLink
but-
tons.
Keep the HomeLink indicator
light in view while programming.
Overhead console type
Press and hold one of the
HomeLink
buttons and the trans-
mitter button. When the
HomeLink
indicator light
changes from a slow to a rapid
flash, you can release both buttons.
If the HomeLink indicator light
comes on but does not flash, or
flashes rapidly for 2 seconds and
remains lit, the HomeLink
button
is already programmed. Use the
other buttons or follow the “Repro-
gramming a HomeLink
button”
instructions. ( →P. 3 8 8 )
Page 387 of 611

385
3-7. Other interior features
3
Interior features
HS250h_U_75033U(Canada)Inside rear view mirror type
Press and hold one of the
HomeLink
buttons and the trans-
mitter button. When the
HomeLink
indicator light
changes from a slow to a rapid
flash after 20 seconds, release
both buttons.
Overhead console type Test the HomeLink
operation by
pressing the newly programmed
button.
If a HomeLink button has been
programmed for a garage door,
check to see if the garage door
opens and closes. If the garage
door does not operate, see if your
garage transmitter is of the rolling
code type. Press and hold the pro-
grammed HomeLink
button. The
remote control transmitter is of the
rolling code type if the HomeLink
indicator light flashes rapidly for 2
seconds and then remains lit. If
your transmitter is the rolling code
type, proceed to the heading “Pro-
gramming a rolling code system”.
Page 388 of 611

386
3-7. Other interior features
HS250h_U_75033U(Canada)Inside rear view mirror type
Test the HomeLink
operation by
pressing the newly programmed
button.
If a HomeLink button has been
programmed for a garage door,
check to see if the garage door
opens and closes. If the garage
door does not operate, see if your
garage transmitter is of the rolling
code type. Press and hold the pro-
grammed HomeLink
button. The
remote control transmitter is of the
rolling code type if the HomeLink
indicator light flashes rapidly for 2
seconds and then remains lit. If
your transmitter is the rolling code
type, proceed to the heading “Pro-
gramming a rolling code system”.
Repeat the steps above to program another device for any of the
remaining HomeLink buttons.
■ Programming a rolling code system (for U.S.A. owners)
If your device is rolling code equipped, follow the steps under the
heading “Programming HomeLink
” before proceeding with the
steps listed below.
Locate the training button on the ceiling mounted garage door
opener motor. The exact location and color of the button may
vary by brand of garage door opener motor.
Refer to the operation manual supplied with the garage door opener
for the location of the training button.
Press the training button.
Following this step, you have 30 seconds in which to initiate step 3
below.