fuel Lexus HS250h 2010 Using the Bluetooth audio system / LEXUS 2010 HS250H (OM75006U) Owner's Manual
[x] Cancel search | Manufacturer: LEXUS, Model Year: 2010, Model line: HS250h, Model: Lexus HS250h 2010Pages: 608, PDF Size: 9.89 MB
Page 152 of 608
![Lexus HS250h 2010 Using the Bluetooth audio system / LEXUS 2010 HS250H (OM75006U) Owners Manual 152
2-1. Driving procedures
■Fuel economy
HS250h is designed to achieve the best possible fuel economy during normal driv-
ing (using the gasoline engine and electric motor [traction motor]). Drivi Lexus HS250h 2010 Using the Bluetooth audio system / LEXUS 2010 HS250H (OM75006U) Owners Manual 152
2-1. Driving procedures
■Fuel economy
HS250h is designed to achieve the best possible fuel economy during normal driv-
ing (using the gasoline engine and electric motor [traction motor]). Drivi](/img/36/29665/w960_29665-151.png)
152
2-1. Driving procedures
■Fuel economy
HS250h is designed to achieve the best possible fuel economy during normal driv-
ing (using the gasoline engine and electric motor [traction motor]). Driving in EV
drive mode more than necessary may lower fuel economy.
CAUTION
■Caution while driving
When driving in EV drive mode, pay special attention to the area around the vehi-
cle. Because there is no engine noise, pedestrians, people riding bicycles or other
people and vehicles in the area may not be aware of the vehicle starting off or
approaching them, so take extra care while driving.
Page 154 of 608

154
2-1. Driving procedures
■Shift position purpose
*: For good fuel economy and noise redu ction, the D position should usually
be used.
■ P position switch
The shift position can be changed to P thr
ough use of the P position
switch.
Fully stop the vehicle and keep
depr
essing the brake pedal, and
then press the P position switch.
When the shift position is
changed to P, the switch indica -
tor comes on.
Check that the P position indi -
cator is illuminated on the shift
position indicator
.
●Changing the shift position from P to other positions:
• While depressing the brake pedal firmly, operate the shift lever. If the
shift lever is operated without depressing the brake pedal, the buzzer
will sound and the shifting operation will be disabled.
• The shift position cannot be changed from P to B directly.
Shift positionFunction
PParking the vehicle/starting the hybrid system
RReversing
NNeutral
DNormal driving*
BApplying moderate engine braking when driving down
hills or on steep slopes
Page 155 of 608

155
2-1. Driving procedures
2
When driving
■Selecting a driving mode
The following modes can be selected to suit driving conditions:
Eco mode
Suitable for improving the fuel
economy, because the torque
corresponding to the accelera-
tor pedal depression amount
can be gener
ated more
smoothly than it is in normal
conditions and the operation of
the air conditioning system will
be minimized.
When the Eco mode switch is
pr
essed, the “ECO MODE”
indicator comes on in the meter.
Power mode
Suitable when the vehicle needs
to drive powerfully or travels in
mountainous areas.
When the power mode switch is
pr
essed, the “PWR MODE”
indicator comes on in the meter.
Page 156 of 608

156
2-1. Driving procedures
■For the shift positions
●When the “POWER” switch is off, the shift position cannot be changed.
●When the “POWER” switch is in ON mo de, the shift position can only be
changed to N.
●When the “READY” indicator is on, the sh ift position can be changed from P to
D, N or R.
●The shift position can only be changed to B directly from D.
In addition, if the shift position is change d in any of
the following situations, the
buzzer will sound and the shifting operation wi ll be disabled or the shift position will
automatically change to N. When this happens, select an appropriate shift position.
● Situations where the shifting operation will be disabled:
• When the shift lever is changed from P to
another position without depress-
ing the brake pedal.
• When the shift position is changed from P or N to B.
● Situations where the shift position will automatically change to N:
• When the P position switch is pressed while the vehicle is running.
• When shift position R is selected when the vehicle is moving forward.
• When shift position D is selected when the vehicle is moving in reverse.
• When the shift position is changed from R to B.
■Reverse warning buzzer
When shifting into R, a buzzer will sound to inform the
driver that the shift position is
in R.
■About engine braking
When shift position B is selected, releasing the accelerator pedal will apply engine
br
aking.
• When the vehicle is driven at high sp eeds, comp
ared to ordinary gasoline-
fueled vehicles, the engine braking deceleration is felt less than that of other
vehicles.
• The vehicle can be accelerated even when shift position B is selected.
If the vehicle is driven continuously in the B posi
tion, fuel efficiency will become low.
Usually, select the D position.
Page 162 of 608

162
2-2. Instrument cluster
Gauges and meters
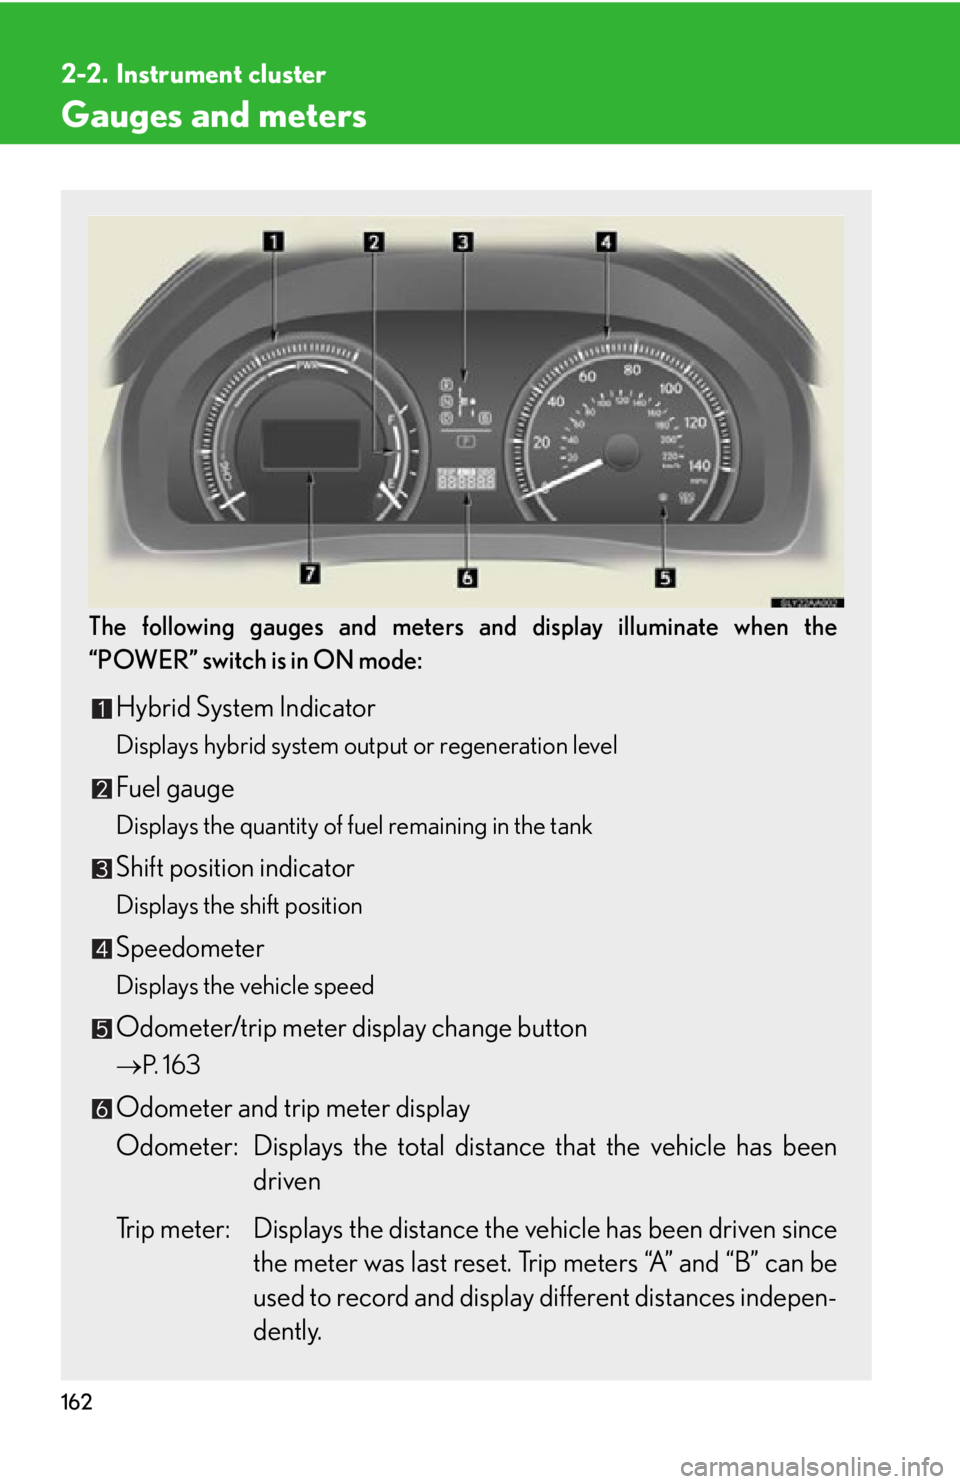
The following gauges and meters and display illuminate when the
“POWER” switch is in ON mode:
Hybrid System Indicator
Displays hybrid system output or regeneration level
Fuel gauge
Displays the quantity of fuel remaining in the tank
Shift position indicator
Displays the shift position
Speedometer
Displays the vehicle speed
Odometer/trip meter display change button
P. 1 6 3
Odometer and trip meter display
Odometer: Displays the total distan ce that the v
ehicle has been
driven
Trip meter: Displays the distance th e v
ehicle has been driven since
the meter was last reset. Trip meters “A” and “B” can be
used to record and display different distances indepen -
dently.
Page 170 of 608

170
2-2. Instrument cluster
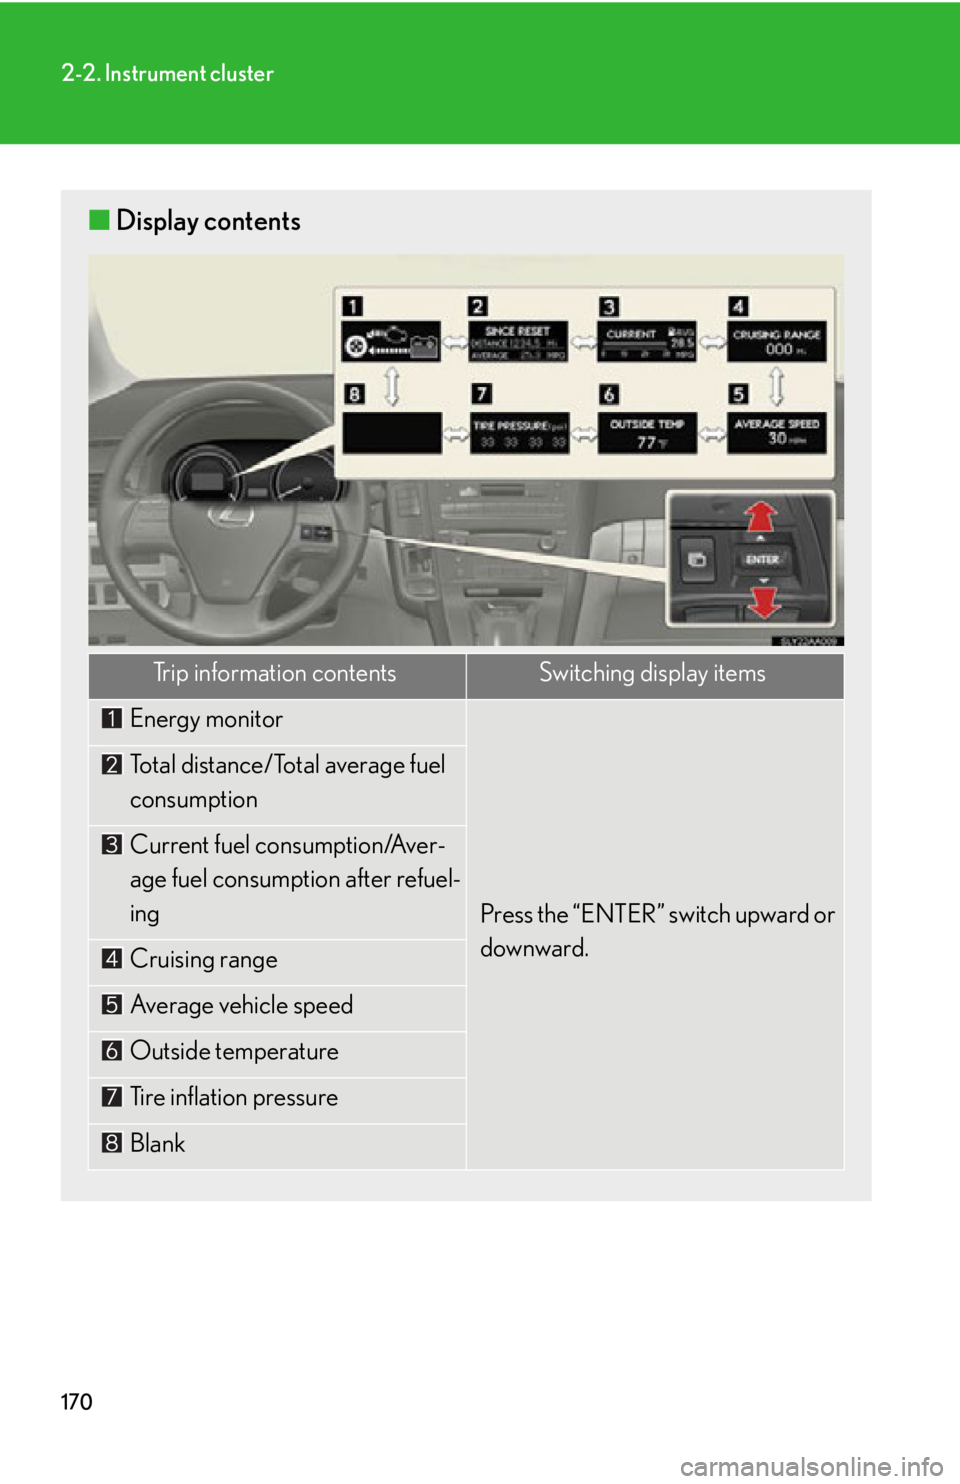
■Display contents
Trip information contentsSwitching display items
Energy monitor
Press the “ENTER” switch upward or
downward.
Total distance/Total average fuel
consumption
Current fuel consumption/Aver-
age fuel consumption after refuel-
ing
Cruising range
Average vehicle speed
Outside temperature
Tire inflation pressure
Blank
Page 172 of 608

172
2-2. Instrument cluster
Trip information
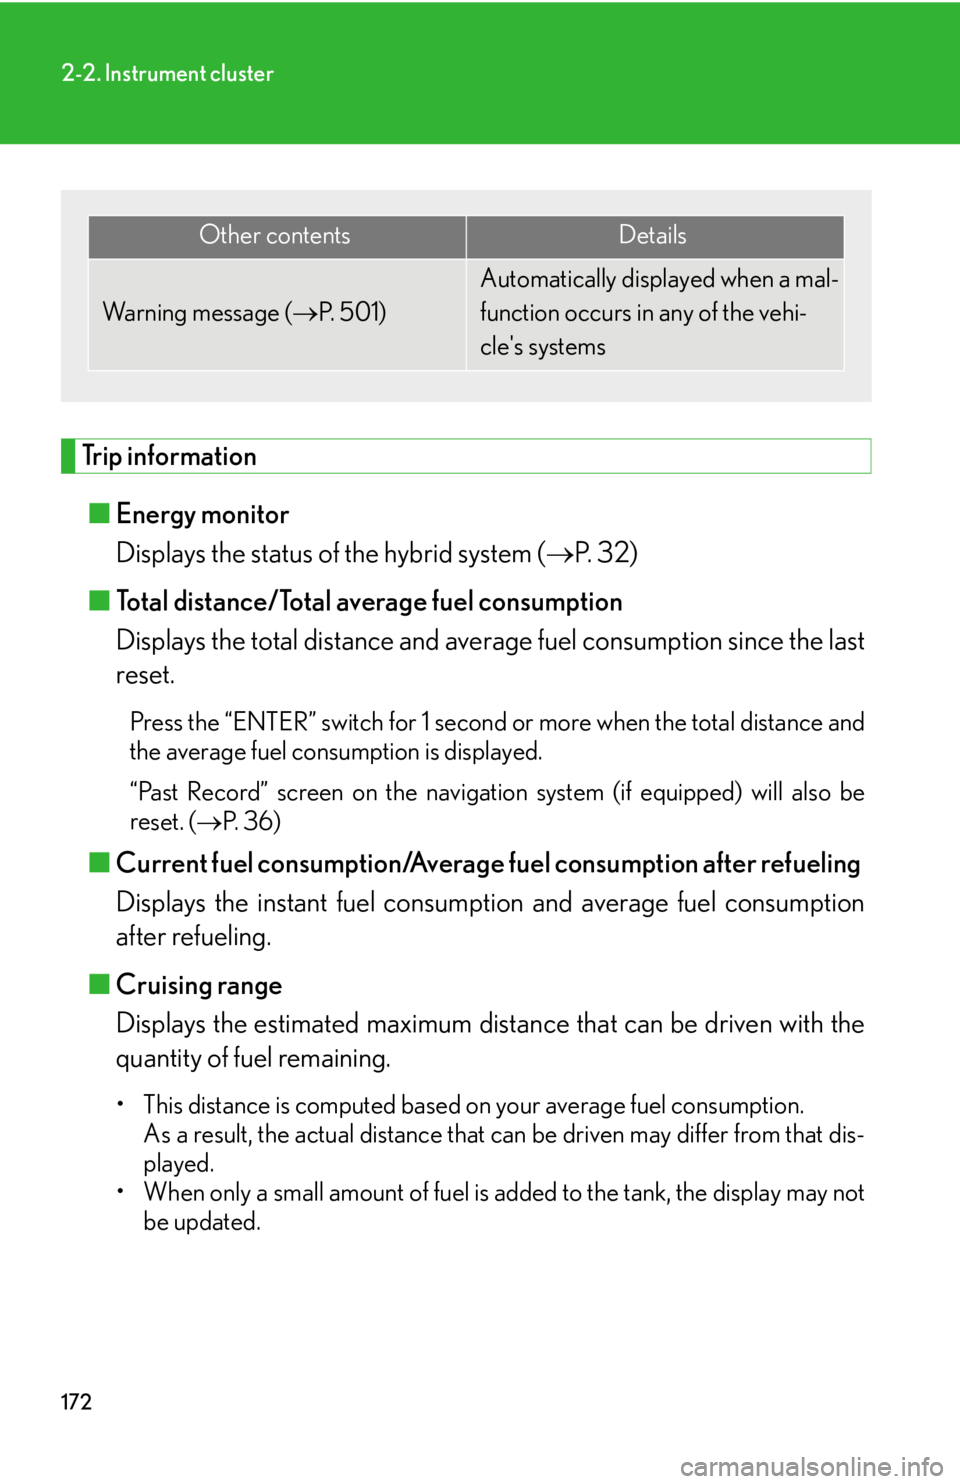
■Energy monitor
Displays the status of the hybrid system ( P
. 32)
■ T
otal distance/Total average fuel consumption
Displays the total distance and aver age fuel consumption since the last
r
eset.
Press the “ENTER” switch for 1 second or more when the total distance and
the average fuel consumption is displayed.
“Past Record” screen on the navigation system (if equipped) will also be
re
set. ( P. 3 6 )
■Current fuel consumption/Averag e fuel consumption after refueling
Displays the instant fu el consumption and av
erage fuel consumption
after refueling.
■ Cruising r
ange
Displays the estimated maximum distan ce that can be driv
en with the
quantity of fuel remaining.
• This distance is computed based on your average fuel consumption.
As a result, the actual distance that can be driven may differ from that dis -
played.
• When only a small amount of fuel is added to the tank, the display may not
be updated.
Other contentsDetails
Wa r n i n g m e s s a g e ( P. 5 0 1 )
Automatically displayed when a mal-
function occurs in any of the vehi-
cle's systems
Page 174 of 608

174
2-2. Instrument cluster
■Outside temperature display
In the following situations, the correct outside temperature may not be displayed, or
the display may take longer than normal to change.
●When stopped, or driving at low speeds (less than 15 mph [25 km/h])
●When the outside temperature has changed suddenly (at the entrance/exit of a
garage, tunnel, etc.)
■When disconnecting and reconnecting battery terminals
The following information will be reset:
●Total distance/Total average fuel consumption
●Average fuel consumption after refueling
●Cruising range
●Average vehicle speed
■Customization
Settings (e.g. available languages) can be changed.
(Customizable features P. 5 7 2 )
CAUTION
■Caution while driving
When operating the electronic feature control while driving, take extra notice of the
vehicle’s surrounding area.
NOTICE
■The multi-information display at low temperatures
Allow the interior of the vehicle to warm up before using the liquid crystal informa-
tion display. At extremely low temperatures, the information display monitor may
respond slowly, and display changes may be delayed.
Page 240 of 608

240
2-5. Driving information
Cargo and luggage
Capacity and distribution
Cargo capacity depends on the total weight of the occupants.
(Cargo capacity) = (Total load capa city) — (T
otal weight of occupants)
Steps for Determining Correct Load Limit
(1) Locate the statement “The combined weight of occupants and cargo should ne
ver exceed XXX kg or XXX lbs.” on your vehicle’s placard.
(2) Determine the combined weight of th e driv
er and passengers that will
be riding in your vehicle.
(3)Subtract the combined weight of the driv
er and passengers from
XXX kg or XXX lbs.
(4)The resulting figure equals the availabl
e amount of cargo and luggage
load capacity.
For example, if the “XXX” amount equals 1400 lbs. and ther
e will be
five 150 lb. passengers in your vehi cle, the amount of available cargo
and luggage load capacity is 650 lbs. (1400 750 (5150) = 650
lbs.)
(5)Determine the combined weight of luggage and cargo being loaded
on the vehicle. That weight may no t safely exceed the available cargo
and luggage load capacity calculated in Step 4.
Take notice of the following informat ion about storage precautions, cargo
capacity and load:
● Stow cargo and luggage in the trunk whenever possible.
● Be sur
e all items are secured in place.
●T
o maintain vehicle balance while driving, position luggage evenly
within the luggage compartment.
● F
or better fuel economy, do not carry unnecessary weight.
Page 399 of 608

399
3-7. Other interior features
3
Interior features
■Emergency Assistance Button (“SOS”)
In the event of an emergency on the road, push the “SOS” button to
reach the Safety Connect response center. The answering agent will
determine your vehicle’s location, assess the emergency, and dispatch
the necessary assistance required.
If you accidentally press the “SOS” bu tton, tell the response-center agent
that you are not experiencing an emergency.
■ Roadside Assistance
Subscribers can press the “SOS” button to reach a Safety Connect
response-center agent, who can help with a wide range of needs, such
as: towing, flat tire, fuel delivery, etc. For a description of the Roadside
Assistance services and their limita tions, please see the Safety Con-
nect Terms and Conditions, which are available at Lexus.com.
Safety information for Safety Connect
Important! Read this information before using Safety Connect.
■ Exposure to radio frequency signals
The Safety Connect sy stem installed in your vehicle is a low-power
radio transmitter and receiver. It receives and also sends out radio fre-
quency (RF) signals.
In August 1996, the Federal Communications Commission (FCC)
adopted RF exposure guidelines with safety levels fo r mobile wireless
phones. Those guidelines are consistent with the safety standards pre-
viously set by the following U.S. and international standards bodies.
● ANSI (American National Standards Institute) C95.1 [1992]
● NCRP (National Council on Radiation Protection and Measure-
ment) Report 86 [1986]
● ICNIRP (International Commission on Non-Ionizing Radiation Pro-
tection) [1996]