light Lexus IS F 2008 Navigation Manual
[x] Cancel search | Manufacturer: LEXUS, Model Year: 2008, Model line: IS F, Model: Lexus IS F 2008Pages: 316, PDF Size: 23.49 MB
Page 181 of 316
Finish
OTHER FUNCTIONS
180
D
Changing between day mode and
night mode
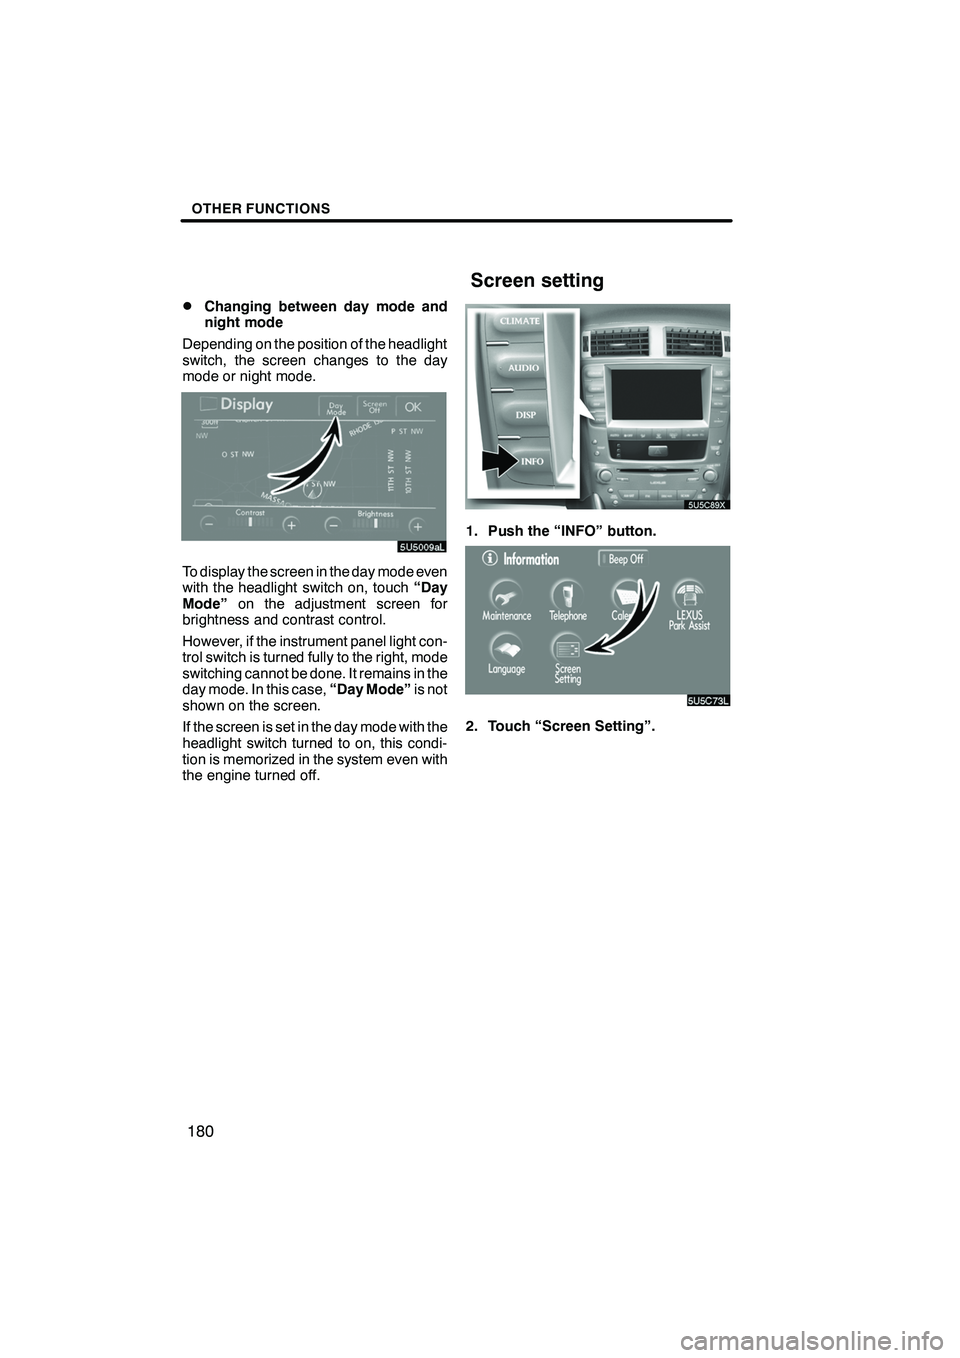
Depending on the position of the headlight
switch, the screen changes to the day
mode or night mode.
To display the screen in the day mode even
with the headlight switch on, touch “Day
Mode” on the adjustment screen for
brightness and contrast control.
However, if the instrument panel light con-
trol switch is turned fully to the right, mode
switching cannot be done. It remains in the
day mode. In this case, “Day Mode”is not
shown on the screen.
If the screen is set in the day mode with the
headlight switch turned to on, this condi-
tion is memorized in the system even with
the engine turned off.
1. Push the “INFO” button.
2. Touch “Screen Setting”.
IS F/350/250_Navi_U
(L/O 0712)
Screen setting
Page 184 of 316
Finish
OTHER FUNCTIONS
183
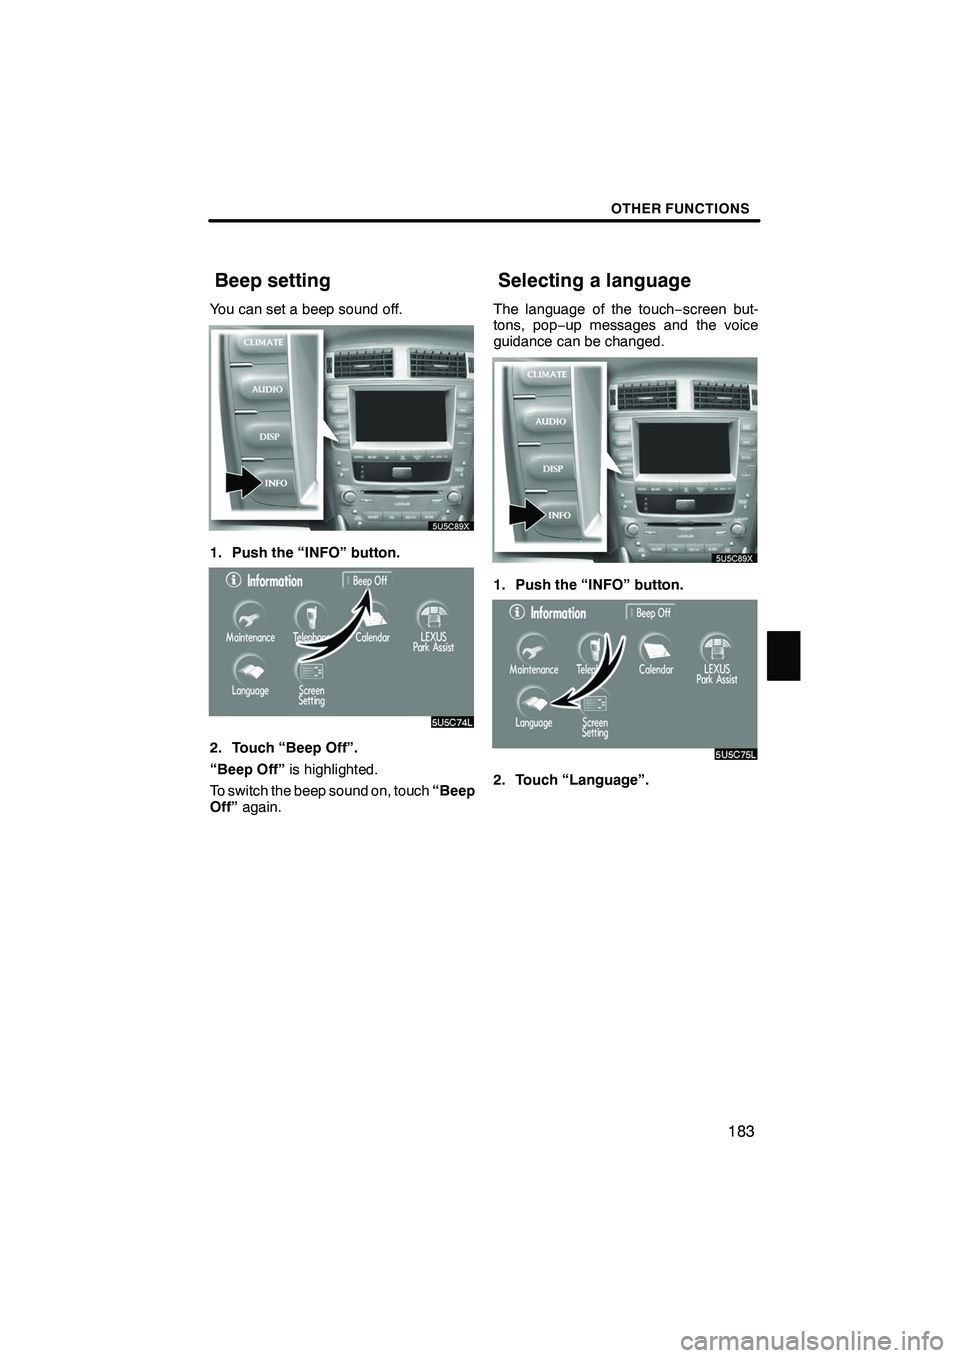
You can set a beep sound off.
1. Push the “INFO” button.
2. Touch “Beep Off”.
“Beep Off”is highlighted.
To switch the beep sound on, touch “Beep
Off” again. The language of the touch
−screen but-
tons, pop− up messages and the voice
guidance can be changed.
1. Push the “INFO” button.
2. Touch “Language”.
IS F/350/250_Navi_U
(L/O 0712)
Beep setting Selecting a language
Page 192 of 316
Finish
AUDIO/VIDEO SYSTEM
191
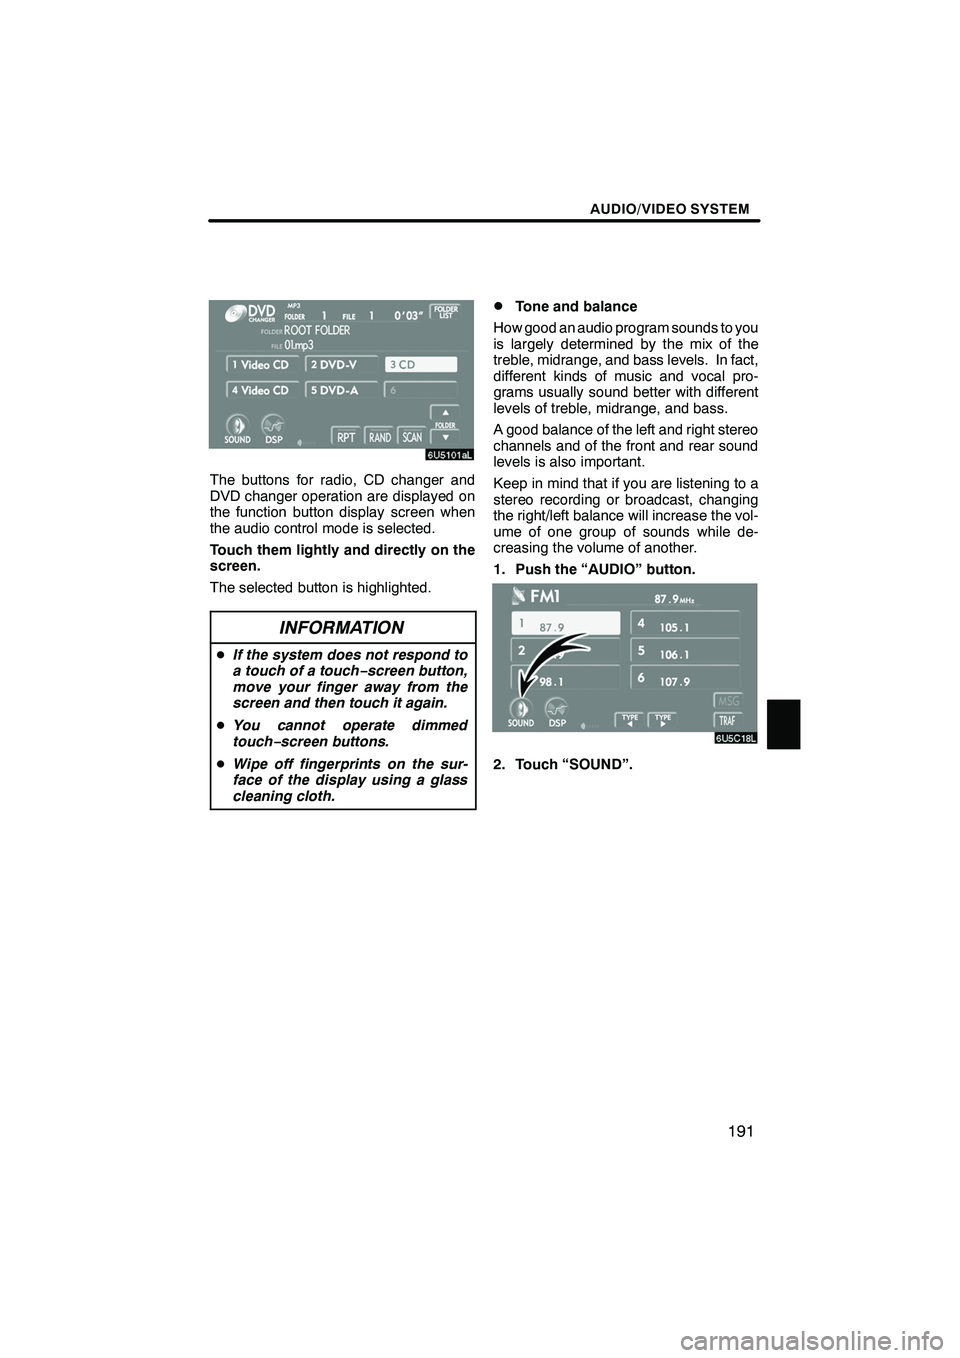
The buttons for radio, CD changer and
DVD changer operation are displayed on
the function button display screen when
the audio control mode is selected.
Touch them lightly and directly on the
screen.
The selected button is highlighted.
INFORMATION
DIf the system does not respond to
a touch of a touch− screen button,
move your finger away from the
screen and then touch it again.
D You cannot operate dimmed
touch− screen buttons.
D Wipe off fingerprints on the sur-
face of the display using a glass
cleaning cloth.
DTone and balance
How good an audio program sounds to you
is largely determined by the mix of the
treble, midrange, and bass levels. In fact,
different kinds of music and vocal pro-
grams usually sound better with different
levels of treble, midrange, and bass.
A good balance of the left and right stereo
channels and of the front and rear sound
levels is also important.
Keep in mind that if you are listening to a
stereo recording or broadcast, changing
the right/left balance will increase the vol-
ume of one group of sounds while de-
creasing the volume of another.
1. Push the “AUDIO” button.
2. Touch “SOUND”.
IS F/350/250_Navi_U
(L/O 0712)
Page 197 of 316
Finish
AUDIO/VIDEO SYSTEM
196
D
Presetting a station
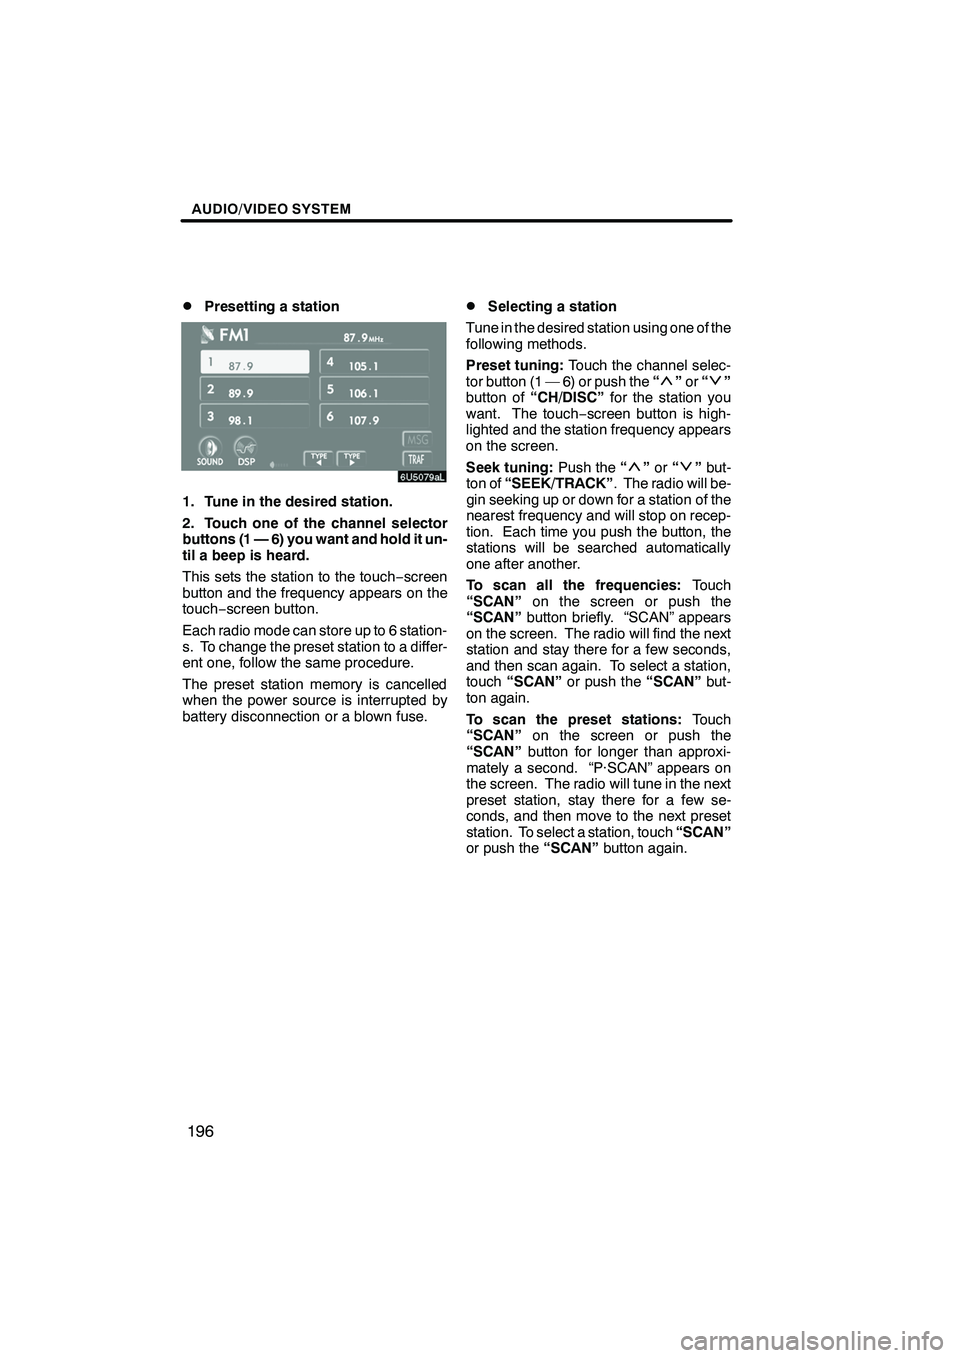
1. Tune in the desired station.
2. Touch one of the channel selector
buttons (1 — 6) you want and hold it un-
til a beep is heard.
This sets the station to the touch
−screen
button and the frequency appears on the
touch− screen button.
Each radio mode can store up to 6 station-
s. To change the preset station to a differ-
ent one, follow the same procedure.
The preset station memory is cancelled
when the power source is interrupted by
battery disconnection or a blown fuse.
DSelecting a station
Tune in the desired station using one of the
following methods.
Preset tuning: Touch the channel selec-
tor button (1 — 6) or push the “
”or “”
button of “CH/DISC” for the station you
want. The touch −screen button is high-
lighted and the station frequency appears
on the screen.
Seek tuning: Push the“
”or “”but-
ton of “SEEK/TRACK” . The radio will be-
gin seeking up or down for a station of the
nearest frequency and will stop on recep-
tion. Each time you push the button, the
stations will be searched automatically
one after another.
To scan all the frequencies: Touch
“SCAN” on the screen or push the
“SCAN” button briefly. “SCAN” appears
on the screen. The radio will find the next
station and stay there for a few seconds,
and then scan again. To select a station,
touch “SCAN” or push the “SCAN”but-
ton again.
To scan the preset stations: Touch
“SCAN” on the screen or push the
“SCAN” button for longer than approxi-
mately a second. “P·SCAN” appears on
the screen. The radio will tune in the next
preset station, stay there for a few se-
conds, and then move to the next preset
station. To select a station, touch “SCAN”
or push the “SCAN”button again.
IS F/350/250_Navi_U
(L/O 0712)
Page 203 of 316
Finish
AUDIO/VIDEO SYSTEM
202
D
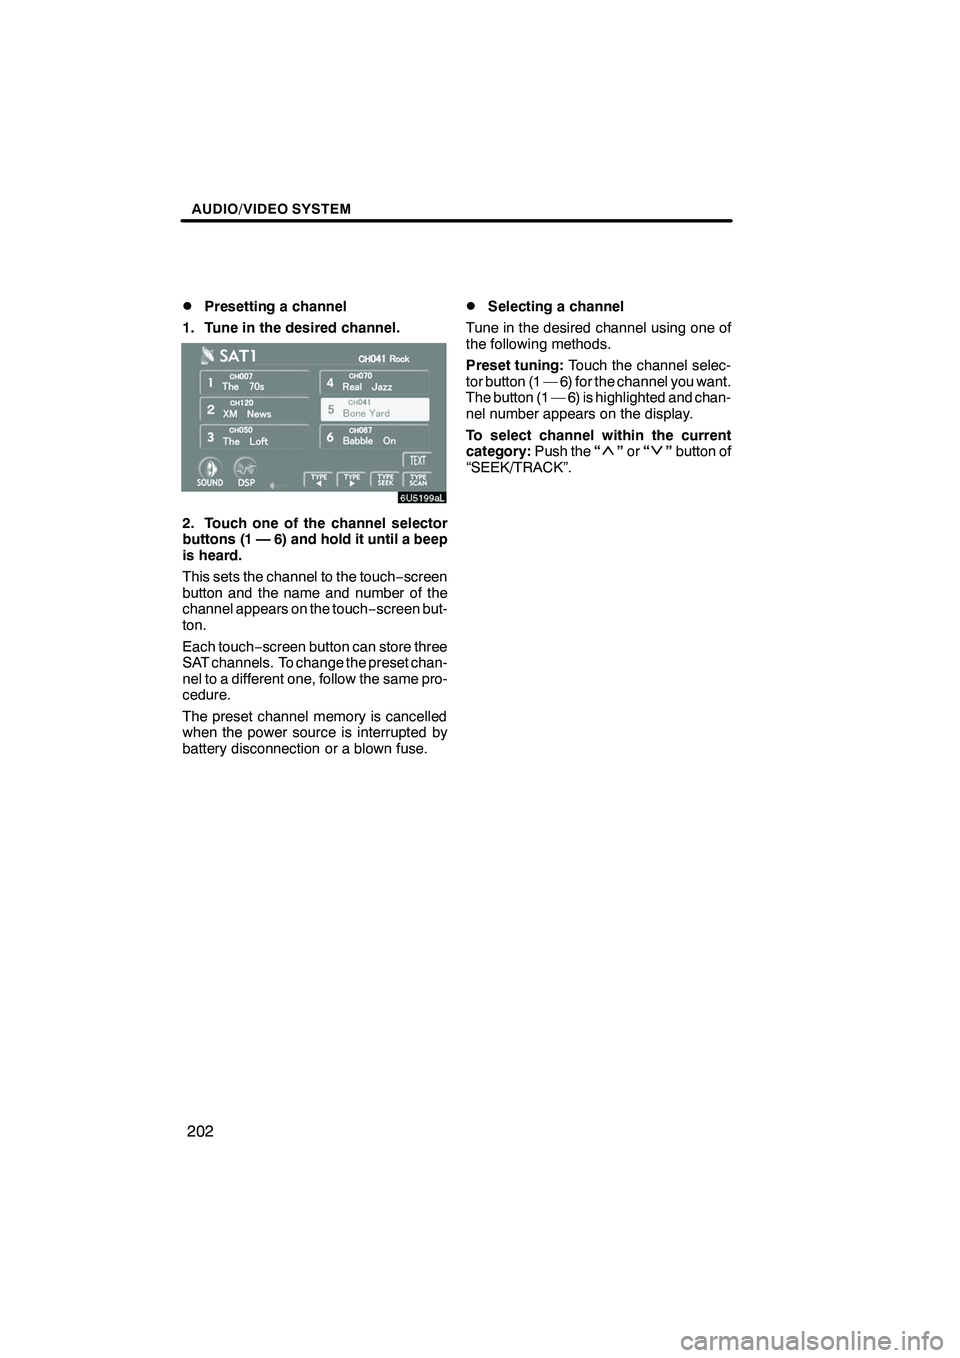
Presetting a channel
1. Tune in the desired channel.
2. Touch one of the channel selector
buttons (1 — 6) and hold it until a beep
is heard.
This sets the channel to the touch −screen
button and the name and number of the
channel appears on the touch −screen but-
ton.
Each touch− screen button can store three
SAT channels. To change the preset chan-
nel to a different one, follow the same pro-
cedure.
The preset channel memory is cancelled
when the power source is interrupted by
battery disconnection or a blown fuse.
DSelecting a channel
Tune in the desired channel using one of
the following methods.
Preset tuning: Touch the channel selec-
tor button (1 — 6) for the channel you want.
The button (1 — 6) is highlighted and chan-
nel number appears on the display.
To select channel within the current
category: Push the“
”or “”button of
“SEEK/TRACK”.
IS F/350/250_Navi_U
(L/O 0712)
Page 209 of 316
Finish
AUDIO/VIDEO SYSTEM
208
3. Insert the next disc after the orange
indicators change to green and stay on
and the CD changer door opens.
4. Repeat this procedure until you in-
sert all the discs.
To cancel the operation, push the“LOAD”
button briefly.
If you do not insert the discs within 15 sec-
onds after pushing the “LOAD”button, the
beep will sound and the operation will be
canceled automatically.
NOTICE
Do not insert one disc stacked on top
of another one or feed them in contin-
uously, to prevent discs from getting
stuck in the changer.
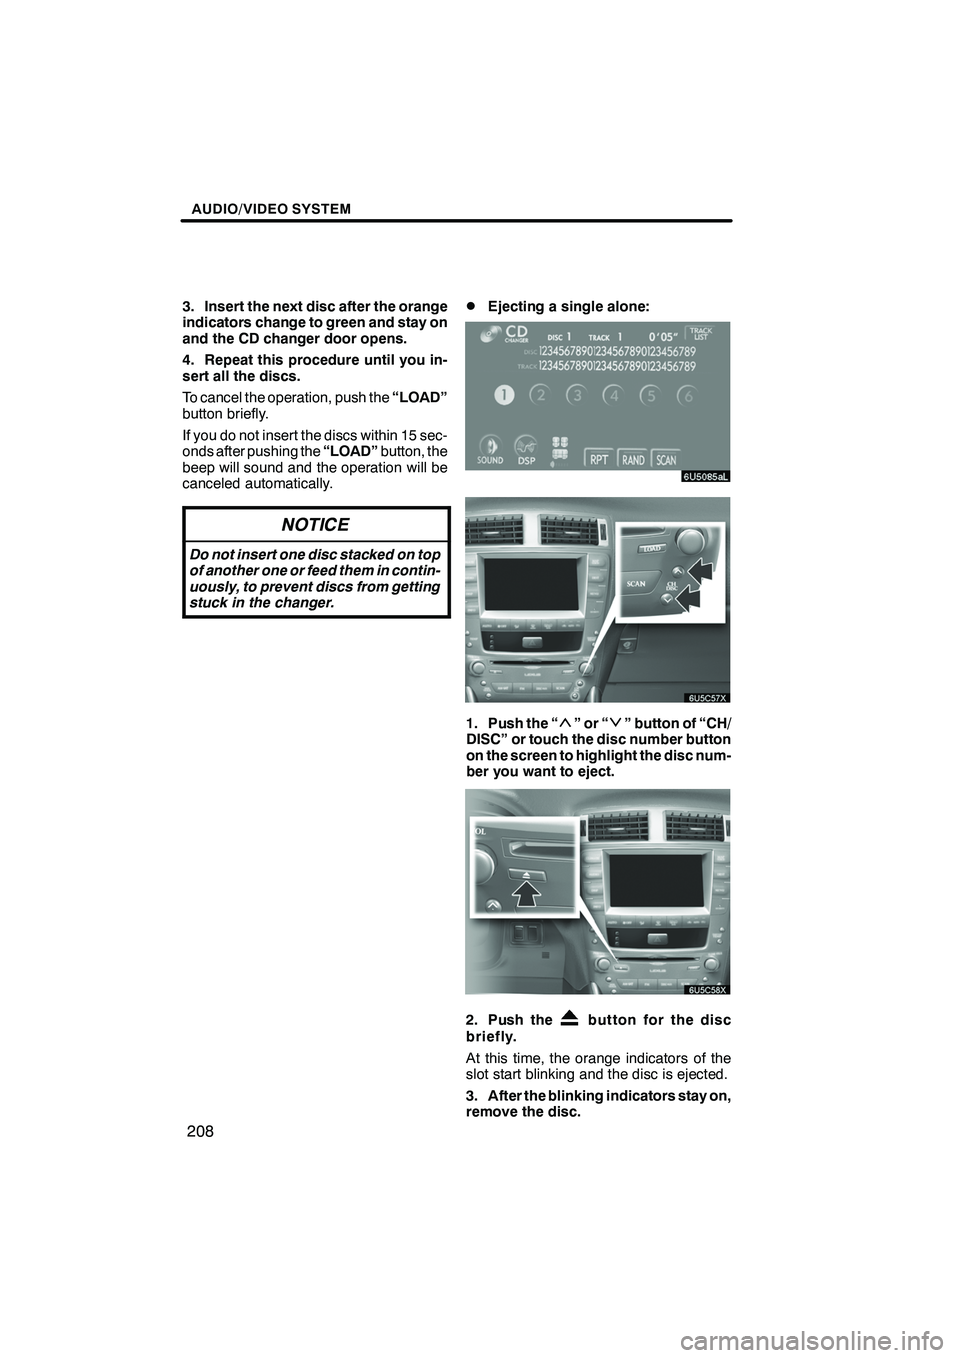
DEjecting a single alone:
1. Push the “”or“” button of “CH/
DISC” or touch the disc number button
on the screen to highlight the disc num-
ber you want to eject.
2. Push thebutton for the disc
briefly.
At this time, the orange indicators of the
slot start blinking and the disc is ejected.
3. After the blinking indicators stay on,
remove the disc.
IS F/350/250_Navi_U
(L/O 0712)
Page 211 of 316
Finish
AUDIO/VIDEO SYSTEM
210
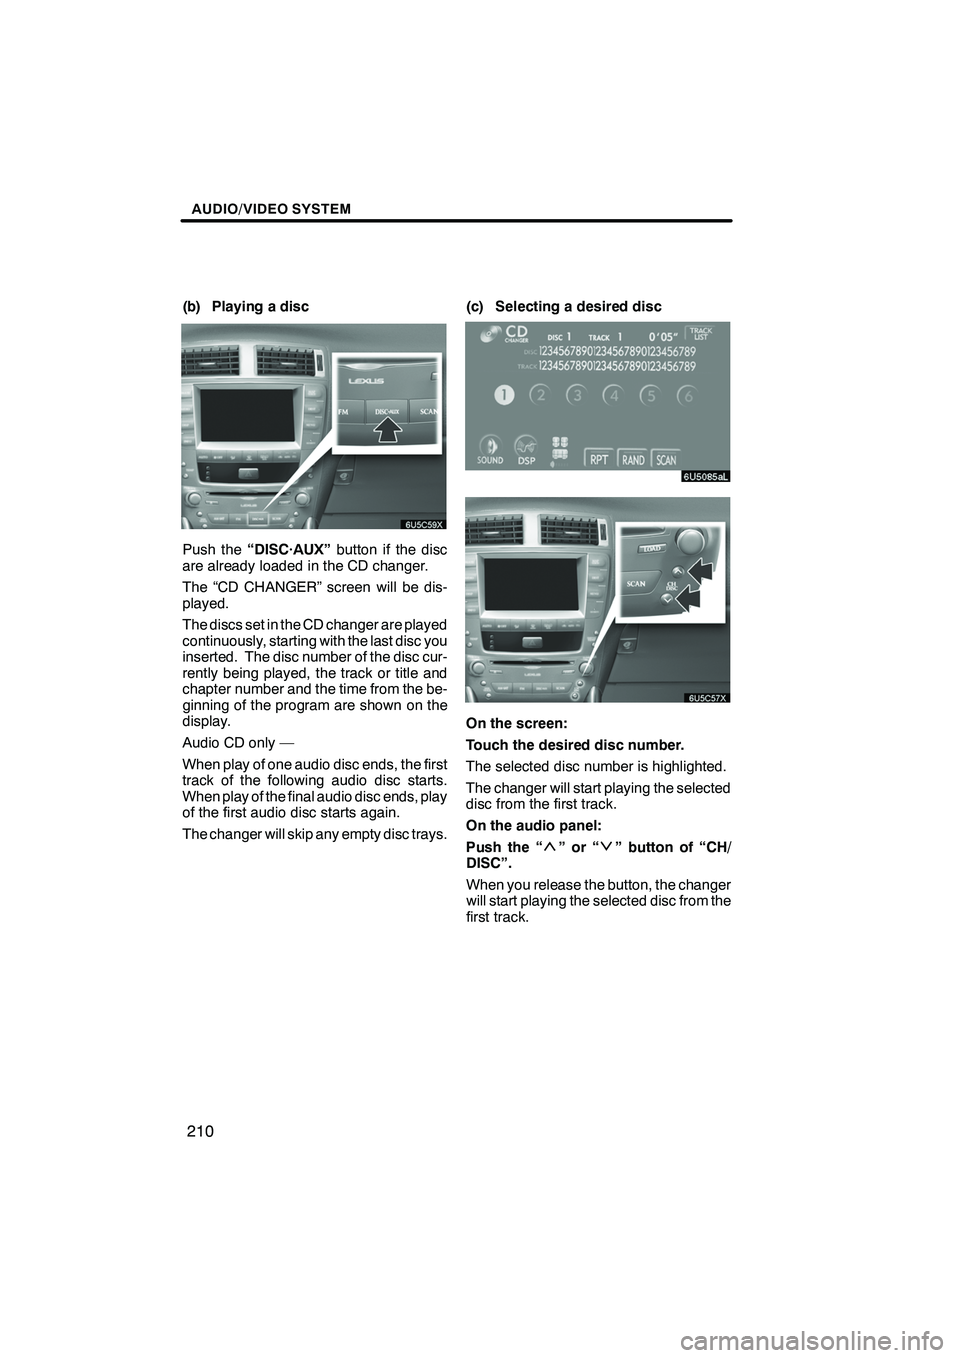
(b) Playing a disc
Push the“DISC·AUX” button if the disc
are already loaded in the CD changer.
The “CD CHANGER” screen will be dis-
played.
The discs set in the CD changer are played
continuously, starting with the last disc you
inserted. The disc number of the disc cur-
rently being played, the track or title and
chapter number and the time from the be-
ginning of the program are shown on the
display.
Audio CD only —
When play of one audio disc ends, the first
track of the following audio disc starts.
When play of the final audio disc ends, play
of the first audio disc starts again.
The changer will skip any empty disc trays. (c) Selecting a desired disc
On the screen:
Touch the desired disc number.
The selected disc number is highlighted.
The changer will start playing the selected
disc from the first track.
On the audio panel:
Push the “
”or“” button of “CH/
DISC”.
When you release the button, the changer
will start playing the selected disc from the
first track.
IS F/350/250_Navi_U
(L/O 0712)
Page 223 of 316
Finish
AUDIO/VIDEO SYSTEM
222
D
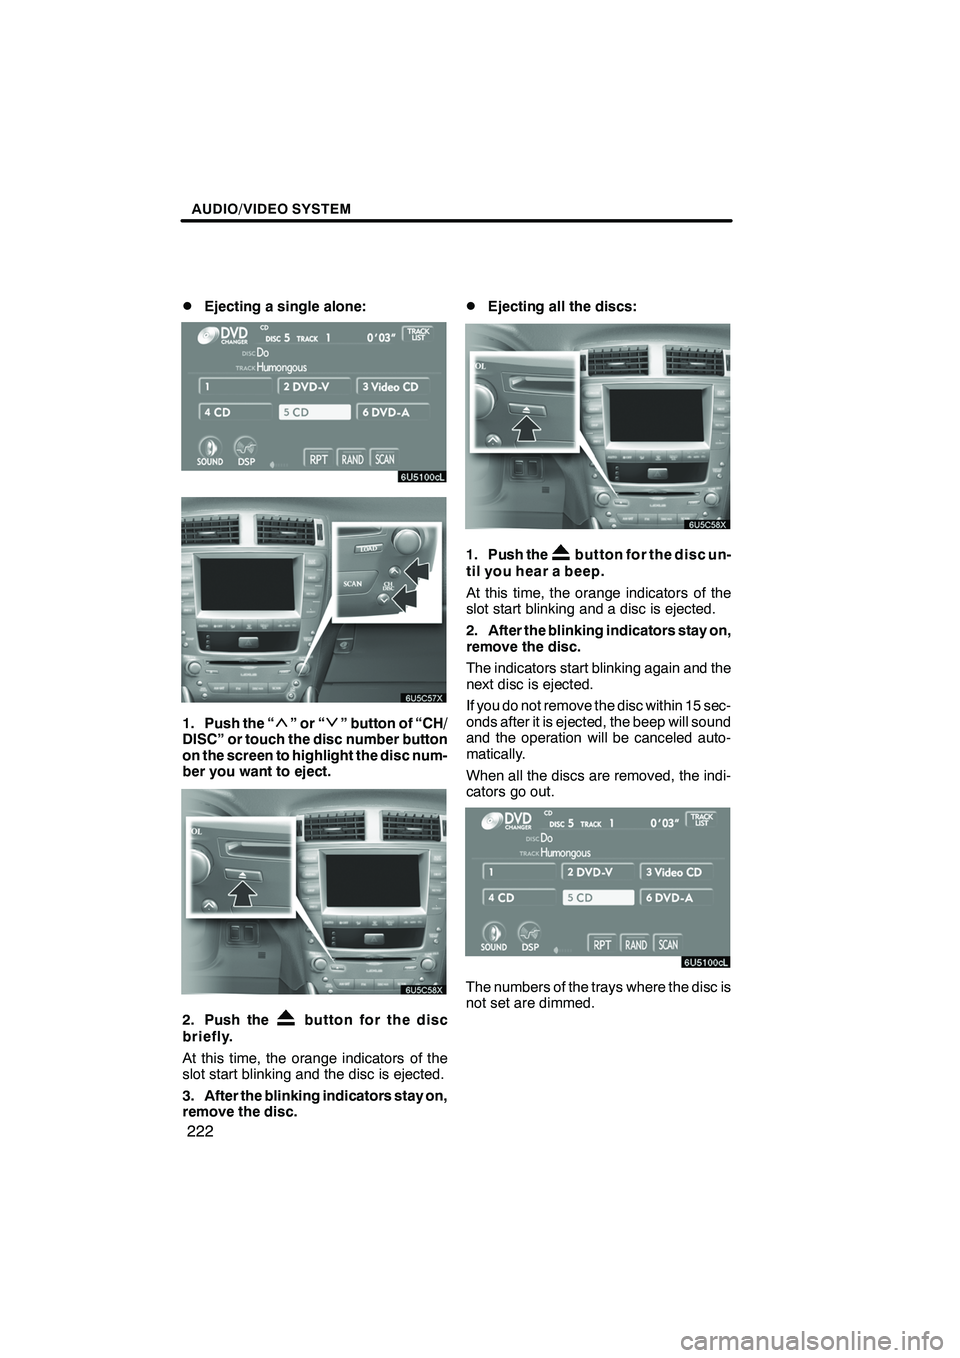
Ejecting a single alone:
1. Push the “”or“” button of “CH/
DISC” or touch the disc number button
on the screen to highlight the disc num-
ber you want to eject.
2. Push thebutton for the disc
briefly.
At this time, the orange indicators of the
slot start blinking and the disc is ejected.
3. After the blinking indicators stay on,
remove the disc.
DEjecting all the discs:
1. Push thebutton for the disc un-
til you hear a beep.
At this time, the orange indicators of the
slot start blinking and a disc is ejected.
2. After the blinking indicators stay on,
remove the disc.
The indicators start blinking again and the
next disc is ejected.
If you do not remove the disc within 15 sec-
onds after it is ejected, the beep will sound
and the operation will be canceled auto-
matically.
When all the discs are removed, the indi-
cators go out.
The numbers of the trays where the disc is
not set are dimmed.
IS F/350/250_Navi_U
(L/O 0712)
Page 224 of 316
Finish
AUDIO/VIDEO SYSTEM
223
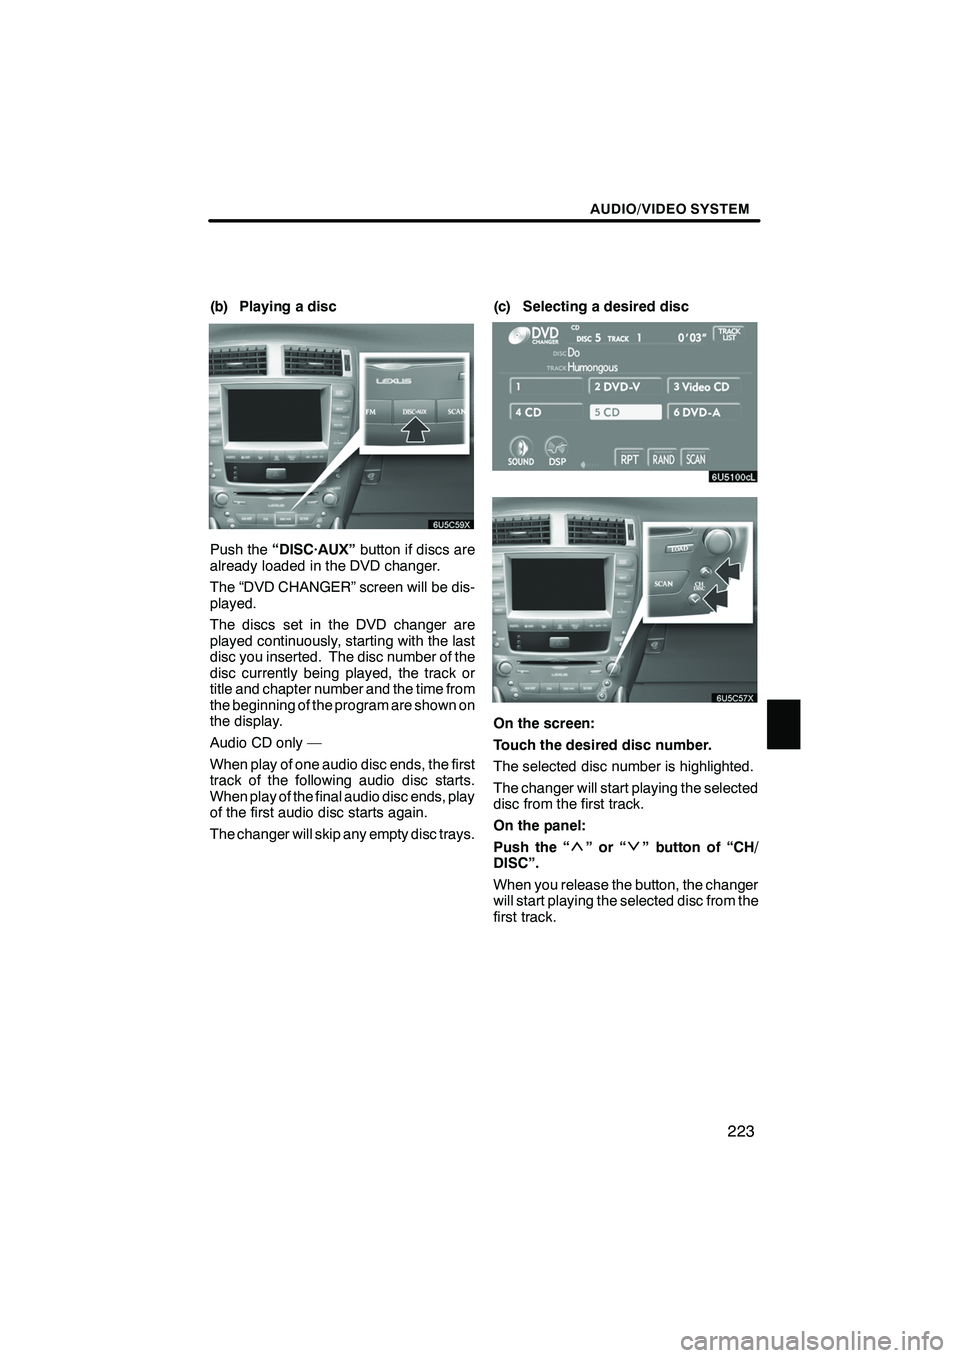
(b) Playing a disc
Push the“DISC·AUX” button if discs are
already loaded in the DVD changer.
The “DVD CHANGER” screen will be dis-
played.
The discs set in the DVD changer are
played continuously, starting with the last
disc you inserted. The disc number of the
disc currently being played, the track or
title and chapter number and the time from
the beginning of the program are shown on
the display.
Audio CD only —
When play of one audio disc ends, the first
track of the following audio disc starts.
When play of the final audio disc ends, play
of the first audio disc starts again.
The changer will skip any empty disc trays. (c) Selecting a desired disc
On the screen:
Touch the desired disc number.
The selected disc number is highlighted.
The changer will start playing the selected
disc from the first track.
On the panel:
Push the “
”or“” button of “CH/
DISC”.
When you release the button, the changer
will start playing the selected disc from the
first track.
IS F/350/250_Navi_U
(L/O 0712)
Page 243 of 316
Finish
AUDIO/VIDEO SYSTEM
242
FM
Fading and drifting stations— General-
ly, the effective range of FM is about 40 km
(25 miles). Once outside this range, you
may notice fading and drifting, which in-
crease with the distance from the radio
transmitter. They are often accompanied
by distortion.
Multi− path— FM signals are reflective,
making it possible for two signals to reach
your antenna at the same time. If this hap-
pens, the signals will cancel each other
out, causing a momentary flutter or loss of
reception.
Static and fluttering — These occur
when signals are blocked by buildings,
trees, or other large objects. Increasing
the bass level may reduce static and flut-
tering.
Station swapping — If the FM signal you
are listening to is interrupted or weakened,
and there is another strong station nearby
on the FM band, your radio may tune in the
second station until the original signal can
be picked up again.
AM
Fading — AM broadcasts are reflected by
the upper atmosphere — especially at
night. These reflected signals can inter-
fere with those received directly from the
radio station, causing the radio station to
sound alternately strong and weak.
Station interference — When a reflected
signal and a signal received directly from
a radio station are very nearly the same
frequency, they can interfere with each
other, making it difficult to hear the broad-
cast.
Static — AM is easily affected by external
sources of electrical noise, such as high
tension power lines, lightening, or electri-
cal motors. This results in static. MP3/WMA files
DMP3 (MPEG Audio Layer 3) and WMA
(Windows Media Audio) are audio
compression standards.
DThe MP3/WMA player can play MP3
and WMA files on CD
−ROM, CD −R
and CD −RW discs.
The unit can play disc recordings com-
patible with ISO 9660 level 1 and level
2 and with the Romeo and Joliet file
system.
DWhen naming an MP3 or WMA file, add
the appropriate file extension (.mp3 or
.wma).
DThe MP3/WMA player plays back files
with .mp3 or .wma file extensions as
MP3 or WMA files. To prevent noise
and playback errors, use the appropri-
ate file extensions.
DThe player can play only the first ses-
sion using multi −session compatible
CDs.
DMP3 files are compatible with the ID3
Tag Ver. 1.0, Ver. 1.1, Ver. 2.2, and Ver.
2.3 formats. The unit cannot display
disc title, track title and artist name in
other formats.
DWMA files can contain a WMA tag that
is used in the same way as an ID3 tag.
WMA tags carry information such as
track title, artist name.
DThe emphasis function is available
only when playing MP3/WMA files re-
corded at 32, 44.1 and 48 kHz. (The
system can play MP3 files with sam-
pling frequencies of 16, 22.05, and 24
kHz. However, the emphasis function
is not available for files recorded at
these frequencies.)
IS F/350/250_Navi_U
(L/O 0712)