clock Lexus IS200t 2016 Navigation Manual / LEXUS 2016 IS200T,IS300,IS350 OWNERS MANUAL (OM53D18U)
[x] Cancel search | Manufacturer: LEXUS, Model Year: 2016, Model line: IS200t, Model: Lexus IS200t 2016Pages: 600, PDF Size: 7.94 MB
Page 6 of 600

TABLE OF CONTENTS6
IS350/300/200t_U (OM53D18U)
6-4. Using the other interior features
Other interior features ............ 387 • Sun visors ................................ 387
• Vanity mirrors ........................ 387
• Clock ........................................ 387
• Power outlet ...........................388
• Armrest.................................... 389
• Rear sunshade ...................... 389
• Assist grips .............................. 391
• Coat hooks .............................. 391
Garage door opener ............... 392
Compass ........................................397
LEXUS Enform Safety Connect......................................400
7-1. Maintenance and care Cleaning and protecting the vehicle exterior ................ 406
Cleaning and protecting the vehicle inte rior.................. 409
7-2. Maintenance Maintenance requirements .............................. 412
General maintenance................415
Emission inspection and maintenance (I/M)
programs ..................................... 418 7-3. Do-it-yourself maintenance
Do-it-yourself service precautions..................................419
Hood ................................................. 421
Positioning a floor jack..............422
Engine compartment ............... 423
Tires.................................................. 434
Tire inflation pressure ............... 443
Wheels ........................................... 446
Air conditioning filter ............... 448
Electronic key battery.............. 450
Checking and replacing fuses...............................................452
Light bulbs .................................... 455
8-1. Essential information Emergency flashers .................. 466
If your vehicle has to be stopped
in an emergency.......................467
8-2. Steps to take in an emergency
If your vehicle needs to be towed................................ 468
If you think something is wrong........................................ 474
Fuel pump shut off system .......475
If a warning light turns on or a warning buzzer
sounds .......................................... 476
If a warning message is displayed ................................ 482
If you have a flat tire .................. 496
If the engine will not start ........ 506
7Maintenance and care
8When trouble arises
Page 291 of 600

2915-2. Setup
5
Lexus Display Audio system
IS350/300/200t_U (OM53D18U)
Go to “Display”: “Display”
Turn off screen.
Adjust screen quality.
Adjust screen quality of the rear
view monitor camera.
Change to day mode.
This setting turns the screen off. To turn it on, press any button such as or .
If a screen off image has been set, the set image will be displayed.
When the headlights are turned on, the screen dims.
However, the screen can be switched to day mode by selecting “Day Mode”.
The screen will stay in day mode when the headlights are turned on until “Day Mode”
is selected again.
Select “General” or “Camera” on the “Display” screen or select “Display” on
each audio menu screen. ( P. 2 9 7 )
Adjust the display as desired by turning the controller clockwise (+) or coun-
terclockwise (-).
To select “Contrast”, “Brightness”, “Color” or “Tone”, move the controller to the left.
(when “Display” is selected, “Color” and “Tone” are available.)
■Changing the sample image (when “General” is selected)
Move the controller to the right and select the desired sample image.
Display settings
Settings are available for adjusting the contrast and brightness of the screen.
The display can also be turned off.
Screen for display settings
1
2
3
4
Screen off
Day mode
Adjusting the screen quality
1
2
Page 367 of 600

367
Interior features6
IS350/300/200t_U (OM53D18U)
6-1. Using the air conditioning system
Automatic air conditioning system ......................................... 368
Heated steering wheel/ seat heaters/
seat ventilators...........................376
6-2. Using the interior lights Interior lights list.......................... 378• Interior lights .......................... 379
• Personal lights........................ 379
6-3. Using the storage features
List of storage features.............. 381 • Glove box............................... 382
• Console box .......................... 382
•Cup holders/ bottle holders ........................ 383
Trunk features ............................. 385 6-4. Using the other interior
features
Other interior features ............ 387 • Sun visors ................................ 387
• Vanity mirrors ........................ 387
• Clock ........................................ 387
• Power outlet .......................... 388
• Armrest ....................................389
• Rear sunshade.......................389
• Assist grips............................... 391
• Coat hooks .............................. 391
Garage door opener................ 392
Compass ....................................... 397
LEXUS Enform Safety Connect ..................................... 400
Page 387 of 600

387
IS350/300/200t_U (OM53D18U)
6
Interior features
6-4. Using the other interior features
To set the visor in the forward posi-
tion, flip it down.
To set the visor in the side position,
flip down, unhook, and swing it to the
side.
Slide the cover to open.
The light turns on when the cover is
opened.
The clock can be adjusted. Pressing and holding will move the
clock hands backward.
Pressing and holding will move the
clock hands forward.
Other interior features
Sun visors
1
2
Vanity mirrors
Clock
1
2
Page 426 of 600

4267-3. Do-it-yourself maintenance
IS350/300/200t_U (OM53D18U)
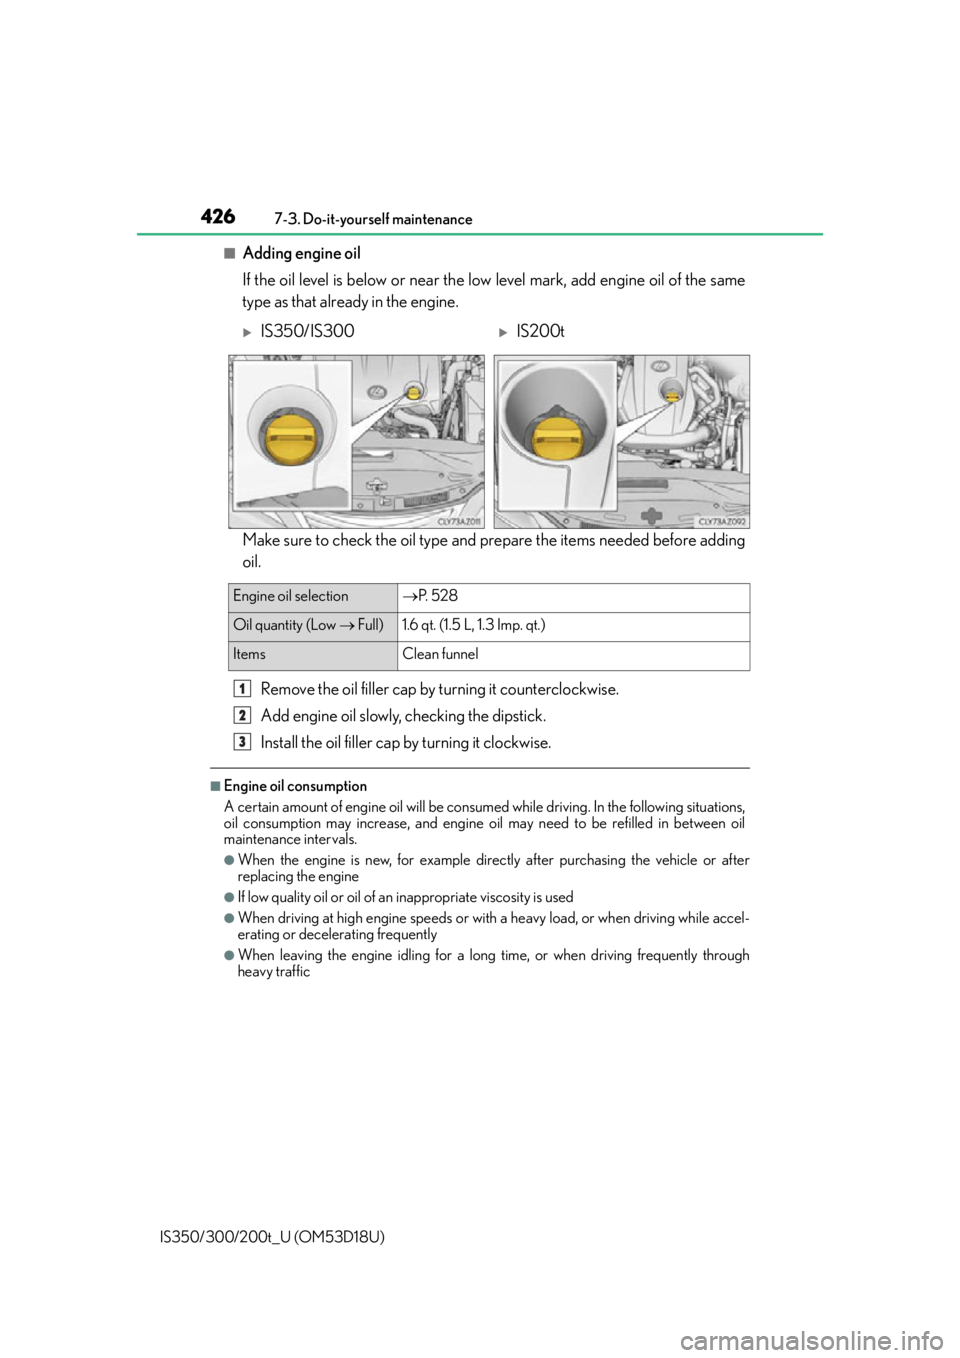
■Adding engine oil
If the oil level is below or near the lo w level mark, add engine oil of the same
type as that already in the engine.
Make sure to check the oil type and prepare the items needed before adding
oil.
Remove the oil filler cap by turning it counterclockwise.
Add engine oil slowly, checking the dipstick.
Install the oil filler cap by turning it clockwise.
■Engine oil consumption
A certain amount of engine oil will be consum ed while driving. In the following situations,
oil consumption may increase, and engine o il may need to be refilled in between oil
maintenance intervals.
●When the engine is new, for example directly after purchasing the vehicle or after
replacing the engine
●If low quality oil or oil of an inappropriate viscosity is used
●When driving at high engine speeds or with a heavy load, or when driving while accel-
erating or decelerating frequently
●When leaving the engi ne idling for a long time, or when driving frequently through
heavy traffic
IS350/IS300IS200t
Engine oil selection P. 5 2 8
Oil quantity (Low Full) 1.6 qt. (1.5 L, 1.3 Imp. qt.)
Items Clean funnel
1
2
3
Page 457 of 600

4577-3. Do-it-yourself maintenance
7
Maintenance and care
IS350/300/200t_U (OM53D18U)
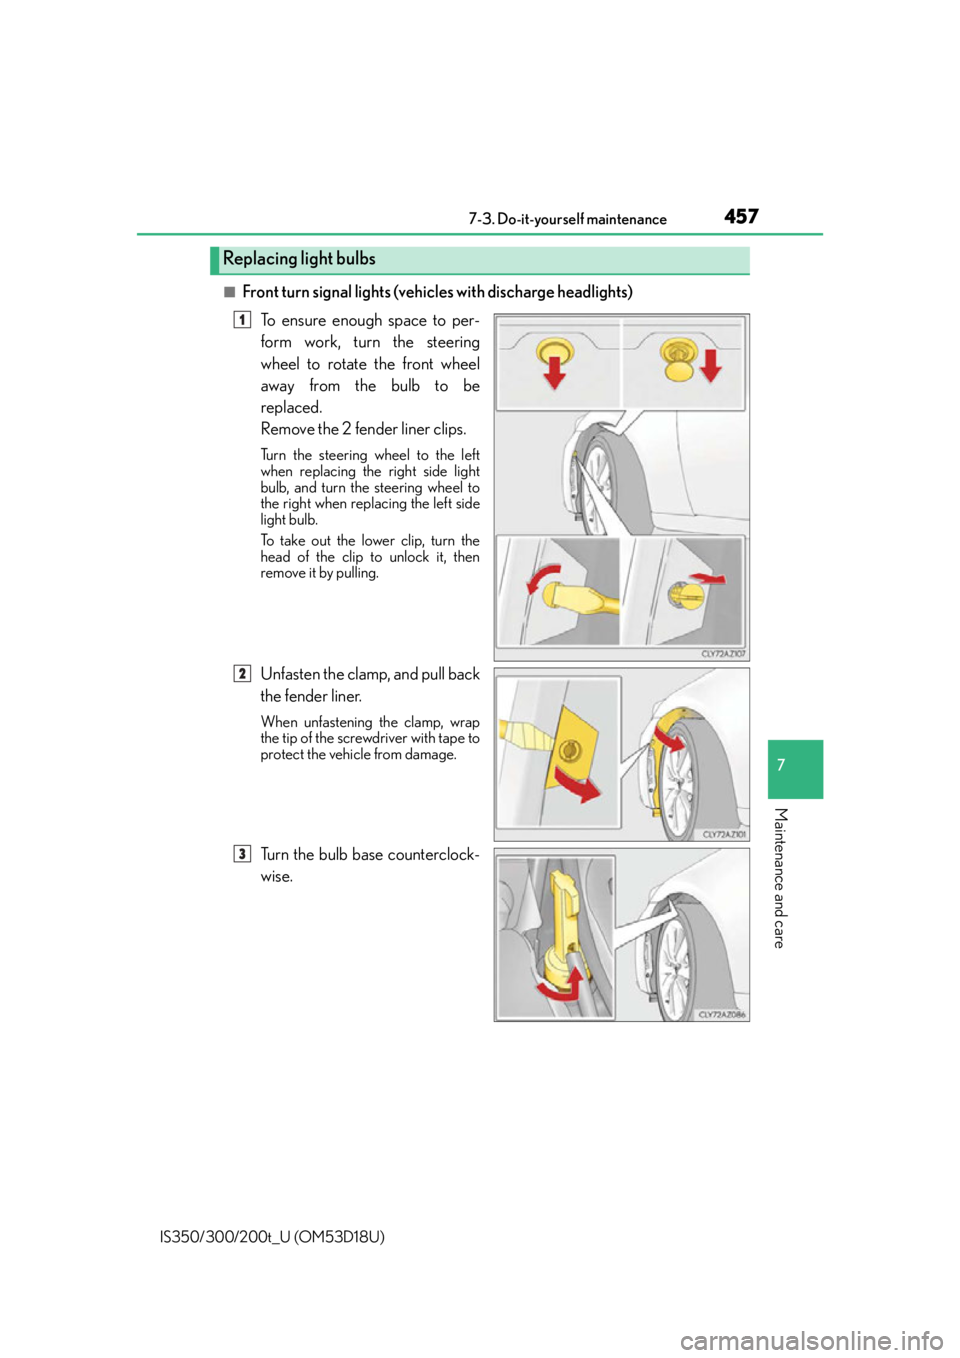
■Front turn signal lights (vehicles with discharge headlights)To ensure enough space to per-
form work, turn the steering
wheel to rotate the front wheel
away from the bulb to be
replaced.
Remove the 2 fender liner clips.
Turn the steering wheel to the left
when replacing the right side light
bulb, and turn the steering wheel to
the right when replacing the left side
light bulb.
To take out the lower clip, turn the
head of the clip to unlock it, then
remove it by pulling.
Unfasten the clamp, and pull back
the fender liner.
When unfastening the clamp, wrap
the tip of the screwdriver with tape to
protect the vehicle from damage.
Turn the bulb base counterclock-
wise.
Replacing light bulbs
1
2
3
Page 458 of 600

4587-3. Do-it-yourself maintenance
IS350/300/200t_U (OM53D18U)
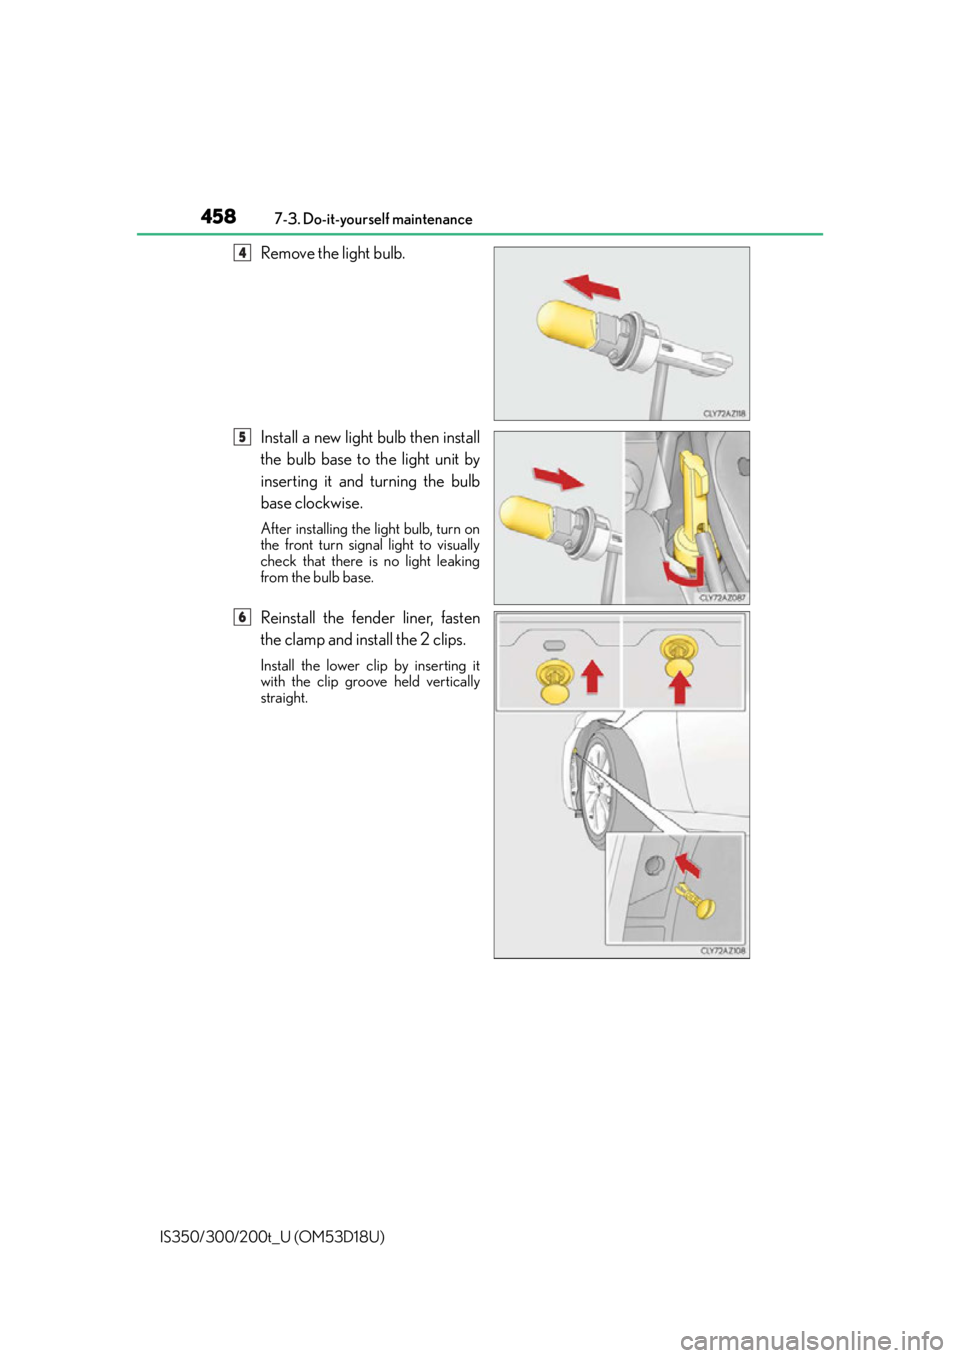
Remove the light bulb.
Install a new light bulb then install
the bulb base to the light unit by
inserting it and turning the bulb
base clockwise.
After installing the light bulb, turn on
the front turn signal light to visually
check that there is no light leaking
from the bulb base.
Reinstall the fender liner, fasten
the clamp and install the 2 clips.
Install the lower clip by inserting it
with the clip groove held vertically
straight.
4
5
6
Page 459 of 600

4597-3. Do-it-yourself maintenance
7
Maintenance and care
IS350/300/200t_U (OM53D18U)
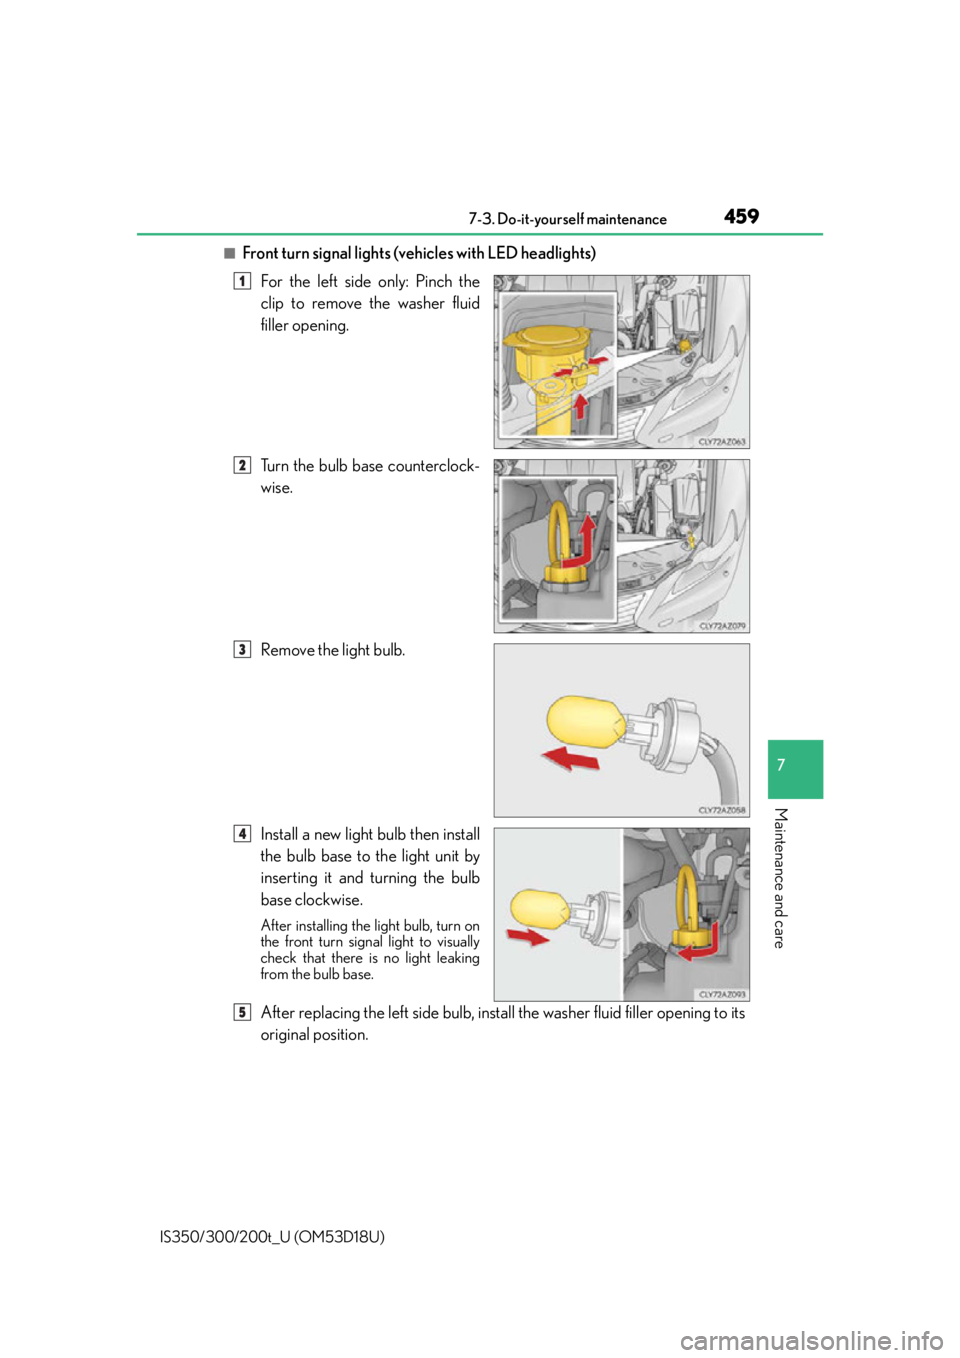
■Front turn signal lights (vehicles with LED headlights)For the left side only: Pinch the
clip to remove the washer fluid
filler opening.
Turn the bulb base counterclock-
wise.
Remove the light bulb.
Install a new light bulb then install
the bulb base to the light unit by
inserting it and turning the bulb
base clockwise.
After installing the light bulb, turn on
the front turn signal light to visually
check that there is no light leaking
from the bulb base.
After replacing the left side bulb, insta ll the washer fluid filler opening to its
original position.
1
2
3
4
5
Page 460 of 600

4607-3. Do-it-yourself maintenance
IS350/300/200t_U (OM53D18U)
■Rear turn signal lights Open the trunk, and remove the
2 covers and 2 screws.
When removing the cover, wrap the
tip of the screwdriver with tape to
protect the vehicle from damage.
Push and pull the light unit toward
the rear of the vehicle as shown in
the illustration to remove it.
Apply protective tape to the periph-
eral of the light un it installation sur-
face on the vehicle body, such as the
rear bumper, to protect the vehicle
from damage.
Pushing on the portion A in the illus-
tration toward the rear of the vehicle
will make disengagement of the tabs
easier.
Turn the bulb base counterclock-
wise.
Remove the light bulb.
1
2
3
4
Page 461 of 600

4617-3. Do-it-yourself maintenance
7
Maintenance and care
IS350/300/200t_U (OM53D18U)
Install a new light bulb then install
the bulb base to the light unit by
inserting it and turning the bulb
base clockwise.
After installing the light bulb, turn on
the rear turn signal light to visually
check that there is no light leaking
from the bulb base.
Align the tabs and push the light
unit toward the front of the vehicle
to install it.
Remove the protective tape applied
to the peripheral of the light unit
installation surface on the vehicle
body.
Install the 2 screws and 2 covers.
5
6
7