display Lexus IS250 2014 Manual PDF
[x] Cancel search | Manufacturer: LEXUS, Model Year: 2014, Model line: IS250, Model: Lexus IS250 2014Pages: 588, PDF Size: 98.77 MB
Page 297 of 588
2975-1. Basic Operations
5
Lexus Display Audio system
IS250_EE(OM53C51E)
■Basic screen operation
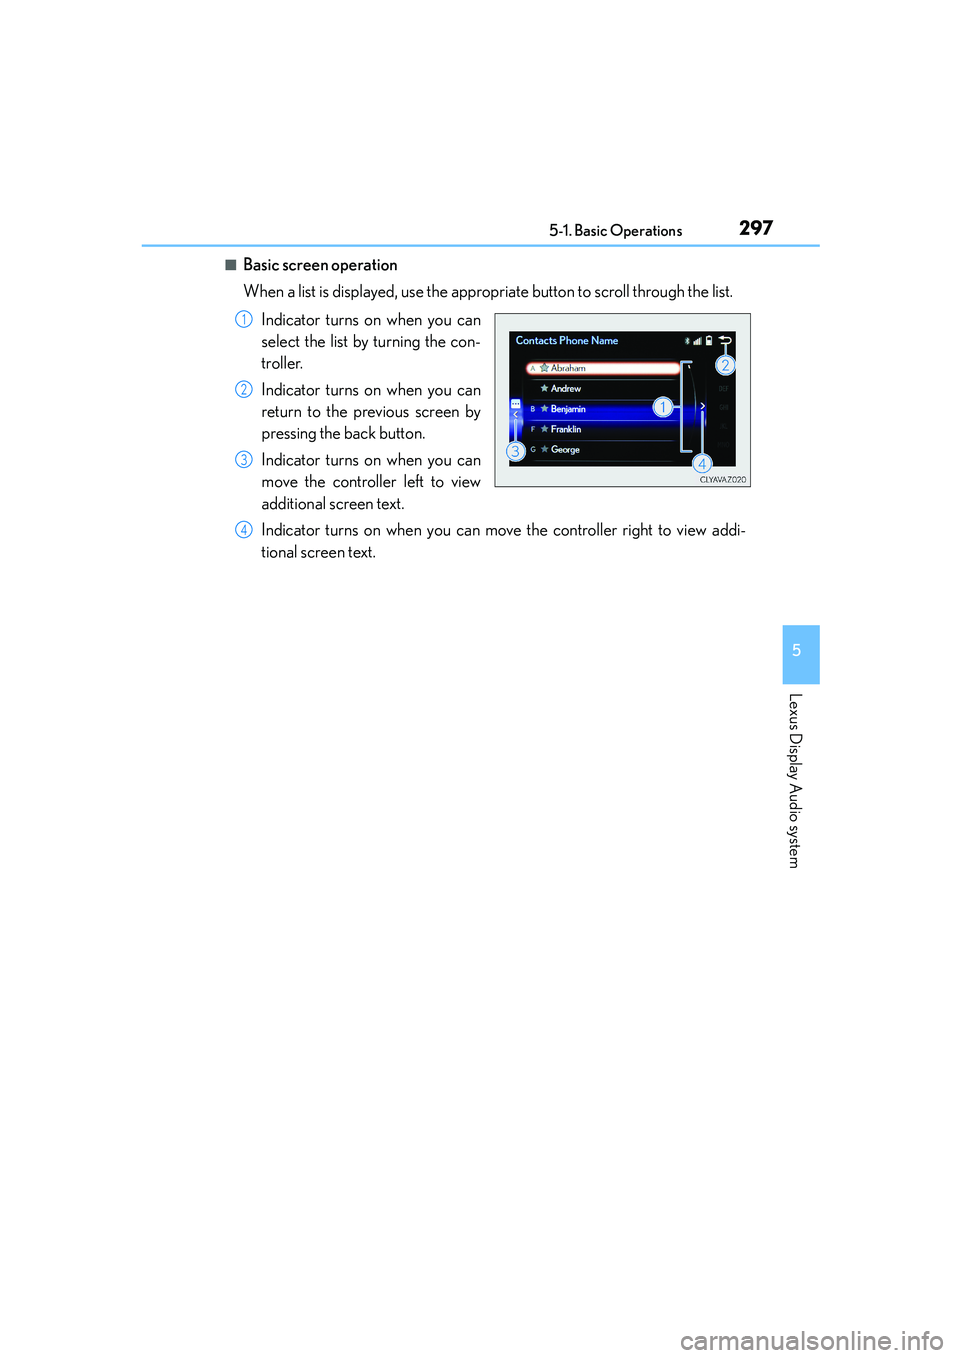
When a list is displayed, use the appropriate button to scroll through the list.
Indicator turns on when you can
select the list by turning the con-
troller.
Indicator turns on when you can
return to the previous screen by
pressing the back button.
Indicator turns on when you can
move the controller left to view
additional screen text.
Indicator turns on when you can move the controller right to view addi-
tional screen text.
1
2
3
4
Page 299 of 588
2995-1. Basic Operations
5
Lexus Display Audio system
IS250_EE(OM53C51E)
■When using the screen
●Under extremely cold conditions, the Lexus Display Audio controller may react slowly.
●If the screen is cold, the display may be dark, or the system may seem to be operating
slightly slower than normal.
●The screen may seem dark and hard to see when viewed through sunglasses. Change
your angle of viewing, adjust the display on the “Display” screen (→P. 3 0 7 ) o r r e m o v e
your sunglasses.
■Using cellular phones
Interference may be heard through the audio system's speakers if a cellular phone is
being used inside or close to the vehicle while the audio system is operating.
CAUTION
■Using the Lexus Display Audio controller
Be careful when touching the Lexus Display Audio controller in extreme temperatures
as it may become very hot or cold due to the temperature inside the vehicle.
■Laser product
This product is a class 1 laser product.
Do not open the cover of the player or attempt to repair the unit yourself. Refer servic-
ing to qualified personnel.
NOTICE
■To prevent Lexus Display Audio controller malfunction
●Do not allow the Lexus Display Audio controller to come into contact with food, liq-
uid, stickers or lit cigarettes as doing so may cause it to change color, emit a strange
odor or stop functioning.
●Do not subject the Lexus Display Audio controller to excessive pressure or strong
impact as the controller may bend or break off.
■To prevent battery discharge
Do not leave the audio system on longer than necessary when the engine is off.
■To avoid damaging the audio system
Take care not to spill drinks or other fluids on the audio system.
Page 301 of 588
3015-1. Basic Operations
5
Lexus Display Audio system
IS250_EE(OM53C51E)
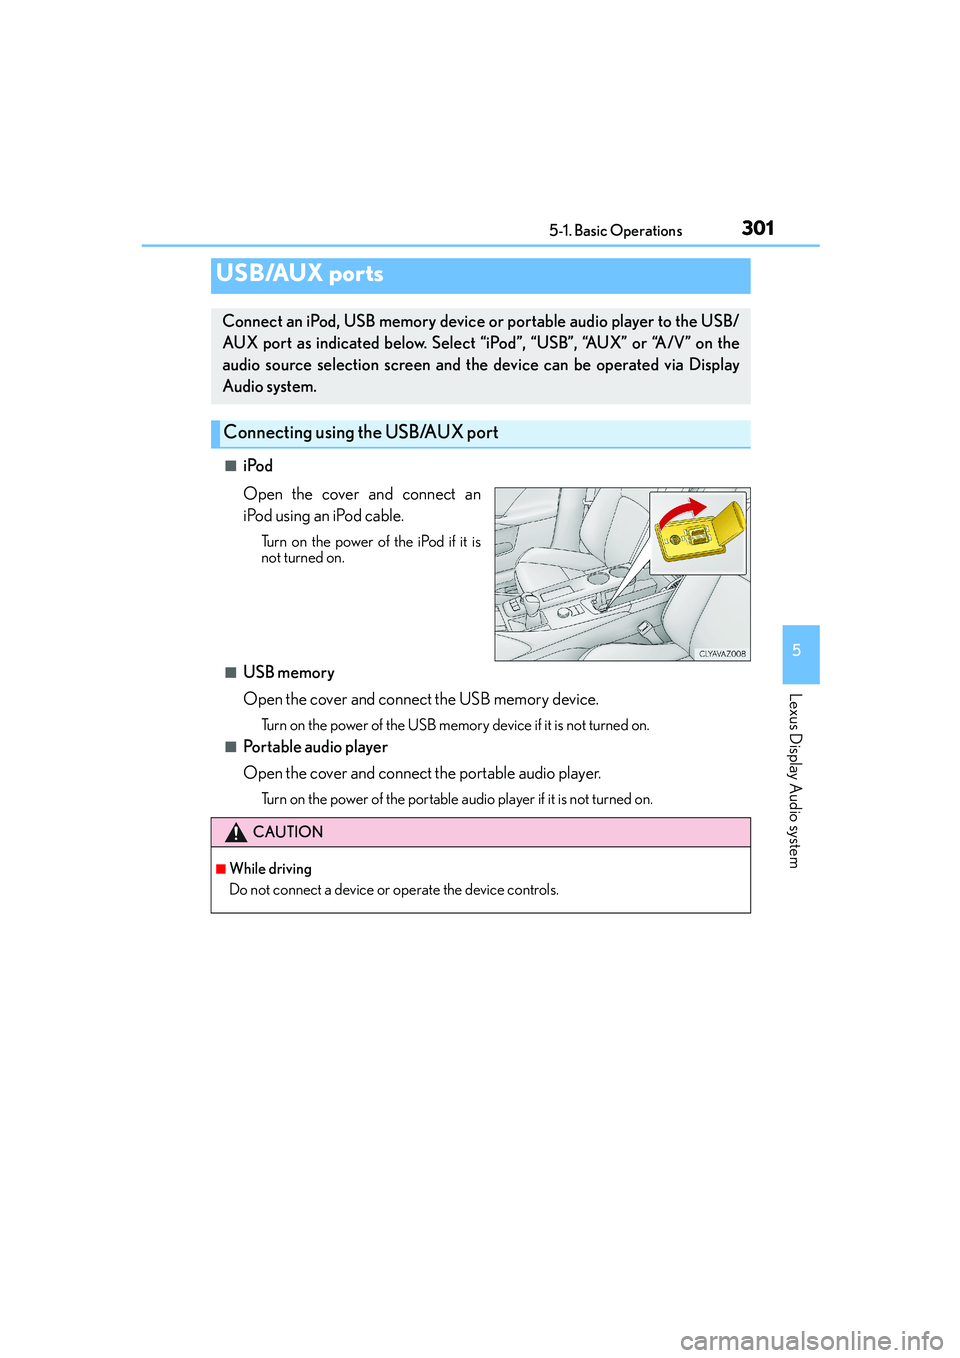
■iPod
Open the cover and connect an
iPod using an iPod cable.
Turn on the power of the iPod if it is
not turned on.
■USB memory
Open the cover and connect the USB memory device.
Turn on the power of the USB memory device if it is not turned on.
■Portable audio player
Open the cover and connect the portable audio player.
Turn on the power of the portable audio player if it is not turned on.
USB/AUX ports
Connect an iPod, USB memory device or portable audio player to the USB/
AUX port as indicated below. Select “iPod”, “USB”, “AUX” or “A/V” on the
audio source selection screen and the device can be operated via Display
Audio system.
Connecting using the USB/AUX port
CAUTION
■While driving
Do not connect a device or operate the device controls.
Page 302 of 588
302
IS250_EE(OM53C51E)5-2. Setup
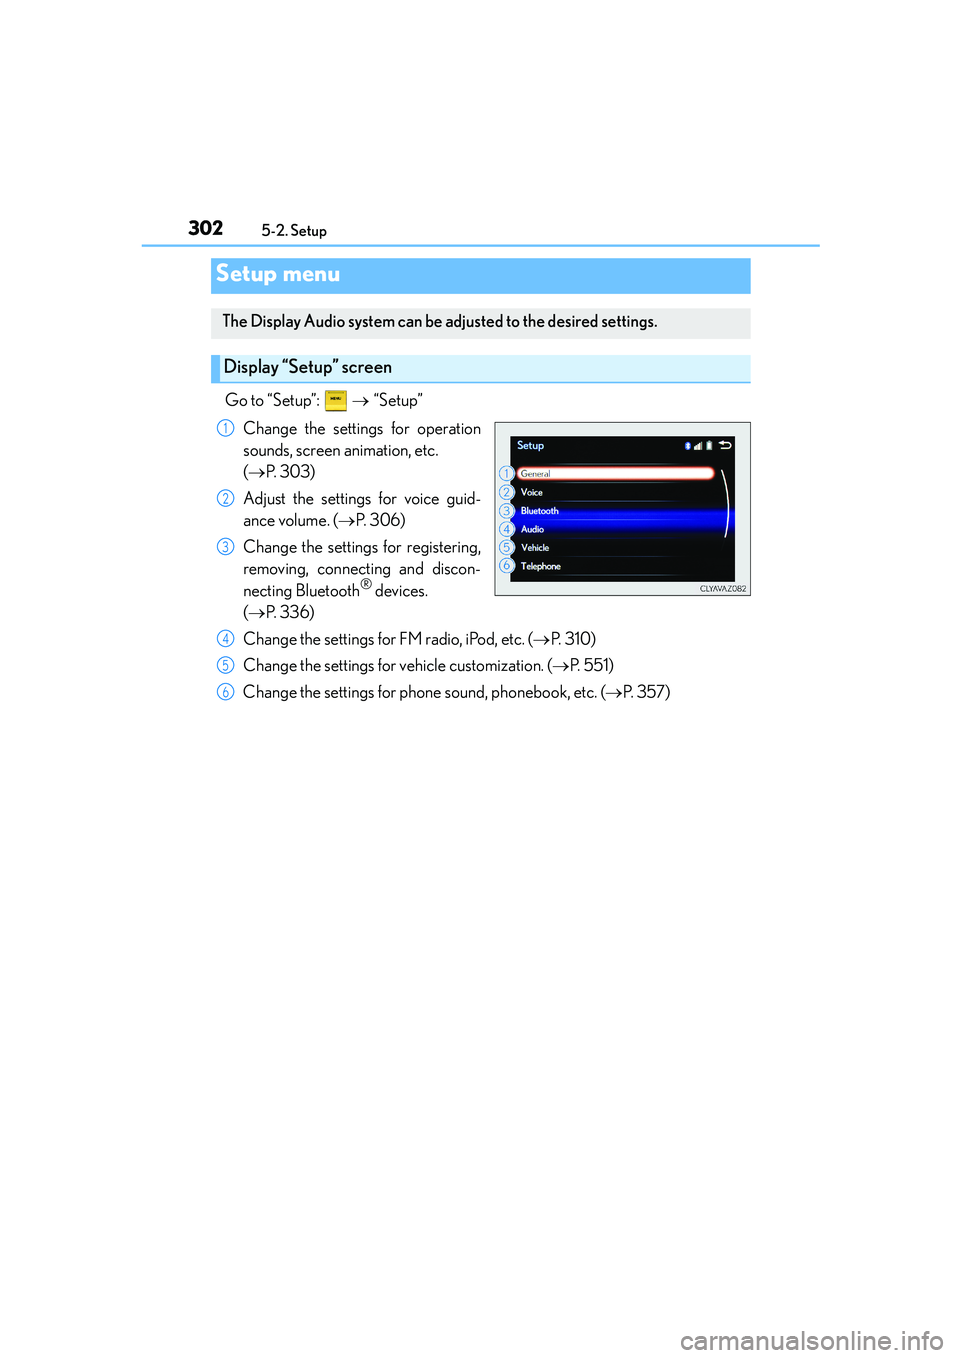
Go to “Setup”: → “Setup”
Change the settings for operation
sounds, screen animation, etc.
(→P. 303)
Adjust the settings for voice guid-
ance volume. (→P. 3 0 6 )
Change the settings for registering,
removing, connecting and discon-
necting Bluetooth
® devices.
(→P. 3 3 6 )
Change the settings for FM radio, iPod, etc. (→P. 3 1 0 )
Change the settings for vehicle customization. (→P. 5 5 1 )
Change the settings for phone sound, phonebook, etc. (→P. 3 5 7 )
Setup menu
The Display Audio system can be adjusted to the desired settings.
Display “Setup” screen
1
2
3
4
5
6
Page 303 of 588
3035-2. Setup
5
Lexus Display Audio system
IS250_EE(OM53C51E)
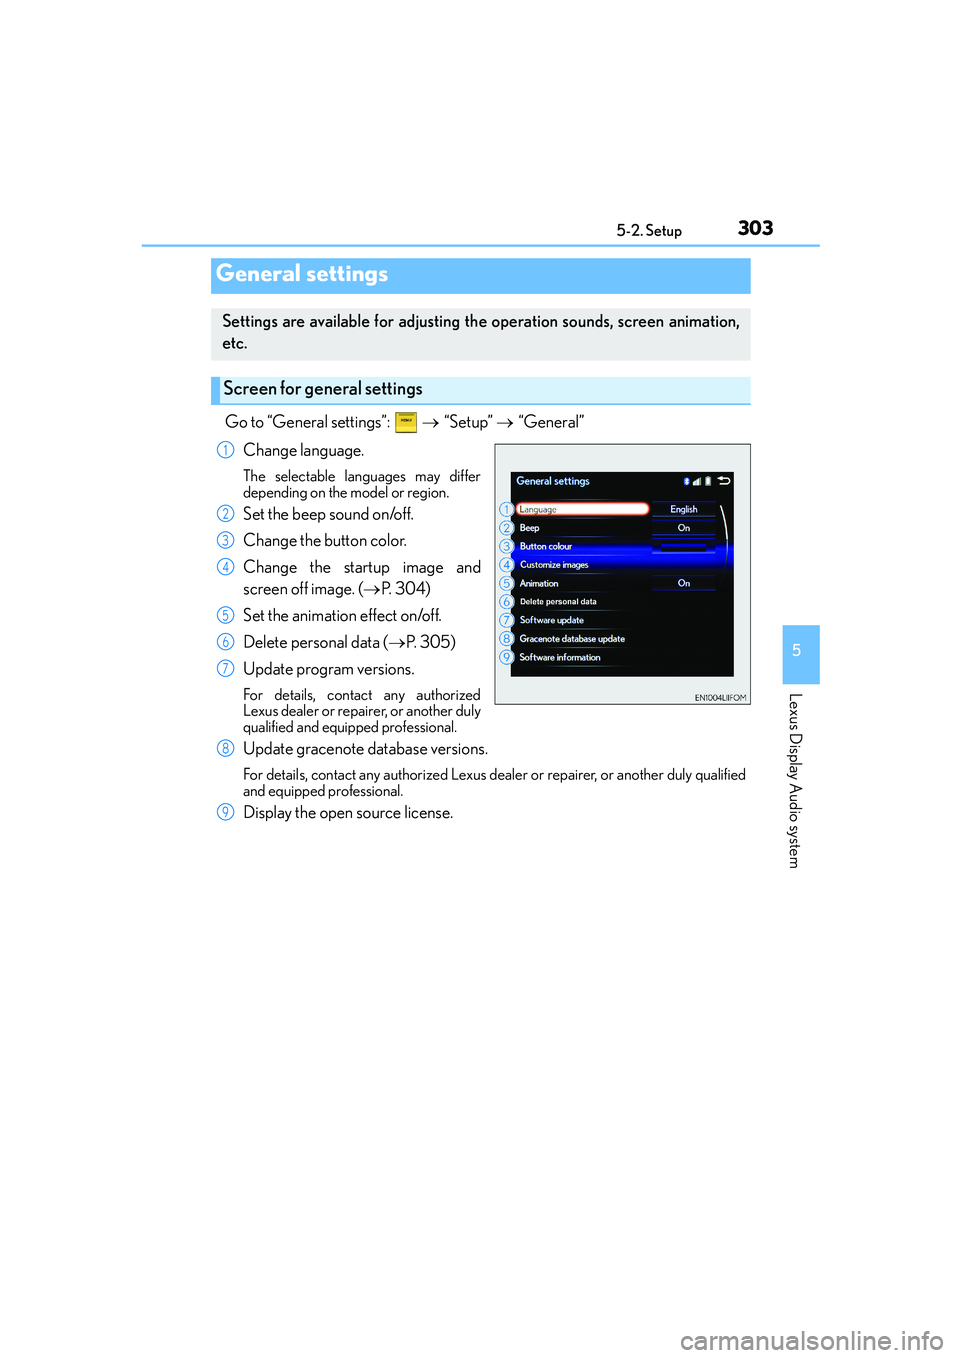
Go to “General settings”: → “Setup” → “General”
Change language.
The selectable languages may differ
depending on the model or region.
Set the beep sound on/off.
Change the button color.
Change the startup image and
screen off image. (→P. 3 0 4 )
Set the animation effect on/off.
Delete personal data (→P. 3 0 5 )
Update program versions.
For details, contact any authorized
Lexus dealer or repairer, or another duly
qualified and equipped professional.
Update gracenote database versions.
For details, contact any authorized Lexus dealer or repairer, or another duly qualified
and equipped professional.
Display the open source license.
General settings
Settings are available for adjusting the operation sounds, screen animation,
etc.
Screen for general settings
1
2
3
4
5
6
7
8
9
Page 305 of 588
3055-2. Setup
5
Lexus Display Audio system
IS250_EE(OM53C51E)
→ “Setup” → “General” → “Delete personal data”
Select “Delete”.
Check carefully beforehand, as data cannot be retrieved once deleted.
The following personal data will be deleted or changed to its default settings.
•Phonebook data
•Voice tag
• Call history data
•Favorite data
• Bluetooth
® devices data
• Phone sound settings
• Detailed Bluetooth
® settings
• Audio/video setting
• Preset switch data
• Last used radio station
• Customized image data
•FM info setting
• iPod tagging information
• Software update history
• Software update detail information
• Phone display setting
• Contact/call history setting
• Messaging setting
NOTICE
■If the console box lid cannot be fully closed
→P. 3 3 3
■To prevent damage to the USB memory device or its terminals
→P. 3 3 3
Deleting personal data
1
2
Page 307 of 588
3075-2. Setup
5
Lexus Display Audio system
IS250_EE(OM53C51E)
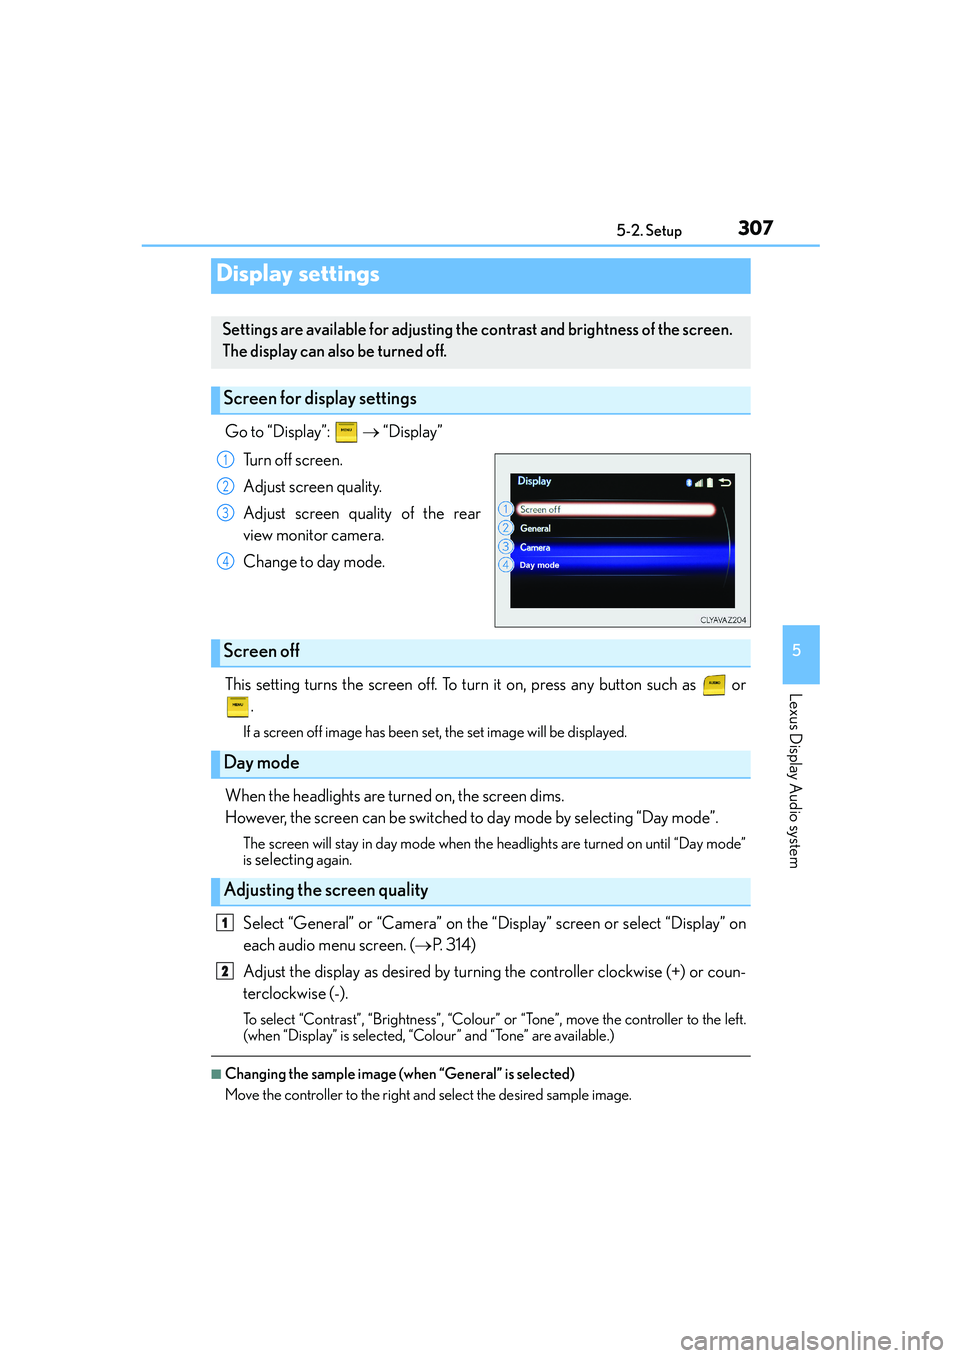
Go to “Display”: → “Display”
Turn off screen.
Adjust screen quality.
Adjust screen quality of the rear
view monitor camera.
Change to day mode.
This setting turns the screen off. To turn it on, press any button such as or
.
If a screen off image has been set, the set image will be displayed.
When the headlights are turned on, the screen dims.
However, the screen can be switched to day mode by selecting “Day mode”.
The screen will stay in day mode when the headlights are turned on until “Day mode”
is
selecting again.
Select “General” or “Camera” on the “Display” screen or select “Display” on
each audio menu screen. (→P. 3 1 4 )
Adjust the display as desired by turning the controller clockwise (+) or coun-
terclockwise (-).
To select “Contrast”, “Brightness”, “Colour” or “Tone”, move the controller to the left.
(when “Display” is selected, “Colour” and “Tone” are available.)
■Changing the sample image (when “General” is selected)
Move the controller to the right and select the desired sample image.
Display settings
Settings are available for adjusting the contrast and brightness of the screen.
The display can also be turned off.
Screen for display settings
1
2
3
4
Screen off
Day mode
Adjusting the screen quality
1
2
Page 308 of 588
308
IS250_EE(OM53C51E)5-3. Using the audio system
Press the button to display the “Source” screen.
If the “Source” screen is not displayed, press the button again.
Select the desired audio source.
The audio source can be selected by pressing the “RADIO” or “MEDIA” button.
Press the “MODE” switch when the audio system is turned on. The audio source
changes each time the “MODE” switch is pressed.
■Rearranging the list
The listing order of the source list can be rearranged.
Move the controller to the left while on the “Source” screen.
Select “Audio source select”.
Select an item you wish to move and then select where to move the item to.
Selecting the audio source
Switching between audio sources such as radio and CD are explained in this
section.
Changing audio source
Using the steering wheel switches to change audio sources
1
2
1
2
3
Page 309 of 588
3095-3. Using the audio system
5
Lexus Display Audio system
IS250_EE(OM53C51E)
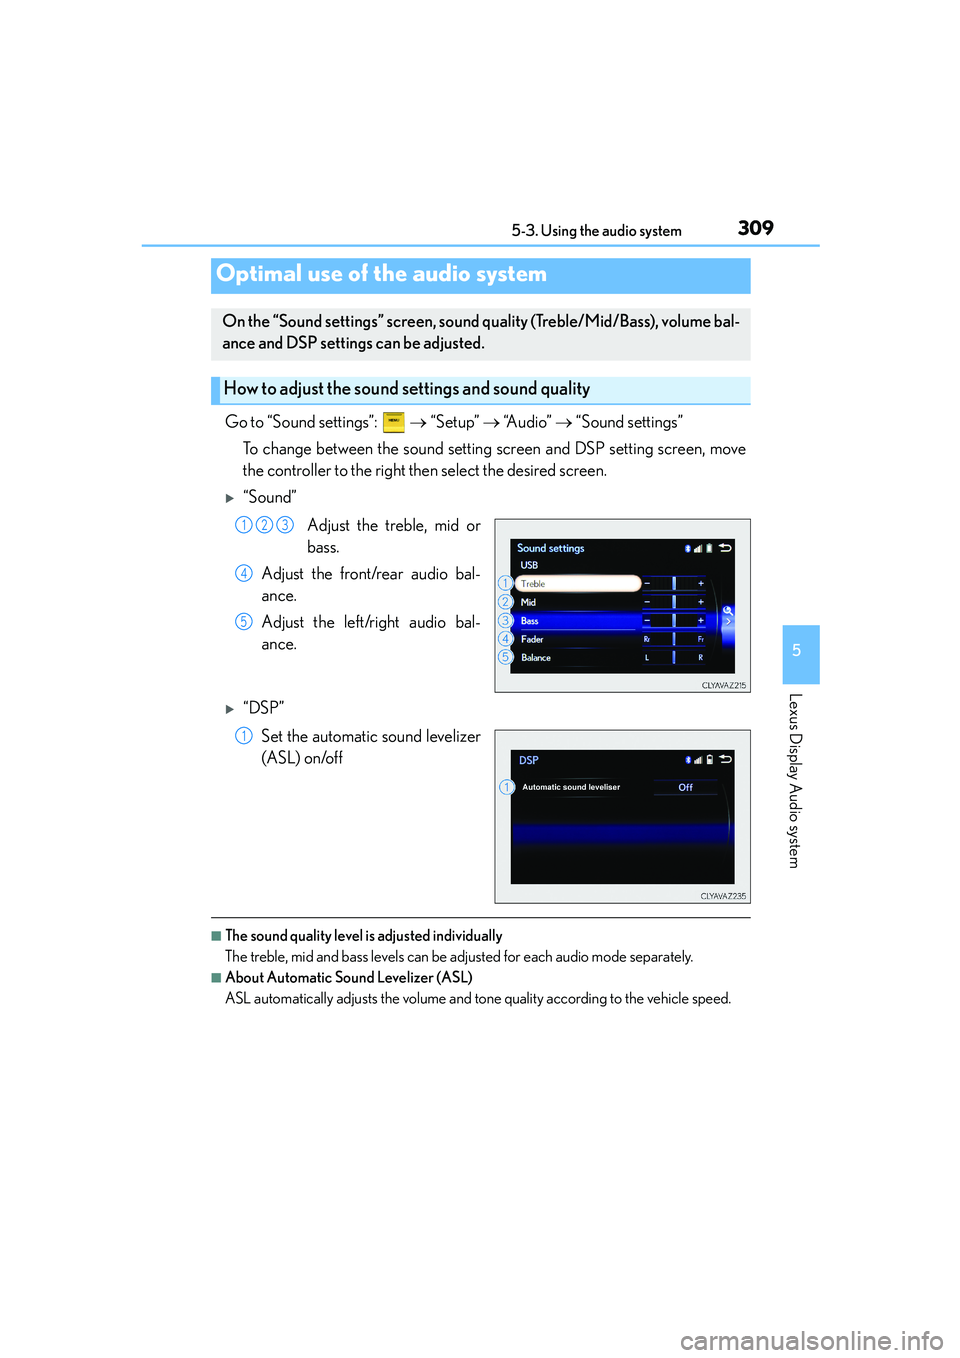
Go to “Sound settings”: → “Setup” → “A u d i o ” → “Sound settings”
To change between the sound setting screen and DSP setting screen, move
the controller to the right then select the desired screen.
�X“Sound”
Adjust the treble, mid or
bass.
Adjust the front/rear audio bal-
ance.
Adjust the left/right audio bal-
ance.
�X“DSP”
Set the automatic sound levelizer
(ASL) on/off
■The sound quality level is adjusted individually
The treble, mid and bass levels can be adjusted for each audio mode separately.
■About Automatic Sound Levelizer (ASL)
ASL automatically adjusts the volume and tone quality according to the vehicle speed.
Optimal use of the audio system
On the “Sound settings” screen, sound quality (Treble/Mid/Bass), volume bal-
ance and DSP settings can be adjusted.
How to adjust the sound settings and sound quality
123
4
5
1
Page 311 of 588
3115-3. Using the audio system
5
Lexus Display Audio system
IS250_EE(OM53C51E)
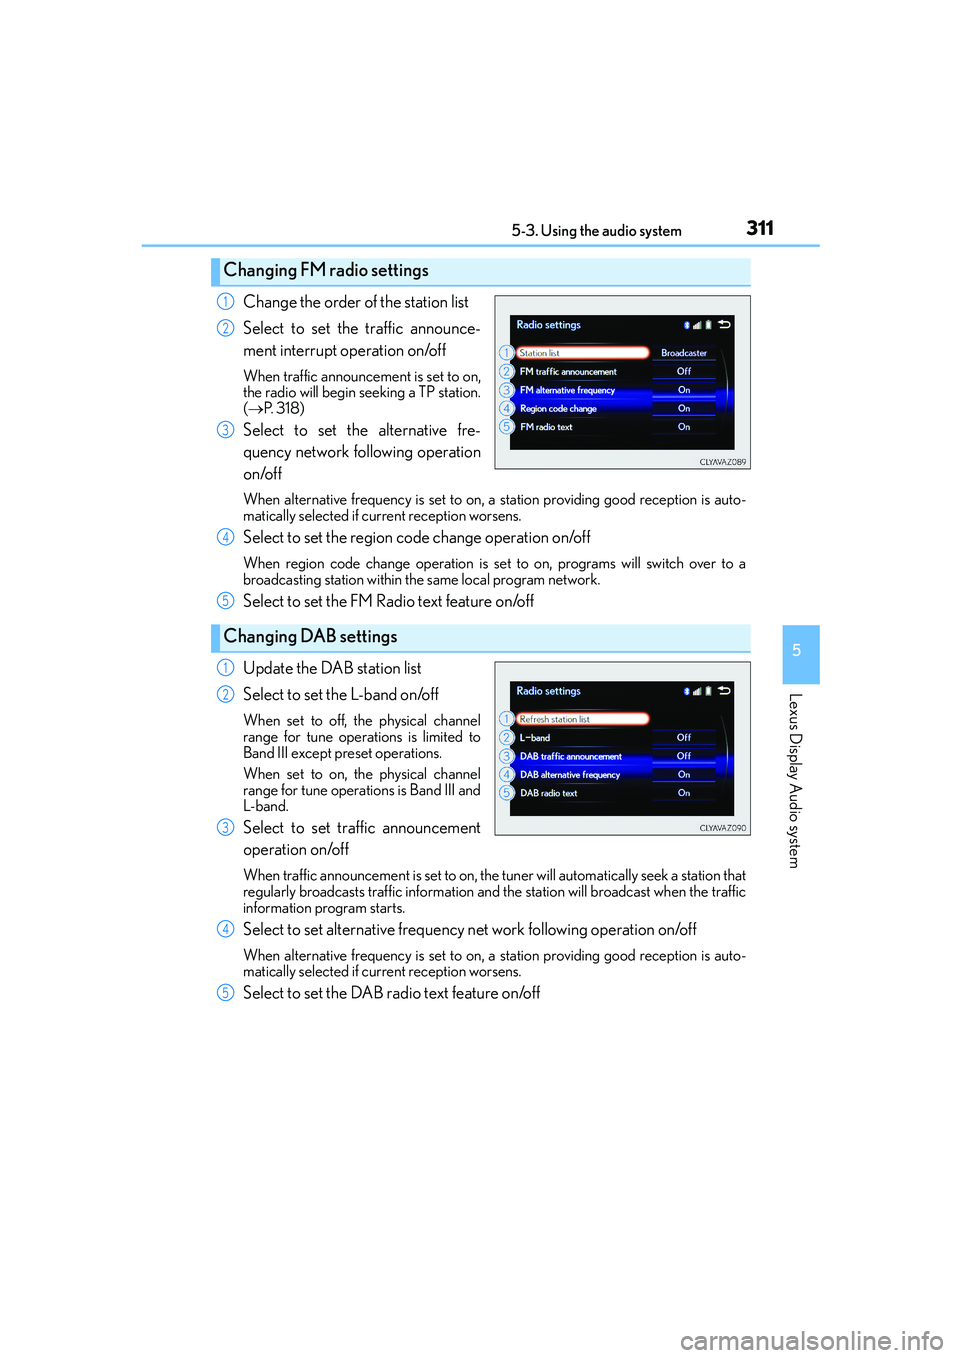
Change the order of the station list
Select to set the traffic announce-
ment interrupt operation on/off
When traffic announcement is set to on,
the radio will begin seeking a TP station.
(→P. 3 1 8 )
Select to set the alternative fre-
quency network following operation
on/off
When alternative frequency is set to on, a station providing good reception is auto-
matically selected if current reception worsens.
Select to set the region code change operation on/off
When region code change operation is set to on, programs will switch over to a
broadcasting station within the same local program network.
Select to set the FM Radio text feature on/off
Update the DAB station list
Select to set the L-band on/off
When set to off, the physical channel
range for tune operations is limited to
Band III except preset operations.
When set to on, the physical channel
range for tune operations is Band III and
L-band.
Select to set traffic announcement
operation on/off
When traffic announcement is set to on, the tuner will automatically seek a station that
regularly broadcasts traffic information and the station will broadcast when the traffic
information program starts.
Select to set alternative frequency net work following operation on/off
When alternative frequency is set to on, a station providing good reception is auto-
matically selected if current reception worsens.
Select to set the DAB radio text feature on/off
Changing FM radio settings
1
2
3
Changing DAB settings
4
5
1
2
3
4
5