turn Lexus IS250 2014 VOICE COMMAND SYSTEM OPERATION / LEXUS 2014 IS250,IS350 QUICK GUIDE OWNERS MANUAL (OM53B33U)
[x] Cancel search | Manufacturer: LEXUS, Model Year: 2014, Model line: IS250, Model: Lexus IS250 2014Pages: 78, PDF Size: 4.35 MB
Page 3 of 78
3
Navigation System*
Register home ................................................................................................................................ 33
Destination input Search by address ........................................................................ 34
Destination input Search points of interest by name ......................................... 36
Destination input Search points of interest by category ...................................37
Destination input Search points of interest by telephone number .............. 38
Voice Command System...........................................................................................................62
Portable Audio Device Ports....................................................................................................... 66
Remote Touch...................................................................................................................................... 30
Safety Connect................................................................................................................................... 68
Seat Heaters/Seat Ventilators..................................................................................................... 61
Tire Pressure Warning System.................................................................................................... 29
Turn Signal Lever................................................................................................................................... 11
Voice Command System*
Basic operation .............................................................................................................................. 62
Command list.................................................................................................................................. 63
Windshield Wipers and Washer................................................................................................... 17
XM Satellite Radio.............................................................................................................................72
*: This feature may be operated by Voice command (See P.62)
Page 4 of 78
4
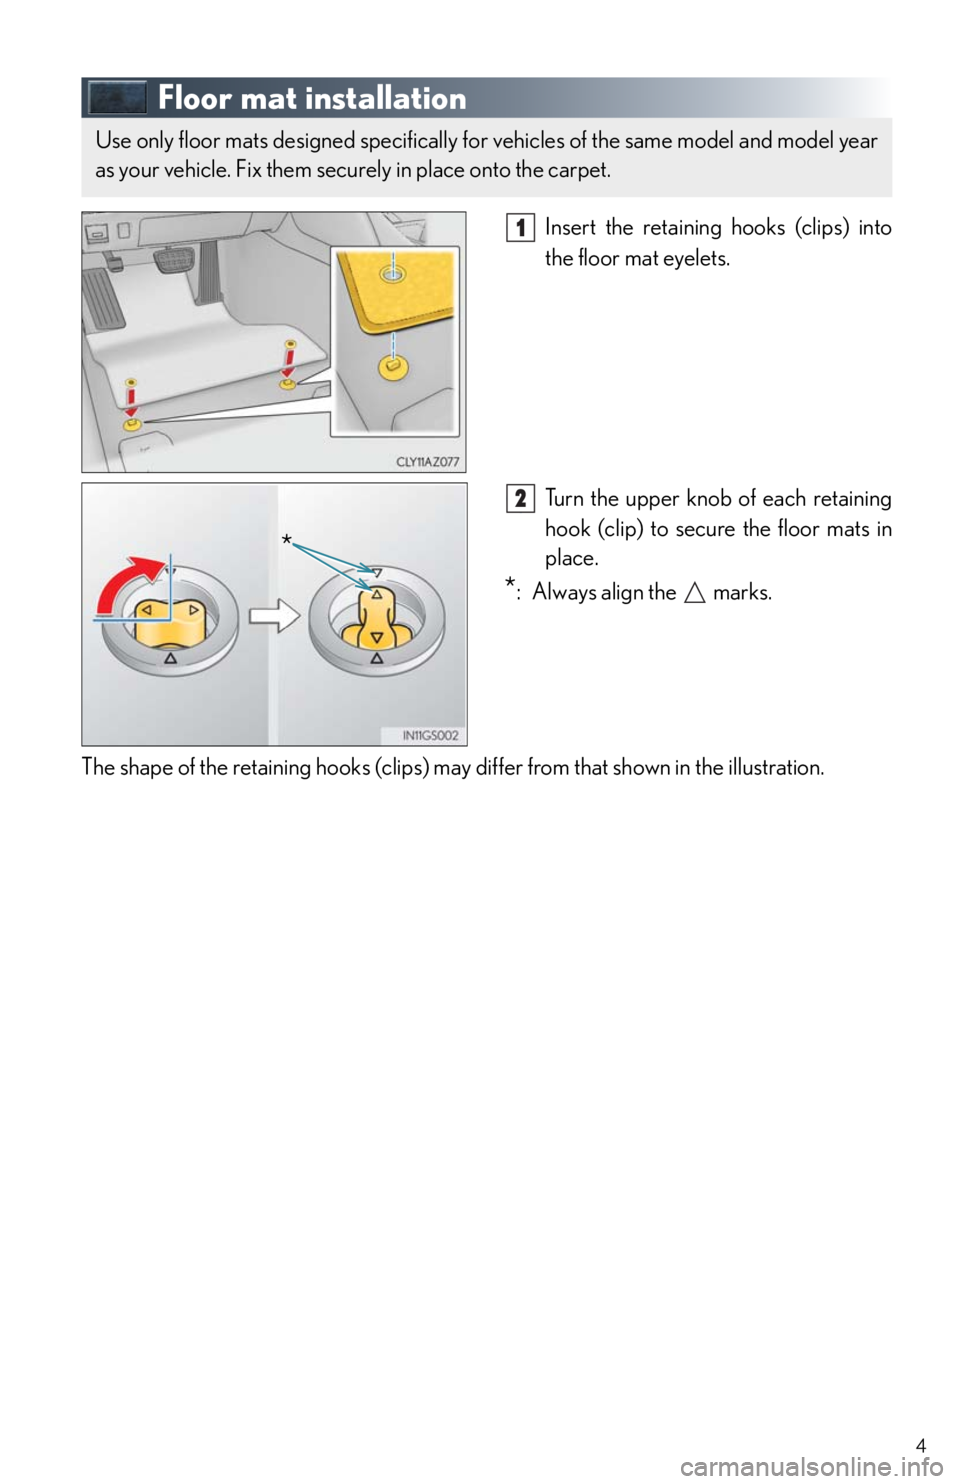
Floor mat installation
Insert the retaining hooks (clips) into
the floor mat eyelets.
Turn the upper knob of each retaining
hook (clip) to secure the floor mats in
place.
*: Always align the marks.
The shape of the retaining hooks (clips) may differ from that shown in the illustration.
Use only floor mats designed specifically for vehicles of the same model and model year
as your vehicle. Fix them securely in place onto the carpet.
11
*
22
Page 5 of 78
5
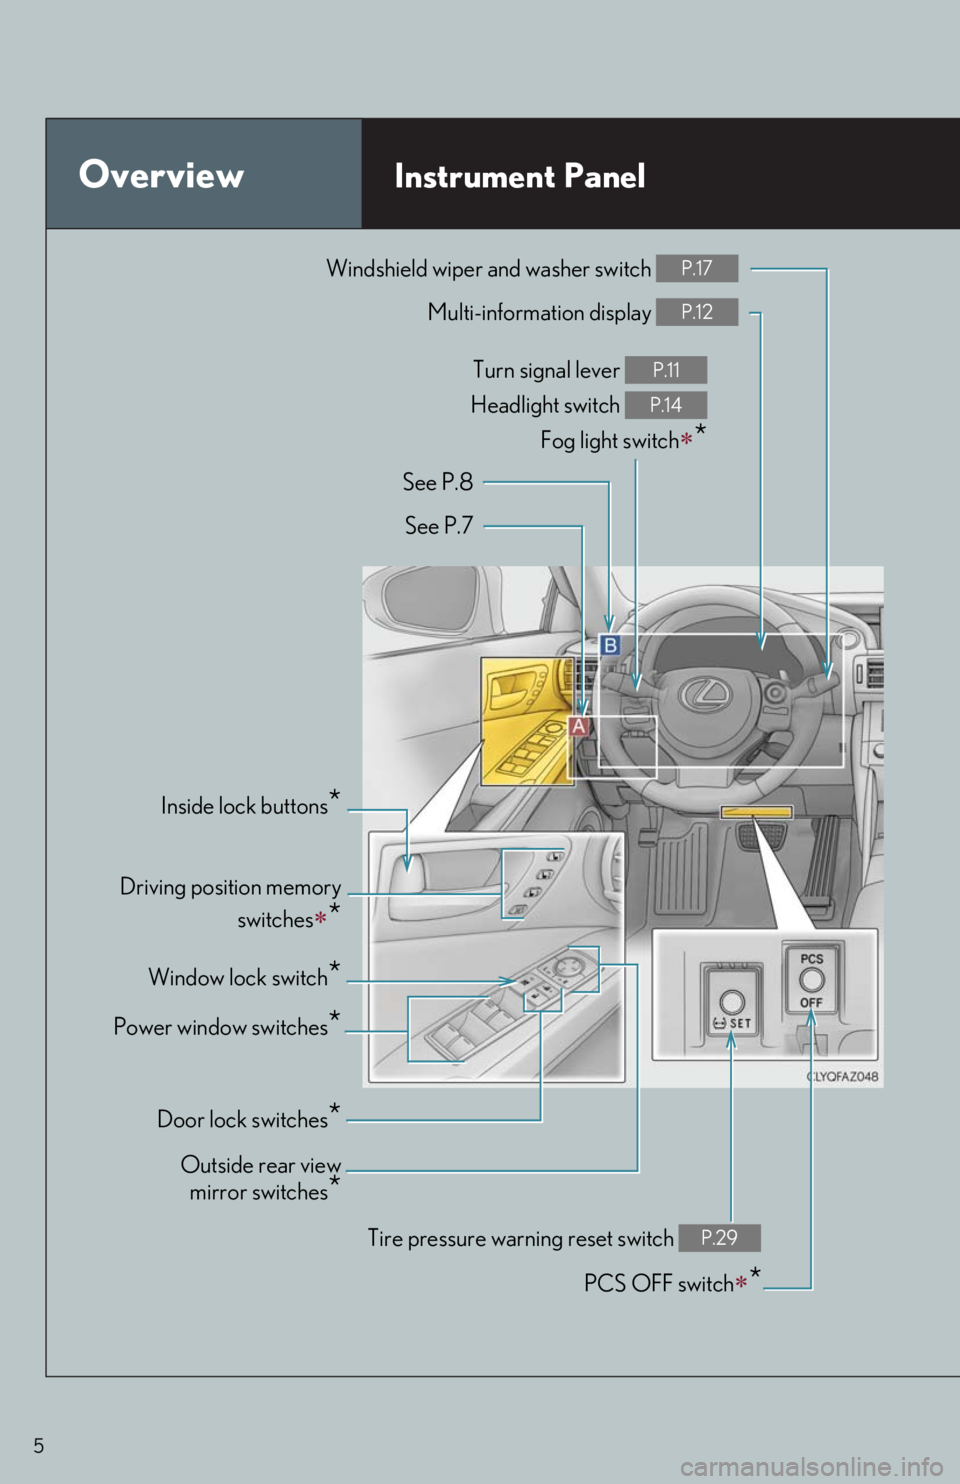
OverviewInstrument Panel
Windshield wiper and washer switch P.17
Multi-information display P.12
Turn signal lever
Headlight switch
Fog light switch
*
P.11
P.14
Inside lock buttons*
PCS OFF switch*
Driving position memory
switches
*
See P.8
See P.7
Window lock switch
*
Outside rear view
mirror switches
*
Power window switches*
Door lock switches*
Tire pressure warning reset switch P.29
Page 11 of 78

11
Tu r n S i g n a l L e v e r
Right turn
Lane change to the right (move the
lever partway and release it)
The right hand signals will flash 3 times.
Lane change to the left (move the lever
partway and release it)
The left hand signals will flash 3 times.
Left turn
■If the turn signals do not stop flashing after turning left or right, or if you
want to stop them flashing
Operate the lever in the opposite direction to either position or . If you move the
lever to either position or , the selected turn signals will flash.
The lever will return to its original position after operation.
1
2
3
4
■Customization
The number of times the turn signals flash during a lane change can be changed.
23
14
Page 13 of 78

13
■Operating the meter control switches
The multi-information display is operated
using the meter control switches.
Select an item/change pages
Enter/Set
Except F SPORT models
Press: Displays the screen registered
to
When no screen has been registered,
the drive information screen will be dis-
played.
Press and hold: Registers the currently
displayed screen to
When the confirmation screen is dis-
played, select yes to register the
screen. If the selected screen cannot
be registered, a registration failure
message will be shown.
F SPORT models
Move the main meter
Return to the previous screen
1
2
3
3
4
■If a problem is detected in any of the vehicle’s systems, a warning message is shown on
the multi-information display.
■Move the main meter
Moves between center and right-side positions.
Page 14 of 78

14
Headlights
The side marker, parking, tail,
license plate and instrument
panel lights turn on.
The headlights and all lights
listed above turn on.
The headlights, daytime run-
ning lights and all the lights
listed above turn on and off
automatically. (When the
engine switch is in IGNITION
ON mode.)
Off
The daytime running lights turn
on.
■Turning on the high beam headlights
With the headlights on, push the lever
away from you to turn on the high
beams.
Pull the lever toward you to the center
position to turn the high beams off.
Pull the lever toward you and release it
to flash the high beams once.
You can flash the high beams with the
headlights on or off.
(Canada) (U.S.A.)
1
2
3
4
(U.S.A.)
(Canada)
1
2
Page 15 of 78

15
Automatic High Beam (if equipped)
■Activating the Automatic High Beam system
Push the lever away from you with the
headlight switch in the or
position.
Press the Automatic High Beam
switch.
The Automatic High Beam indicator
will come on when the headlights are
turned on automatically to indicate that
the system is active.
The Automatic High Beam uses an in-vehicle camera sensor to assess the brightness of
streetlights, the lights of oncoming and preceding vehicles, etc., and automatically turns
the high beam on or off as necessary.
1
2
Page 16 of 78

16
■Turning the high beam on/off manually
●Switching to low beam
Pull the lever to the original position.
The Automatic High Beam indicator will
turn off.
Push the lever away from you to activate
the Automatic High Beam system again.
●Switching to high beam
Press the Automatic High Beam switch.
The Automatic High Beam indicator will
turn off and the high beam indicator will
turn on.
Press the switch to activate the Auto-
matic High Beam system again.
Page 17 of 78

17
Windshield Wipers and Washer
Intermittent windshield wipers with interval adjuster
(U.S.A.) or (Canada)
Up 2 levels
Up 1 level
(U.S.A.) or (Canada)
Down 1 level
(U.S.A.) or (Canada)
Down 2 levels
The lever will return to its original position after operation.
1
2
3
4
or or or
OffTe m p o r a r y
operationTe m p o r a r y
operationIntermittent
operationHigh speed
operation
Intermittent
operationOffOffLow speed
operationHigh speed
operation
Low speed
operationOffIntermittent
operationHigh speed
operationHigh speed
operation
High speed
operationOffLow speed
operationNo changeNo change
Status
before
operation
Operation
Page 19 of 78

19
Rain-sensing windshield wipers
(U.S.A.) or (Canada)
Up 2 levels
Up 1 level
(U.S.A.) or (Canada)
Down 1 level
(U.S.A.) or (Canada)
Down 2 levels
AUTO mode on/off switch
With AUTO mode selected, the wipers
will operate automatically when the
sensor detects falling rain. The system
automatically adjusts wiper timing in
accordance with rain volume and vehi-
cle speed.
The AUTO mode indicator will turn on
when AUTO mode is selected.
*: After temporary operation, the mode will return to AUTO mode.
AUTO mode
indicator
1
2
3
4
5
or or or
OffTe m p o r a r y
operationTe m p o r a r y
operationLow speed
operationHigh speed
operation
Low speed
operationOffOffHigh speed
operationHigh speed
operation
High speed
operationOffLow speed
operationNo changeNo change
AUTO
mode
Intermit-
tent
operation
Off
Te m p o r a r y
operation
*Low speed
operationHigh speed
operation
Continu-
ouslyNo change
Status
before
operation
Operation