Lexus IS250 2015 Audio menu screen operation /
Manufacturer: LEXUS, Model Year: 2015, Model line: IS250, Model: Lexus IS250 2015Pages: 584, PDF Size: 7.59 MB
Page 281 of 584
281
5
Lexus Display Audio system
IS350/250_U (OM53C50U)5-3. Using the audio system
Press the button to display the “Source” screen.
If the “Source” screen is not displayed, press the button again.
Select the desired audio source.
The audio source can be selected by pressing the “RADIO” or “MEDIA” button.
Press the “MODE” switch when the audio
system is turned on. The audio source
changes each time the “MODE” switch is pressed.
■Rearranging the list
The listing order of the sour ce list can be rearranged.
Move the controller to the left while on the “Source” screen.
Select “Audio Source Select”.
Select an item you wish to move and th en select where to move the item to.
Selecting the audio source
Switching between audio sources such as radio and CD are explained in this
section.
Changing audio source
Using the steering wheel switches to change audio sources
1
2
1
2
3
Page 282 of 584
2825-3. Using the audio system
IS350/250_U (OM53C50U)
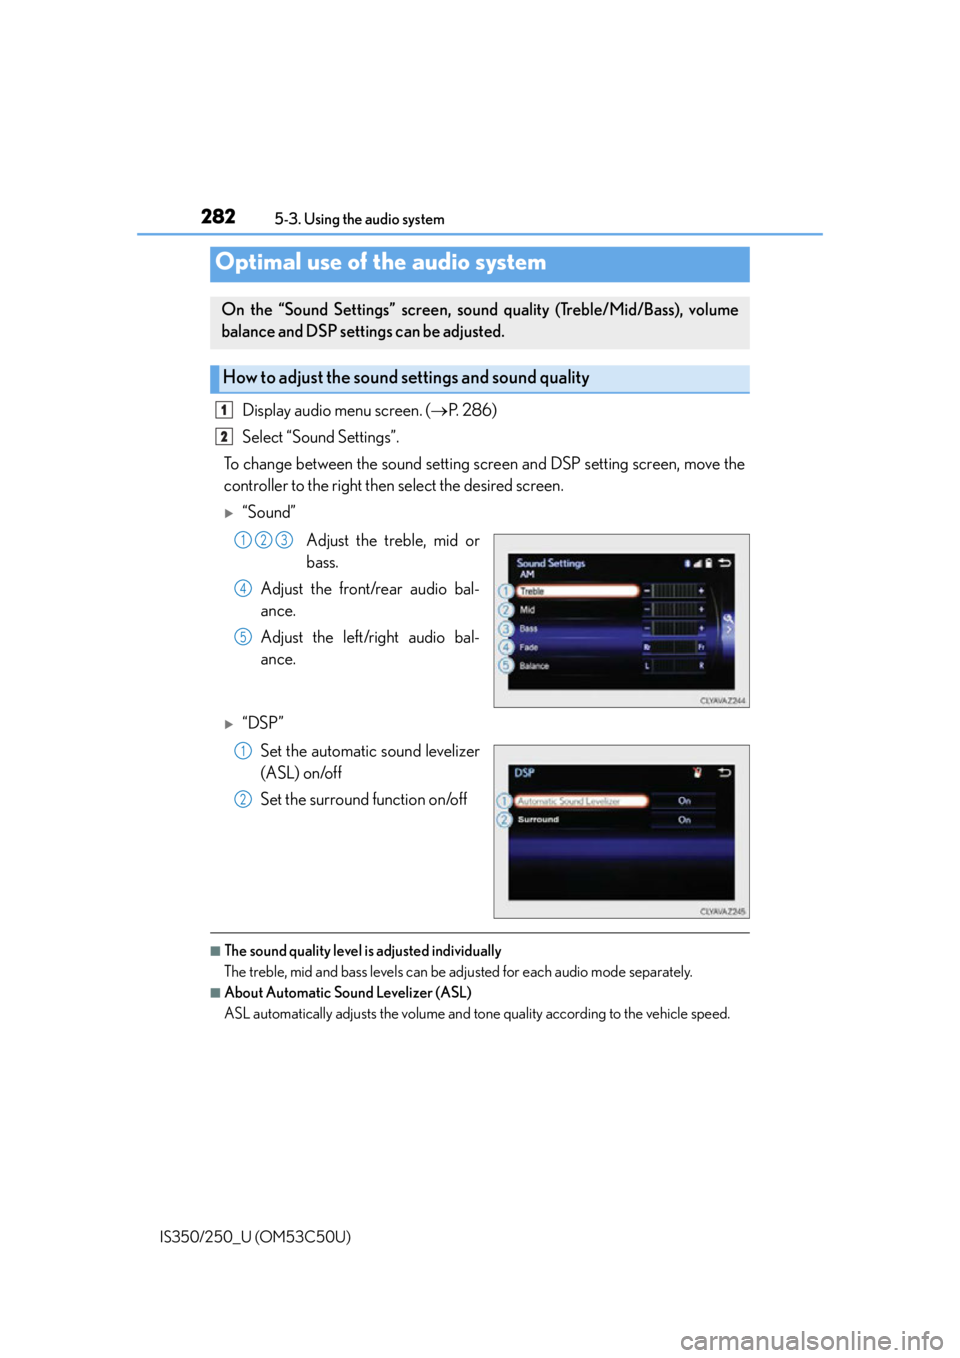
Display audio menu screen. ( P. 2 8 6 )
Select “Sound Settings”.
To change between the sound setting screen and DSP setting screen, move the
controller to the right then select the desired screen.
“Sound”
Adjust the treble, mid or
bass.
Adjust the front/rear audio bal-
ance.
Adjust the left/right audio bal-
ance.
“DSP”
Set the automatic sound levelizer
(ASL) on/off
Set the surround function on/off
■The sound quality level is adjusted individually
The treble, mid and bass levels can be ad justed for each audio mode separately.
■About Automatic Sound Levelizer (ASL)
ASL automatically adjusts the volume and tone quality according to the vehicle speed.
Optimal use of the audio system
On the “Sound Settings” screen, sound quality (Treble/Mid/Bass), volume
balance and DSP settings can be adjusted.
How to adjust the sound settings and sound quality
1
2
123
4
5
1
2
Page 283 of 584
2835-3. Using the audio system
5
Lexus Display Audio system
IS350/250_U (OM53C50U)
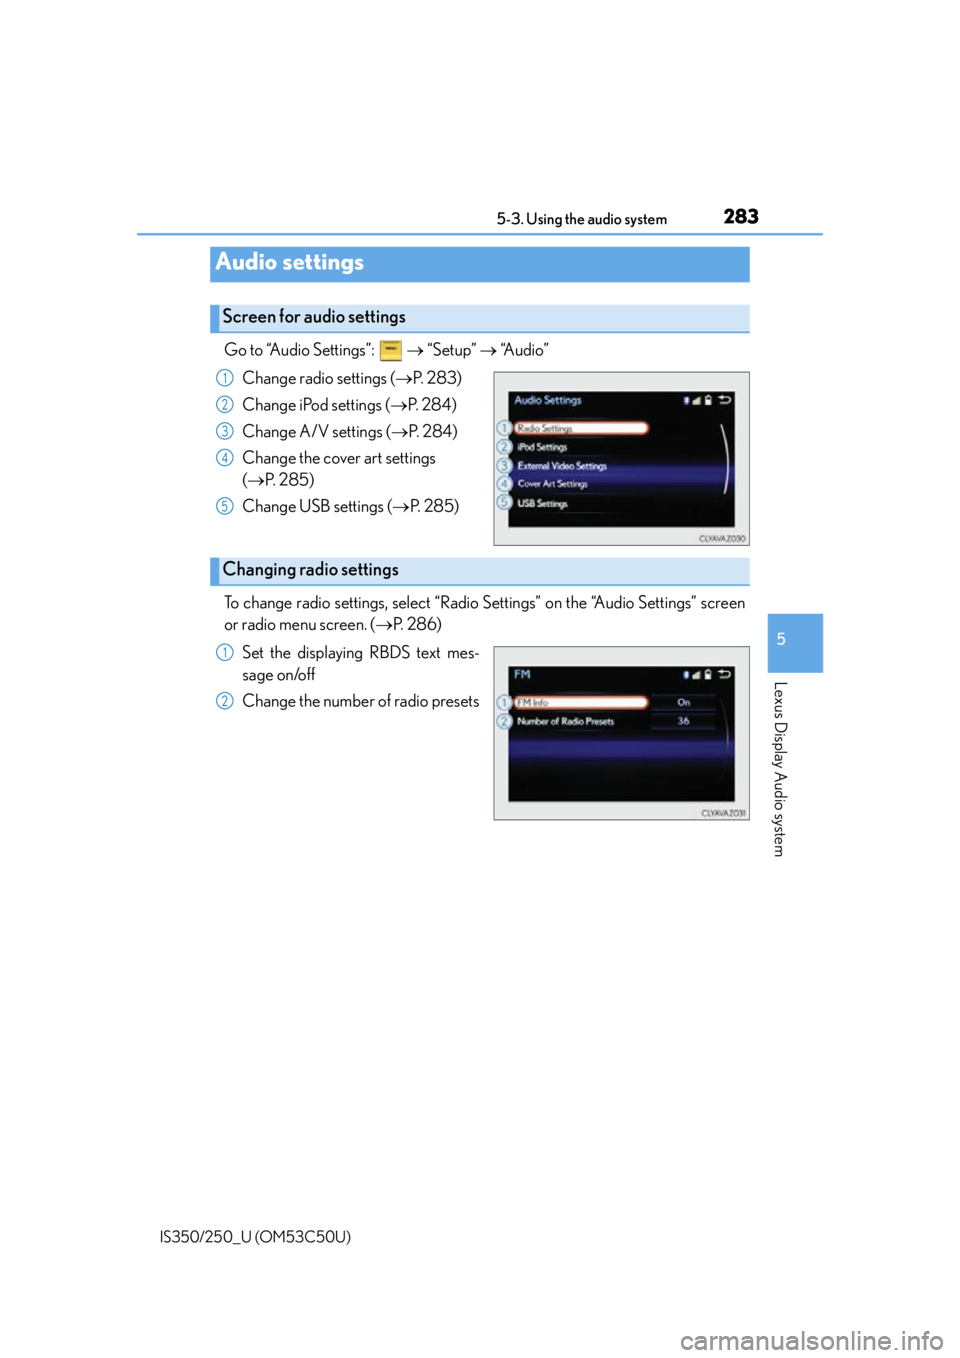
Go to “Audio Settings”: “Setup” “Audio”
Change radio settings ( P. 2 8 3 )
Change iPod settings ( P. 2 8 4 )
Change A/V settings ( P. 2 8 4 )
Change the cover art settings
( P. 2 8 5 )
Change USB settings ( P. 2 8 5 )
To change radio settings, select “Radio Settings” on the “Audio Settings” screen
or radio menu screen. ( P. 2 8 6 )
Set the displaying RBDS text mes-
sage on/off
Change the number of radio presets
Audio settings
Screen for audio settings
1
2
3
4
5
Changing radio settings
1
2
Page 284 of 584
2845-3. Using the audio system
IS350/250_U (OM53C50U)
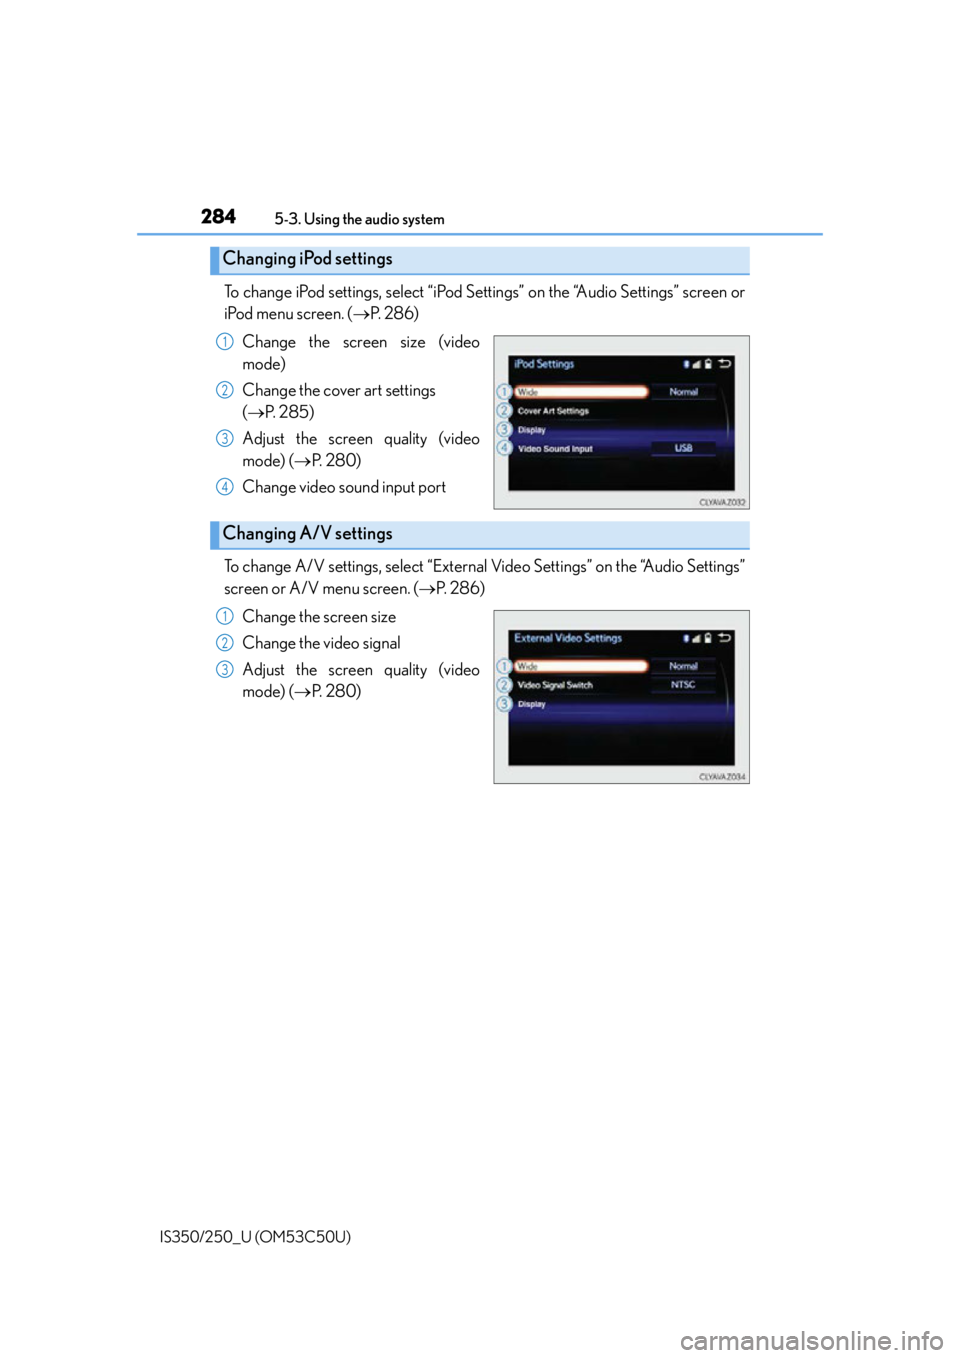
To change iPod settings, select “iPod Se ttings” on the “Audio Settings” screen or
iPod menu screen. ( P. 2 8 6 )
Change the screen size (video
mode)
Change the cover art settings
( P. 2 8 5 )
Adjust the screen quality (video
mode) ( P. 2 8 0 )
Change video sound input port
To change A/V settings, select “External Video Settings” on the “Audio Settings”
screen or A/V menu screen. ( P. 2 8 6 )
Change the screen size
Change the video signal
Adjust the screen quality (video
mode) ( P. 2 8 0 )
Changing iPod settings
1
2
3
4
Changing A/V settings
1
2
3
Page 285 of 584
2855-3. Using the audio system
5
Lexus Display Audio system
IS350/250_U (OM53C50U)
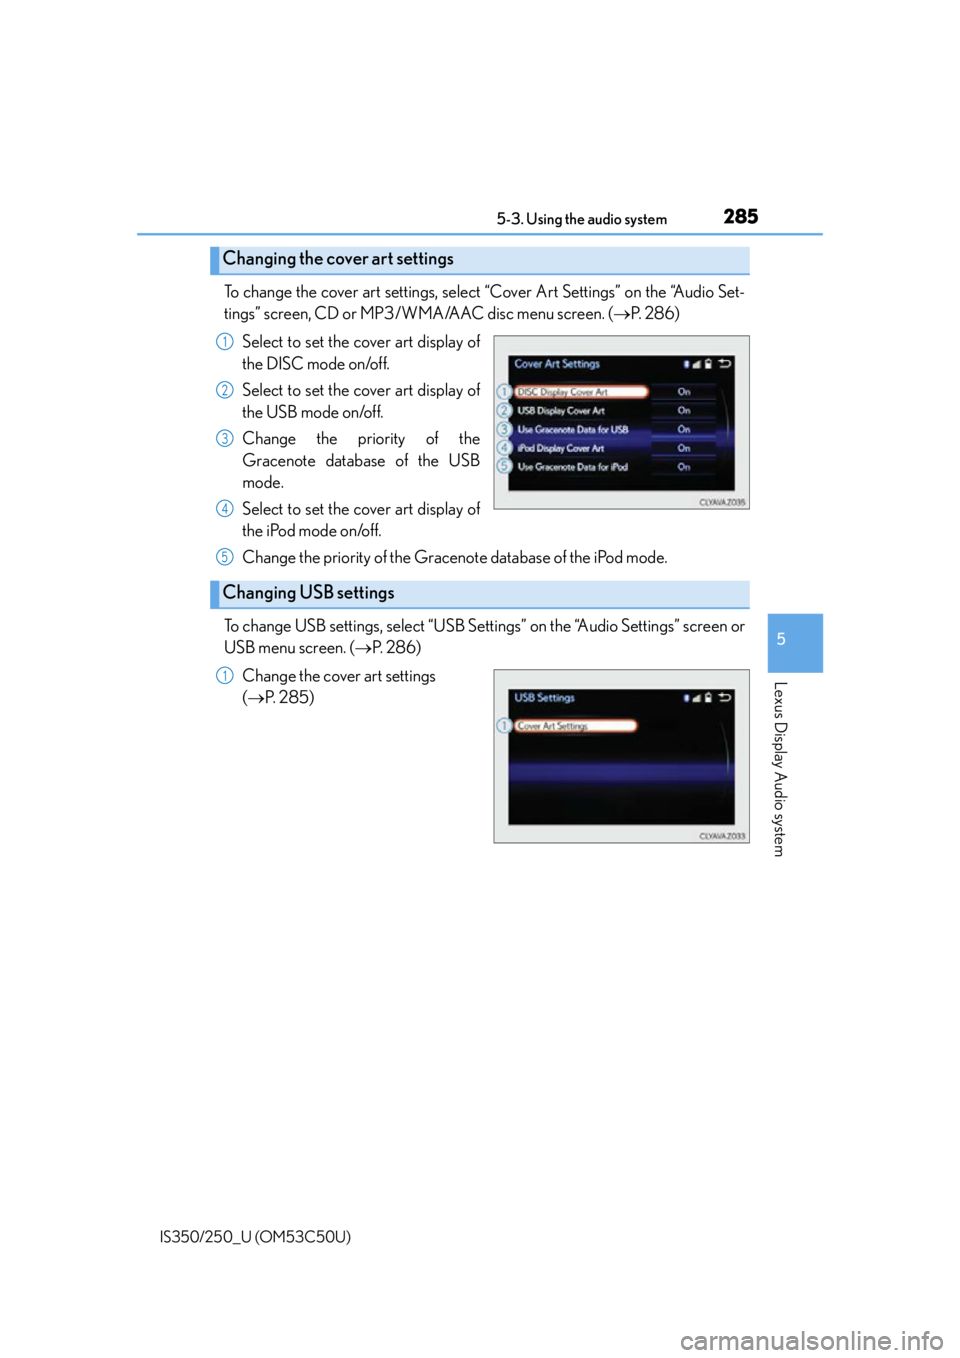
To change the cover art settings, select “Cover Art Settings” on the “Audio Set-
tings” screen, CD or MP3/WMA/AAC disc menu screen. (P. 2 8 6 )
Select to set the cover art display of
the DISC mode on/off.
Select to set the cover art display of
the USB mode on/off.
Change the priority of the
Gracenote database of the USB
mode.
Select to set the cover art display of
the iPod mode on/off.
Change the priority of the Gracenote database of the iPod mode.
To change USB settings, select “USB Settings” on the “Audio Settings” screen or
USB menu screen. ( P. 2 8 6 )
Change the cover art settings
( P. 2 8 5 )
Changing the cover art settings
1
2
3
4
Changing USB settings
5
1
Page 286 of 584
2865-3. Using the audio system
IS350/250_U (OM53C50U)
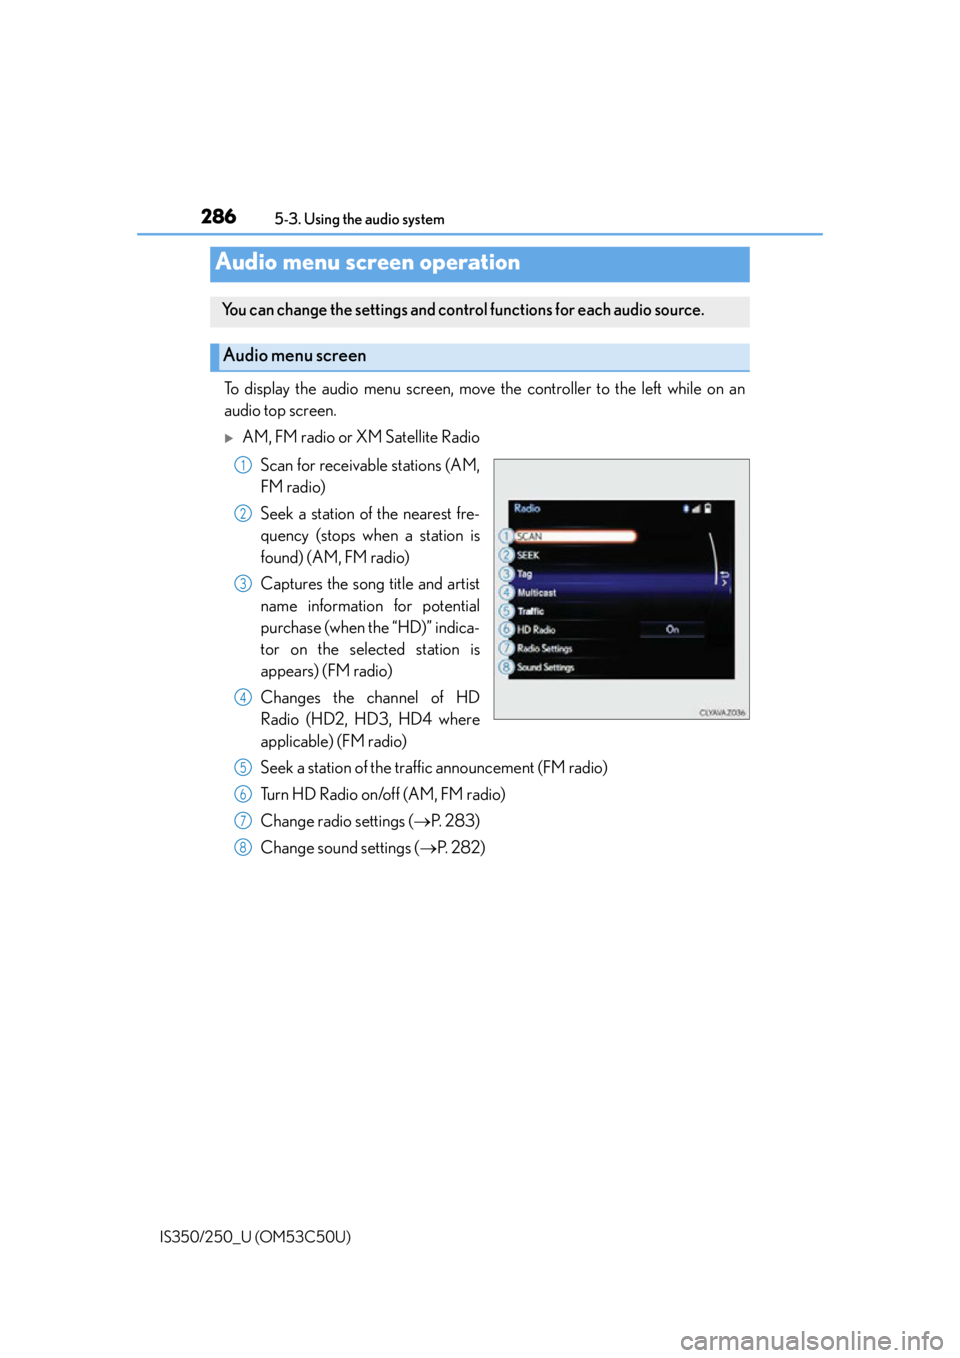
To display the audio menu screen, move the controller to the left while on an
audio top screen.
AM, FM radio or XM Satellite Radio Scan for receivable stations (AM,
FM radio)
Seek a station of the nearest fre-
quency (stops when a station is
found) (AM, FM radio)
Captures the song title and artist
name information for potential
purchase (when the “HD)” indica-
tor on the selected station is
appears) (FM radio)
Changes the channel of HD
Radio (HD2, HD3, HD4 where
applicable) (FM radio)
Seek a station of the traffic announcement (FM radio)
Turn HD Radio on/off (AM, FM radio)
Change radio settings ( P. 2 8 3 )
Change sound settings ( P. 2 8 2 )
Audio menu screen operation
You can change the settings and contro l functions for each audio source.
Audio menu screen
1
2
3
4
5
6
7
8
Page 287 of 584
2875-3. Using the audio system
5
Lexus Display Audio system
IS350/250_U (OM53C50U)
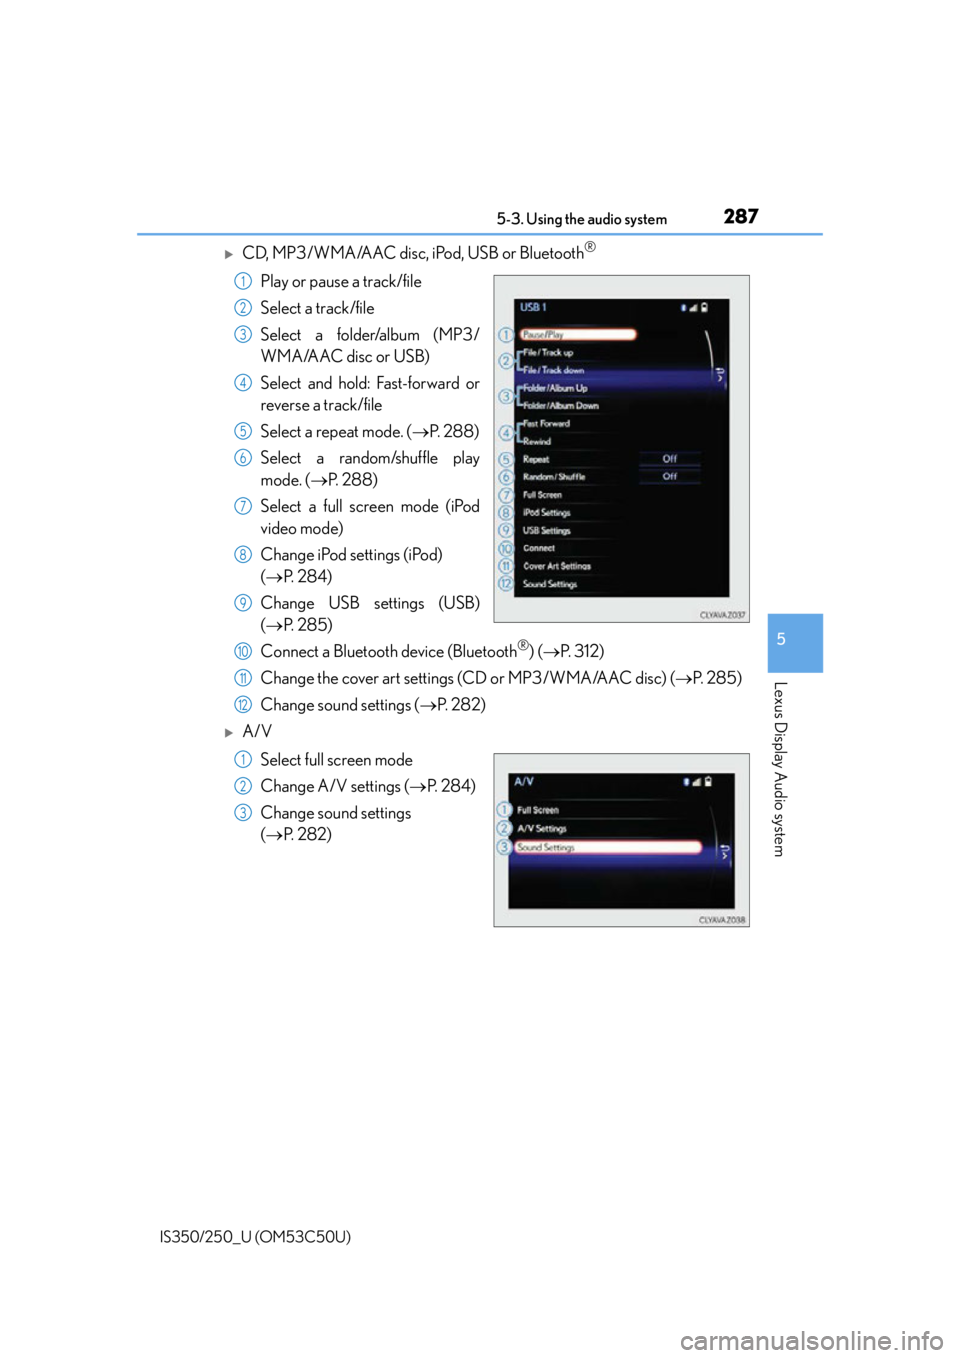
CD, MP3/WMA/AAC disc, iPod, USB or Bluetooth®
Play or pause a track/file
Select a track/file
Select a folder/album (MP3/
WMA/AAC disc or USB)
Select and hold: Fast-forward or
reverse a track/file
Select a repeat mode. (P. 2 8 8 )
Select a random/shuffle play
mode. ( P. 2 8 8 )
Select a full screen mode (iPod
video mode)
Change iPod settings (iPod)
( P. 2 8 4 )
Change USB settings (USB)
( P. 2 8 5 )
Connect a Bluetooth device (Bluetooth
®) ( P. 3 1 2 )
Change the cover art settings (CD or MP3/WMA/AAC disc) ( P. 2 8 5 )
Change sound settings ( P. 2 8 2 )
A/V
Select full screen mode
Change A/V settings ( P. 2 8 4 )
Change sound settings
( P. 2 8 2 )
1
2
3
4
5
6
7
8
9
10
11
12
1
2
3
Page 288 of 584
2885-3. Using the audio system
IS350/250_U (OM53C50U)
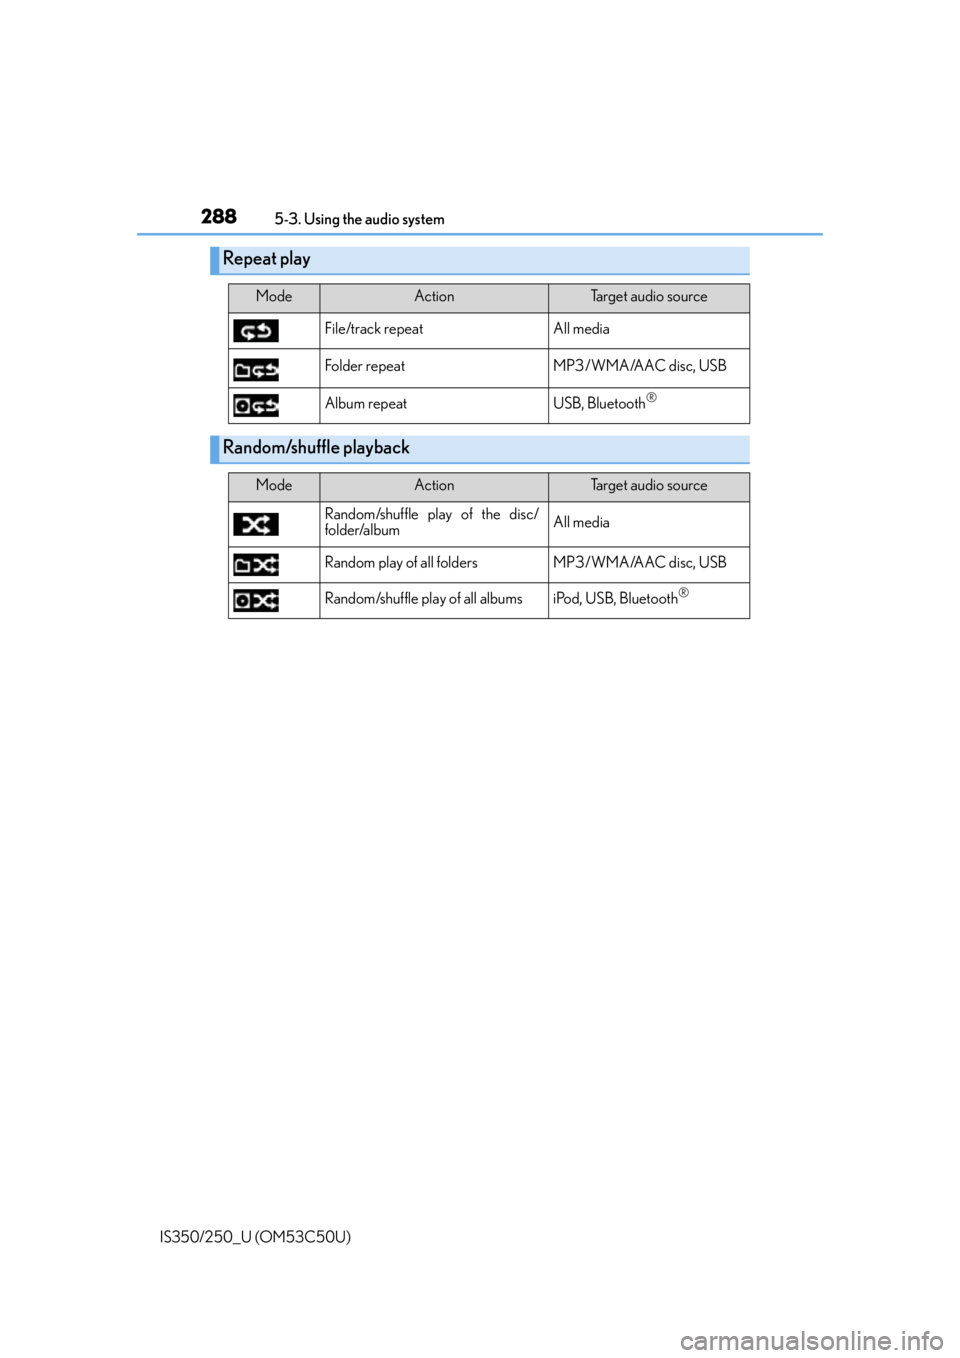
Repeat play
ModeActionTarget audio source
File/track repeat All media
Folder repeat MP3/WMA/AAC disc, USB
Album repeat USB, Bluetooth
®
Random/shuffle playback
ModeActionTarget audio source
Random/shuffle play of the disc/
folder/album All media
Random play of all folders MP3/WMA/AAC disc, USB
Random/shuffle play of all albums iPod, USB, Bluetooth
®
Page 289 of 584
289
5
Lexus Display Audio system
IS350/250_U (OM53C50U)5-4. Using the radio
Pressing the “RADIO” button displays the radio top screen from any screen of
the selected source.
■Menu screen
P. 2 8 6
Tune in to the desired station us ing one of the following methods.
■Seek tuning
Press and hold then release “” or “ ”.
The radio will begin seeking up or down for a station of the nearest frequency
and will stop when a station is found.
■Manual tuning
Turn the “TUNE/SCROLL” knob.
■Preset stations
Select the desired preset station by pressing “ ” or “ ” or controller.
■Station list
Move the controller to the right and selecting “Station List”.
AM radio: Selecting a desired station.
FM radio: Selecting a desired type of station and selecting a desired sta-
tion.
To refreshing the station list, select “R efresh”. Select “Source” on the refresh
screen, can be change to the other audio source while refreshing.
Radio operation
Select “AM”, “FM” or “SAT” on the audio source selection screen to begin lis-
tening to the radio.
Radio top screen
Selecting a station (AM or FM radio)
1
2
Page 290 of 584
2905-4. Using the radio
IS350/250_U (OM53C50U)
When “HD Radio” is set to “On”, available stations with HD Radio channels are
marked with “HD)”. In AM or FM mode, select a station marked with “HD)”.
Turn the “TUNE/SCROLL” knob to select an HD Radio channel.
HD Radio channels can also be selected by selecting “Multicast” on the menu screen.
( P. 2 8 6 )
Select in to the desired channel using one of the following methods.
■Tu r n i n g u p /d o w n t h e c h a n n e l
Press and hold “” or “ ” or turn the “TUNE/SCROLL” knob.
■Preset channels
Select the desired preset channel by pressing “ ” or “ ” or controller.
■Channel list
Move the controller to the right and selecting “Select a SAT Category”.
Selecting a desired category of chan nel and selecting a desired channel.
Search for desired stations or channel.
Select and hold one of the preset until you hear a beep.
■Display the song information
Move the controller to the right and selecting “Text”.
■Display the Additional information (AM, FM radio)
Move the controller to the right and selecting “Additional Information”.
Selecting an HD Radio channel
Selecting a channel (XM Satellite Radio)
Setting presets
Display the text message
1
2
1
2
1
2