Lexus IS250C 2010 Do-It-Yourself Maintenance / LEXUS 2010 IS350C/IS250C QUICK GUIDE (OM53836U) Service Manual
Manufacturer: LEXUS, Model Year: 2010,
Model line: IS250C,
Model: Lexus IS250C 2010
Pages: 90, PDF Size: 2.86 MB
Lexus IS250C 2010 Do-It-Yourself Maintenance / LEXUS 2010 IS350C/IS250C QUICK GUIDE (OM53836U) Service Manual
IS250C 2010
Lexus
Lexus
https://www.carmanualsonline.info/img/36/29962/w960_29962-0.png
Lexus IS250C 2010 Do-It-Yourself Maintenance / LEXUS 2010 IS350C/IS250C QUICK GUIDE (OM53836U) Service Manual
Trending: trunk release, warning light, high beam, ABS, warning lights, brake light, key battery
Page 41 of 90
41
■Registering a speed dial
Push the button on the side of the touch
screen. ( P. 2 9 )
To u c h .
To u c h .
To u c h .
To u c h .
Touch the data you want to register.
Touch the desired phone number.
Touch the button you want to register in.
The registration completion message is dis-
played on the screen.
STEP6
STEP2
STEP3
Page 42 of 90
42
■Calling by name
You can call by saying a voice tag registered in the phonebook. For setting the voice recog-
nition, refer to the “Navigation System Owner' s Manual”. Only when English is selected as
the system language can you call by saying a name registered in the phonebook without
registering any voice tags beforehand. (Names in the phonebook work as voice tags.)
Press .
Follow the voice guidance and say “Phone”.
Follow the voice guidance and say “Dial by
name”.
Follow the voice guidance and say a contact
name.
Follow the voice guidance and say the type of
phone number (home, mobile, work, other).
Follow the voice guidance and say “Dial”.
STEP1
STEP2
STEP4
: Pressing this switch turns the speech command system on. Say a command after
the beep.
Page 43 of 90
43
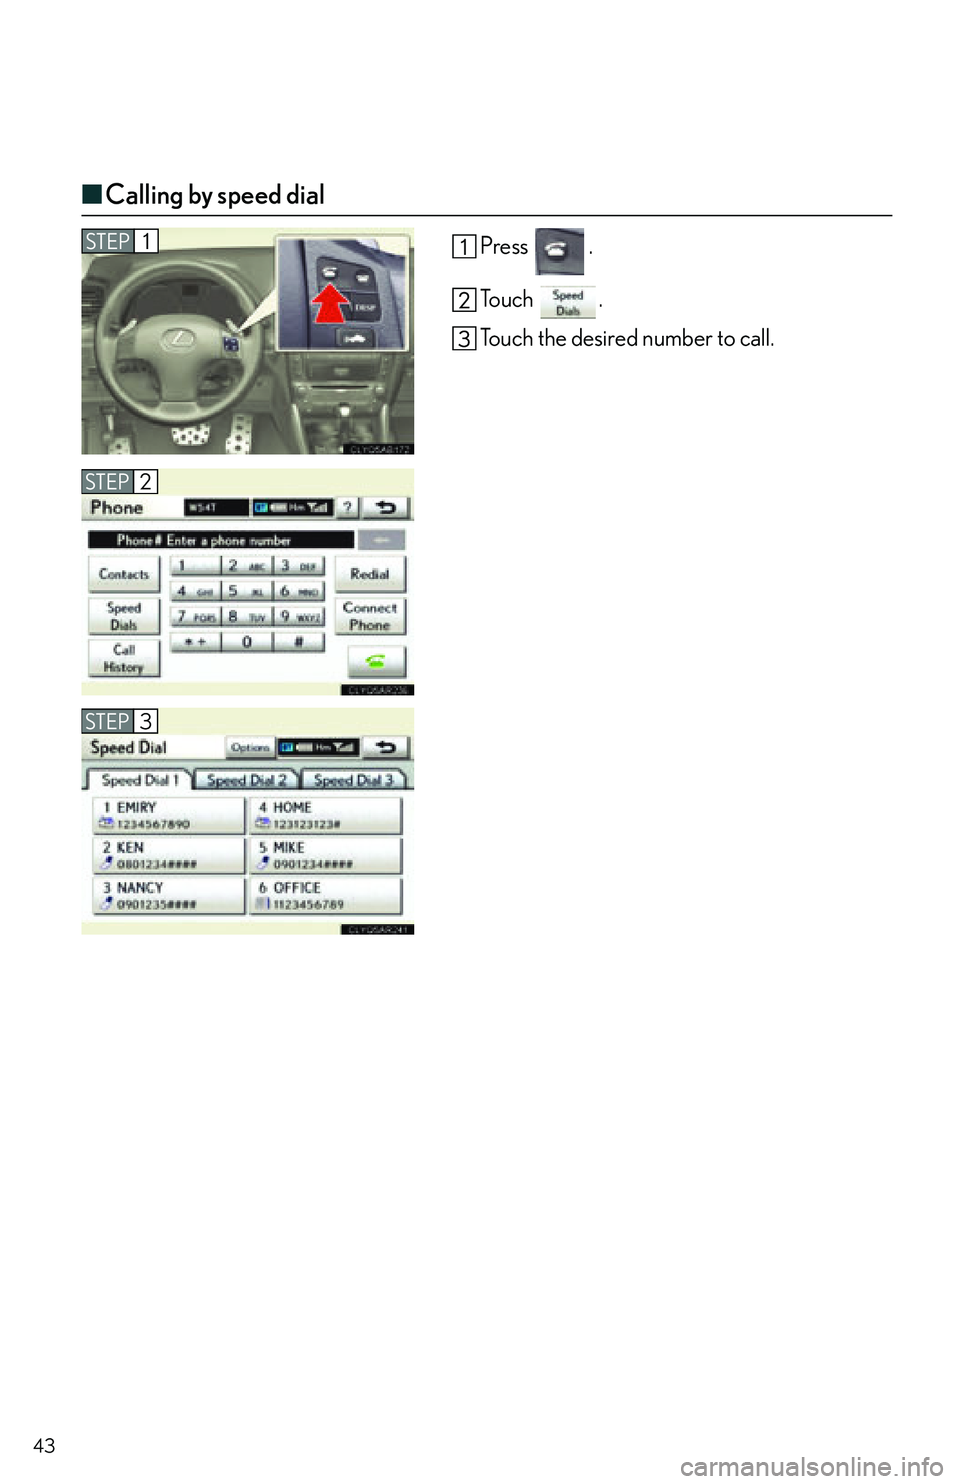
■Calling by speed dial
Press .
To u c h .
Touch the desired number to call.
STEP2
STEP1
STEP3
Page 44 of 90
44
■Receiving a call
When a call is received, this screen is dis-
played with a sound.
Push on the steering wheel to talk on
the phone.
To ignore the call, push on the steering
wheel.STEP1
STEP2
Page 45 of 90
45
■XM® NavWeather
The XM® NavWeather service that allows the navigation system to display weather infor-
mation on the map is available if your satellite radio tu ner can receive weather information.
For details, refer to the “Navig ation System Owner's Manual”.
To receive the XM
® NavWeather service, a subscription to the XM® Satellite Radio with
NavWeather is necessary.
The XM
® NavWeather is available in the contiguo us 48 U.S. states. For details about the
XM
® NavWeather service coverage area, refer to www.xmradio.com.
● How to activate the XM® NavWeather service
To receive the XM
® NavWeather service, it is necessary to activate the service. To activate
the service, an extra fee is required in addition to subscription fees for the XM
® Satellite
Radio. For details about service and activation, call XM
® Listener Care Center at 1-877-
515-3987.
Customers should have their radio ID ready; th e radio ID can be found by selecting “channel
000” on the radio.
XM
® Satellite Radio has the responsibility for a ll fees and service, they are subject to
change.
The following operatio ns can be performed.
● Show XM
® NavWeather information
● Weather information
● Weather warnings
Page 46 of 90
46
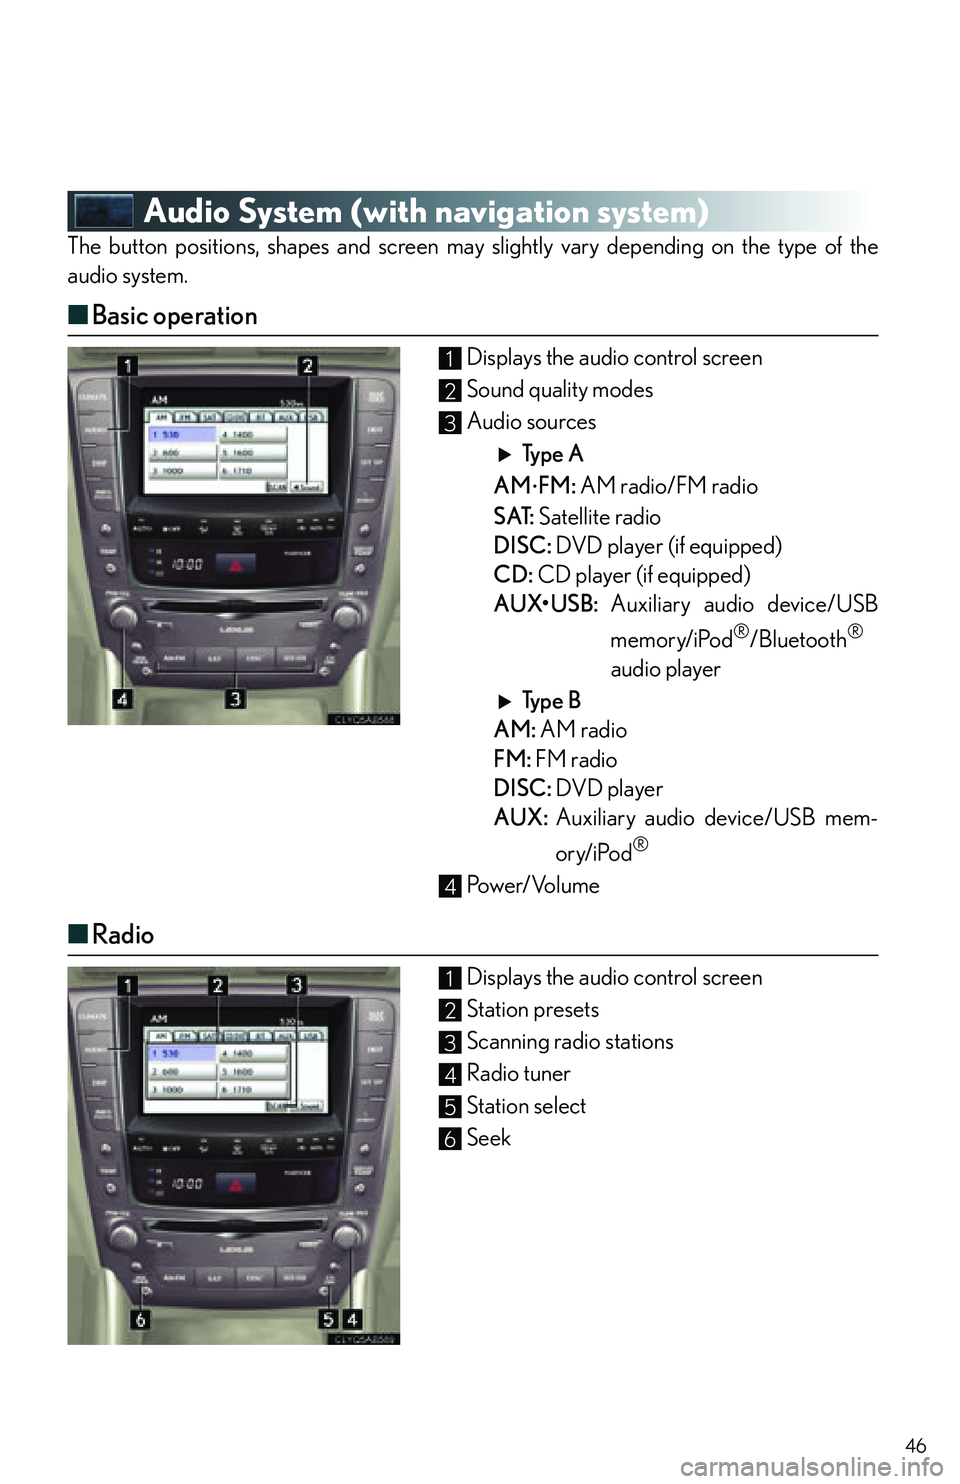
Audio System (with navigation system)
The button positions, shapes and screen may slightly vary depending on the type of the
audio system.
■ Basic operation
Displays the audio control screen
Sound quality modes
Audio sources
Type A
AM
FM: AM radio/FM radio
S AT: Satellite radio
DISC: DVD player (if equipped)
CD: CD player (if equipped)
AUX•USB: Auxiliary audio device/USB
memory/iPod
®/Bluetooth®
audio player
Type B
AM: AM radio
FM: FM radio
DISC: DVD player
AUX: Auxiliary audio device/USB mem-
ory/iPod
®
Power/Volume
■Radio
Displays the audio control screen
Station presets
Scanning radio stations
Radio tuner
Station select
Seek
1
2
3
4
1
2
3
4
5
6
Page 47 of 90
47
■Entering station presets
Touch the desired station by using the tune, seek or scan function.
Press and hold one of the preset buttons (1-6 ) until you hear a beep, indicating that the
station is set.
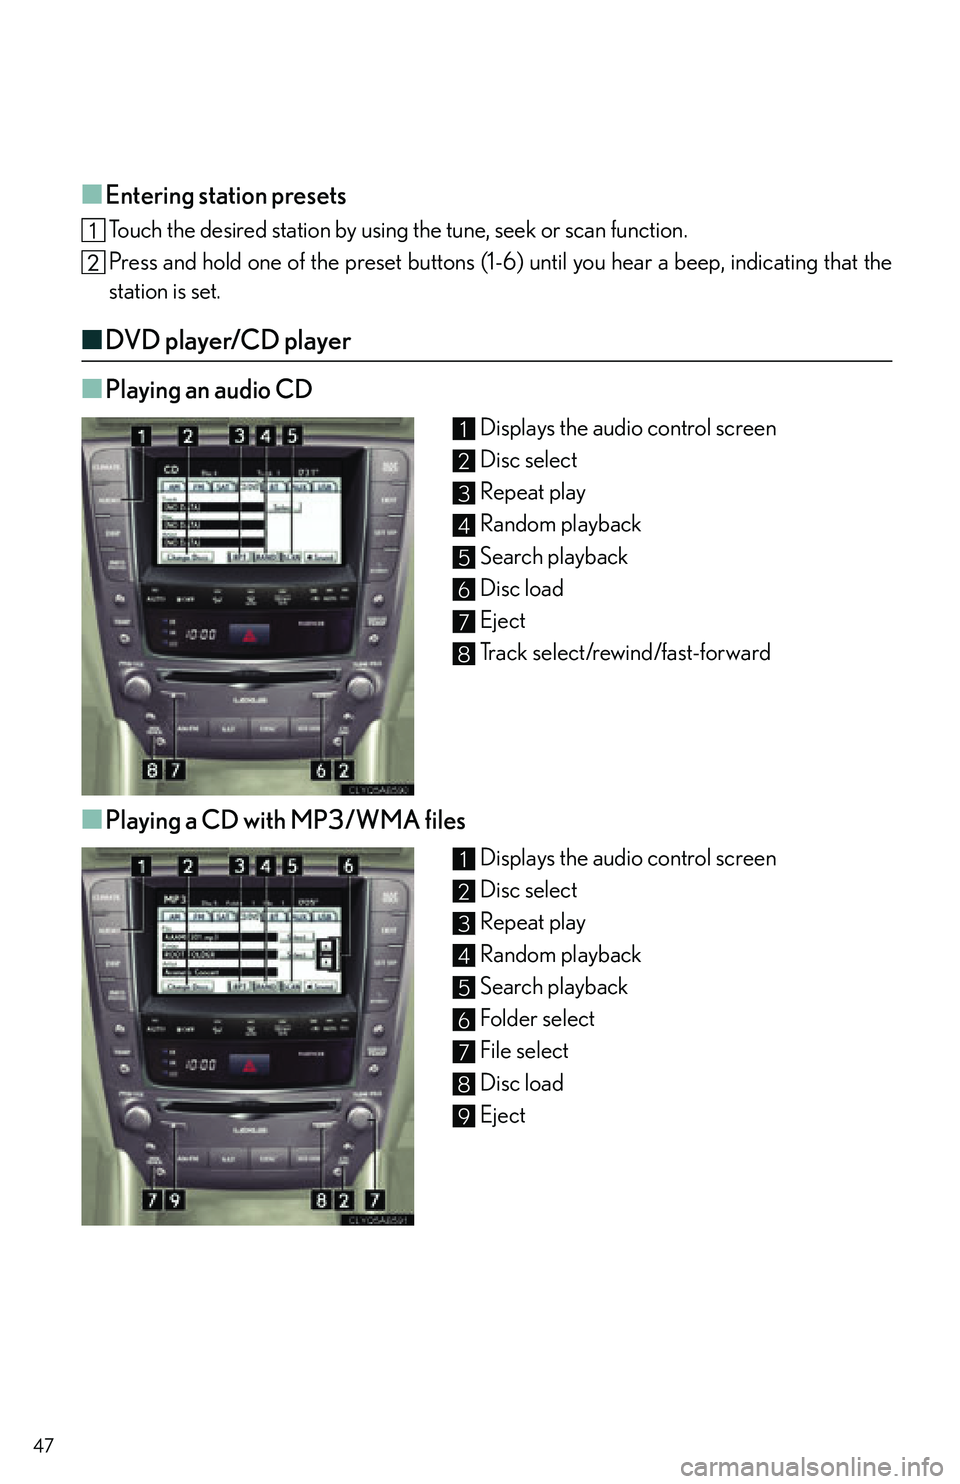
■ DVD player/CD player
■
Playing an audio CD
Displays the audio control screen
Disc select
Repeat play
Random playback
Search playback
Disc load
Eject
Track select/rewind/fast-forward
■Playing a CD with MP3/WMA files
Displays the audio control screen
Disc select
Repeat play
Random playback
Search playback
Folder select
File select
Disc load
Eject
1
2
3
4
5
6
7
8
1
2
3
4
5
6
7
8
9
Page 48 of 90
48
■Playing a DVD (DVD player only)
Displays the audio control screen
Disc select
DVD operation
Image display (full screen)
Disc load
Eject
Chapter select/rewind/fast-forward
■Loading a disc
Press the “LOAD” button.
When the indicator changes from flashing amber to green, insert a disc after the disc slot
door opens.
■Loading multiple discs
Press and hold the “LOAD” button until you hear a beep.
When the indicator changes from flashing amber to green, insert a disc after the disc slot
door opens.
After inserting a disc, wait until the indicator changes from flashing amber to green, then
insert the next disc after th e disc slot door has opened.
Repeat and until you have inserted all discs.
To cancel the operation, press the “LOAD” button. If you do not insert a disc within 15 sec-
onds, loading will be canceled automatically.
1
2
3
4
5
6
7
Page 49 of 90
49
■Operating an iPod®
Displays the audio control screen
Menu
Pause/Playback
Repeat play
Random playback
Song list
Song select
Song select/rewind/fast-forward
■Remote control (steering wheel switches)
The audio system can be operated using the remote control located on the steering wheel.
Volume
Radio mode: radio tuner
DVD mode: track/chapter/disc select
CD mode: disc/track/file (MP3/WMA) select
iPod
® mode: song select
Power on/change mode: press
Power off: press and hold
1
2
3
4
5
6
7
8
1
2
3
Page 50 of 90
50
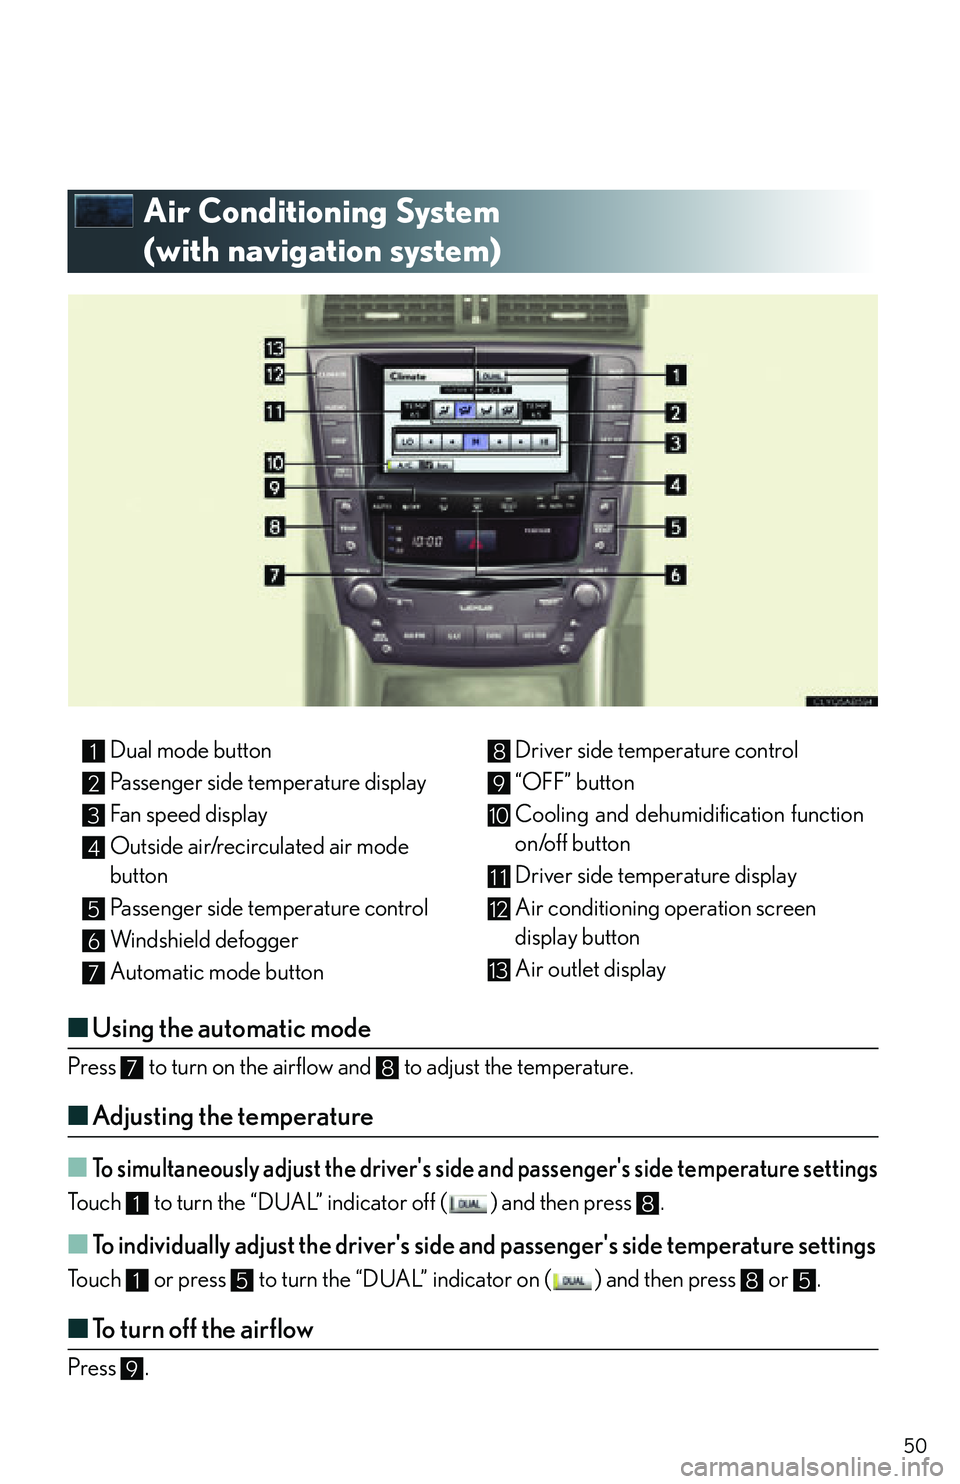
Air Conditioning System
(with navigation system)
■Using the automatic mode
Press to turn on the airflow and to adjust the temperature.
■Adjusting the temperature
■To simultaneously adjust the driver's side and passenger's side temperature settings
Touch to turn the “DUAL” indicator off ( ) and then press .
■To individually adjust the driver's side and passenger's side temperature settings
Touch or press to turn the “DUAL” indicator on ( ) and then press or .
■To turn off the airflow
Press .
Dual mode button
Passenger side temperature display
Fan speed display
Outside air/recirculated air mode
button
Passenger side temperature control
Windshield defogger
Automatic mode button Driver side temperature control
“OFF” button
Cooling and dehumidification function
on/off button
Driver side temperature display
Air conditioning operation screen
display button
Air outlet display1
2
3
4
5
6
7
8
9
10
11
12
13
78
18
1585
9
Trending: brake, door lock, lights, light, washer fluid, trunk release, instrument cluster


