ECU Lexus IS250C 2012 Instrument cluster / LEXUS 2012 IS250C,IS350C (OM53A62U) Service Manual
[x] Cancel search | Manufacturer: LEXUS, Model Year: 2012, Model line: IS250C, Model: Lexus IS250C 2012Pages: 632, PDF Size: 6.77 MB
Page 381 of 632

381
3-7. Other interior features
3
Interior features
Trunk features
■Cargo hooks
Cargo hooks are provided for
securing loose items.
■ Shopping bag hooks
Page 384 of 632

384
3-7. Other interior features
Garage door opener
The garage door opener (HomeLink Universal Transceiver) is manufactured
under license from HomeLink.
Programming the HomeLink (for U.S.A. owners)
The HomeLink
compatible transceiver in your vehicle has 3 buttons
which can be programmed to operate 3 different devices. Refer to the
programming method below appropriate for the device.
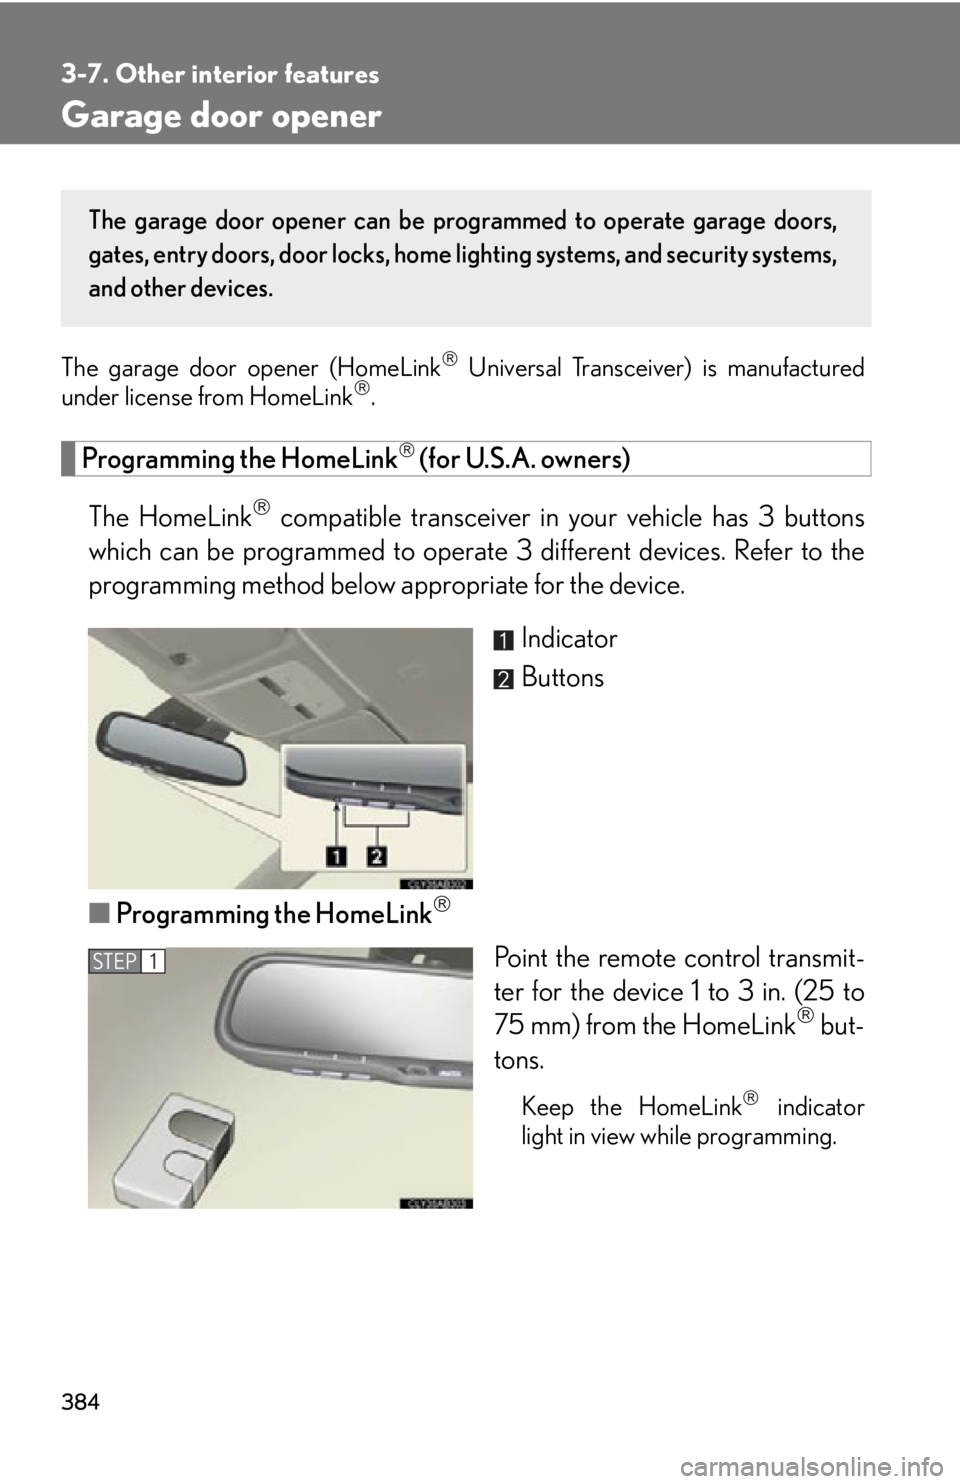
Indicator
Buttons
■ Programming the HomeLink
Point the remote control transmit-
ter for the device 1 to 3 in. (25 to
75 mm) from the HomeLink
but-
tons.
Keep the HomeLinkindicator
light in view while programming.
The garage door opener can be pr ogrammed to operate garage doors,
gates, entry doors, door locks, home lighting systems, and security systems,
and other devices.
STEP1
Page 387 of 632

387
3-7. Other interior features
3
Interior features
Test the operation of the HomeLink by pressing the newly pro-
grammed button. Check to see if the gate/device operates cor-
rectly.
Repeat the steps above to program another device for each of
the remaining HomeLink
buttons.
■ Programming other devices
To program other devices such as home security systems, home door
locks or lighting, contact your auth orized Lexus dealer for assistance.
■ Reprogramming a button
The individual HomeLink
buttons cannot be erased but can be
reprogrammed. To reprogram a button, follow the “Reprogramming a
HomeLink
button” instructions.
Operating the HomeLink
Press the appropriate HomeLink button. The HomeLink indicator
light should come on.
The HomeLink compatible transceiver in your vehicle continues to send a
signal for up to 20 seconds as long as the button is pressed.
Reprogramming a HomeLink button
Press and hold the desired HomeLink
button. After 20 seconds, the
HomeLink indicator light will st art flashing slowly. Next, while still press-
ing and holding the HomeLink button, press and hold the button on the
transmitter until the HomeLink indicator light chan ges from a slow to a
rapid flash.
STEP5
STEP6
Page 393 of 632

393
3-7. Other interior features
3
Interior features
CAUTION
■While driving the vehicle
Do not adjust the display. Be sure to adjust the display only when the vehicle is
stopped.
■When doing the circling calibration
Be sure to secure a wide space, and watch out for people and vehicles in the neigh-
borhood. Do not violate any local traffic rules while performing circling calibration.
NOTICE
■To avoid the compass malfunctions
Do not place magnets or any metal objects near the inside rear view mirror.
Doing this may cause a malfunction of the compass sensor.
■To ensure normal operation of the compass
●Do not perform circling calibration of the compass in a place where the earth's
magnetic field is subject to interference by artificial magnetic fields.
●During calibration, do not operate electric systems (retractable hardtop, power
windows, etc.) as they may interfere with the calibration.
Page 394 of 632

394
3-7. Other interior features
Safety Connect
Safety Connect is a subscription-based telematics service that uses Global
Positioning System (GPS) data and emb edded cellular technology to pro-
vide safety and security features to subscribers. Safety Connect is sup-
ported by Lexus’ designated response center, which operates 24 hours per
day, 7 days per week.
Safety Connect service is available by subscription on select, telematics
hardware-equipped vehicles.
By using the Safety Connect service, you are agreeing to be bound by the
Telematics Subscription Service Agreement and its Terms and Conditions,
as in effect and amended from time to time, a current copy of which is avail-
able at Lexus.com. All use of the Safety Connect service is subject to such
then-applicable Terms and Conditions.
■ System components
Microphone
LED light indicators
“SOS” button
�
: If equipped
Page 413 of 632

413
4-2. Maintenance
4
Maintenance and care
Vehicle interior
ItemsCheck points
Accelerator pedal• Moves smoothly (without uneven pedal effort or catching)?
Automatic transmission “Park”
mechanism• Can the vehicle be held securely on an incline with the shift lever in
P?
Brake pedal
• Moves smoothly?
• Does it have appropriate clearance and correct amount of free play?
Brakes
• Not pull to one side when applied?
• Loss of brake effectiveness?
• Spongy feeling brake pedal?
• Pedal almost touches floor?
Clutch pedal• Moves smoothly?
Head restraints• Move smoothly and lock securely?
Indicators/buzzers• Function properly?
Lights
• Do all the lights come on?
• Headlights aimed correctly? ( P. 4 7 3 )
Pa r k i n g b r a ke
• Moves smoothly?
• Can hold the vehicle securely on
an incline?
Seat belts
• Does the seat belt system operate smoothly?
• Are the belts undamaged?
Seats• Do the seat controls operate prop- erly?
Page 425 of 632

425
4-3. Do-it-yourself maintenance
4
Maintenance and care
■Installing the clips
Press the tip of the clip against a
hard surface, such as a desk, to
allow the center part of the clip
to be pushed up.
Insert
Press
NOTICE
■After installing an engine compartment cover
Make sure that the cover is securely installed in its original position.
Page 434 of 632

434
4-3. Do-it-yourself maintenance
■Adding distilled water
Remove the vent plug.
Add distilled water.
If the “UPPER LEVEL” line cannot be seen, check the fluid level by
looking directly at the cell.
Put the vent plug back on and close securely.
Low O.K.
■Before recharging
When recharging, the battery produces hydrogen gas which is flammable and
explosive. Therefore, before recharging:
●If recharging with the battery installed on the vehicle, be sure to disconnect the
ground cable.
●Make sure the power switch on the charger is off when connecting and discon-
necting the charger cables to the battery.
■After recharging/reconnecting the battery
In some cases, the engine may not start. Follow the procedure below to initialize the
system.
Shift the shift lever to P (automatic transmission) or depress the brake
pedal with the shift lever in N (manual transmission), and turn the
“ENGINE START STOP” switch OFF.
Open and close any of the doors.
Start the engine. (If the engine does not start first time, repeat the proce-
dure.)
If the engine will not start even after mult iple attempts at the above method, contact
your Lexus dealer.
STEP1
STEP2
STEP3
STEP1
STEP2
STEP3
Page 463 of 632

463
4-3. Do-it-yourself maintenance
4
Maintenance and care
9E/G-B60 AFR CTRL-B, ETCS, ALT-S, A/F, TEL,
STR LOCK
10ABS150 AVDIM
11RH J/B-B30 AFR DOOR RH, AM2
12MAIN30 AH-LP R LWR, H-LP L LWR
13STARTER30 ASmart access system with push-button
start
14LH J/B-B30 AFR DOOR LH, SECURITY
15P/I-B60 AINJ, F/PMP, EFI
16EPS80 APower steering
17ALT150 A
LH J/B-AM, E/G-AM, GLW PLG2,
HEATER, FAN1, FAN2, ABS2, RH
J/B-AM, GLW PLG1, RR R/B-AM
18RR R/B-AM80 A
DEFOG, PSB, ROOF RH, ROOF
LH, LGG RH, LGG LH, LGG LCK
RH, LGG LCK LH, P-TRAY MAIN,
P-T R AY S I D E
19GLW PLG150 APTC heater
20RH J/B-AM80 A
OBD, STOP SW, TI&TE, FR P/SEAT
RH, RAD NO.3, ECU-IG RH,
RH-IG, FR S/HTR RH, ACC, CIG,
PWR OUTLET, DOOR DL
21ABS230 AVDIM
22FA N 240 AElectric cooling fans
23FA N 140 AElectric cooling fans
24HEATER50 AAir conditioning system
25GLW PLG250 APTC heater
FuseAmpereCircuit
Page 464 of 632

464
4-3. Do-it-yourself maintenance
26E/G-AM60 AH-LP CLN, FR CTRL-AM, DEICER,
A/C COMP
27LH J/B-AM80 A
FR P/SEAT LH, TV NO.1, A/C, FUEL
OPN, FR WIP, LH-IG, ECU-IG LH,
PANEL, TAIL, MIR HTR,
FR S/HTR LH, TV NO. 2, RR FOG
FuseAmpereCircuit