change Lexus IS300h 2015 Workshop Manual
[x] Cancel search | Manufacturer: LEXUS, Model Year: 2015, Model line: IS300h, Model: Lexus IS300h 2015Pages: 628, PDF Size: 137.89 MB
Page 315 of 628

3154-5. Using the driving support systems
4
Driving
IS300h_EE(OM53D56E)
The Blind Spot Monitor function uses radar sensors to detect vehicles that are
traveling in an adjacent lane in the area that is not reflected in the outside rear
view mirror (the blind spot), and advises the driver of the vehicles existence via
the outside rear view mirror indicator.
The areas that vehicles can be detected in are outlined below.
The range of the detection area
extends to:
Approximately 3.5 m (11.5 ft.) from
the side of the vehicle
The first 0.5 m (1.6 ft.) from the side of
the vehicle is not in the detection area
Approximately 3 m (9.8 ft.) from the
rear bumper
Approximately 1 m (3.3 ft.) forward
of the rear bumper
The Blind Spot Monitor function
The Blind Spot Monitor function detection areas
1
2
3
CAUTION
■Cautions regarding the use of the system
The driver is solely responsible for safe driving. Always drive safely, taking care to
observe your surroundings.
The Blind Spot Monitor function is a supplementary function which alerts the driver
that a vehicle is present in the blind spot. Do not overly rely on the Blind Spot Monitor
function. The function cannot judge if it is safe to change lanes, therefore over reliance
could cause an accident resulting in death or serious injury.
According to conditions, the system may not function correctly. Therefore the driver’s
own visual confirmation of safety is necessary.
Page 316 of 628
3164-5. Using the driving support systems
IS300h_EE(OM53D56E)
■The Blind Spot Monitor function is operational when
●The BSM main switch is set to on
●Vehicle speed is greater than approximately 16 km/h (10 mph).
■The Blind Spot Monitor function will detect a vehicle when
●A vehicle in an adjacent lane overtakes your vehicle.
●Another vehicle enters the detection area when it changes lanes.
■Conditions under which the Blind Spot Monitor function will not detect a vehicle
The Blind Spot Monitor function is not designed to detect the following types of vehicles
and/or objects:
●Small motorcycles, bicycles, pedestrians etc.*
●Vehicles traveling in the opposite direction
●Guardrails, walls, signs, parked vehi cles and similar stationary objects*
●Following vehicles that are in the same lane*
●Vehicles driving 2 lanes across from your vehicle*
*
: Depending on conditions, detection of a vehicle and/or object may occur.
■Conditions under which the Blind Spot Monitor function may not function correctly
●The Blind Spot Monitor function may not detect vehicles correctly in the following con-
ditions:
• During bad weather such as heavy rain, fog, snow etc.
• When ice or mud etc. is attached to the rear bumper
• When driving on a road surface that is wet due to rain, standing water etc.
• When there is a significant difference in speed between your vehicle and the vehicle that enters the detection area
• When a vehicle is in the detection area from a stop and remains in the detection area as your vehicle accelerates
• When driving up or down consecutive steep inclines, such as hills, a dip in the road
etc.
• When multiple vehicles approach with only a small gap between each vehicle
• When vehicle lanes are wide, and the vehicle in the next lane is too far away from
your vehicle
• When the vehicle that enters the detection area is traveling at about the same speed as your vehicle
• When there is a significant difference in height between your vehicle and the vehicle that enters the detection area
• Directly after the BSM main switch is set to on
• When your vehicle is towing a trailer
●Instances of the Blind Spot Monitor function unnecessarily detecting a vehicle and/ or
object may increase under the following conditions:
• When there is only a short distance between your vehicle and a guardrail, wall etc.
• When there is only a short distance between your vehicle and a following vehicle
• When vehicle lanes are narrow and a vehicle driving 2 lanes across from your vehi- cle enters the detection area
• When items such as a bicycle carrier are installed on the rear of the vehicle
Page 332 of 628
3325-1. Basic Operations
IS300h_EE(OM53D56E)
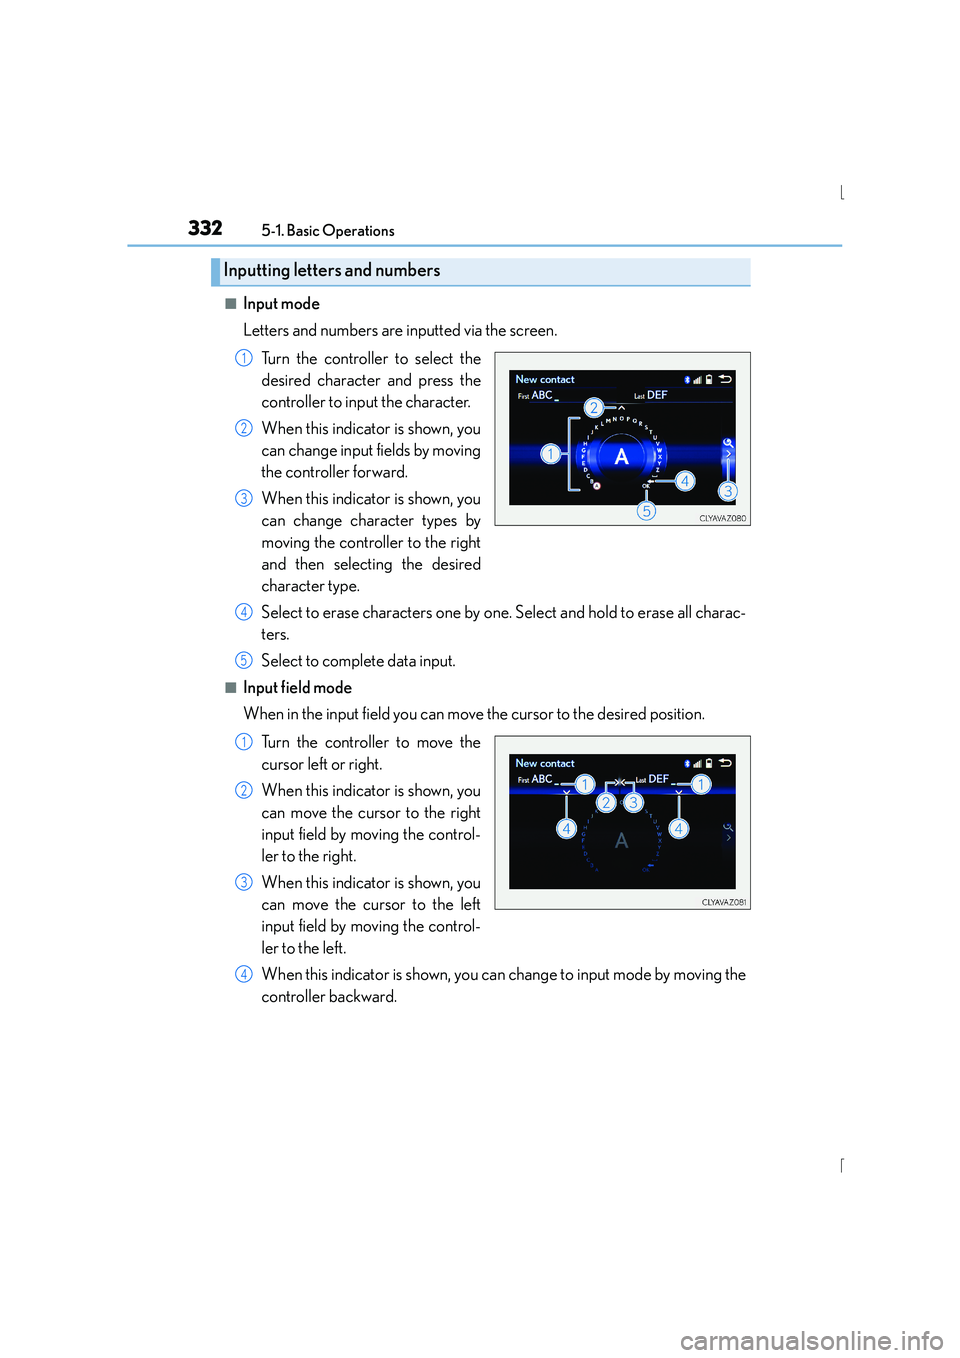
■Input mode
Letters and numbers are inputted via the screen.Turn the controller to select the
desired character and press the
controller to input the character.
When this indicator is shown, you
can change input fields by moving
the controller forward.
When this indicator is shown, you
can change character types by
moving the controller to the right
and then selecting the desired
character type.
Select to erase characters one by one. Select and hold to erase all charac-
ters.
Select to complete data input.
■Input field mode
When in the input field you can move the cursor to the desired position.
Turn the controller to move the
cursor left or right.
When this indicator is shown, you
can move the cursor to the right
input field by moving the control-
ler to the right.
When this indicator is shown, you
can move the cursor to the left
input field by moving the control-
ler to the left.
When this indicator is shown, you can change to input mode by moving the
controller backward.
Inputting letters and numbers
1
2
3
4
5
1
2
3
4
Page 333 of 628
3335-1. Basic Operations
5
Lexus Display Audio system
IS300h_EE(OM53D56E)
■When using the screen
●Under extremely cold conditions, the Lexus Display Audio controller may react slowly.
●If the screen is cold, the display may be dark, or the system may seem to be operating
slightly slower than normal.
●The screen may seem dark and hard to see when viewed through sunglasses. Change
your angle of viewing, adjust the display on the “Display” screen (→P. 342) or remove
your sunglasses.
■Using cellular phones
Interference may be heard through the audio system's speakers if a cellular phone is
being used inside or close to the vehicle while the audio system is operating.
CAUTION
■Using the Lexus Display Audio controller
Be careful when touching the Lexus Display Audio controller in extreme temperatures
as it may become very hot or cold due to the temperature inside the vehicle.
■Laser product
This product is a class 1 laser product.
Do not open the cover of the player or attempt to repair the unit yourself. Refer servic-
ing to qualified personnel.
NOTICE
■To prevent Lexus Display Audio controller malfunction
●Do not allow the Lexus Display Audio contro ller to come into contact with food, liq-
uid, stickers or lit cigarettes as doing so may cause it to change color, emit a strange
odor or stop functioning.
●Do not subject the Lexus Display Audio controller to excessive pressure or strong
impact as the controller may bend or break off.
■To prevent 12-volt battery discharge
Do not leave the audio system on longer than necessary when the hybrid system is off.
■To avoid damaging the audio system
Take care not to spill drinks or other fluids on the audio system.
Page 337 of 628
337
5
Lexus Display Audio system
IS300h_EE(OM53D56E)5-2. Setup
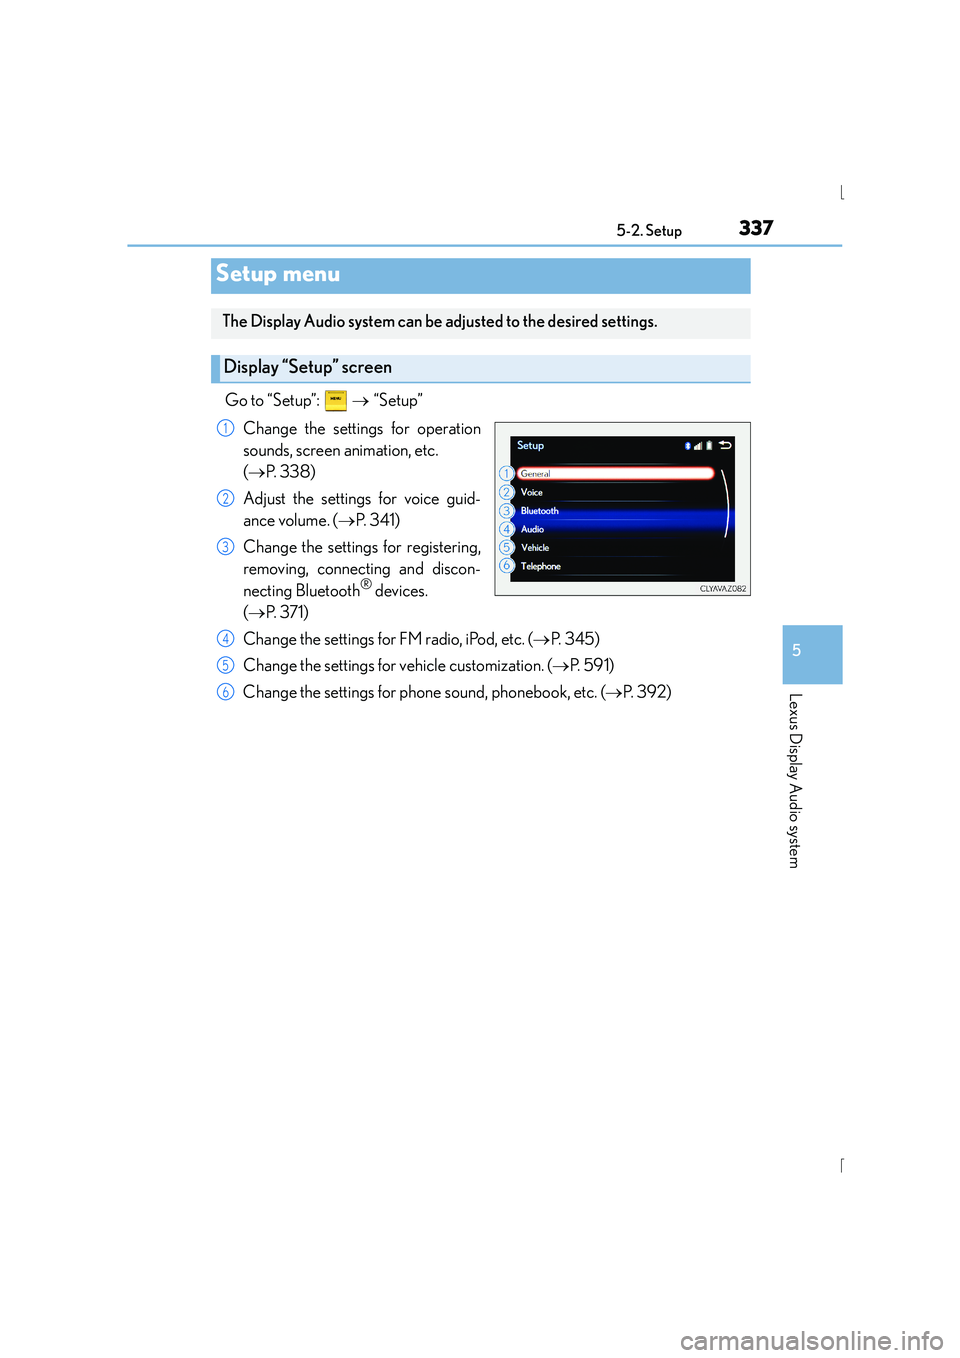
Go to “Setup”:
→ “Setup”
Change the settings for operation
sounds, screen animation, etc.
( → P. 3 3 8 )
Adjust the settings for voice guid-
ance volume. ( →P. 3 4 1 )
Change the settings for registering,
removing, connecting and discon-
necting Bluetooth
® devices.
( → P. 3 7 1 )
Change the settings for FM radio, iPod, etc. ( →P. 3 4 5 )
Change the settings for vehicle customization. ( →P. 5 9 1 )
Change the settings for phon e sound, phonebook, etc. (→P. 3 9 2 )
Setup menu
The Display Audio system can be adjusted to the desired settings.
Display “Setup” screen
1
2
3
4
5
6
Page 338 of 628
3385-2. Setup
IS300h_EE(OM53D56E)
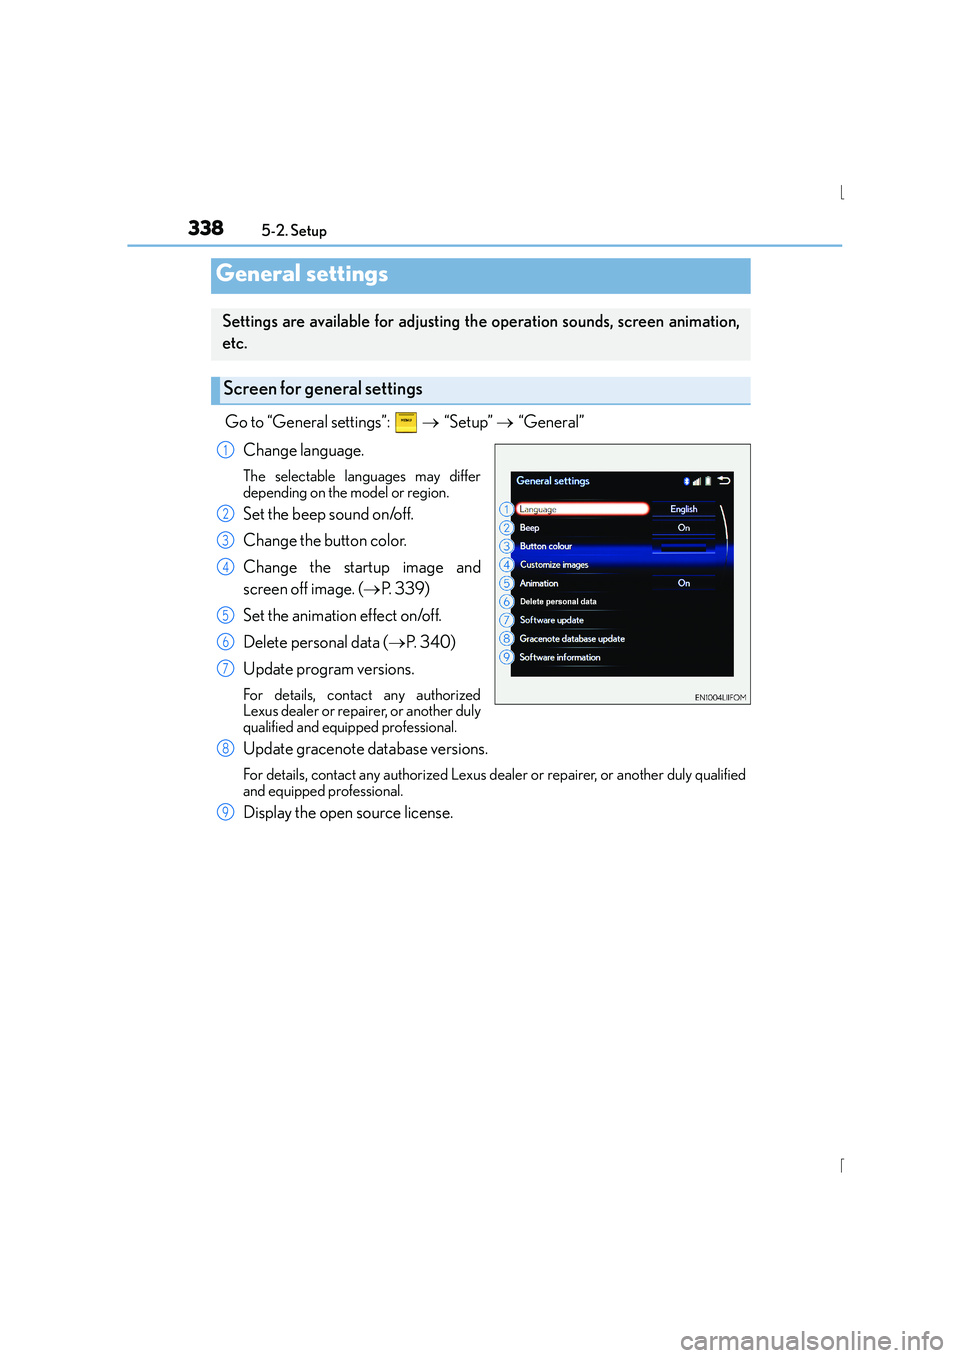
Go to “General settings”: → “Setup” → “General”
Change language.
The selectable languages may differ
depending on the model or region.
Set the beep sound on/off.
Change the button color.
Change the startup image and
screen off image. ( →P. 3 3 9 )
Set the animation effect on/off.
Delete personal data ( →P. 3 4 0 )
Update program versions.
For details, contact any authorized
Lexus dealer or repairer, or another duly
qualified and equipped professional.
Update gracenote database versions.
For details, contact any authorized Lexus dealer or repairer, or another duly qualified
and equipped professional.
Display the open source license.
General settings
Settings are available for adjusting th e operation sounds, screen animation,
etc.
Screen for general settings
1
2
3
4
5
6
7
8
9
Page 340 of 628
3405-2. Setup
IS300h_EE(OM53D56E)
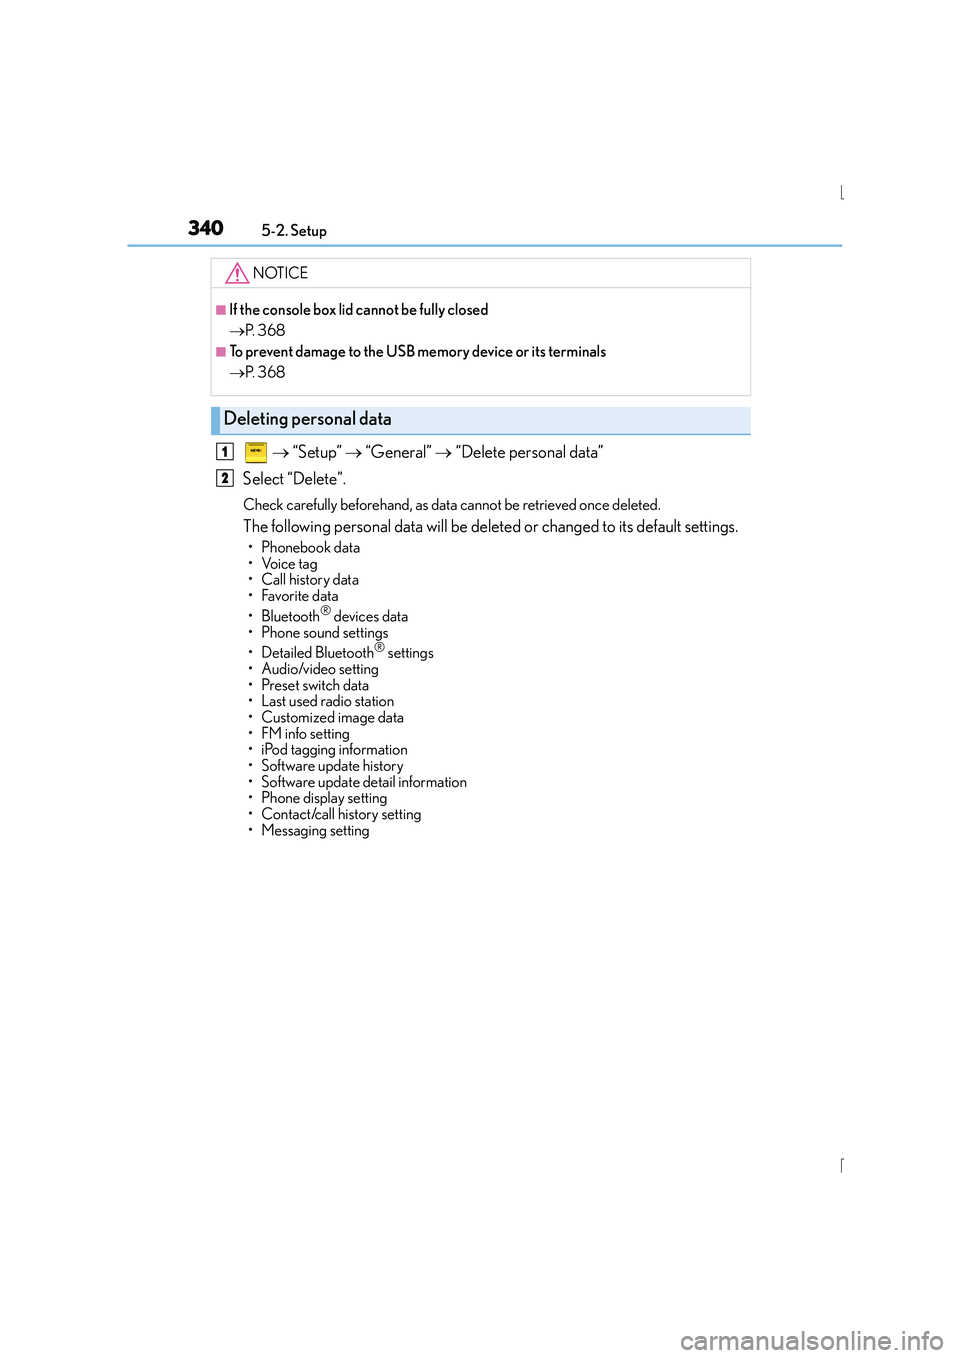
→ “Setup” → “General” → “Delete personal data”
Select “Delete”.
Check carefully beforehand, as data cannot be retrieved once deleted.
The following personal data will be deleted or changed to its default settings.
•Phonebook data
•Voice tag
• Call history data
•Favorite data
• Bluetooth
® devices data
• Phone sound settings
• Detailed Bluetooth
® settings
• Audio/video setting
• Preset switch data
• Last used radio station
• Customized image data
•FM info setting
• iPod tagging information
• Software update history
• Software update detail information
• Phone display setting
• Contact/call history setting
• Messaging setting
NOTICE
■If the console box lid cannot be fully closed
→ P. 3 6 8
■To prevent damage to the USB memory device or its terminals
→P. 3 6 8
Deleting personal data
1
2
Page 342 of 628

3425-2. Setup
IS300h_EE(OM53D56E)
Go to “Display”: → “Display”
Turn off screen.
Adjust screen quality.
Adjust screen quality of the rear
view monitor camera.
Change to day mode.
This setting turns the screen off. To turn it on, press any button such as or .
If a screen off image has been se t, the set image will be displayed.
When the headlights are turned on, the screen dims.
However, the screen can be switched to day mode by selecting “Day mode”.
The screen will stay in day mode when the headlights are turned on until “Day mode”
is selected again.
Select “General” or “Camera” on the “Display” screen or select “Display” on
each audio menu screen. ( →P. 3 4 9 )
Adjust the display as desired by turning the controller clockwise (+) or
counterclockwise (-).
To select “Contrast”, “Brightness”, “Colour” or “Tone”, move the controller to the left.
(when “Display” is selected, “Colour” and “Tone” are available.)
■Changing the sample image (when “General” is selected)
Move the controller to the right and select the desired sample image.
Display settings
Settings are available for adjusting the contrast and brightness of the screen.
The display can also be turned off.
Screen for display settings
1
2
3
4
Screen off
Day mode
Adjusting the screen contrast/brightness/color/tone
1
2
Page 343 of 628
343
5
Lexus Display Audio system
IS300h_EE(OM53D56E)5-3. Using the audio system
Press the button to display the “Source” screen.
If the “Source” screen is not displayed, press the button again.
Select the desired audio source.
The audio source can be selected by pressing the “RADIO” or “MEDIA” button.
Press the “MODE” switch when the audio system is turned on. The audio source
changes each time the “MODE” switch is pressed.
■Rearranging the list
The listing order of the source list can be rearranged.
Move the controller to the left while on the “Source” screen.
Select “Audio source select”.
Select an item you wish to move and th en select where to move the item to.
Selecting the audio source
Switching between audio sources such as radio and CD are explained in this
section.
Changing audio source
Using the steering wheel switches to change audio sources
1
2
1
2
3
Page 344 of 628
3445-3. Using the audio system
IS300h_EE(OM53D56E)
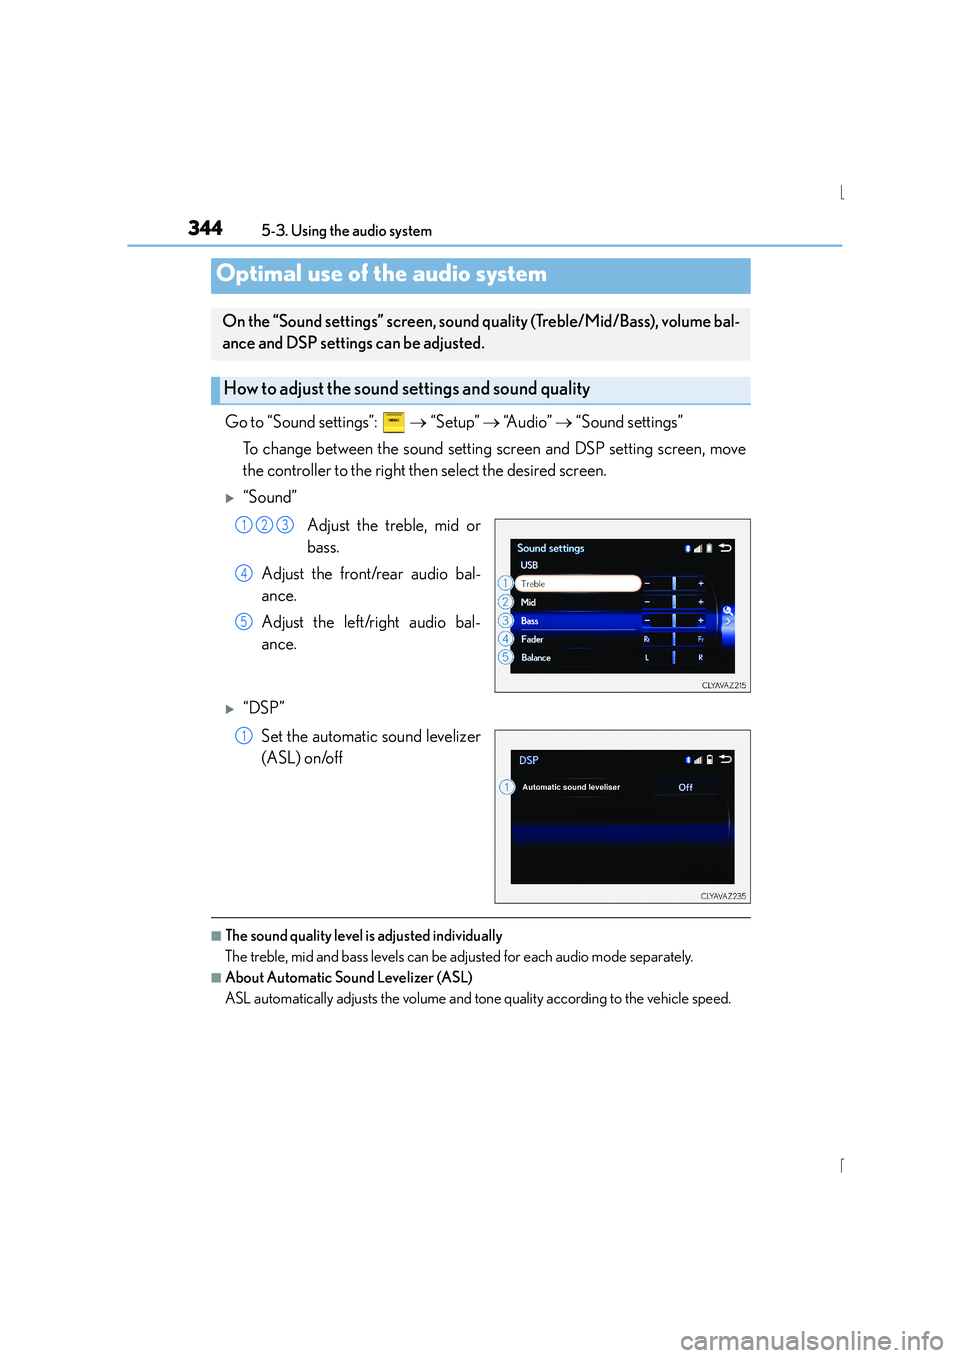
Go to “Sound settings”: → “Setup” → “A u d i o ” → “Sound settings”
To change between the sound setting screen and DSP setting screen, move
the controller to the right then select the desired screen.
X“Sound”
Adjust the treble, mid or
bass.
Adjust the front/rear audio bal-
ance.
Adjust the left/right audio bal-
ance.
X“DSP”
Set the automatic sound levelizer
(ASL) on/off
■The sound quality level is adjusted individually
The treble, mid and bass levels can be adjusted for each audio mode separately.
■About Automatic Sound Levelizer (ASL)
ASL automatically adjusts the volume and tone quality according to the vehicle speed.
Optimal use of the audio system
On the “Sound settings” screen, sound quality (Treble/Mid/Bass), volume bal-
ance and DSP settings can be adjusted.
How to adjust the sound settings and sound quality
123
4
5
1