ECU lexus LC500 2019 / LEXUS 2019 LC 500,LC 500H (OM11471U) Workshop Manual
[x] Cancel search | Manufacturer: LEXUS, Model Year: 2019, Model line: LC500, Model: Lexus LC500 2019Pages: 432, PDF Size: 13.82 MB
Page 262 of 432

2625-5. Using the storage features
Raise the hooks when needed.
The cargo hooks are provided for securing
loose items.
1Loosen the belt
2 Tighten the belt
■Loosening/tightening the belt
1 Loosen the belt
2 Tighten the belt
■Stowing the belt
1 Fold the belt
2 Secure the belt with the clip
Trunk features
Cargo hooks
WARNING
■When the cargo hooks are not in use
To avoid injury, always return the cargo
hooks to their stowed positions when not
in use.
Grocery bag hooks
NOTICE
■To prevent damage to the grocery
bag hooks
Do not hang any object heavier than 4 lb.
(2 kg) on the grocery bag hooks.
First-aid kit storage belt
Warning reflector storage belt
Page 266 of 432
2665-6. Using the other interior features
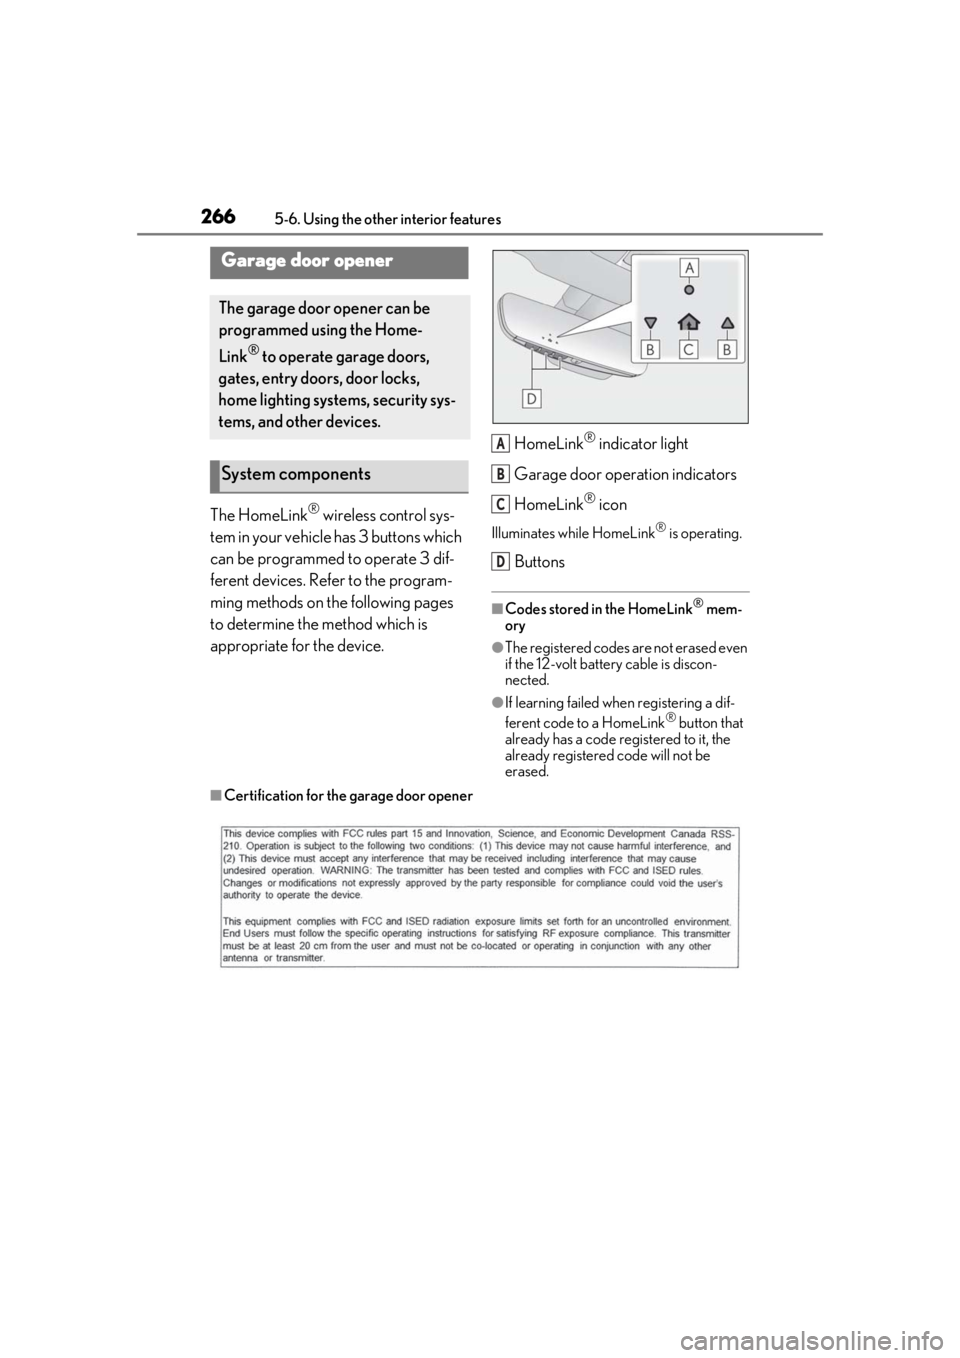
The HomeLink® wireless control sys-
tem in your vehicle has 3 buttons which
can be programmed to operate 3 dif-
ferent devices. Refer to the program-
ming methods on the following pages
to determine the method which is
appropriate for the device. HomeLink
® indicator light
Garage door operation indicators
HomeLink
® icon
Illuminates while HomeLink® is operating.
Buttons
■Codes stored in the HomeLink® mem-
ory
●The registered codes are not erased even
if the 12-volt battery cable is discon-
nected.
●If learning failed when registering a dif-
ferent code to a HomeLink® button that
already has a code registered to it, the
already registered code will not be
erased.
■Certification for the garage door opener
Garage door opener
The garage door opener can be
programmed using the Home-
Link
® to operate garage doors,
gates, entry doors, door locks,
home lighting systems, security sys-
tems, and other devices.
System components
A
B
C
D
Page 285 of 432

2856-2. Maintenance
6
Maintenance and care
Radiator/con-
denser
The radiator and con-
denser should be free
from foreign objects.
( P.297)
Washer fluid
Is there sufficient
washer fluid?
( P.298)
Trunk
ItemsCheck points
12-volt battery
Check the battery fluid
level and connections.
( P.299)
Vehicle interior
ItemsCheck points
Accelerator
pedal
• The accelerator
pedal should move
smoothly (without
uneven pedal effort
or catching).
Automatic trans-
mission “Park”
mechanism
(LC500)/Hybrid
transmission
“Park” mecha-
nism (LC500h)
•When parked on a slope and the shift
position is in P, is the
vehicle securely
stopped?
ItemsCheck points
Brake pedal
•Does the brake pedal move
smoothly?
•Does the brake pedal have appro-
priate clearance
from the floor?
•Does the brake pedal have the cor-
rect amount of free
play?
Brakes
•The vehicle should not pull to one side
when the brakes are
applied.
• The brakes should work effectively.
• The brake pedal should not feel
spongy.
• The brake pedal should not get too
close to the floor
when the brakes are
applied.
Head restraints
•Do the head restraints move
smoothly and lock
securely?
Indicators/buzz-
ers•Do the indicators and buzzers function
properly?
Lights
• Do all the lights come on?
• Are the headlights aimed correctly?
ItemsCheck points
Page 286 of 432
2866-2. Maintenance
Parking brake
• Move smoothly?
•When parked on a slope and the park-
ing brake is on, is the
vehicle securely
stopped?
Seat belts
• Do the seat belts operate smoothly?
• The seat belts should not be damaged.
Seats• Do the seat controls operate properly?
Steering wheel
• Does the steering wheel rotate
smoothly?
• Does the steering wheel have the cor-
rect amount of free
play?
•There should not be any strange sounds
coming from the
steering wheel.
Vehicle exterior
ItemsCheck points
Doors/trunk• Do the doors/trunk operate smoothly?
Engine hood
•Does the engine hood lock system
work properly?
Fluid leaks
•There should not be any signs of fluid
leakage after the
vehicle has been
parked.
ItemsCheck points
Tires
• Is the tire inflation pressure correct?
• The tires should not be damaged or
excessively worn.
• Have the tires been rotated according to
the maintenance
schedule?
• The wheel nuts should not be loose.
Windshield wip-
ers
• The wiper blades should not show any
signs of cracking,
splitting, wear, con-
tamination or defor-
mation.
• The wiper blades should clear the
windshield without
streaking or skip-
ping.
ItemsCheck points
Page 313 of 432

3136-3. Do-it-yourself maintenance
6
Maintenance and care
The recommended cold tire inflation
pressure and tire size are displayed on
the tire and loading information label.
(P.379)
Tire valve
WARNING
■When installing the tire
Failure to follow these precautions could
cause the wheel nuts to loosen and the
tire to fall off, resulting in death or serious
injury.
●Never use oil or grease on the wheel
bolts or wheel nuts.
Oil and grease may cause the wheel
nuts to be excessively tightened, lead-
ing to bolt or disc wheel damage. In
addition, the oil or grease can cause
the wheel nuts to loosen and the wheel
may fall off, causing a serious accident.
Remove any oil or grease from the
wheel bolts or wheel nuts.
●Have the wheel nuts tightened with a
torque wrench to 103.3 ft•lbf (140
N•m, 14.3 kgf•m) soon as possible
after changing wheels.
●Do not attach a heavily damaged
wheel ornament, as it may fly off the
wheel while the vehicle is moving.
●When installing a tire, only use wheel
nuts that have been specifically
designed for that wheel.
●If there are any cracks or deformations
in the bolt screws, nut threads or bolt
holes of the wheel, have the vehicle
inspected by your Lexus dealer.
■After using the tools
Before driving, make sure all the tools are
stored securely in place. Failure to do so
may cause injury in case of a collision or
sudden braking.
NOTICE
■Repairing or replacing tires, wheels,
tire pressure warning valves, trans-
mitters and tire valve caps
P.306
Tire inflation pressure
Checking the specified tire infla-
tion pressure
Inspection and adjustment pro-
cedure
A
Page 322 of 432

3226-3. Do-it-yourself maintenance
Type DNormal fuse
Blown fuse
■After a fuse is replaced
●When installing the lid, make sure that the
tab is installed securely.
●If the lights do not turn on even after the
fuse has been replaced, a bulb may need
replacement. ( P.324)
●If the replaced fuse blows again, have the
vehicle inspected by your Lexus dealer.
■If there is an overload in a circuit
The fuses are designed to blow, protecting
the wiring harness from damage.
■When replacing light bulbs
Lexus recommends that you use genuine
Lexus products designed for this vehicle.
Because certain bulbs are connected to cir-
cuits designed to prevent overload, non-
genuine parts or parts not designed for this
vehicle may be unusable.
WARNING
■To prevent system breakdowns and
vehicle fire
Observe the following precautions.
Failure to do so may cause damage to
the vehicle, and possibly a fire or injury.
●Never use a fuse of a higher amperage
rating than that indicated, or use any
other object in place of a fuse.
A
B
●Always use a genuine Lexus fuse or
equivalent.
Never replace a fuse with a wire, even
as a temporary fix.
●Do not modify the fuses or fuse boxes.
NOTICE
■Before replacing fuses
Have the cause of electrical overload
determined and repaired by your Lexus
dealer as soon as possible.
Page 326 of 432

3267-1. Essential information
7-1.Essential information
Press the switch to flash all of the turn
signal lights.
To turn them off, press the switch once
again.
■Emergency flashers
LC500: If the emergency flashers are used
for a long time while the engine is not run-
ning, the 12-volt battery may discharge.
LC500h: If the emergency flashers are
used for a long time while the hybrid system
is not operating (while the “READY” indica-
tor is not illuminated), the 12-volt battery
may discharge.
1 Steadily step on the brake pedal
with both feet and firmly depress it.
Do not pump the brake pedal repeatedly
as this will increase the effort required to
slow the vehicle.
2Shift the shift position to N.
If the shift position is shifted to N
3 After slowing down, stop the vehi-
cle in a safe place by the road.
4 Stop the engine
If the shift position cannot be shifted
to N
3 Keep depressing the brake pedal
with both feet to reduce vehicle
speed as much as possible.
4 To stop the engine
press and hold the engine switch
Emergency flashers
The emergency flashers are used to
warn other drivers when the vehicle
has to be stopped in the road due to
a breakdown, etc.
Operating instructions
If your vehicle has to be
stopped in an emergency
Only in an emergency, such as if it
becomes impossible to stop the
vehicle in the normal way, stop the
vehicle using the following proce-
dure:
Stopping the vehicle
Page 330 of 432

3307-2. Steps to take in an emergency
In the following situations, it is not pos-
sible to be towed by another vehicle
using cables or chains, as the rear
wheels may be locked due to the park-
ing lock. Contact your Lexus dealer or
commercial towing service.
There is a malfunction in the shift control system. (
P.149, 153, 347)
There is a malfunction in the engine
immobilizer system
There is a malfunction in the smart
access system with push-button
start. ( P.355)
The 12-volt battery is discharged.
( P.357)
The following may indicate a problem
with your transmission. Contact your
Lexus dealer or commercial towing
service before towing.
LC500: The engine is running but
the vehicle does not move.
LC500h: The hybrid system warn-
ing message is shown on the multi-
information display and the vehicle
does not move.
The vehicle makes an abnormal
sound.
Do not tow with a sling-type truck to
prevent body damage.
WARNING
■Installing towing eyelets to the vehi-
cle
Make sure that towing eyelets are
installed securely.
If not securely installed, towing eyelets
may come loose during towing.
NOTICE
■To prevent damage to the vehicle
when towing using a wheel-lift type
truck
●Do not tow the vehicle from the rear
when the engine switch
nism is not strong enough to hold the
front wheels straight.
●When raising the vehicle, ensure ade-
quate ground clearance for towing at
the opposite end of the raised vehicle.
Without adequate clearance, the vehi-
cle could be damaged while being
towed.
■To prevent damage to the vehicle
when towing with a sling-type truck
Do not tow with a sling-type truck, either
from the front or rear.
■To prevent damage to the vehicle
during emergency towing
Do not secure cables or chains to the
suspension components.
Situations when it is not possible
to be towed by another vehicle
Situations when it is necessary to
contact dealers before towing
Towing with a sling-type truck
Page 331 of 432

3317-2. Steps to take in an emergency
7
When trouble arises
From the front
Use a towing dolly under the rear
wheels.
From the rear
Use a towing dolly under the front
wheels.
If your vehicle is transported by a flat-
bed truck, it should be tied down at the
locations shown in the illustration. If you use chains or cables to tie down
your vehicle, the angles shaded in
black must be 45°.
Do not overly tighten the tie downs or
the vehicle may be damaged.
If a tow truck is not available in an
emergency, your vehicle may be tem-
porarily towed using cables or chains
secured to the emergency towing eye-
lets. This should only be attempted on
hard surfaced roads for short distances
at under 18 mph (30 km/h).
A driver must be in the vehicle to steer
and operate the brakes. The vehicle’s
wheels, drive train, axles, steering and
brakes must be in good condition.
To have your vehicle towed by another
Towing with a wheel-lift type
truck
Using a flatbed truck
Emergency towing
Emergency towing procedure
Page 332 of 432

3327-2. Steps to take in an emergency
vehicle, the towing eyelet must be
installed to your vehicle. Install the tow-
ing eyelet using the following proce-
dure.
1Take out the screwdriver and the
towing eyelet. ( P.310)
2 Remove the eyelet cover using a
flathead screwdriver.
To protect the bodywork, place a rag
between the screwdriver and the vehicle
body as shown in the illustration.
3Insert the towing eyelet into the
hole and tighten partially by hand. 4
Tighten down the towing eyelet
securely using the screwdriver or
hard metal bar.
5 Securely attach cables or chains to
the towing eyelet.
Take care not to damage the vehicle body.
6Enter the vehicle being towed and
start the engine
If the engine
start, turn the engine switch
7Shift the shift position to N and
release the parking brake.
■While towing
If the engine is not running
steering will not function, making steering
and braking more difficult.