cylinder block LEXUS LS430 2003 Factory Repair Manual
[x] Cancel search | Manufacturer: LEXUS, Model Year: 2003, Model line: LS430, Model: LEXUS LS430 2003Pages: 4500, PDF Size: 87.45 MB
Page 1011 of 4500

Fig. 44: Removing Snap Ring With Snap Ring Pliers
Courtesy of TOYOTA MOTOR SALES, U.S.A., INC.
d. Place a shop rag and 2 wooden blocks on the work table, and lightly tap the cylinder flange against
the block edges until the No.2 piston drops out of the cylinder.
<002500480003004600440055004800490058004f00030051005200570003005700520003005600460055004400570046004b00030057004b0048000300500044005600570048005500030046005c004f004c00510047004800550003004500520055004800
110003[
HINT:
Make sure that the distance (A) from the shop rag to the top of the blocks is at least 100 mm (3.94
in.).
e. Remove the O-rin
g from the master cylinder body.
Page 1850 of 4500
psi), and check that the pressure does not drop.
If the pressure drops, check the hoses, radiator and water pump for leaks. If no external leaks are found,
check the heater core, cylinder block and head.
2.CHECK ENGINE COOLANT LEVEL AT RESERVOIR
a. Check that the engine coolant level is between the LOW and FULL lines when the engine is cold.
If the engine coolant is low, check for leaks and add "TOYOTA Super Long Life Coolant" to the
FULL line.
If "TOYOTA Super Long Life Coolant" is not available, use a similar high quality ethylene glycol
based non-silicate, non-amino, non-nitrite and non-borate coolant with long-life hybrid organic acid
technology. Do not substitute plain water for engine coolant.
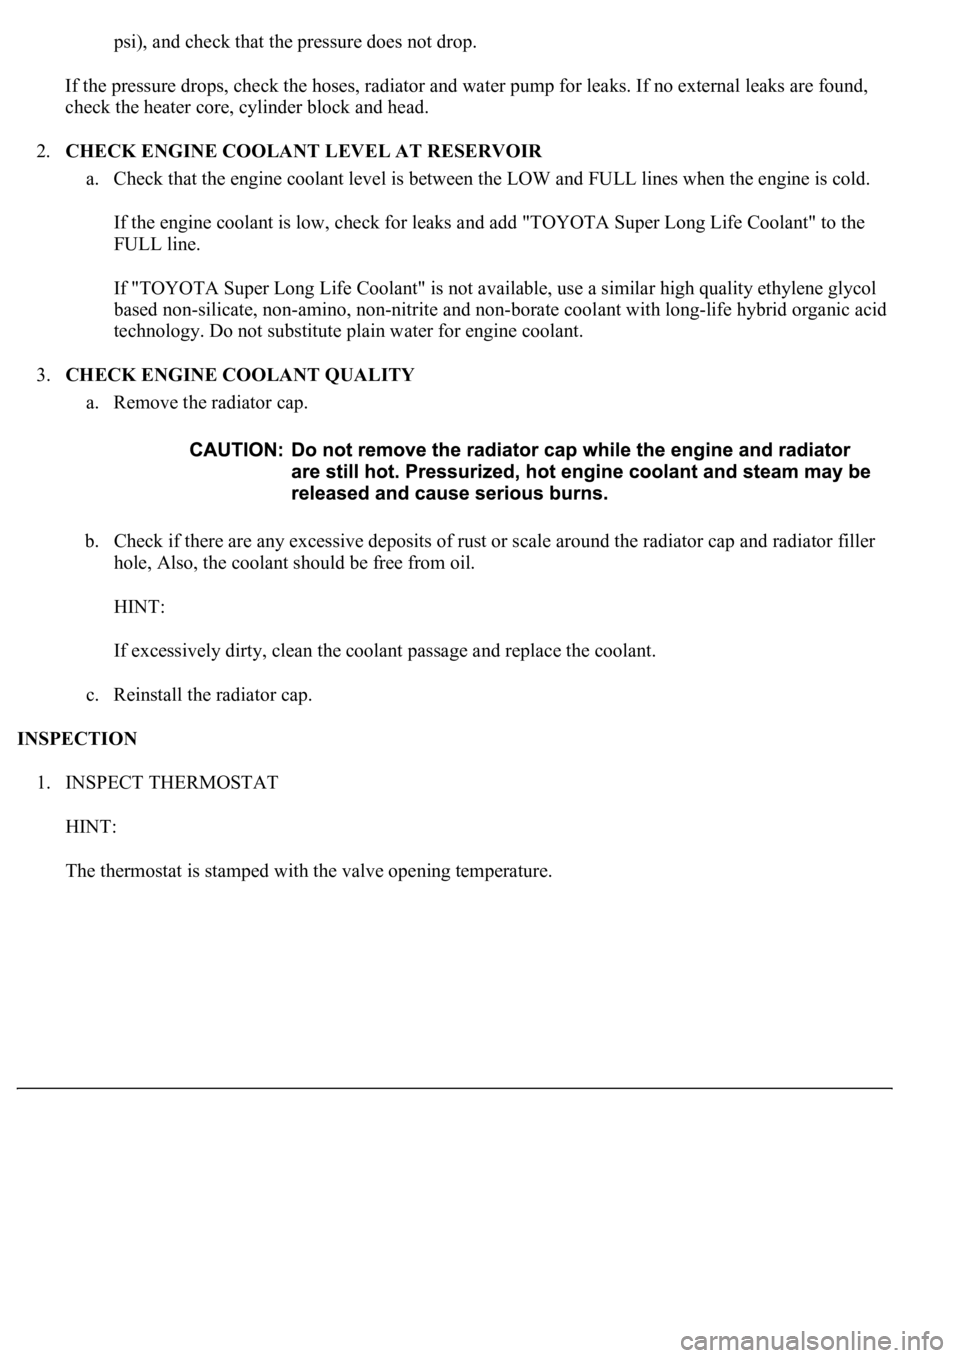
3.CHECK ENGINE COOLANT QUALITY
a. Remove the radiator cap.
b. Check if there are any excessive deposits of rust or scale around the radiator cap and radiator filler
hole, Also, the coolant should be free from oil.
HINT:
If excessively dirty, clean the coolant passage and replace the coolant.
c. Reinstall the radiator cap.
INSPECTION
1. INSPECT THERMOSTAT
HINT:
The thermostat is stamped with the valve openin
g temperature.
Page 2014 of 4500

Bronco
1982-85
6-CylinderOn Left Front Fender
V8On Right Inner Fender Panel
1986-87On Right Front Fender, Near Starter Relay
1988-92On Left Fender Apron
1993-952 Connectors In Left Rear Of Engine
Compartment, On Bracket
1996-Below Glove Box
Bronco II
1983-85On Right Front Inner Fender Panel (2.3L
Only)
1986-90On Right Front Fender Apron
ExcursionBehind Center Of Dash
Explorer & Mountaineer (1991-94)On Right Rear Of Engine Compartment, Near
A/C-Heater Blower
Pickup
1982-85
6-CylinderOn Left Front Fender
V8On Right Inner Fender Panel
1986-87On Right Front Fender, Near Starter Relay
1988-92On Left Fender Apron
1993-952 Connectors In Left Rear Of Engine
Compartment, On Bracket
1996-Below Center Of Instrument Panel
Pickup (F250 Heavy Duty & F350)Under Right Side Of Dash
Ranger
1983-85On Right Front Inner Fender Panel (2.3L
Only)
1986-90On Right Front Fender Apron
1991Behind Engine Compartment Fuse/Relay
Block
1992On Left Front Inner Fender Panel
1993-95On Rear Of Engine Compartment Fuse/Relay
Block
Van
1986-92On Right Fender Apron
1993-95On Left Front Corner Of Engine
Compartment
1996
5.8L (49 State, Over 8600 GVW) & 7.5L (Except
Calif.)On Left Front Corner Of Engine
Compartment
Page 2033 of 4500
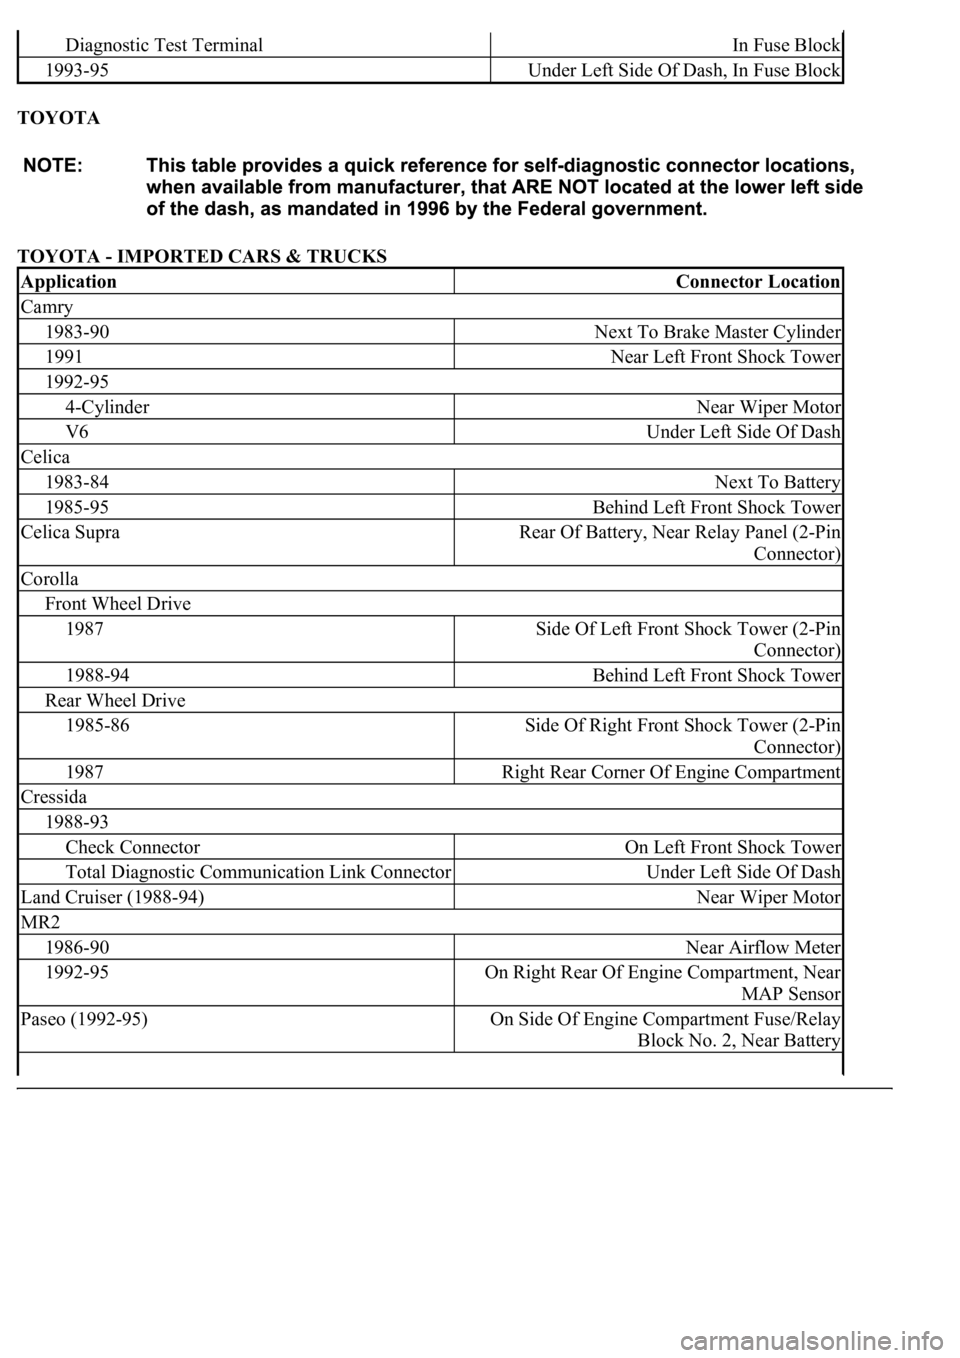
TOYOTA
TOYOTA - IMPORTED CARS & TRUCKS
Diagnostic Test TerminalIn Fuse Block
1993-95Under Left Side Of Dash, In Fuse Block
ApplicationConnector Location
Camry
1983-90Next To Brake Master Cylinder
1991Near Left Front Shock Tower
1992-95
4-CylinderNear Wiper Motor
V6Under Left Side Of Dash
Celica
1983-84Next To Battery
1985-95Behind Left Front Shock Tower
Celica SupraRear Of Battery, Near Relay Panel (2-Pin
Connector)
Corolla
Front Wheel Drive
1987Side Of Left Front Shock Tower (2-Pin
Connector)
1988-94Behind Left Front Shock Tower
Rear Wheel Drive
1985-86Side Of Right Front Shock Tower (2-Pin
Connector)
1987Right Rear Corner Of Engine Compartment
Cressida
1988-93
Check ConnectorOn Left Front Shock Tower
Total Diagnostic Communication Link ConnectorUnder Left Side Of Dash
Land Cruiser (1988-94)Near Wiper Motor
MR2
1986-90Near Airflow Meter
1992-95On Right Rear Of Engine Compartment, Near
MAP Sensor
Paseo (1992-95)On Side Of Engine Compartment Fuse/Relay
Block No. 2, Near Battery
Page 2034 of 4500
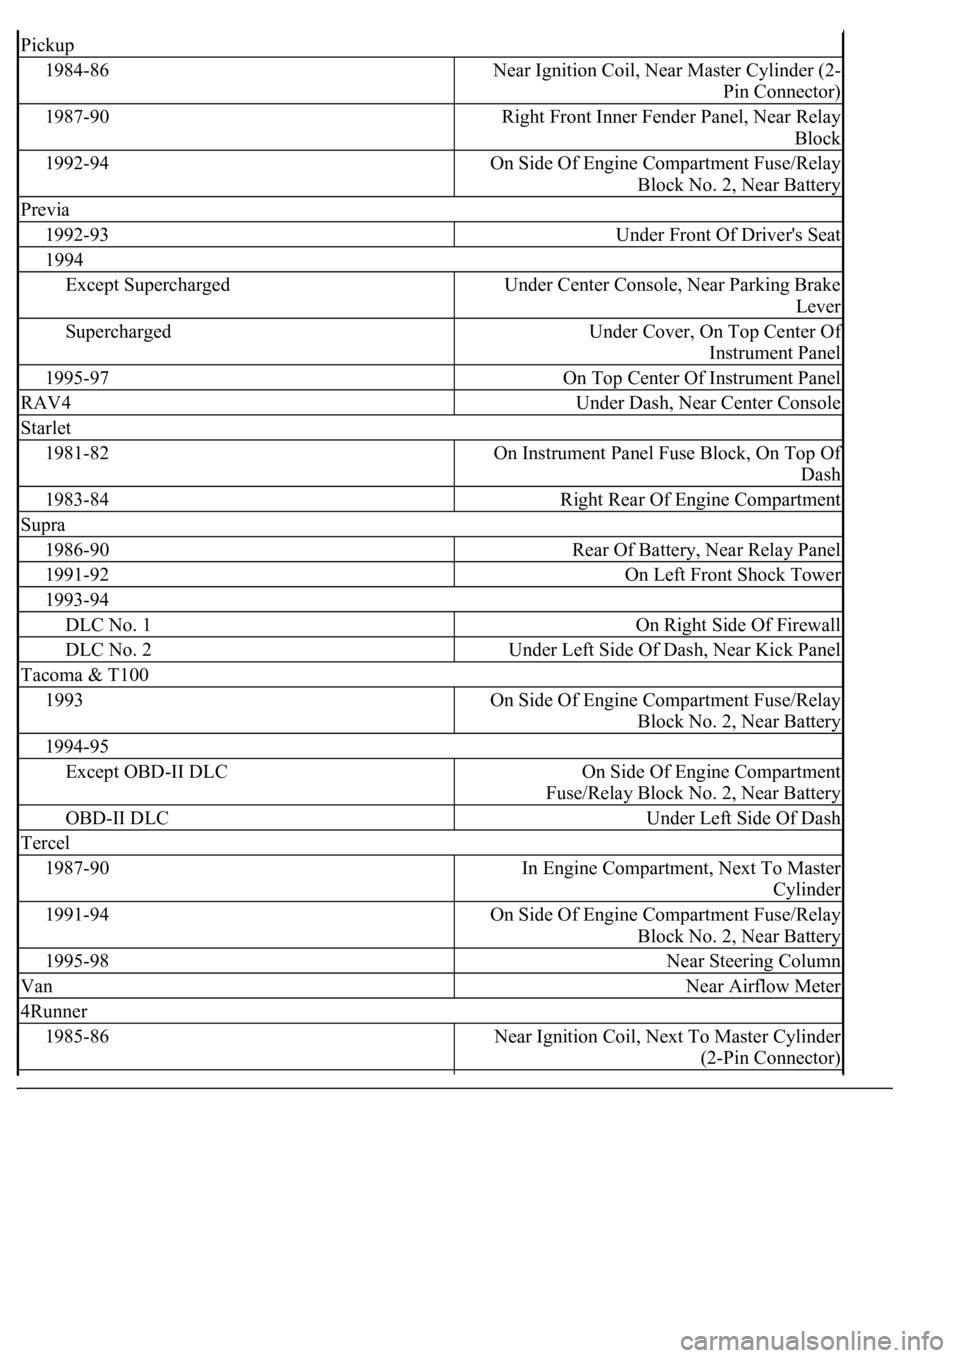
Pickup
1984-86Near Ignition Coil, Near Master Cylinder (2-
Pin Connector)
1987-90Right Front Inner Fender Panel, Near Relay
Block
1992-94On Side Of Engine Compartment Fuse/Relay
Block No. 2, Near Battery
Previa
1992-93Under Front Of Driver's Seat
1994
Except SuperchargedUnder Center Console, Near Parking Brake
Lever
SuperchargedUnder Cover, On Top Center Of
Instrument Panel
1995-97On Top Center Of Instrument Panel
RAV4Under Dash, Near Center Console
Starlet
1981-82On Instrument Panel Fuse Block, On Top Of
Dash
1983-84Right Rear Of Engine Compartment
Supra
1986-90Rear Of Battery, Near Relay Panel
1991-92On Left Front Shock Tower
1993-94
DLC No. 1On Right Side Of Firewall
DLC No. 2Under Left Side Of Dash, Near Kick Panel
Tacoma & T100
1993On Side Of Engine Compartment Fuse/Relay
Block No. 2, Near Battery
1994-95
Except OBD-II DLCOn Side Of Engine Compartment
Fuse/Relay Block No. 2, Near Battery
OBD-II DLCUnder Left Side Of Dash
Tercel
1987-90In Engine Compartment, Next To Master
Cylinder
1991-94On Side Of Engine Compartment Fuse/Relay
Block No. 2, Near Battery
1995-98Near Steering Column
VanNear Airflow Meter
4Runner
1985-86Near Ignition Coil, Next To Master Cylinder
(2-Pin Connector)
Page 2639 of 4500
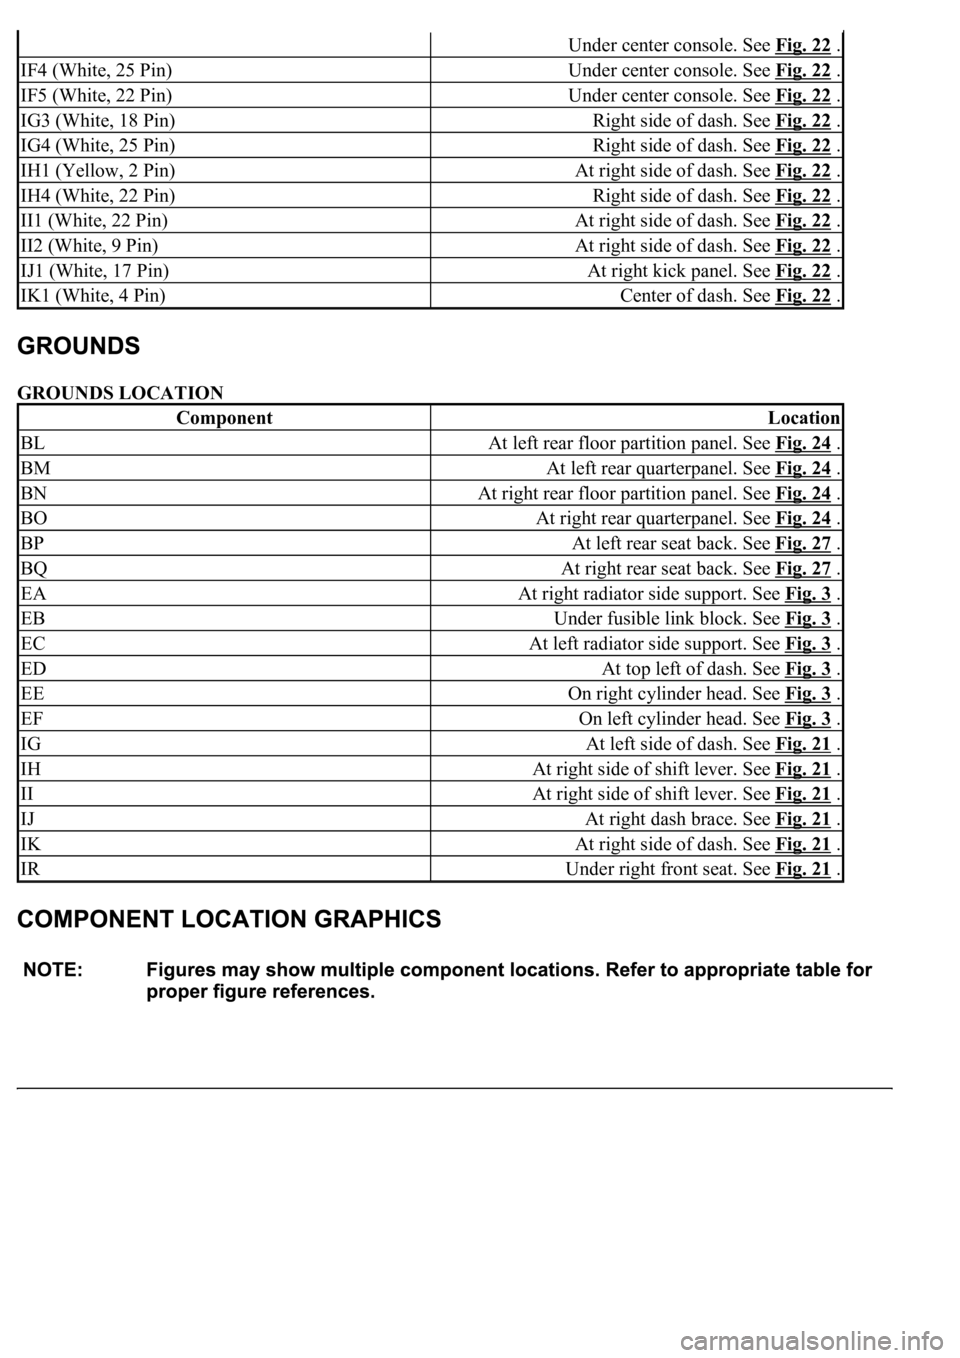
GROUNDS LOCATION
Under center console. See Fig. 22 .
IF4 (White, 25 Pin)Under center console. See Fig. 22 .
IF5 (White, 22 Pin)Under center console. See Fig. 22 .
IG3 (White, 18 Pin)Right side of dash. See Fig. 22 .
IG4 (White, 25 Pin)Right side of dash. See Fig. 22 .
IH1 (Yellow, 2 Pin)At right side of dash. See Fig. 22 .
IH4 (White, 22 Pin)Right side of dash. See Fig. 22 .
II1 (White, 22 Pin)At right side of dash. See Fig. 22 .
II2 (White, 9 Pin)At right side of dash. See Fig. 22 .
IJ1 (White, 17 Pin)At right kick panel. See Fig. 22 .
IK1 (White, 4 Pin)Center of dash. See Fig. 22 .
ComponentLocation
BLAt left rear floor partition panel. See Fig. 24 .
BMAt left rear quarterpanel. See Fig. 24 .
BNAt right rear floor partition panel. See Fig. 24 .
BOAt right rear quarterpanel. See Fig. 24 .
BPAt left rear seat back. See Fig. 27 .
BQAt right rear seat back. See Fig. 27 .
EAAt right radiator side support. See Fig. 3 .
EBUnder fusible link block. See Fig. 3 .
ECAt left radiator side support. See Fig. 3 .
EDAt top left of dash. See Fig. 3 .
EEOn right cylinder head. See Fig. 3 .
EFOn left cylinder head. See Fig. 3 .
IGAt left side of dash. See Fig. 21 .
IHAt right side of shift lever. See Fig. 21 .
IIAt right side of shift lever. See Fig. 21 .
IJAt right dash brace. See Fig. 21 .
IKAt right side of dash. See Fig. 21 .
IRUnder right front seat. See Fig. 21 .
Page 3387 of 4500

Fig. 106: Identifying Cylinder Head Bolt Into Portion A
Courtesy of TOYOTA MOTOR SALES, U.S.A., INC.
b. Lift the cylinder head from the dowels on the cylinder block, and place the cylinder head on
wooden blocks on a bench.
HINT:
If the cylinder head cannot be removed, pry between the cylinder head and cylinder block with a
screwdriver.
Page 3390 of 4500

Fig. 109: Identifying Cylinder Head Bolt Into Portion A
Courtesy of TOYOTA MOTOR SALES, U.S.A., INC.
b. Lift the cylinder head from the dowels on the cylinder block, and place the cylinder head on
wooden blocks on a bench.
HINT:
If the cylinder head cannot be removed, pry between the cylinder head and cylinder block with a
screwdriver.
Page 3412 of 4500
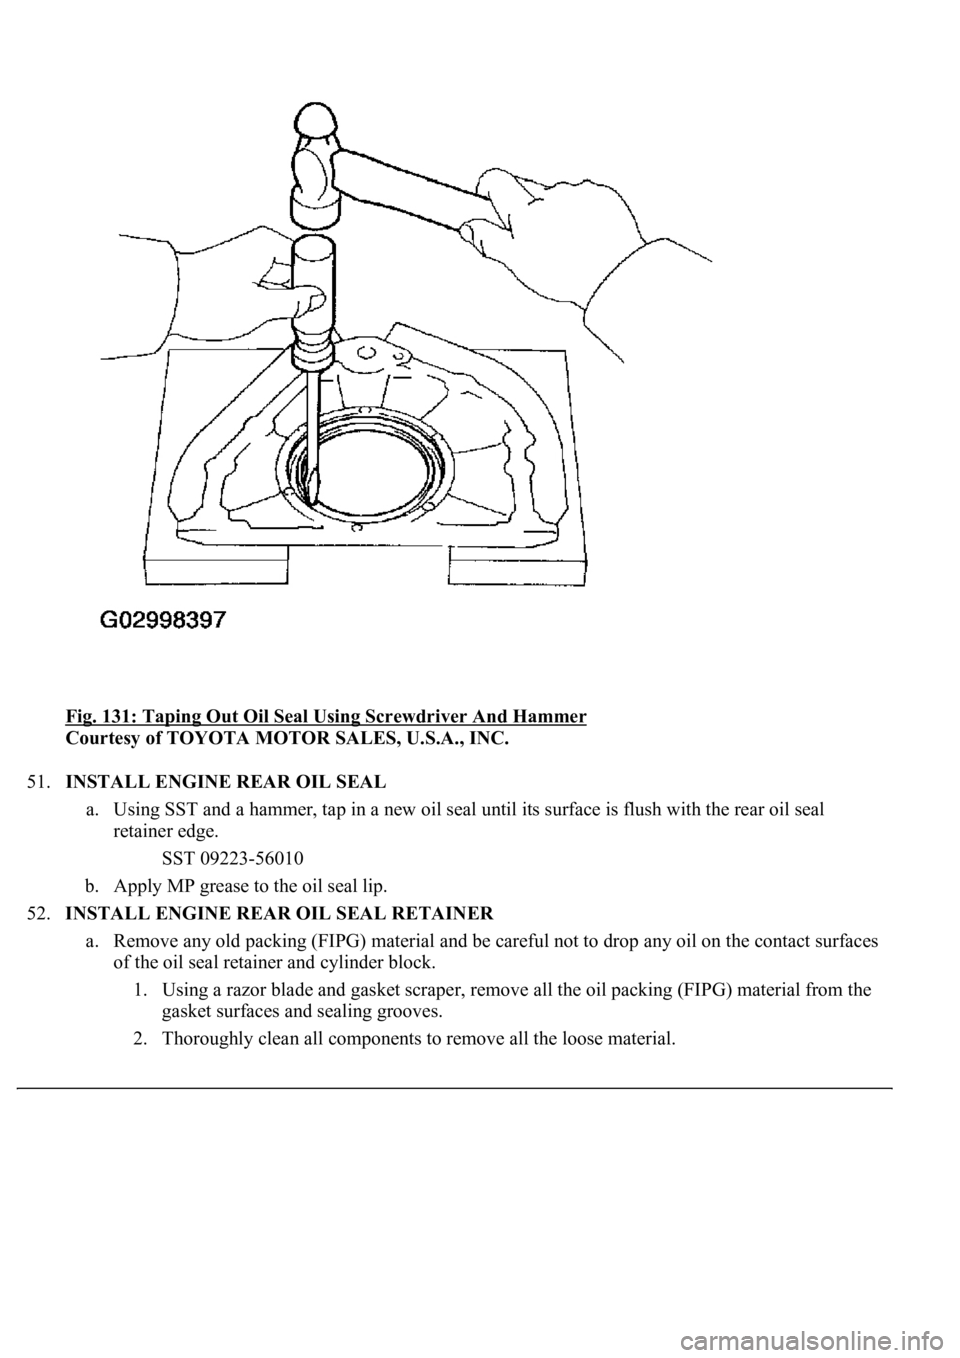
Fig. 131: Taping Out Oil Seal Using Screwdriver And Hammer
Courtesy of TOYOTA MOTOR SALES, U.S.A., INC.
51.INSTALL ENGINE REAR OIL SEAL
a. Using SST and a hammer, tap in a new oil seal until its surface is flush with the rear oil seal
retainer edge.
SST 09223-56010
b. Apply MP grease to the oil seal lip.
52.INSTALL ENGINE REAR OIL SEAL RETAINER
a. Remove any old packing (FIPG) material and be careful not to drop any oil on the contact surfaces
of the oil seal retainer and cylinder block.
1. Using a razor blade and gasket scraper, remove all the oil packing (FIPG) material from the
gasket surfaces and sealing grooves.
2. Thoroughly clean all components to remove all the loose material.
Page 3414 of 4500
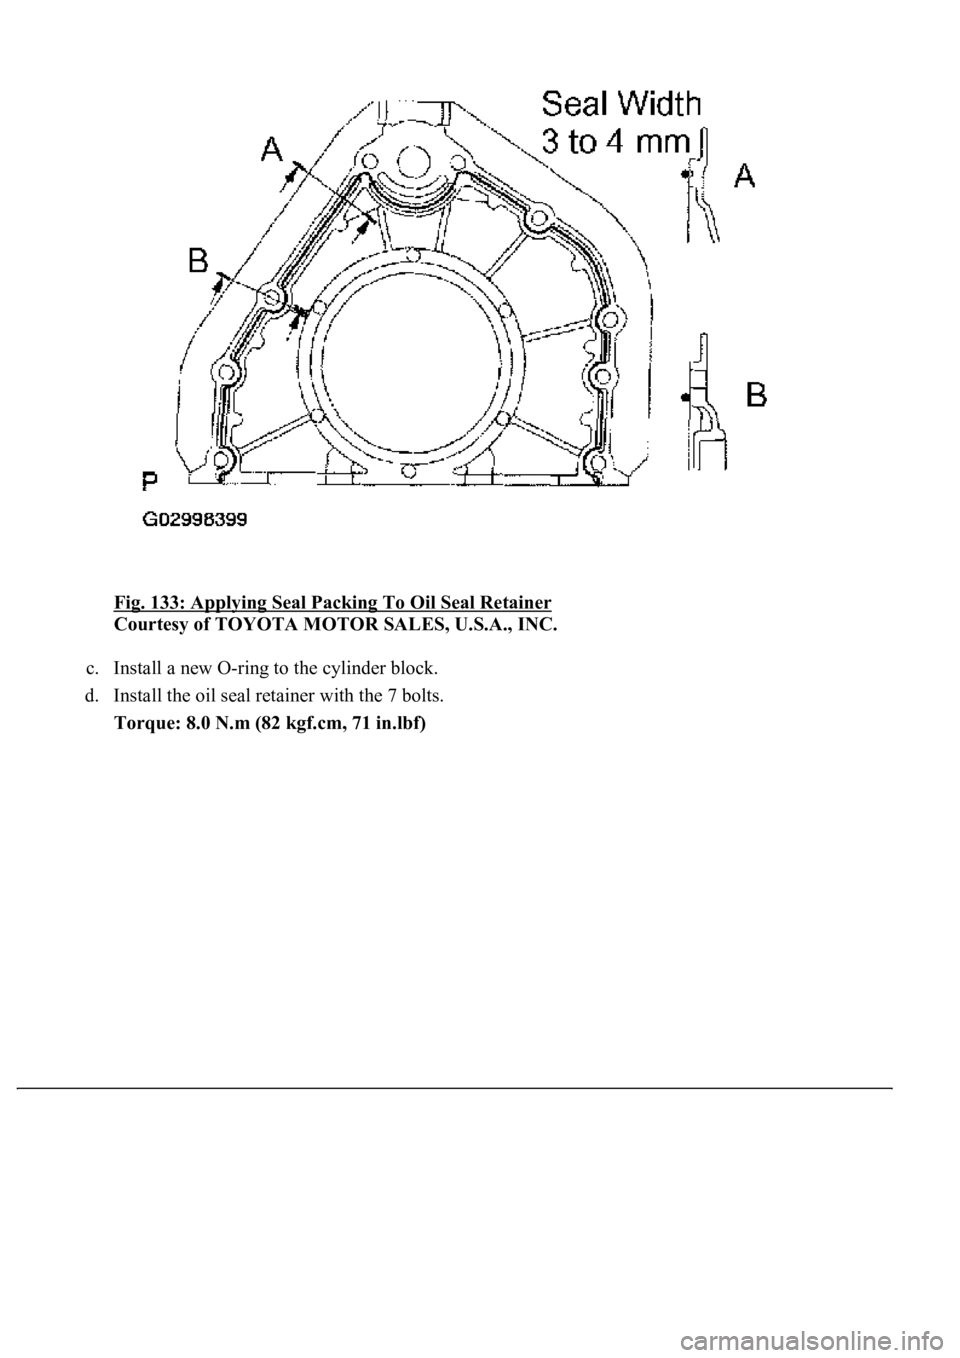
<0029004c004a00110003001400160016001d0003002400530053004f005c004c0051004a0003003600480044004f0003003300440046004e004c0051004a00030037005200030032004c004f0003003600480044004f00030035004800570044004c005100
480055[
Courtesy of TOYOTA MOTOR SALES, U.S.A., INC.
c. Install a new O-ring to the cylinder block.
d. Install the oil seal retainer with the 7 bolts.
Torque: 8.0 N.m (82 kgf.cm, 71 in.lbf)