set LEXUS LS500 2019 User Guide
[x] Cancel search | Manufacturer: LEXUS, Model Year: 2019, Model line: LS500, Model: LEXUS LS500 2019Pages: 512, PDF Size: 9.71 MB
Page 82 of 512
82 2-1. Instrument cluster
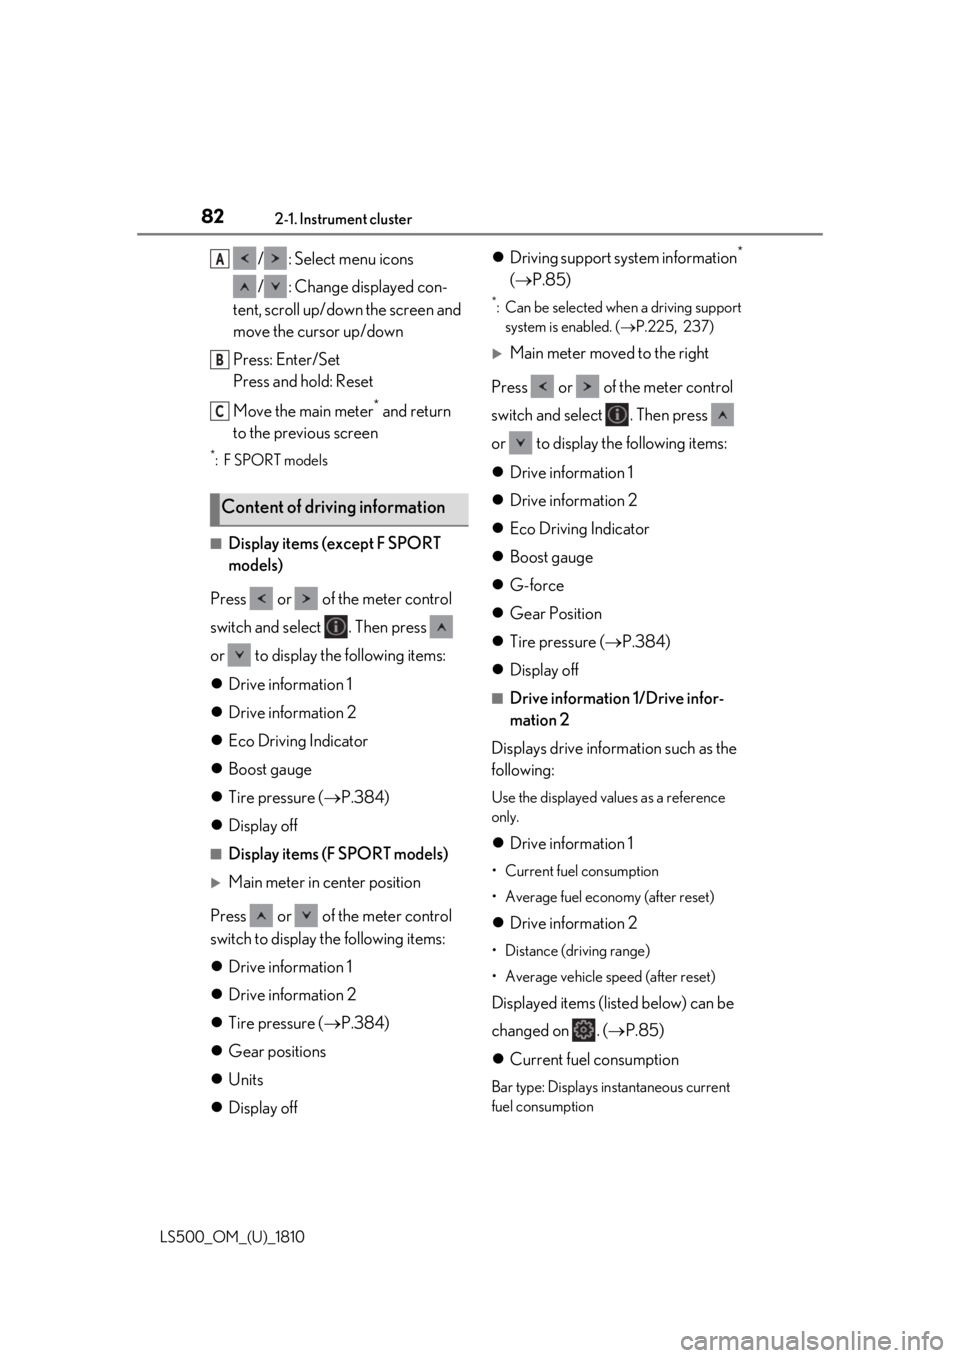
LS500_OM_(U)_1810 / : Select menu icons
/ : Change displayed con-
tent, scroll up/down the screen and
move the cursor up/down
Press: Enter/Set
Press and hold: Reset
Move the main meter *
and return
to the previous screen *
:F SPORT models
■
Display items (except F SPORT
models)
Press or of the meter control
switch and select . Then press
or to display the following items:
Drive information 1
Drive information 2
Eco Driving Indicator
Boost gauge
Tire pressure ( P.384)
Display off ■
Display items (F SPORT models)
Main meter in center position
Press or of the meter control
switch to display the following items:
Drive information 1
Drive information 2
Tire pressure ( P.384)
Gear positions
Units
Display off Driving support system information *
( P.85) *
: Can be selected when a driving support
system is enabled. ( P.225, 237)
Main meter moved to the right
Press or of the meter control
switch and select . Then press
or to display the following items:
Drive information 1
Drive information 2
Eco Driving Indicator
Boost gauge
G-force
Gear Position
Tire pressure ( P.384)
Display off ■
Drive information 1/Drive infor-
mation 2
Displays drive information such as the
following: Use the displayed values as a reference
only.
Drive information 1 • Current fuel consumption
• Average fuel economy (after reset)
Drive information 2 • Distance (driving range)
• Average vehicle speed (after reset)
Displayed items (listed below) can be
changed on . ( P.85)
Current fuel consumption Bar type: Displays instantaneous current
fuel consumptionContent of driving information A
B
C
Page 83 of 512
832-1. Instrument cluster
LS500_OM_(U)_1810 2
Vehicle status information and indicators Average fuel economy After reset: Displays average fuel con-
sumption since the display was reset *1
After start: Displays average fuel con-
sumption since engine start
After refuel: Displays average fuel con-
sumption since refuel
Average vehicle speed After reset: Displays average vehicle
speed since the display was reset *1
After start: Displays average vehicle speed
since engine start
Elapsed time After reset: Displays elapsed time since the
display was reset *1
After start: Displays elapsed time since
engine start
Distance Driving range: Displays driving range with
remaining fuel *2, 3
After start: Displays the distance driven
since engine start
Other Blank: No item *1
: To reset, display the desired item and
press and hold of the meter control
switch. *2
: This distance is computed based on
your average fuel consumption. As a
result, the actual distance that can be
driven may differ from that displayed. *3
: When only a small amount of fuel is
added to the tank, the display may not
be updated.
When refueling, turn the engine switch
off. If the vehicle is refueled without
turning the engine switch off, the display may not be updated. ■
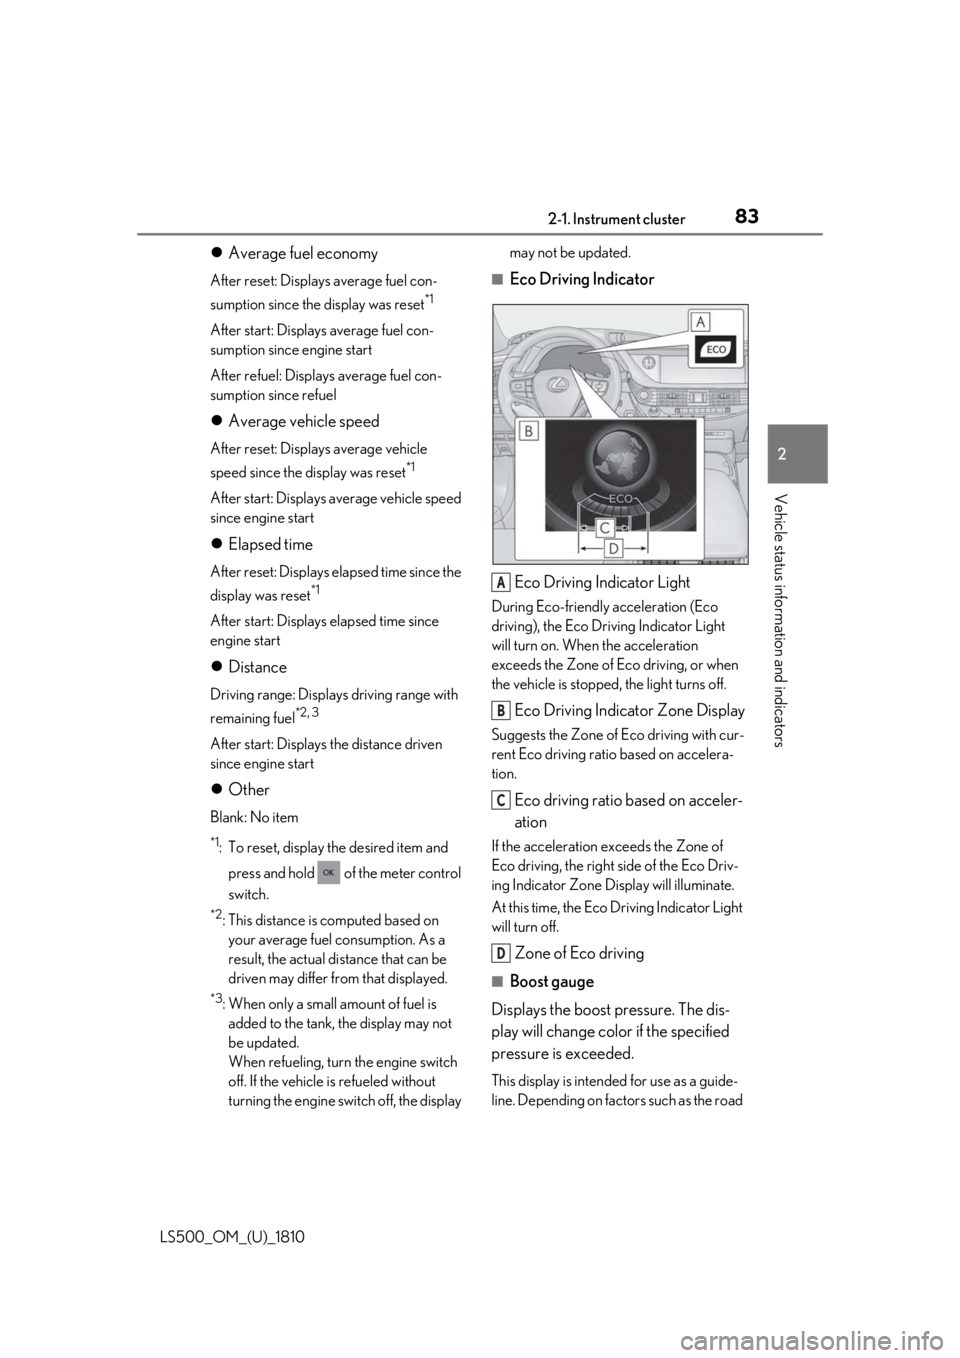
Eco Driving Indicator
Eco Driving Indicator Light During Eco-friendly acceleration (Eco
driving), the Eco Driving Indicator Light
will turn on. When the acceleration
exceeds the Zone of Eco driving, or when
the vehicle is stopped, the light turns off.
Eco Driving Indicator Zone Display Suggests the Zone of Eco driving with cur-
rent Eco driving ratio based on accelera-
tion.
Eco driving ratio based on acceler-
ation If the acceleration exceeds the Zone of
Eco driving, the right side of the Eco Driv-
ing Indicator Zone Display will illuminate.
At this time, the Eco Driving Indicator Light
will turn off.
Zone of Eco driving ■
Boost gauge
Displays the boost pressure. The dis-
play will change color if the specified
pressure is exceeded. This display is intended for use as a guide-
line. Depending on fact ors such as the road A
B
C
D
Page 84 of 512
84 2-1. Instrument cluster
LS500_OM_(U)_1810 surface condition, temperature and vehicle
speed, the display may not show the actual
condition of the vehicle. ■
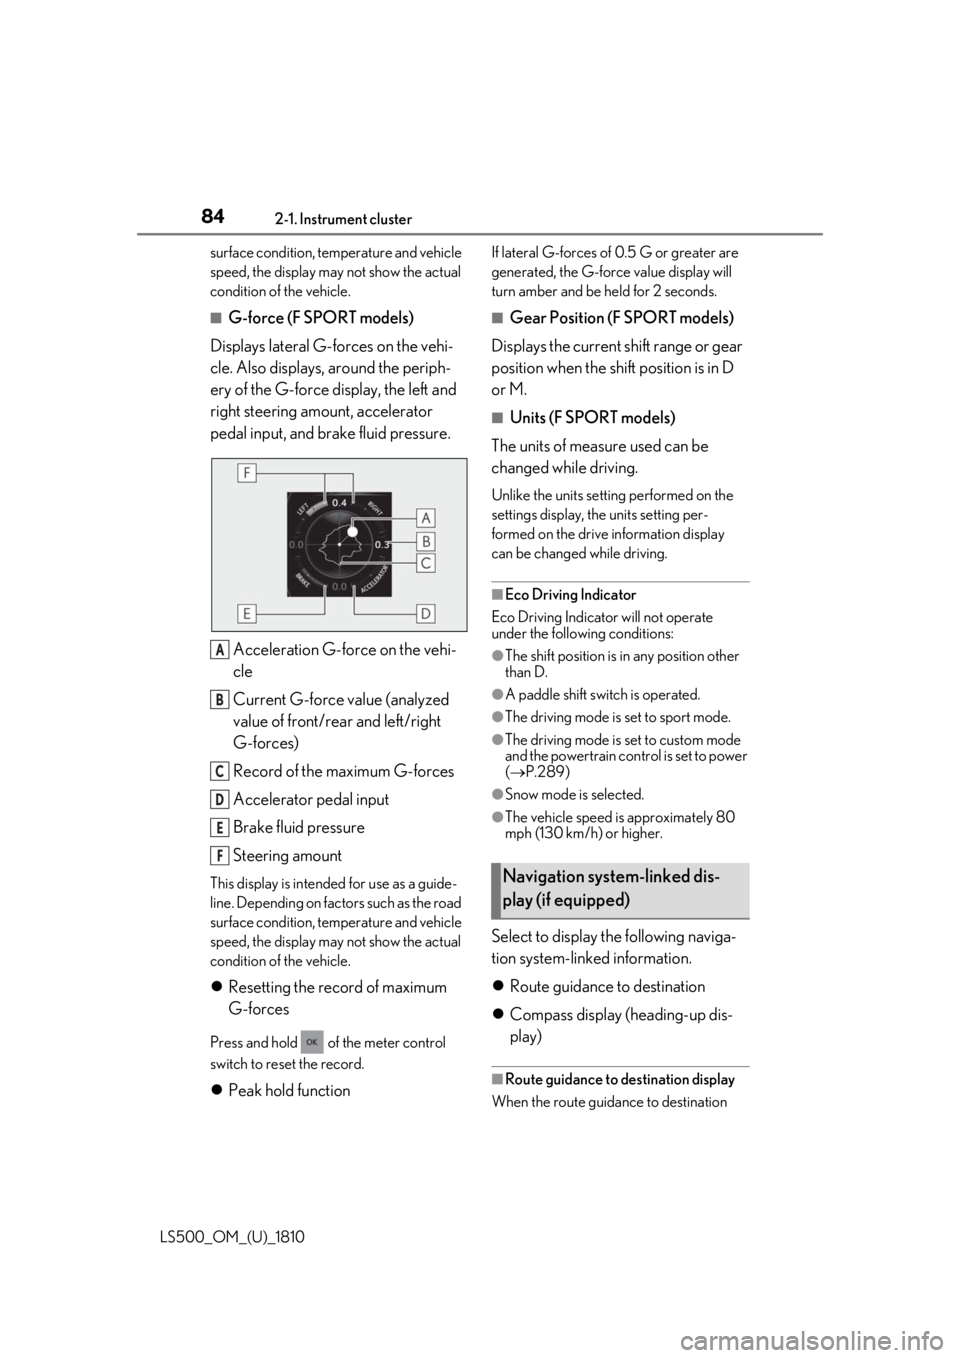
G-force (F SPORT models)
Displays lateral G-forces on the vehi-
cle. Also displays, around the periph-
ery of the G-force display, the left and
right steering amount, accelerator
pedal input, and brake fluid pressure.
Acceleration G-force on the vehi-
cle
Current G-force value (analyzed
value of front/rear and left/right
G-forces)
Record of the maximum G-forces
Accelerator pedal input
Brake fluid pressure
Steering amountThis display is intended for use as a guide-
line. Depending on factors such as the road
surface condition, temperature and vehicle
speed, the display may not show the actual
condition of the vehicle.
Resetting the record of maximum
G-forces
Press and hold of the meter control
switch to reset the record.
Peak hold function If lateral G-forces of 0.5 G or greater are
generated, the G-forc e value display will
turn amber and be held for 2 seconds. ■
Gear Position (F SPORT models)
Displays the current shift range or gear
position when the shift position is in D
or M. ■
Units (F SPORT models)
The units of measure used can be
changed while driving. Unlike the units sett ing performed on the
settings display, th e units setting per-
formed on the drive information display
can be changed while driving.
■
Eco Driving Indicator
Eco Driving Indicator will not operate
under the following conditions: ●
The shift position is in any position other
than D. ●
A paddle shift swit ch is operated.●
The driving mode is set to sport mode. ●
The driving mode is set to custom mode
and the powertrain control is set to power
( P.289)●
Snow mode is selected. ●
The vehicle speed is approximately 80
mph (130 km/h) or higher.
Select to display the following naviga-
tion system-linked information.
Route guidance to destination
Compass display (heading-up dis-
play) ■
Route guidance to destination display
When the route guidance to destination A
B
C
D
E
F
Navigation system-linked dis-
play (if equipped)
Page 85 of 512
852-1. Instrument cluster
LS500_OM_(U)_1810 2
Vehicle status information and indicators display is enabled on the head-up display, it
will not be displayed on the multi-informa-
tion display. ( P.89)
Select to enable selection of an audio
source or track on the meter using the
meter control switches.
Select to display the operational status
of the following systems:
LTA (Lane Tracing Assist) ( P.225)
Dynamic radar cruise control with
full-speed range ( P.237)
RSA (Road Sign Assist) (if
equipped) ( P.247)■
Meter display settings that can be
changed
Language Select to change th e language displayed.
Units Select to change the units of measure dis-
played.
Speedometer display (except F
SPORT models) Select to set the display of the speedome-
ter to digital/analog/both digital and ana-
log.
Drive information 1/Drive informa-
tion 2
Select to select up to 2 items ( P.82) that
will be displayed on ea ch Drive information screen (Drive information 1 screen and
Drive information 2 sc reen) respectively.
Clock Select to switch between 12-hour display
and 24-hour display.
Pop-up display Select to enable/disable pop-up displays
for each relevant system.
Accent color Select to change the accent color on the
screen, such as the cursor color.
Rev indicator (F SPORT models) • Select to enable/disable the rev indica-
tor.
• Select to set the engine speed at which
the rev indicator (amber) will begin to be
displayed.
Rev peak (F SPORT models) Select to enable/disable the rev peak.
Eco Driving Indicator Light Select to enable/disable the Eco Driving
Indicator Light.
Default setting Select to reset the meter display settings to
the default setting.
■
Vehicle functions and settings that
can be changed
P.466 ■
Suspension of the settings display
●
Some settings cannot be changed while
driving. When changing settings, park
the vehicle in a safe place.
●
If a warning message is displayed, opera-
tion of the settings display will be sus-
pended.Audio system-linked display
Driving support system informa-
tion display
Settings display
Page 86 of 512
86 2-1. Instrument cluster
LS500_OM_(U)_1810 Displays suggestions to the driver in
the following situations. To select a
response to a displayed suggestion,
use the meter control switches. ■
Suggestion to turn off the head-
lights
If the headlights are left on for a certain
amount of time with the headlight
switch in after the engine switch
has been turned off, a suggestion mes-
sage will be displayed asking if you
wish to turn the headlights off.
To turn the headlights off, select “Yes”. If a front door is op ened after the engine
switch is turned off, this suggestion mes-
sage will not be displayed.
■
Customization
Some functions can be customized.
( P.466) WARNING■
Cautions during setting up the dis-
play
As the engine needs to be running
during setting up the display, ensure that
the vehicle is parked in a place with ade-
quate ventilation. In a closed area such as
a garage, exhaust gases including harm-
ful carbon monoxide (CO) may collect
and enter the vehicle. This may lead to
death or a serious health hazard.
NOTICE■
During setting up the display
To prevent battery discharge, ensure that
the engine is running while setting up the
display features.
Suggestion function
Page 89 of 512
892-1. Instrument cluster
LS500_OM_(U)_1810 2
Vehicle status information and indicators ■
Enabling/disabling the head-up dis-
play
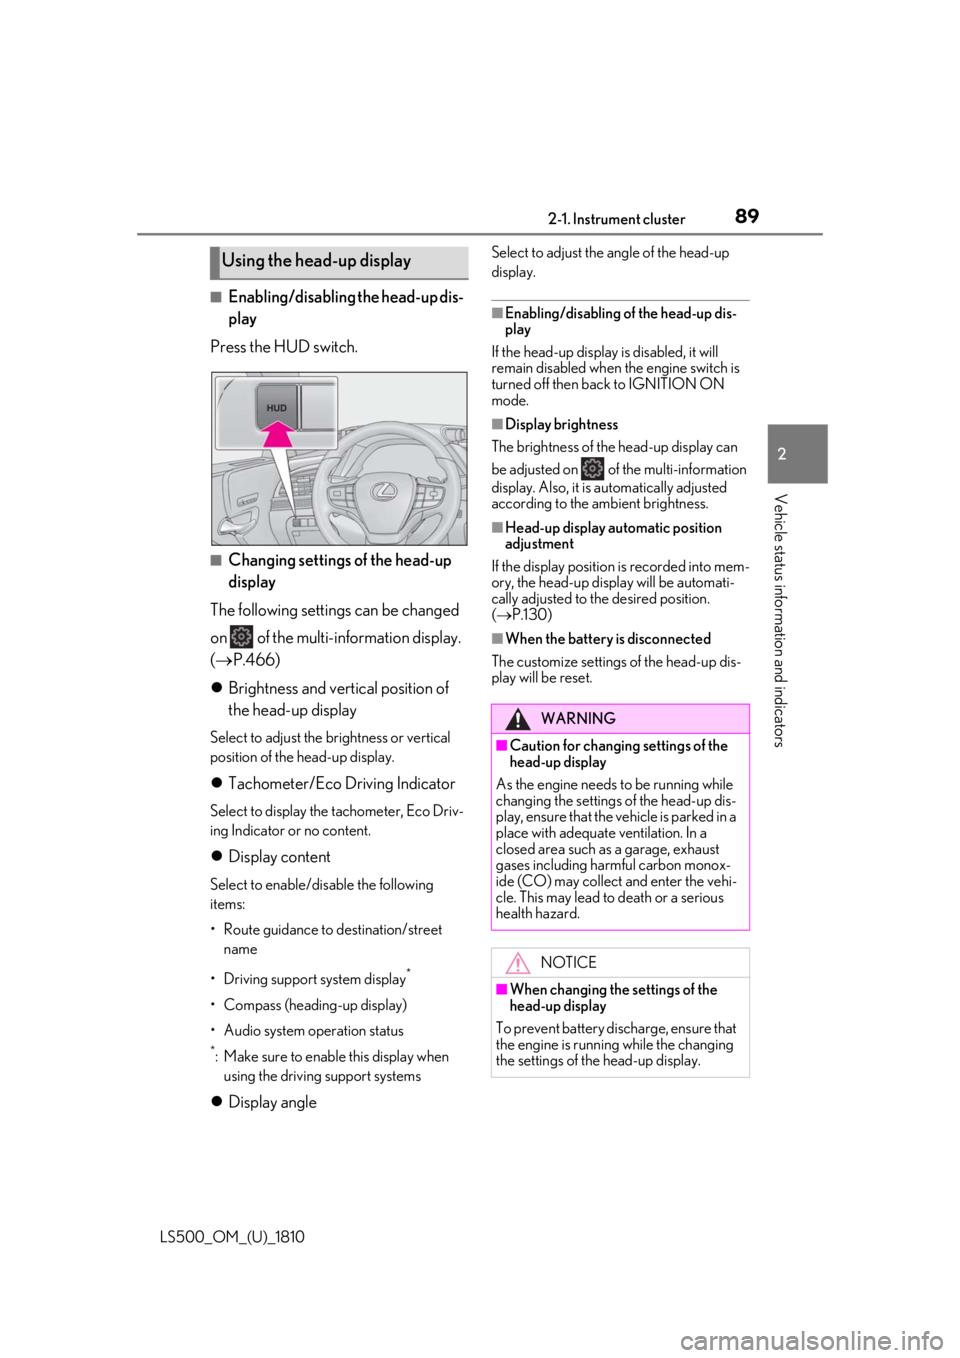
Press the HUD switch.
■
Changing settings of the head-up
display
The following settings can be changed
on of the multi-information display.
( P.466)
Brightness and vertical position of
the head-up display Select to adjust the brightness or vertical
position of the head-up display.
Tachometer/Eco Driving Indicator Select to display the tachometer, Eco Driv-
ing Indicator or no content.
Display content Select to enable/dis able the following
items:
• Route guidance to destination/street
name
• Driving support system display *
• Compass (heading-up display)
• Audio system operation status *
: Make sure to enable this display when
using the driving support systems
Display angle Select to adjust the angle of the head-up
display. ■
Enabling/disabling of the head-up dis-
play
If the head-up display is disabled, it will
remain disabled when the engine switch is
turned off then back to IGNITION ON
mode. ■
Display brightness
The brightness of the head-up display can
be adjusted on of the multi-information
display. Also, it is automatically adjusted
according to the ambient brightness. ■
Head-up display automatic position
adjustment
If the display position is recorded into mem-
ory, the head-up display will be automati-
cally adjusted to th e desired position.
( P.130) ■
When the battery is disconnected
The customize settings of the head-up dis-
play will be reset.Using the head-up display
WARNING■
Caution for changing settings of the
head-up display
As the engine needs to be running while
changing the settings of the head-up dis-
play, ensure that the vehicle is parked in a
place with adequate ventilation. In a
closed area such as a garage, exhaust
gases including harmful carbon monox-
ide (CO) may collect and enter the vehi-
cle. This may lead to death or a serious
health hazard.
NOTICE
■
When changing the settings of the
head-up display
To prevent battery discharge, ensure that
the engine is running while the changing
the settings of the head-up display.
Page 92 of 512
92 2-1. Instrument cluster
LS500_OM_(U)_1810 menu screen.
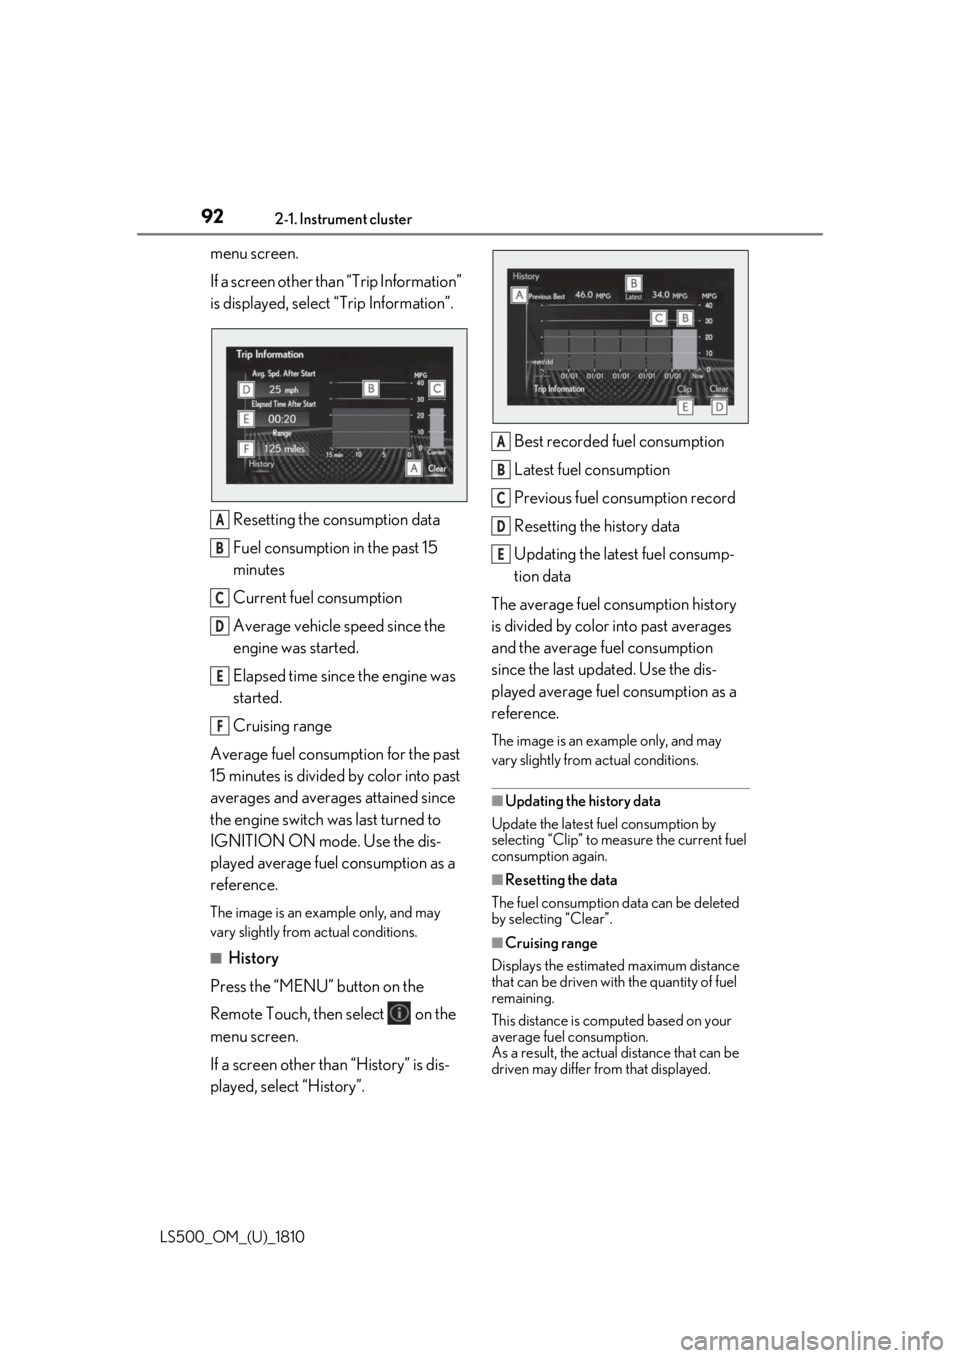
If a screen other than “Trip Information”
is displayed, select “Trip Information”.
Resetting the consumption data
Fuel consumption in the past 15
minutes
Current fuel consumption
Average vehicle speed since the
engine was started.
Elapsed time since the engine was
started.
Cruising range
Average fuel consumption for the past
15 minutes is divided by color into past
averages and averages attained since
the engine switch was last turned to
IGNITION ON mode. Use the dis-
played average fuel consumption as a
reference. The image is an example only, and may
vary slightly from actual conditions.
■
History
Press the “MENU” button on the
Remote Touch, then select on the
menu screen.
If a screen other than “History” is dis-
played, select “History”. Best recorded fuel consumption
Latest fuel consumption
Previous fuel consumption record
Resetting the history data
Updating the latest fuel consump-
tion data
The average fuel consumption history
is divided by color into past averages
and the average fuel consumption
since the last updated. Use the dis-
played average fuel consumption as a
reference. The image is an example only, and may
vary slightly from actual conditions.
■
Updating the history data
Update the latest fuel consumption by
selecting “Clip” to meas ure the current fuel
consumption again.
■
Resetting the data
The fuel consumption data can be deleted
by selecting “Clear”.
■
Cruising range
Displays the estimated maximum distance
that can be driven with the quantity of fuel
remaining.
This distance is computed based on your
average fuel consumption.
As a result, the actual distance that can be
driven may differ from that displayed.A
B
C
D
E
F A
B
C
D
E
Page 97 of 512
973-1. Key information
LS500_OM_(U)_1810 3
Before driving ●
To reduce key battery depletion when the
electronic key is to not be used for long
periods of time, set the electronic key to
the battery-saving mode. ( P.113)●
As the electronic ke y always receives
radio waves, the battery will become
depleted even if the electronic key is not
used. The following symptoms indicate
that the electronic key battery may be
depleted. Replace the battery when nec-
essary.
• The smart access system with push-but-
ton start or the wireless remote control
does not operate.
• The detection area becomes smaller.
•The LED indicator on the key surface
does not turn on.●
To avoid serious deterioration, do not
leave the electronic ke y within 3 ft. (1 m)
of the following electr ical appliances that
produce a magnetic field:
•TVs
• Personal computers
• Cellular phones, cordless phones and
battery chargers
• Recharging cellular phones or cordless
phones
• Table lamps
• Induction cookers ■
Replacing the battery
P.399■
Confirmation of the number of regis-
tered keys
The number of keys already registered to
the vehicle can be confirmed. Ask your
Lexus dealer for details.
■
If “A New Key has been Registered
Contact Your Dealer for Details” is
shown on the multi-information display
This message will be displayed each time
the driver’s door is opened when the doors
are unlocked from the outside for approxi-
mately 10 days after a new electronic key
has been registered.
If this message is disp layed but you have not
had a new electronic key registered, ask
your Lexus dealer to check if an unknown
electronic key (other than those in your
possession) has been registered. NOTICE■
To prevent key damage ●
Do not drop the keys, subject them to
strong shocks or bend them. ●
Do not expose the keys to high tem-
peratures for a long period of time. ●
Do not get the keys wet or wash them
in an ultrasonic washer etc. ●
Do not attach metallic or magnetic
materials to the keys or place the keys
close to such materials. ●
Do not disassemble the keys. ●
Do not attach a sticker or anything else
to the surface of the electronic key. ●
Do not place the keys near objects that
produce magnetic fields, such as TVs,
audio systems and induction cookers,
or medical electrical equipment, such
as low-frequency therapy equipment. ■
Carrying the electronic key on your
person
Carry the electronic key 3.9 in. (10 cm)
or more away from electric appliances
that are turned on. Radio waves emitted
from electric applianc es within 3.9 in. (10
cm) of the electronic key may interfere
with the key, causing the key to not func-
tion properly.
■
In case of a smart access system with
push-button start malfunction or
other key-rela ted problems
P.433
■
When an electronic key is lost
P.432
■
Handling the card key (if equipped)
●
Do not apply excess force when insert-
ing the mechanical key into the card
key. Doing so may damage the card
key.
Page 98 of 512
98 3-1. Key information
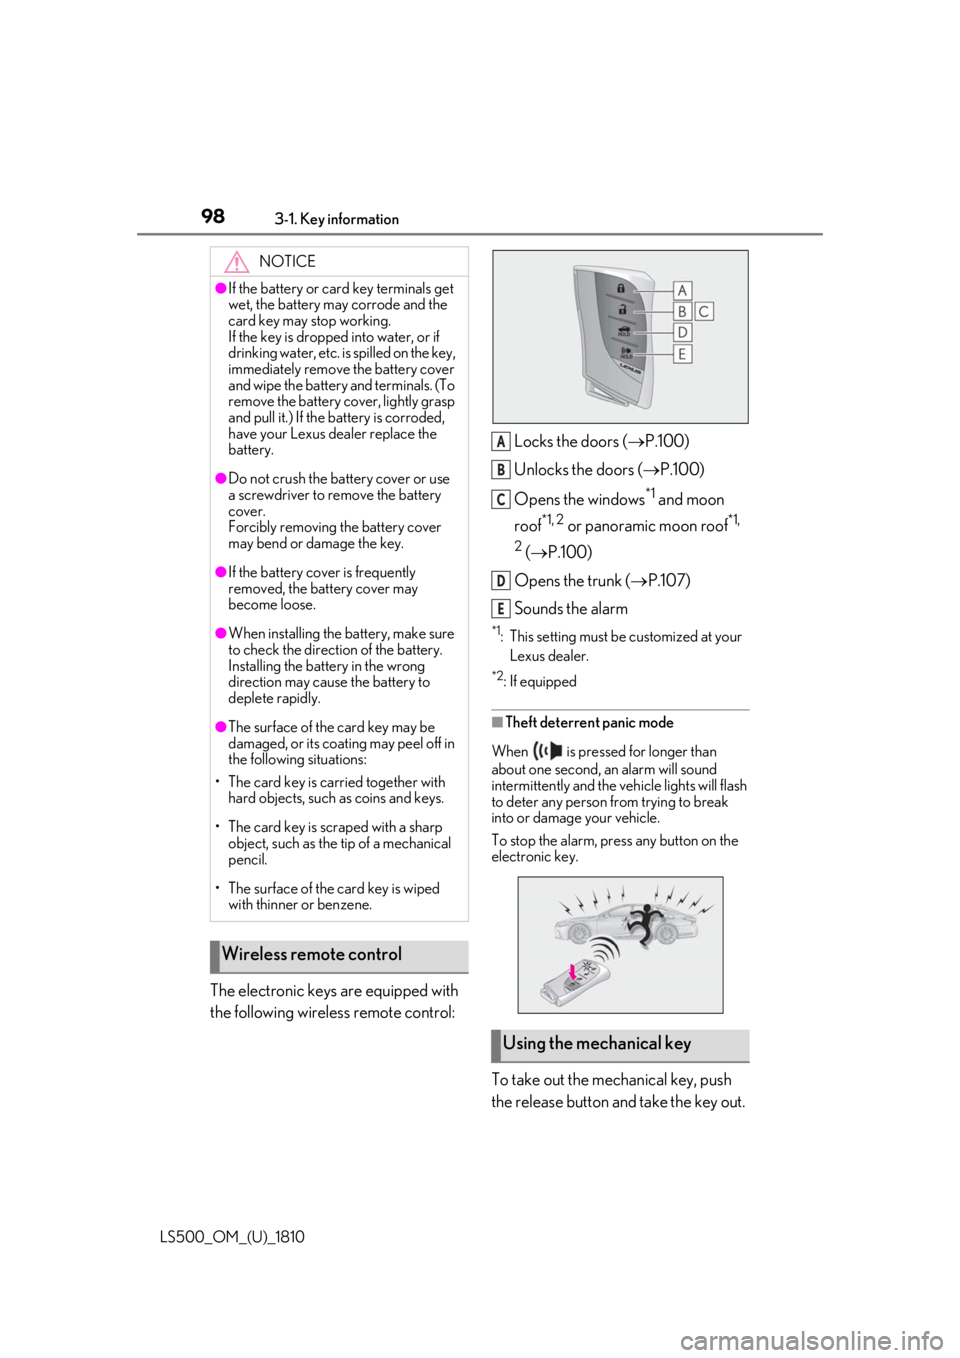
LS500_OM_(U)_1810 The electronic keys are equipped with
the following wireless remote control: Locks the doors ( P.100)
Unlocks the doors ( P.100)
Opens the windows *1
and moon
roof *1, 2
or panoramic moon roof *1,
2
( P.100)
Opens the trunk ( P.107)
Sounds the alarm *1
: This setting must be customized at your
Lexus dealer. *2
: If equipped
■
Theft deterrent panic mode
When is pressed for longer than
about one second, an alarm will sound
intermittently and the vehicle lights will flash
to deter any person from trying to break
into or damage your vehicle.
To stop the alarm, press any button on the
electronic key.
To take out the mechanical key, push
the release button and take the key out.NOTICE●
If the battery or card key terminals get
wet, the battery may corrode and the
card key may stop working.
If the key is dropped into water, or if
drinking water, etc. is spilled on the key,
immediately remove the battery cover
and wipe the battery and terminals. (To
remove the battery co ver, lightly grasp
and pull it.) If the battery is corroded,
have your Lexus dealer replace the
battery.●
Do not crush the battery cover or use
a screwdriver to remove the battery
cover.
Forcibly removing the battery cover
may bend or damage the key.●
If the battery cover is frequently
removed, the battery cover may
become loose.●
When installing the ba ttery, make sure
to check the direction of the battery.
Installing the battery in the wrong
direction may cause the battery to
deplete rapidly.●
The surface of the card key may be
damaged, or its coating may peel off in
the following situations:
• The card key is carried together with
hard objects, such as coins and keys.
• The card key is scraped with a sharp
object, such as the tip of a mechanical
pencil.
• The surface of the card key is wiped
with thinner or benzene.
Wireless remote control
Using the mechanical key A
B
C
D
E
Page 100 of 512
100 3-2. Opening, closing and locking the doors and trunk
LS500_OM_(U)_1810 3-2.Opening, closing and locking the doors and trunk
■
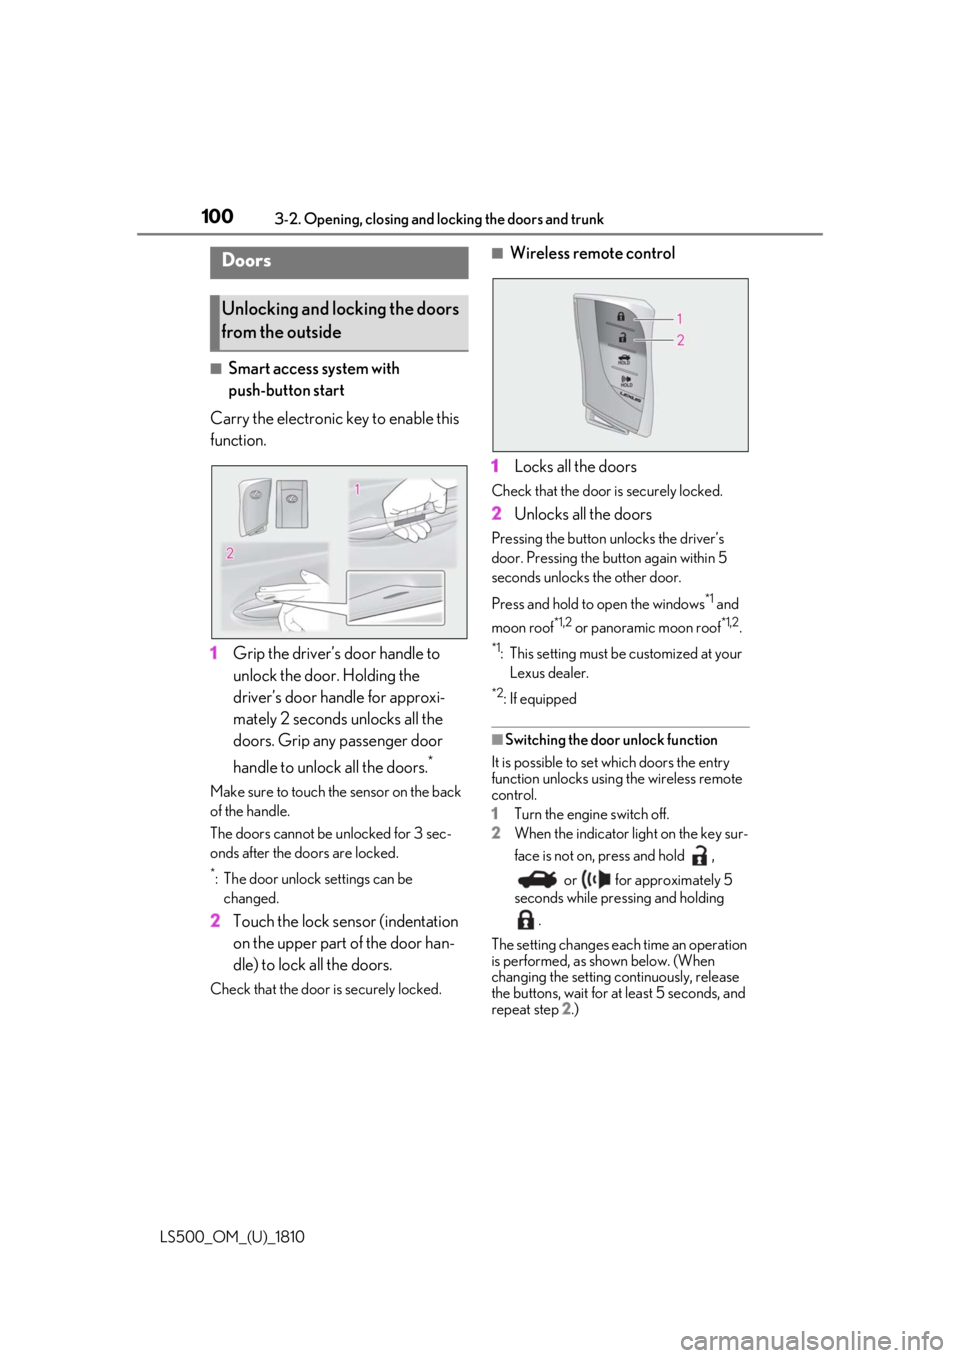
Smart access system with
push-button start
Carry the electronic key to enable this
function.
1 Grip the driver’s door handle to
unlock the door. Holding the
driver’s door ha ndle for approxi-
mately 2 seconds unlocks all the
doors. Grip any passenger door
handle to unlock all the doors. *
Make sure to touch the sensor on the back
of the handle.
The doors cannot be unlocked for 3 sec-
onds after the doors are locked. *
: The door unlock settings can be
changed.
2 Touch the lock sensor (indentation
on the upper part of the door han-
dle) to lock all the doors.Check that the door is securely locked. ■
Wireless remote control
1 Locks all the doors Check that the door is securely locked.
2 Unlocks all the doors Pressing the button unlocks the driver’s
door. Pressing the button again within 5
seconds unlocks the other door.
Press and hold to open the windows *1
and
moon roof *1,2
or panoramic moon roof *1,2
.*1
: This setting must be customized at your
Lexus dealer. *2
: If equipped
■
Switching the door unlock function
It is possible to set which doors the entry
function unlocks using the wireless remote
control.
1 Turn the engine switch off.
2 When the indicator light on the key sur-
face is not on, press and hold ,
or for approximately 5
seconds while pre ssing and holding
.
The setting changes each time an operation
is performed, as shown below. (When
changing the setting continuously, release
the buttons, wait for at least 5 seconds, and
repeat step 2 .)Doors
Unlocking and locking the doors
from the outside