LEXUS LS500 2019 Owners Manual
Manufacturer: LEXUS, Model Year: 2019, Model line: LS500, Model: LEXUS LS500 2019Pages: 512, PDF Size: 9.71 MB
Page 371 of 512
3716-3. Do-it-yourself maintenance
LS500_OM_(U)_1810 6
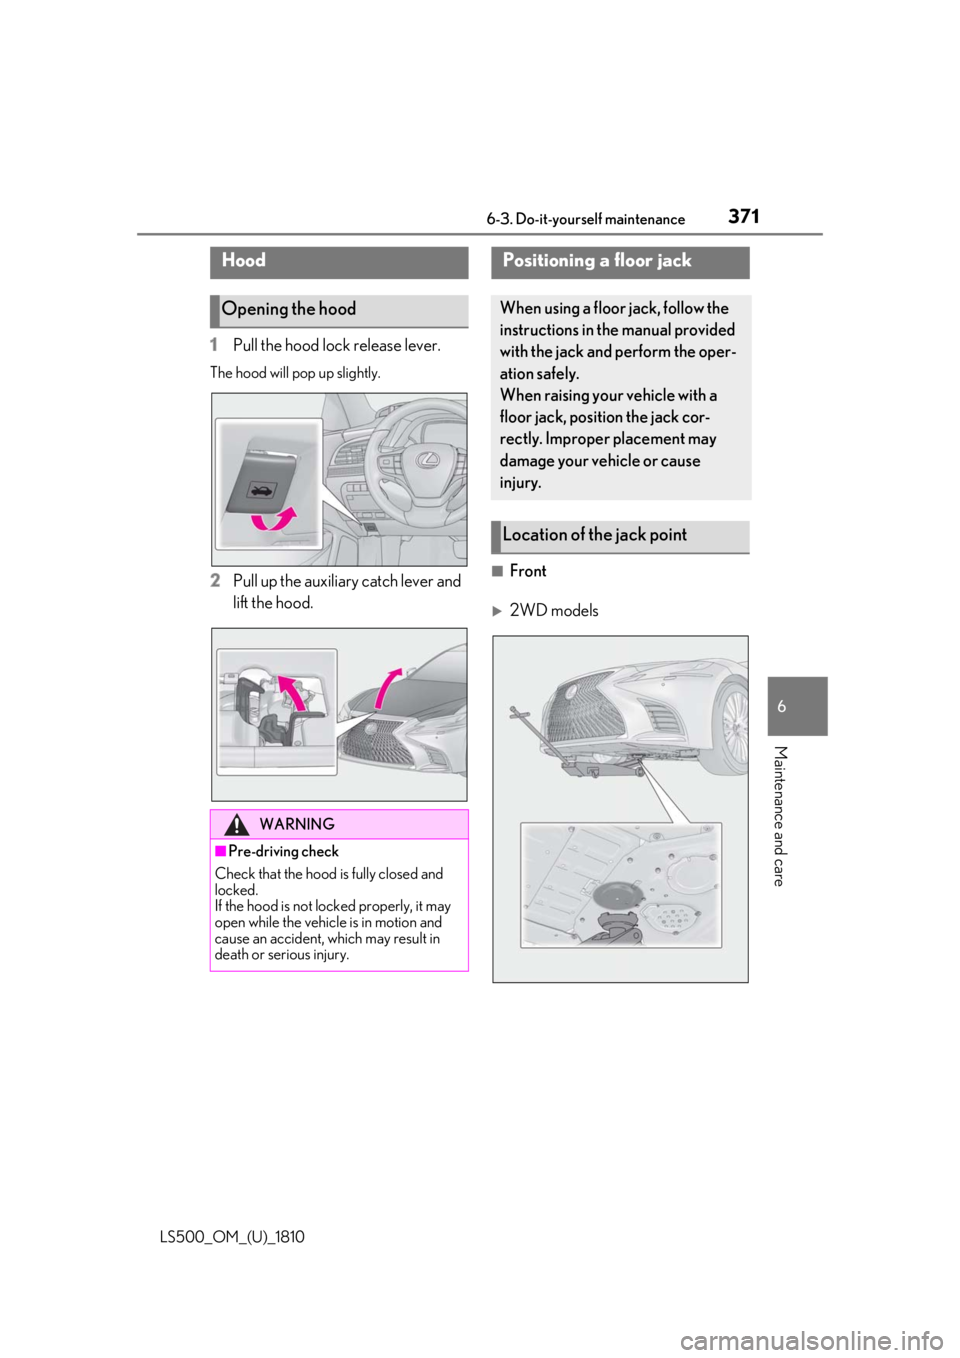
Maintenance and care 1 Pull the hood lock release lever.The hood will pop up slightly.
2 Pull up the auxiliary catch lever and
lift the hood. ■
Front
2WD modelsHood
Opening the hood
WARNING
■
Pre-driving check
Check that the hood is fully closed and
locked.
If the hood is not locked properly, it may
open while the vehicle is in motion and
cause an accident, which may result in
death or serious injury. Positioning a floor jack When using a floor jack, follow the
instructions in the manual provided
with the jack and perform the oper-
ation safely.
When raising your vehicle with a
floor jack, position the jack cor-
rectly. Improper placement may
damage your vehicle or cause
injury.
Location of the jack point
Page 372 of 512
372 6-3. Do-it-yourself maintenance
LS500_OM_(U)_1810
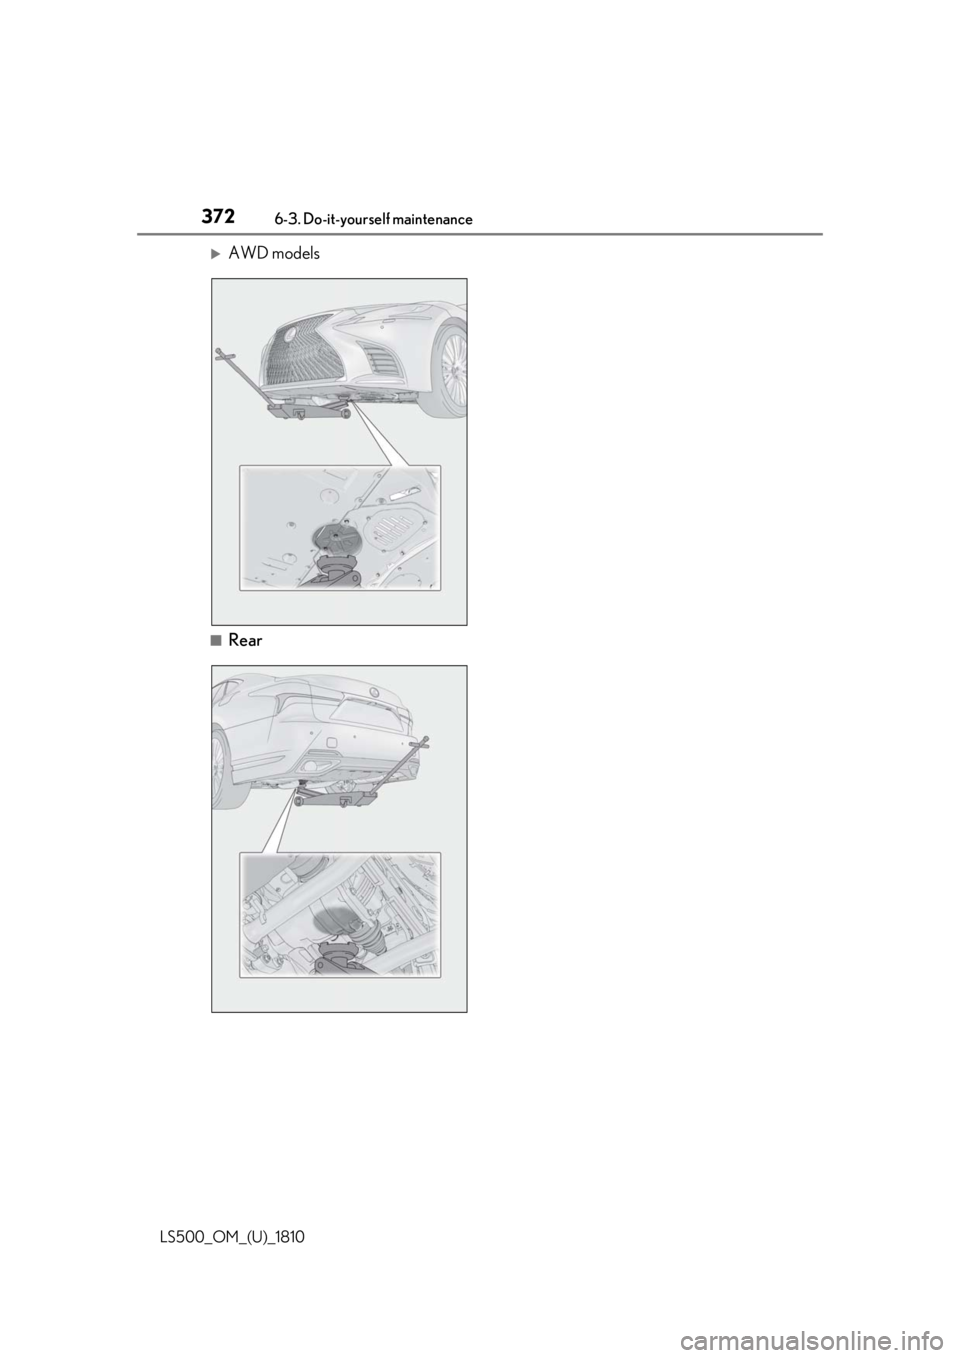
AWD models
■
Rear
Page 373 of 512
3736-3. Do-it-yourself maintenance
LS500_OM_(U)_1810 6
Maintenance and care
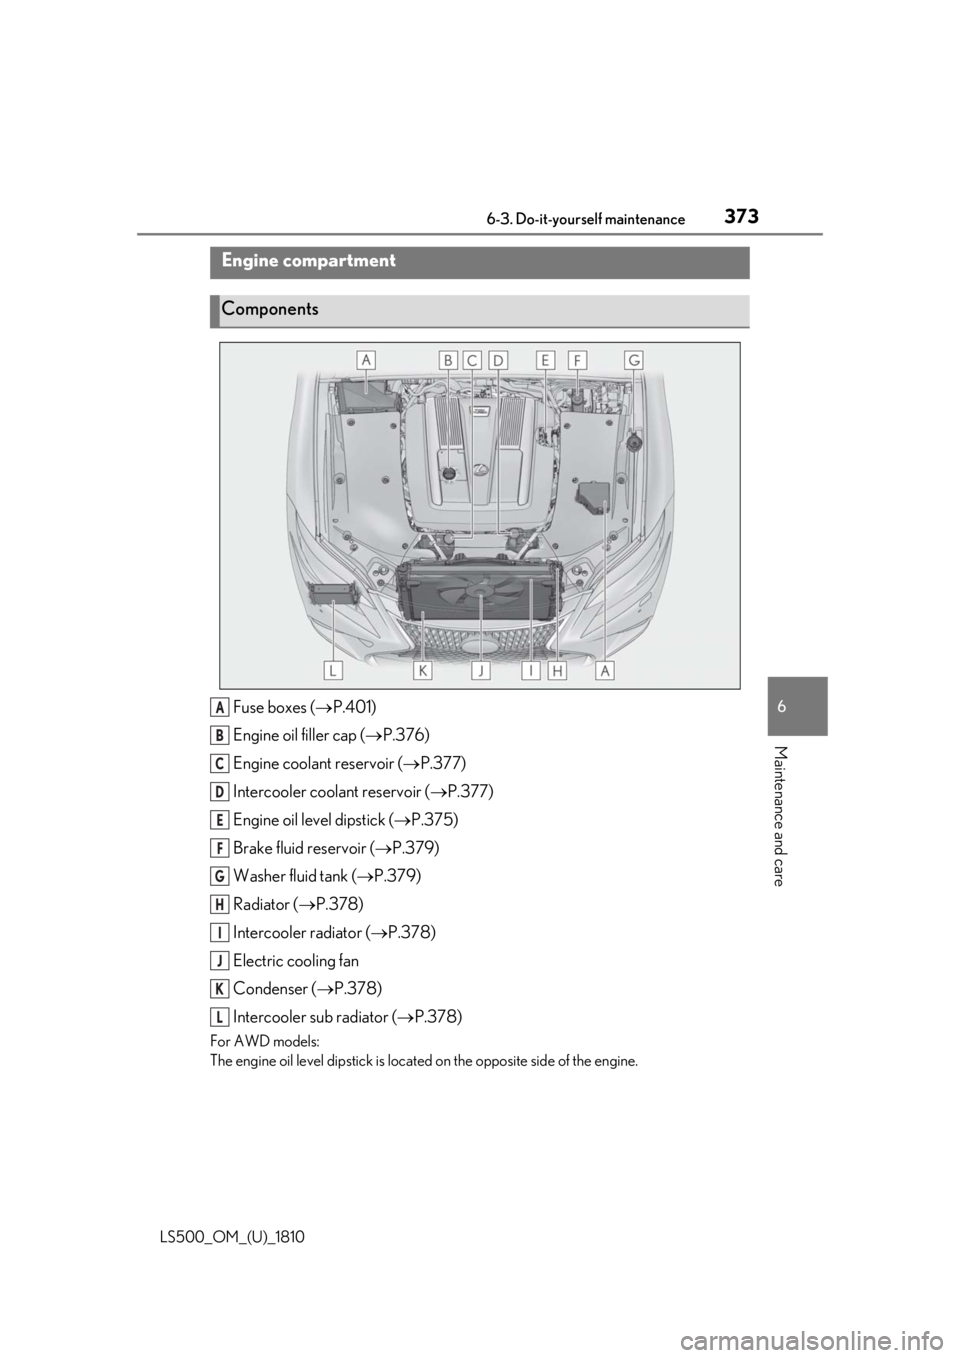
Fuse boxes ( P.401)
Engine oil filler cap ( P.376)
Engine coolant reservoir ( P.377)
Intercooler coolant reservoir ( P.377)
Engine oil level dipstick ( P.375)
Brake fluid reservoir ( P.379)
Washer fluid tank ( P.379)
Radiator ( P.378)
Intercooler radiator ( P.378)
Electric cooling fan
Condenser ( P.378)
Intercooler sub radiator ( P.378)For AWD models:
The engine oil level dipstick is locate d on the opposite side of the engine.Engine compartment
Components
A
B
C
D
E
F
G
H
I
J
K
L
Page 374 of 512
374 6-3. Do-it-yourself maintenance
LS500_OM_(U)_1810 ■
Battery
P.380
■
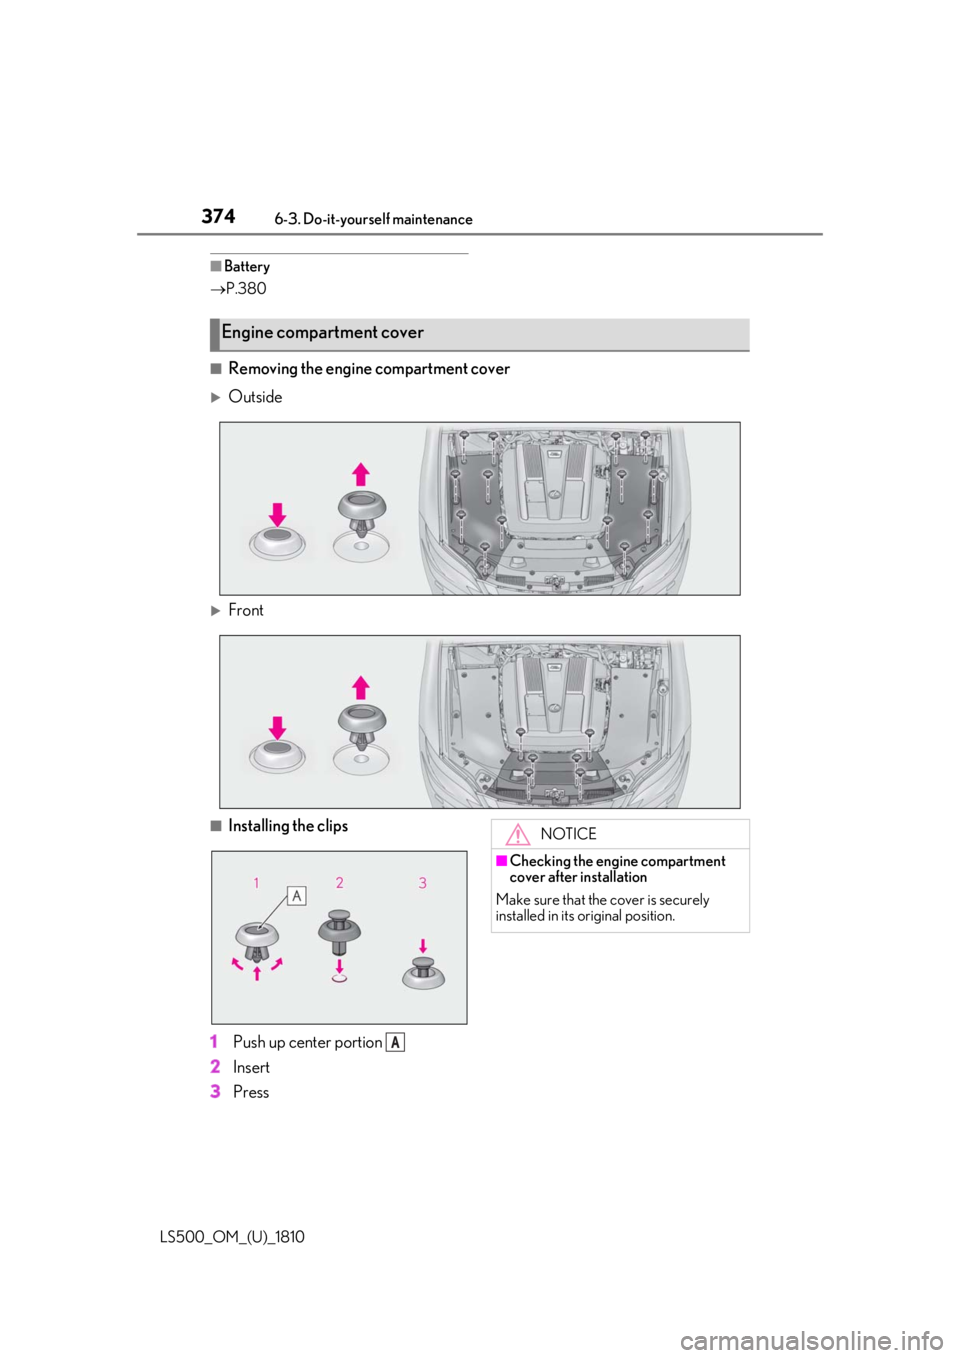
Removing the engine compartment cover
Outside
Front
■
Installing the clips
1 Push up center portion
2 Insert
3 PressEngine compartment cover
A NOTICE
■
Checking the engine compartment
cover after installation
Make sure that the cover is securely
installed in its original position.
Page 375 of 512
3756-3. Do-it-yourself maintenance
LS500_OM_(U)_1810 6
Maintenance and care ■
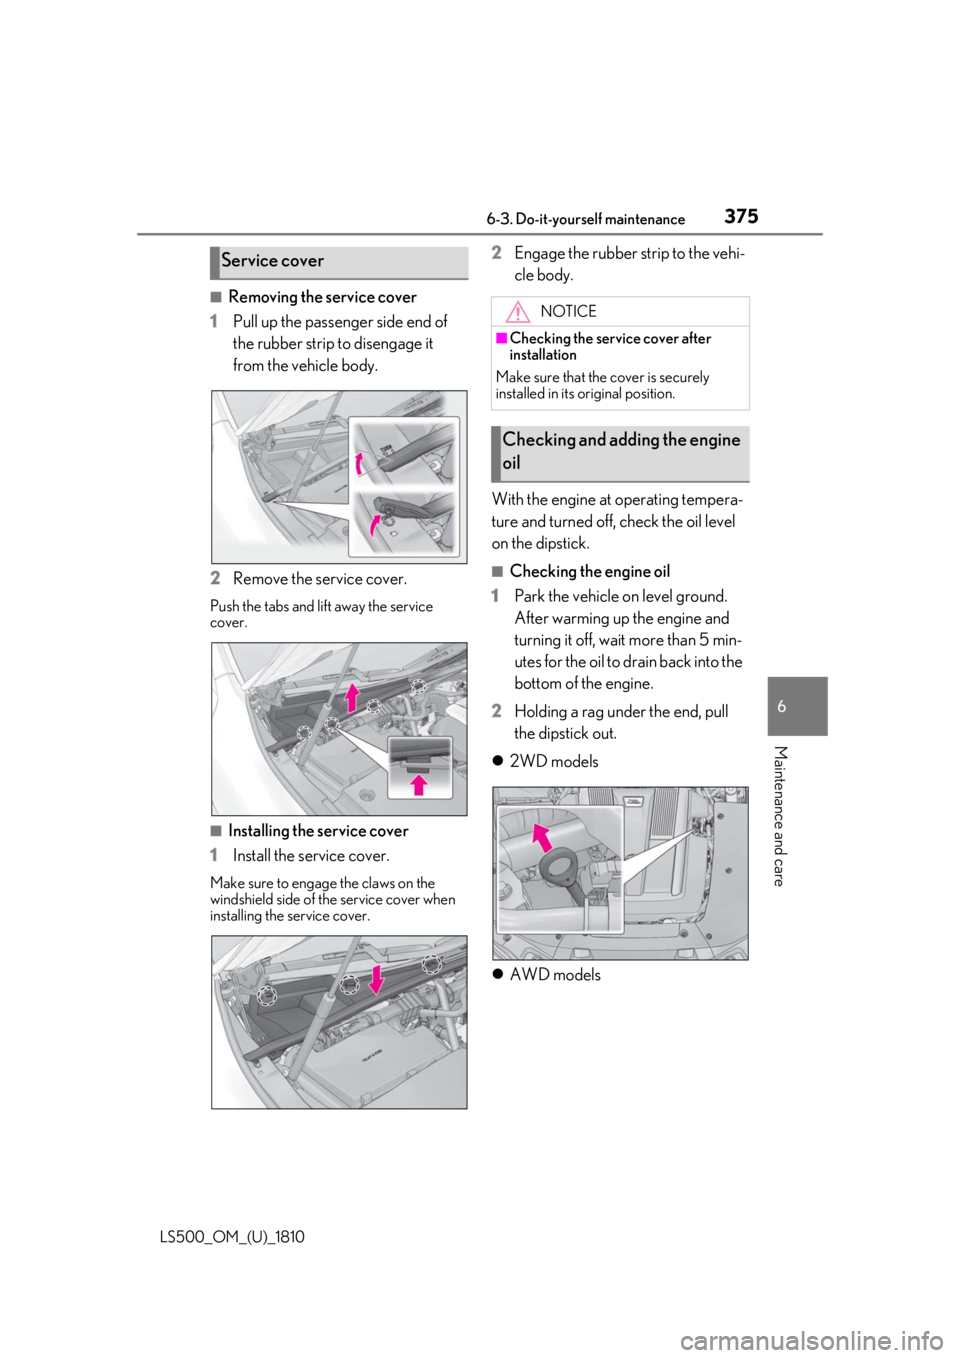
Removing the service cover
1 Pull up the passenger side end of
the rubber strip to disengage it
from the vehicle body.
2 Remove the service cover.Push the tabs and lift away the service
cover.
■
Installing the service cover
1 Install the service cover.Make sure to engage the claws on the
windshield side of the service cover when
installing the service cover. 2 Engage the rubber strip to the vehi-
cle body.
With the engine at operating tempera-
ture and turned off, check the oil level
on the dipstick. ■
Checking the engine oil
1 Park the vehicle on level ground.
After warming up the engine and
turning it off, wait more than 5 min-
utes for the oil to drain back into the
bottom of the engine.
2 Holding a rag under the end, pull
the dipstick out.
2WD models
AWD modelsService cover NOTICE■
Checking the service cover after
installation
Make sure that the cover is securely
installed in its original position.
Checking and adding the engine
oil
Page 376 of 512
376 6-3. Do-it-yourself maintenance
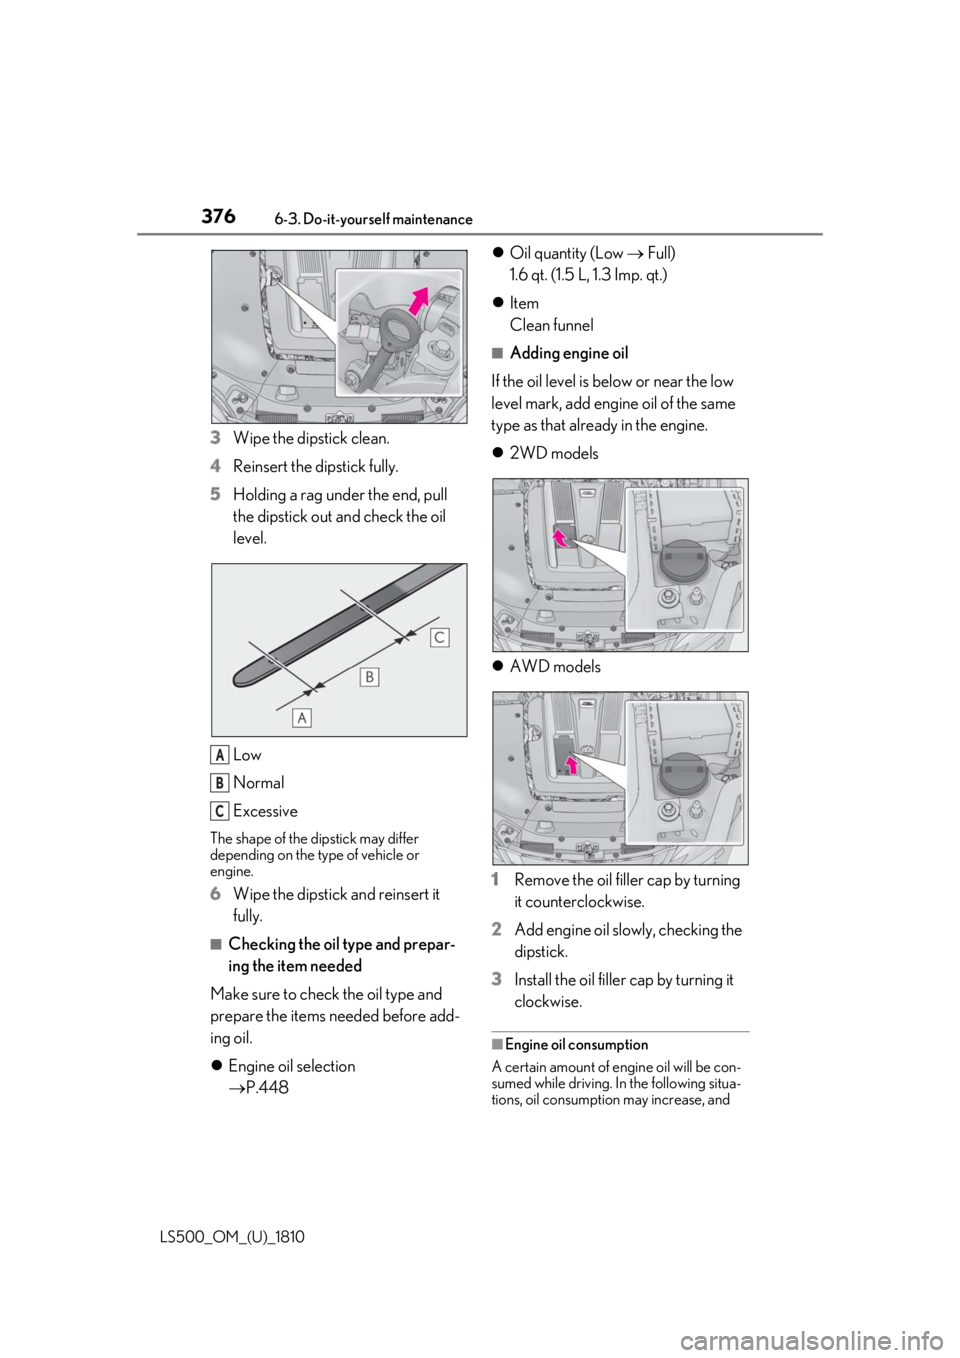
LS500_OM_(U)_1810 3 Wipe the dipstick clean.
4 Reinsert the dipstick fully.
5 Holding a rag under the end, pull
the dipstick out and check the oil
level.
Low
Normal
ExcessiveThe shape of the dipstick may differ
depending on the type of vehicle or
engine.
6 Wipe the dipstick and reinsert it
fully. ■
Checking the oil type and prepar-
ing the item needed
Make sure to check the oil type and
prepare the items needed before add-
ing oil.
Engine oil selection
P.448 Oil quantity (Low Full)
1.6 qt. (1.5 L, 1.3 Imp. qt.)
Item
Clean funnel ■
Adding engine oil
If the oil level is below or near the low
level mark, add engine oil of the same
type as that already in the engine.
2WD models
AWD models
1 Remove the oil filler cap by turning
it counterclockwise.
2 Add engine oil slowly, checking the
dipstick.
3 Install the oil filler cap by turning it
clockwise. ■
Engine oil consumption
A certain amount of engine oil will be con-
sumed while driving. In the following situa-
tions, oil consumption may increase, and A
B
C
Page 377 of 512
3776-3. Do-it-yourself maintenance
LS500_OM_(U)_1810 6
Maintenance and care engine oil may need to be refilled in
between oil maintenance intervals. ●
When the engine is new, for example
directly after purchasing the vehicle or
after replacing the engine●
If low quality oil or oil of an inappropriate
viscosity is used●
When driving at high engine speeds or
with a heavy load, or when driving while
accelerating or decelerating frequently●
When leaving the engine idling for a long
time, or when driving frequently through
heavy traffic■
After changing the engine oil
The engine oil maintena nce data should be
reset. Perform the following procedures:
1 Press or of the meter control
switch to select .
2 Press or to select “Vehicle Set-
tings” and then press .
3 Press or to select “Oil Mainte-
nance” and then press .
4 Press or to select “Yes” and
then press .
A message will be displayed on the
multi-information disp lay when the reset
procedure has been completed.
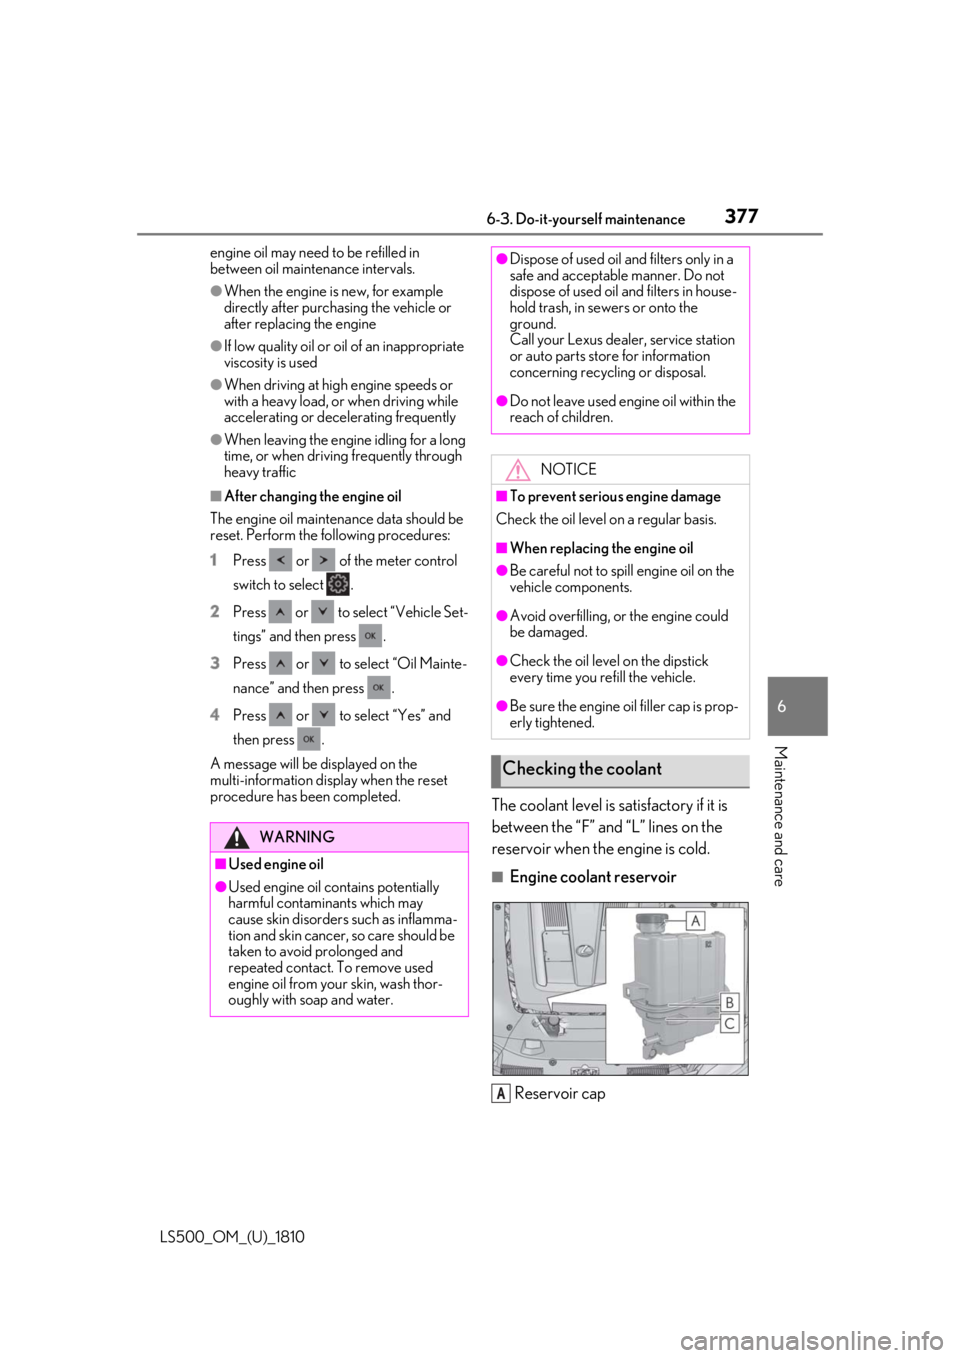
The coolant level is satisfactory if it is
between the “F” and “L” lines on the
reservoir when the engine is cold. ■
Engine coolant reservoir
Reservoir capWARNING
■
Used engine oil●
Used engine oil contains potentially
harmful contaminants which may
cause skin disorders such as inflamma-
tion and skin cancer, so care should be
taken to avoid prolonged and
repeated contact. To remove used
engine oil from your skin, wash thor-
oughly with soap and water. ●
Dispose of used oil and filters only in a
safe and acceptable manner. Do not
dispose of used oil and filters in house-
hold trash, in sewers or onto the
ground.
Call your Lexus dealer, service station
or auto parts store for information
concerning recycling or disposal. ●
Do not leave used engine oil within the
reach of children.
NOTICE■
To prevent serious engine damage
Check the oil level on a regular basis. ■
When replacing the engine oil ●
Be careful not to spill engine oil on the
vehicle components. ●
Avoid overfilling, or the engine could
be damaged. ●
Check the oil level on the dipstick
every time you re fill the vehicle.●
Be sure the engine o il filler cap is prop-
erly tightened.
Checking the coolant
A
Page 378 of 512
378 6-3. Do-it-yourself maintenance
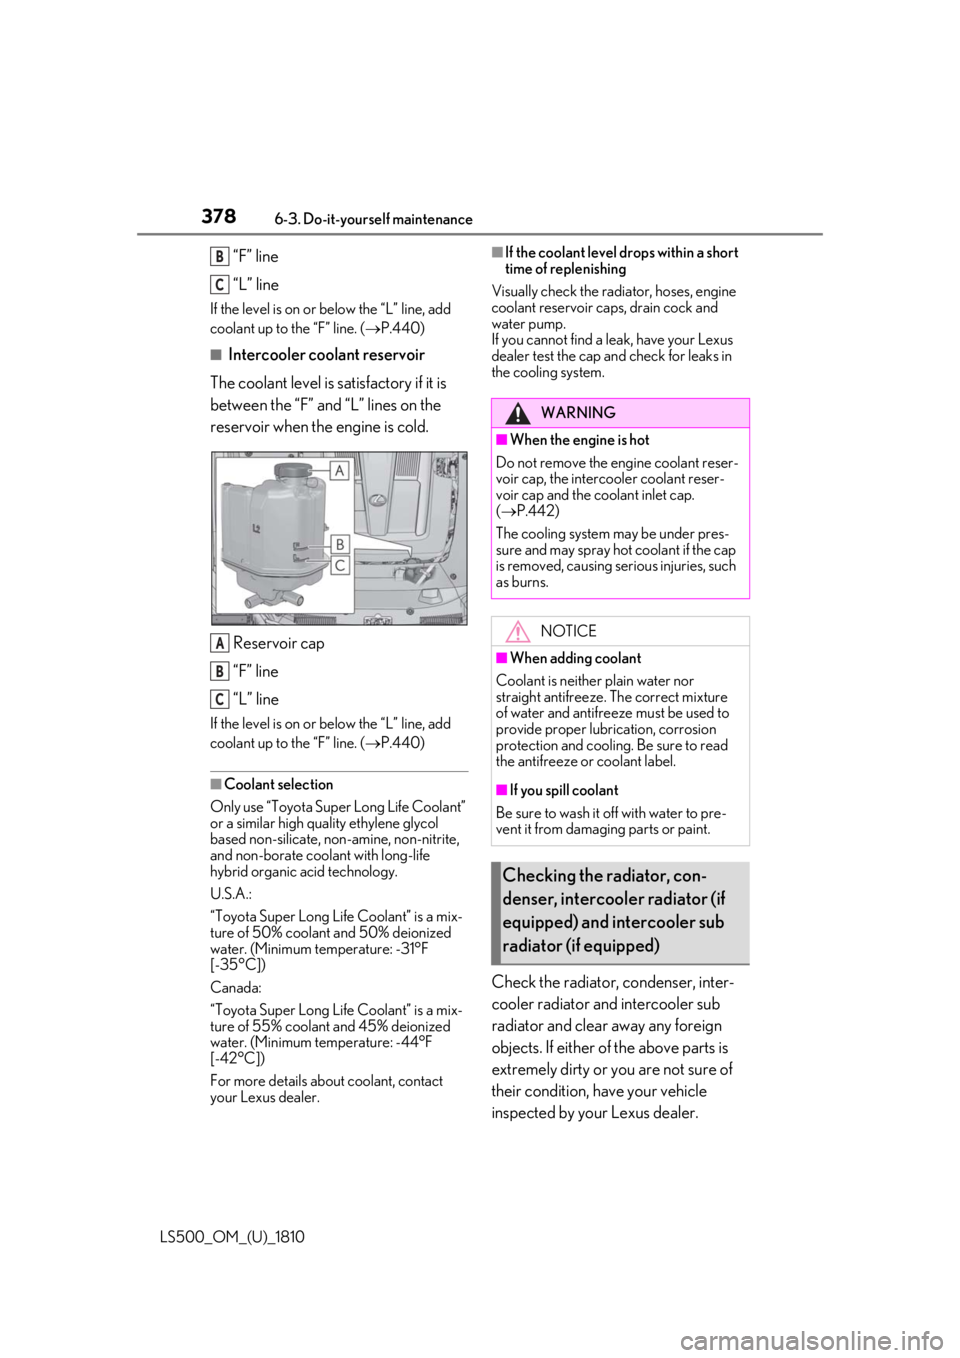
LS500_OM_(U)_1810 “F” line
“L” lineIf the level is on or below the “L” line, add
coolant up to the “F” line. ( P.440)■
Intercooler coolant reservoir
The coolant level is satisfactory if it is
between the “F” and “L” lines on the
reservoir when the engine is cold.
Reservoir cap
“F” line
“L” lineIf the level is on or below the “L” line, add
coolant up to the “F” line. ( P.440)
■
Coolant selection
Only use “Toyota Super Long Life Coolant”
or a similar high quality ethylene glycol
based non-silicate, non-amine, non-nitrite,
and non-borate coolant with long-life
hybrid organic acid technology.
U.S.A.:
“Toyota Super Long Life Coolant” is a mix-
ture of 50% coolant and 50% deionized
water. (Minimum temperature: -31°F
[-35°C])
Canada:
“Toyota Super Long Life Coolant” is a mix-
ture of 55% coolant and 45% deionized
water. (Minimum temperature: -44°F
[-42°C])
For more details about coolant, contact
your Lexus dealer. ■
If the coolant level drops within a short
time of replenishing
Visually check the radi ator, hoses, engine
coolant reservoir caps, drain cock and
water pump.
If you cannot find a leak, have your Lexus
dealer test the cap and check for leaks in
the cooling system.
Check the radiator, condenser, inter-
cooler radiator and intercooler sub
radiator and clear away any foreign
objects. If either of the above parts is
extremely dirty or yo u are not sure of
their condition, have your vehicle
inspected by your Lexus dealer.B
C
A
B
C WARNING■
When the engine is hot
Do not remove the engine coolant reser-
voir cap, the intercooler coolant reser-
voir cap and the coolant inlet cap.
( P.442)
The cooling system may be under pres-
sure and may spray hot coolant if the cap
is removed, causing serious injuries, such
as burns.
NOTICE■
When adding coolant
Coolant is neithe r plain water nor
straight antifreeze. The correct mixture
of water and antifreeze must be used to
provide proper lubrication, corrosion
protection and cooling. Be sure to read
the antifreeze or coolant label.
■
If you spill coolant
Be sure to wash it off with water to pre-
vent it from damaging parts or paint.
Checking the radiator, con-
denser, intercooler radiator (if
equipped) and intercooler sub
radiator (if equipped)
Page 379 of 512
3796-3. Do-it-yourself maintenance
LS500_OM_(U)_1810 6
Maintenance and care ■
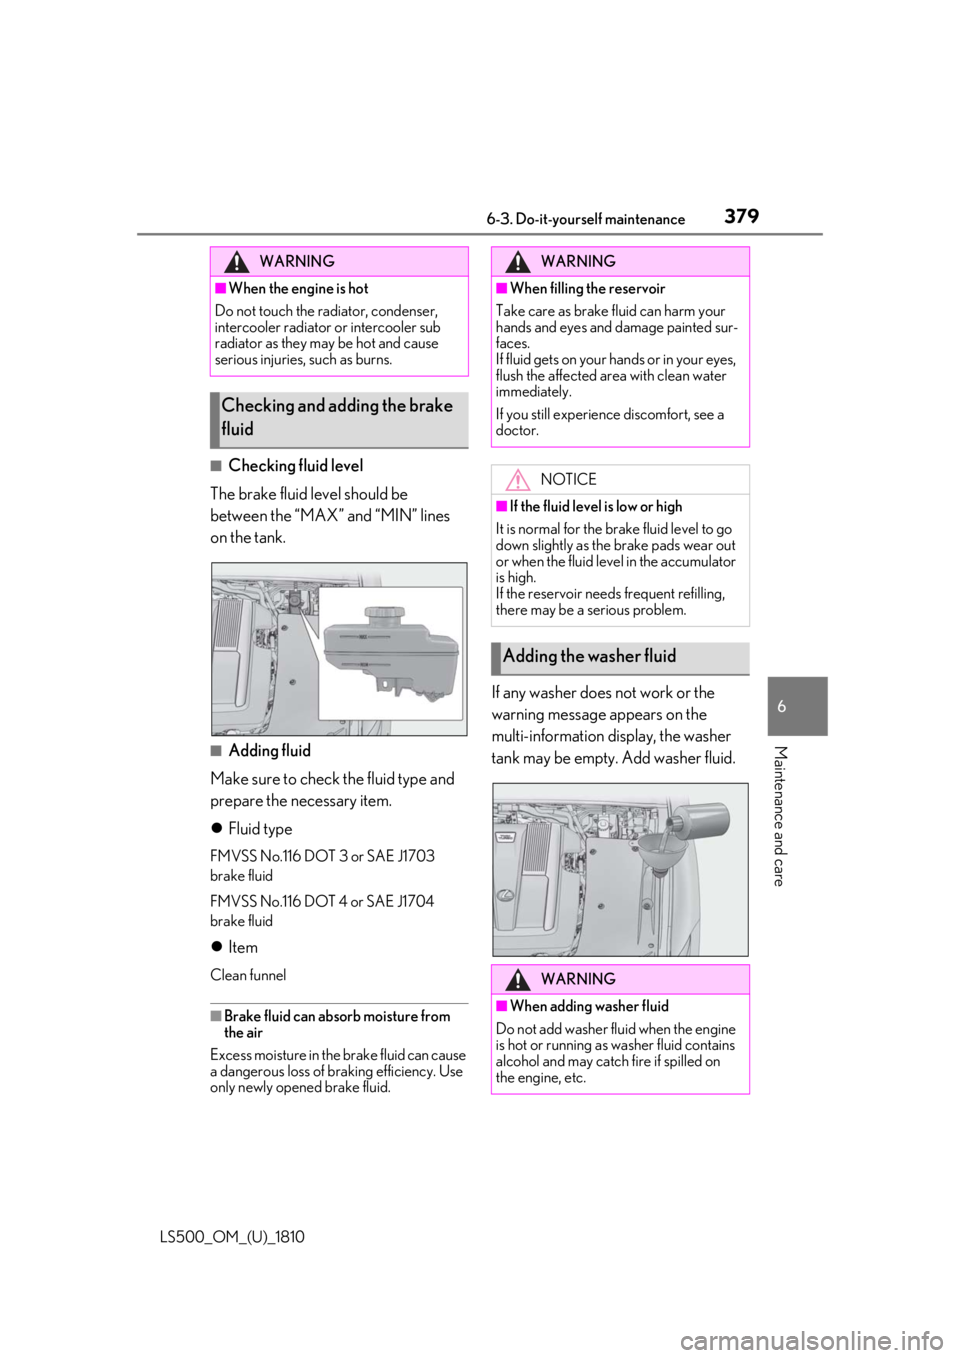
Checking fluid level
The brake fluid level should be
between the “MAX” and “MIN” lines
on the tank.
■
Adding fluid
Make sure to check the fluid type and
prepare the necessary item.
Fluid type FMVSS No.116 DOT 3 or SAE J1703
brake fluid
FMVSS No.116 DOT 4 or SAE J1704
brake fluid
Item Clean funnel
■
Brake fluid can absorb moisture from
the air
Excess moisture in the brake fluid can cause
a dangerous loss of braking efficiency. Use
only newly opened brake fluid. If any washer does not work or the
warning message appears on the
multi-information display, the washer
tank may be empty. Add washer fluid.WARNING■
When the engine is hot
Do not touch the radiator, condenser,
intercooler radiator or intercooler sub
radiator as they may be hot and cause
serious injuries, such as burns.
Checking and adding the brake
fluid WARNING■
When filling the reservoir
Take care as brake fluid can harm your
hands and eyes and damage painted sur-
faces.
If fluid gets on your hands or in your eyes,
flush the affected area with clean water
immediately.
If you still experience discomfort, see a
doctor.
NOTICE■
If the fluid level is low or high
It is normal for the brake fluid level to go
down slightly as the brake pads wear out
or when the fluid leve l in the accumulator
is high.
If the reservoir need s frequent refilling,
there may be a serious problem.
Adding the washer fluid
WARNING
■
When adding washer fluid
Do not add washer fluid when the engine
is hot or running as washer fluid contains
alcohol and may catch fire if spilled on
the engine, etc.
Page 380 of 512
380 6-3. Do-it-yourself maintenance
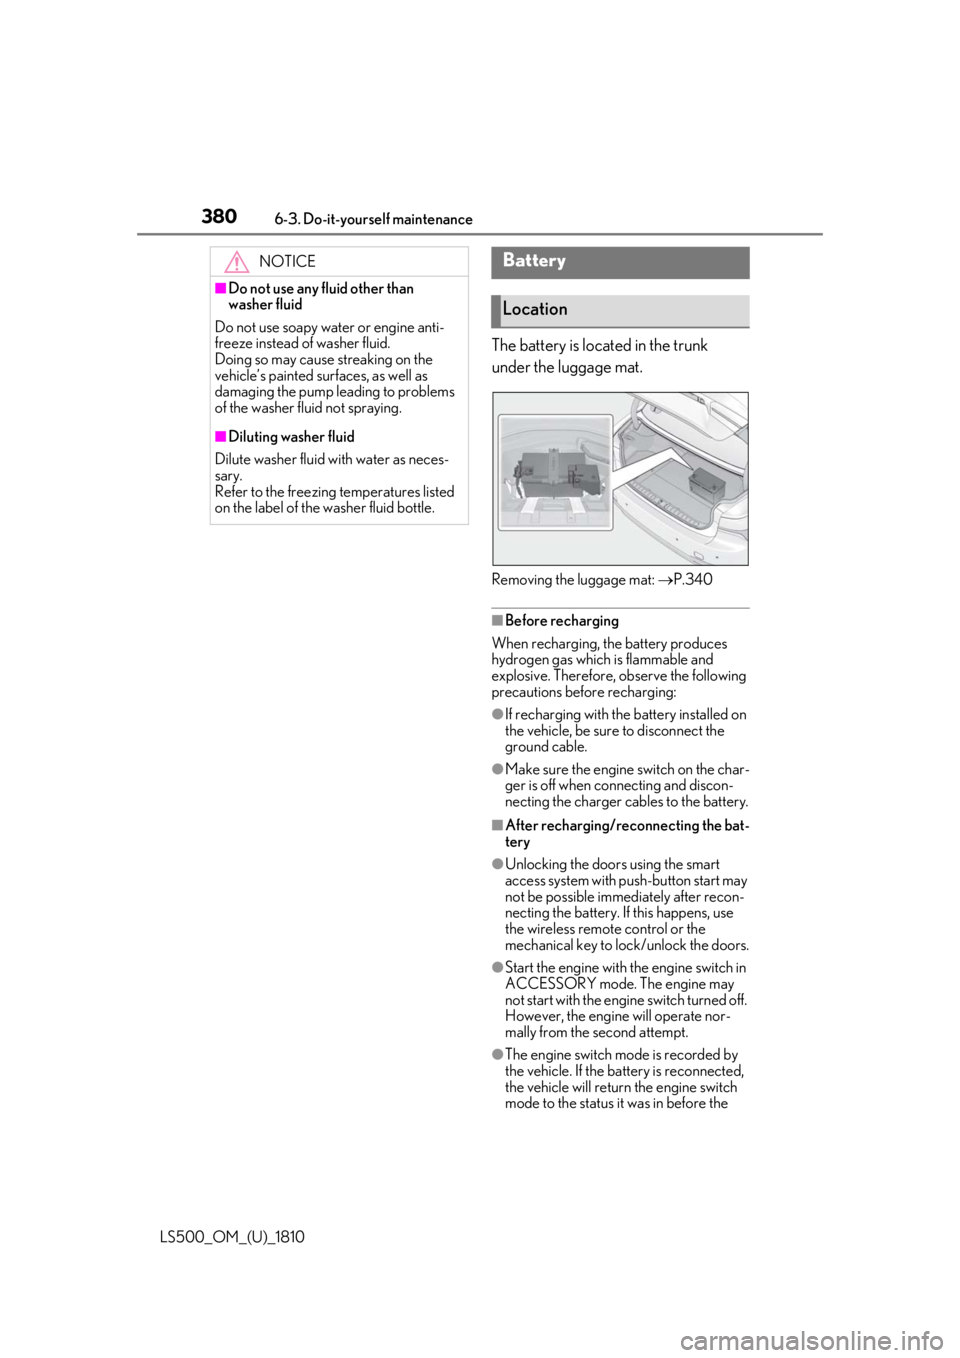
LS500_OM_(U)_1810 The battery is located in the trunk
under the luggage mat.
Removing the luggage mat: P.340
■
Before recharging
When recharging, the battery produces
hydrogen gas which is flammable and
explosive. Therefore, observe the following
precautions before recharging: ●
If recharging with the battery installed on
the vehicle, be sure to disconnect the
ground cable. ●
Make sure the engine switch on the char-
ger is off when connecting and discon-
necting the charger cables to the battery. ■
After recharging/reconnecting the bat-
tery ●
Unlocking the doors using the smart
access system with pu sh-button start may
not be possible immediately after recon-
necting the battery. If this happens, use
the wireless remote control or the
mechanical key to lo ck/unlock the doors.
●
Start the engine with the engine switch in
ACCESSORY mode. The engine may
not start with the engine switch turned off.
However, the engine will operate nor-
mally from the second attempt.
●
The engine switch mode is recorded by
the vehicle. If the battery is reconnected,
the vehicle will return the engine switch
mode to the status it was in before the NOTICE■
Do not use any fluid other than
washer fluid
Do not use soapy water or engine anti-
freeze instead of washer fluid.
Doing so may cause streaking on the
vehicle’s painted surfaces, as well as
damaging the pump leading to problems
of the washer fluid not spraying. ■
Diluting washer fluid
Dilute washer fluid with water as neces-
sary.
Refer to the freezing temperatures listed
on the label of the washer fluid bottle. Battery
Location