park LEXUS LS500 2021 Owners Manual
[x] Cancel search | Manufacturer: LEXUS, Model Year: 2021, Model line: LS500, Model: LEXUS LS500 2021Pages: 520, PDF Size: 9.81 MB
Page 399 of 520
3996-3. Do-it-yourself maintenance
6
Maintenance and care
■The tire pressure warning system
must be initialized in the following
circumstances:
When the tire inflation pressure is
changed such as when changing
traveling speed or load weight.
When the tire inflation pressure is
changed such as when the tire size
is changed.
When rotating the tires.
After performing the transmitter ID
code registration procedure.
( P.400)
When the tire pressure warning system
is initialized, the cu rrent tire inflation
pressure is set as the benchmark pres-
sure.
■How to initialize the tire pressure
warning system
1 Park the vehicle in a safe place, turn
the engine switch off and wait 20
minutes or more.
The initialization procedure cannot be
started while the vehicle is moving.
2Adjust the tire inflation pressure to
the specified cold tire inflation pres-
sure level.
Make sure to adjust th e tire pressure to the
specified cold tire infl ation pressure level.
The tire pressure warning system will oper-
ate based on this pressure level.
3 Start the engine.
4 Press or of the meter con-
trol switch to select . 5
Press or to select “Vehicle
Settings” and then press .
6 Press or to select “TPWS”
and then press .
7 Press or to select “Set
Pressure”. Then press and hold
until the tire pressure warning light
blinks 3 times.
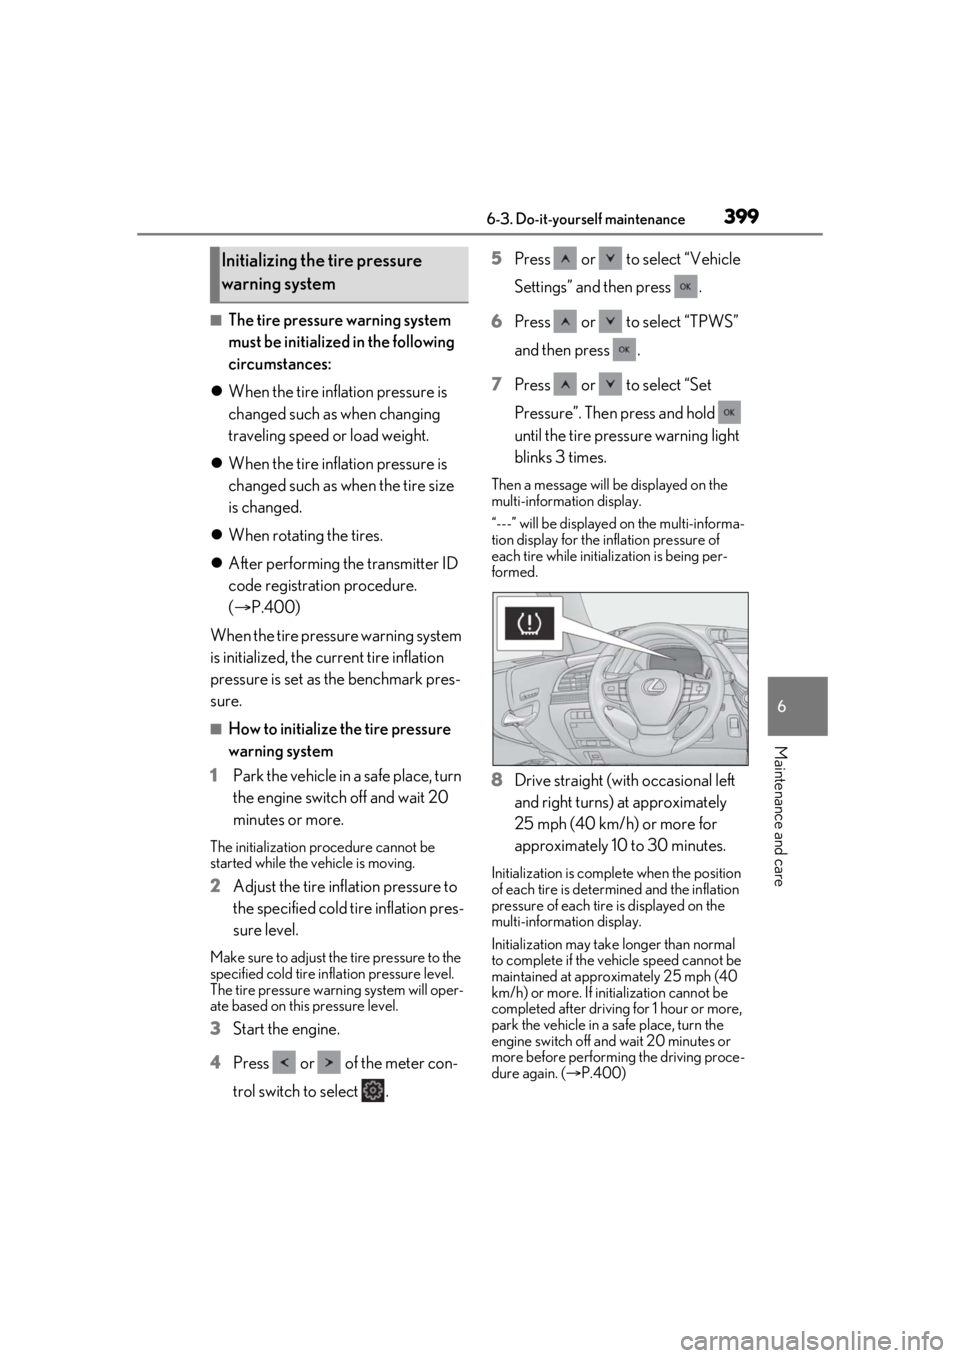
Then a message will be displayed on the
multi-information display.
“---” will be displayed on the multi-informa-
tion display for the inflation pressure of
each tire while initialization is being per-
formed.
8Drive straight (with occasional left
and right turns) at approximately
25 mph (40 km/h) or more for
approximately 10 to 30 minutes.
Initialization is comple te when the position
of each tire is determ ined and the inflation
pressure of each tire is displayed on the
multi-information display.
Initialization may take longer than normal
to complete if the vehicle speed cannot be
maintained at approx imately 25 mph (40
km/h) or more. If initialization cannot be
completed after driving for 1 hour or more,
park the vehicle in a safe place, turn the
engine switch off and wait 20 minutes or
more before performing the driving proce-
dure again. ( P.400)
Initializing the tire pressure
warning system
Page 400 of 520
4006-3. Do-it-yourself maintenance
■Initialization procedure
●Make sure to perform the initialization
procedure after adjusting the tire inflation
pressure.
Also, make sure the tires are cold before
performing the initialization procedure or
adjusting the tire inflation pressure.
●If the engine switch is turned off during
initialization, it is not necessary to restart
the initialization procedure from the
beginning as it will begin automatically
when the engine switch is turned back to
IGNITION ON mode.
●If initialization has accidentally been
started when it is not necessary, adjust
the tire inflation pres sure to the specified
level when the tires are cold and then
perform the initia lization procedure
again.
●While the position of each tire is being
determined and the inflation pressures
are not being displayed on the
multi-information display, if the inflation
pressure of a tire drops, the tire pressure
warning light will come on.
■If the tire pressure warning system is not
initialized properly
●In the following situations, initialization
may take longer than usual to be com-
pleted or may not be possible. (Usually,
the vehicle will need to be driven for
approximately 10 to 30 minutes to com-
plete initialization.) If initialization is not
complete after drivin g approximately 30
minutes, continue driving for a while.
• If the vehicle is driven on an unpaved road, it may take longer to complete ini-
tialization.
• If the vehicle is backed up while perform- ing initialization, data collected during ini-
tialization will be cleared and it will take
longer than normal to complete.
• If the vehicle is driven in heavy traffic or another situation where other vehicles
are driven close by, it may take time for
the system to recognize the tire pressure
warning valve and tran smitters of your
vehicle over those of other vehicles.
If initialization is not complete after driving
for approximately 1 hour, park the vehicle in a safe place for approximately 20 minutes
and then drive the vehicle again.
●In the following situations, initialization
will not be started or was not completed
properly and the system will not operate
properly. Perform the initialization proce-
dure again.
• If, when attempting to start initialization,
the tire pressure warning light does not
blink 3 times.
• If, when the vehicle has been driven for
about 20 minutes after performing ini-
tialization, the tire pressure warning light
blinks for approximately 1 minute and
then illuminates.
●If initialization canno t be completed after
performing the above procedure, con-
tact your Lexus dealer.
Every tire pressure warning valve and
transmitter has a unique ID code.
When replacing a tire pressure warn-
ing valve and transmitter, it is necessary
to register the ID codes.
The ID codes can be registered on
of the multi-information display.
1 Park the vehicle in a safe place, turn
the engine switch off, wait 20 min-
utes or more, and then start the
engine.
WARNING
■When initializing the tire pressure
warning system
Do not initialize the tire pressure warning
system without first adjusting the tire
inflation pressure to the specified level.
Otherwise, the tire pressure warning
light may not come on even if the tire
inflation pressure is low, or it may come
on when the tire in flation pressure is
actually normal.
Registering ID codes
Page 402 of 520
4026-3. Do-it-yourself maintenance
approximately 10 to 30 minutes to com-
plete ID code registration.)
If ID code registration is not complete
after driving for approximately 30 min-
utes, continue driving for a while.
• If the vehicle is driven on an unpaved
road, it may take longer than normal to
complete registration.
• If the vehicle is backed up while perform-
ing registration, data collected during
registration will be cleared, and it will take
longer than normal to complete.
• If the vehicle is driven in heavy traffic or another situation where other vehicles
are driven close by, it may take time for
the system to recognize the tire pressure
warning valve and tran smitters of your
vehicle over those of other vehicles.
• If a wheel with a tire pressure warning valve and transmitter installed is inside or
near the vehicle, registration of the ID
codes for the installed wheels may not be
possible.
If ID registration is not complete after driv-
ing for approximately 1 hour, park the vehi-
cle in a safe place for approximately 20
minutes and then perform the ID code reg-
istration procedure again.
●In the following situations, ID code regis-
tration will not be started or was not com-
pleted properly and the system will not
operate properly. Perform the ID code
registration procedure again.
• If, when attempting to start ID code regis-
tration, the tire pressure warning light
does not blink slowly 3 times.
• If, when the vehicle has been driven for
about 20 minutes after performing ID
code registration, the tire pressure warn-
ing light blinks for approximately 1 minute
and then illuminates.
●If ID code registration cannot be com-
pleted after performing the above proce-
dure, contact your Lexus dealer.
Stop the vehicle in a safe place on a
hard, flat surface.
Set the parking brake.
Shift the shift position to P.
Disabling the height control. (if
equipped) ( P.303)
Stop the engine.
■Jack and tools
As your vehicle is eq uipped with run-flat
tires, the following tools for replacing a tire
are not included with your vehicle. They can
be purchased at your Lexus dealer.
●Wheel nut wrench
●Jack
●Jack handle
Replacing the tire
When raising your vehicle with a
jack, position the jack correctly.
Improper placement may damage
your vehicle or cause injury.
If necessary tire replacement
seems difficult to perform, contact
your Lexus dealer.
Before jacking up the vehicle
WARNING
■Using the tire jack
Observe the following precautions.
Improper use of the tire jack may cause
the vehicle to suddenly fall off the jack,
leading to death or serious injury.
●Do not use the tire jack for any pur-
pose other than replacing tires or
installing and removing tire chains.
●Do not use other tire jacks for replac-
ing tires on this vehicle.
Page 406 of 520

4066-3. Do-it-yourself maintenance
The recommended cold tire inflation
pressure and tire size are displayed on
the tire and loading information label.
( P.462)
Tire valve
Tire pressure gauge 1
Remove the tire valve cap.
2 Press the tip of the tire pressure
gauge onto the tire valve.
3 Read the pressure using the gauge
gradations.
4 If the tire inflation pressure is not at
the recommended level, adjust the
pressure.
If you add too much air, press the
center of the valve to deflate.
5 After completing the tire inflation
pressure measurement and adjust-
ment, apply soapy water to the
valve and check for leakage.
6 Put the tire valve cap back on.
■Tire inflation pressure check interval
You should check tire inflation pressure
every two weeks, or at least once a month.
Do not forget to check the spare.
■Effects of incorrect tire inflation pres-
sure
Driving with incorrect ti re inflation pressure
may result in the following:
●Reduced fuel economy
●Reduced driving comfort and poor han-
dling
●Reduced tire life due to wear
●Reduced safety
●Damage to the drive train
If a tire needs frequent inflating, have it
checked by your Lexus dealer.
■Instructions for checking tire inflation
pressure
When checking tire inflation pressure,
observe the following:
●Check only when the tires are cold.
If your vehicle has been parked for at
least 3 hours or has not been driven for
more than 1 mile or 1.5 km, you will get an
accurate cold tire inflation pressure read-
Tire inflation pressure
Checking the specified tire infla-
tion pressure
Inspection and adjustment pro-
cedure
A
B
Page 415 of 520

4156-3. Do-it-yourself maintenance
6
Maintenance and care
Adjustment bolt A
Adjustment bolt B
1 Make sure the vehicle has a full
tank of gasoline and the area
around the headlight is not
deformed.
2 Park the vehicle on level ground.
3 Sit in the driver’s seat.
4 Bounce the vehicle several times.
1 Using a phillips-head screwdriver,
turn bolt A in either direction.
Remember the turning direction and the
NOTICE
■Before replacing fuses
Have the cause of electrical overload
determined and repaired by your Lexus
dealer as soon as possible.
Headlight aim
Vertical movement adjusting
bolts
Before checking the headlight
aim
Adjusting the headlight aim
A
B
Page 422 of 520
4227-2. Steps to take in an emergency
In the following situations, it is not pos-
sible to be towed by another vehicle
using cables or chains, as the rear
wheels may be locked due to the park-
ing lock. Contact your Lexus dealer or
commercial towing service.
There is a malfunction in the P posi-
tion control system. ( P.177, 436)
There is a malfunction in the engine
immobilizer system. ( P.64)
There is a malfunction in the smart
access system with push-button
start. ( P.442)
The battery is discharged.
( P.444)
WARNING
■While towing
●When towing using cables or chains,
avoid sudden starts, etc. which place
excessive stress on the towing eyelets,
cables or chains. The towing eyelets,
cables or chains may become dam-
aged, broken debris may hit people,
and cause serious damage.
●Make sure to disable all functions of
the vehicle height control of the elec-
tronically modulate d air suspension.
Otherwise, the vehicle height may
change and part of your body may be
caught under the vehicle, possibly
causing injury. (
P.303)
●Do not turn the engine switch off.
This may lead to an accident as the
rear wheels will be locked by the park-
ing lock.
■Installing towing eyelets to the vehi-
cle
Make sure that towing eyelets are
installed securely.
If not securely installed, towing eyelets
may come loose during towing.
NOTICE
■To prevent damage to the vehicle
when towing using a wheel-lift type
truck
●Do not tow the vehicle from the rear
when the engine switch is off. The
steering lock mechanism is not strong
enough to hold the front wheels
straight.
●When raising the vehicle, ensure ade-
quate ground clearance for towing at
the opposite end of the raised vehicle.
Without adequate clearance, the vehi-
cle could be damaged while being
towed.
■To prevent damage to the vehicle
when towing with a sling-type truck
Do not tow with a sling-type truck, either
from the front or rear.
■To prevent damage to the vehicle
during emergency towing
Do not secure cables or chains to the
suspension components.
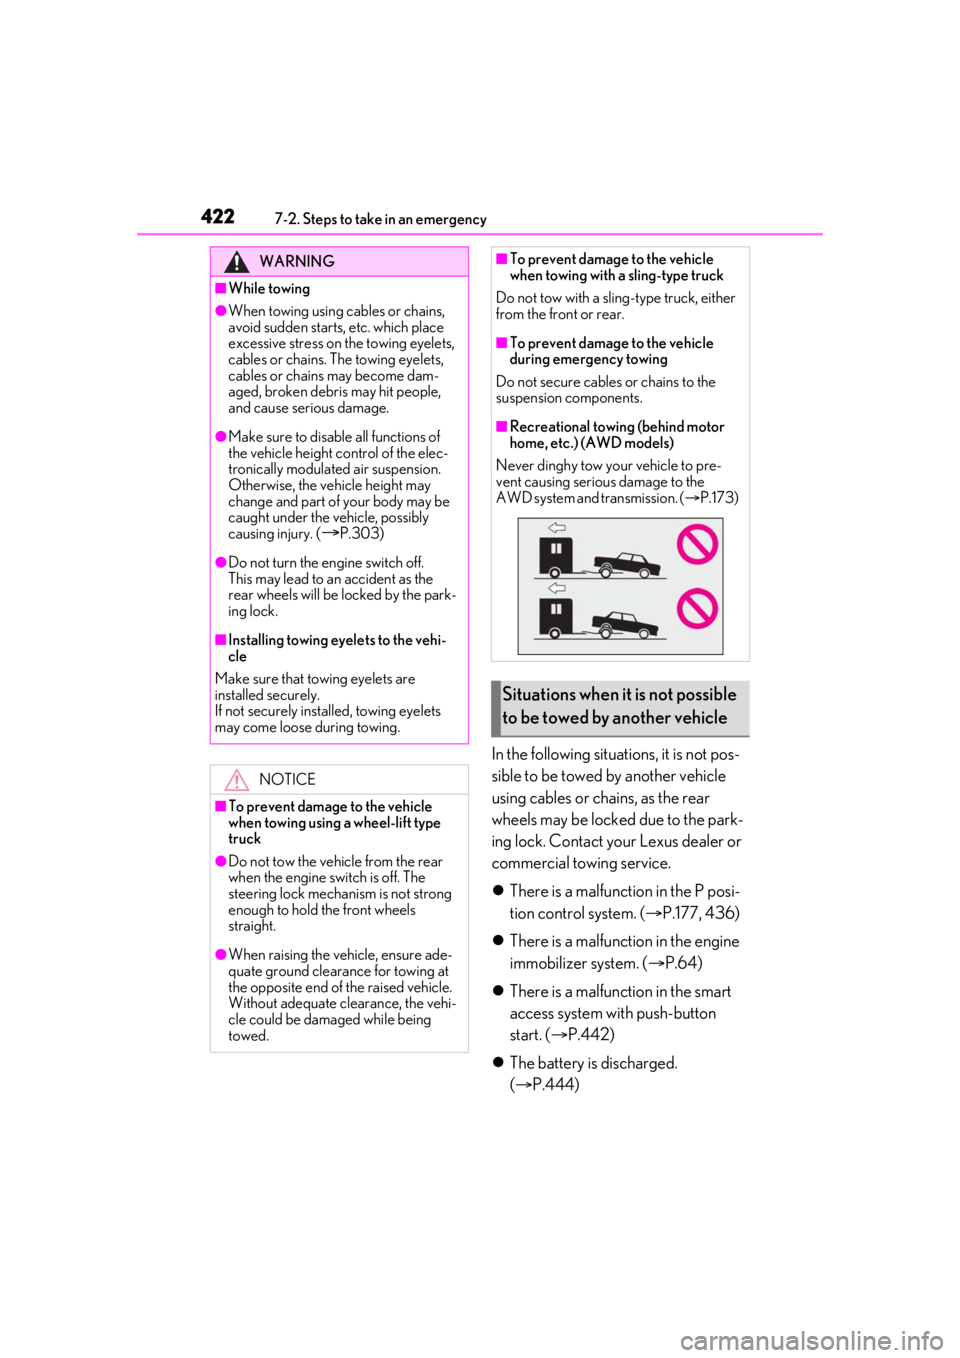
■Recreational towing (behind motor
home, etc.) (AWD models)
Never dinghy tow your vehicle to pre-
vent causing serious damage to the
AWD system and transmission. ( P.173)
Situations when it is not possible
to be towed by another vehicle
Page 423 of 520
4237-2. Steps to take in an emergency
7
When trouble arises
The following may indicate a problem
with your transmission. Contact your
Lexus dealer or commercial towing
service before towing.
The engine is running but the vehi-
cle does not move.
The vehicle makes an abnormal
sound.
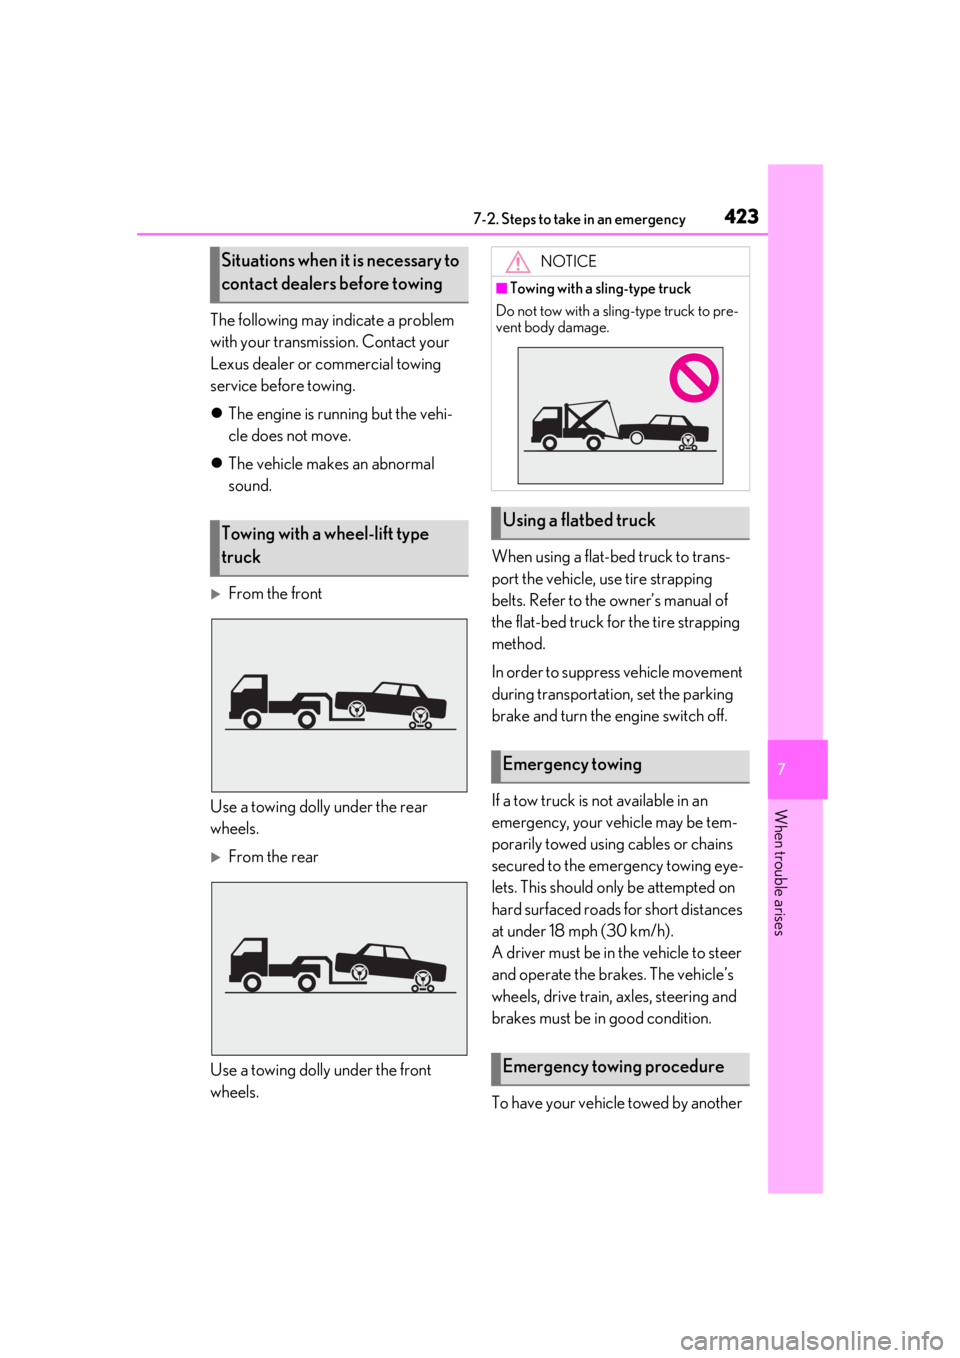
From the front
Use a towing dolly under the rear
wheels.
From the rear
Use a towing dolly under the front
wheels. When using a flat-bed truck to trans-
port the vehicle, use tire strapping
belts. Refer to the owner’s manual of
the flat-bed truck for the tire strapping
method.
In order to suppress vehicle movement
during transportation, set the parking
brake and turn the engine switch off.
If a tow truck is not available in an
emergency, your vehicle may be tem-
porarily towed using cables or chains
secured to the emergency towing eye-
lets. This should only be attempted on
hard surfaced roads for short distances
at under 18 mph (30 km/h).
A driver must be in the vehicle to steer
and operate the brakes. The vehicle’s
wheels, drive train, axles, steering and
brakes must be in good condition.
To have your vehicle towed by another
Situations when it is necessary to
contact dealers before towing
Towing with a wheel-lift type
truck
NOTICE
■Towing with a sling-type truck
Do not tow with a sling-type truck to pre-
vent body damage.
Using a flatbed truck
Emergency towing
Emergency towing procedure
Page 424 of 520
4247-2. Steps to take in an emergency
vehicle, the towing eyelet must be
installed to your vehicle. Install the tow-
ing eyelet using the following proce-
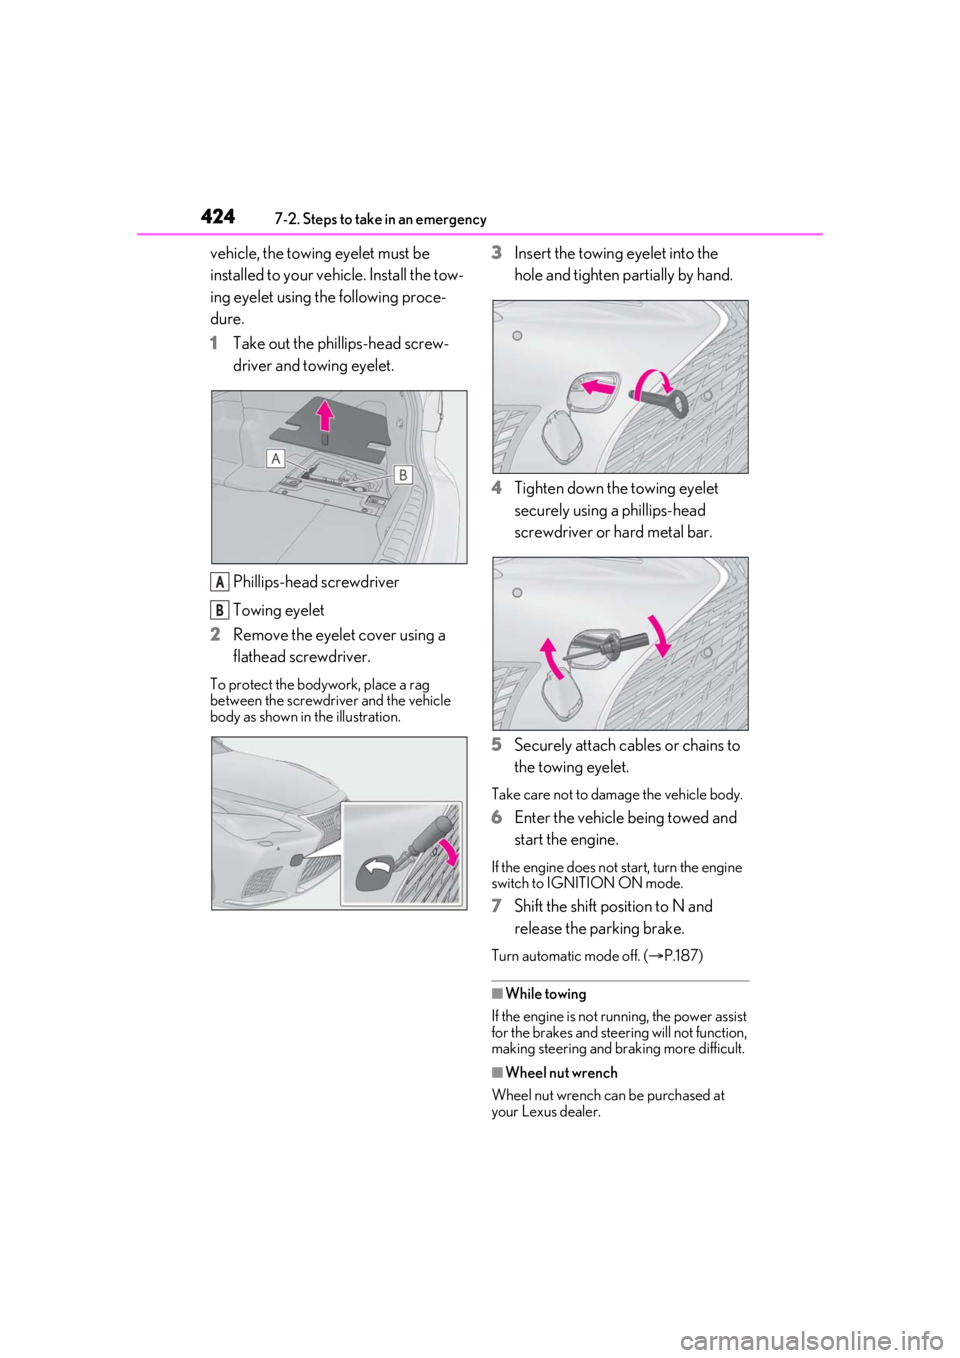
dure.
1Take out the phillips-head screw-
driver and towing eyelet.
Phillips-head screwdriver
Towing eyelet
2 Remove the eyelet cover using a
flathead screwdriver.
To protect the bodywork, place a rag
between the screwdriver and the vehicle
body as shown in the illustration.
3Insert the towing eyelet into the
hole and tighten partially by hand.
4 Tighten down the towing eyelet
securely using a phillips-head
screwdriver or hard metal bar.
5 Securely attach cables or chains to
the towing eyelet.
Take care not to damage the vehicle body.
6Enter the vehicle being towed and
start the engine.
If the engine does not start, turn the engine
switch to IGNITION ON mode.
7Shift the shift position to N and
release the parking brake.
Turn automatic mode off. ( P.187)
■While towing
If the engine is not running, the power assist
for the brakes and steering will not function,
making steering and braking more difficult.
■Wheel nut wrench
Wheel nut wrench can be purchased at
your Lexus dealer.
A
B
Page 427 of 520
4277-2. Steps to take in an emergency
7
When trouble arises
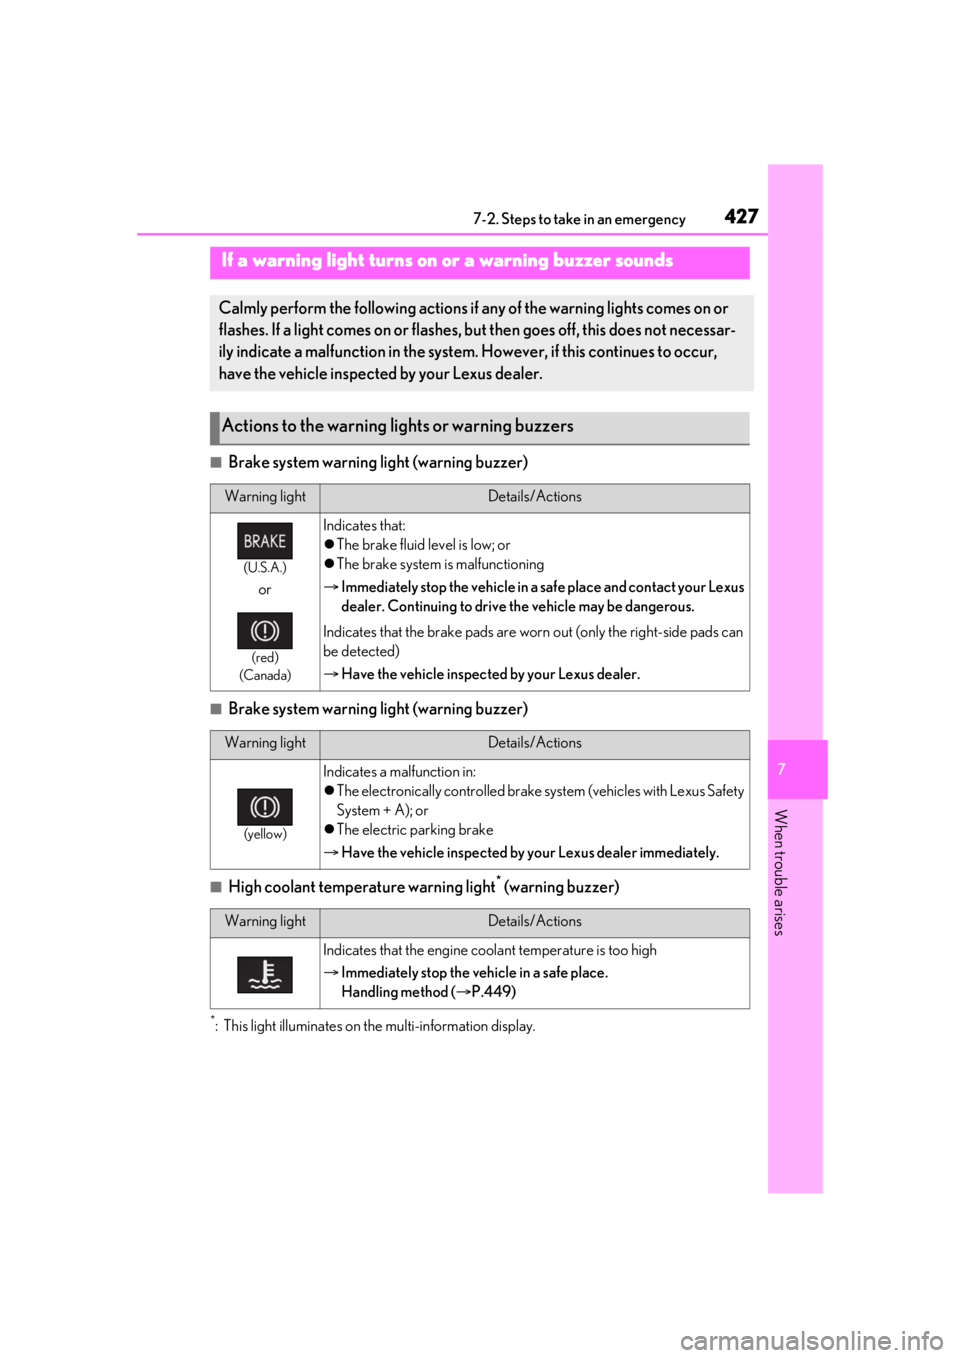
■Brake system warning light (warning buzzer)
■Brake system warning light (warning buzzer)
■High coolant temperature warning light* (warning buzzer)
*: This light illuminates on the multi-information display.
If a warning light turns on or a warning buzzer sounds
Calmly perform the following actions if any of the warning lights comes on or
flashes. If a light comes on or flashes, bu t then goes off, this does not necessar-
ily indicate a malfunction in the system. However, if this continues to occur,
have the vehicle inspected by your Lexus dealer.
Actions to the warning lights or warning buzzers
Warning lightDetails/Actions
(U.S.A.)
or
(red)
(Canada)
Indicates that:
The brake fluid level is low; or
The brake system is malfunctioning
Immediately stop the vehicle in a safe place and contact your Lexus
dealer. Continuing to drive the vehicle may be dangerous.
Indicates that the brake pads are worn out (only the right-side pads can
be detected)
Have the vehicle inspected by your Lexus dealer.
Warning lightDetails/Actions
(yellow)
Indicates a malfunction in:
The electronically controlled brake sy stem (vehicles with Lexus Safety
System + A); or
The electric parking brake
Have the vehicle inspected by your Lexus dealer immediately.
Warning lightDetails/Actions
Indicates that the engine coolant temperature is too high
Immediately stop the vehicle in a safe place.
Handling method ( P.449)
Page 433 of 520
4337-2. Steps to take in an emergency
7
When trouble arises
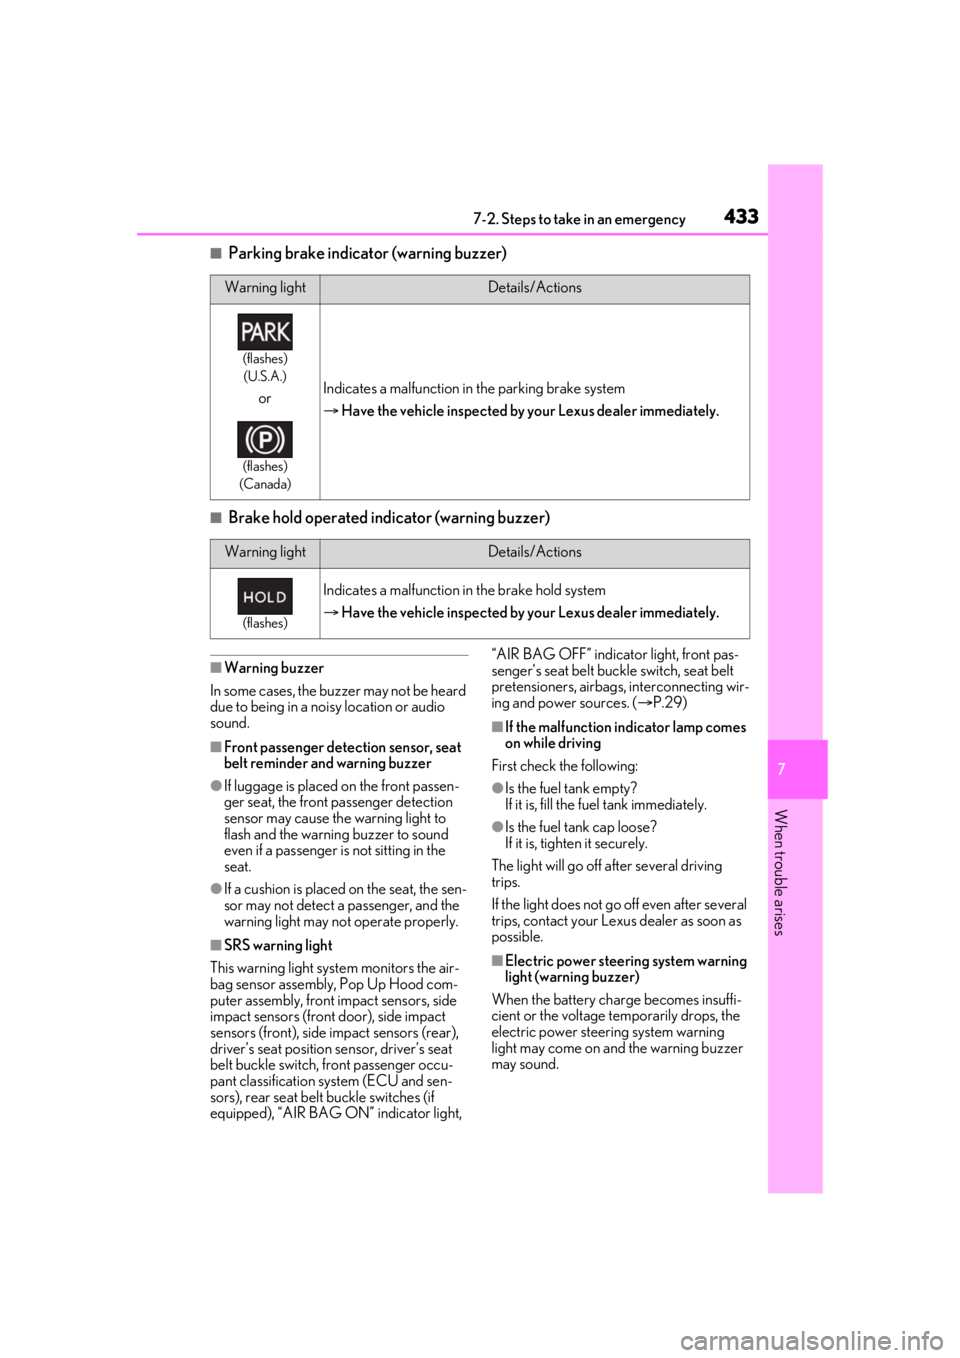
■Parking brake indicator (warning buzzer)
■Brake hold operated indicator (warning buzzer)
■Warning buzzer
In some cases, the bu zzer may not be heard
due to being in a noisy location or audio
sound.
■Front passenger detection sensor, seat
belt reminder and warning buzzer
●If luggage is placed on the front passen-
ger seat, the front passenger detection
sensor may cause th e warning light to
flash and the warning buzzer to sound
even if a passenger is not sitting in the
seat.
●If a cushion is placed on the seat, the sen-
sor may not detect a passenger, and the
warning light may not operate properly.
■SRS warning light
This warning light system monitors the air-
bag sensor assembly, Pop Up Hood com-
puter assembly, front impact sensors, side
impact sensors (front door), side impact
sensors (front), side impact sensors (rear),
driver’s seat position sensor, driver’s seat
belt buckle switch, front passenger occu-
pant classification system (ECU and sen-
sors), rear seat belt buckle switches (if
equipped), “AIR BAG ON” indicator light, “AIR BAG OFF” indicator light, front pas-
senger’s seat belt buckle switch, seat belt
pretensioners, airbags, interconnecting wir-
ing and power sources. (
P.29)
■If the malfunction indicator lamp comes
on while driving
First check the following:
●Is the fuel tank empty?
If it is, fill the fuel tank immediately.
●Is the fuel tank cap loose?
If it is, tighten it securely.
The light will go off after several driving
trips.
If the light does not go off even after several
trips, contact your Lexus dealer as soon as
possible.
■Electric power steering system warning
light (warning buzzer)
When the battery charge becomes insuffi-
cient or the voltage temporarily drops, the
electric power steering system warning
light may come on and the warning buzzer
may sound.
Warning lightDetails/Actions
(flashes) (U.S.A.)
or
(flashes)
(Canada)
Indicates a malfunction in the parking brake system
Have the vehicle inspected by your Lexus dealer immediately.
Warning lightDetails/Actions
(flashes)
Indicates a malfunction in the brake hold system
Have the vehicle inspected by your Lexus dealer immediately.