LEXUS LX570 2014 Owners Manual
LX570 2014
LEXUS
LEXUS
https://www.carmanualsonline.info/img/36/58937/w960_58937-0.png
LEXUS LX570 2014 Owners Manual
Trending: key, check oil, service reset, lane assist, wheelbase, keyless entry, battery replacement
Page 411 of 956
4113-1. Using the touch screen
3
Interior features
LX570_OM_OM60L21U_(U) * : Bluetooth is a registered tr ademark of Bluetooth SIG, Inc.Switch Pa g e
“Display” P. 4 0 3 /
Navigation System Owner’s Manual
“General” P. 4 1 2 /
Navigation System Owner’s Manual
“Voice” P. 4 2 3 /
Navigation System Owner’s Manual
“Navigation” Navigation System Owner’s Manual
“Vehicle” P. 4 2 4 /
Navigation System Owner’s Manual
“Phone” P. 4 2 5
“Bluetooth
* ” P. 4 2 5
“A u d i o ” P. 4 2 6
“Other ” Navigation System Owner’s Manual
Page 412 of 956
4123-1. Using the touch screen
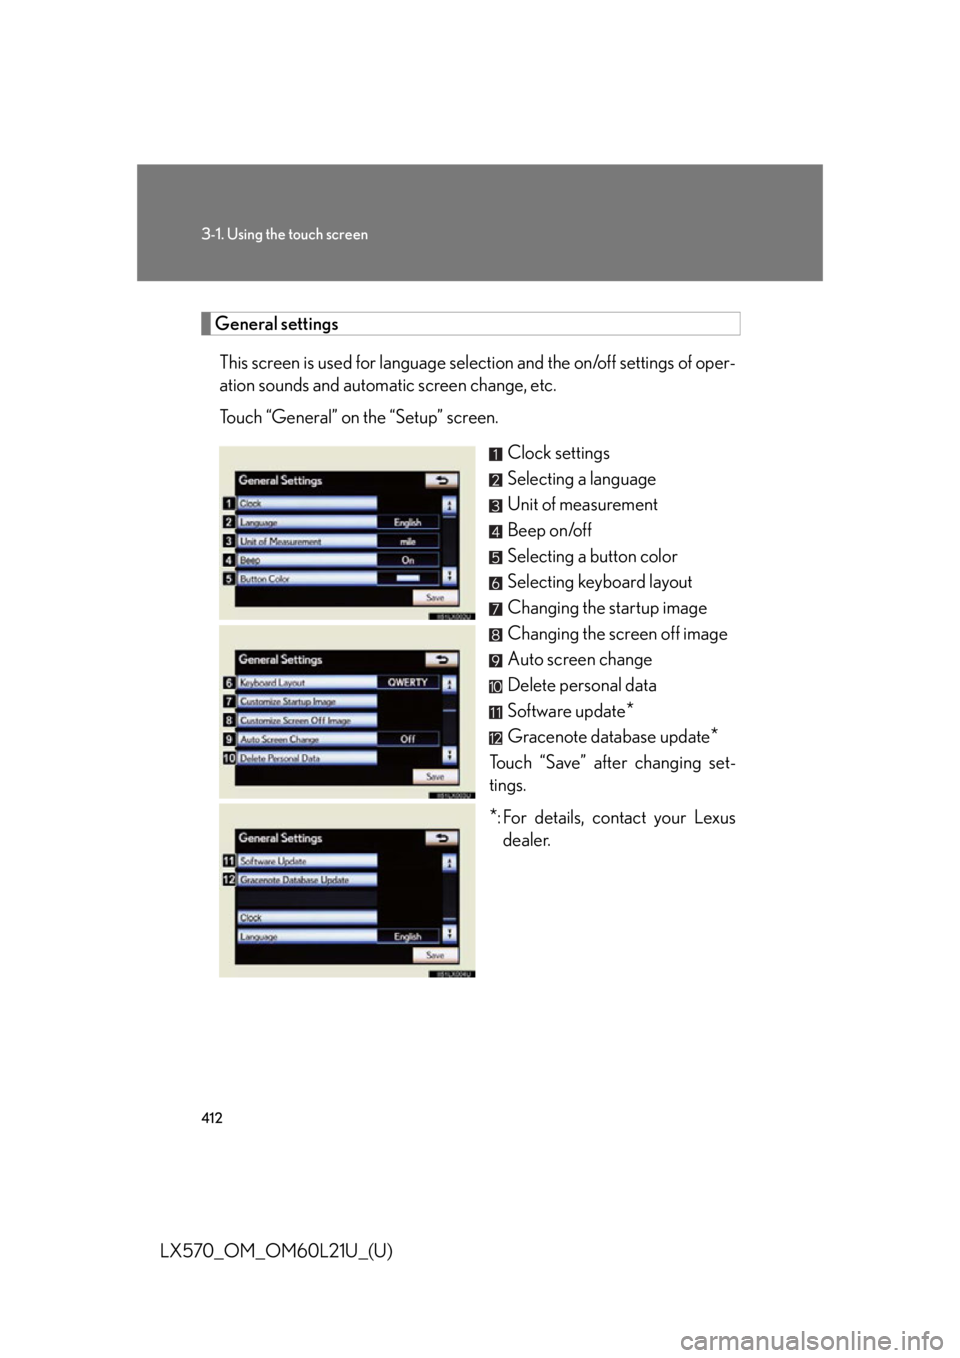
LX570_OM_OM60L21U_(U) General settings
This screen is used for language selection and the on/off settings of oper-
ation sounds and automatic screen change, etc.
Touch “General” on the “Setup” screen.
Clock settings
Selecting a language
Unit of measurement
Beep on/off
Selecting a button color
Selecting keyboard layout
Changing the startup image
Changing the screen off image
Auto screen change
Delete personal data
Software update
*Gracenote database update
*Touch “Save” after changing set-
tings.
* : For details, contact your Lexus
dealer.
Page 413 of 956
4133-1. Using the touch screen
3
Interior features
LX570_OM_OM60L21U_(U) ■ Clock settings
Used for changing time zones, the on/off settings of daylight saving
time and automatic adjustment of the clock.
Touch “Clock” on the “General Settings” screen.
Touch the items to be set.
Time zone
Daylight saving time
Automatic adjustment of the
clock
Manual clock setting
Touch “Save”.
● Time zone
A time zone can be selected and GMT can be set.
Touch “Time Zone”.STEP 1
STEP 2
STEP 3
STEP 1
Page 414 of 956
4143-1. Using the touch screen
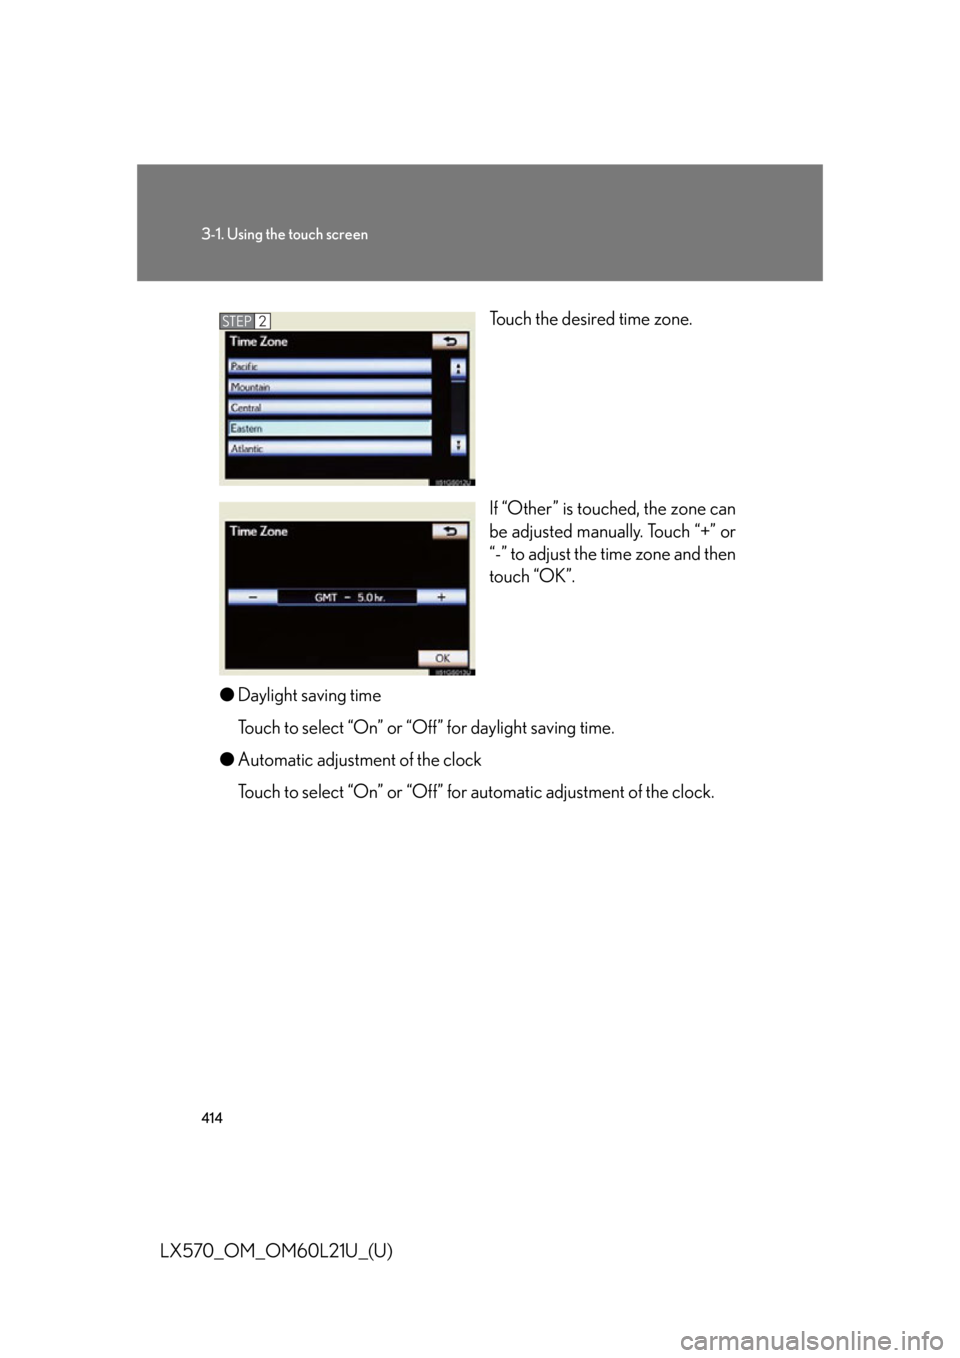
LX570_OM_OM60L21U_(U) Touch the desired time zone.
If “Other” is touched, the zone can
be adjusted manually. Touch “+” or
“-” to adjust the time zone and then
touch “OK”.
● Daylight saving time
Touch to select “On” or “O ff” for daylight saving time.
● Automatic adjustment of the clock
Touch to select “On” or “Off” for automatic adjustment of the clock. STEP 2
Page 415 of 956
4153-1. Using the touch screen
3
Interior features
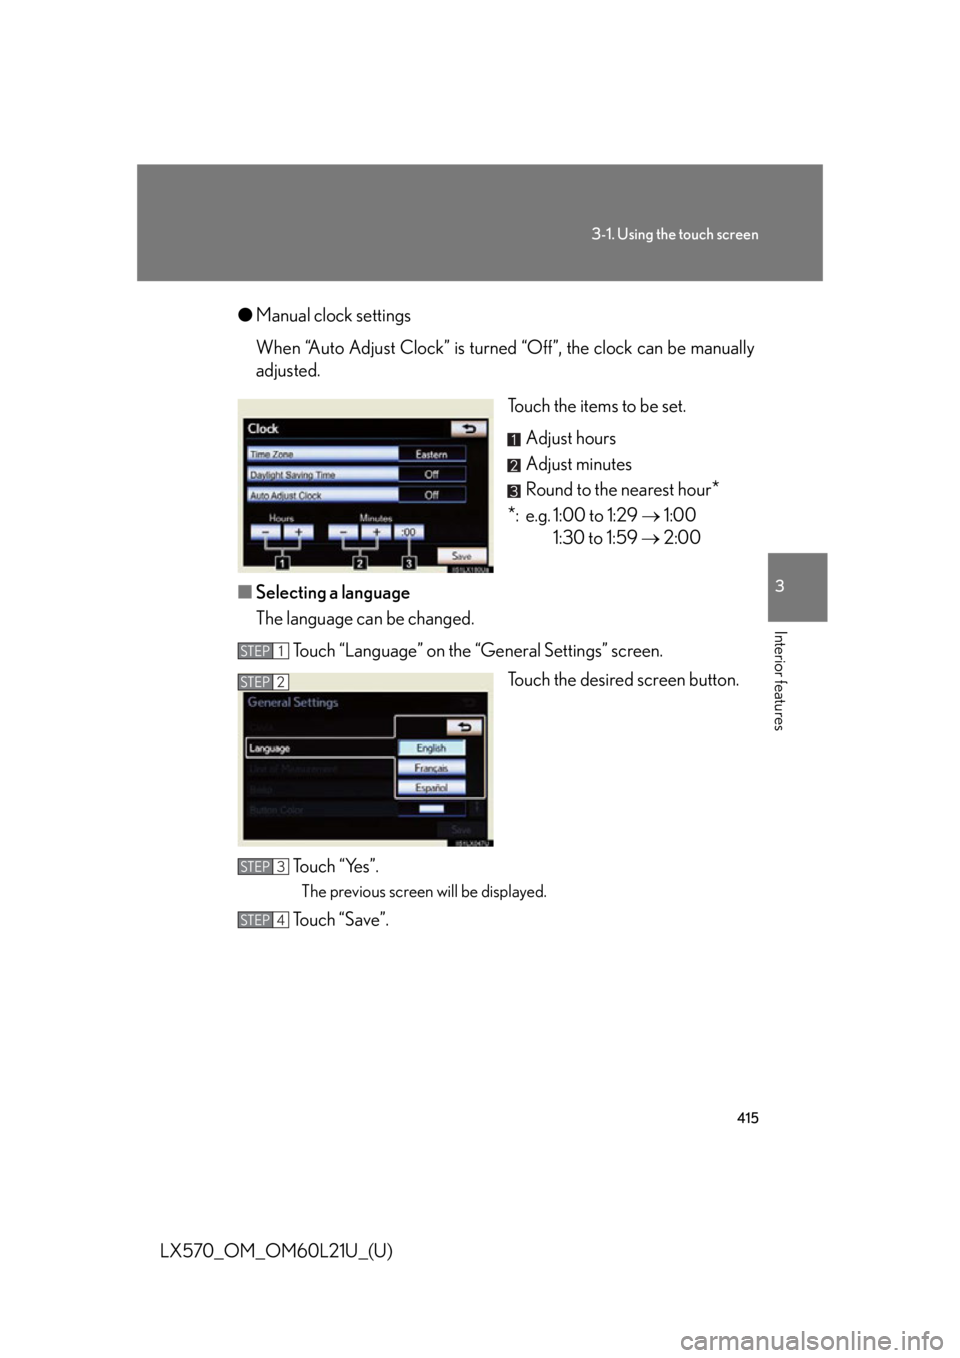
LX570_OM_OM60L21U_(U) ● Manual clock settings
When “Auto Adjust Clock” is turned “Off”, the clock can be manually
adjusted.
Touch the items to be set.
Adjust hours
Adjust minutes
Round to the nearest hour
*
* : e.g. 1:00 to 1:29 1:00
1:30 to 1:59 2:00
■ Selecting a language
The language can be changed.
Touch “Language” on the “General Settings” screen.
Touch the desired screen button.
To u c h “ Ye s ” . The previous screen will be displayed.
Touch “Save”. STEP 1
STEP 2
STEP 3
STEP 4
Page 416 of 956
4163-1. Using the touch screen
LX570_OM_OM60L21U_(U) ■ Unit of measurement
Distance unit can be changed.
This function is availa ble only in English or Spanish. To change lan-
guage, see “Selecting a language”. ( P. 4 1 5 )
Touch “Unit of Measurement” on the “General Settings” screen.
Touch “km” or “mile”. The previous screen will be dis-
played.
Touch “Save”.
■ Selecting a button color
The color of the screen buttons can be changed.
Touch “Button Color” on the “General Settings” screen.
Touch the desired screen button
color. The previous screen will be dis-
played.
Touch “Save”. STEP 1
STEP 2
STEP 3
STEP 1
STEP 2
STEP 3
Page 417 of 956
4173-1. Using the touch screen
3
Interior features
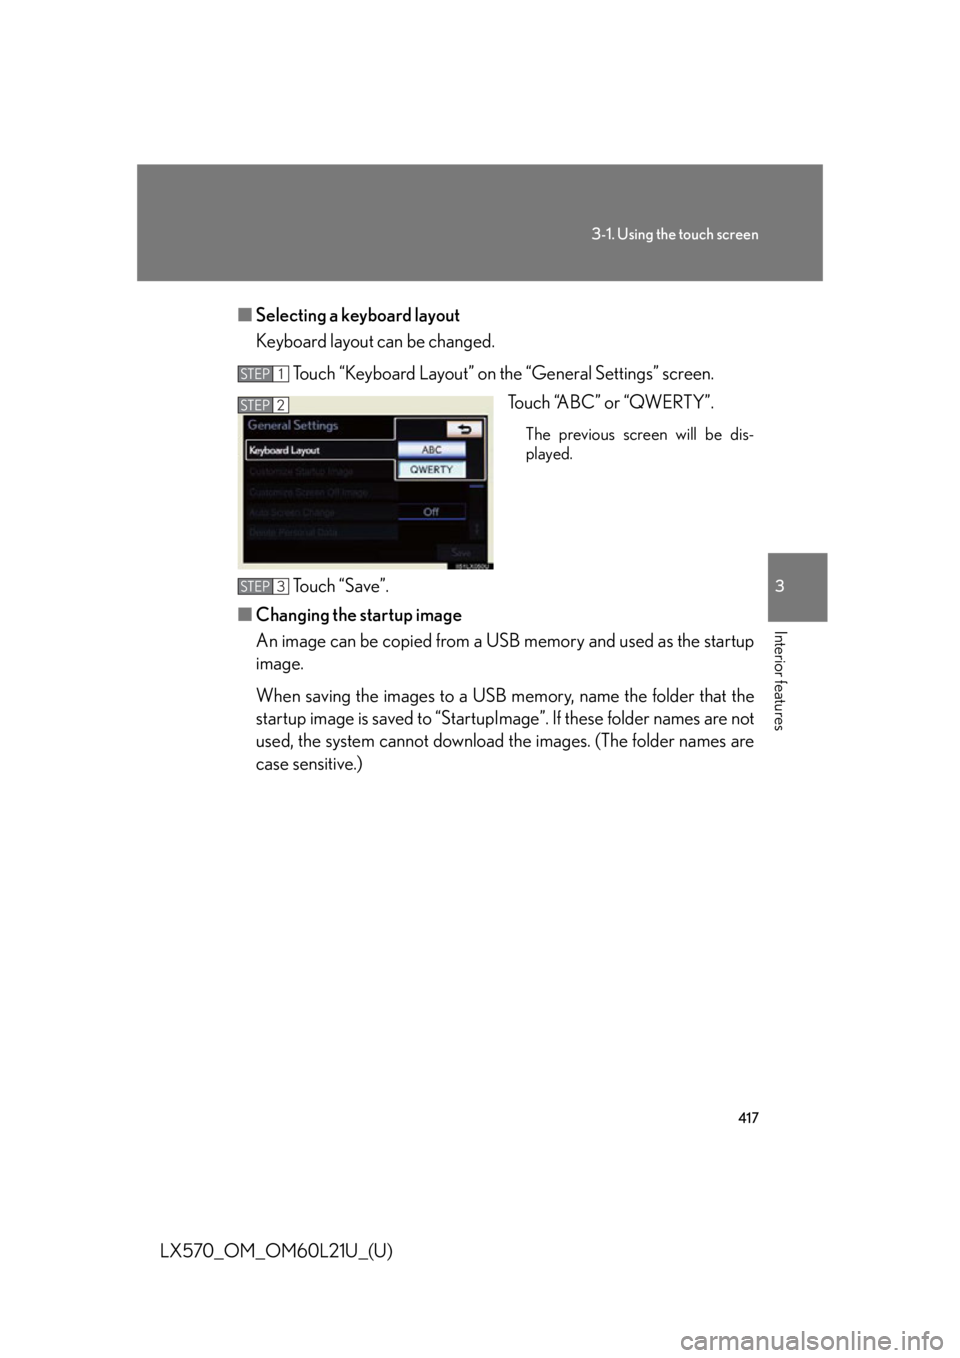
LX570_OM_OM60L21U_(U) ■ Selecting a keyboard layout
Keyboard layout can be changed.
Touch “Keyboard Layout” on the “General Settings” screen.
Touch “ABC” or “QWERTY”. The previous screen will be dis-
played.
Touch “Save”.
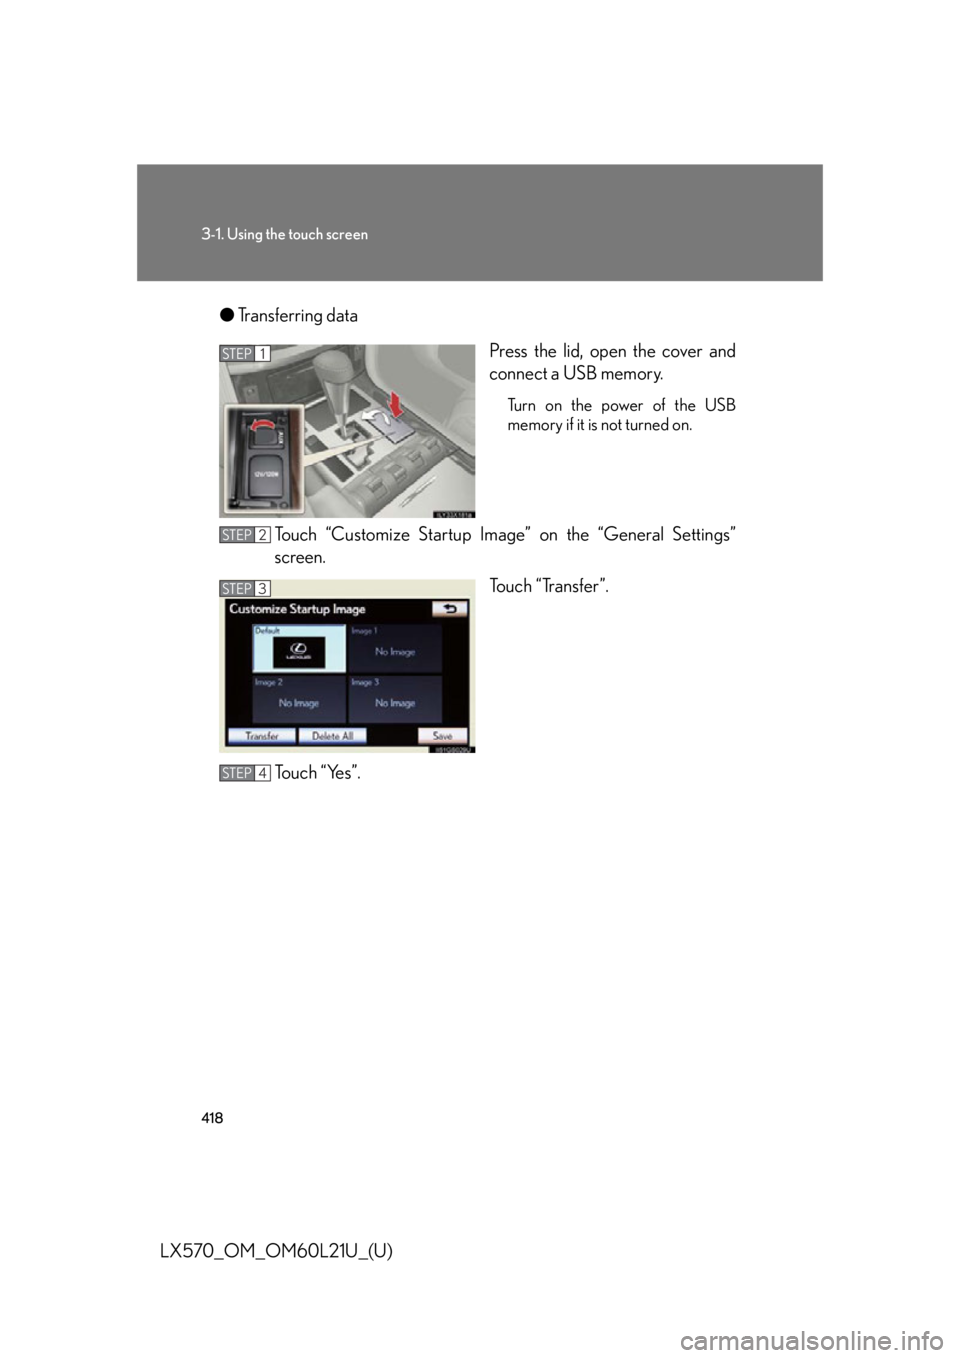
■ Changing the startup image
An image can be copied from a USB memory and used as the startup
image.
When saving the images to a USB memory, name the folder that the
startup image is saved to “StartupIma ge”. If these folder names are not
used, the system cannot download th e images. (The folder names are
case sensitive.) STEP 1
STEP 2
STEP 3
Page 418 of 956
4183-1. Using the touch screen
LX570_OM_OM60L21U_(U) ● Transferring data
Press the lid, open the cover and
connect a USB memory. Turn on the power of the USB
memory if it is not turned on.
Touch “Customize Startup Image” on the “General Settings”
screen.
Touch “Transfer”.
To u c h “ Ye s ” . STEP 1
STEP 2
STEP 3
STEP 4
Page 419 of 956
4193-1. Using the touch screen
3
Interior features
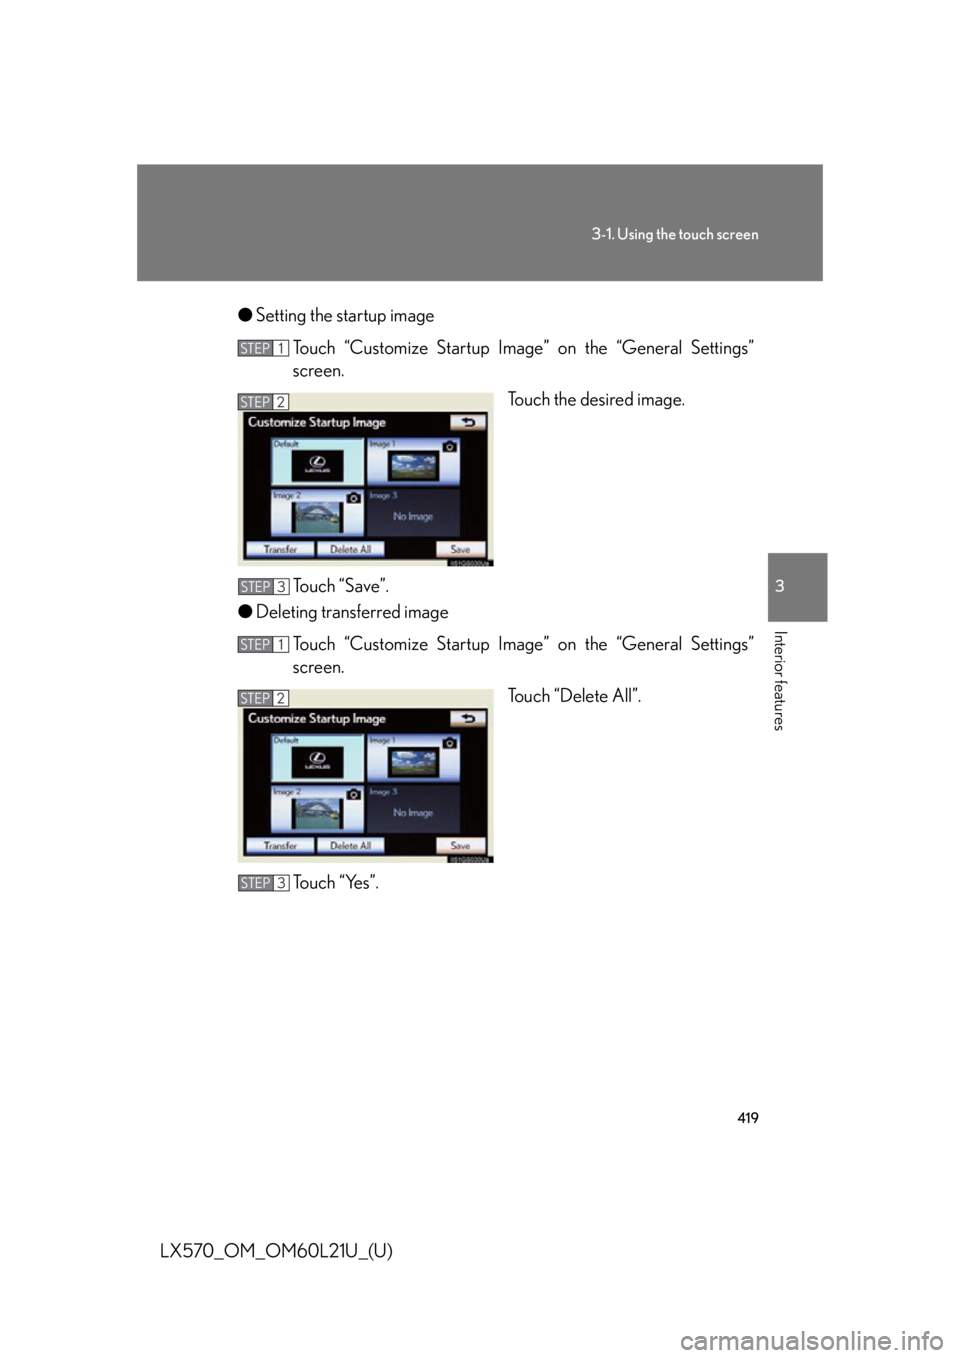
LX570_OM_OM60L21U_(U) ● Setting the startup image
Touch “Customize Startup Image” on the “General Settings”
screen.
Touch the desired image.
Touch “Save”.
● Deleting transferred image
Touch “Customize Startup Image” on the “General Settings”
screen.
Touch “Delete All”.
To u c h “ Ye s ” . STEP 1
STEP 2
STEP 3
STEP 1
STEP 2
STEP 3
Page 420 of 956
4203-1. Using the touch screen
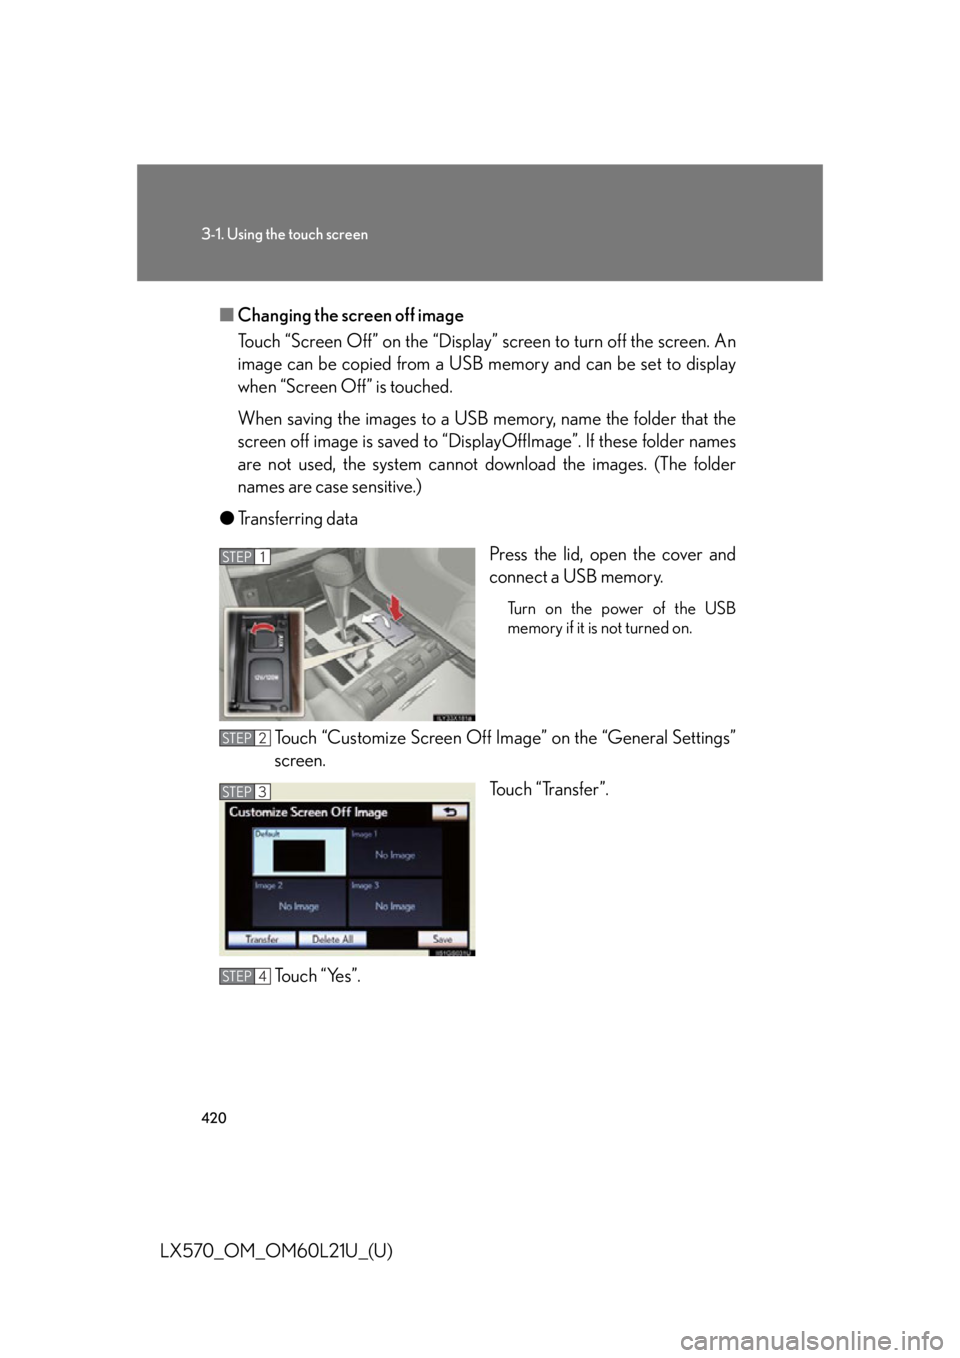
LX570_OM_OM60L21U_(U) ■ Changing the screen off image
Touch “Screen Off” on the “Display” screen to turn off the screen. An
image can be copied from a USB memory and can be set to display
when “Screen Off” is touched.
When saving the images to a USB memory, name the folder that the
screen off image is saved to “Displ ayOffImage”. If these folder names
are not used, the system cannot do wnload the images. (The folder
names are case sensitive.)
● Transferring data
Press the lid, open the cover and
connect a USB memory. Turn on the power of the USB
memory if it is not turned on.
Touch “Customize Screen Off Ima ge” on the “General Settings”
screen.
Touch “Transfer”.
To u c h “ Ye s ” . STEP 1
STEP 2
STEP 3
STEP 4
Trending: steering wheel adjustment, wiper fluid, keyless entry, maintenance, jump cable, glove box, ECO mode

