front LEXUS RC350 2015 Service Manual
[x] Cancel search | Manufacturer: LEXUS, Model Year: 2015, Model line: RC350, Model: LEXUS RC350 2015Pages: 684, PDF Size: 9.31 MB
Page 162 of 684
1623-3. Adjusting the seats
RC350/RCF_U (OM24636U)
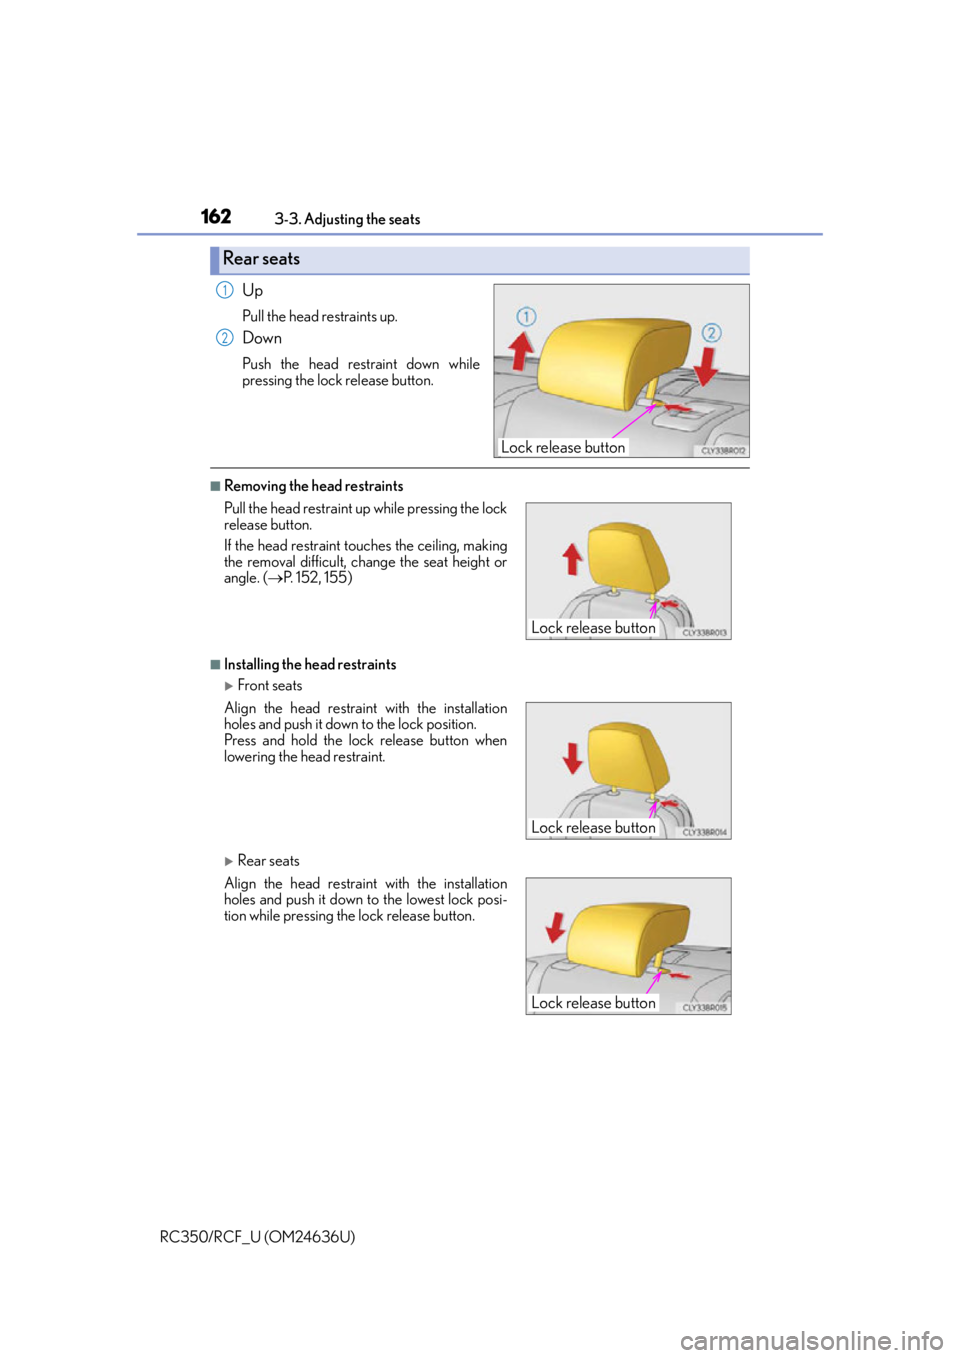
Up
Pull the head restraints up.
Down
Push the head restraint down while
pressing the lock release button.
■Removing the head restraints
■Installing the head restraints
Front seats
Rear seats
Rear seats
Lock release button
1
2
Pull the head restraint up while pressing the lock
release button.
If the head restraint to uches the ceiling, making
the removal difficult, change the seat height or
angle. ( P. 1 5 2 , 1 5 5 )
Align the head restrain t with the installation
holes and push it down to the lock position.
Press and hold the lock release button when
lowering the head restraint.
Align the head restrain t with the installation
holes and push it down to the lowest lock posi-
tion while pressing the lock release button.
Lock release button
Lock release button
Lock release button
Page 183 of 684
1834-1. Before driving
4
Driving
RC350/RCF_U (OM24636U)
WA R N I N G
Observe the following precautions.
Failure to do so may result in death or serious injury.
■When driving on slippery road surfaces
●Sudden braking, acceleration and steering may cause tire slippage and reduce your
ability to control the vehicle.
●Sudden acceleration, engine braking due to shifting, or changes in engine speed
could cause the vehicle to skid.
●After driving through a puddle , lightly depress the brake pedal to make sure that the
brakes are functioning properly. Wet brake pads may prevent the brakes from func-
tioning properly. If the brakes on only on e side are wet and not functioning properly,
steering control may be affected.
■When shifting the shift lever
●Do not let the vehicle roll backward while the shift lever is in a driving position, or roll
forward while the shift lever is in R.
Doing so may cause the engine to stall or lead to poor brake and steering perfor-
mance, resulting in an acciden t or damage to the vehicle.
●Do not shift the shift lever to P while the vehicle is moving.
Doing so can damage the transmission and may result in a loss of vehicle control.
●Do not shift the shift lever to R while the vehicle is moving forward.
Doing so can damage the transmission and may result in a loss of vehicle control.
●Do not shift the shift lever to D while the vehicle is moving backward.
Doing so can damage the transmission and may result in a loss of vehicle control.
●Moving the shift lever to N while the vehicle is moving will disengage the engine from
the transmission. Engine braking is not available when N is selected.
●Be careful not to shift the shift lever with the accelerator pedal depressed. Shifting the
shift lever to a gear other than P or N may lead to unexpected rapid acceleration of
the vehicle that may cause an accident and result in death or serious injury.
■If you hear a squealing or scraping noise (brake pad wear limit indicators) (RC350)
Have the brake pads checked and replaced by your Lexus dealer as soon as possible.
Rotor damage may result if the pads are not replaced when needed.
Front brakes on F SPORT models only: Moderate levels of brake pad and disc wear
allow enhanced front braking power. As a re sult, the discs may wear more quickly than
conventional brake discs. Therefore, when replacing the brake pads, Lexus recom-
mends that you also have the thickness of the discs measured.
It is dangerous to drive the vehicle when the wear limits of the brake pads and/or those
of the brake discs are exceeded.
■If a brake pad wear warning message is displayed (RC F)
Have the brake pads checked and replaced by your Lexus dealer as soon as possible.
Rotor damage may result if the pads are not replaced when needed.
Moderate levels of the brake pad and disc wear allow enhanced braking power. As a
result, the discs may wear more quickly than conventional brake discs. Therefore, when
replacing the brake pads, Lexus recommends that you also have the thickness of the
discs measured.
It is dangerous to drive the vehicle when the wear limits of the brake pads and/or those
of the brake discs are exceeded.
Page 189 of 684
1894-1. Before driving
4
Driving
RC350/RCF_U (OM24636U)
WA R N I N G
■Things that must not be carried in the trunk
The following things may cause a fire if loaded in the trunk:
●Receptacles containing gasoline
●Aerosol cans
■Storage precautions
Observe the following precautions.
Failure to do so may prevent the pedals from being depressed properly, may block the
driver’s vision, or may result in items hittin g the driver or passengers, possibly causing
an accident.
●Stow cargo and luggage in the trunk whenever possible.
●RC350: To prevent cargo and luggage from sliding forward during braking, do not
stack anything in the enlarged trunk. Keep cargo and luggage low, as close to the
floor as possible.
●RC350: When you fold down the rear seats, long items should not be placed directly
behind the front seats.
●RC350: Never allow anyone to ride in the en larged trunk. It is not designed for pas-
sengers. They should ride in their seats with their seat belts properly fastened.
●Do not place cargo or luggage in or on the following locations.
• At the feet of the driver
• On the front passenger or rear seats (when stacking items)
• On the package tray
• On the instrument panel
•On the dashboard
• In front of the navigation system scre en (if equipped) or Lexus Display Audio
screen (if equipped)
●Secure all items in th e occupant compartment.
■Capacity and distribution
●Do not exceed the maximum axle weight ra ting or the total vehicle weight rating.
●Even if the total load of occupant’s weight and the cargo load is less than the total load
capacity, do not apply the load unevenly. Improper loading may cause deterioration
of steering or braking control which may cause death or serious injury.
Page 190 of 684
1904-1. Before driving
RC350/RCF_U (OM24636U)
◆Total load capacity (vehicle capacity weight): ( P. 6 0 4 )
Total load capacity means the combined weight of occupants, cargo and lug-
gage.
◆Seating capacity: 4 occupants (Front 2, Rear 2)
Seating capacity means the maximum number of occupants whose estimated
average weight is 150 lb. (68 kg) per person.
◆To w i n g c a p a c i t y
Lexus does not recommend towing a trailer with your vehicle.
◆Cargo capacity
Cargo capacity may increase or decrea se depending on the weight and the
number of occupants.
■Total load capacity and seating capacity
These details are also described on the tire and loading information label. (P. 5 0 0 )
Vehicle load limits
Vehicle load limits include total load capacity, seating capacity, towing capac-
ity and cargo capacity.
WA R N I N G
■Overloading the vehicle
Do not overload the vehicle.
It may not only cause damage to the tires, but also degrade steering and braking ability,
resulting in an accident.
Page 204 of 684
2044-2. Driving procedures
RC350/RCF_U (OM24636U)
The lever will return to its original position immediately after operation.
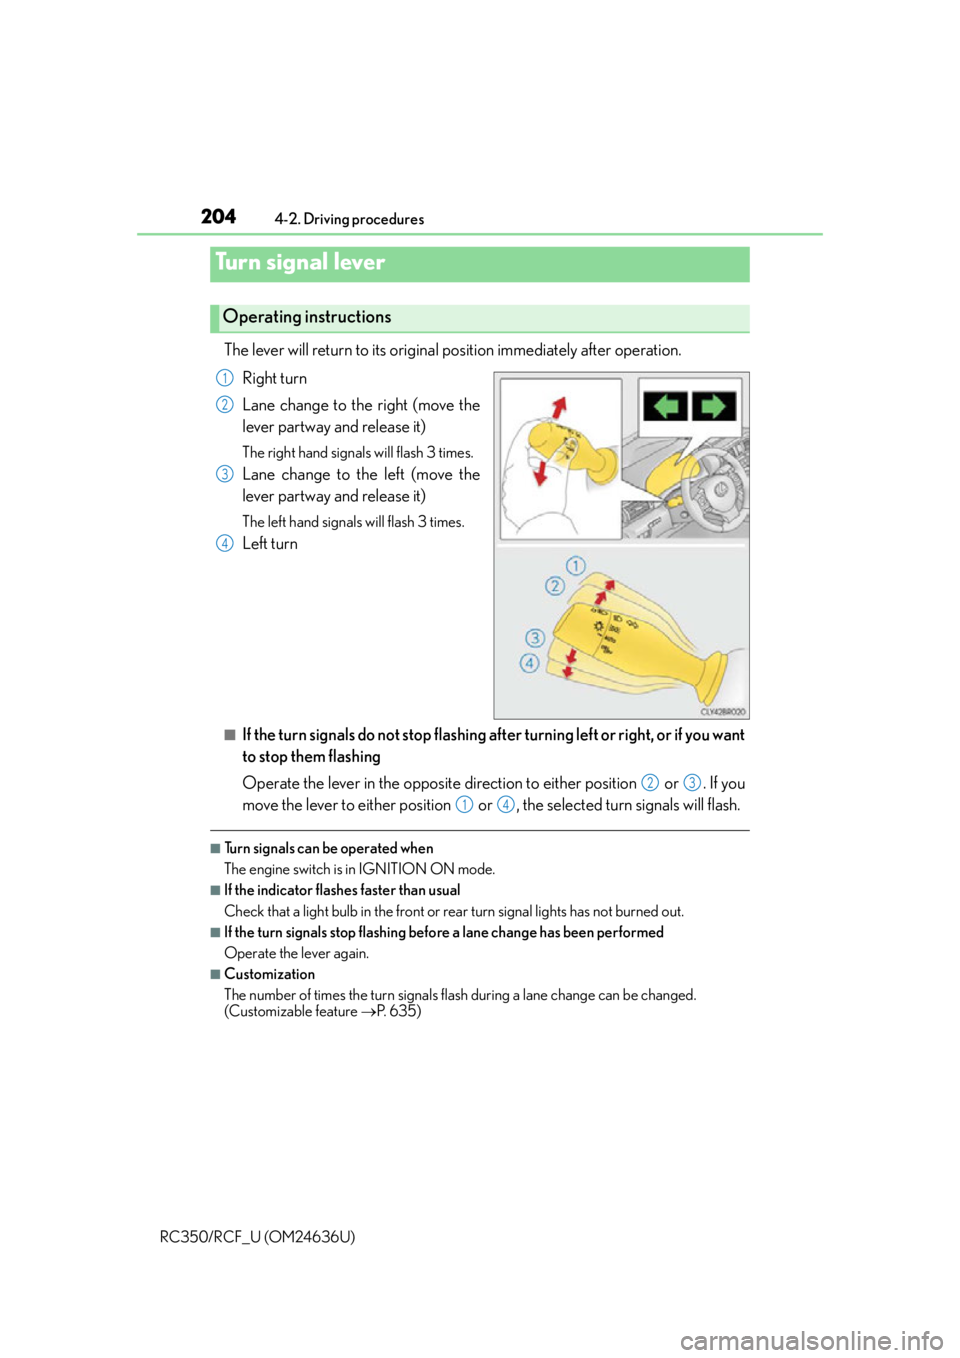
Right turn
Lane change to the right (move the
lever partway and release it)
The right hand signals will flash 3 times.
Lane change to the left (move the
lever partway and release it)
The left hand signals will flash 3 times.
Left turn
■If the turn signals do not stop flashing af ter turning left or right, or if you want
to stop them flashing
Operate the lever in the opposite direction to either position or . If you
move the lever to either position or , the selected turn signals will flash.
■Turn signals can be operated when
The engine switch is in IGNITION ON mode.
■If the indicator flashes faster than usual
Check that a light bulb in the front or rear turn signal lights has not burned out.
■If the turn signals stop flashing befo re a lane change has been performed
Operate the lever again.
■Customization
The number of times the turn signals flash during a lane change can be changed.
(Customizable feature P. 6 3 5 )
Turn signal lever
Operating instructions
1
2
3
4
23
14
Page 209 of 684
2094-3. Operating the lights and wipers
4
Driving
RC350/RCF_U (OM24636U)
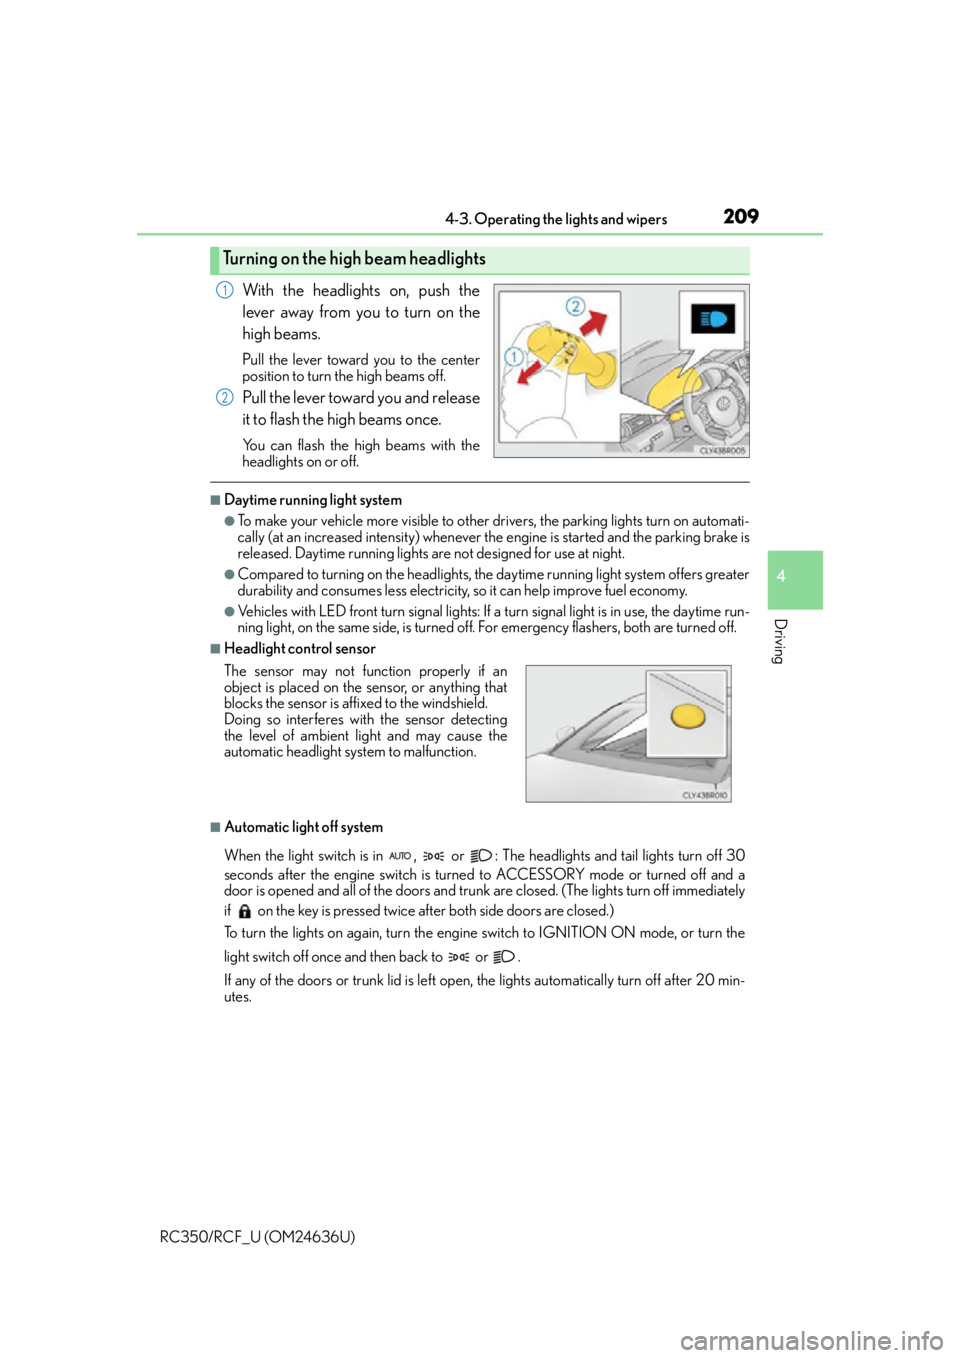
With the headlights on, push the
lever away from you to turn on the
high beams.
Pull the lever toward you to the center
position to turn the high beams off.
Pull the lever toward you and release
it to flash the high beams once.
You can flash the high beams with the
headlights on or off.
■Daytime running light system
●To make your vehicle more visible to other drivers, the parking lights turn on automati-
cally (at an increased intensity) whenever the engine is started and the parking brake is
released. Daytime running lights ar e not designed for use at night.
●Compared to turning on the headlights, the daytime running light system offers greater
durability and consumes less electricity, so it can help improve fuel economy.
●Vehicles with LED front turn signal lights: If a turn signal light is in use, the daytime run-
ning light, on the same side, is turned off. For emergency flashers, both are turned off.
■Headlight control sensor
■Automatic light off system
When the light switch is in , or : The headlights and tail lights turn off 30
seconds after the engine switch is turned to ACCESSORY mode or turned off and a
door is opened and all of the doors and trunk are closed. (The lights turn off immediately
if on the key is pressed twice after both side doors are closed.)
To turn the lights on again, turn the engine switch to IGNITION ON mode, or turn the
light switch off once and then back to or .
If any of the doors or trunk lid is left open, the lights automatically turn off after 20 min-
utes.
Turning on the high beam headlights
1
2
The sensor may not function properly if an
object is placed on the sensor, or anything that
blocks the sensor is affixed to the windshield.
Doing so interferes with the sensor detecting
the level of ambient light and may cause the
automatic headlight system to malfunction.
Page 213 of 684

2134-3. Operating the lights and wipers
4
Driving
RC350/RCF_U (OM24636U)
■The Automatic High Beam can be operated when
The engine switch is in IGNITION ON mode.
■Camera sensor detection information
●High beam may not be automatically tu rned off in the following situations:
• When oncoming vehicles sudd enly appear from a curve
• When the vehicle is cut in front of by another vehicle
• When oncoming or preceding vehicles are hidden from sight due to repeated
curves, road dividers or roadside trees
●High beam may be turned off if an oncoming vehicle that is using fog lights without
using the headlights is detected.
●House lights, street lights, red traffic signals, and illuminated billboards or signs may
cause the high beam to turn off.
●The following factors may affect the amount of time taken to turn high beam on or off:
• The brightness of headlights, fog lights, and tail lights of oncoming and preceding
vehicles
• The movement and direction of oncoming and preceding vehicles
• When an oncoming or preceding vehicle only has operational lights on one side
• When an oncoming or preceding vehicle is a two-wheeled vehicle
• The condition of the road (gradient, curve, condition of the road surface etc.)
• The number of passengers and amount of luggage
●High beam may be turned on or off when unexpected by the driver.
●Small vehicles, such as bicy cles, may not be detected.
●In the situations below, the system may not be able to correctly detect the surrounding
brightness levels, and may flash or expose nearby pedestrians to the high beam. There-
fore, you should consider turning the high be ams on or off manually rather than relying
on the Automatic High Beam system.
• In bad weather (rain, snow, fog, sandstorms etc.)
• The windshield is obscured by fog, mist, ice, dirt etc.
• The windshield is cracked or damaged.
• The camera sensor is deformed or dirty.
• Surrounding brightness levels are equal to those of headlights, tail lights or fog lights.
• Vehicles ahead have headlights or tail lights that are either switched off, dirty, chang-
ing color, or have improperly adjusted aim.
• When driving through an area of intermit tently changing brightness and darkness.
• When frequently and repeatedly driving ascending/descending roads, or roads with
rough, bumpy or uneven surfaces (such as stone-paved roads, gravel tracks etc.).
• When frequently and repeat edly taking curves or driving on a winding road.
• There is a highly reflective object ahead of the vehicle, such as a sign or a mirror.
• The vehicle’s headlights are damaged or dirty.
• The vehicle is listing or titling, due to a flat tire, a trailer being towed etc.
• The driver believes that the high beam may be causing problems or distress to other
drivers or pedestrians nearby.
Page 216 of 684
2164-3. Operating the lights and wipers
RC350/RCF_U (OM24636U)
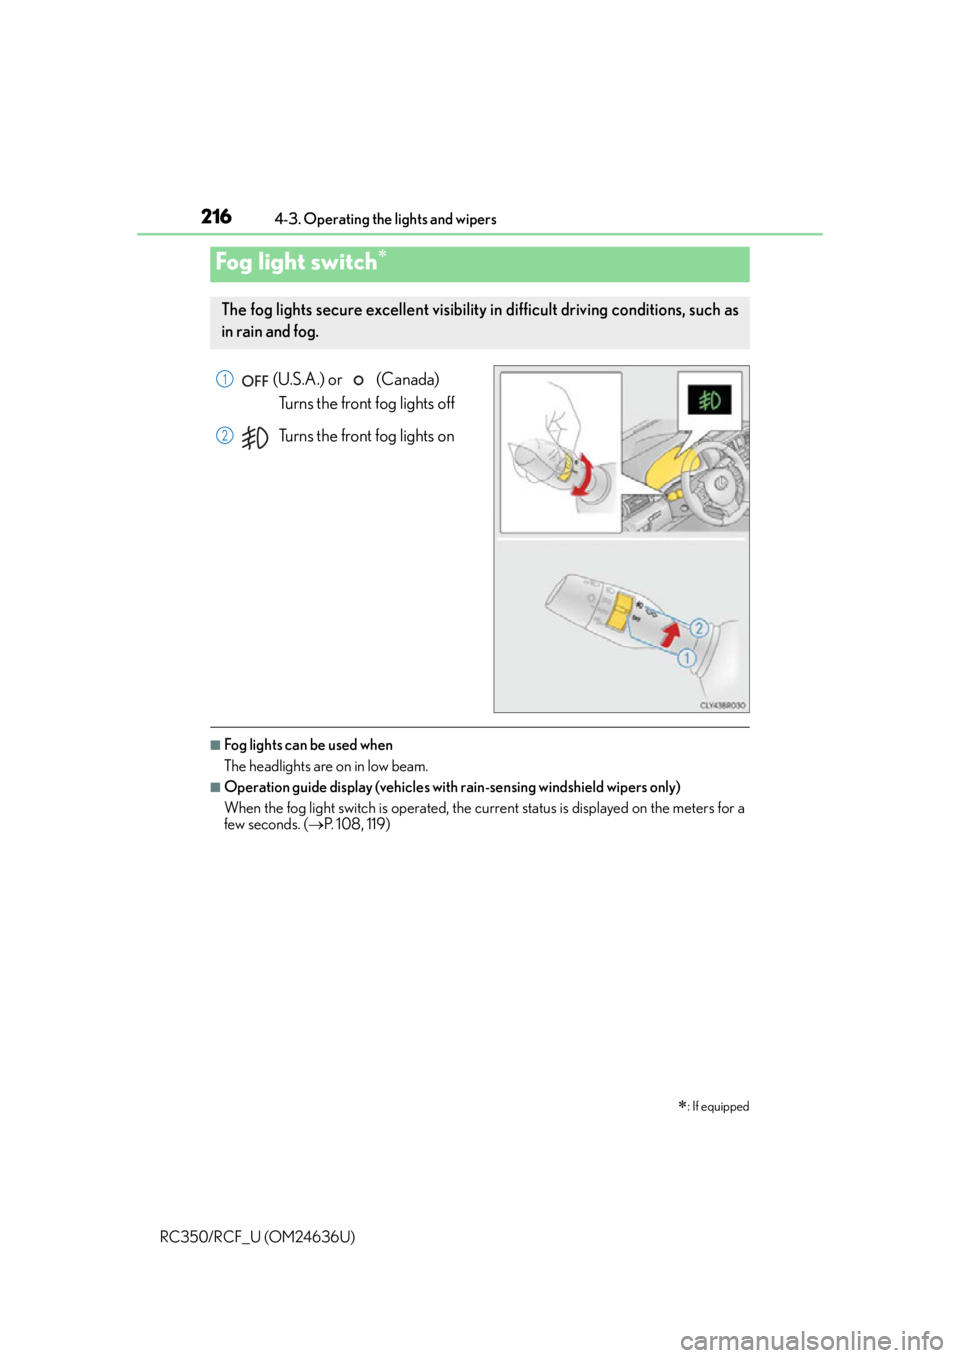
(U.S.A.) or (Canada) Turns the front fog lights off
Turns the front fog lights on
■Fog lights can be used when
The headlights are on in low beam.
■Operation guide display (vehicles with rain-sensing windshield wipers only)
When the fog light switch is operated, the curr ent status is displayed on the meters for a
few seconds. ( P. 1 0 8 , 1 1 9 )
Fog light switch
: If equipped
The fog lights secure excellent visibility in difficult driving conditions, such as
in rain and fog.
1
2
Page 238 of 684
2384-5. Using the driving support systems
RC350/RCF_U (OM24636U)
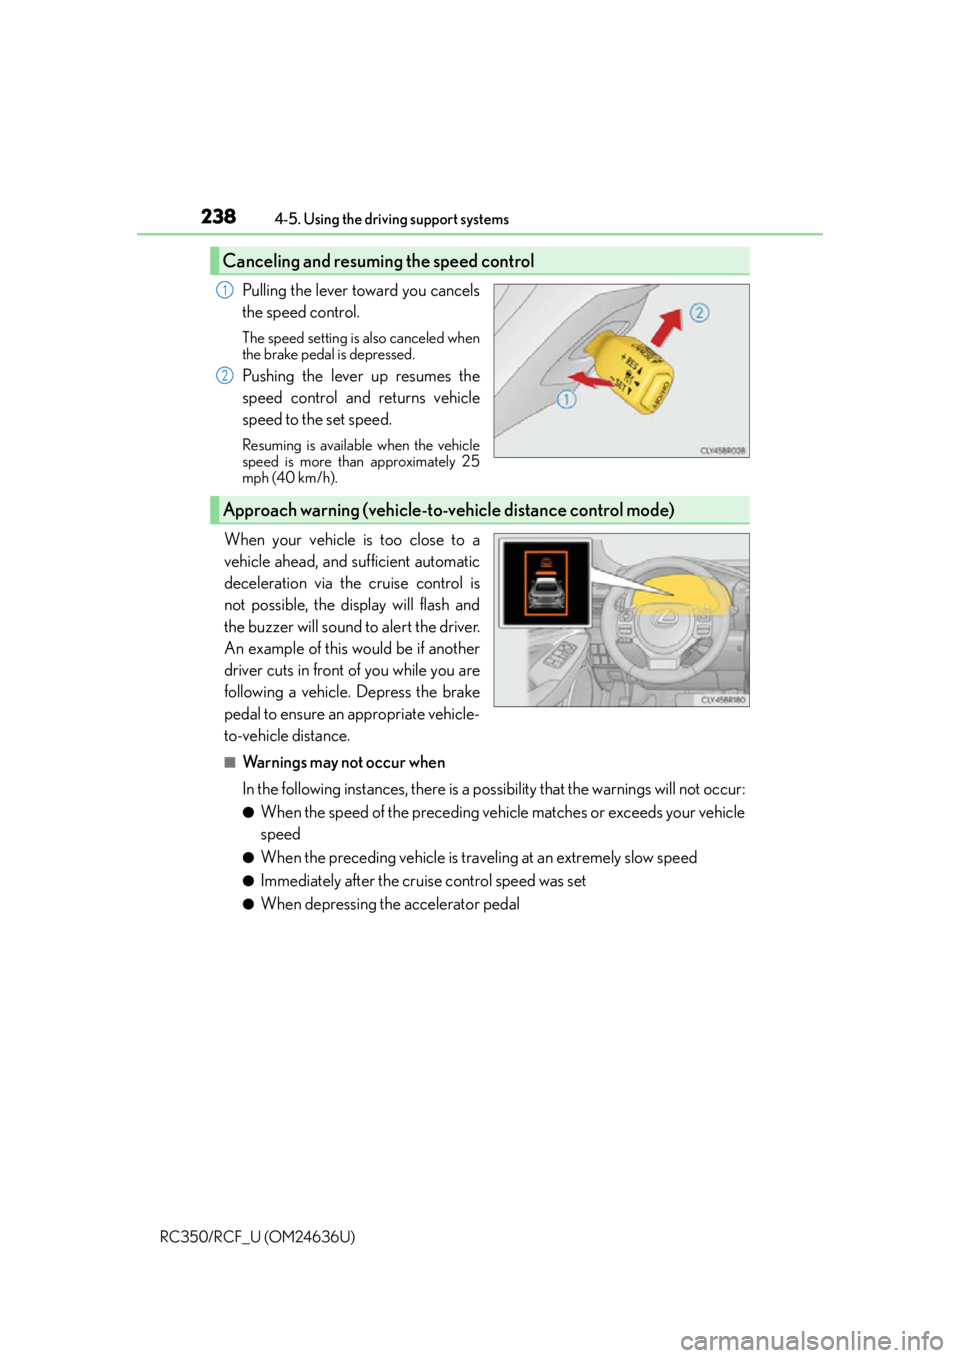
Pulling the lever toward you cancels
the speed control.
The speed setting is also canceled when
the brake pedal is depressed.
Pushing the lever up resumes the
speed control and returns vehicle
speed to the set speed.
Resuming is available when the vehicle
speed is more than approximately 25
mph (40 km/h).
When your vehicle is too close to a
vehicle ahead, and sufficient automatic
deceleration via the cruise control is
not possible, the display will flash and
the buzzer will sound to alert the driver.
An example of this would be if another
driver cuts in front of you while you are
following a vehicle. Depress the brake
pedal to ensure an appropriate vehicle-
to-vehicle distance.
■Warnings may not occur when
In the following instances, there is a po ssibility that the warnings will not occur:
●When the speed of the preceding vehicle matches or exceeds your vehicle
speed
●When the preceding vehicle is traveling at an extremely slow speed
●Immediately after the cruise control speed was set
●When depressing the accelerator pedal
Canceling and resuming the speed control
1
2
Approach warning (vehicle-to-vehicle distance control mode)
Page 253 of 684
2534-5. Using the driving support systems
4
Driving
RC350/RCF_U (OM24636U)
NOTICE
■To prevent damage to or incorrect operation of the LDA system
●Do not modify the headlights or attach stickers to the surface of the lights.
●Do not modify the suspension.
If any suspension parts need to be replaced, contact your Lexus dealer.
●Do not install or place anything on the hood or the grille. Also, do not install a grille
guard (bull bars, kangaroo bar etc.).
●If your windshield needs repairs, contact your Lexus dealer.
■Camera sensor
Observe the following to ensure that the LDA system functions correctly.
●Keep the windshield clean at all times.
Performance could be affected if the windshie ld is dirty, or if raindrops, condensation
or ice are adhering to the windshield.
●Do not spill liquid onto the camera sensor.
●Do not attach window tinting to the windshield.
●Do not install an antenna in front of the camera lens.
●If the area of the windshield in front of the camera sensor is fogged up, use the wind-
shield defogger to remove the fog.
When it is cold, setting the heater to blow air to the feet only may cause the area of
the windshield in front of the camera sensor to fog up. This will have a negative effect
on the images.
●Do not scratch the camera lens, or let it get dirty.
When cleaning the inside of the windshield , be careful not to get any glass cleaner
etc. on the lens. Also, do not touch the lens.
For lens repair, contact your Lexus dealer.
●Do not change the installation position or di rection of the camera sensor or remove it.
The direction of the camera se nsor is precisely adjusted.
●Do not subject the camera sensor to strong impact or force, and do not disassemble
the camera sensor.
●If the windshield needs to be re placed, contact your Lexus dealer.
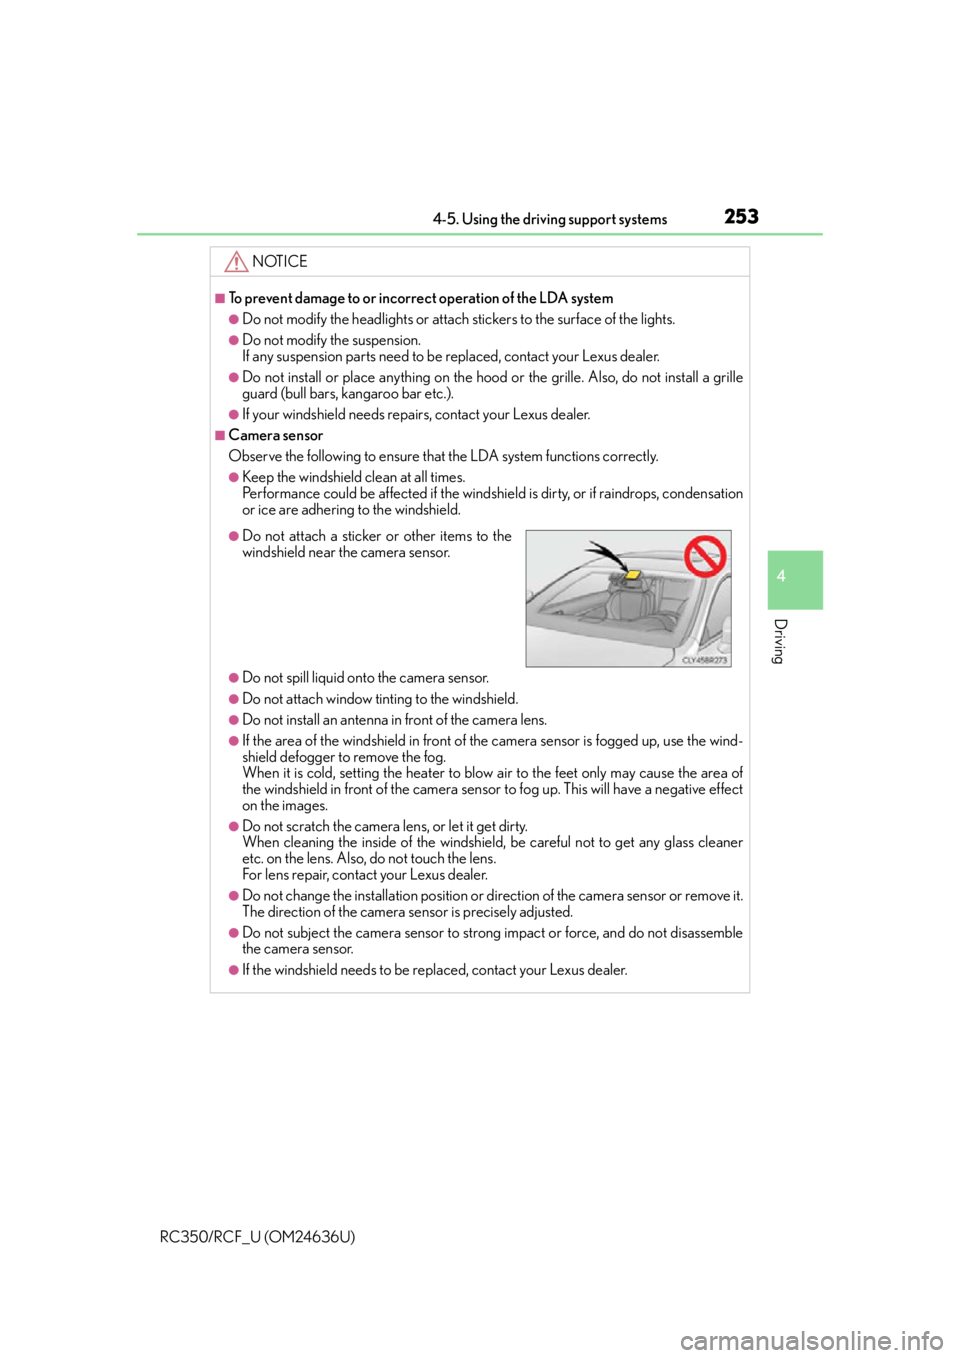
●Do not attach a sticker or other items to the
windshield near the camera sensor.