LEXUS RX350 2016 Owners Manual
Manufacturer: LEXUS, Model Year: 2016, Model line: RX350, Model: LEXUS RX350 2016Pages: 748, PDF Size: 12.36 MB
Page 531 of 748
5316-5. Using the other interior features
6
Interior features
RX350_U_OM48E90U Please use as a power supply for electronic goods that use less than 12 VDC/10
A (power consumption of 120 W).
Observe the following when using electronic goods: ●
Make sure that the power consumption of all the connected power outlets on
the instrument panel and in the lugg age compartment is less than 120 W.●
Make sure that the power consumption of all the connected power outlets
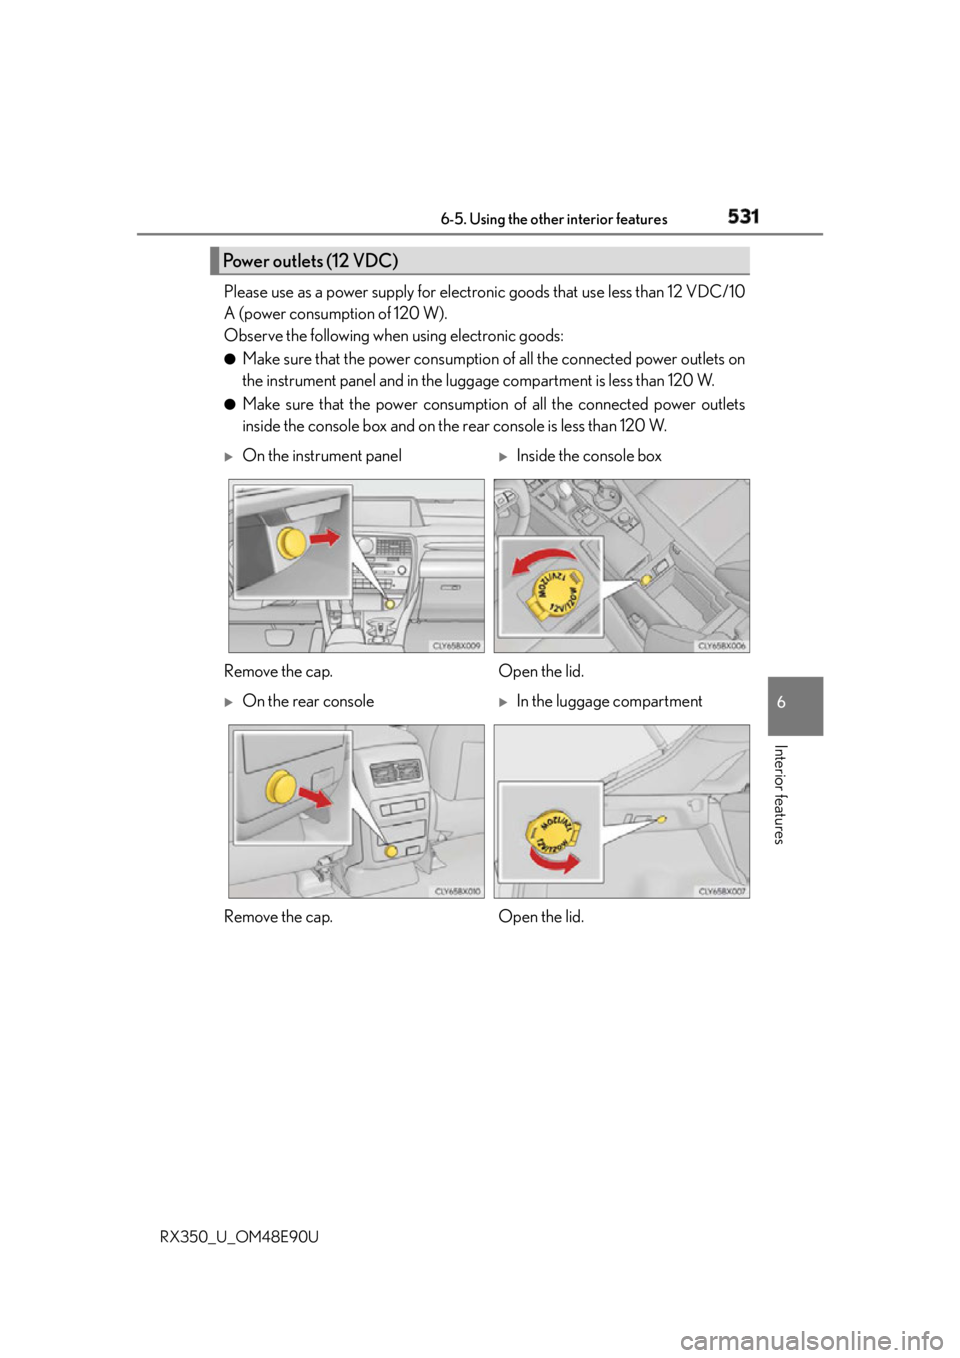
inside the console box and on the rear console is less than 120 W.Power outlets (12 VDC)
On the instrument panel
Inside the console box
Remove the cap. Open the lid.
On the rear console
In the luggage compartment
Remove the cap. Open the lid.
Page 532 of 748
532 6-5. Using the other interior features
RX350_U_OM48E90U ●
The power outlets can be used when the engine switch is in ACCESSORY or
IGNITION ON mode.
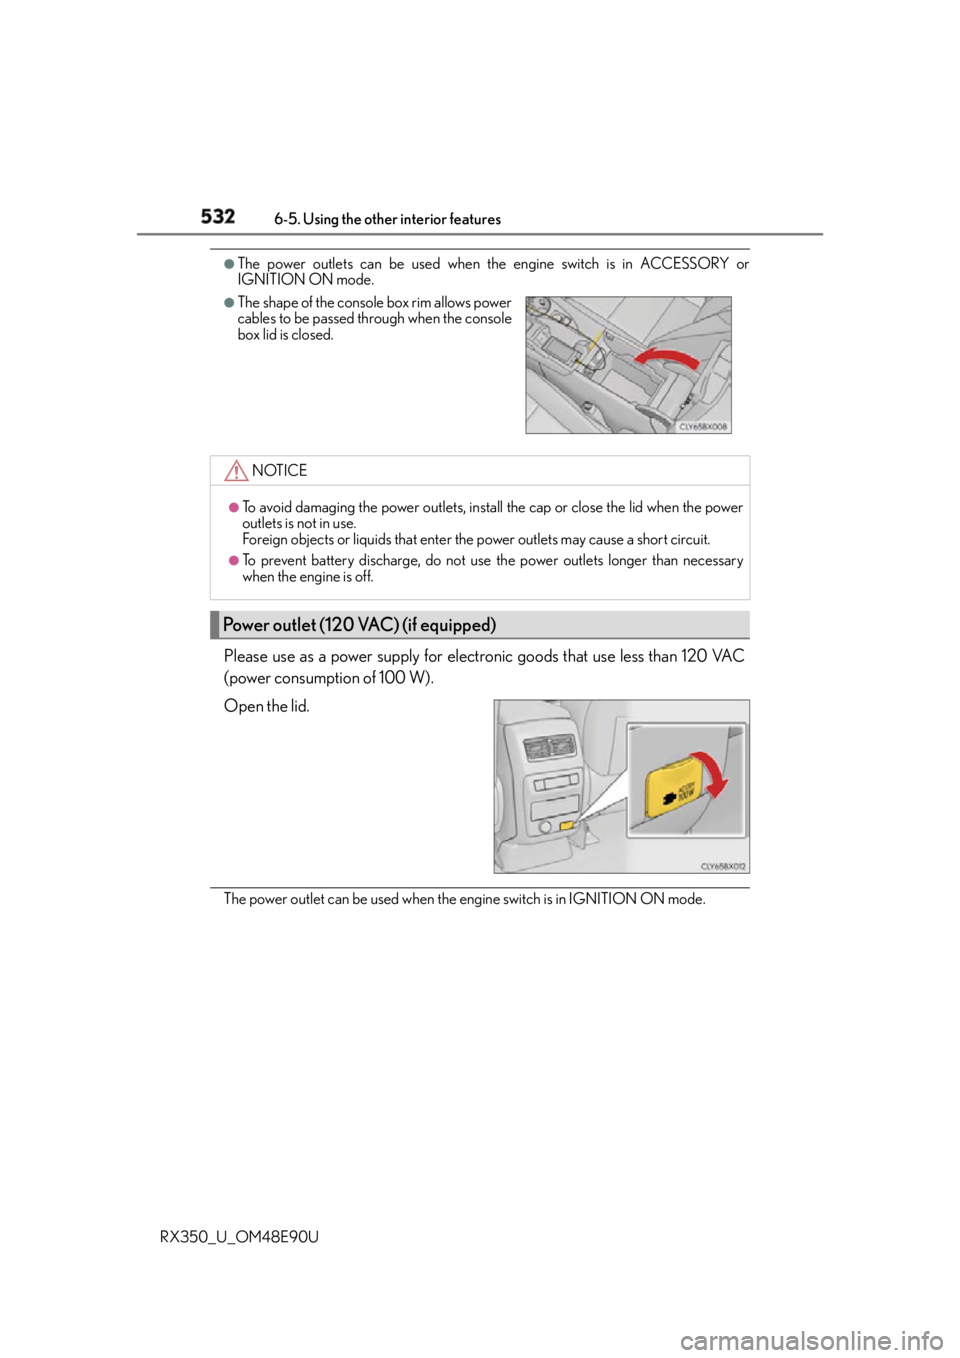
Please use as a power supply for electronic goods that use less than 120 VAC
(power consumption of 100 W).
Open the lid.
The power outlet can be used when the en gine switch is in IGNITION ON mode.●
The shape of the console box rim allows power
cables to be passed through when the console
box lid is closed.
NOTICE ●
To avoid damaging the power outlets, instal l the cap or close the lid when the power
outlets is not in use.
Foreign objects or liquids that enter the power outlets may cause a short circuit. ●
To prevent battery discharge, do not use the power outlets longer than necessary
when the engine is off.
Power outlet (120 VAC) (if equipped)
Page 533 of 748
5336-5. Using the other interior features
6
Interior features
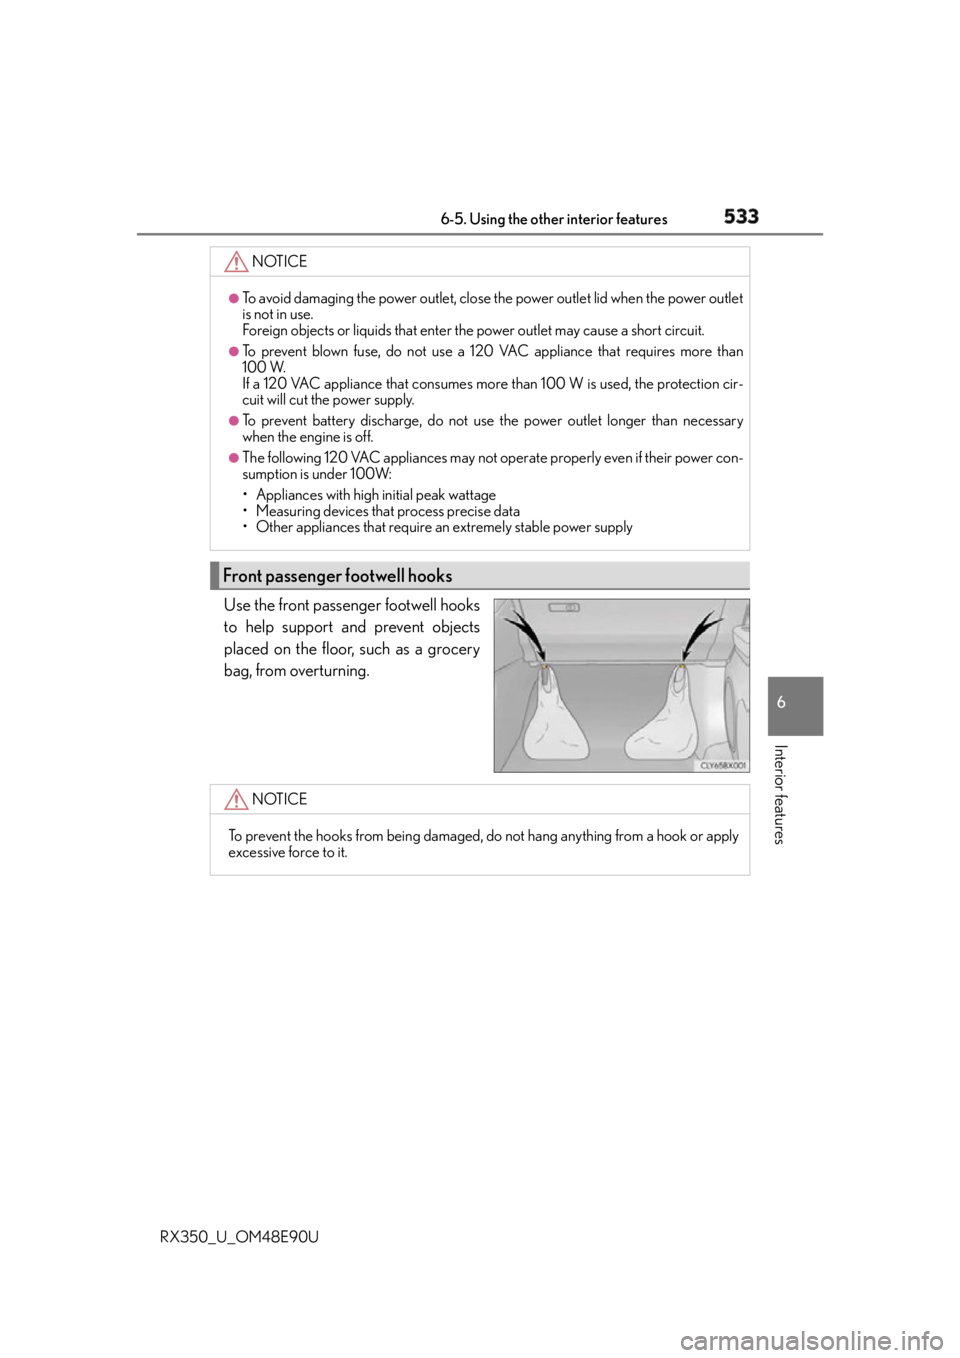
RX350_U_OM48E90U Use the front passenger footwell hooks
to help support and prevent objects
placed on the floor, such as a grocery
bag, from overturning. NOTICE ●
To avoid damaging the power outlet, close the power outlet lid when the power outlet
is not in use.
Foreign objects or liquids that enter the power outlet may cause a short circuit. ●
To prevent blown fuse, do not use a 120 VAC appliance that requires more than
100 W.
If a 120 VAC appliance that consumes more than 100 W is used, the protection cir-
cuit will cut the power supply. ●
To prevent battery discharge, do not use the power outlet longer than necessary
when the engine is off. ●
The following 120 VAC appliances may not op erate properly even if their power con-
sumption is under 100W:
• Appliances with high initial peak wattage
• Measuring devices that process precise data
• Other appliances that require an extremely stable power supply
Front passenger footwell hooks
NOTICE
To prevent the hooks from being damaged, do not hang anything from a hook or apply
excessive force to it.
Page 534 of 748
534 6-5. Using the other interior features
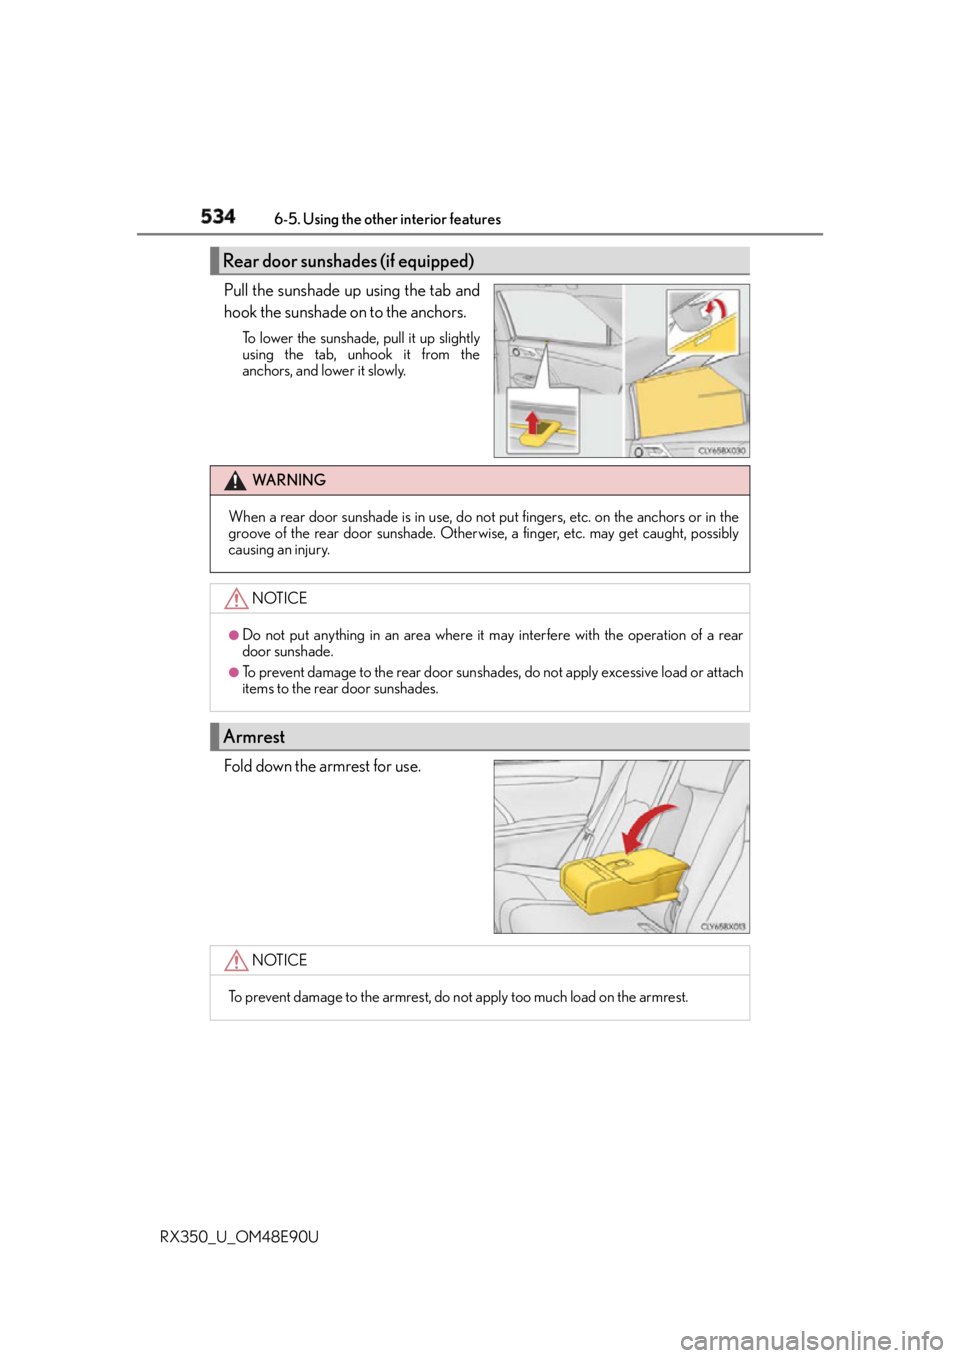
RX350_U_OM48E90U Pull the sunshade up using the tab and
hook the sunshade on to the anchors. To lower the sunshade, pull it up slightly
using the tab, unhook it from the
anchors, and lower it slowly.
Fold down the armrest for use.Rear door sunshades (if equipped)
WA R N I N G
When a rear door sunshade is in use, do not put fingers, etc. on the anchors or in the
groove of the rear door sunshade. Otherwis e, a finger, etc. may get caught, possibly
causing an injury.
NOTICE ●
Do not put anything in an area where it may interfere with the operation of a rear
door sunshade. ●
To prevent damage to the rear door sunsha des, do not apply excessive load or attach
items to the rear door sunshades.
Armrest
NOTICE
To prevent damage to the armrest, do not apply too much load on the armrest.
Page 535 of 748
5356-5. Using the other interior features
6
Interior features
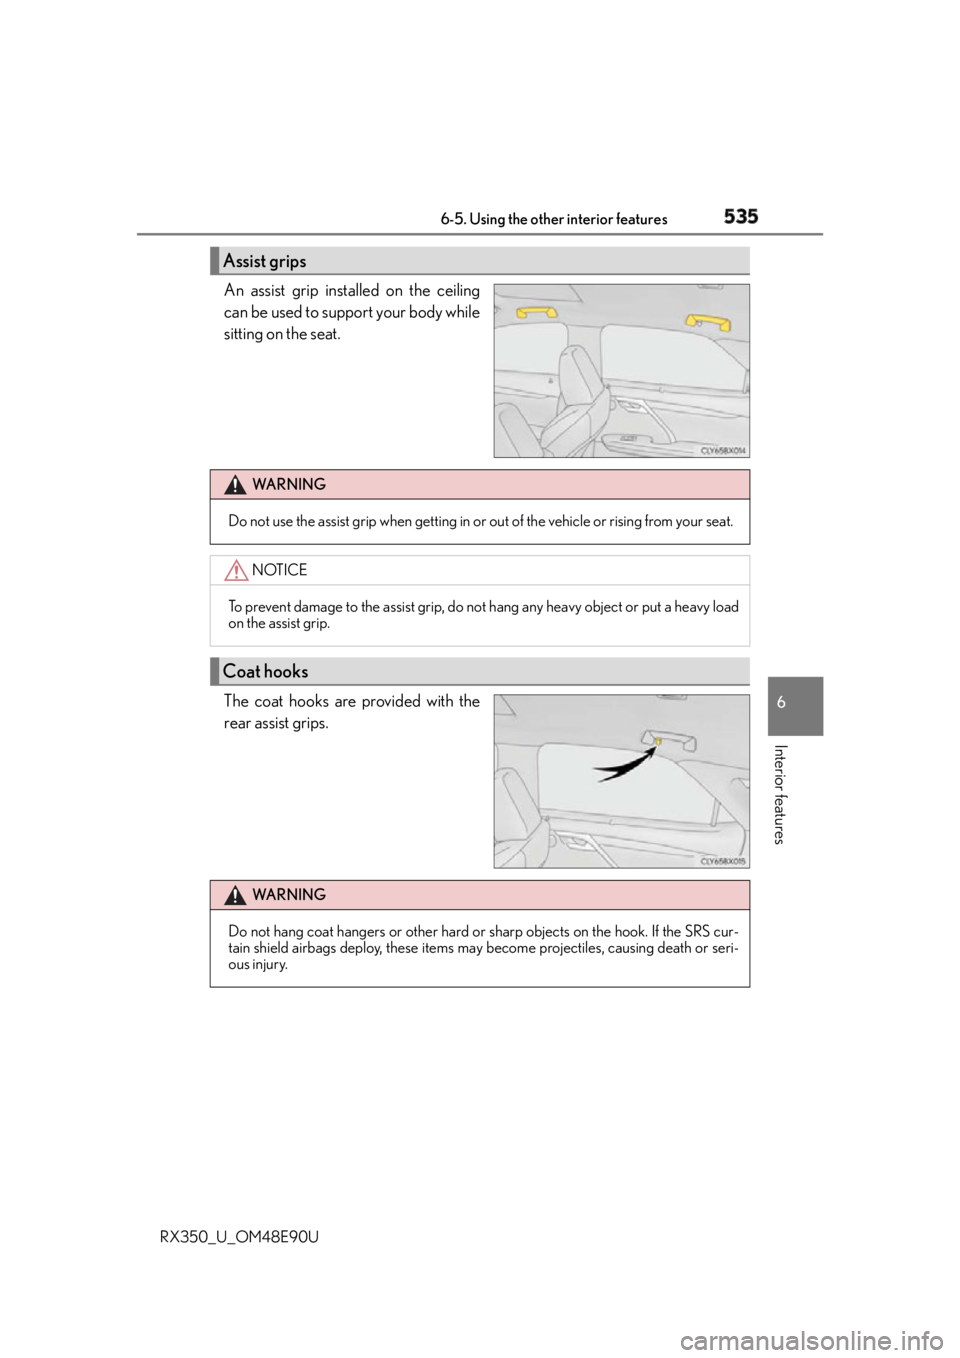
RX350_U_OM48E90U An assist grip installed on the ceiling
can be used to support your body while
sitting on the seat.
The coat hooks are provided with the
rear assist grips.Assist grips
WA R N I N G
Do not use the assist grip when getting in or out of the vehicle or rising from your seat.
NOTICE
To prevent damage to the assist grip, do not hang any heavy object or put a heavy load
on the assist grip.
Coat hooks
WA R N I N G
Do not hang coat hangers or other hard or sharp objects on the hook. If the SRS cur-
tain shield airbags deploy, these items may become projectiles, causing death or seri-
ous injury.
Page 536 of 748
536 6-5. Using the other interior features
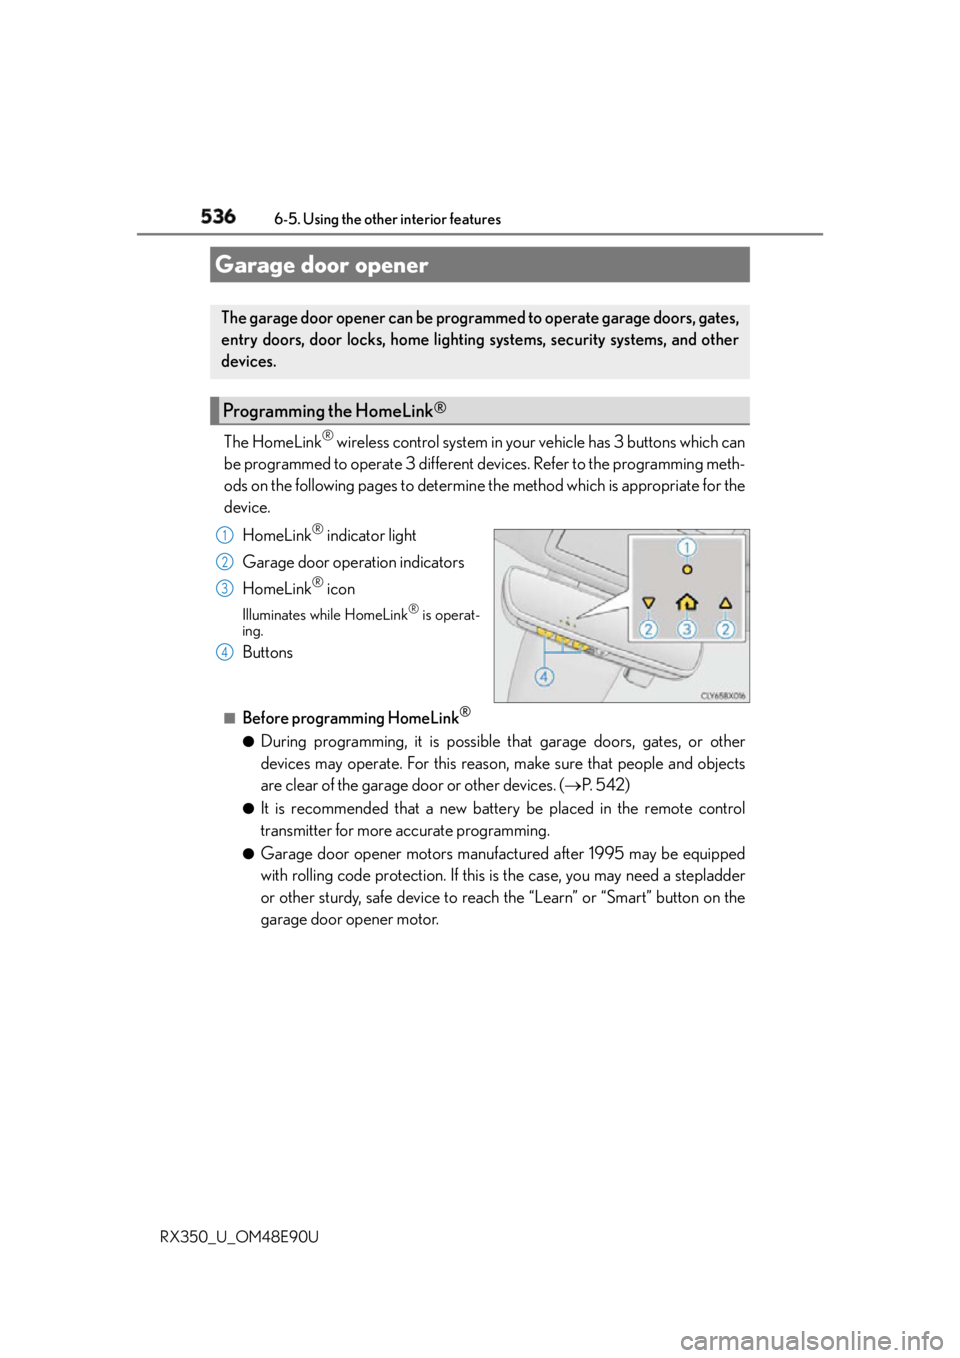
RX350_U_OM48E90U The HomeLink ®
wireless control system in your vehicle has 3 buttons which can
be programmed to operate 3 different devices. Refer to the programming meth-
ods on the following pages to determine the method which is appropriate for the
device.
HomeLink ®
indicator light
Garage door operation indicators
HomeLink ®
iconIlluminates while HomeLink ®
is operat-
ing.
Buttons ■
Before programming HomeLink ®
●
During programming, it is possible th at garage doors, gates, or other
devices may operate. For this reason, make sure that people and objects
are clear of the garage door or other devices. ( P. 5 4 2 )●
It is recommended that a new battery be placed in the remote control
transmitter for more accurate programming. ●
Garage door opener motors manufactured after 1995 may be equipped
with rolling code protection. If this is the case, you may need a stepladder
or other sturdy, safe device to reach the “Learn” or “Smart” button on the
garage door opener motor.Garage door opener The garage door opener can be programmed to operate garage doors, gates,
entry doors, door locks, home lighting systems, security systems, and other
devices.
Programming the HomeLink ®
1
2
3
4
Page 537 of 748
5376-5. Using the other interior features
6
Interior features
RX350_U_OM48E90U ■
Programming HomeLink ®
Press and release the HomeLink ®
button you want to program and check
that the HomeLink ®
indicator light flashes (orange).Pe r f o r m
within 60 seconds of
, or the indicator light will stop flashing and
programming will not be able to be completed.
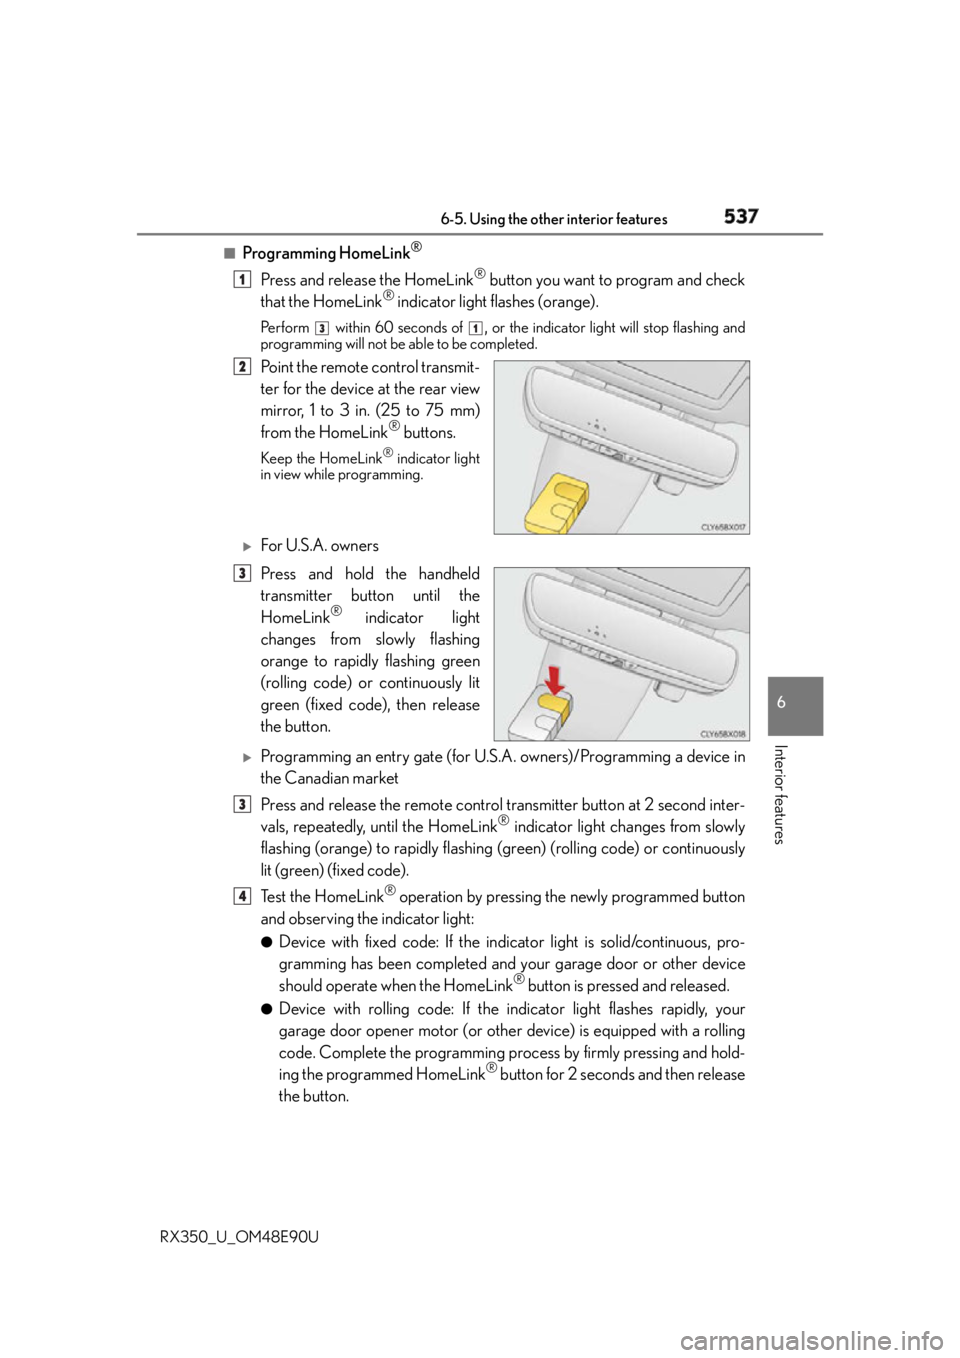
Point the remote control transmit-
ter for the device at the rear view
mirror, 1 to 3 in. (25 to 75 mm)
from the HomeLink ®
buttons.Keep the HomeLink ®
indicator light
in view while programming.
For U.S.A. owners
Press and hold the handheld
transmitter button until the
HomeLink ®
indicator light
changes from slowly flashing
orange to rapidly flashing green
(rolling code) or continuously lit
green (fixed code), then release
the button.
Programming an entry gate (for U.S. A. owners)/Programming a device in
the Canadian market
Press and release the remote control transmitter button at 2 second inter-
vals, repeatedly, until the HomeLink ®
indicator light changes from slowly
flashing (orange) to rapidly flashing (green) (rolling code) or continuously
lit (green) (fixed code).
Te s t t h e H o m e L i n k ®
operation by pressing the newly programmed button
and observing the indicator light: ●
Device with fixed code: If the indi cator light is solid/continuous, pro-
gramming has been completed and your garage door or other device
should operate when the HomeLink ®
button is pressed and released.●
Device with rolling code: If the indicator light flashes rapidly, your
garage door opener motor (or other device) is equipped with a rolling
code. Complete the programming process by firmly pressing and hold-
ing the programmed HomeLink ®
button for 2 seconds and then release
the button. 1 3 1
2
3
3
4
Page 538 of 748
538 6-5. Using the other interior features
RX350_U_OM48E90U ●
If the garage door or other device does not operate, proceed to “Pro-
gramming a rolling code system”.
Repeat the steps above to program another device for any of the remaining
HomeLink ®
buttons.■
Programming a rolling code system
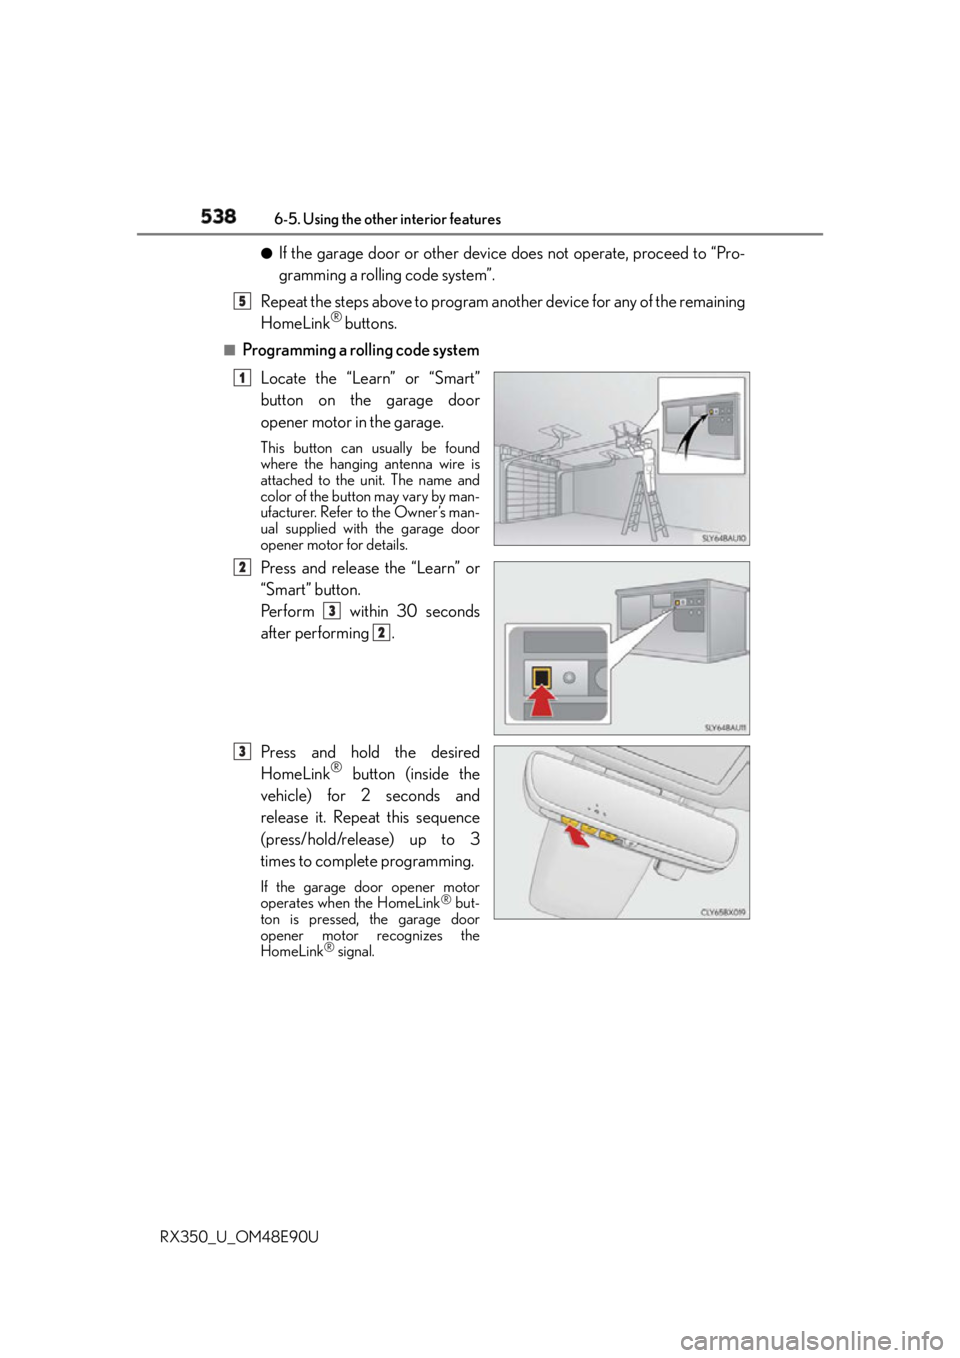
Locate the “Learn” or “Smart”
button on the garage door
opener motor in the garage. This button can usually be found
where the hanging antenna wire is
attached to the unit. The name and
color of the button may vary by man-
ufacturer. Refer to the Owner’s man-
ual supplied with the garage door
opener motor for details.
Press and release the “Learn” or
“Smart” button.
Pe r f o r m w i t h i n 3 0 s e c o n d s
after performing .
Press and hold the desired
HomeLink ®
button (inside the
vehicle) for 2 seconds and
release it. Repeat this sequence
(press/hold/release) up to 3
times to complete programming. If the garage door opener motor
operates when the HomeLink ®
but-
ton is pressed, the garage door
opener motor recognizes the
HomeLink ®
signal. 5
1
2
3
2
3
Page 539 of 748
5396-5. Using the other interior features
6
Interior features
RX350_U_OM48E90U ■
Enabling 2-way communication with a garage door (only available for com-
patible devices)
When enabled, 2-way communication allows you to check the status of the
opening and closing of a garage door through indicators in your vehicle.
2-way communication is only available if the garage door opener motor used
is a compatible device. (To check device compatibility, refer to
www.HomeLink.com.)
Within 5 seconds after programming the garage door opener has been
completed, if the garage door opener motor is trained to HomeLink ®
,
both garage door operation indicators will flash rapidly (green) and the
light on the garage door opener motor will blink twice, indicating that
2-way communication is enabled.
If the indicators do not flash, perform and within the first 10 presses of
the HomeLink ®
button after programming has been completed.
Press a programmed HomeLink ®
button to operate a garage door.
Within 1 minute of pressing the HomeLink ®
button, after the garage door
operation has stopped, press the “Learn” or “Smart” button on the garage
door opener motor. Within 5 second s of the establishment of 2-way com-
munication with the garage door opener, both garage door operation indi-
cators in the vehicle will flash rapidly (green) and the light on the garage
door opener motor will blink twice, indicating that 2-way communication is
enabled.■
Reprogramming a single HomeLink ®
button
When the following procedure is performed, buttons which already have
devices registered to them can be overwritten:
With one hand, press and hold the desired HomeLink ®
button.
When the HomeLink ®
indicator starts flashing (orange), continue to hold
the HomeLink ®
button and perform “Programming HomeLink ®
” (it
takes 20 seconds for the HomeLink ®
indicator to start flashing).
Press the appropriate HomeLink ®
button. The HomeLink ®
indicator light
should turn on.Operating HomeLink ®1
2 3
2
3
1
2
1
Page 540 of 748
540 6-5. Using the other interior features
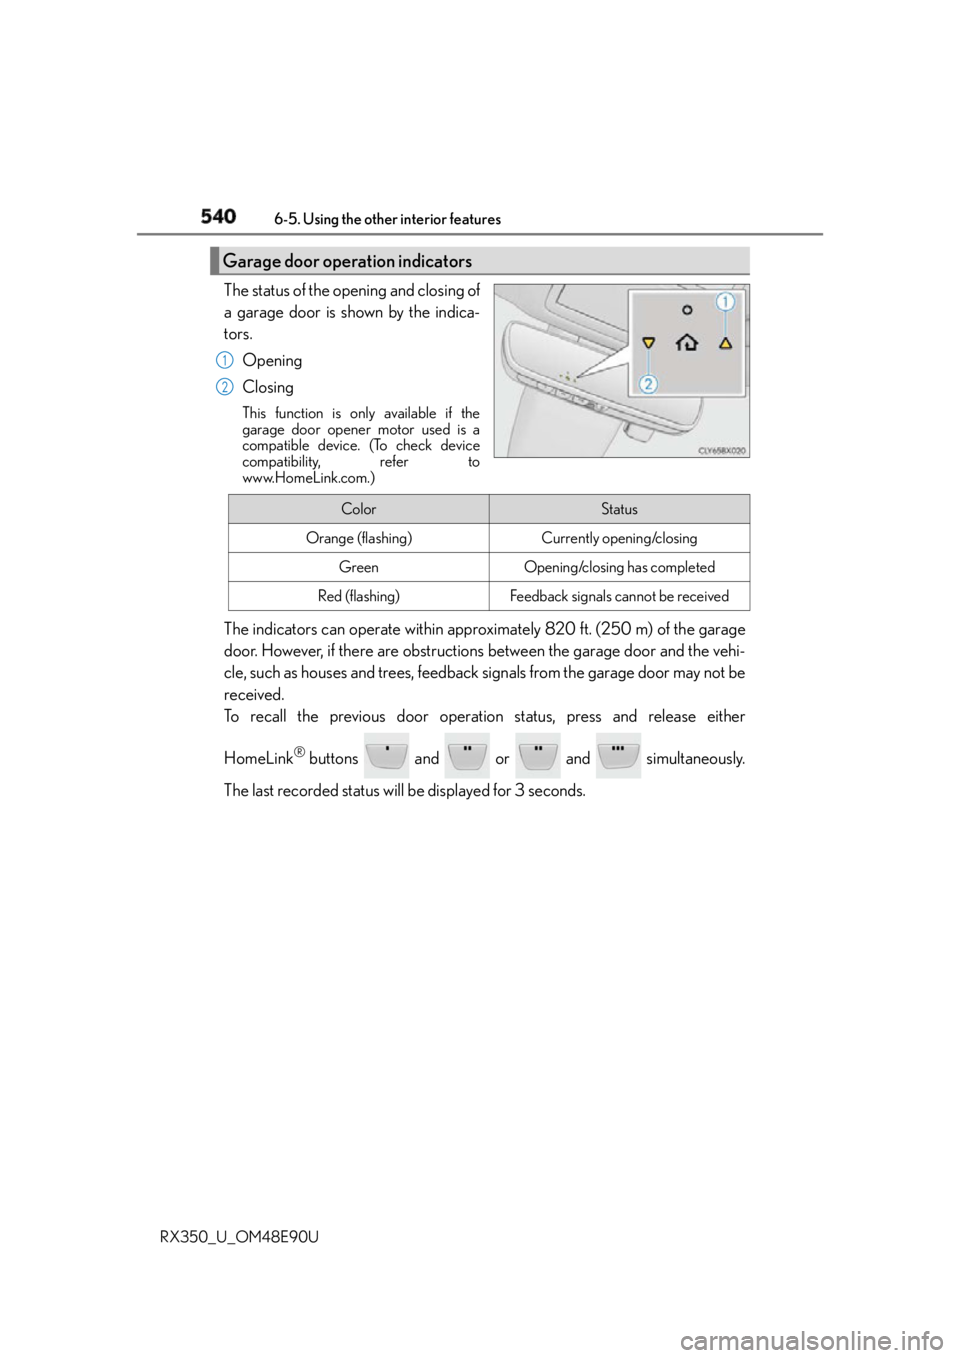
RX350_U_OM48E90U The status of the opening and closing of
a garage door is shown by the indica-
tors.
Opening
Closing This function is only available if the
garage door opener motor used is a
compatible device. (To check device
compatibility, refer to
www.HomeLink.com.)
The indicators can operate within approximately 820 ft. (250 m) of the garage
door. However, if there are obstructions between the garage door and the vehi-
cle, such as houses and trees, feedback signals from the garage door may not be
received.
To recall the previous door operation status, press and release either
HomeLink ®
buttons and or and simultaneously.
The last recorded status w ill be displayed for 3 seconds.Garage door operation indicators 1
2
Color Status
Orange (flashing) Currently opening/closing
Green Opening/closing has completed
Red (flashing) Feedback signals cannot be received