Settings screen LEXUS RX350 2019 Owner's Manual
[x] Cancel search | Manufacturer: LEXUS, Model Year: 2019, Model line: RX350, Model: LEXUS RX350 2019Pages: 777, PDF Size: 12.44 MB
Page 450 of 777
4495-7. Connecting Bluetooth ®
5
Lexus Display Audio system
RX350/RX350L_U Go to “Bluetooth
* Setup”: “MENU” button “Setup” “Bluetooth
* ”
Select the desired device and then select “Device Info”.
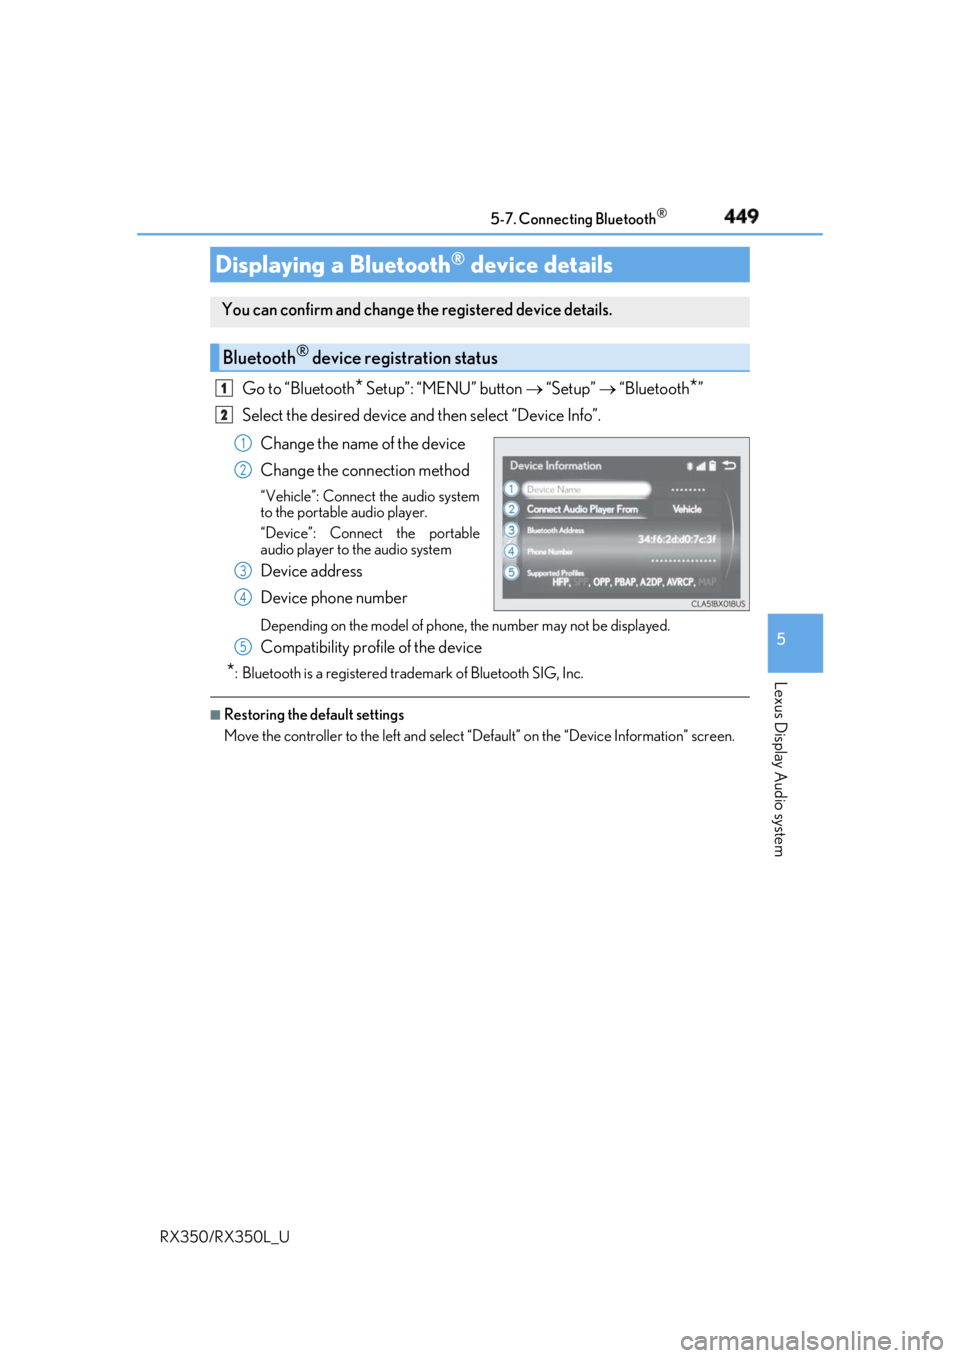
Change the name of the device
Change the connection method “Vehicle”: Connect the audio system
to the portable audio player.
“Device”: Connect the portable
audio player to the audio system
Device address
Device phone number Depending on the model of phone, the number may not be displayed.
Compatibility profile of the device
* : Bluetooth is a registered trademark of Bluetooth SIG, Inc. ■
Restoring the default settings
Move the controller to the left and select “D efault” on the “Device Information” screen.Displaying a Bluetooth ®
device detailsYou can confirm and change th e registered device details.
Bluetooth ®
device registration status 1
2
1
2
3
4
5
Page 451 of 777
450 5-7. Connecting Bluetooth ®
RX350/RX350L_U Go to “Bluetooth
* Setup”: “MENU” button “Setup” “Bluetooth
* ”
Move the controller to the left an d then select “System Settings”.
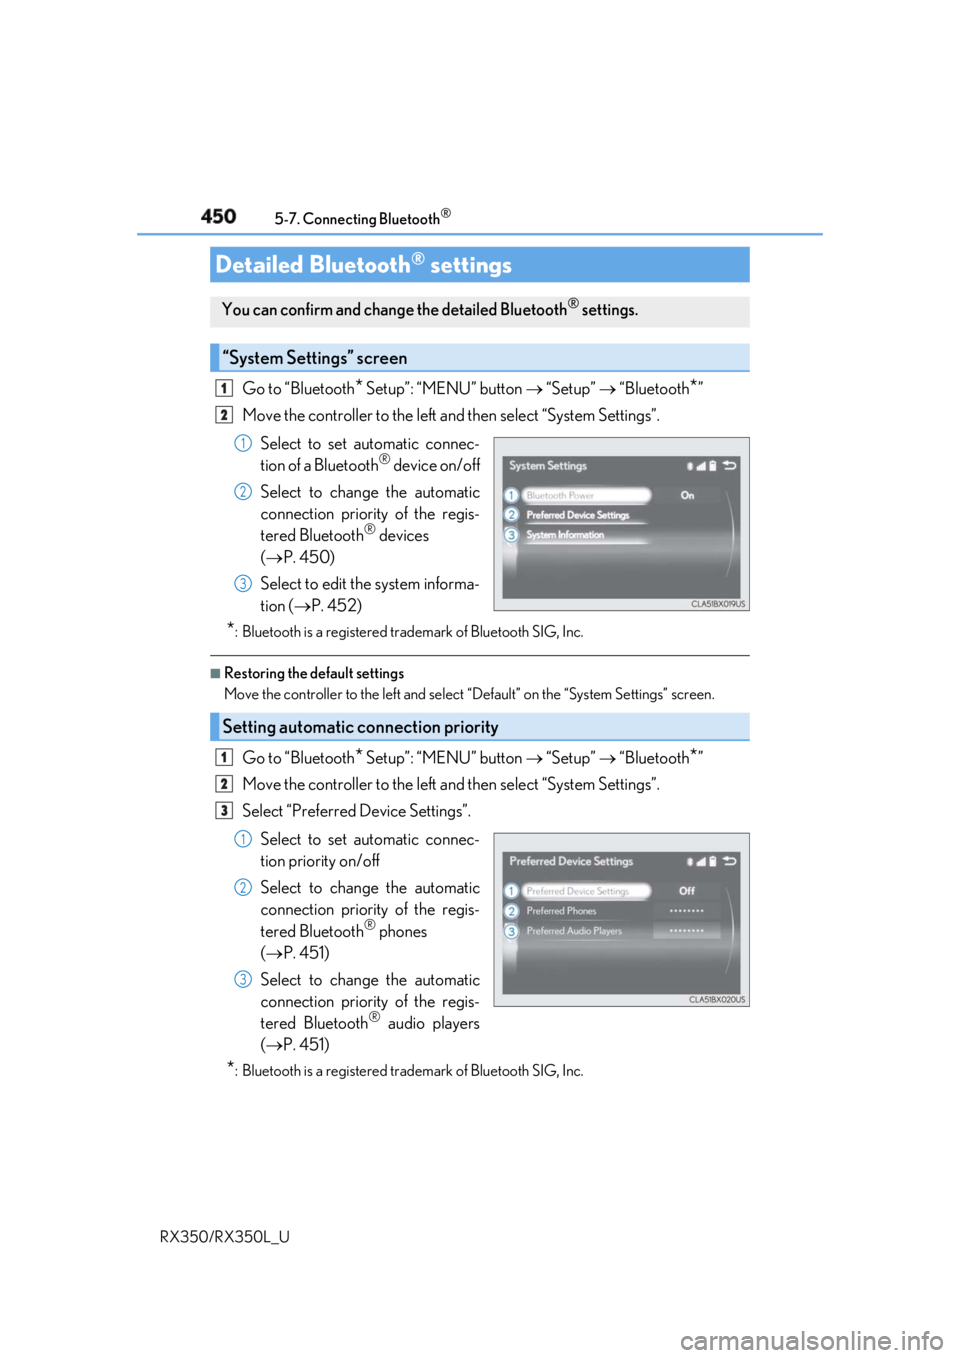
Select to set automatic connec-
tion of a Bluetooth ®
device on/off
Select to change the automatic
connection priority of the regis-
tered Bluetooth ®
devices
( P. 450)
Select to edit the system informa-
tion ( P. 452)
* : Bluetooth is a registered trademark of Bluetooth SIG, Inc. ■
Restoring the default settings
Move the controller to the left and select “Default” on the “System Settings” screen.
Go to “Bluetooth
* Setup”: “MENU” button “Setup” “Bluetooth
* ”
Move the controller to the left an d then select “System Settings”.
Select “Preferred Device Settings”.
Select to set automatic connec-
tion priority on/off
Select to change the automatic
connection priority of the regis-
tered Bluetooth ®
phones
( P. 451)
Select to change the automatic
connection priority of the regis-
tered Bluetooth ®
audio players
( P. 451)
* : Bluetooth is a registered trademark of Bluetooth SIG, Inc.Detailed Bluetooth ®
settingsYou can confirm and change the detailed Bluetooth ®
settings.
“System Settings” screen 1
2
1
2
3
Setting automatic connection priority 1
2
3
1
2
3
Page 452 of 777
4515-7. Connecting Bluetooth ®
5
Lexus Display Audio system
RX350/RX350L_U ■
Restoring the default settings
Move the controller to the left and select “D efault” on the “Preferred Device Settings”
screen.
Go to “Bluetooth
* Setup”: “MENU” button “Setup” “Bluetooth
* ”
Move the controller to the left an d then select “System Settings”.
Select “Preferred Device Settings”.
If “Preferred Device Settings” is set to off, set it to on.
To change the automatic connection pr iority of the registered Bluetooth ®
phones, select “Preferred Phones”. To change the automatic connection pri-
ority of the registered Bluetooth ®
audio players, select “Preferred Audio
Players”.
Select the desired Bluetooth ®
device.
Move the controller to the left and then select “Up” or “Down” to change the
preferred order.
A newly registered Bluetooth ®
device will automatically be given the highest
automatic connection priority.
* : Bluetooth is a registered trademark of Bluetooth SIG, Inc.Changing Bluetooth ®
device automatic connection priority 1
2
3
4
5
6
7
Page 453 of 777
452 5-7. Connecting Bluetooth ®
RX350/RX350L_U Go to “Bluetooth
* Setup”: “MENU” button “Setup” “Bluetooth
* ”
Move the controller to the left an d then select “System Settings”.
Select “System Information”.
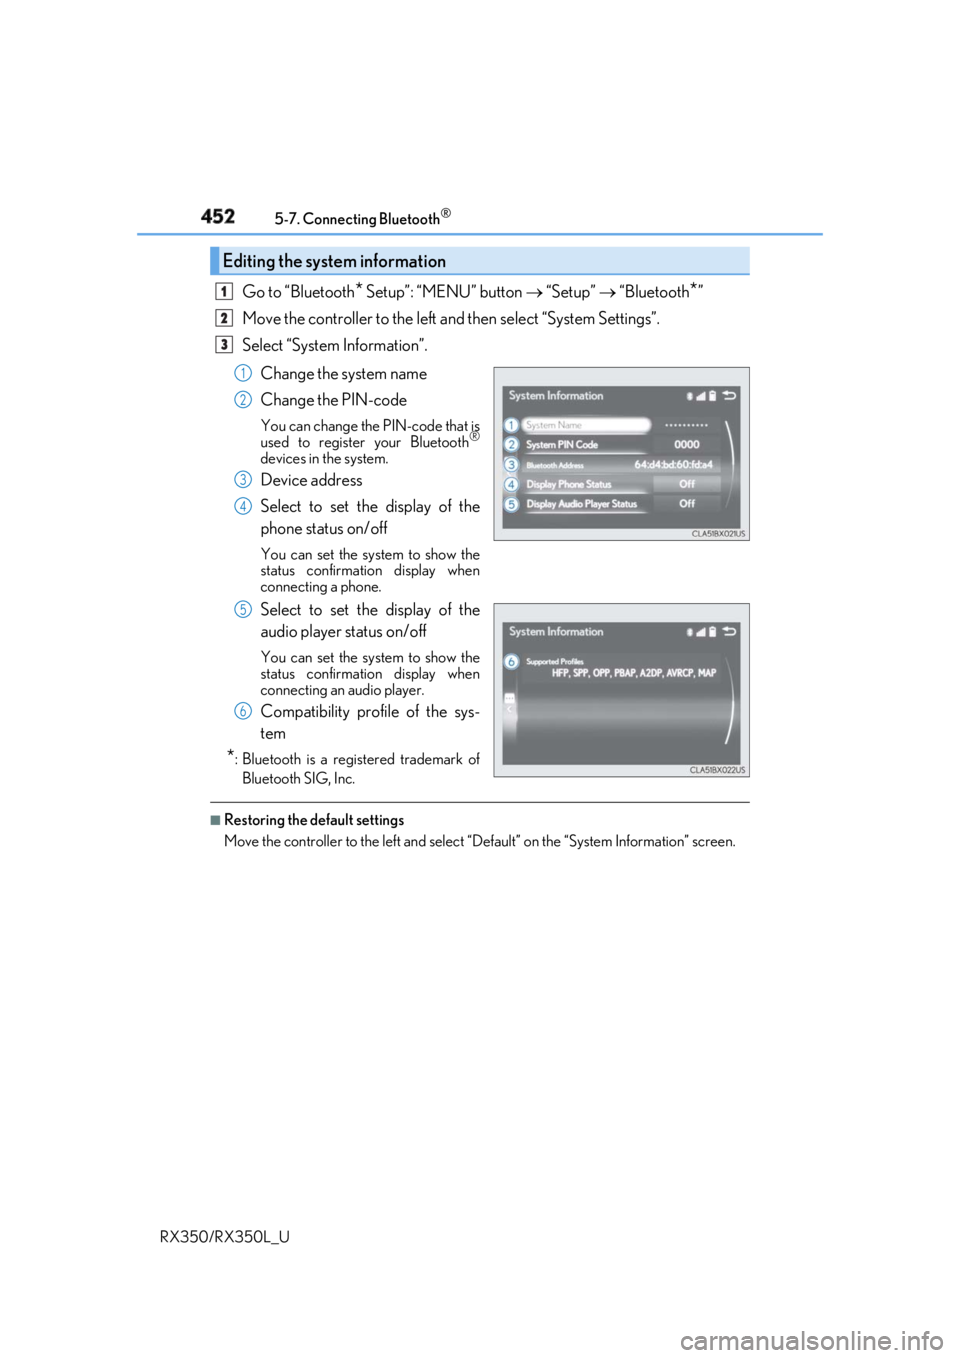
Change the system name
Change the PIN-code You can change the PIN-code that is
used to register your Bluetooth ®
devices in the system.
Device address
Select to set the display of the
phone status on/off You can set the system to show the
status confirmation display when
connecting a phone.
Select to set the display of the
audio player status on/off You can set the system to show the
status confirmation display when
connecting an audio player.
Compatibility profile of the sys-
tem
* : Bluetooth is a registered trademark of
Bluetooth SIG, Inc. ■
Restoring the default settings
Move the controller to the left and select “D efault” on the “System Information” screen.Editing the system information 1
2
3
1
2
3
4
5
6
Page 467 of 777
466 5-9. Bluetooth ®
Phone
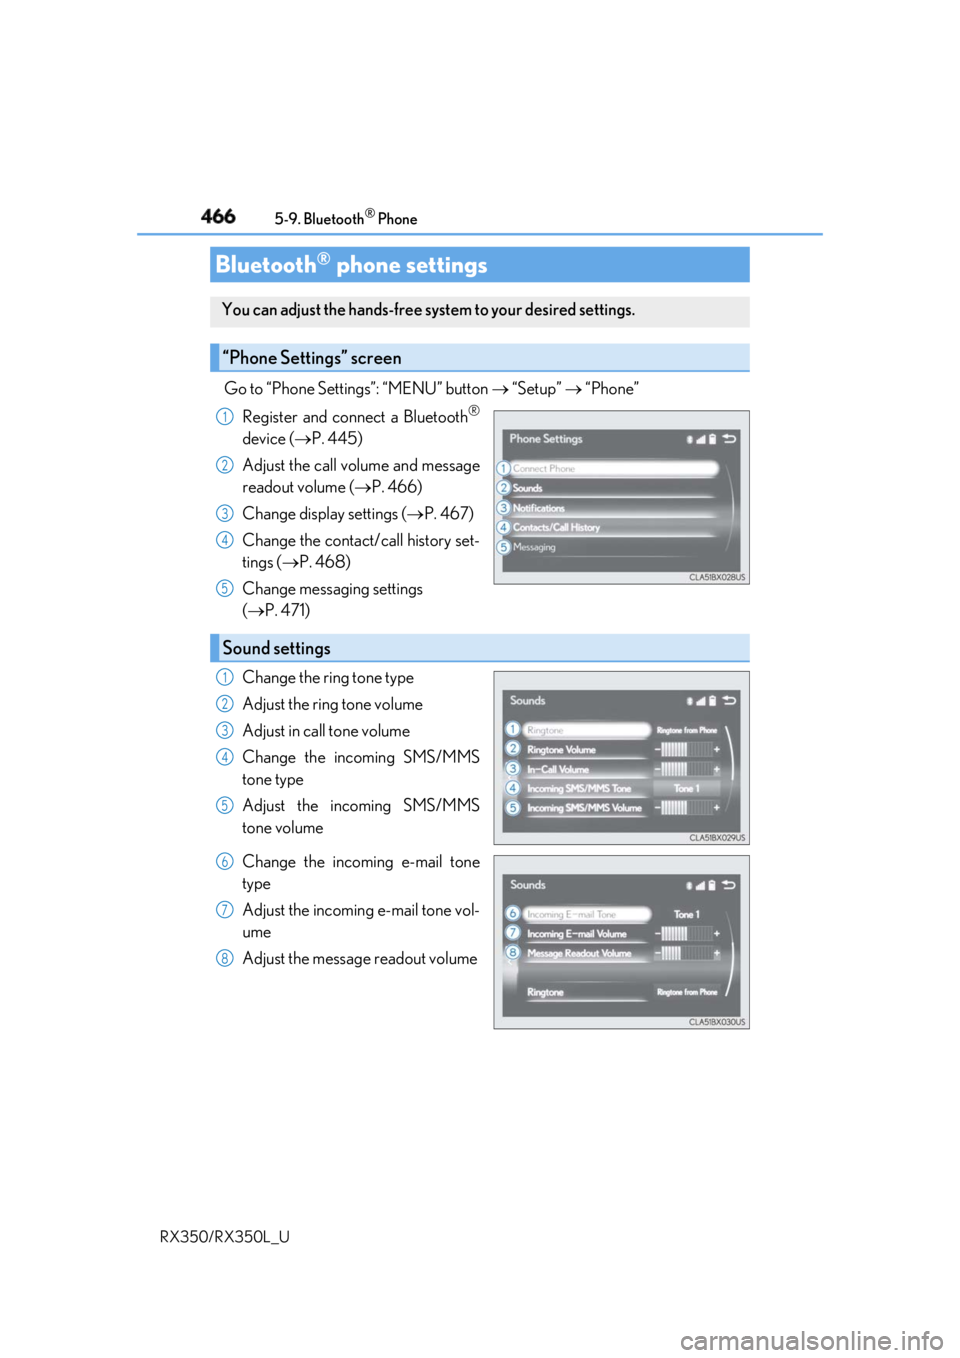
RX350/RX350L_U Go to “Phone Settings”: “MENU” button “Setup” “Phone”
Register and connect a Bluetooth ®
device ( P. 445)
Adjust the call volume and message
readout volume ( P. 466)
Change display settings ( P. 467)
Change the contact/call history set-
tings ( P. 468)
Change messaging settings
( P. 471)
Change the ring tone type
Adjust the ring tone volume
Adjust in call tone volume
Change the incoming SMS/MMS
tone type
Adjust the incoming SMS/MMS
tone volume
Change the incoming e-mail tone
type
Adjust the incoming e-mail tone vol-
ume
Adjust the message readout volumeBluetooth ®
phone settingsYou can adjust the hands-free sy stem to your desired settings.
“Phone Settings” screen 1
2
3
4
5
Sound settings 1
2
3
4
5
6
7
8
Page 469 of 777
468
RX350/RX350L_U 5-10. Phonebook
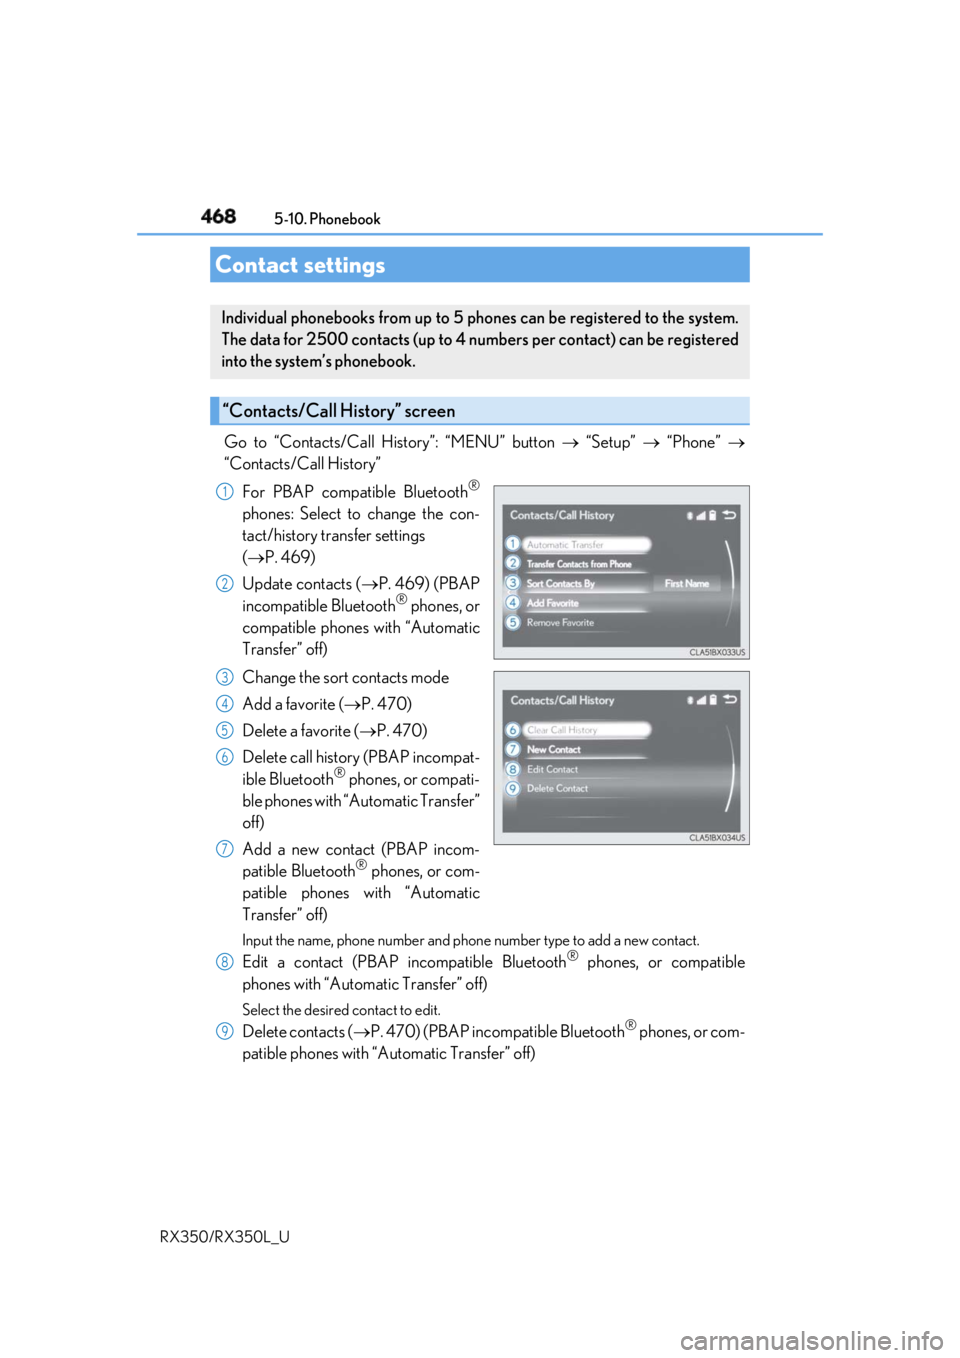
Go to “Contacts/Call History”: “MENU” button “Setup” “Phone”
“Contacts/Call History”
For PBAP compatible Bluetooth ®
phones: Select to change the con-
tact/history transfer settings
( P. 469)
Update contacts ( P. 469) (PBAP
incompatible Bluetooth ®
phones, or
compatible phones with “Automatic
Transfer” off)
Change the sort contacts mode
Add a favorite ( P. 470)
Delete a favorite ( P. 470)
Delete call history (PBAP incompat-
ible Bluetooth ®
phones, or compati-
ble phones with “Automatic Transfer”
off)
Add a new contact (PBAP incom-
patible Bluetooth ®
phones, or com-
patible phones with “Automatic
Transfer” off) Input the name, phone number and phon e number type to add a new contact.
Edit a contact (PBAP in compatible Bluetooth ®
phones, or compatible
phones with “Automatic Transfer” off) Select the desired contact to edit.
Delete contacts ( P. 470) (PBAP incompatible Bluetooth ®
phones, or com-
patible phones with “Automatic Transfer” off)Contact settings Individual phonebooks from up to 5 ph ones can be registered to the system.
The data for 2500 contacts (up to 4 numbers per contact) can be registered
into the system’s phonebook.
“Contacts/Call History” screen 1
2
3
4
5
6
7
8
9
Page 470 of 777
4695-10. Phonebook
5
Lexus Display Audio system
RX350/RX350L_U ■
Return to the default settings
Move the controller to the left and select “Default”.
You can transfer the phone numbers in your Bluetooth ®
phone to the system.
Operation methods differ between PBAP compatible and PBAP incompatible
Bluetooth ®
phones. If your cellular phone does not support either PBAP or
OPP services, you canno t transfer contacts.
For PBAP compatible Bluetooth ®
phones
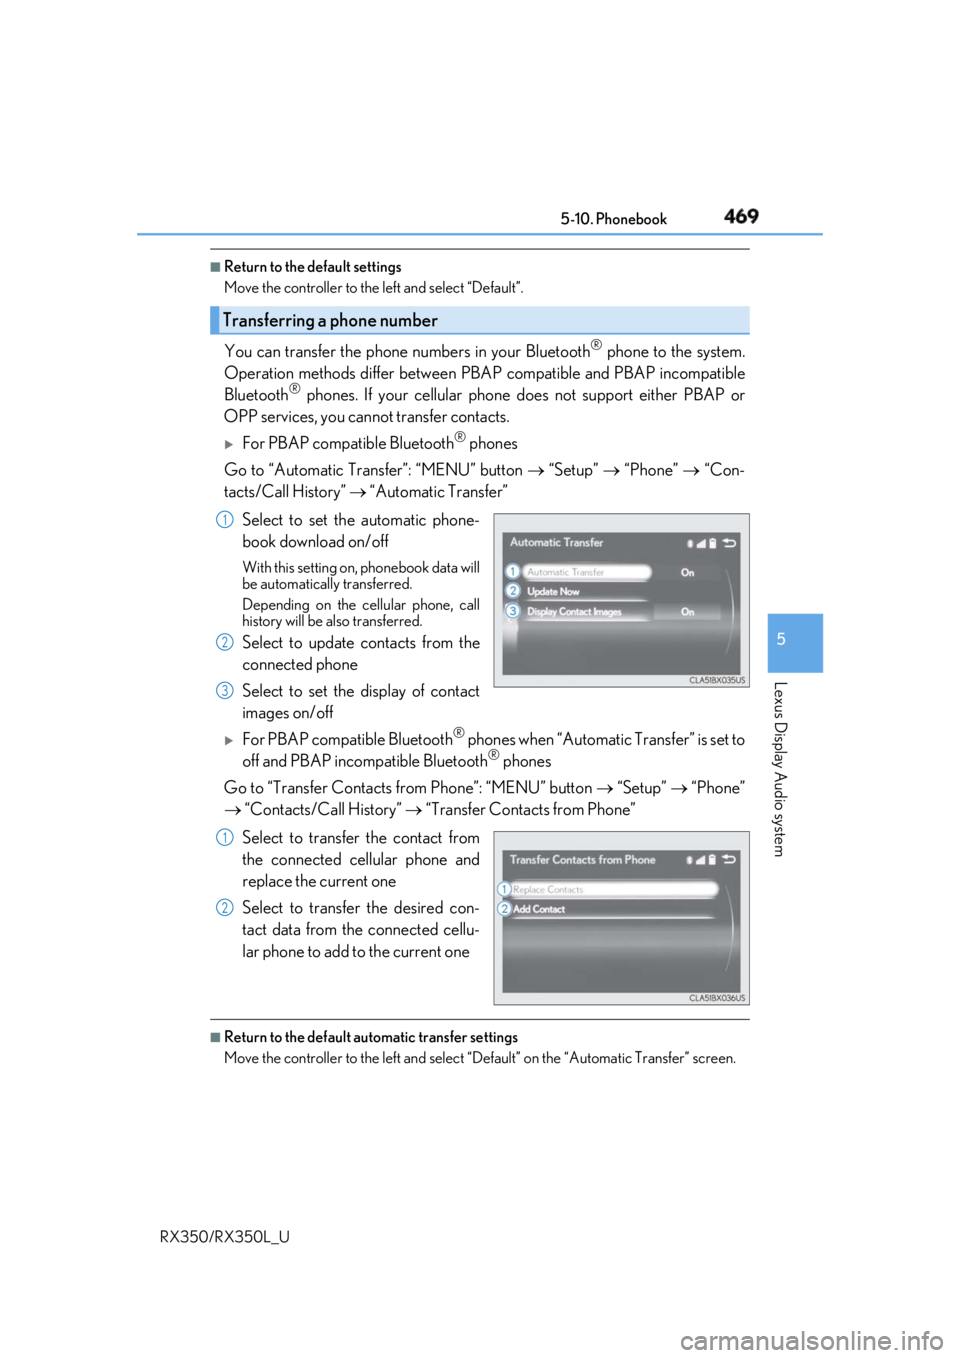
Go to “Automatic Transfer”: “MENU” button “Setup” “Phone” “Con-
tacts/Call History” “Automatic Transfer”
Select to set the automatic phone-
book download on/off With this setting on, phonebook data will
be automatically transferred.
Depending on the cellular phone, call
history will be also transferred.
Select to update contacts from the
connected phone
Select to set the display of contact
images on/off
For PBAP compatible Bluetooth ®
phones when “Automatic Transfer” is set to
off and PBAP incompatible Bluetooth ®
phones
Go to “Transfer Contacts from Phone”: “MENU” button “Setup” “Phone”
“Contacts/Call History” “Transfer Contacts from Phone”
Select to transfer the contact from
the connected cellular phone and
replace the current one
Select to transfer the desired con-
tact data from the connected cellu-
lar phone to add to the current one ■
Return to the default automatic transfer settings
Move the controller to the left and select “D efault” on the “Automatic Transfer” screen.Transferring a phone number 1
2
3
1
2
Page 472 of 777
4715-10. Phonebook
5
Lexus Display Audio system
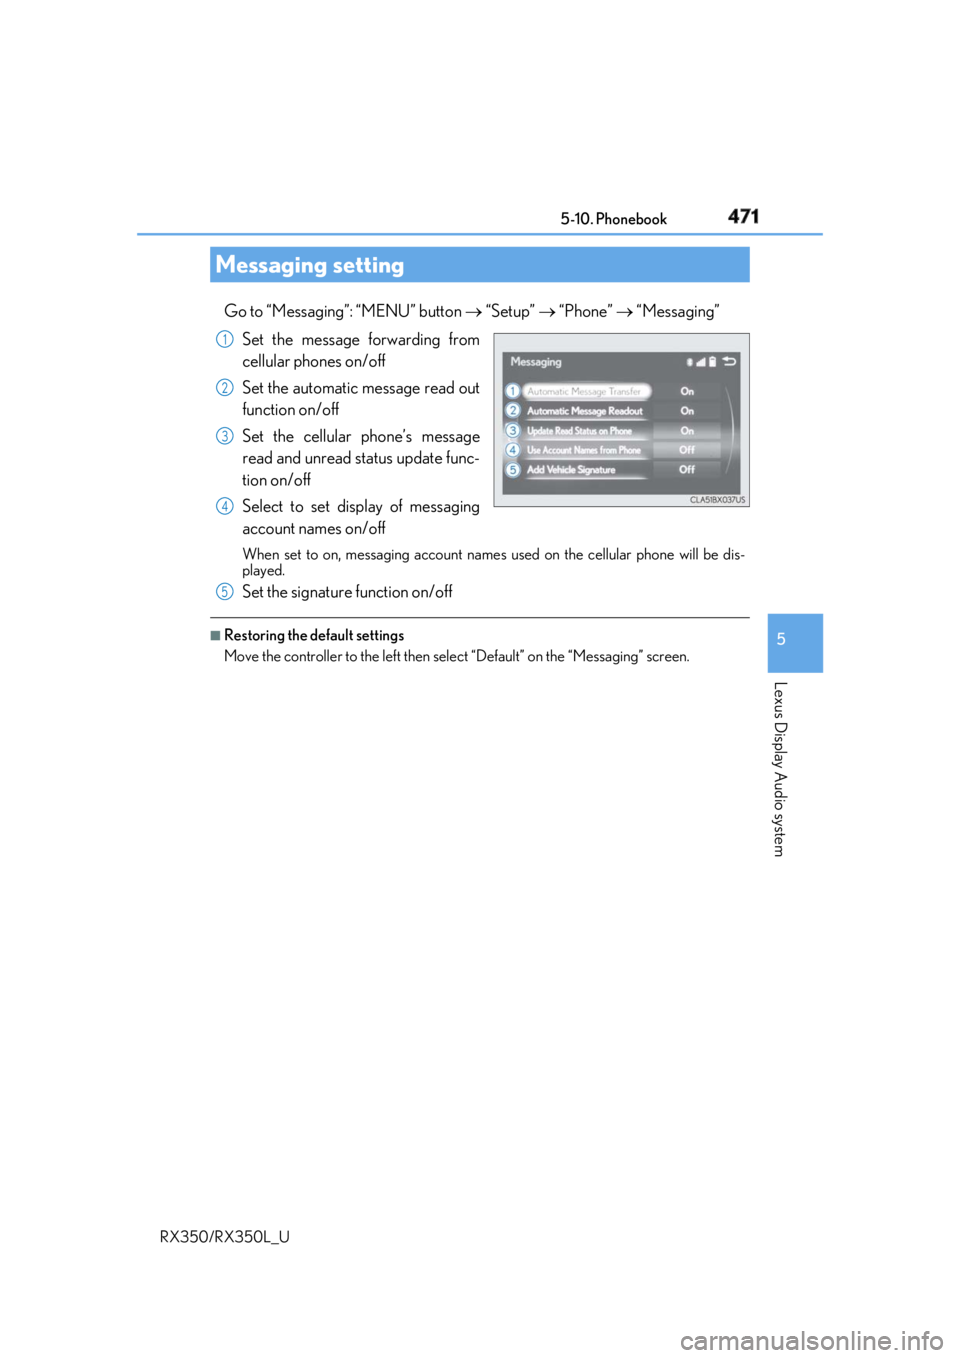
RX350/RX350L_U Go to “Messaging”: “MENU” button “Setup” “Phone” “Messaging”
Set the message forwarding from
cellular phones on/off
Set the automatic message read out
function on/off
Set the cellular phone’s message
read and unread st atus update func-
tion on/off
Select to set display of messaging
account names on/off When set to on, messaging account names used on the cellular phone will be dis-
played.
Set the signature function on/off ■
Restoring the default settings
Move the controller to the left then select “Default” on the “Messaging” screen.Messaging setting 1
2
3
4
5
Page 488 of 777
4875-12. Other function
5
Lexus Display Audio system
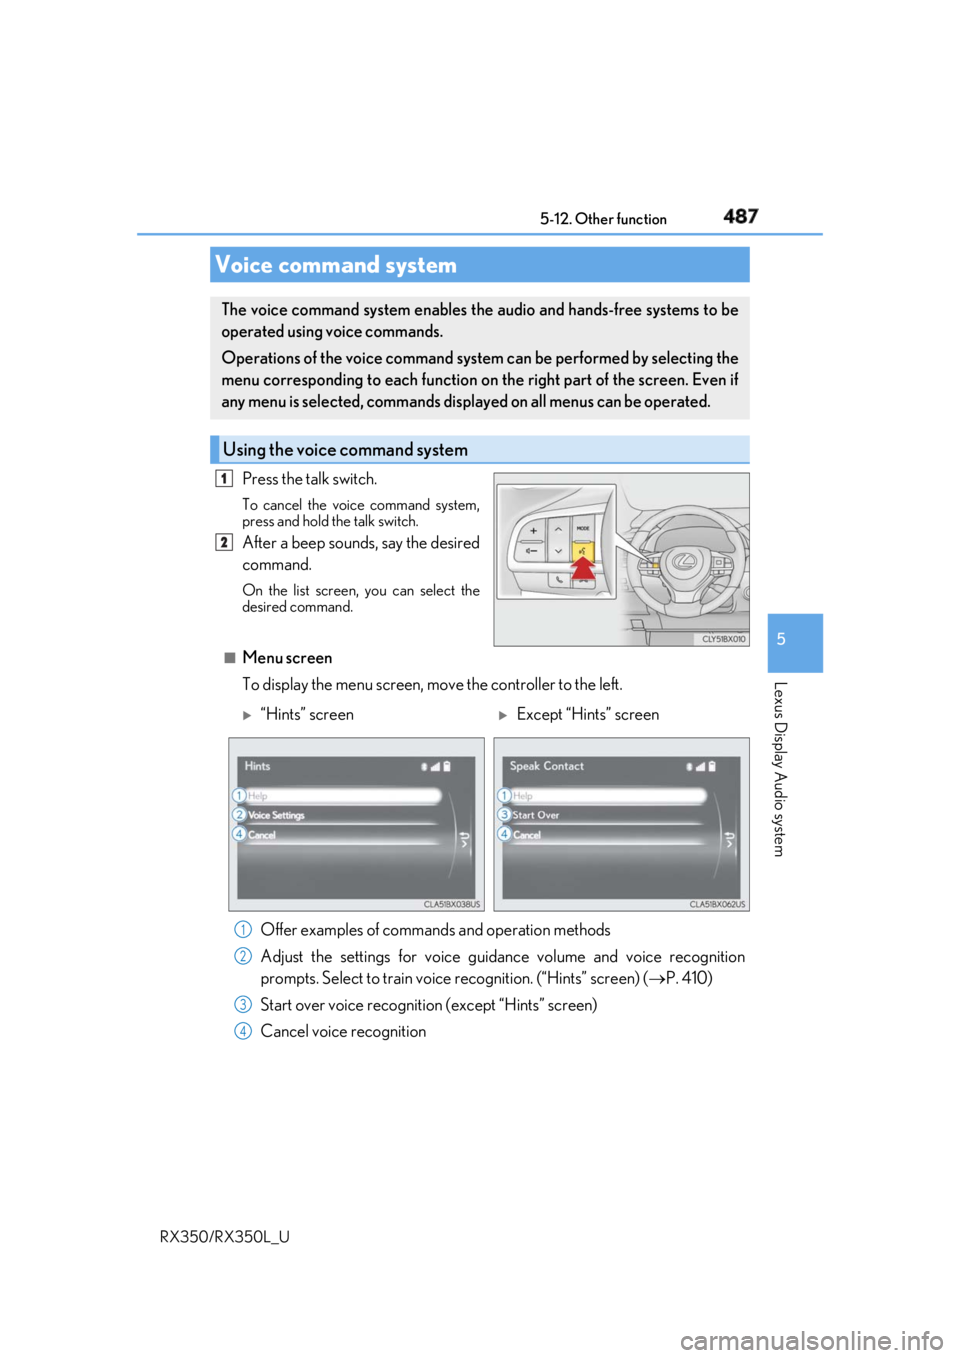
RX350/RX350L_U Press the talk switch. To cancel the voice command system,
press and hold the talk switch.
After a beep sounds, say the desired
command. On the list screen, you can select the
desired command.
■
Menu screen
To display the menu screen, m ove the controller to the left.Voice command system The voice command system enables the audio and hands-free systems to be
operated using voice commands.
Operations of the voice command system can be performed by selecting the
menu corresponding to each function on the right part of the screen. Even if
any menu is selected, commands displayed on all menus can be operated.
Using the voice command system 1
2
“Hints” screen
Except “Hints” screen
Offer examples of commands and operation methods
Adjust the settings for voice guidance volume and voice recognition
prompts. Select to train voice recognition. (“Hints” screen) ( P. 410)
Start over voice recognition (except “Hints” screen)
Cancel voice recognition 1
2
3
4
Page 513 of 777
512 6-2. Using the air conditio ning system and defogger
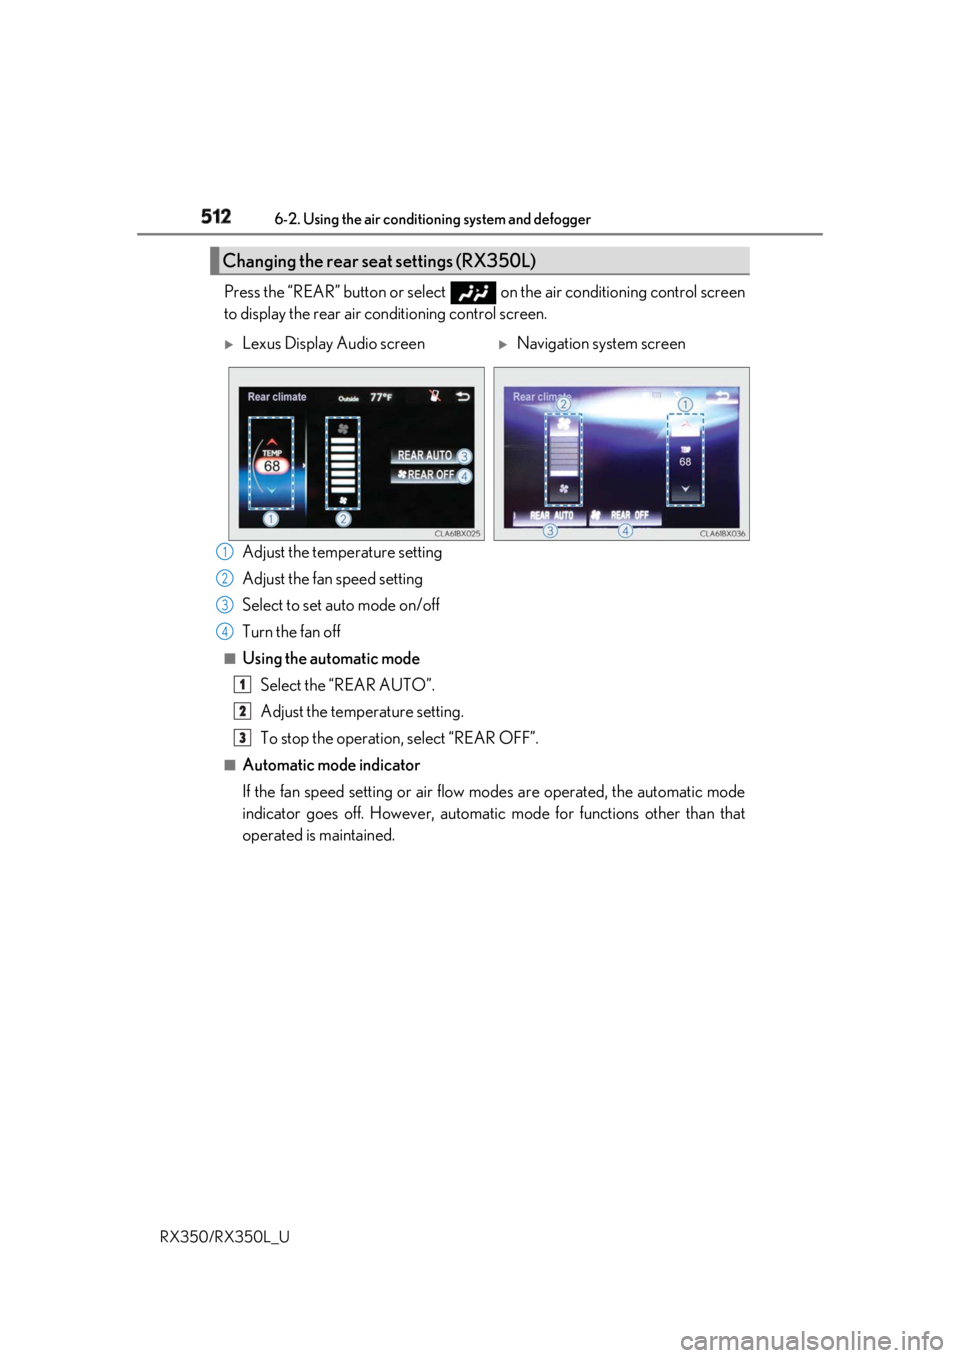
RX350/RX350L_U Press the “REAR” button or select on the air conditioning control screen
to display the rear air conditioning control screen.
Adjust the temperature setting
Adjust the fan speed setting
Select to set auto mode on/off
Turn the fan off ■
Using the automatic mode
Select the “REAR AUTO”.
Adjust the temperature setting.
To stop the operation, select “REAR OFF”.■
Automatic mode indicator
If the fan speed setting or air flow modes are operated, the automatic mode
indicator goes off. However, automati c mode for functions other than that
operated is maintained.Changing the rear se at settings (RX350L)
Lexus Display Audio screen
Navigation system screen
1
2
3
4
1
2
3