LEXUS RX450h 2015 Owners Manual
RX450h 2015
LEXUS
LEXUS
https://www.carmanualsonline.info/img/36/58963/w960_58963-0.png
LEXUS RX450h 2015 Owners Manual
Trending: service reset, check oil, spark plugs, fold seats, oil viscosity, open gas tank, odometer
Page 711 of 878
7114-3. Do-it-yourself maintenance
4
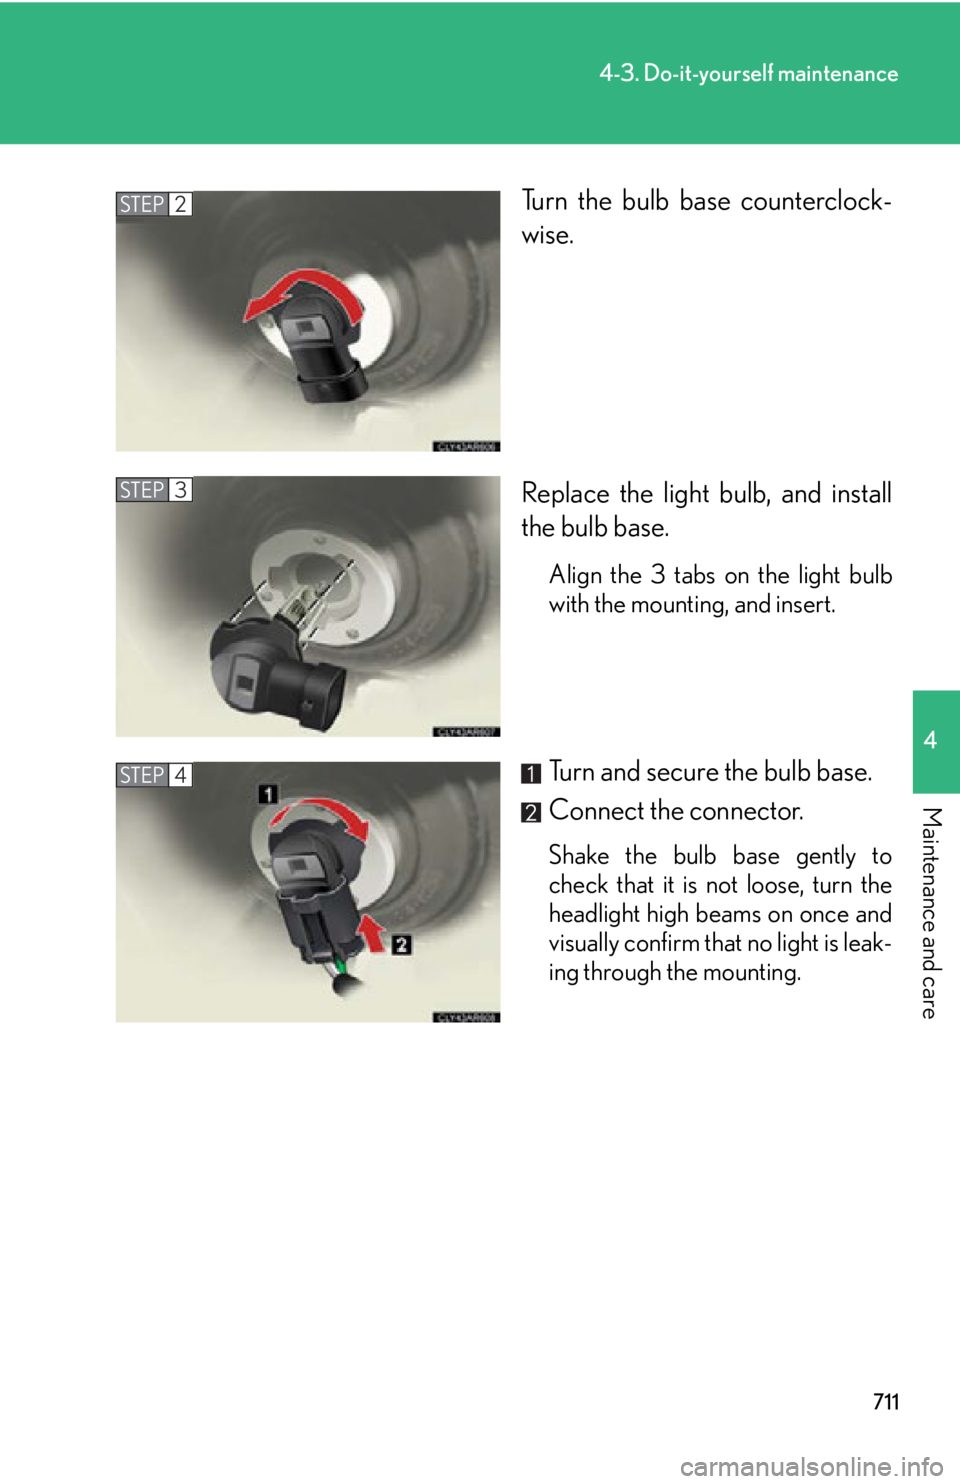
Maintenance and care Turn the bulb base counterclock-
wise.
Replace the light bulb, and install
the bulb base. Align the 3 tabs on the light bulb
with the mounting, and insert.
Turn and secure the bulb base.
Connect the connector. Shake the bulb base gently to
check that it is not loose, turn the
headlight high beams on once and
visually confirm that no light is leak-
ing through the mounting.STEP 2
STEP 3
STEP 4
Page 712 of 878
7124-3. Do-it-yourself maintenance
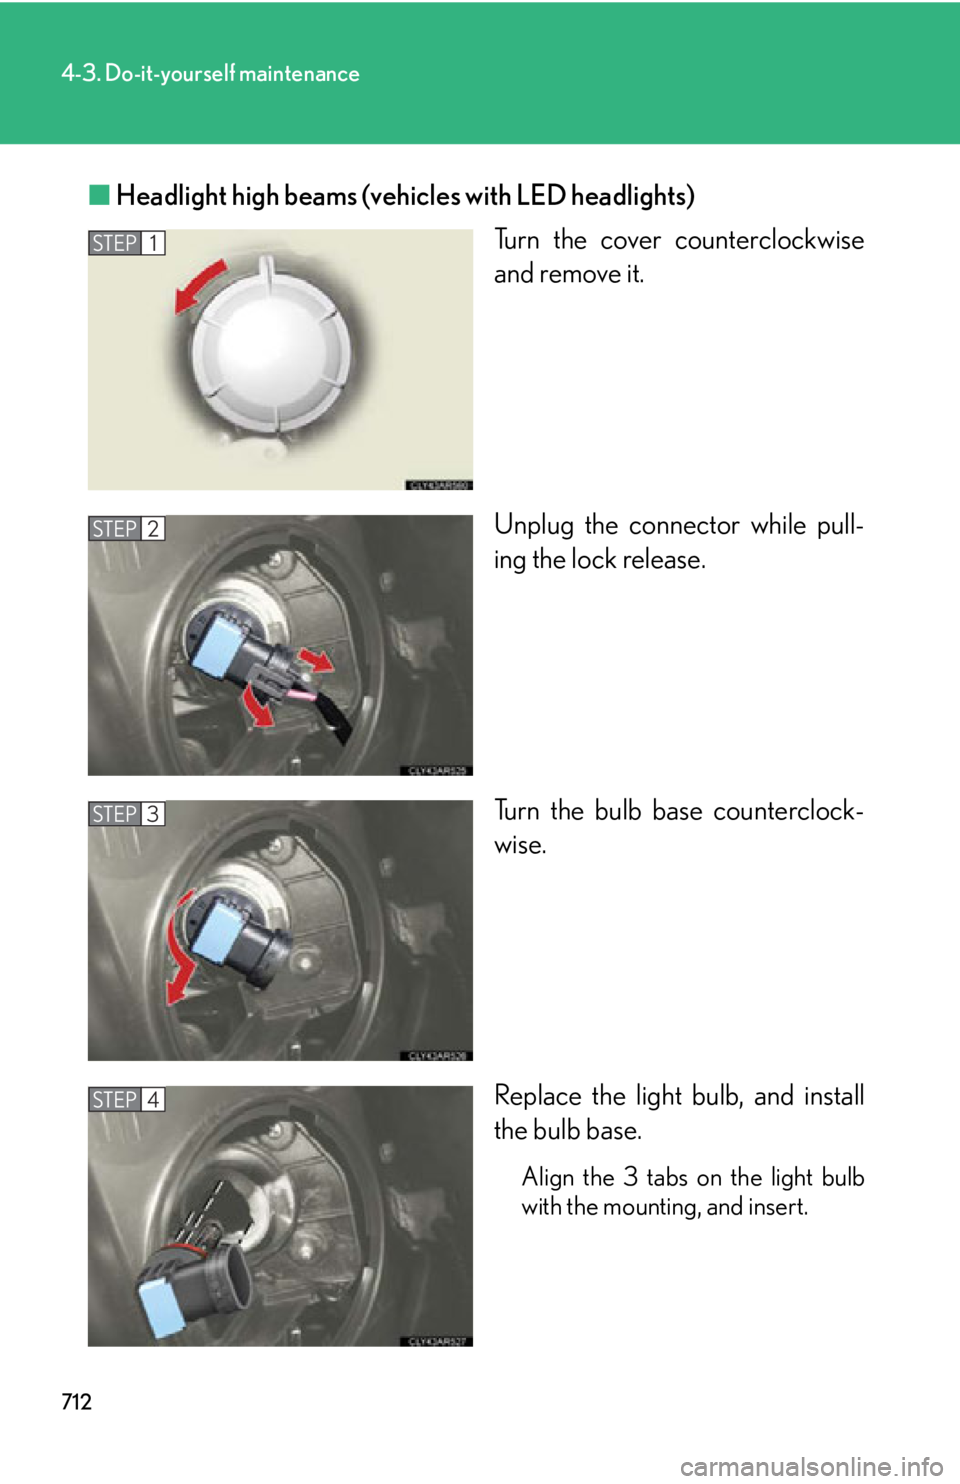
■ Headlight high beams (vehicles with LED headlights)
Turn the cover counterclockwise
and remove it.
Unplug the connector while pull-
ing the lock release.
Turn the bulb base counterclock-
wise.
Replace the light bulb, and install
the bulb base.
Align the 3 tabs on the light bulb
with the mounting, and insert.STEP 1
STEP 2
STEP 3
STEP 4
Page 713 of 878
7134-3. Do-it-yourself maintenance
4
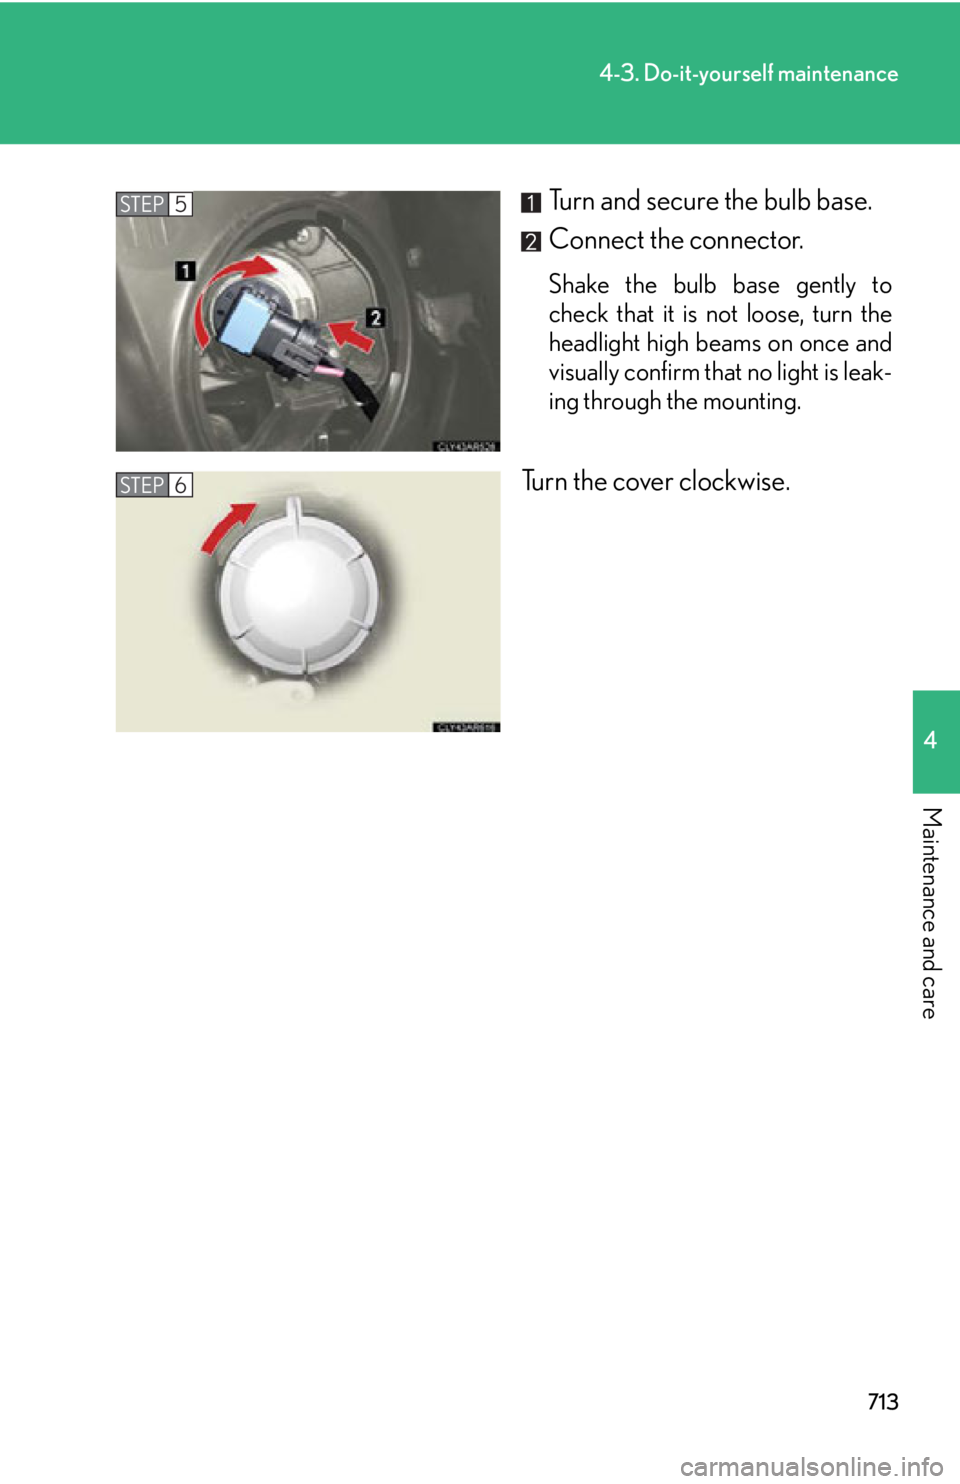
Maintenance and care Turn and secure the bulb base.
Connect the connector. Shake the bulb base gently to
check that it is not loose, turn the
headlight high beams on once and
visually confirm that no light is leak-
ing through the mounting.
Turn the cover clockwise.STEP 5
STEP 6
Page 714 of 878
7144-3. Do-it-yourself maintenance
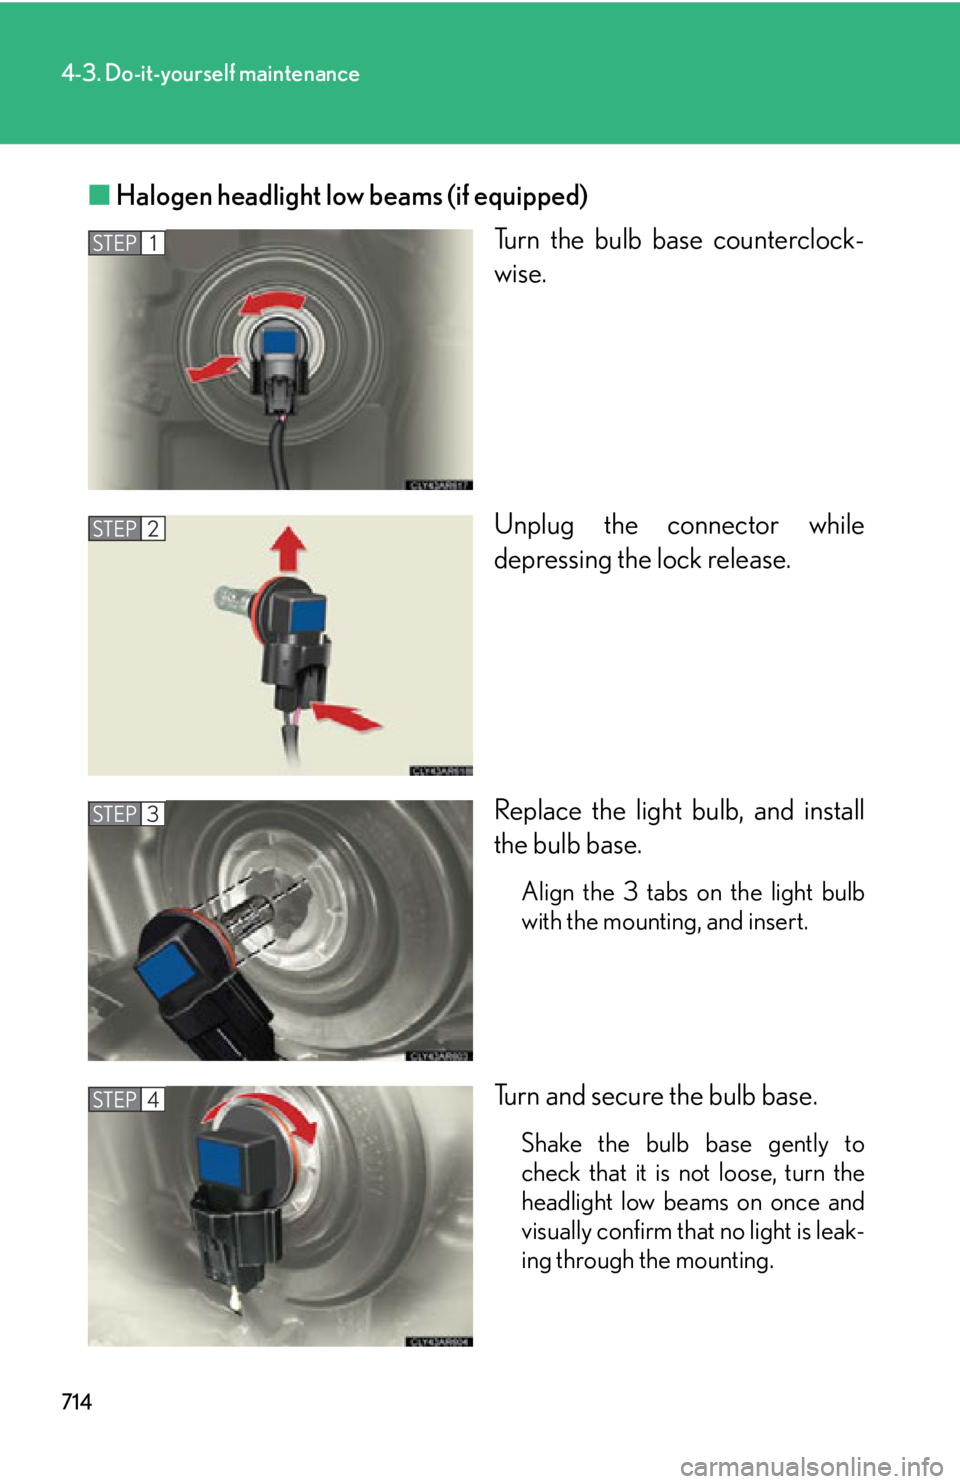
■ Halogen headlight low beams (if equipped)
Turn the bulb base counterclock-
wise.
Unplug the connector while
depressing the lock release.
Replace the light bulb, and install
the bulb base. Align the 3 tabs on the light bulb
with the mounting, and insert.
Turn and secure the bulb base.
Shake the bulb base gently to
check that it is not loose, turn the
headlight low beams on once and
visually confirm that no light is leak-
ing through the mounting.STEP 1
STEP 2
STEP 3
STEP 4
Page 715 of 878
7154-3. Do-it-yourself maintenance
4
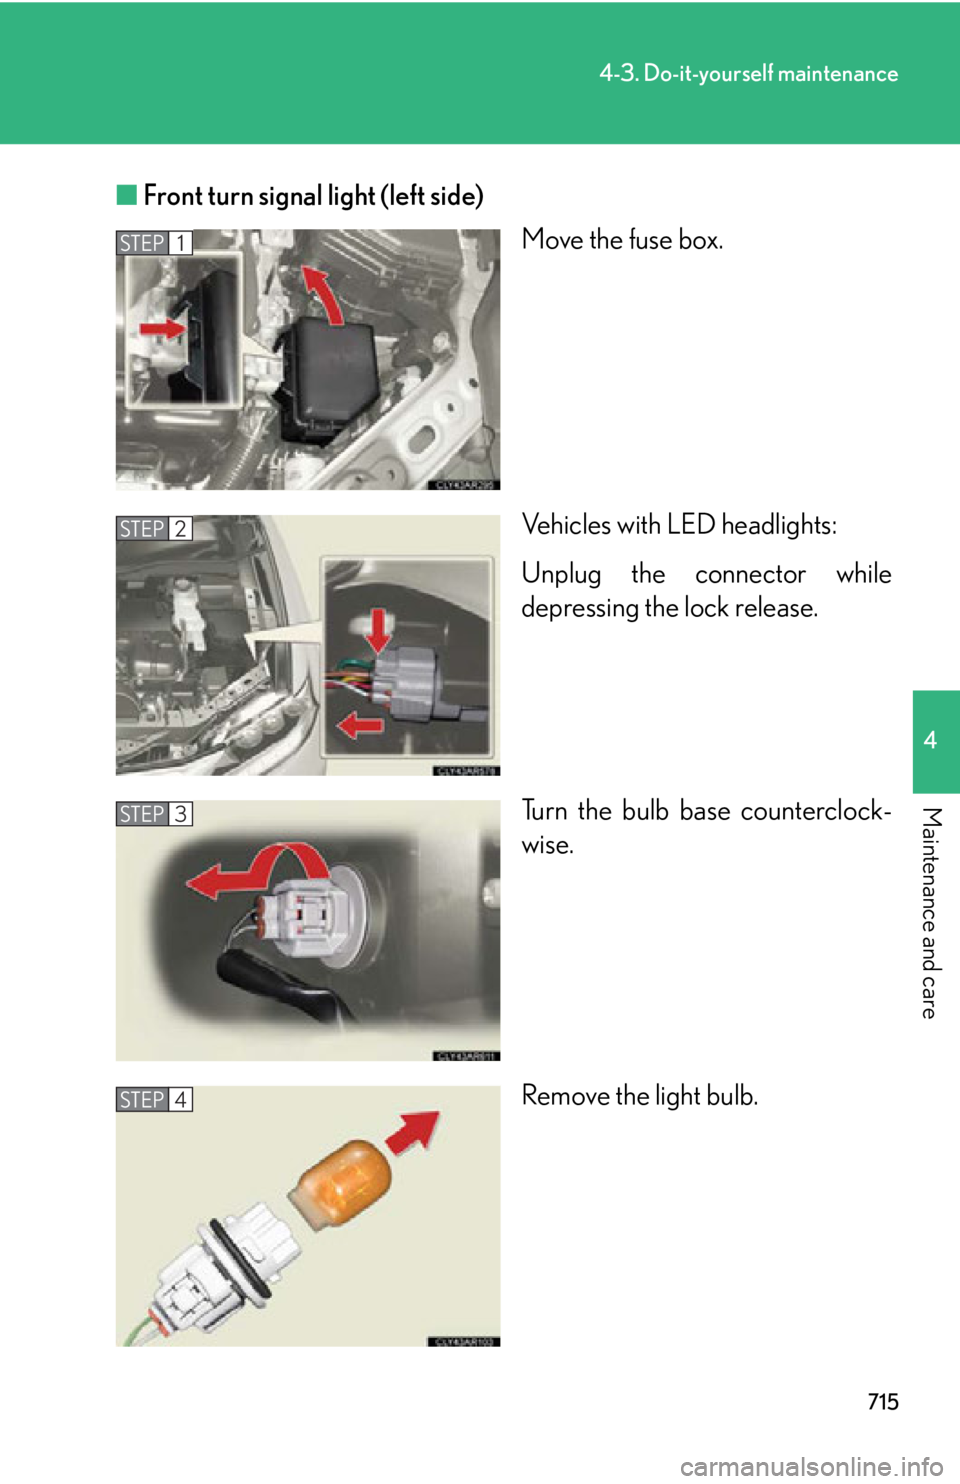
Maintenance and care ■ Front turn signal light (left side)
Move the fuse box.
Vehicles with LED headlights:
Unplug the connector while
depressing the lock release.
Turn the bulb base counterclock-
wise.
Remove the light bulb.STEP 1
STEP 2
STEP 3
STEP 4
Page 716 of 878
7164-3. Do-it-yourself maintenance
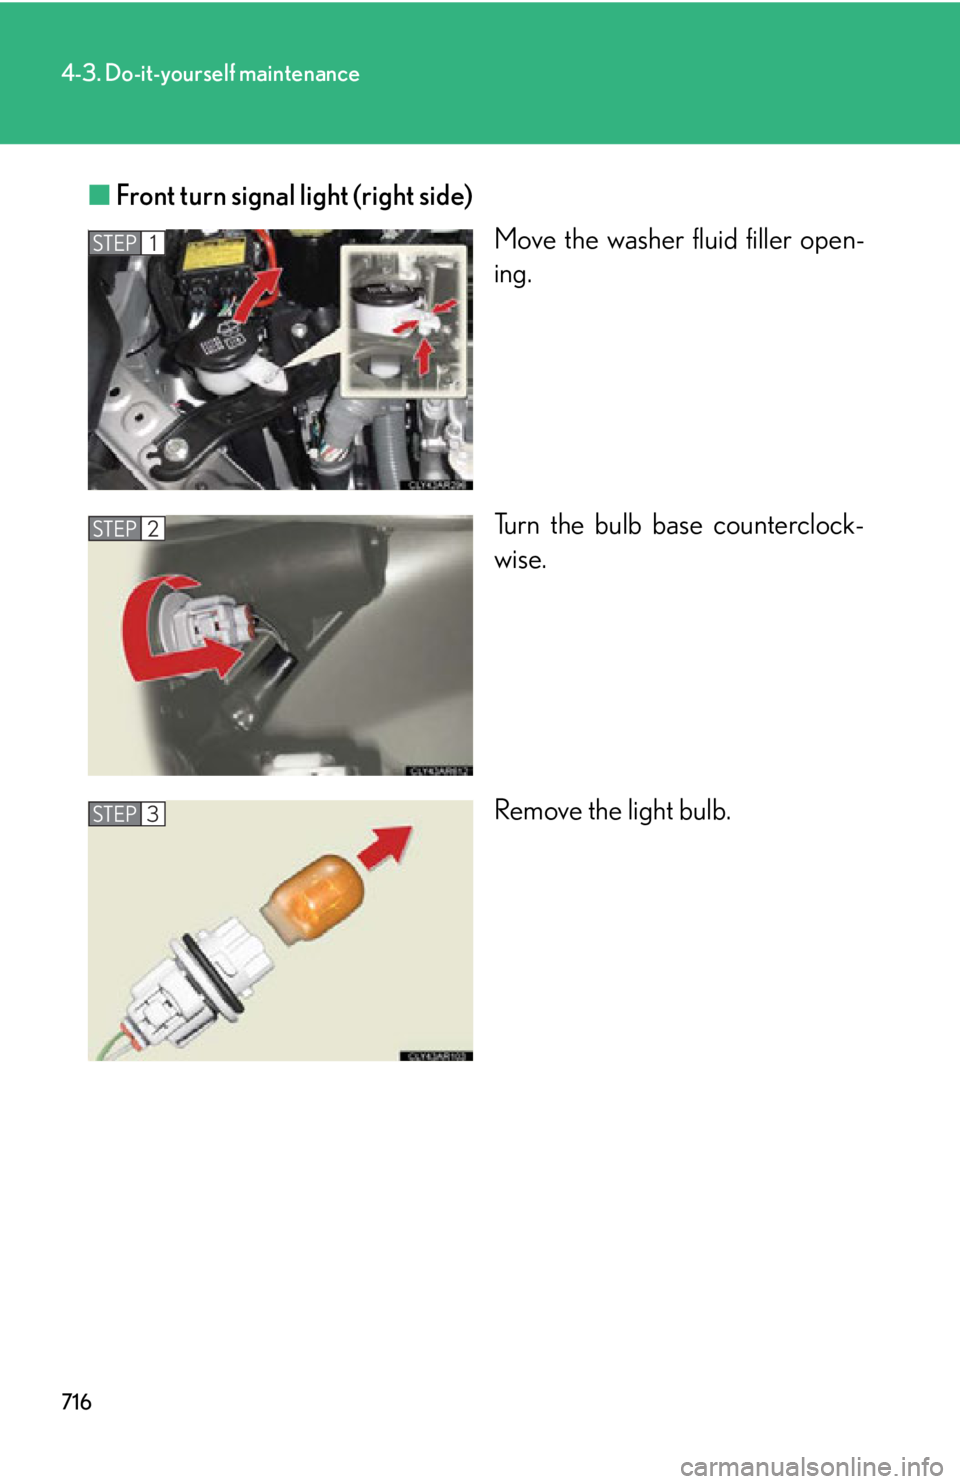
■ Front turn signal light (right side)
Move the washer fluid filler open-
ing.
Turn the bulb base counterclock-
wise.
Remove the light bulb.STEP 1
STEP 2
STEP 3
Page 717 of 878
7174-3. Do-it-yourself maintenance
4
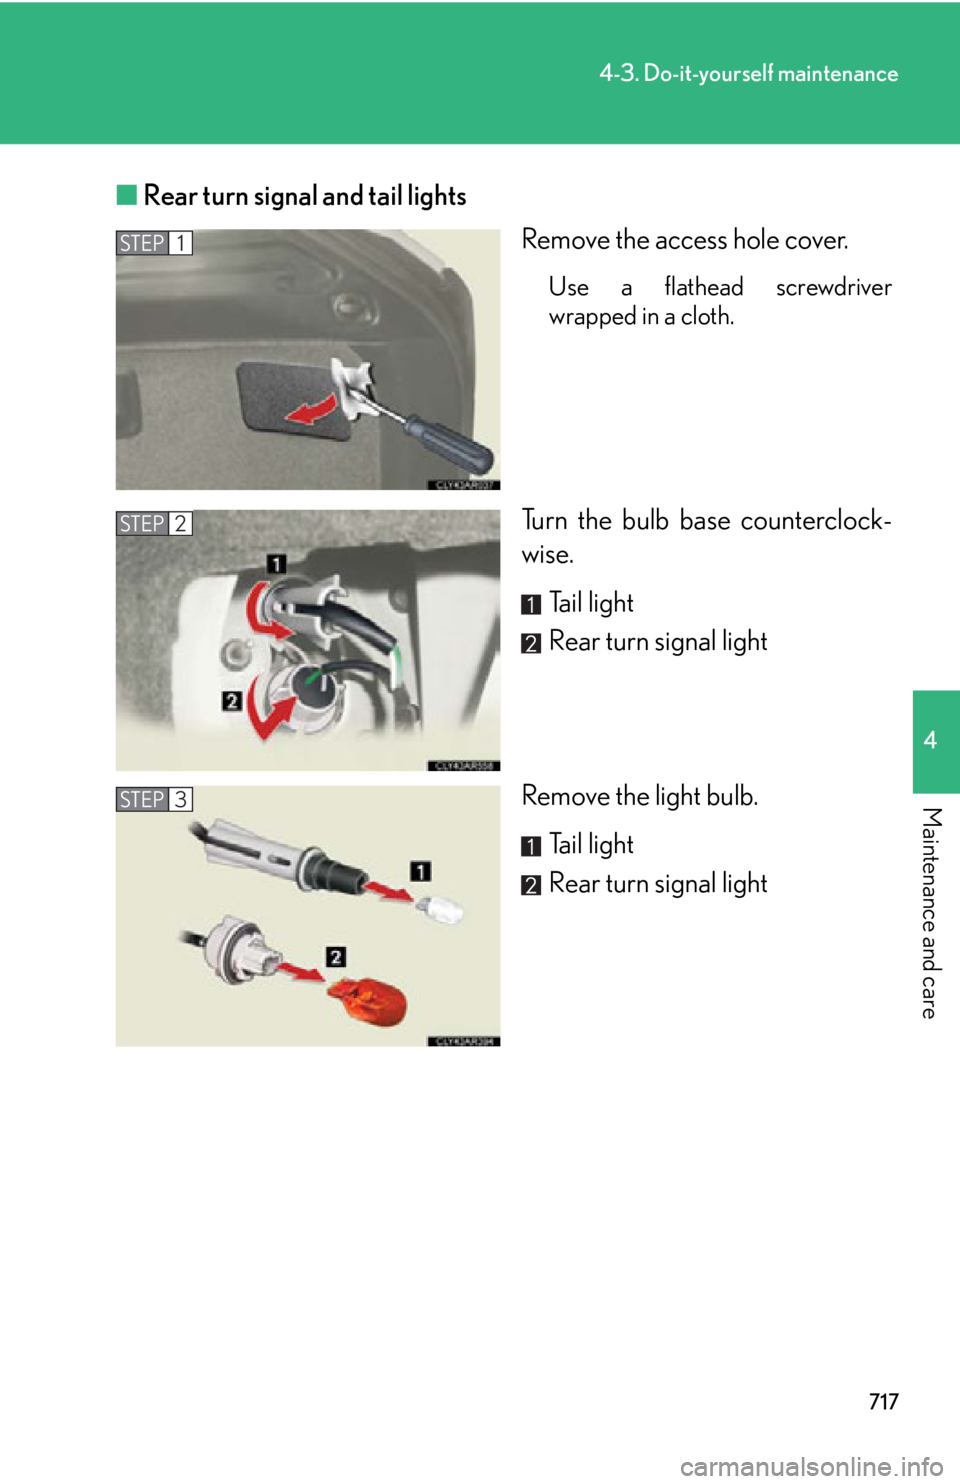
Maintenance and care ■ Rear turn signal and tail lights
Remove the access hole cover. Use a flathead screwdriver
wrapped in a cloth.
Turn the bulb base counterclock-
wise.
Tail light
Rear turn signal light
Remove the light bulb.
Tail light
Rear turn signal lightSTEP 1
STEP 2
STEP 3
Page 718 of 878
7184-3. Do-it-yourself maintenance
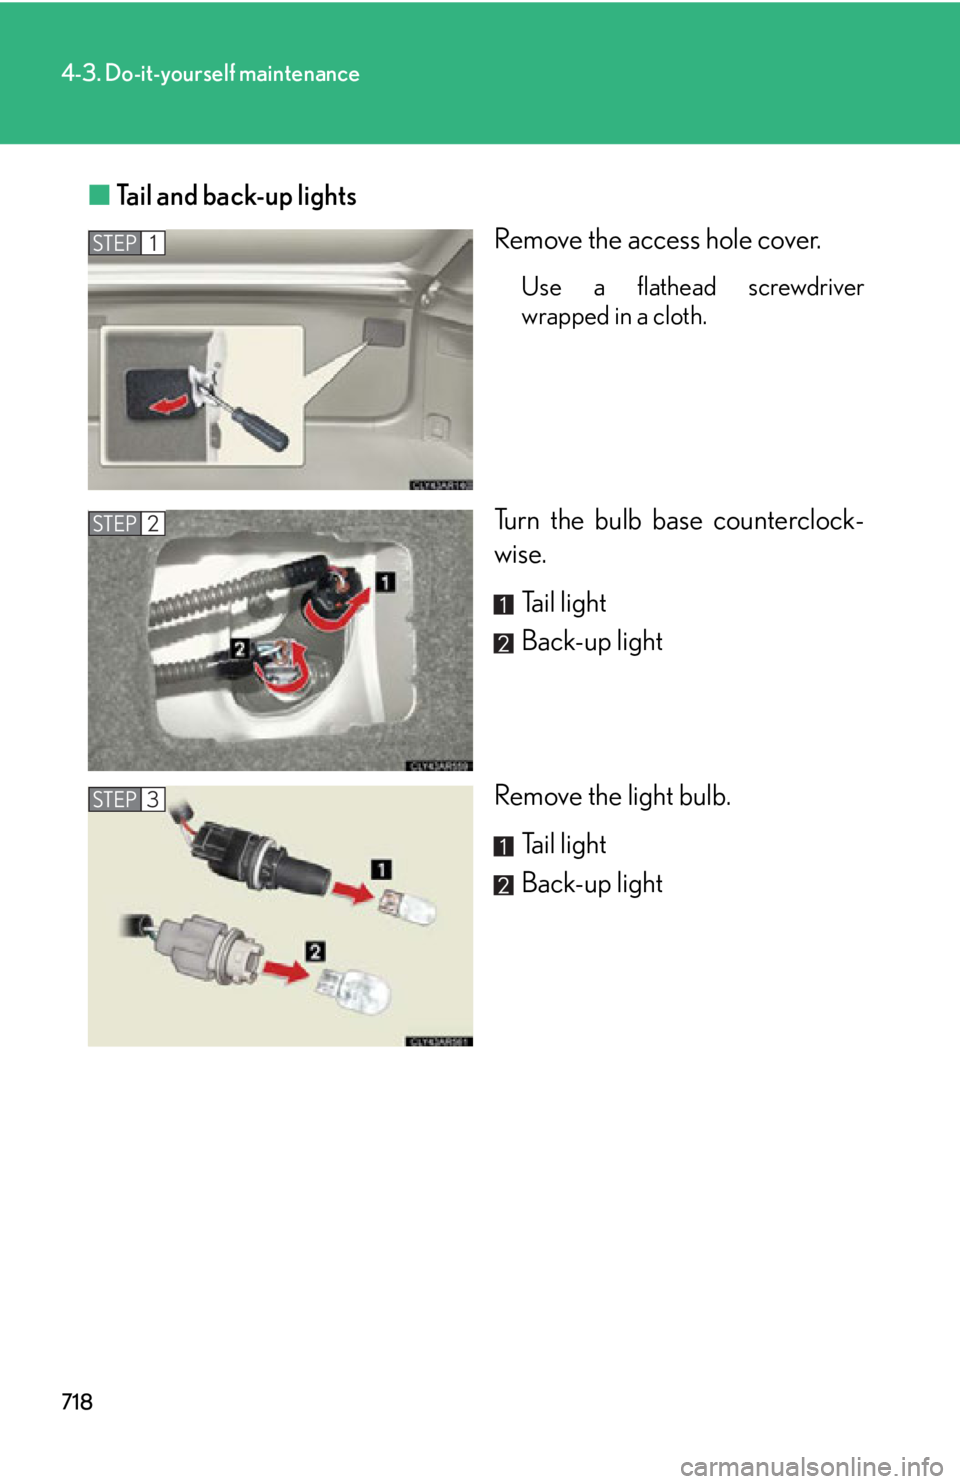
■ Tail and back-up lights
Remove the access hole cover. Use a flathead screwdriver
wrapped in a cloth.
Turn the bulb base counterclock-
wise.
Tail light
Back-up light
Remove the light bulb.
Tail light
Back-up lightSTEP 1
STEP 2
STEP 3
Page 719 of 878
7194-3. Do-it-yourself maintenance
4
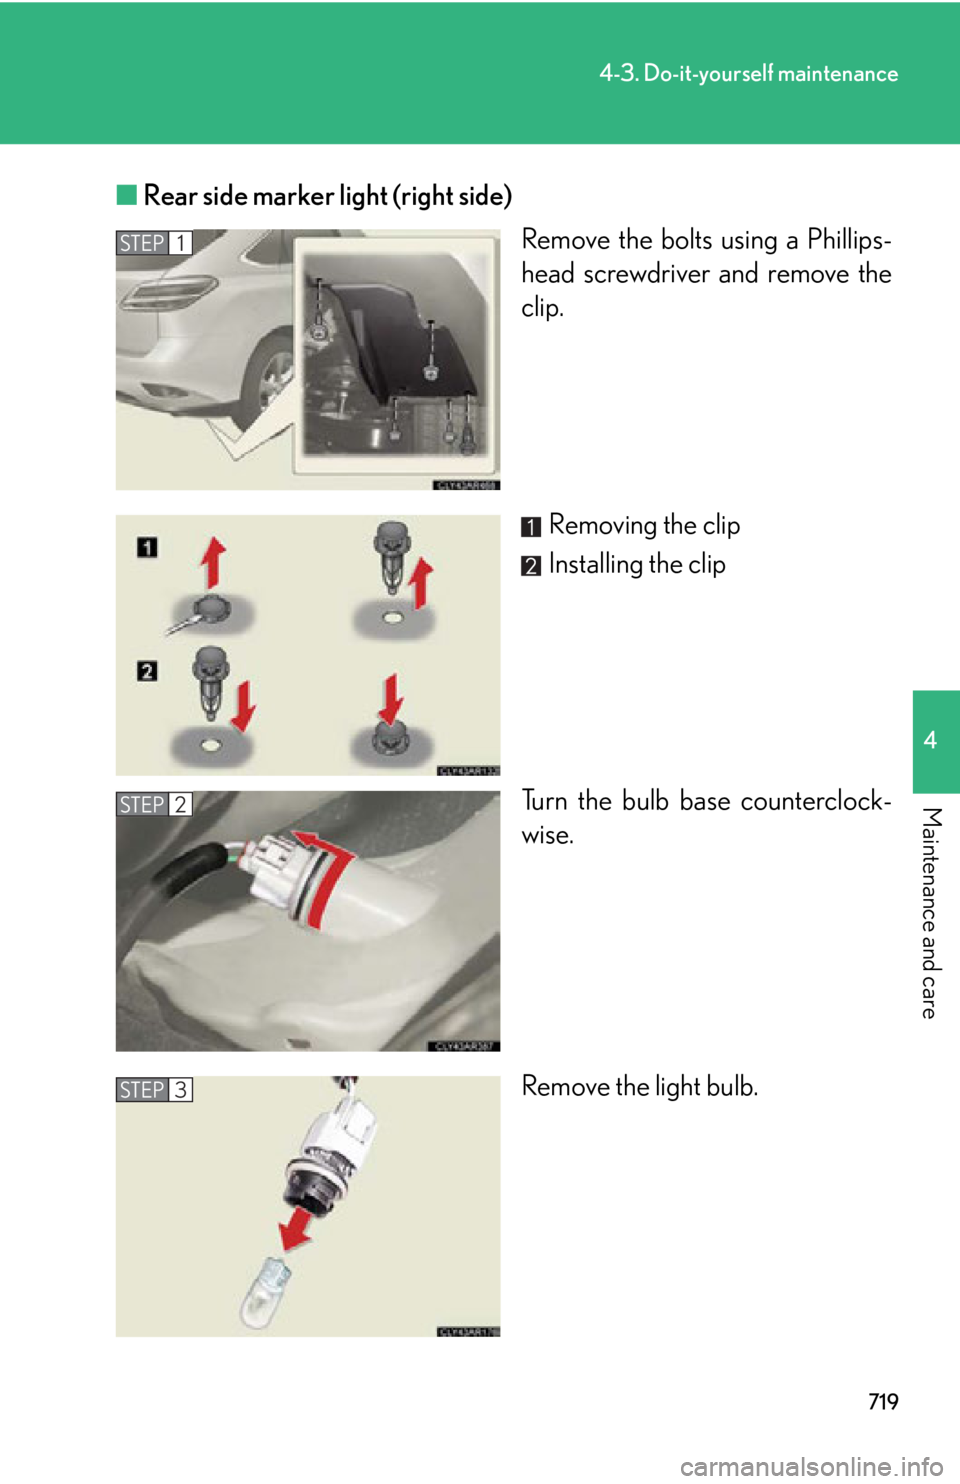
Maintenance and care ■ Rear side marker light (right side)
Remove the bolts using a Phillips-
head screwdriver and remove the
clip.
Removing the clip
Installing the clip
Turn the bulb base counterclock-
wise.
Remove the light bulb.STEP 1
STEP 2
STEP 3
Page 720 of 878
7204-3. Do-it-yourself maintenance
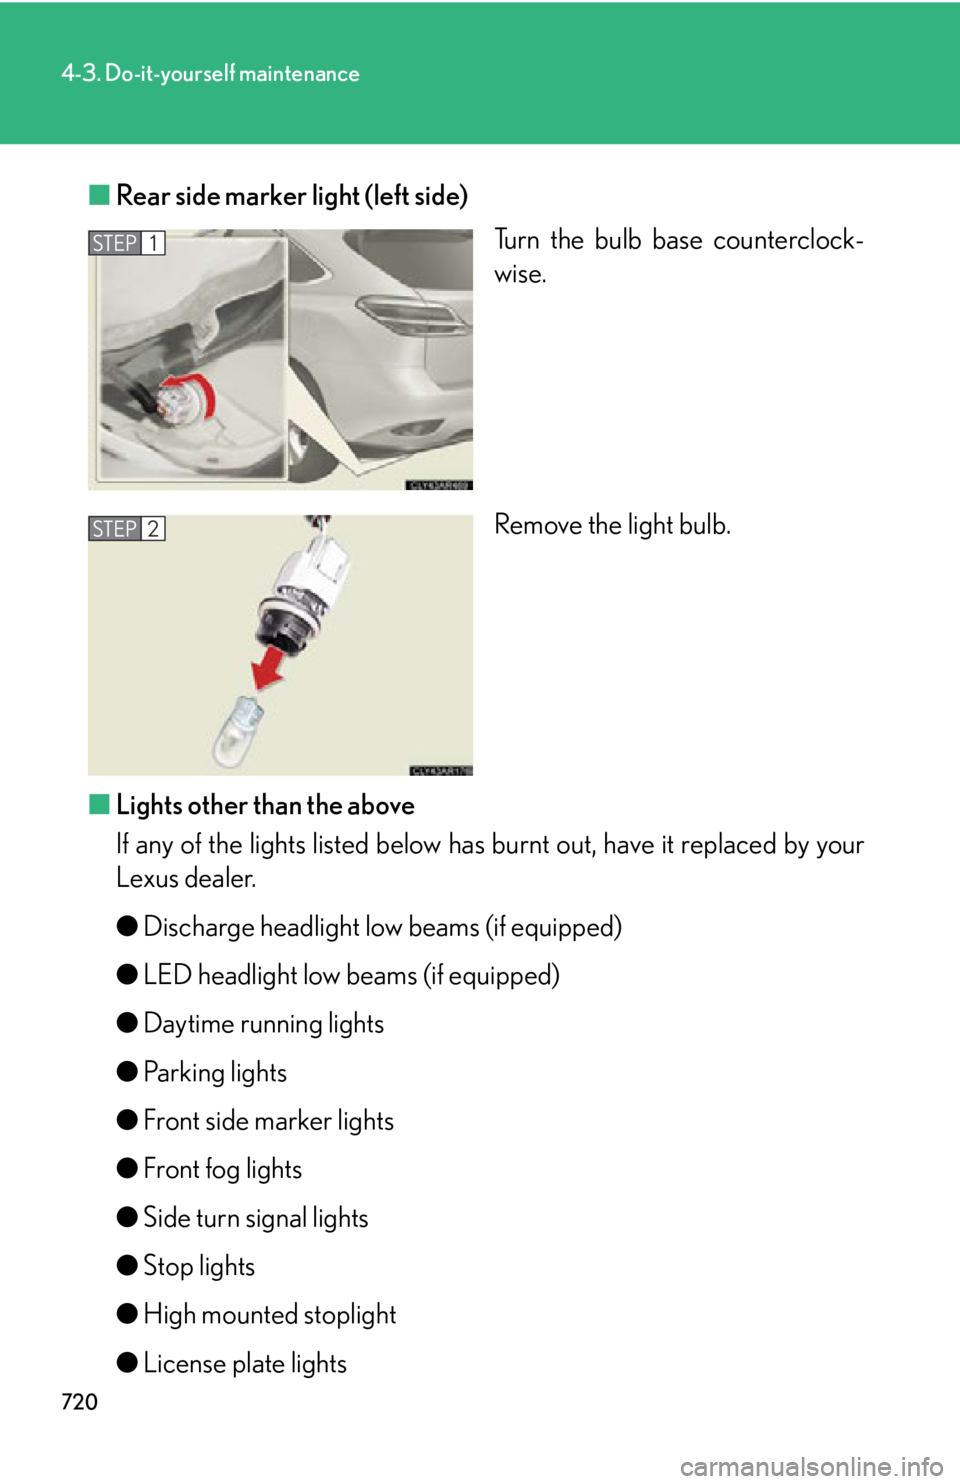
■ Rear side marker light (left side)
Turn the bulb base counterclock-
wise.
Remove the light bulb.
■ Lights other than the above
If any of the lights listed below ha s burnt out, have it replaced by your
Lexus dealer.
● Discharge headlight low beams (if equipped)
● LED headlight low beams (if equipped)
● Daytime running lights
● Parking lights
● Front side marker lights
● Front fog lights
● Side turn signal lights
● Stop lights
● High mounted stoplight
● License plate lightsSTEP 1
STEP 2
Trending: OBD port, display, CD player, warning, language, 4WD, spare tire
