LEXUS SC400 1991 Service Repair Manual
Manufacturer: LEXUS, Model Year: 1991, Model line: SC400, Model: LEXUS SC400 1991Pages: 4087, PDF Size: 75.75 MB
Page 1301 of 4087
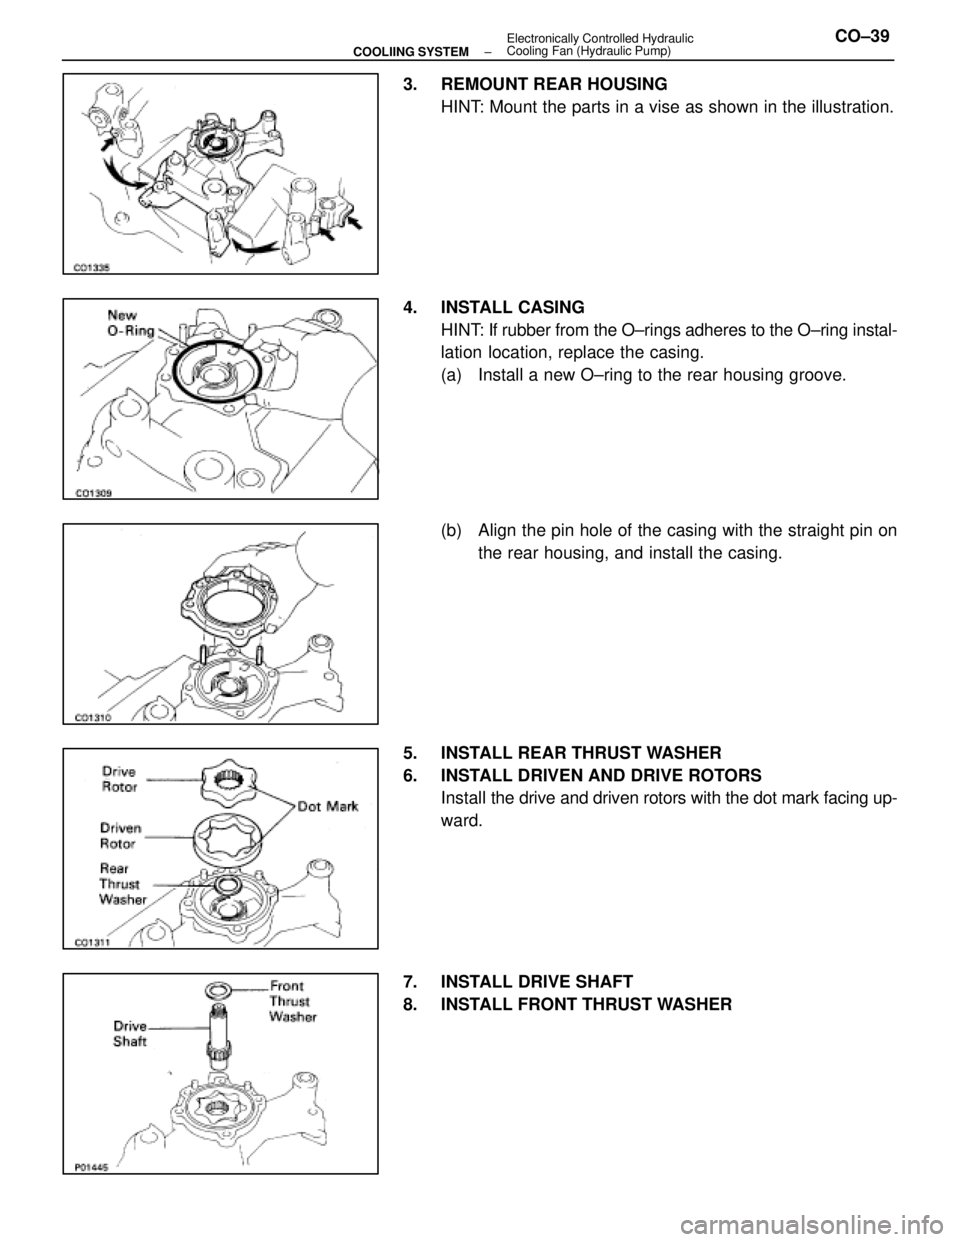
3. REMOUNT REAR HOUSINGHINT: Mount the parts in a vise as shown in the illustration.
4. INSTALL CASING HINT: If rubber from the O±rings adheres to the O±ring instal-
lation location, replace the casing.
(a) Install a new O±ring to the rear housing groove.
(b) Align the pin hole of the casing with the straight pin onthe rear housing, and install the casing.
5. INSTALL REAR THRUST WASHER
6. INSTALL DRIVEN AND DRIVE ROTORS Install the d rive and driven rotors with the dot mark facing up-
ward.
7. INSTALL DRIVE SHAFT
8. INSTALL FRONT THRUST WASHER
±
COOLIING SYSTEM Electronically Controlled Hydraulic
Cooling Fan (Hydraulic Pump)CO±39
WhereEverybodyKnowsYourName
Page 1302 of 4087
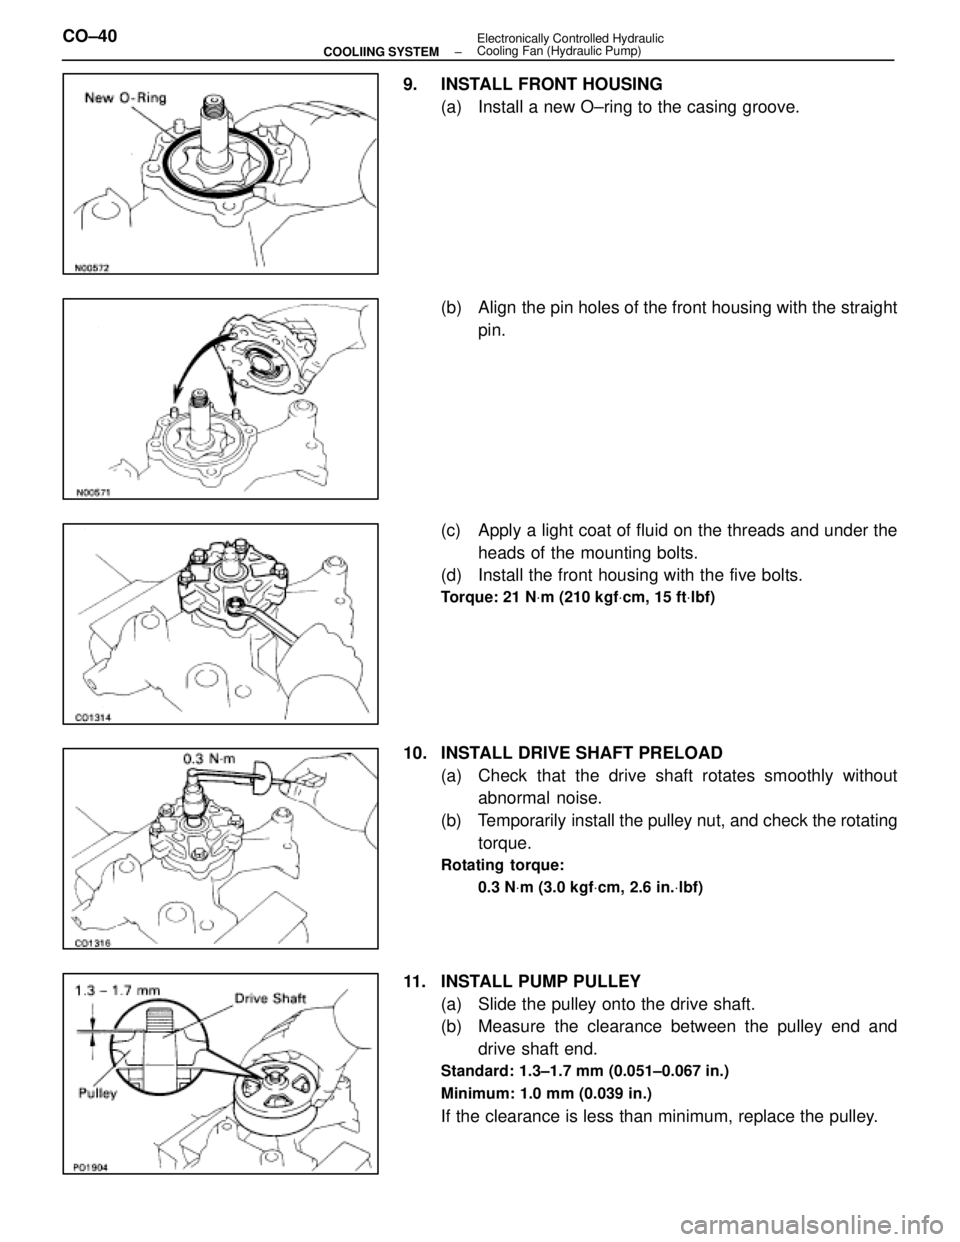
9. INSTALL FRONT HOUSING(a) Install a new O±ring to the casing groove.
(b) Align the pin holes of the front housing with the straightpin.
(c) Apply a light coat of fluid on the threads and under the heads of the mounting bolts.
(d) Install the front housing with the five bolts.
Torque: 21 N Vm (210 kgf Vcm, 15 ft Vlbf)
10. INSTALL DRIVE SHAFT PRELOAD
(a) Check that the drive shaft rotates smoothly withoutabnormal noise.
(b) Temporarily install the pulley nut, and check the rotating torque.
Rotating torque:
0.3 N Vm (3.0 kgf Vcm, 2.6 in. Vlbf)
11. INSTALL PUMP PULLEY
(a) Slide the pulley onto the drive shaft.
(b) Measure the clearance between the pulley end anddrive shaft end.
Standard: 1.3±1.7 mm (0.051±0.067 in.)
Minimum: 1.0 mm (0.039 in.)
If the clearance is less than minimum, replace the pulley.
CO±40
±
COOLIING SYSTEM Electronically Controlled Hydraulic
Cooling Fan (Hydraulic Pump)
WhereEverybodyKnowsYourName
Page 1303 of 4087
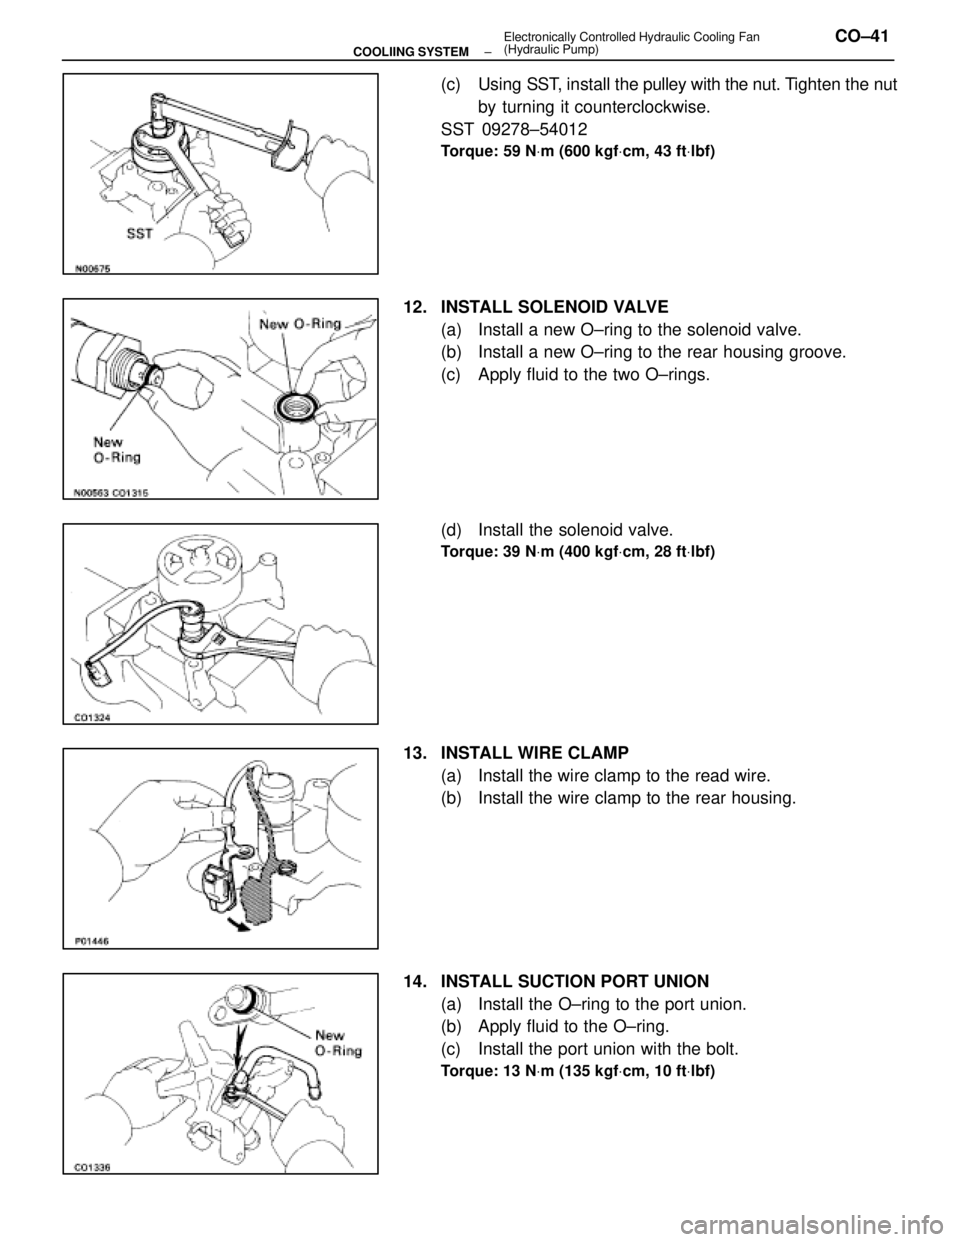
(c) Using SST, install the pulley with the nut. Tighten the nut
by turning it counterclockwise.
SST 09278±54012
Torque: 59 N Vm (600 kgf Vcm, 43 ft Vlbf)
12. INSTALL SOLENOID VALVE
(a) Install a new O±ring to the solenoid valve.
(b) Install a new O±ring to the rear housing groove.
(c) Apply fluid to the two O±rings.
(d) Install the solenoid valve.
Torque: 39 N Vm (400 kgf Vcm, 28 ft Vlbf)
13. INSTALL WIRE CLAMP
(a) Install the wire clamp to the read wire.
(b) Install the wire clamp to the rear housing.
14. INSTALL SUCTION PORT UNION (a) Install the O±ring to the port union.
(b) Apply fluid to the O±ring.
(c) Install the port union with the bolt.
Torque: 13 N Vm (135 kgf Vcm, 10 ft Vlbf)
±
COOLIING SYSTEM Electronically Controlled Hydraulic Cooling Fan
(Hydraulic Pump)CO±41
WhereEverybodyKnowsYourName
Page 1304 of 4087
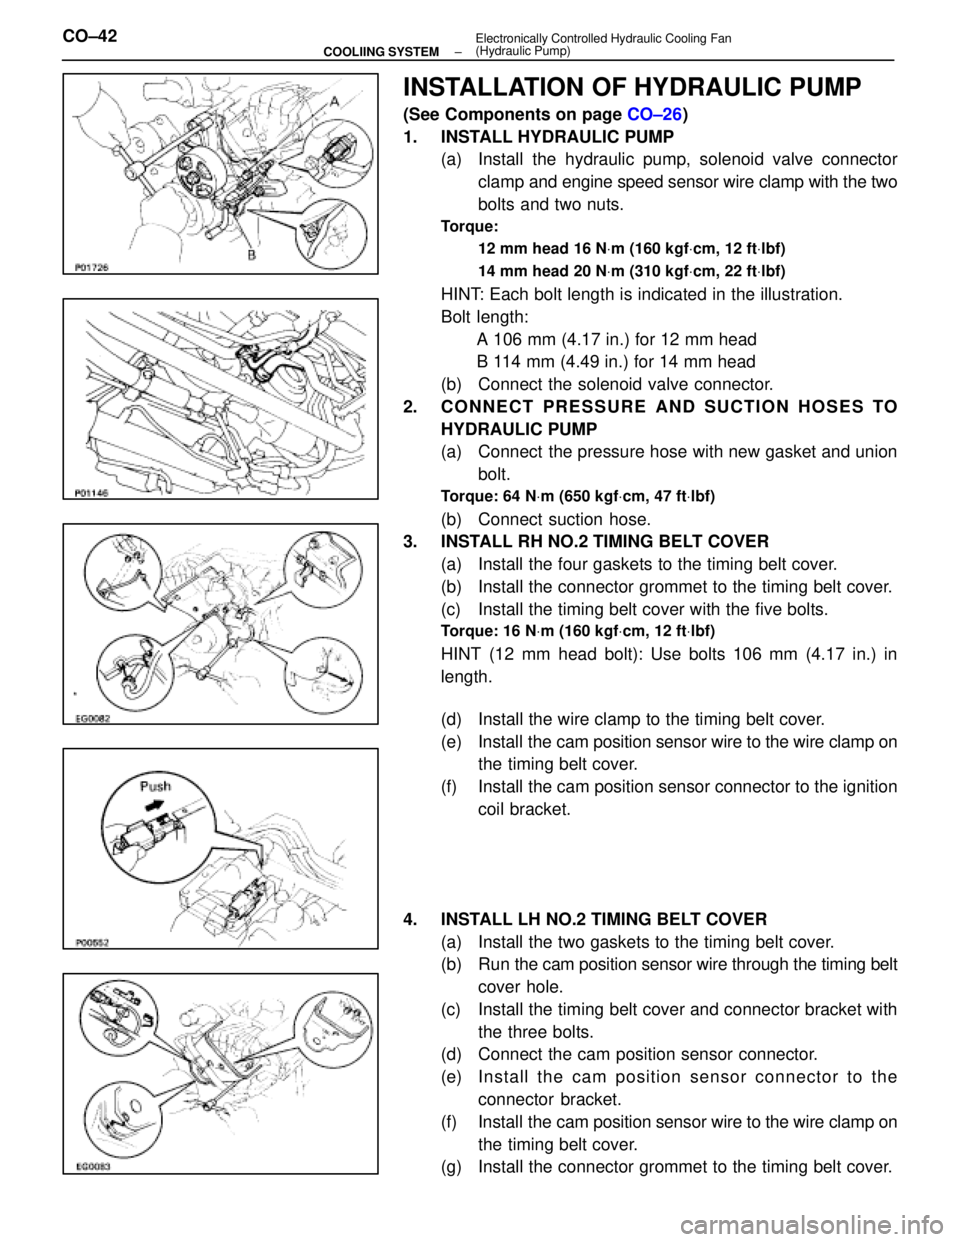
INSTALLATION OF HYDRAULIC PUMP
(See Components on page CO±26)
1. INSTALL HYDRAULIC PUMP (a) Install the hydraulic pump, solenoid valve connector
clamp and engine speed sensor wire clamp with the two
bolts and two nuts.
Torque:
12 mm head 16 N Vm (160 kgf Vcm, 12 ft Vlbf)
14 mm head 20 N Vm (310 kgf Vcm, 22 ft Vlbf)
HINT: Each bolt length is indicated in the illustration.
Bolt length:
A 106 mm (4.17 in.) for 12 mm head
B 114 mm (4.49 in.) for 14 mm head
(b) Connect the solenoid valve connector.
2. CONNECT PRESSURE AND SUCTION HOSES TO HYDRAULIC PUMP
(a) Connect the pressure hose with new gasket and unionbolt.
Torque: 64 N Vm (650 kgf Vcm, 47 ft Vlbf)
(b) Connect suction hose.
3. INSTALL RH NO.2 TIMING BELT COVER
(a) Install the four gaskets to the timing belt cover.
(b) Install the connector grommet to the timing belt cover.
(c) Install the timing belt cover with the five bolts.
Torque: 16 N Vm (160 kgf Vcm, 12 ft Vlbf)
HINT (12 mm head bolt): Use bolts 106 mm (4.17 in.) in
length.
(d) Install the wire clamp to the timing belt cover.
(e) Install the cam position sensor wire to the wire clamp on
the timing belt cover.
(f) Install the cam position sensor connector to the ignition coil bracket.
4. INSTALL LH NO.2 TIMING BELT COVER (a) Install the two gaskets to the timing belt cover.
(b) Run the cam po sition sensor wire through the timing belt
cover hole.
(c) Install the timing belt cover and connector bracket with the three bolts.
(d) Connect the cam position sensor connector.
(e) In sta ll th e ca m po sitio n se n so r c onnector to the
connector bracket.
(f) Install the cam position sensor wire to the wire clamp on
the timing belt cover.
(g) Install the connector grommet to the timing belt cover.
CO±42
±
COOLIING SYSTEM Electronically Controlled Hydraulic Cooling Fan
(Hydraulic Pump)
WhereEverybodyKnowsYourName
Page 1305 of 4087
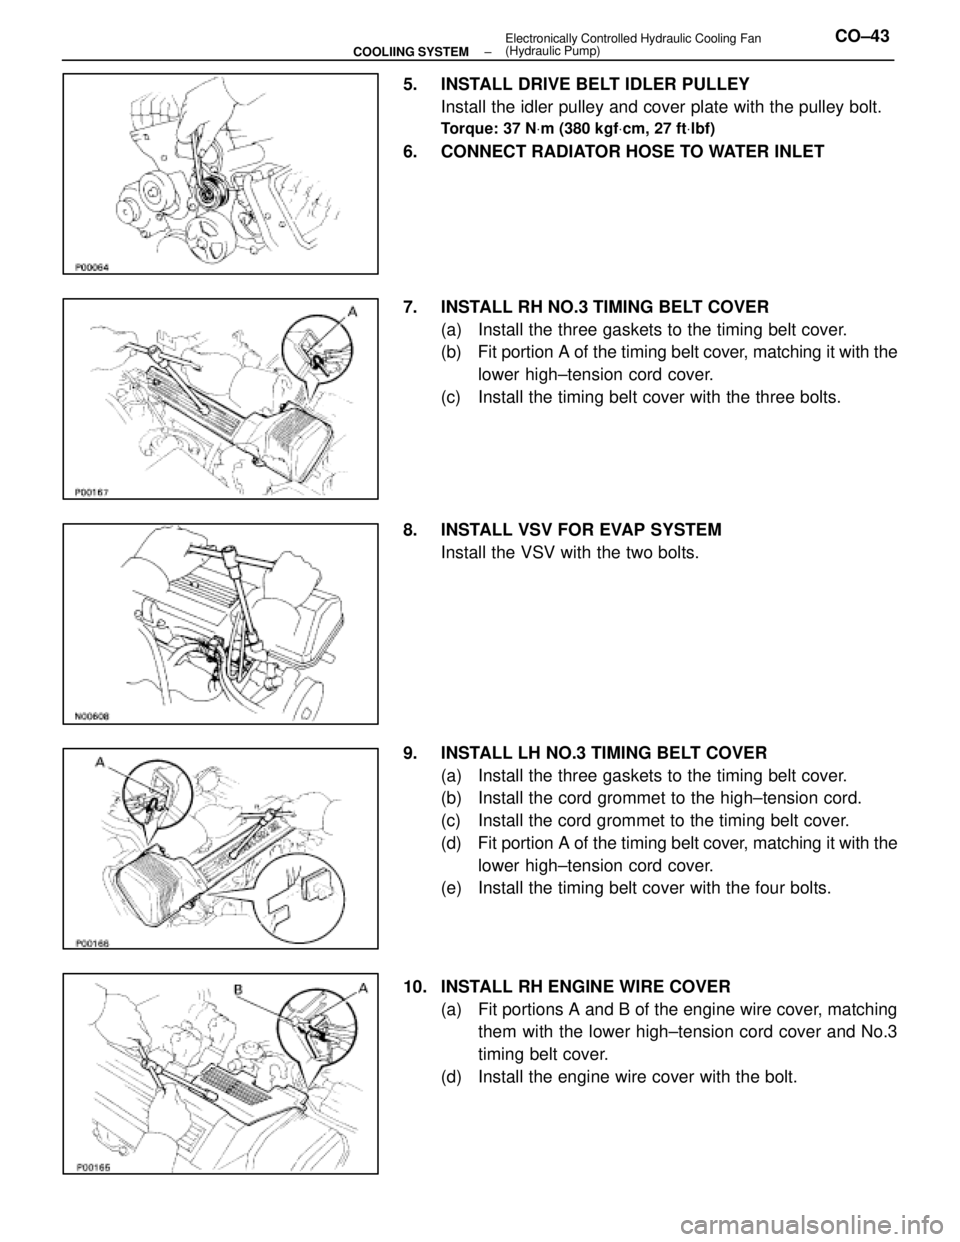
5. INSTALL DRIVE BELT IDLER PULLEYInstall the idler pulley and cover plate with the pulley bolt.
Torque: 37 N Vm (380 kgf Vcm, 27 ft Vlbf)
6. CONNECT RADIATOR HOSE TO WATER INLET
7. INSTALL RH NO.3 TIMING BELT COVER
(a) Install the three gaskets to the timing belt cover.
(b) Fit portion A of the timing belt cover, matching it with the
lower high±tension cord cover.
(c) Install the timing belt cover with the three bolts.
8. INSTALL VSV FOR EVAP SYSTEM Install the VSV with the two bolts.
9. INSTALL LH NO.3 TIMING BELT COVER (a) Install the three gaskets to the timing belt cover.
(b) Install the cord grommet to the high±tension cord.
(c) Install the cord grommet to the timing belt cover.
(d) Fit portion A of the timing belt cover, matching it with the
lower high±tension cord cover.
(e) Install the timing belt cover with the four bolts.
10. INSTALL RH ENGINE WIRE COVER (a) Fit portions A and B of the engine wire cover, matchingthem with the lower high±tension cord cover and No.3
timing belt cover.
(d) Install the engine wire cover with the bolt.
±
COOLIING SYSTEM Electronically Controlled Hydraulic Cooling Fan
(Hydraulic Pump)CO±43
WhereEverybodyKnowsYourName
Page 1306 of 4087
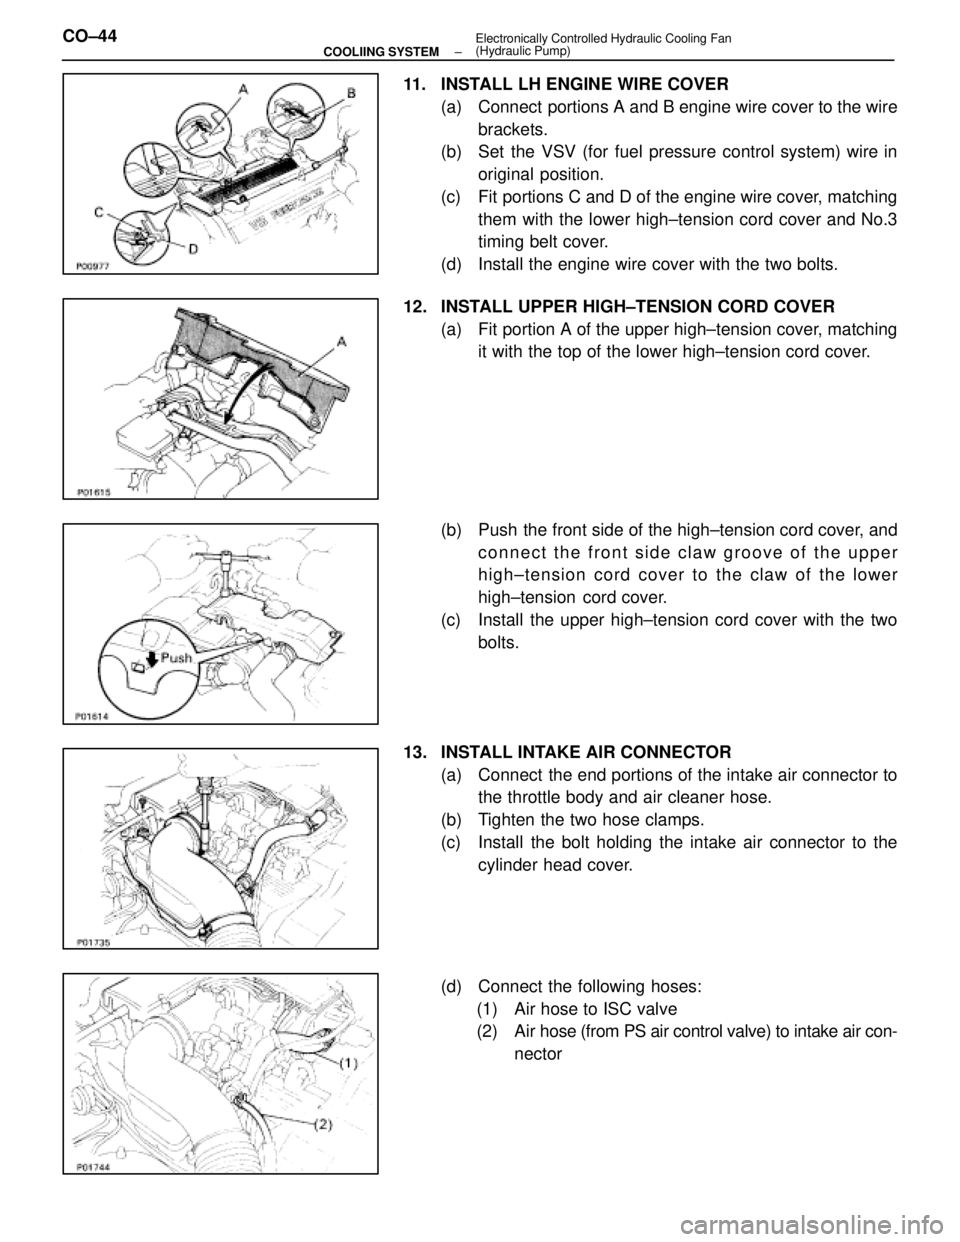
11. INSTALL LH ENGINE WIRE COVER(a) Connect portions A and B engine wire cover to the wirebrackets.
(b) Set the VSV (for fuel pressure control system) wire in
original position.
(c) Fit portions C and D of the engine wire cover, matching them with the lower high±tension cord cover and No.3
timing belt cover.
(d) Install the engine wire cover with the two bolts.
12. INSTALL UPPER HIGH±TENSION CORD COVER (a) Fit portion A of the upper high±tension cover, matchingit with the top of the lower high±tension cord cover.
(b) Push the front side of the high±tension cord cover, and connect the front side claw groove of the upper
high±tension cord cover to the claw of the lower
high±tension cord cover.
(c) Install the upper high±tension cord cover with the two bolts.
13. INSTALL INTAKE AIR CONNECTOR (a) Connect the end portions of the intake air connector tothe throttle body and air cleaner hose.
(b) Tighten the two hose clamps.
(c) Install the bolt holding the intake air connector to the cylinder head cover.
(d) Connect the following hoses: (1) Air hose to ISC valve
(2) Air hose (from PS air control valve) to intake air con- nector
CO±44
±
COOLIING SYSTEM Electronically Controlled Hydraulic Cooling Fan
(Hydraulic Pump)
WhereEverybodyKnowsYourName
Page 1307 of 4087
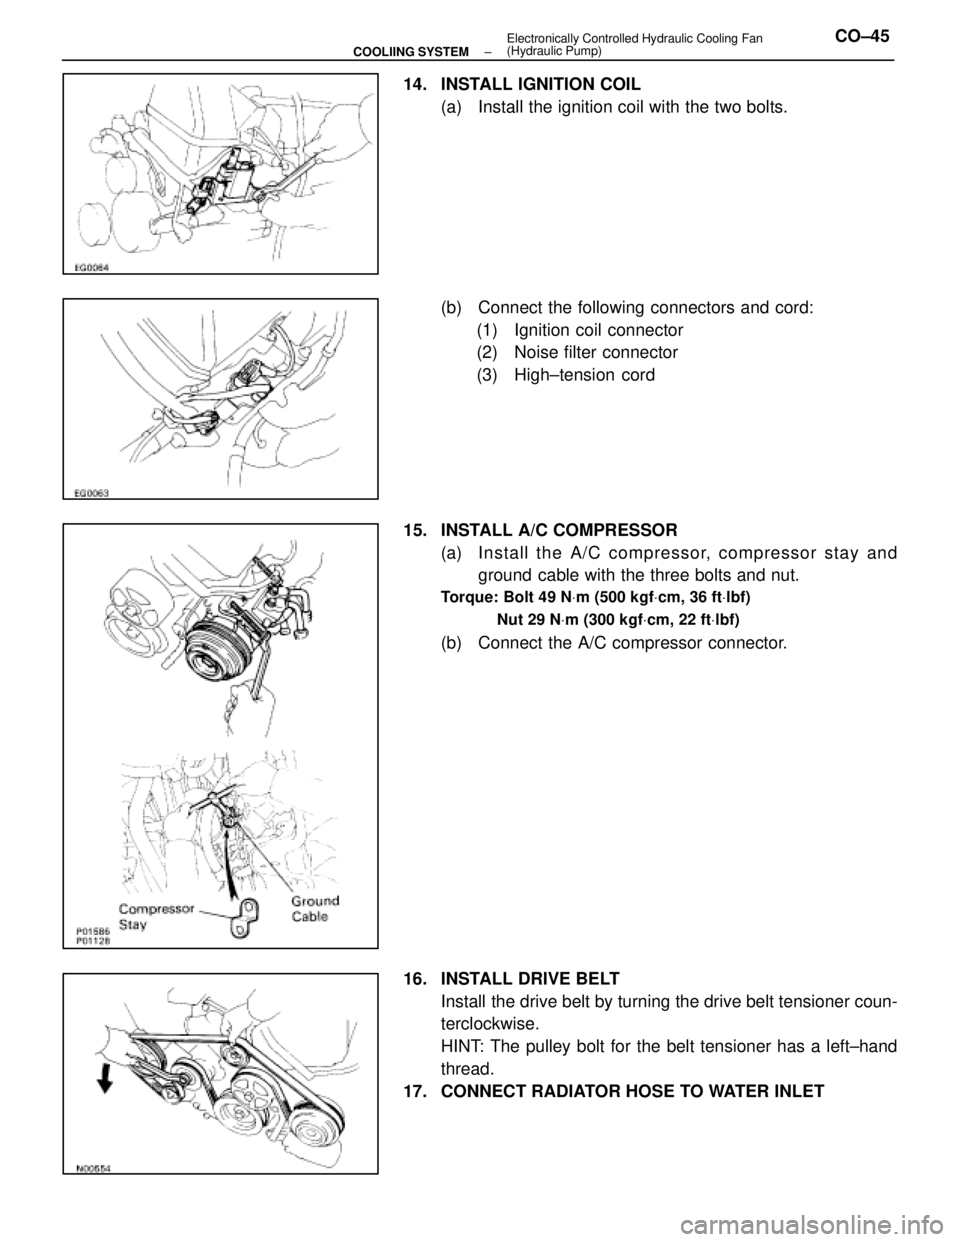
14. INSTALL IGNITION COIL(a) Install the ignition coil with the two bolts.
(b) Connect the following connectors and cord:(1) Ignition coil connector
(2) Noise filter connector
(3) High±tension cord
15. INSTALL A/C COMPRESSOR (a) In sta ll th e A/C co mp re sso r, co mp re sso r sta y an dground cable with the three bolts and nut.
Torque: Bolt 49 N Vm (500 kgf Vcm, 36 ft Vlbf)
Nut 29 N Vm (300 kgf Vcm, 22 ft Vlbf)
(b) Connect the A/C compressor connector.
16. INSTALL DRIVE BELT Install the drive belt by turning the drive belt tensioner coun-
terclockwise.
HINT: The pulley bolt for the belt tensioner has a left±hand
thread.
17. CONNECT RADIATOR HOSE TO WATER INLET
±
COOLIING SYSTEM Electronically Controlled Hydraulic Cooling Fan
(Hydraulic Pump)CO±45
WhereEverybodyKnowsYourName
Page 1308 of 4087
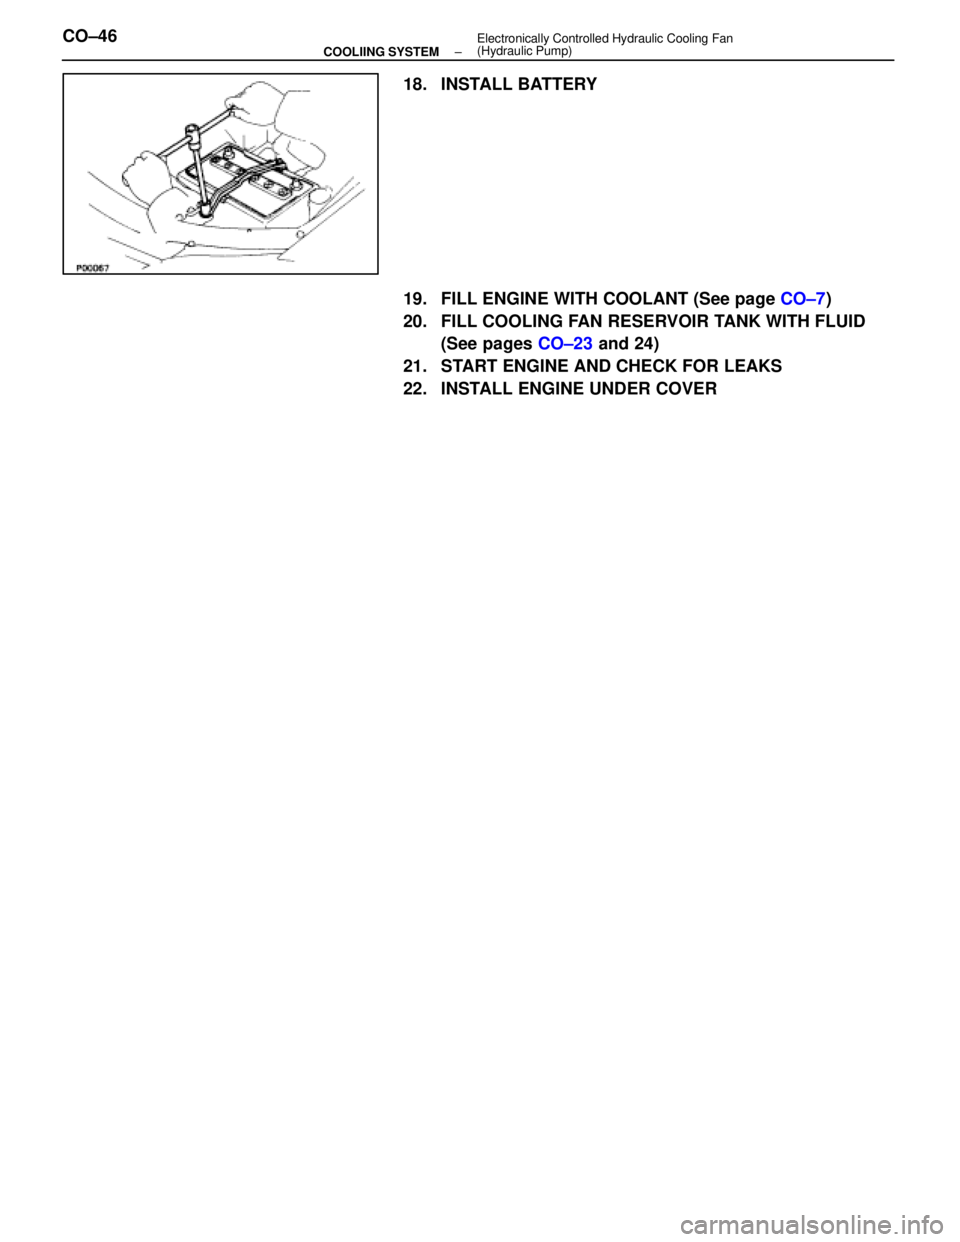
18. INSTALL BATTERY
19. FILL ENGINE WITH COOLANT (See page CO±7)
20. FILL COOLING FAN RESERVOIR TANK WITH FLUID (See pages CO±23 and 24)
21. START ENGINE AND CHECK FOR LEAKS
22. INSTALL ENGINE UNDER COVER
CO±46
±
COOLIING SYSTEM Electronically Controlled Hydraulic Cooling Fan
(Hydraulic Pump)
WhereEverybodyKnowsYourName
Page 1309 of 4087
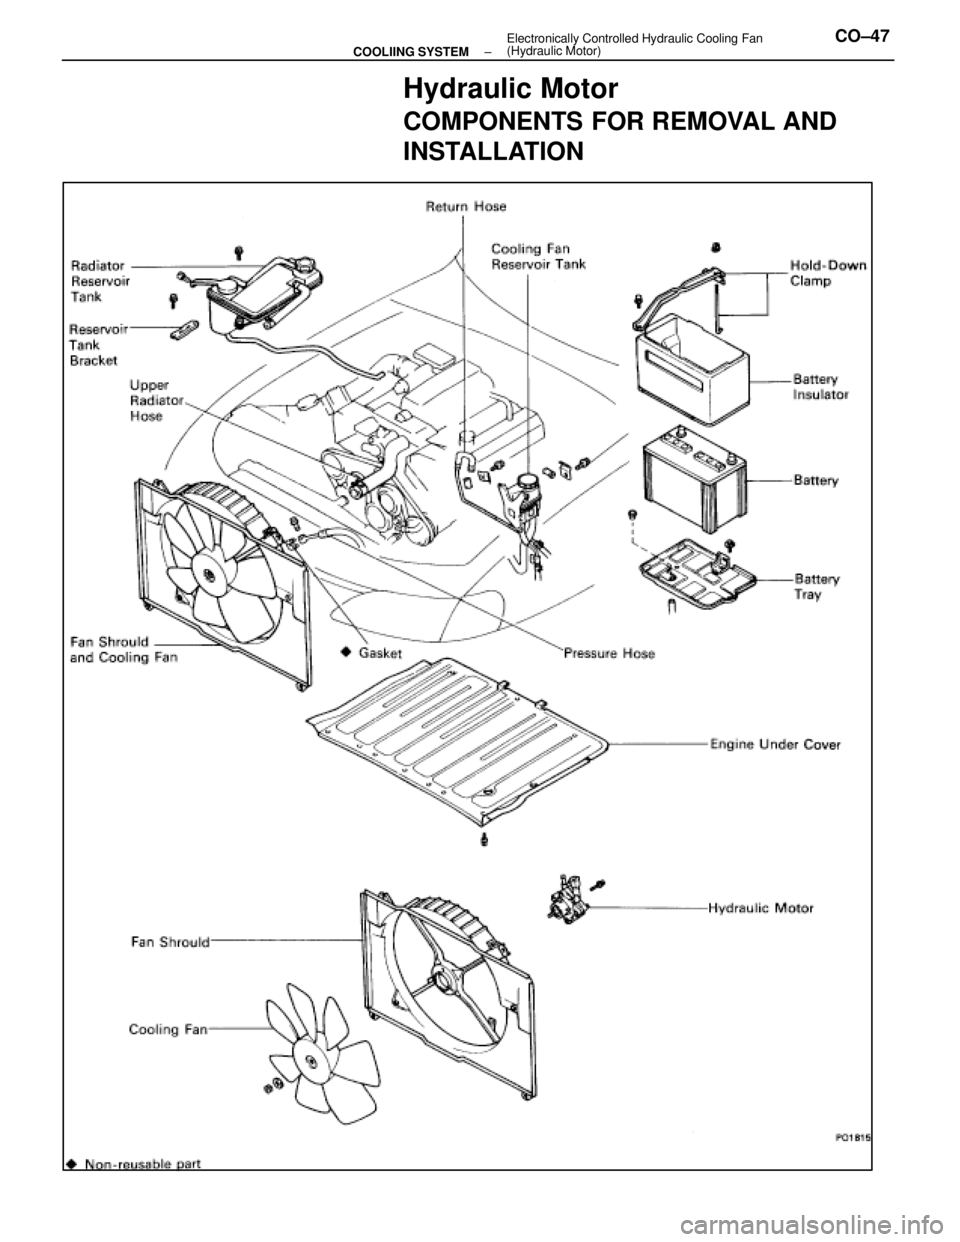
Hydraulic Motor
COMPONENTS FOR REMOVAL AND
INSTALLATION
±
COOLIING SYSTEM Electronically Controlled Hydraulic Cooling Fan
(Hydraulic Motor)CO±47
WhereEverybodyKnowsYourName
Page 1310 of 4087
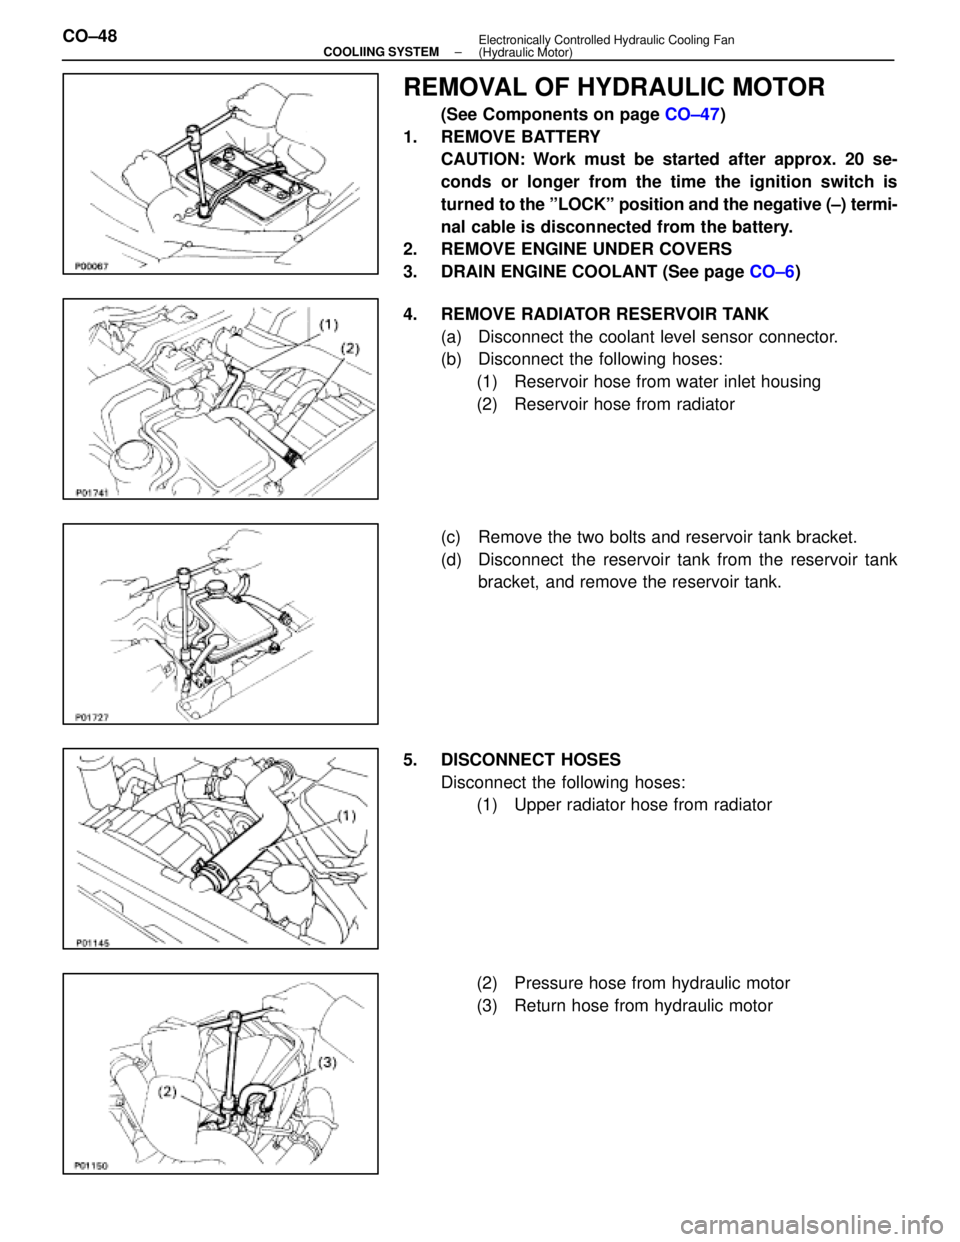
REMOVAL OF HYDRAULIC MOTOR
(See Components on page CO±47)
1. REMOVE BATTERY CAUTION: Work must be started after approx. 20 se-
conds or longer from the time the ignition switch is
turned to the ºLOCKº position and the negative (±) termi-
nal cable is disconnected from the battery.
2. REMOVE ENGINE UNDER COVERS
3. DRAIN ENGINE COOLANT (See page CO±6)
4. REMOVE RADIATOR RESERVOIR TANK (a) Disconnect the coolant level sensor connector.
(b) Disconnect the following hoses:(1) Reservoir hose from water inlet housing
(2) Reservoir hose from radiator
(c) Remove the two bolts and reservoir tank bracket.
(d) Disconnect the reservoir tank from the reservoir tank bracket, and remove the reservoir tank.
5. DISCONNECT HOSES Disconnect the following hoses:(1) Upper radiator hose from radiator
(2) Pressure hose from hydraulic motor
(3) Return hose from hydraulic motor
CO±48
±
COOLIING SYSTEM Electronically Controlled Hydraulic Cooling Fan
(Hydraulic Motor)
WhereEverybodyKnowsYourName