LEXUS SC400 1991 Service Repair Manual
Manufacturer: LEXUS, Model Year: 1991,
Model line: SC400,
Model: LEXUS SC400 1991
Pages: 4087, PDF Size: 75.75 MB
LEXUS SC400 1991 Service Repair Manual
SC400 1991
LEXUS
LEXUS
https://www.carmanualsonline.info/img/36/57051/w960_57051-0.png
LEXUS SC400 1991 Service Repair Manual
Trending: tow, fuel pump, wiring diagram, Throttle Position, fold seats, glove box, transmission fluid
Page 3551 of 4087
OKNG
OKNG
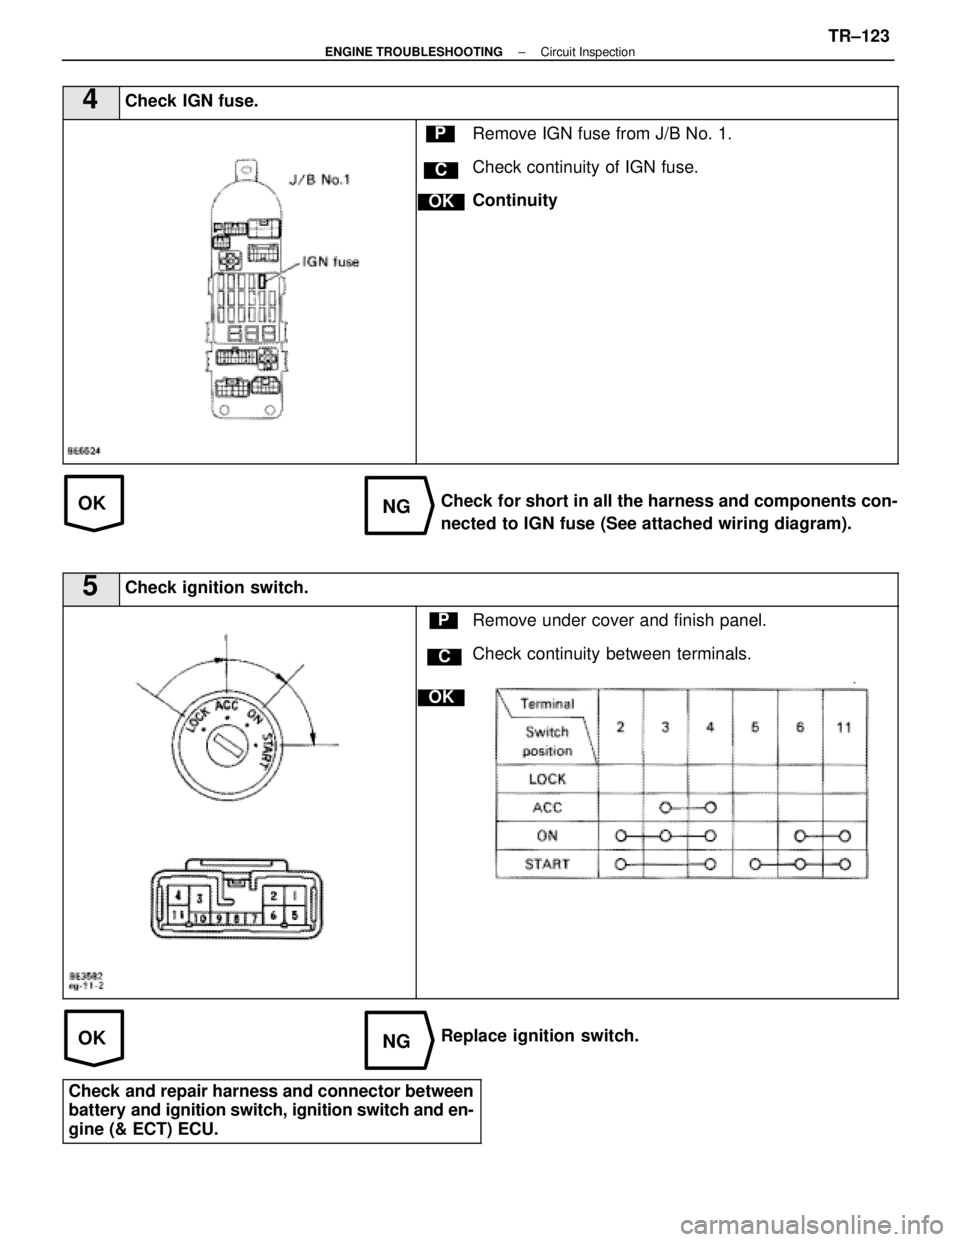
4Check IGN fuse.
C
OK
PRemove IGN fuse from J/B No. 1.
Check continuity of IGN fuse.
Continuity
Check for short in all the harness and components con-
nected to IGN fuse (See attached wiring diagram).
5Check ignition switch.
C
OK
PRemove under cover and finish panel.
Check continuity between terminals.
Replace ignition switch.
Check and repair harness and connector between
battery and ignition switch, ignition switch and en-
gine (& ECT) ECU.
±
ENGINE TROUBLESHOOTING Circuit InspectionTR±123
WhereEverybodyKnowsYourName
Page 3552 of 4087
OKNG
OKNG
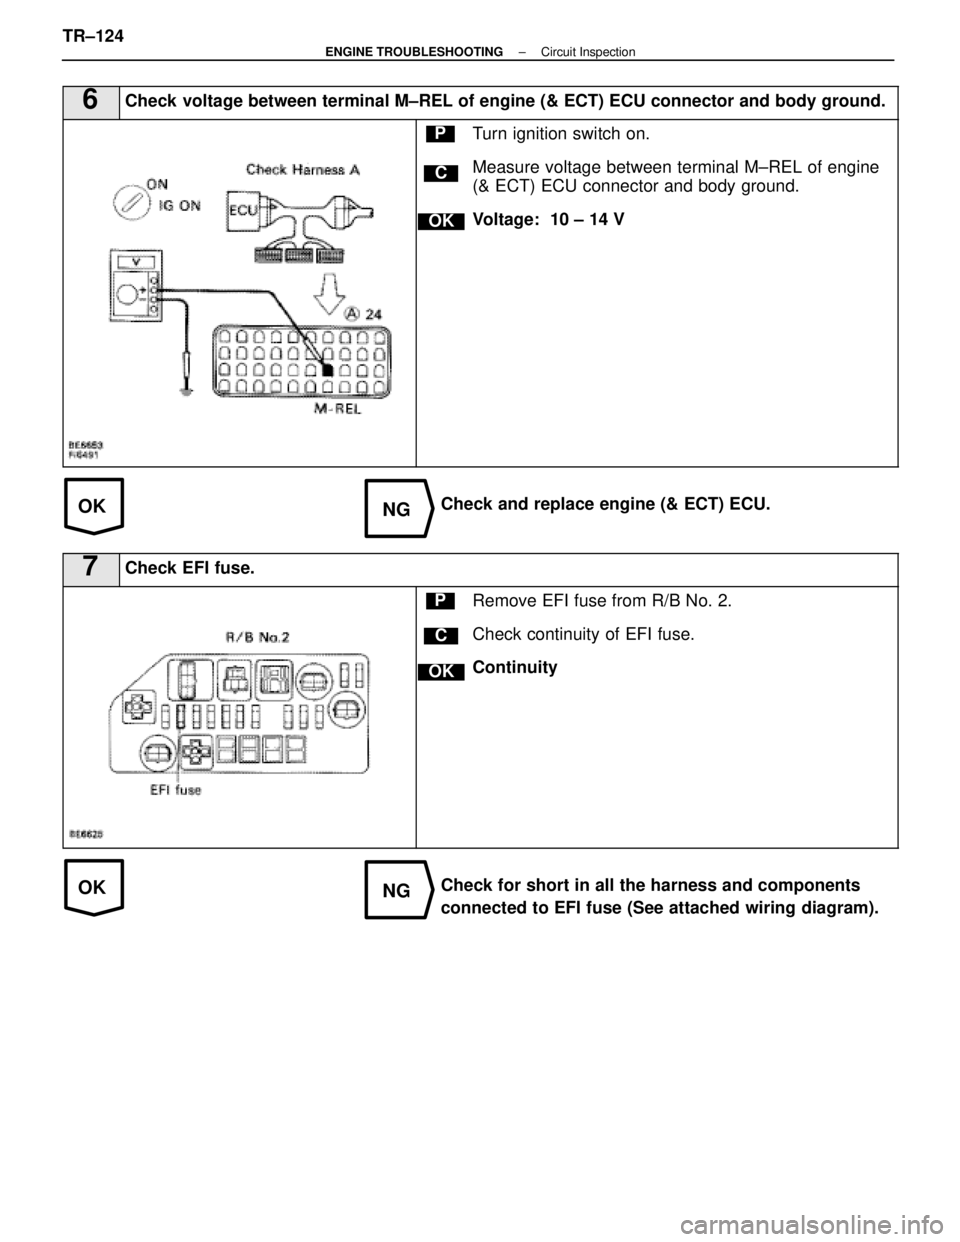
6Check voltage between terminal M±REL of engine (& ECT) ECU connector and\
body ground.
C
OK
PTurn ignition switch on.
Measure voltage between terminal M±REL of engine
(& ECT) ECU connector and body ground.
Voltage: 10 ± 14 V
Check and replace engine (& ECT) ECU.
7Check EFI fuse.
C
OK
PRemove EFI fuse from R/B No. 2.
Check continuity of EFI fuse.
Continuity
Check for short in all the harness and components
connected to EFI fuse (See attached wiring diagram).
TR±124
±
ENGINE TROUBLESHOOTING Circuit Inspection
WhereEverybodyKnowsYourName
Page 3553 of 4087
OKNG
OKNG
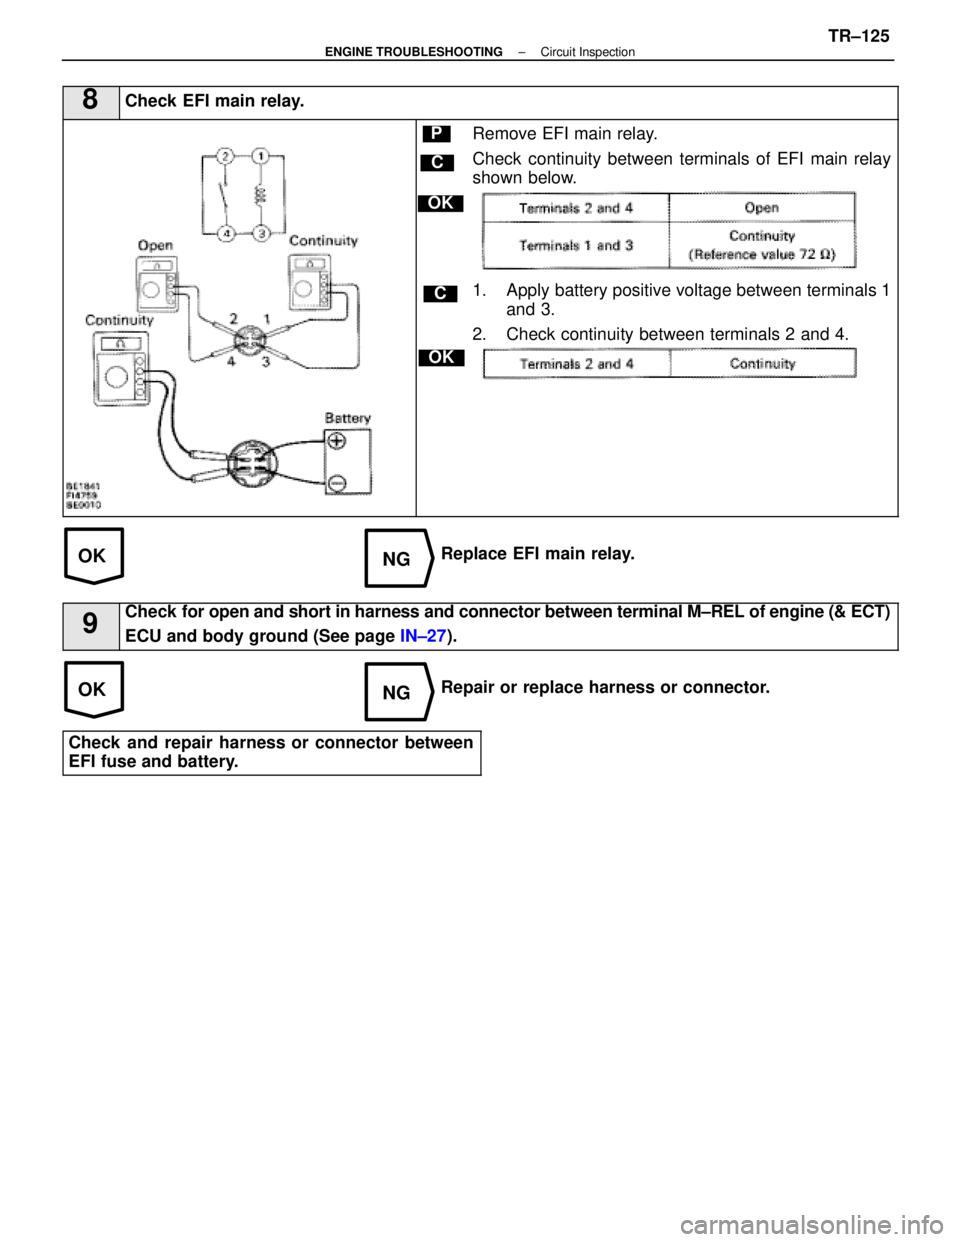
8Check EFI main relay.
C
OK
P
OK
C
Remove EFI main relay.
Check continuity between terminals of EFI main relay
shown below.
1. Apply battery positive voltage between terminals 1and 3.
2. Check continuity between terminals 2 and 4.
Replace EFI main relay.
9Check for open and short in harness and connector between terminal M±REL of\
engine (& ECT)
ECU and body ground (See page IN±27).
Repair or replace harness or connector.
Check and repair harness or connector between
EFI fuse and battery.
±
ENGINE TROUBLESHOOTING Circuit InspectionTR±125
WhereEverybodyKnowsYourName
Page 3554 of 4087
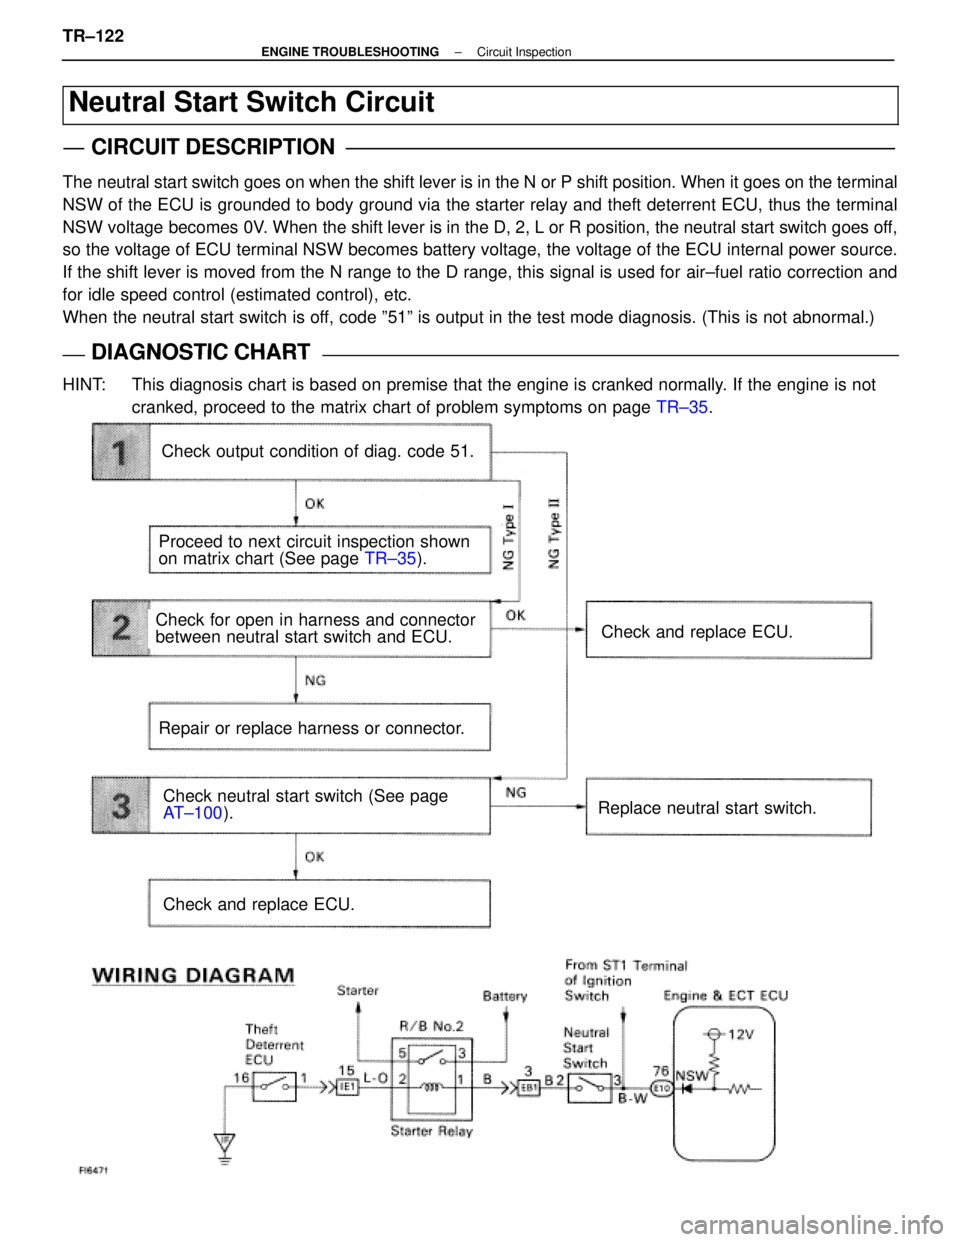
Neutral Start Switch Circuit
CIRCUIT DESCRIPTION
The neutral start switch goes on when the shift lever is in the N or P shif\
t position. When it goes on the terminal
NSW of the ECU is grounded to body ground via the starter relay and theft deterrent ECU\
, thus the terminal
NSW voltage becomes 0V. When the shift lever is in the D, 2, L or R position, the neutral start\
switch goes off,
so the voltage of ECU terminal NSW becomes battery voltage, the voltage of the ECU internal power source.
If the shift lever is moved from the N range to the D range, this signal\
is used for air±fuel ratio correction and
for idle speed control (estimated control), etc.
When the neutral start switch is off, code º51º is output in the test mode diagnosis. (This is not a\
bnormal.)
DIAGNOSTIC CHARTDIAGNOSTIC CHART
HINT: This diagnosis chart is based on premise that the engine is cranked norm\
ally. If the engine is notcranked, proceed to the matrix chart of problem symptoms on page TR±35.
Check output condition of diag. code 51.
Proceed to next circuit inspection shown
on matrix chart (See page TR±35).
Check for open in harness and connector
between neutral start switch and ECU.
Repair or replace harness or connector.
Check and replace ECU.
Check and replace ECU.
Replace neutral start switch.Check neutral start switch (See page
AT±100 ).
TR±122
±
ENGINE TROUBLESHOOTING Circuit Inspection
WhereEverybodyKnowsYourName
Page 3555 of 4087
OK
NG
Type I
NG
Type II
NG
OK
OKNG
INSPECTION PROCEDURE
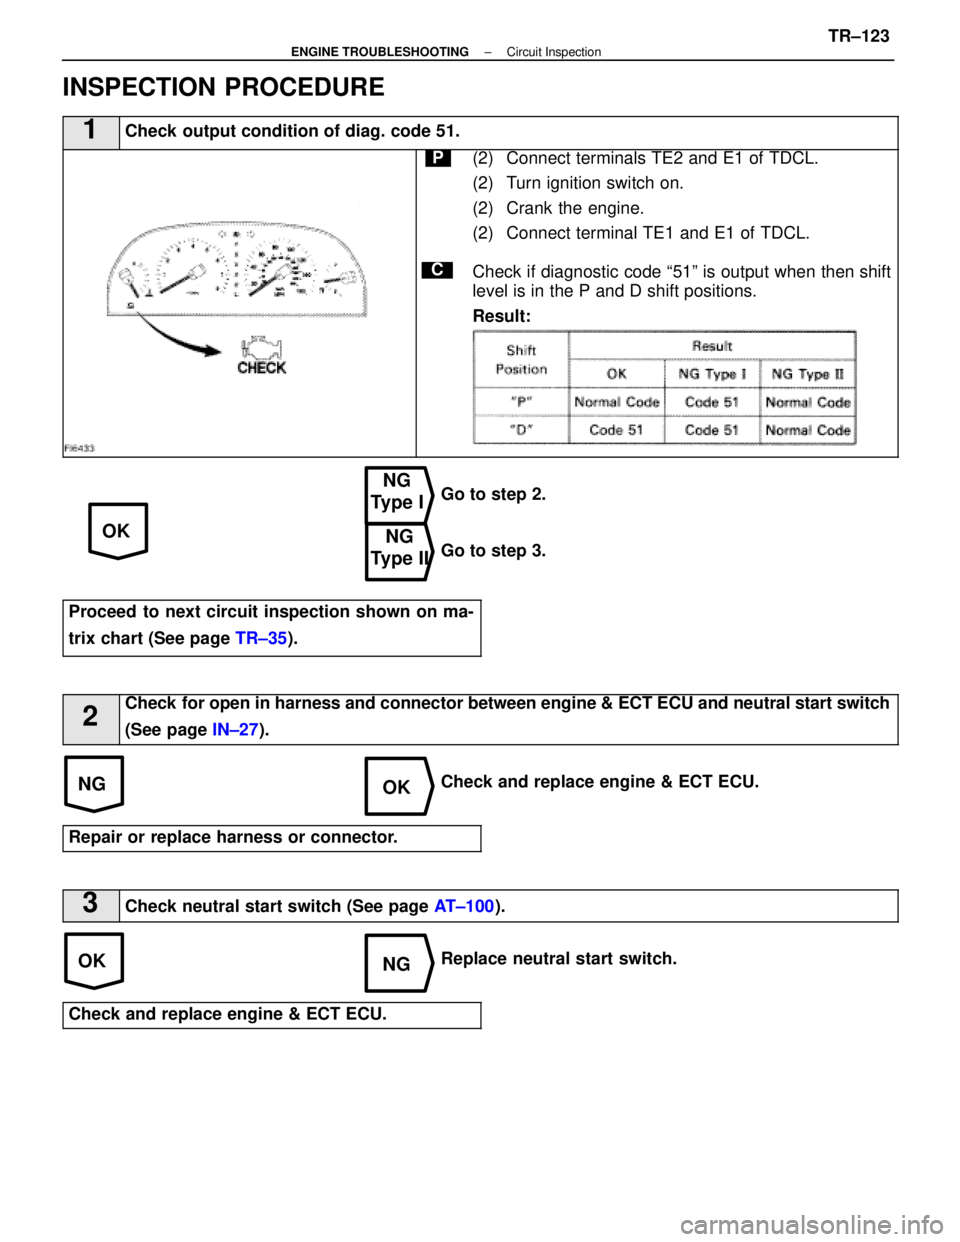
1Check output condition of diag. code 51.
C
P(2) Connect terminals TE2 and E1 of TDCL.
(2) Turn ignition switch on.
(2) Crank the engine.
(2) Connect terminal TE1 and E1 of TDCL.
Check if diagnostic code ª51º is output when then shift
level is in the P and D shift positions.
Result:
Go to step 2.
Go to step 3.
Proceed to next circuit inspection shown on ma-
trix chart (See page TR±35).
2
Check for open in harness and connector between engine & ECT ECU and neutral \
start switch
(See page IN±27).
Check and replace engine & ECT ECU.
Repair or replace harness or connector.
3Check neutral start switch (See page AT±100).
Replace neutral start switch.
Check and replace engine & ECT ECU.
±
ENGINE TROUBLESHOOTING Circuit InspectionTR±123
WhereEverybodyKnowsYourName
Page 3556 of 4087
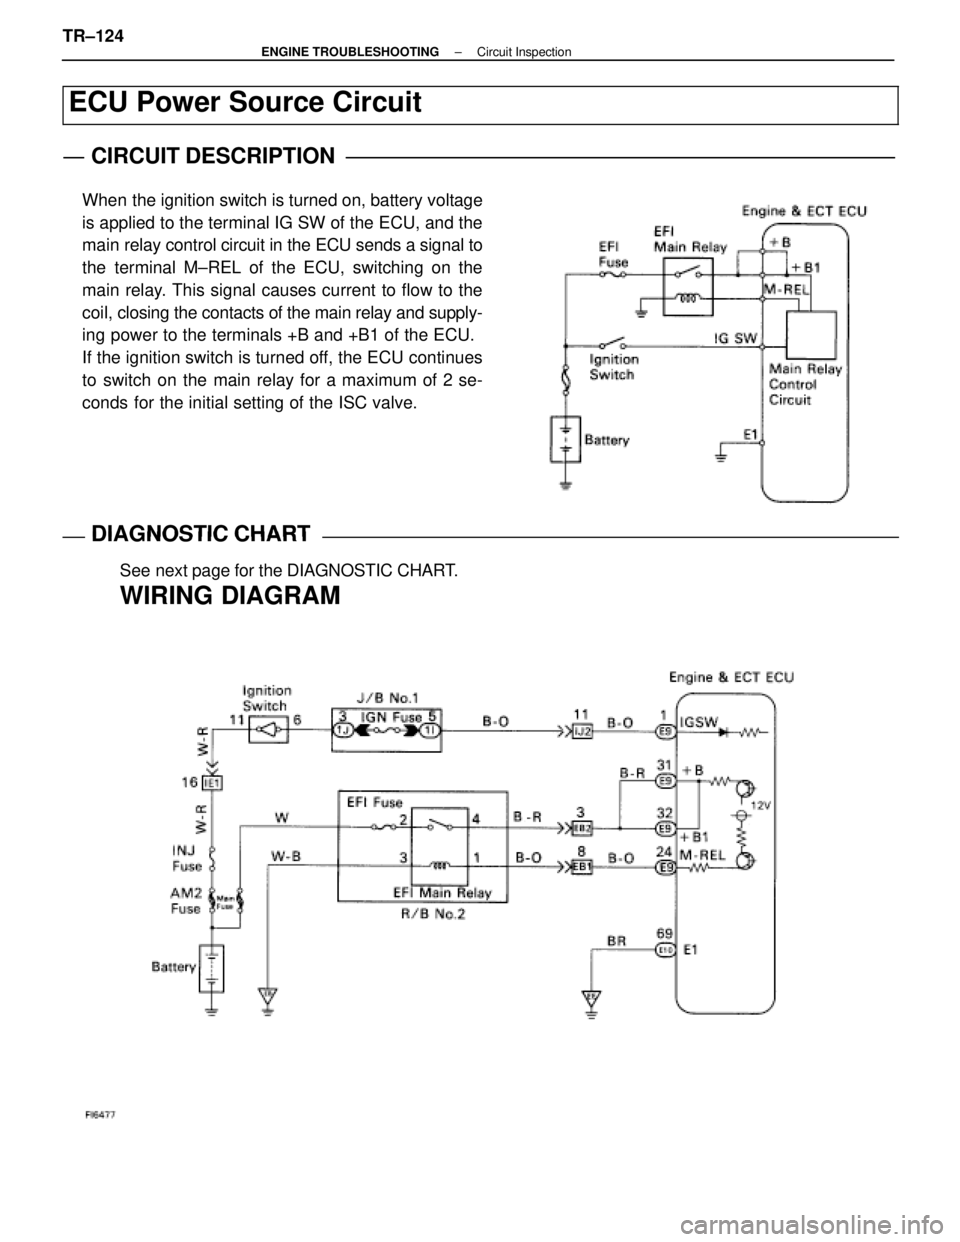
ECU Power Source Circuit
CIRCUIT DESCRIPTION
When the ignition switch is turned on, battery voltage
is applied to the terminal IG SW of the ECU, and the
main relay control circuit in the ECU sends a signal to
the terminal M±REL of the ECU, switching on the
main relay. This signal causes current to flow to the
coil, closing the contacts of the main relay and supply-
ing power to the terminals +B and +B1 of the ECU.
If the ignition switch is turned off, the ECU continues
to switch on the main relay for a maximum of 2 se-
conds for the initial setting of the ISC valve.
DIAGNOSTIC CHARTDIAGNOSTIC CHART
See next page for the DIAGNOSTIC CHART.
WIRING DIAGRAM
TR±124±
ENGINE TROUBLESHOOTING Circuit Inspection
WhereEverybodyKnowsYourName
Page 3557 of 4087
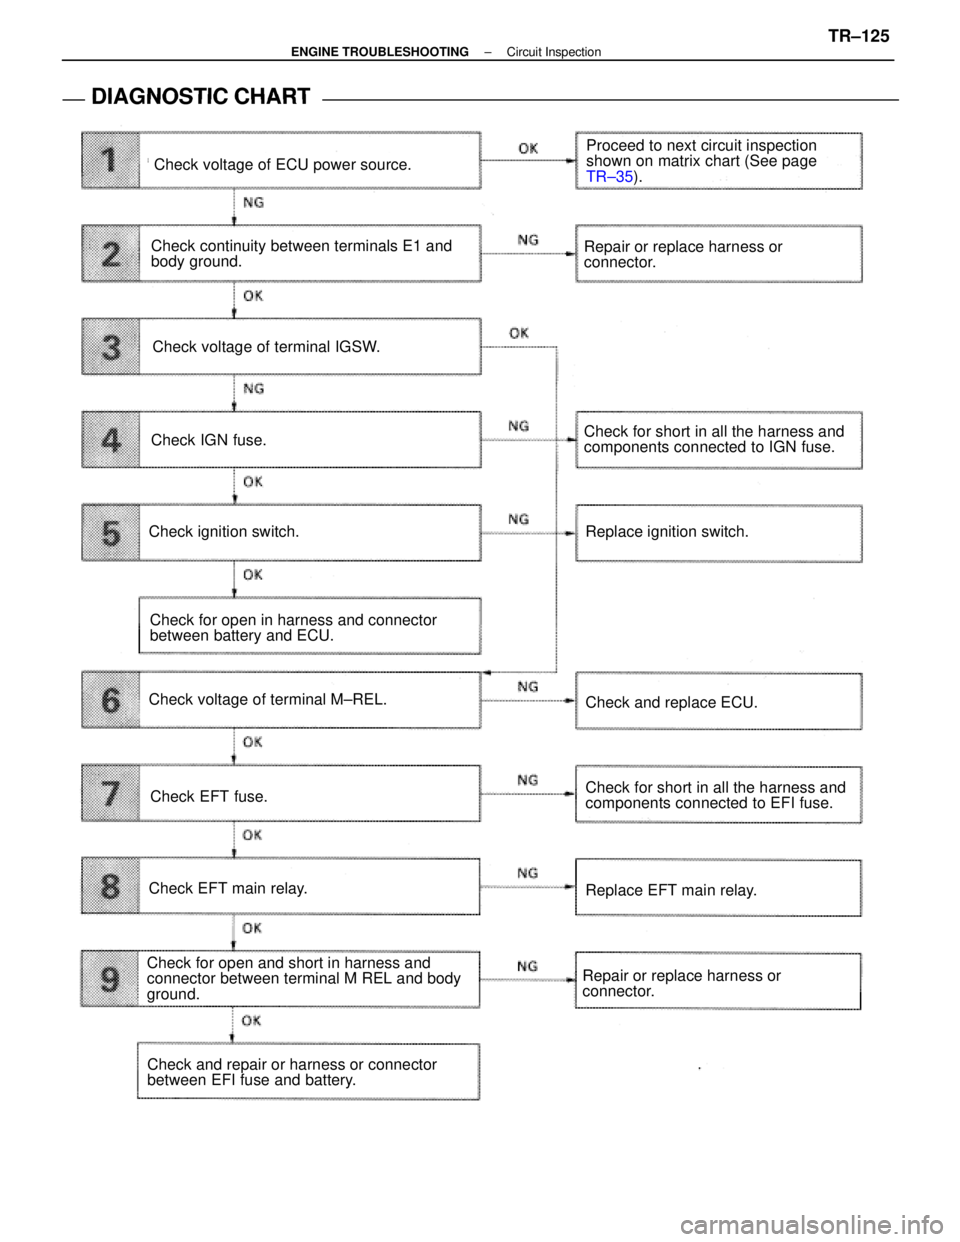
DIAGNOSTIC CHART
DIAGNOSTIC
CHART
Check for short in all the harness and
components connected to IGN fuse.
Check voltage of terminal M±REL.
Check for open in harness and connector
between battery and ECU.
Check and replace ECU.
Replace ignition switch.
Repair or replace harness or
connector.
Repair or replace harness or
connector.
Check for open and short in harness and
connector between terminal M REL and body
ground.
Replace EFT main relay.
Check voltage of terminal IGSW.
Check IGN fuse.
Check continuity between terminals E1 and
body ground.
Check voltage of ECU power source.
Proceed to next circuit inspection
shown on matrix chart (See page
TR±35
).
Check ignition switch.
Check EFT fuse.
Check EFT main relay.
Check and repair or harness or connector
between EFI fuse and battery.
Check for short in all the harness and
components connected to EFI fuse.
±
ENGINE TROUBLESHOOTING Circuit InspectionTR±125
WhereEverybodyKnowsYourName
Page 3558 of 4087
NGOK
OKNG
NGOK
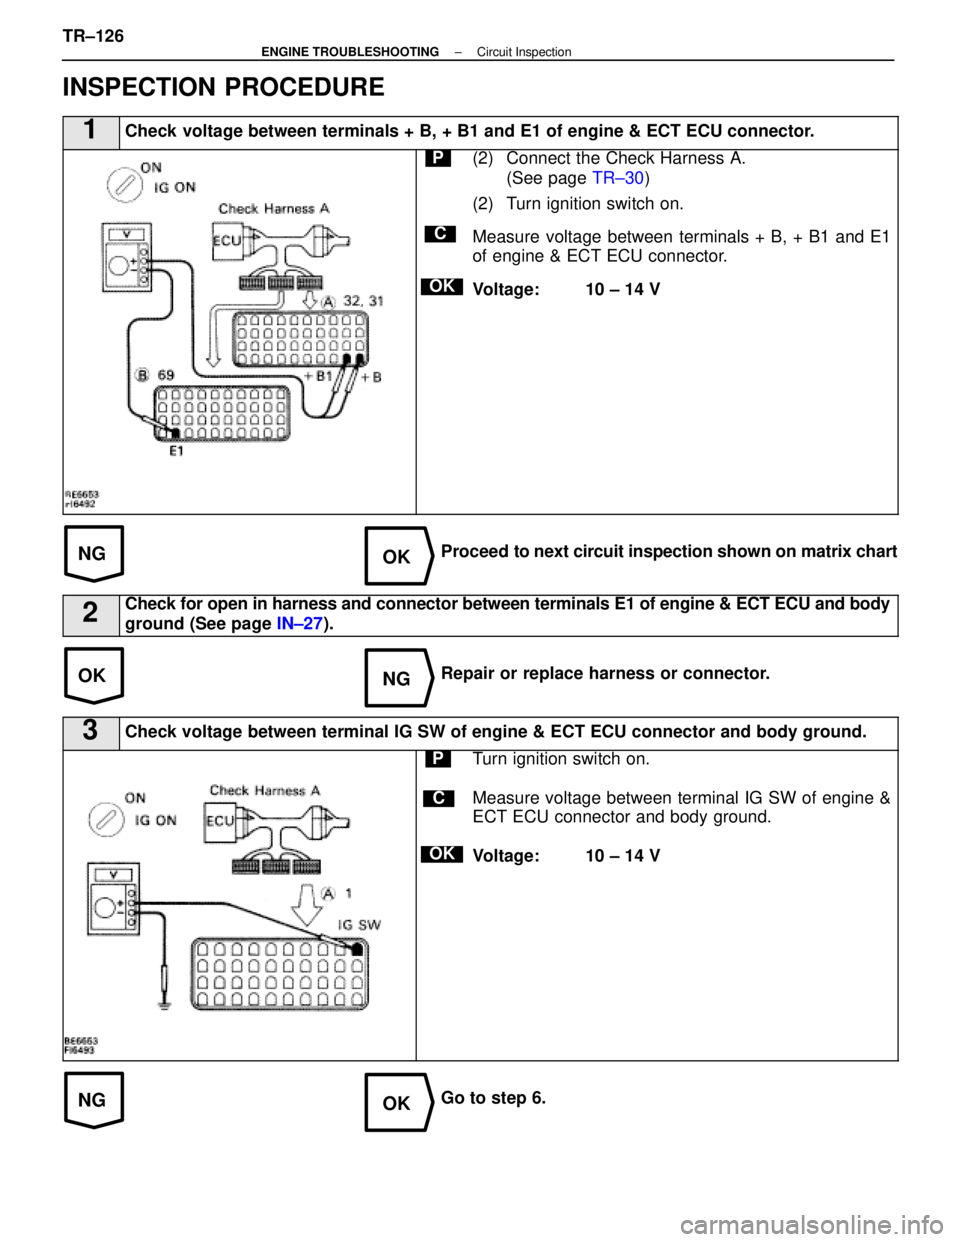
INSPECTION PROCEDURE
1Check voltage between terminals + B, + B1 and E1 of engine & ECT ECU connecto\
r.
C
OK
P(2) Connect the Check Harness A.(See page TR±30)
(2) Turn ignition switch on.
Measure voltage between terminals + B, + B1 and E1
of engine & ECT ECU connector.
Voltage: 10 ± 14 V
Proceed to next circuit inspection shown on matrix chart
2Check for open in harness and connector between terminals E1 of engine &\
ECT ECU and body
ground (See page IN±27).
Repair or replace harness or connector.
3Check voltage between terminal IG SW of engine & ECT ECU connector and b\
ody ground.
C
OK
PTurn ignition switch on.
Measure voltage between terminal IG SW of engine &
ECT ECU connector and body ground.
Voltage: 10 ± 14 V
Go to step 6.
TR±126
±
ENGINE TROUBLESHOOTING Circuit Inspection
WhereEverybodyKnowsYourName
Page 3559 of 4087
OKNG
OKNG
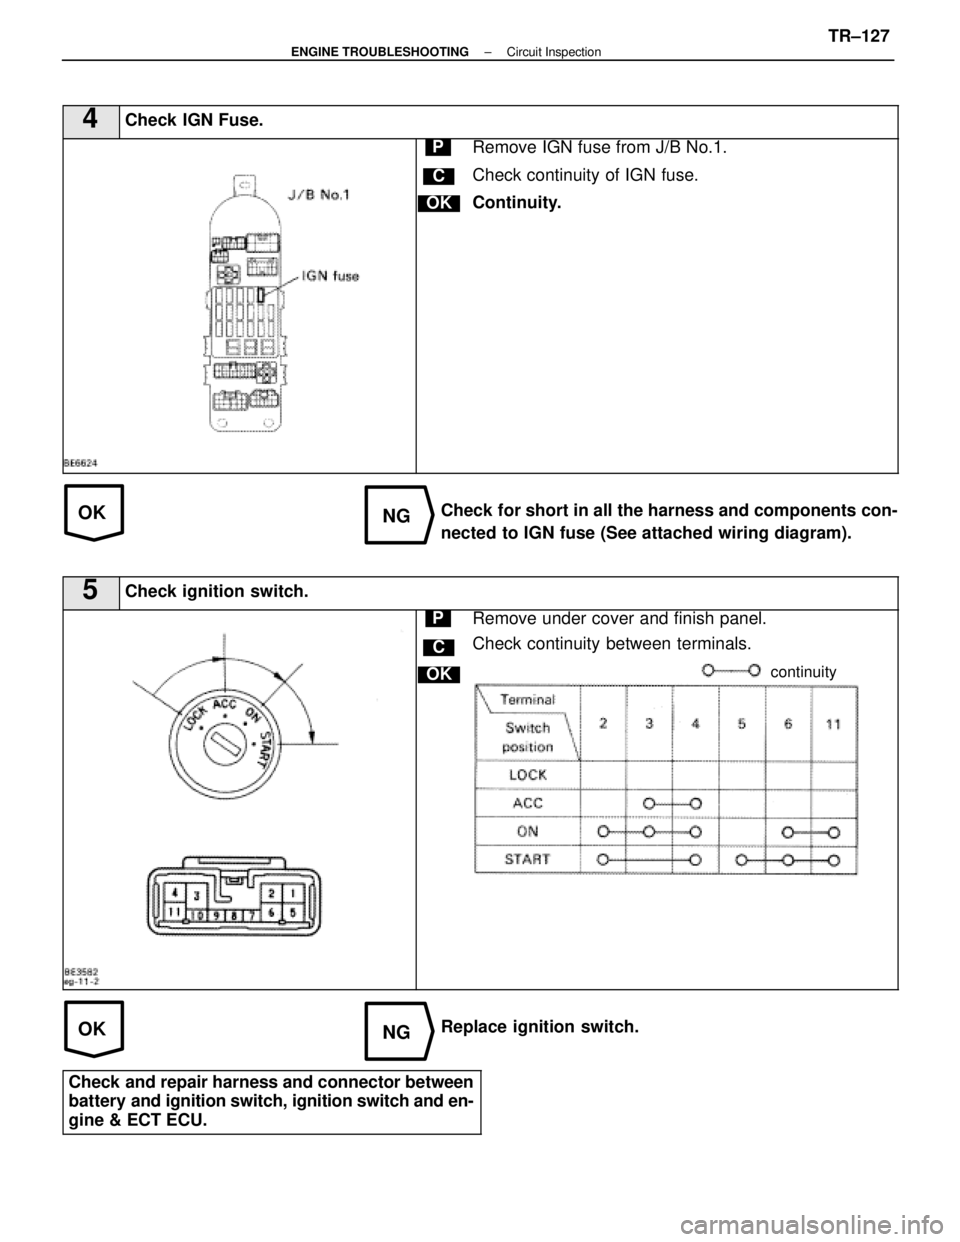
4Check IGN Fuse.
C
OK
PRemove IGN fuse from J/B No.1.
Check continuity of IGN fuse.
Continuity.
Check for short in all the harness and components con-
nected to IGN fuse (See attached wiring diagram).
5Check ignition switch.
C
OK
PRemove under cover and finish panel.
Check continuity between terminals.
continuity
Replace ignition switch.
Check and repair harness and connector between
battery and ignition switch, ignition switch and en-
gine & ECT ECU.
±
ENGINE TROUBLESHOOTING Circuit InspectionTR±127
WhereEverybodyKnowsYourName
Page 3560 of 4087
OKNG
OKNG
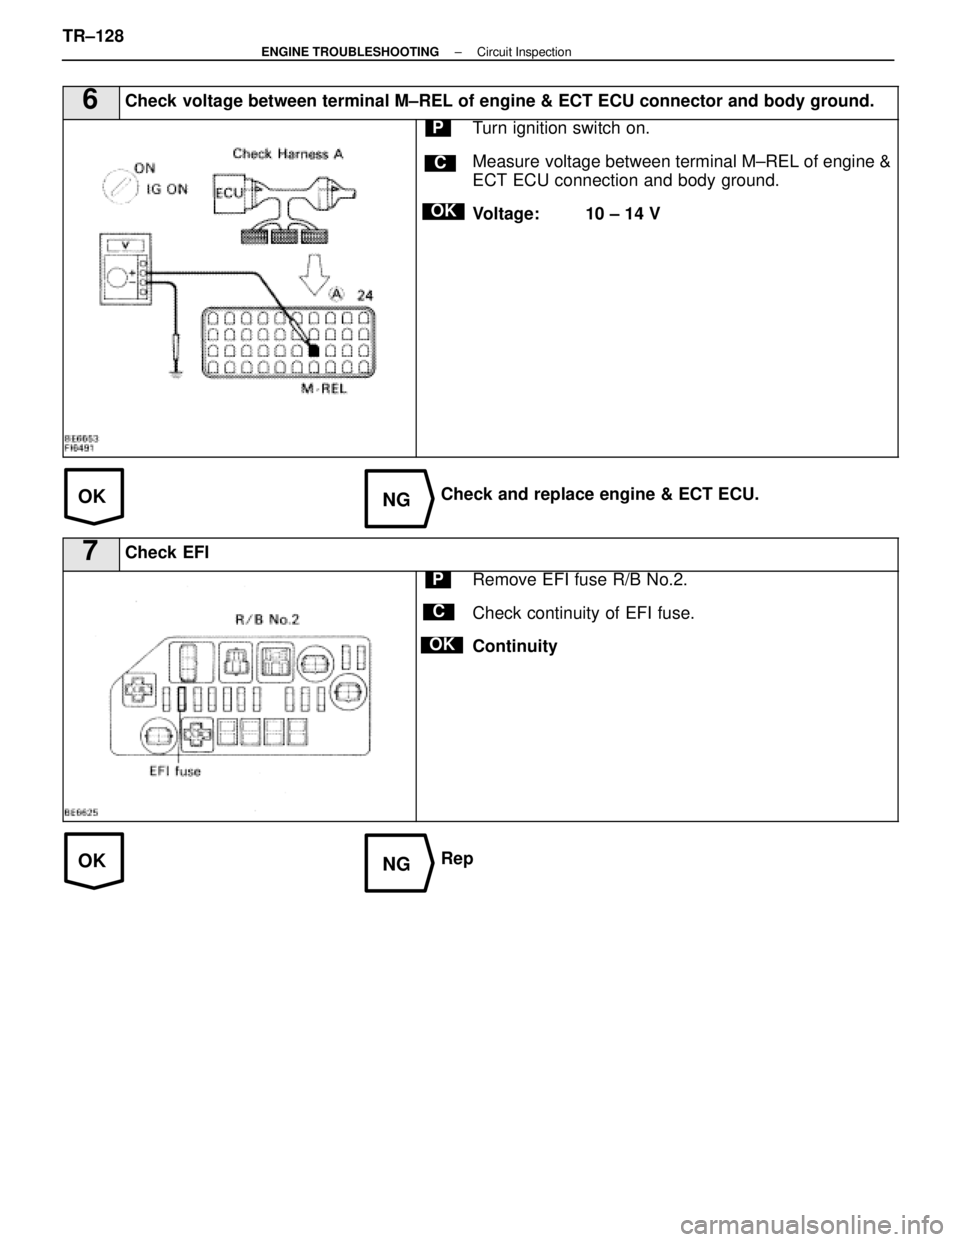
6Check voltage between terminal M±REL of engine & ECT ECU connector and bod\
y ground.
C
OK
PTurn ignition switch on.
Measure voltage between terminal M±REL of engine &
ECT ECU connection and body ground.
Voltage: 10 ± 14 V
Check and replace engine & ECT ECU.
7Check EFI
C
OK
PRemove EFI fuse R/B No.2.
Check continuity of EFI fuse.
Continuity
Rep
TR±128
±
ENGINE TROUBLESHOOTING Circuit Inspection
WhereEverybodyKnowsYourName
Trending: spare wheel, wipers, cooling, headrest, steering wheel, air filter, brake pads
