Engine LINCOLN AVIATOR 2004 User Guide
[x] Cancel search | Manufacturer: LINCOLN, Model Year: 2004, Model line: AVIATOR, Model: LINCOLN AVIATOR 2004Pages: 336, PDF Size: 3.69 MB
Page 73 of 336
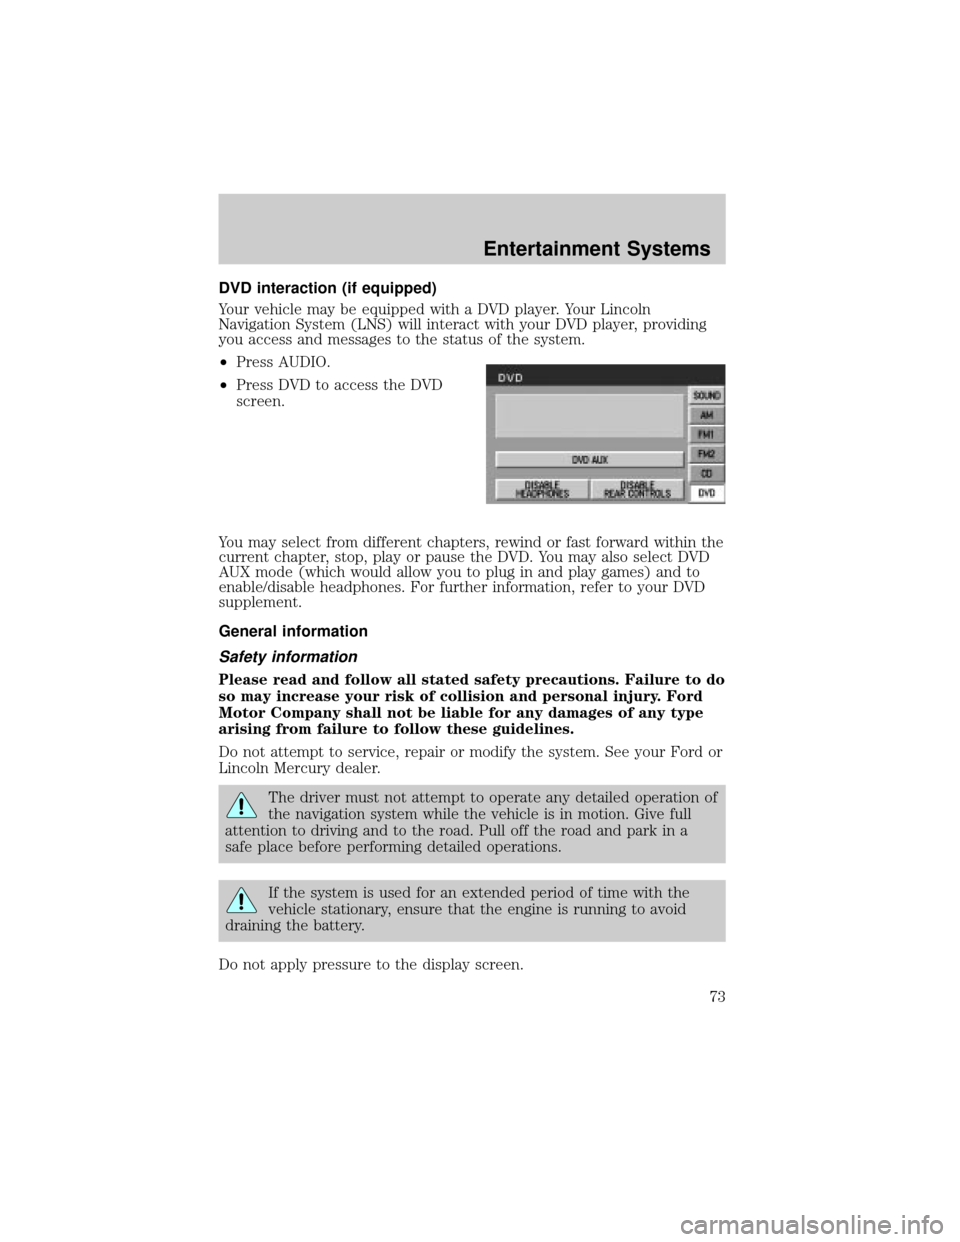
DVD interaction (if equipped)
Your vehicle may be equipped with a DVD player. Your Lincoln
Navigation System (LNS) will interact with your DVD player, providing
you access and messages to the status of the system.
²Press AUDIO.
²Press DVD to access the DVD
screen.
You may select from different chapters, rewind or fast forward within the
current chapter, stop, play or pause the DVD. You may also select DVD
AUX mode (which would allow you to plug in and play games) and to
enable/disable headphones. For further information, refer to your DVD
supplement.
General information
Safety information
Please read and follow all stated safety precautions. Failure to do
so may increase your risk of collision and personal injury. Ford
Motor Company shall not be liable for any damages of any type
arising from failure to follow these guidelines.
Do not attempt to service, repair or modify the system. See your Ford or
Lincoln Mercury dealer.
The driver must not attempt to operate any detailed operation of
the navigation system while the vehicle is in motion. Give full
attention to driving and to the road. Pull off the road and park in a
safe place before performing detailed operations.
If the system is used for an extended period of time with the
vehicle stationary, ensure that the engine is running to avoid
draining the battery.
Do not apply pressure to the display screen.
Entertainment Systems
73
Page 120 of 336
Compass zone/calibration adjustment
Perform this adjustment in an open area free from steel structures and
high voltage lines.
For optimum calibration, turn off all electrical accessories (heater/air
conditioning, wipers, etc.) and make sure all vehicle doors are shut.
1. Turn ignition to the ON position.
2. Start the engine.
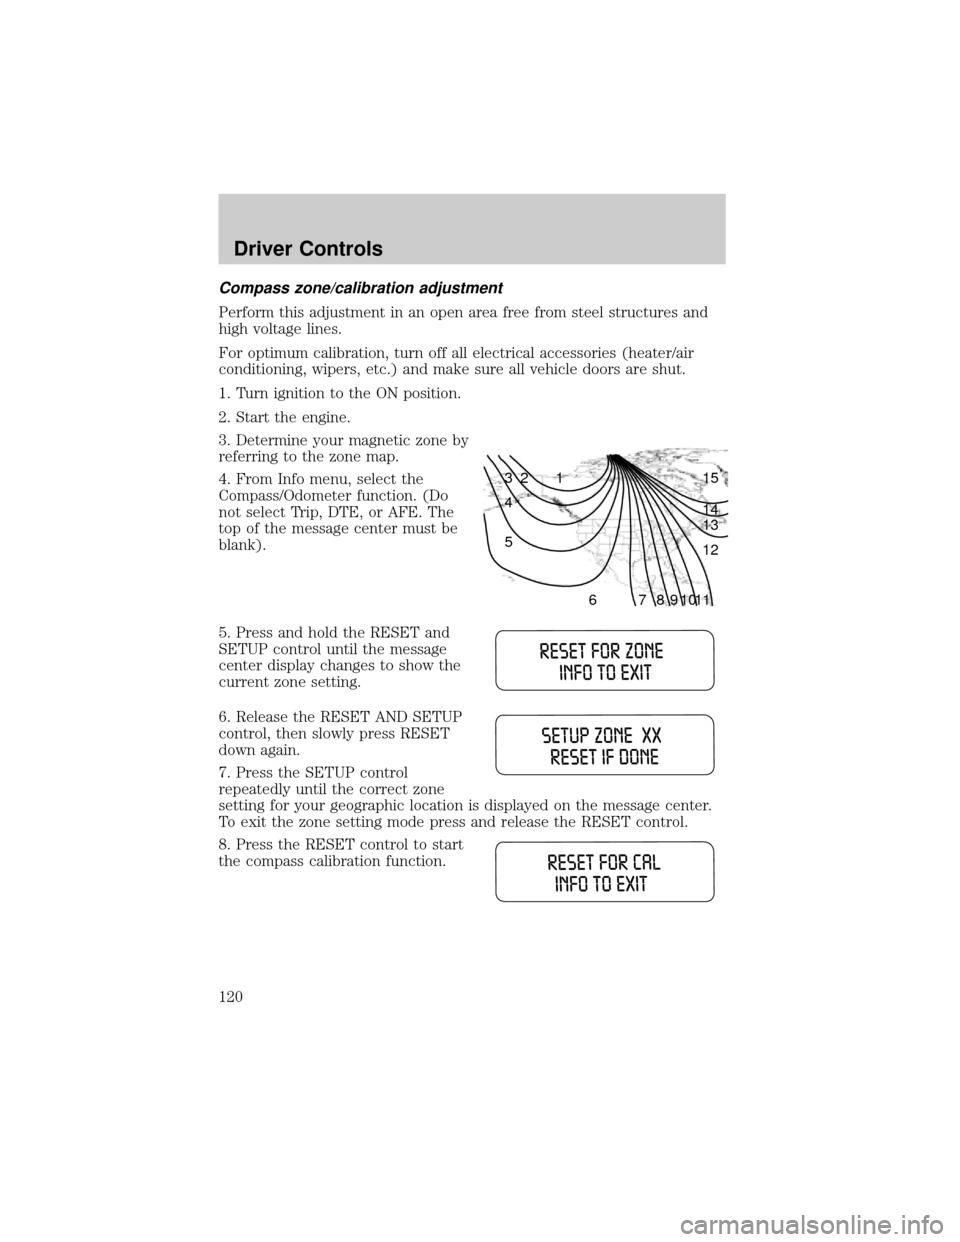
3. Determine your magnetic zone by
referring to the zone map.
4. From Info menu, select the
Compass/Odometer function. (Do
not select Trip, DTE, or AFE. The
top of the message center must be
blank).
5. Press and hold the RESET and
SETUP control until the message
center display changes to show the
current zone setting.
6. Release the RESET AND SETUP
control, then slowly press RESET
down again.
7. Press the SETUP control
repeatedly until the correct zone
setting for your geographic location is displayed on the message center.
To exit the zone setting mode press and release the RESET control.
8. Press the RESET control to start
the compass calibration function.
1 2 3
4
5
6 7 8 9 101112 13 14 15
Driver Controls
120
Page 123 of 336
²Language
²Rear Park Assist (while in reverse)
²AWD Locked (if equipped)
²Avdtrac (if equipped)
System check
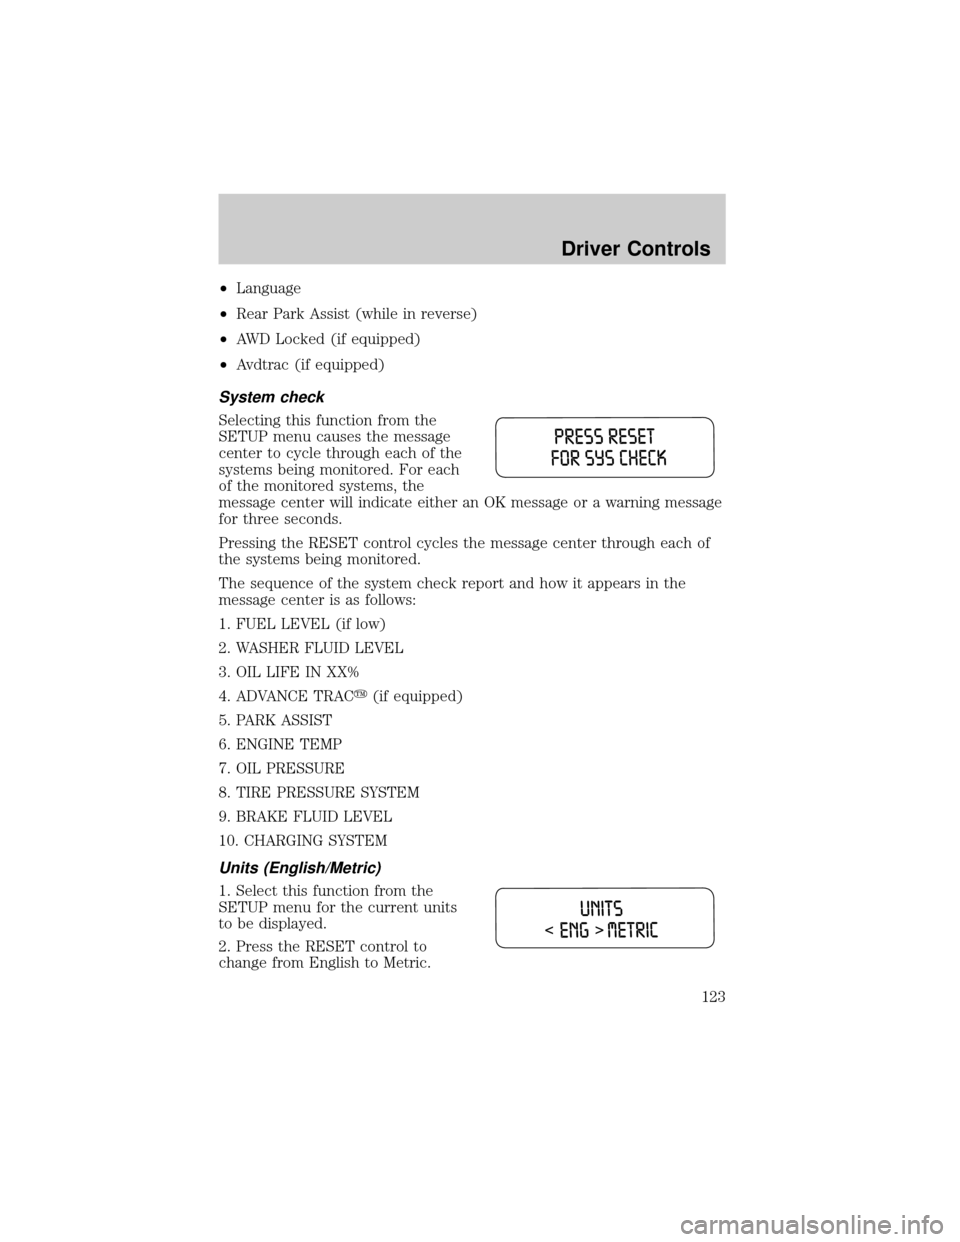
Selecting this function from the
SETUP menu causes the message
center to cycle through each of the
systems being monitored. For each
of the monitored systems, the
message center will indicate either an OK message or a warning message
for three seconds.
Pressing the RESET control cycles the message center through each of
the systems being monitored.
The sequence of the system check report and how it appears in the
message center is as follows:
1. FUEL LEVEL (if low)
2. WASHER FLUID LEVEL
3. OIL LIFE IN XX%
4. ADVANCE TRACy(if equipped)
5. PARK ASSIST
6. ENGINE TEMP
7. OIL PRESSURE
8. TIRE PRESSURE SYSTEM
9. BRAKE FLUID LEVEL
10. CHARGING SYSTEM
Units (English/Metric)
1. Select this function from the
SETUP menu for the current units
to be displayed.
2. Press the RESET control to
change from English to Metric.
Driver Controls
123
Page 127 of 336
Warning display Status
Door ajar Liftgate ajar Warning returns after cycling through
the system sequence
Low fuel level
Check charging system
Low brake fluid level
Low oil pressure
Transmission overheated
Check transmission
Check engine temperature
Reduced engine power
Stop engine safely
AWD disabled locked (vehicles
equipped with AdvanceTracy
only)
Low washer fluid level Warning returns after the ignition key
is turned from OFF to ON.
Check tire pressure
Tire pressure system fault
Tire pressure sensor fault
Check AdvTrac (if equipped)
Check AWD (vehicles equipped
with AdvanceTracyonly)
AWD Disabled (vehicles
equipped with AdvanceTracy
only)
Check fuel cap
Oil change required
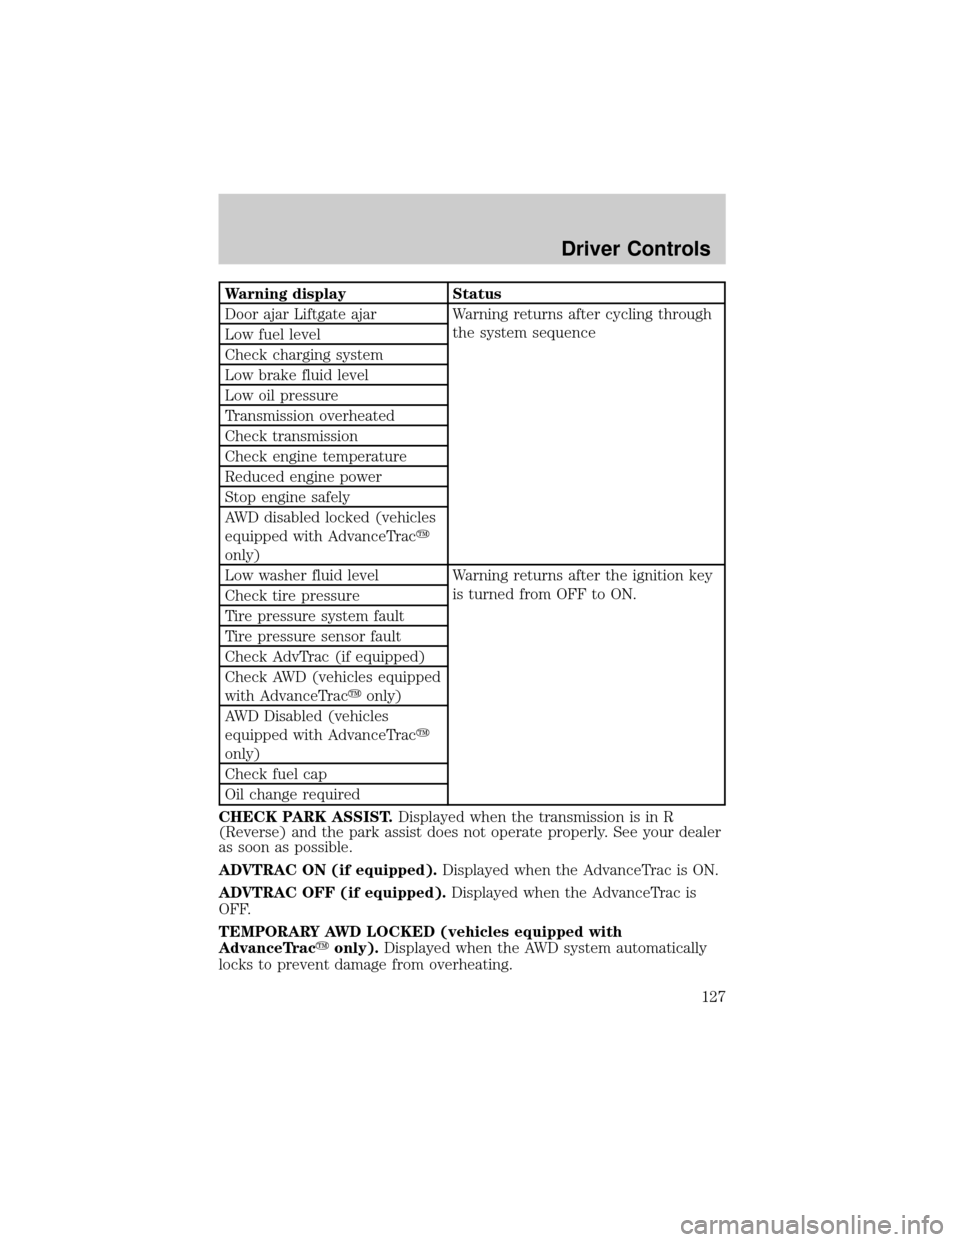
CHECK PARK ASSIST.Displayed when the transmission is in R
(Reverse) and the park assist does not operate properly. See your dealer
as soon as possible.
ADVTRAC ON (if equipped).Displayed when the AdvanceTrac is ON.
ADVTRAC OFF (if equipped).Displayed when the AdvanceTrac is
OFF.
TEMPORARY AWD LOCKED (vehicles equipped with
AdvanceTracyonly).Displayed when the AWD system automatically
locks to prevent damage from overheating.
Driver Controls
127
Page 128 of 336

AWD LOCK OFF and AWD AUTO ON (vehicles equipped with
AdvanceTracyonly).Displayed when the AWD system is completely
cooled down from being overheated.
DOOR AJAR LIFTGATE AJAR.Displayed when a door or liftgate is
not completely closed.
CHECK ENGINE TEMPERATURE.Displayed when the engine
coolant is overheating. Stop the vehicle as soon as safely possible, turn
off the engine and let it cool. Check the coolant and coolant level. Refer
toEngine coolantin theMaintenance and specificationschapter. If
the warning stays on or continues to come on, contact your dealer as
soon as safely possible.
REDUCED ENGINE POWER.Displayed when the engine is
overheating. Stop the vehicle as soon as safely possible, turn off the
engine. If the warning stays on or continues to come on, contact your
dealer as soon as safely possible.
STOP ENGINE SAFELY.Displayed when the engine is overheating.
Stop the vehicle as soon as safely possible, turn off the engine. If the
warning stays on or continues to come on, contact your dealer as soon as
safely possible.
AWD DISABLED LOCKED (vehicles equipped with AdvanceTracy
only).Displayed when the AWD system begins to overheat placing itself
in the autolock mode. If the warning stays on or continues to come on,
contact your dealer as soon as safely possible.
WARNING-TIRE VERY LOW.Displayed when one or more tires have
very low pressure. When this warning message is displayed, a warning
chime will sound reminding you to stop the vehicle as soon as safely
possible and check your tires for proper pressure, leaks and damage.
Refer toServicing your tiresin theMaintenance and specifications
chapter.
CHECK TIRE PRESSURE.Displayed when any of the tire pressures
are low. Refer toChecking the tire pressurein theMaintenance and
specificationschapter.
TIRE PRESSURE SYSTEM FAULT.Displayed when a tire pressure
monitoring system is malfunctioning. If the warning stays on or continues
to come on, have the system checked by your dealer.
TIRE PRESSURE SENSOR FAULT.Displayed when a tire pressure
sensor is malfunctioning. If the warning stays on or continues to come
on, have the system checked by your dealer.
LOW FUEL LEVEL.Displayed as an early reminder of a low fuel
condition.
Driver Controls
128
Page 129 of 336

CHECK CHARGING SYSTEM.Displayed when the electrical system is
not maintaining proper voltage. If you are operating electrical accessories
when the engine is idling at a low speed, turn off as many of the
electrical loads as soon as possible. If the warning stays on or comes on
when the engine is operating at normal speeds, have the electrical
system checked as soon as possible.
LOW BRAKE FLUID LEVEL.Indicates the brake fluid level is low and
the brake system should be inspected immediately. Refer toChecking
and adding brake fluidin theMaintenance and specifications
chapter.
LOW OIL PRESSURE.Displayed when the engine oil pressure is low. If
this warning message is displayed, check the level of the engine oil.
Refer toEngine oilin theMaintenance and specificationschapter for
information about adding engine oil.
TRANSMISSION OVERHEATED.Indicates the transmission is
overheating. This warning may appear when towing heavy loads, city
driving, when driving in a low gear at a high speed for an extended
period of time or due to a loss of transmission fluid. Stop the vehicle as
soon as safely possible, place the shift lever into P (Park) or N (Neutral)
and raise the engine RPM. If this does not cool the transmission, turn off
the engine and let it cool. If the warning stays on or continues to come
on, contact your dealer for transmission service as soon as possible.
Continued operation in this condition may cause internal transmission
damage.
CHECK TRANSMISSION.Indicates the transmission is not operating
properly. If this warning stays on, contact your dealer as soon as possible
to prevent additional transmission damage. Refer to the instrument
cluster warning lamps in theInstrument clusterchapter.
LOW WASHER FLUID LEVEL.Indicates the washer fluid reservoir is
less than one quarter full. Check the washer fluid level. Refer to
Windshield washer fluidin theMaintenance and specifications
chapter.
CHECK ADVTRAC (if equipped).Displayed when the AdvanceTracy
system is not operating properly. If this message is displayed on the
message center the AdvanceTracysystem will be partially operable. If
this warning stays on while the engine is running, contact your dealer as
soon as possible. For further information, refer toAdvanceTracy
stability enhancement systemin theDrivingchapter.
Driver Controls
129
Page 130 of 336
AWD DISABLED (vehicles equipped with AdvanceTracyonly).
Displayed for 4 seconds then SEE OWNER'S MANUAL will display
indicating that the AWD system is not operating properly. For further
information, refer toDisabling AWDin theDrivingchapter. See your
dealer as soon as possible
CHECK AWD (vehicles equipped with AdvanceTracyonly).
Displayed when the AWD system is not operating properly. If the warning
stays on or continues to come on, contact your dealer immediately.
CHECK FUEL CAP.Displayed when the fuel filler cap is not properly
installed. Check the fuel filler cap for proper installation. Refer toFuel
filler capin theMaintenance and specificationschapter.
CHANGE OIL SOON/OIL CHANGE REQUIRED.Displayed when the
engine oil life remaining is 5 percent or less. When oil life left is between
5% and 0%, the CHANGE OIL SOON message will be displayed. When oil
life left reaches 0%, the OIL CHANGE REQUIRED message will be
displayed.
An oil change is required whenever indicated by the message center and
according to the recommended maintenance schedule. USE ONLY
RECOMMENDED ENGINE OILS.
To reset the oil monitoring system to 100% after each oil change
[approximately 8,000 km (5,000 miles) or 180 days] perform the
following:
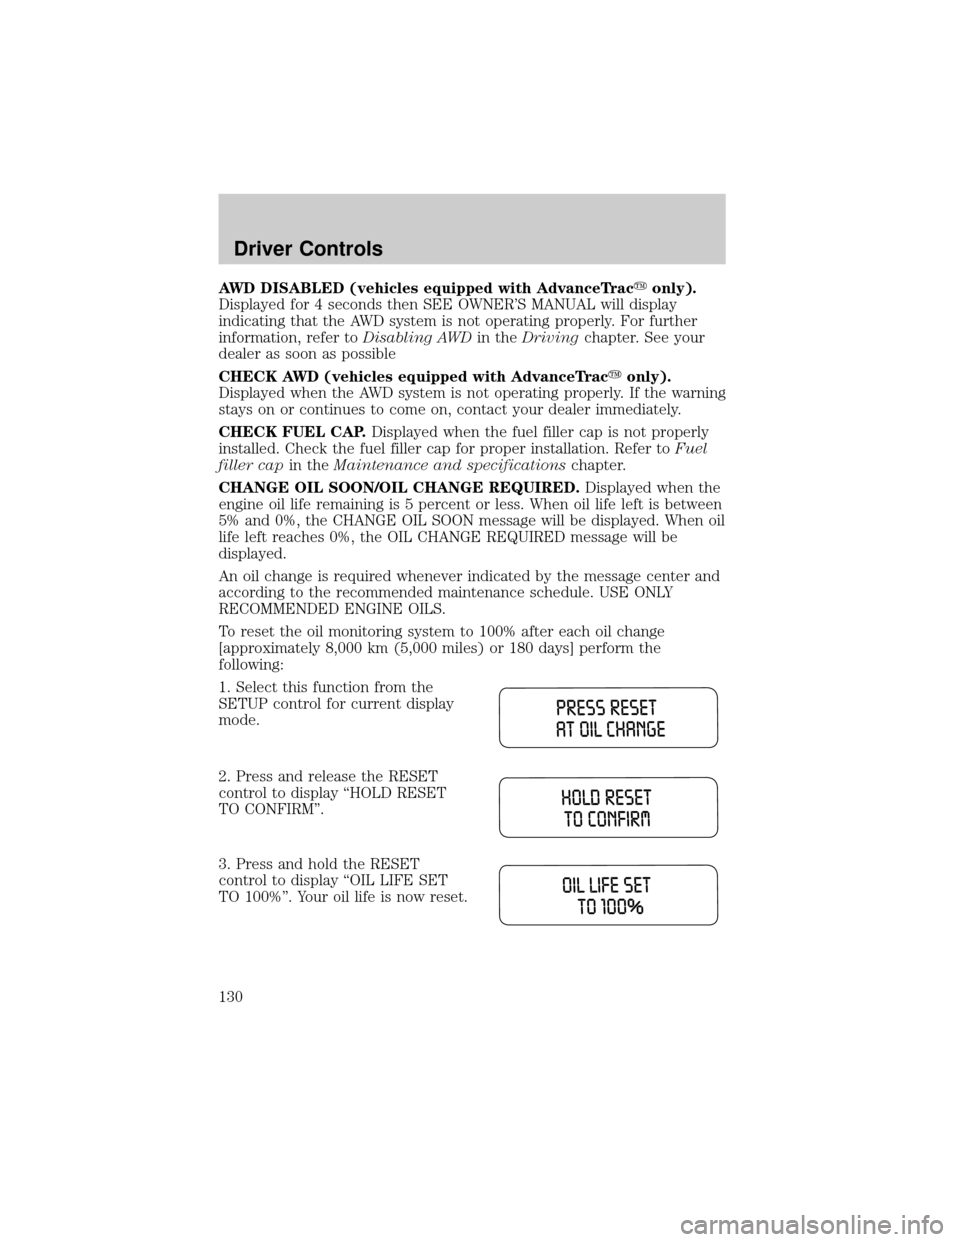
1. Select this function from the
SETUP control for current display
mode.
2. Press and release the RESET
control to display ªHOLD RESET
TO CONFIRMº.
3. Press and hold the RESET
control to display ªOIL LIFE SET
TO 100%º. Your oil life is now reset.
Driver Controls
130
Page 131 of 336
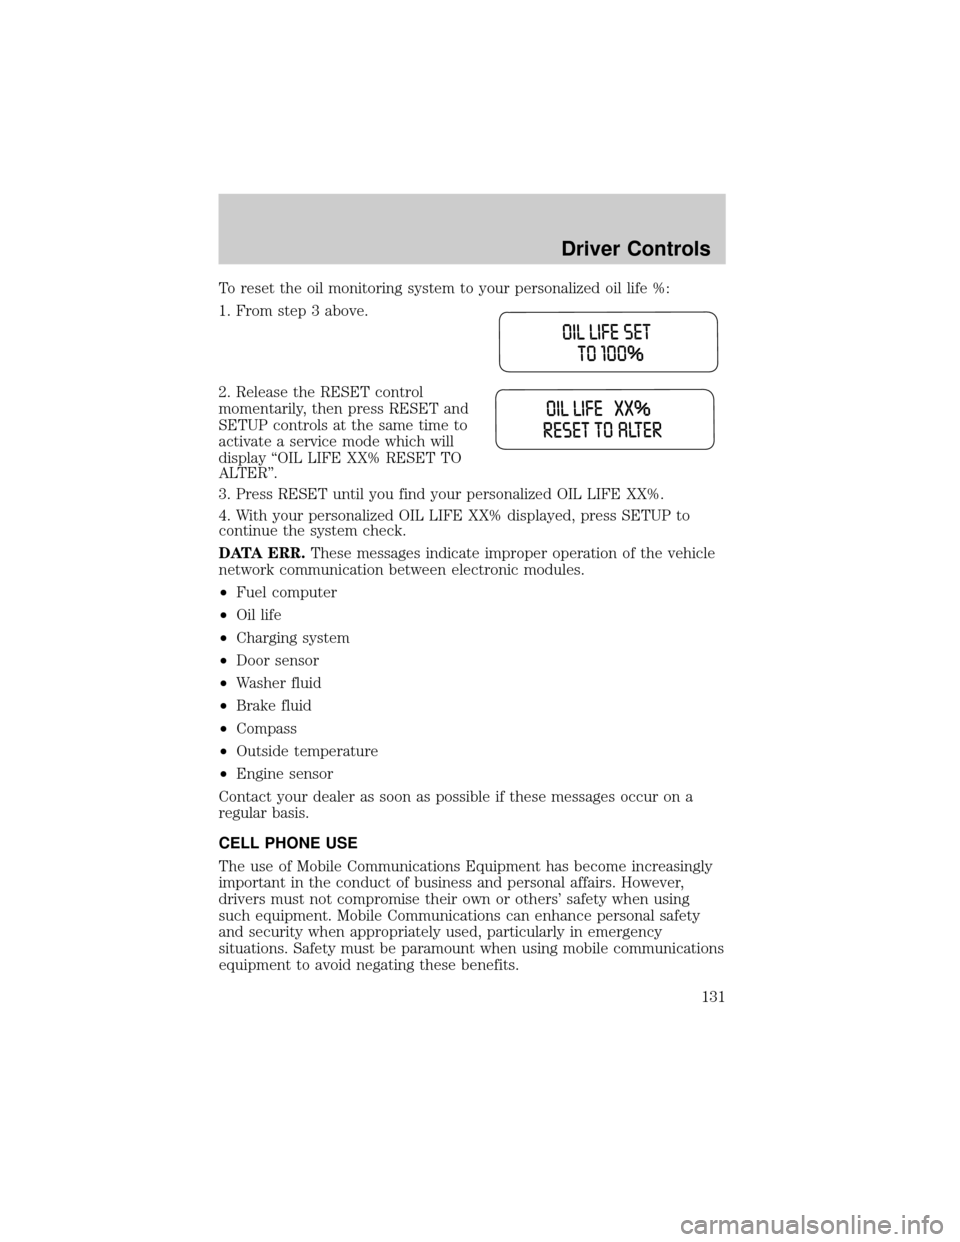
To reset the oil monitoring system to your personalized oil life %:
1. From step 3 above.
2. Release the RESET control
momentarily, then press RESET and
SETUP controls at the same time to
activate a service mode which will
display ªOIL LIFE XX% RESET TO
ALTERº.
3. Press RESET until you find your personalized OIL LIFE XX%.
4. With your personalized OIL LIFE XX% displayed, press SETUP to
continue the system check.
DATA ERR.These messages indicate improper operation of the vehicle
network communication between electronic modules.
²Fuel computer
²Oil life
²Charging system
²Door sensor
²Washer fluid
²Brake fluid
²Compass
²Outside temperature
²Engine sensor
Contact your dealer as soon as possible if these messages occur on a
regular basis.
CELL PHONE USE
The use of Mobile Communications Equipment has become increasingly
important in the conduct of business and personal affairs. However,
drivers must not compromise their own or others' safety when using
such equipment. Mobile Communications can enhance personal safety
and security when appropriately used, particularly in emergency
situations. Safety must be paramount when using mobile communications
equipment to avoid negating these benefits.
Driver Controls
131
Page 146 of 336
Locking the doors with the keyless entry system
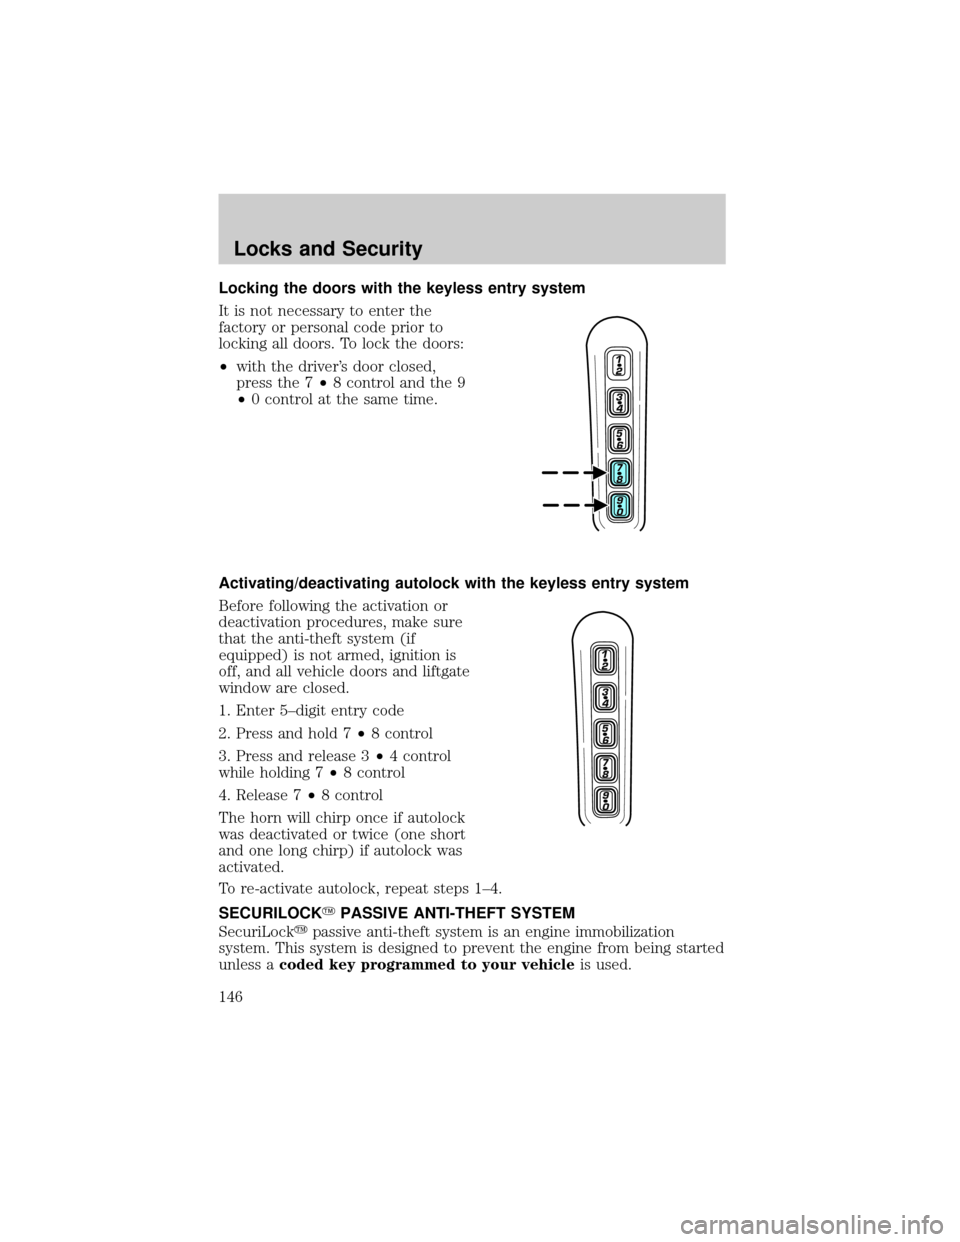
It is not necessary to enter the
factory or personal code prior to
locking all doors. To lock the doors:
²with the driver's door closed,
press the 7²8 control and the 9
²0 control at the same time.
Activating/deactivating autolock with the keyless entry system
Before following the activation or
deactivation procedures, make sure
that the anti-theft system (if
equipped) is not armed, ignition is
off, and all vehicle doors and liftgate
window are closed.
1. Enter 5±digit entry code
2. Press and hold 7²8 control
3. Press and release 3²4 control
while holding 7²8 control
4. Release 7²8 control
The horn will chirp once if autolock
was deactivated or twice (one short
and one long chirp) if autolock was
activated.
To re-activate autolock, repeat steps 1±4.
SECURILOCKYPASSIVE ANTI-THEFT SYSTEM
SecuriLockypassive anti-theft system is an engine immobilization
system. This system is designed to prevent the engine from being started
unless acoded key programmed to your vehicleis used.
Locks and Security
146
Page 148 of 336

The following items may prevent the vehicle from starting:
²Large metallic objects
²Electronic devices on the key chain that can be used to purchase
gasoline or similar items
²A second key on the same key ring as thecoded key
If any of these items are present, you need to keep these objects from
touching thecoded keywhile starting the engine. These objects and
devices cannot damage thecoded key,but can cause a momentary ªno
startº condition if they are too close to the key during engine start. If a
problem occurs, turn ignition OFF and restart the engine with all other
objects on the key ring held away from the ignition key. Check to make
sure thecoded keyis an approved Lincolncoded key.
If your keys are lost or stolen you will need to do the following:
²Use your spare key to start the vehicle, or
²Have your vehicle towed to a dealership or a locksmith. The key codes
will need to be erased from your vehicle and new key codes will need
to be re-coded.
Replacing coded keys can be very costly and you may want to store an
extra programmed key away from the vehicle in a safe place to prevent
an unforeseen inconvenience.
The correctcoded keymust be used for your vehicle. The use of the
wrong type ofcoded keymay lead to a ªno startº condition.
If an unprogrammed key is used in the ignition it will cause a ªno
startº condition.
Programming spare keys
A maximum of eight keys can be coded to your vehicle. Only
SecuriLockykeys can be used. To program acoded keyyourself, you
will need two previously programmedcoded keys(keys that already
operate your vehicle's engine) and the new unprogrammed key(s) readily
accessible for timely implementation of each step in the procedure.
If two previously programmed coded keys are not available, you must
bring your vehicle to your dealership to have the spare coded key(s)
programmed.
Please read and understand the entire procedure before you begin.
Locks and Security
148