AUX LINCOLN AVIATOR 2004 Owners Manual
[x] Cancel search | Manufacturer: LINCOLN, Model Year: 2004, Model line: AVIATOR, Model: LINCOLN AVIATOR 2004Pages: 336, PDF Size: 3.69 MB
Page 24 of 336
Speed sensitive volume:Radio volume changes automatically and
slightly with vehicle speed to compensate for road and wind noise.
Recommended level is 1±3. Level 0 turns the feature off and level 7 is
the maximum setting.
Press and hold the volume control for five seconds. Then press SEL to
increase (
) or decrease () the volume setting. The level will
appear in the display.
14.Load:Press to load a CD. Press
and hold to load up to six discs.
15.CD AUX:Press to access CD to
toggle between CD and DVD (if
equipped).
CD units are designed to play commercially pressed 12 cm (4.75
in) audio compact discs only. Due to technical incompatibility,
certain recordable and re-recordable compact discs may not
function correctly when used in Ford CD players. Irregular
shaped CDs, CDs with a scratch protection film attached, and CDs
with homemade paper (adhesive) labels should not be inserted
into the CD player. The label may peel and cause the CD to
become jammed. It is recommended that homemade CDs be
identified with permanent felt tip marker rather than adhesive
labels. Ballpoint pens may damage CDs. Please contact your
dealer for further information.
16.Scan:Press SCAN to hear a
brief sampling of radio stations or
CD tracks. Press again to stop.
17.Disc/Tune:Press
orto
manually tune down/up the radio
frequency band, or to listen to the
previous/next track on the CD.
CAT:CAT is only available when equipped with Satellite Radio. Your
Audiophile radio comes equipped with Satellite ready capability. The kit
to enable Satellite reception is available through your Lincoln dealer.
Detailed Satellite instructions are included with the dealer installed kit.
For information regarding SIRIUS Satellite Radio, please call toll-free
888-539-SIRIUS (888-539-7474) or visit the SIRIUS website at
www.siriusradio.com
Entertainment Systems
24
Page 73 of 336
DVD interaction (if equipped)
Your vehicle may be equipped with a DVD player. Your Lincoln
Navigation System (LNS) will interact with your DVD player, providing
you access and messages to the status of the system.
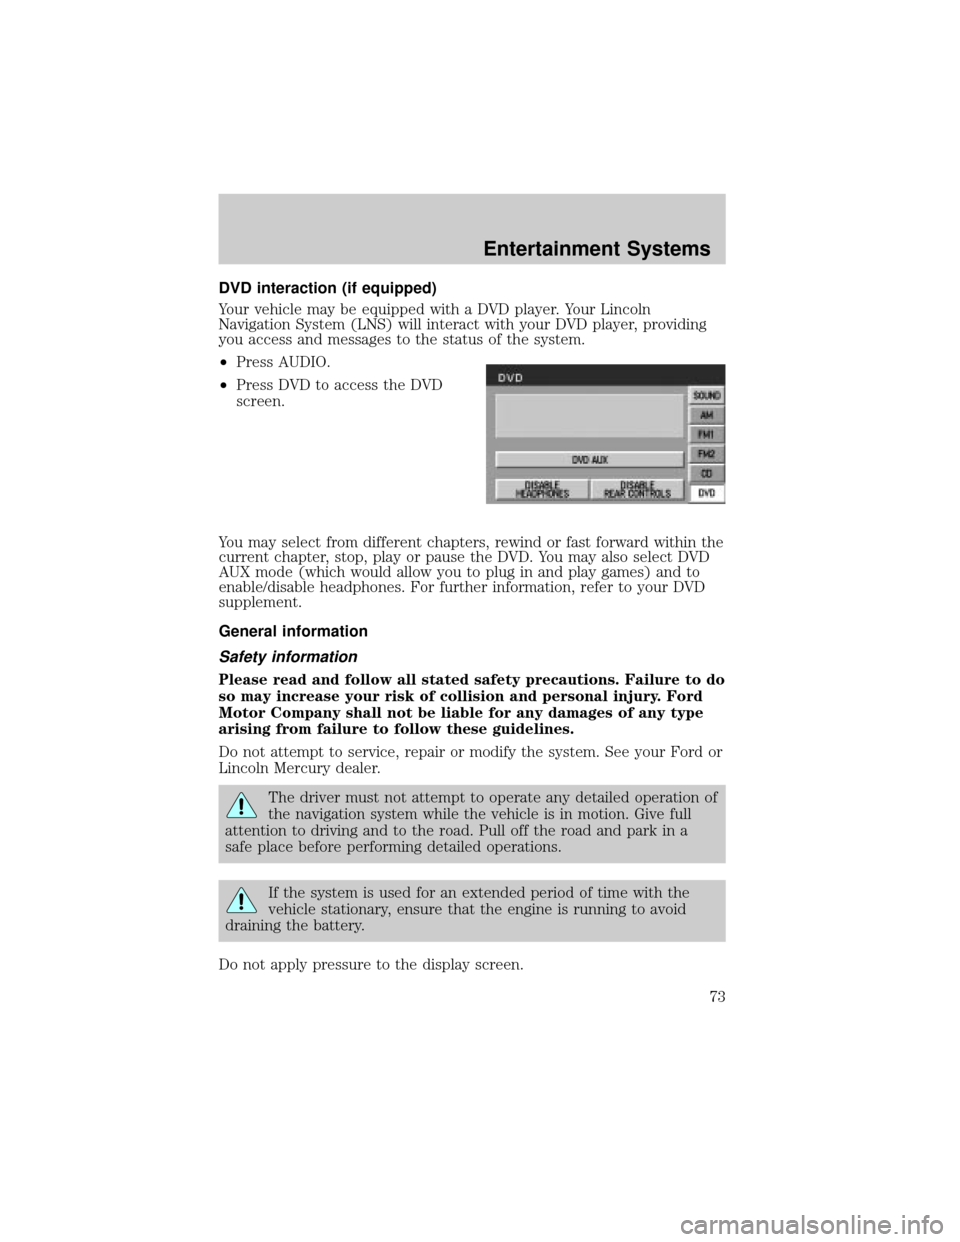
²Press AUDIO.
²Press DVD to access the DVD
screen.
You may select from different chapters, rewind or fast forward within the
current chapter, stop, play or pause the DVD. You may also select DVD
AUX mode (which would allow you to plug in and play games) and to
enable/disable headphones. For further information, refer to your DVD
supplement.
General information
Safety information
Please read and follow all stated safety precautions. Failure to do
so may increase your risk of collision and personal injury. Ford
Motor Company shall not be liable for any damages of any type
arising from failure to follow these guidelines.
Do not attempt to service, repair or modify the system. See your Ford or
Lincoln Mercury dealer.
The driver must not attempt to operate any detailed operation of
the navigation system while the vehicle is in motion. Give full
attention to driving and to the road. Pull off the road and park in a
safe place before performing detailed operations.
If the system is used for an extended period of time with the
vehicle stationary, ensure that the engine is running to avoid
draining the battery.
Do not apply pressure to the display screen.
Entertainment Systems
73
Page 80 of 336
AUXILIARY CLIMATE CONTROLS
Your vehicle may be equipped with auxiliary climate controls. These
allow the front or rear seat passengers to control airflow direction,
temperature and fan level of the rear compartment to quickly heat or
cool the entire vehicle.
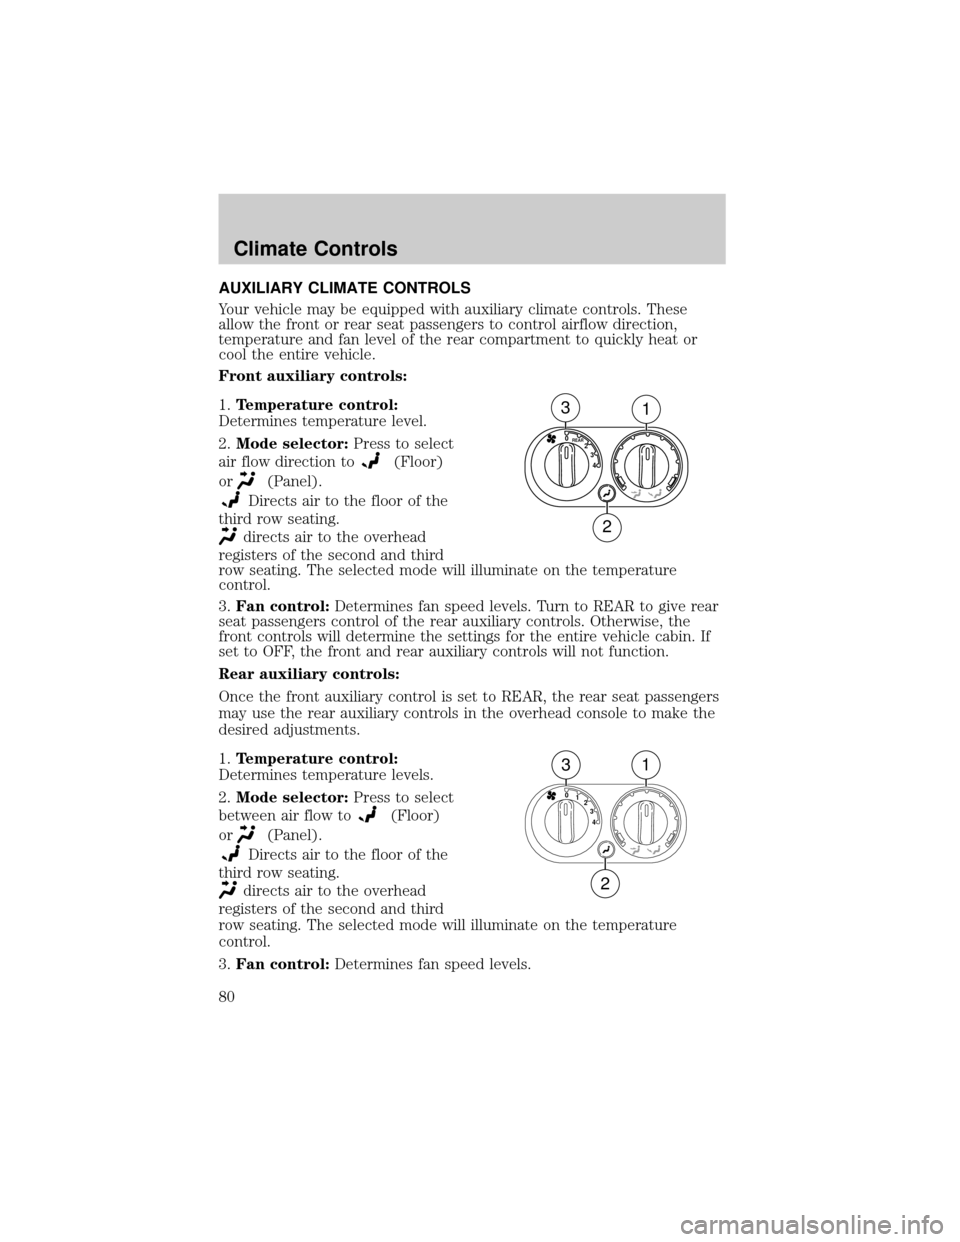
Front auxiliary controls:
1.Temperature control:
Determines temperature level.
2.Mode selector:Press to select
air flow direction to
(Floor)
or
(Panel).
Directs air to the floor of the
third row seating.
directs air to the overhead
registers of the second and third
row seating. The selected mode will illuminate on the temperature
control.
3.Fan control:Determines fan speed levels. Turn to REAR to give rear
seat passengers control of the rear auxiliary controls. Otherwise, the
front controls will determine the settings for the entire vehicle cabin. If
set to OFF, the front and rear auxiliary controls will not function.
Rear auxiliary controls:
Once the front auxiliary control is set to REAR, the rear seat passengers
may use the rear auxiliary controls in the overhead console to make the
desired adjustments.
1.Temperature control:
Determines temperature levels.
2.Mode selector:Press to select
between air flow to
(Floor)
or
(Panel).
Directs air to the floor of the
third row seating.
directs air to the overhead
registers of the second and third
row seating. The selected mode will illuminate on the temperature
control.
3.Fan control:Determines fan speed levels.
4 3 2
REAR0
31
2
4 3 2 1 0
31
2
Climate Controls
80
Page 101 of 336
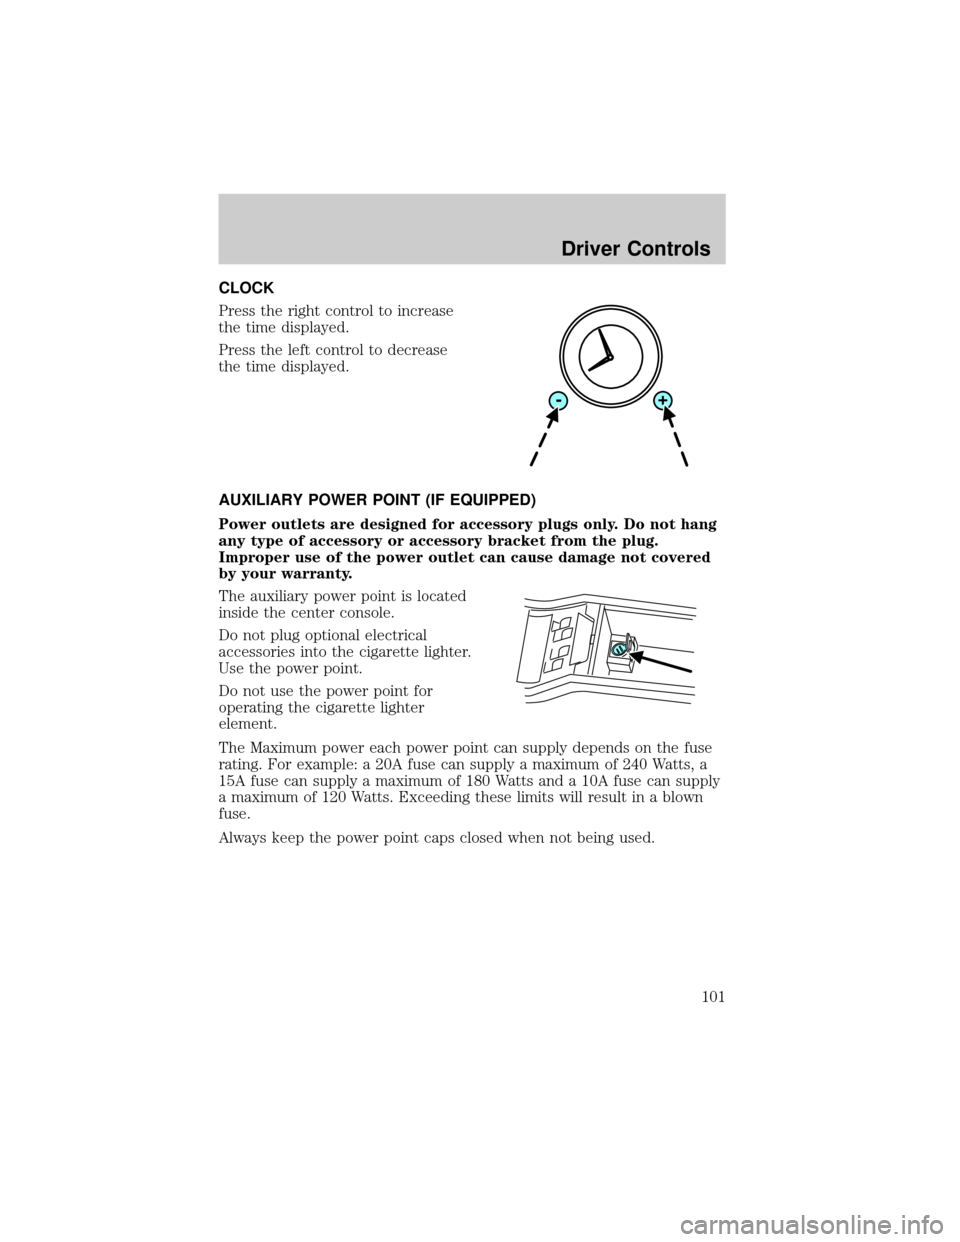
CLOCK
Press the right control to increase
the time displayed.
Press the left control to decrease
the time displayed.
AUXILIARY POWER POINT (IF EQUIPPED)
Power outlets are designed for accessory plugs only. Do not hang
any type of accessory or accessory bracket from the plug.
Improper use of the power outlet can cause damage not covered
by your warranty.
The auxiliary power point is located
inside the center console.
Do not plug optional electrical
accessories into the cigarette lighter.
Use the power point.
Do not use the power point for
operating the cigarette lighter
element.
The Maximum power each power point can supply depends on the fuse
rating. For example: a 20A fuse can supply a maximum of 240 Watts, a
15A fuse can supply a maximum of 180 Watts and a 10A fuse can supply
a maximum of 120 Watts. Exceeding these limits will result in a blown
fuse.
Always keep the power point caps closed when not being used.
Driver Controls
101
Page 102 of 336
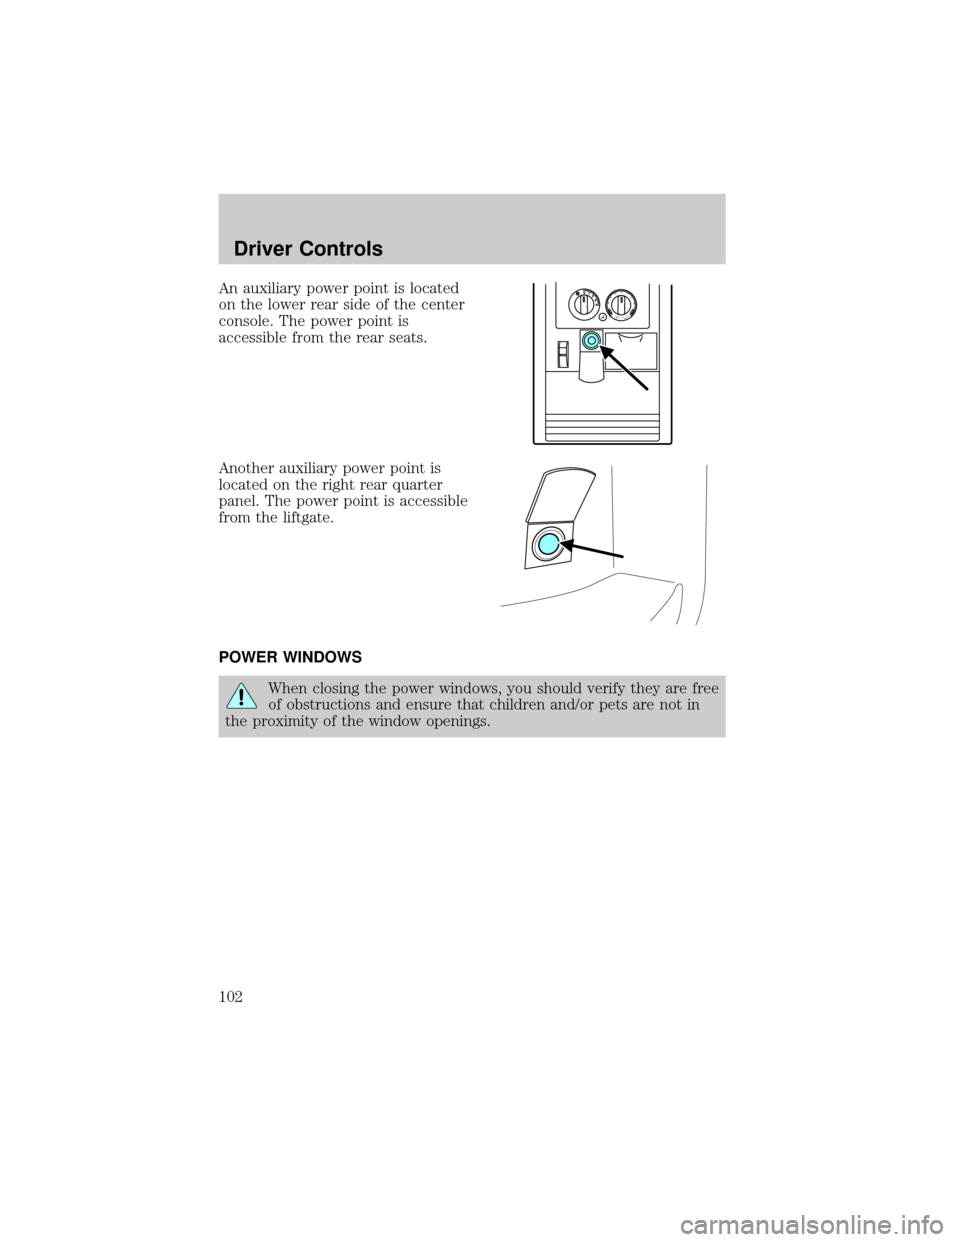
An auxiliary power point is located
on the lower rear side of the center
console. The power point is
accessible from the rear seats.
Another auxiliary power point is
located on the right rear quarter
panel. The power point is accessible
from the liftgate.
POWER WINDOWS
When closing the power windows, you should verify they are free
of obstructions and ensure that children and/or pets are not in
the proximity of the window openings.
Driver Controls
102
Page 236 of 336
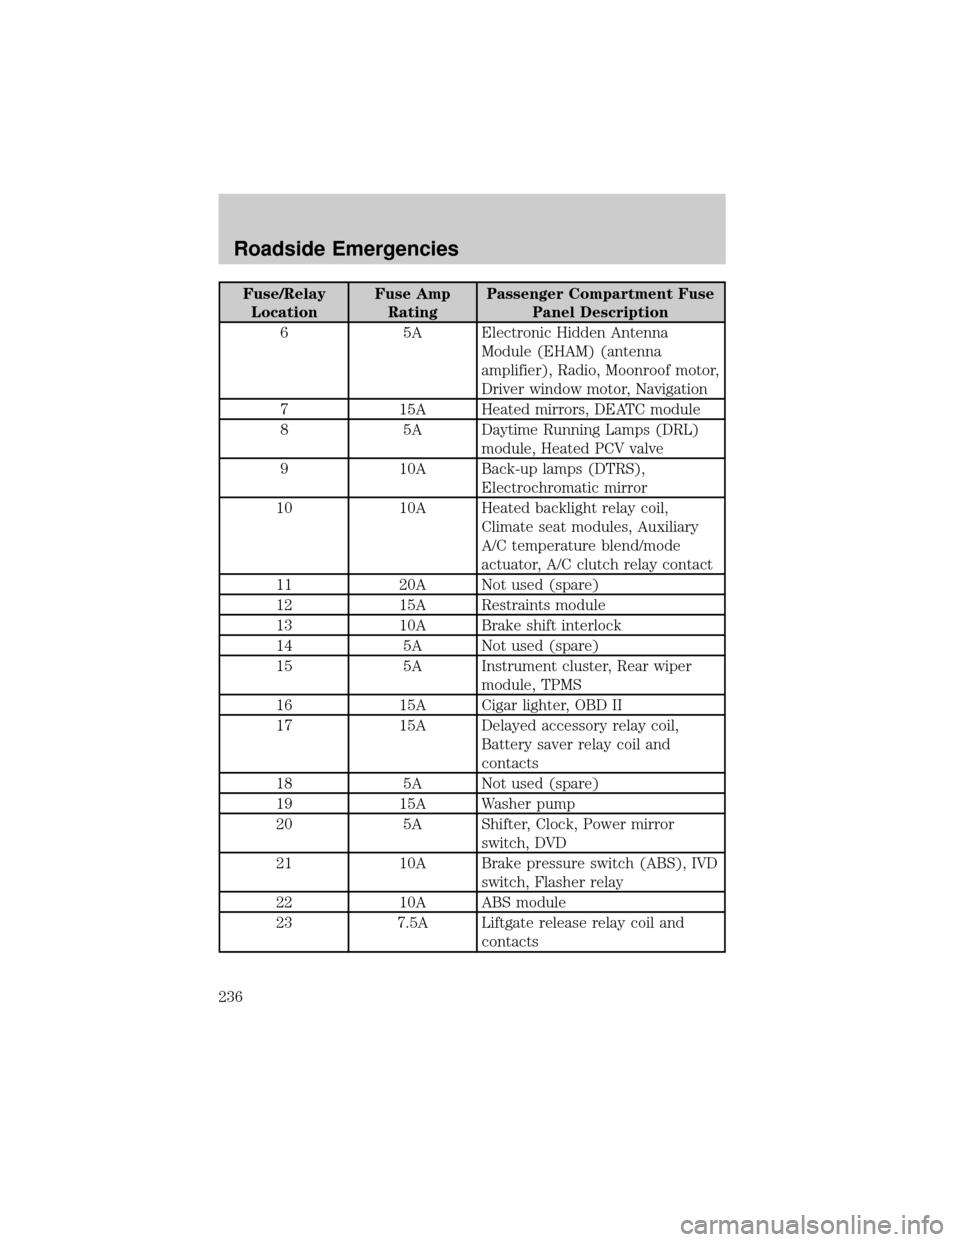
Fuse/Relay
LocationFuse Amp
RatingPassenger Compartment Fuse
Panel Description
6 5A Electronic Hidden Antenna
Module (EHAM) (antenna
amplifier), Radio, Moonroof motor,
Driver window motor, Navigation
7 15A Heated mirrors, DEATC module
8 5A Daytime Running Lamps (DRL)
module, Heated PCV valve
9 10A Back-up lamps (DTRS),
Electrochromatic mirror
10 10A Heated backlight relay coil,
Climate seat modules, Auxiliary
A/C temperature blend/mode
actuator, A/C clutch relay contact
11 20A Not used (spare)
12 15A Restraints module
13 10A Brake shift interlock
14 5A Not used (spare)
15 5A Instrument cluster, Rear wiper
module, TPMS
16 15A Cigar lighter, OBD II
17 15A Delayed accessory relay coil,
Battery saver relay coil and
contacts
18 5A Not used (spare)
19 15A Washer pump
20 5A Shifter, Clock, Power mirror
switch, DVD
21 10A Brake pressure switch (ABS), IVD
switch, Flasher relay
22 10A ABS module
23 7.5A Liftgate release relay coil and
contacts
Roadside Emergencies
236
Page 237 of 336
Fuse/Relay
LocationFuse Amp
RatingPassenger Compartment Fuse
Panel Description
24 30A Subwoofer, Navigation
25 5A Trailer tow battery charge relay
coil
26 5A SecuriLockytransceiver
27 5A Rear park assist, VAPS module
28 5A Radio, Navigation
29 10A DTRS, Feed to Fuse 28
30 5A Instrument cluster, Compass
module, Auxiliary A/C relay coil
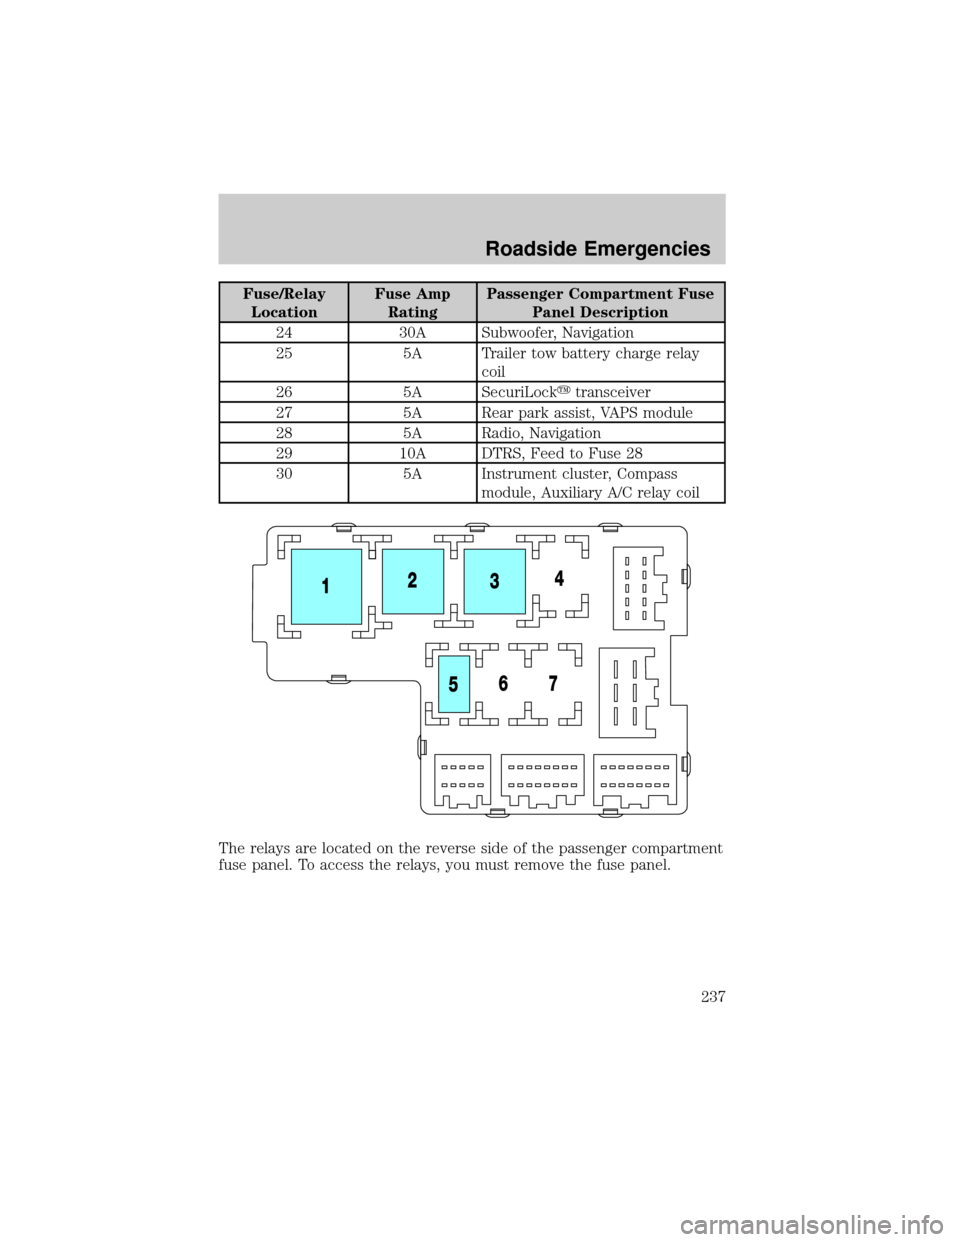
The relays are located on the reverse side of the passenger compartment
fuse panel. To access the relays, you must remove the fuse panel.
Roadside Emergencies
237
Page 240 of 336
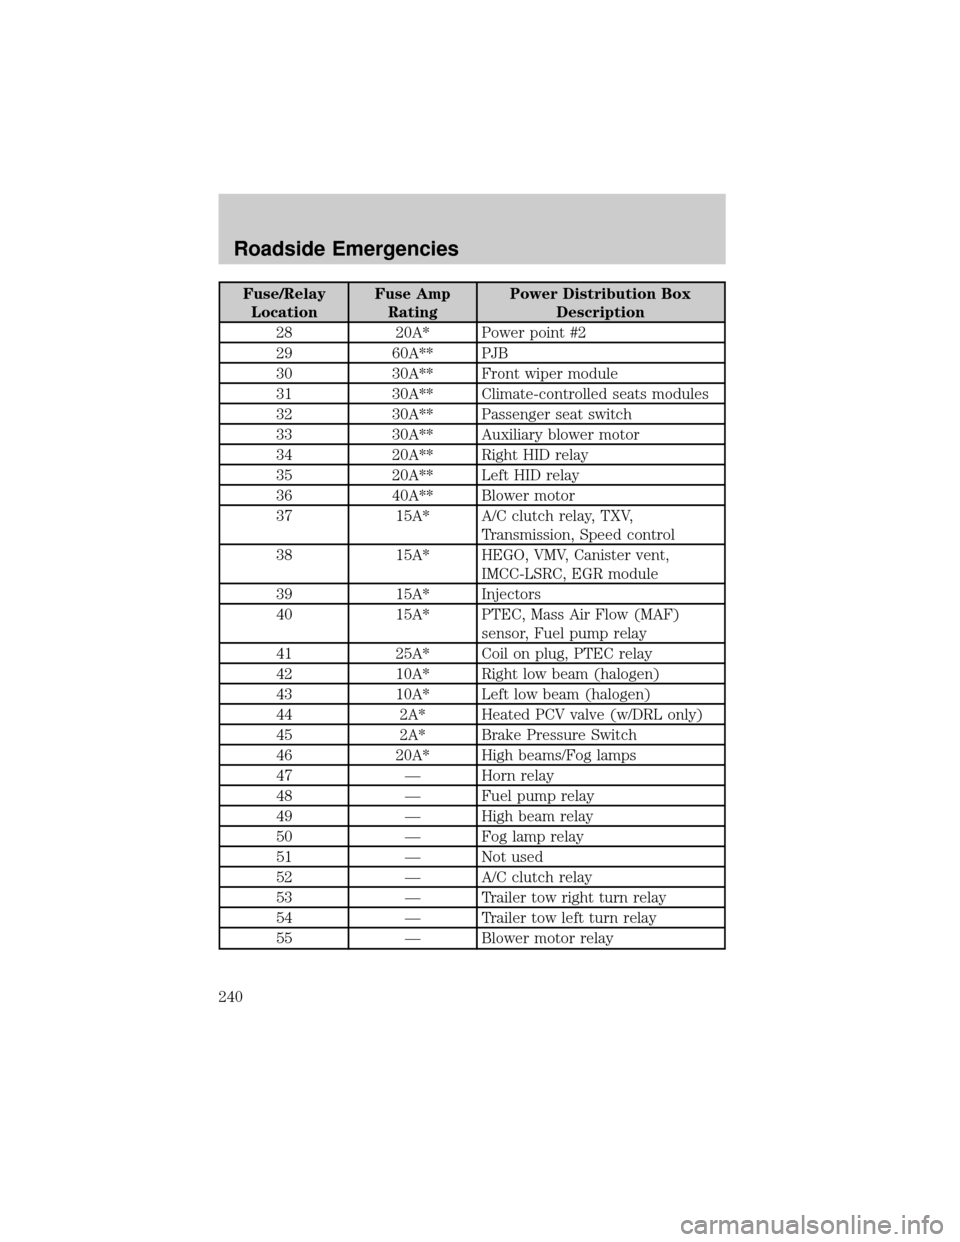
Fuse/Relay
LocationFuse Amp
RatingPower Distribution Box
Description
28 20A* Power point #2
29 60A** PJB
30 30A** Front wiper module
31 30A** Climate-controlled seats modules
32 30A** Passenger seat switch
33 30A** Auxiliary blower motor
34 20A** Right HID relay
35 20A** Left HID relay
36 40A** Blower motor
37 15A* A/C clutch relay, TXV,
Transmission, Speed control
38 15A* HEGO, VMV, Canister vent,
IMCC-LSRC, EGR module
39 15A* Injectors
40 15A* PTEC, Mass Air Flow (MAF)
sensor, Fuel pump relay
41 25A* Coil on plug, PTEC relay
42 10A* Right low beam (halogen)
43 10A* Left low beam (halogen)
44 2A* Heated PCV valve (w/DRL only)
45 2A* Brake Pressure Switch
46 20A* High beams/Fog lamps
47 Ð Horn relay
48 Ð Fuel pump relay
49 Ð High beam relay
50 Ð Fog lamp relay
51 Ð Not used
52 Ð A/C clutch relay
53 Ð Trailer tow right turn relay
54 Ð Trailer tow left turn relay
55 Ð Blower motor relay
Roadside Emergencies
240
Page 241 of 336
Fuse/Relay
LocationFuse Amp
RatingPower Distribution Box
Description
56 Ð Starter motor relay
57 Ð PTEC relay
58 Ð Ignition relay
59 Ð Driver brake applied relay
60 Ð PCM diode
61 Ð A/C clutch diode
62 30A*** Power windows
* Mini Fuses ** Maxi Cartridge Fuses *** Circuit breaker
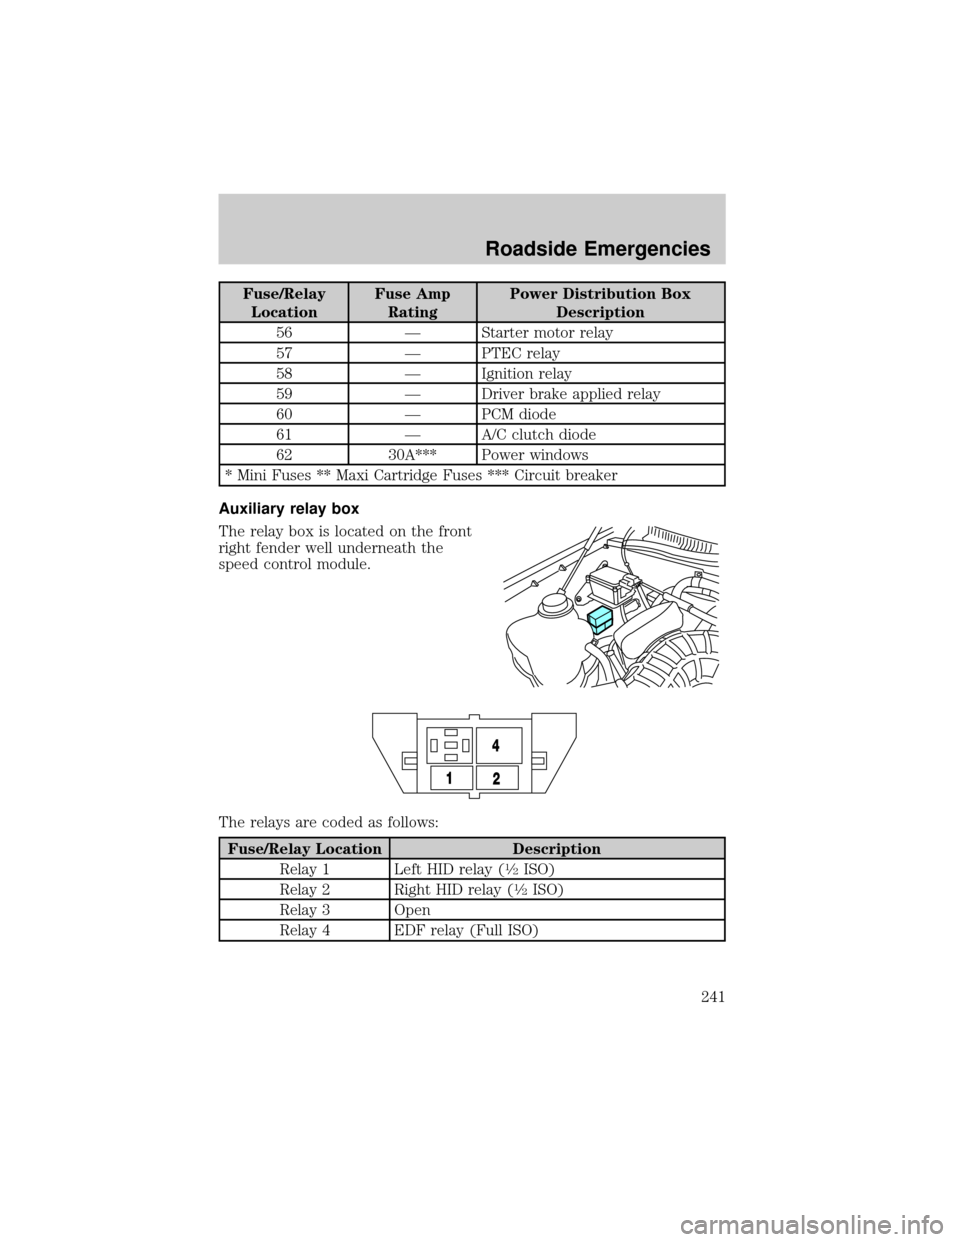
Auxiliary relay box
The relay box is located on the front
right fender well underneath the
speed control module.
The relays are coded as follows:
Fuse/Relay Location Description
Relay 1 Left HID relay (
1¤2ISO)
Relay 2 Right HID relay (
1¤2ISO)
Relay 3 Open
Relay 4 EDF relay (Full ISO)
Roadside Emergencies
241
Page 314 of 336
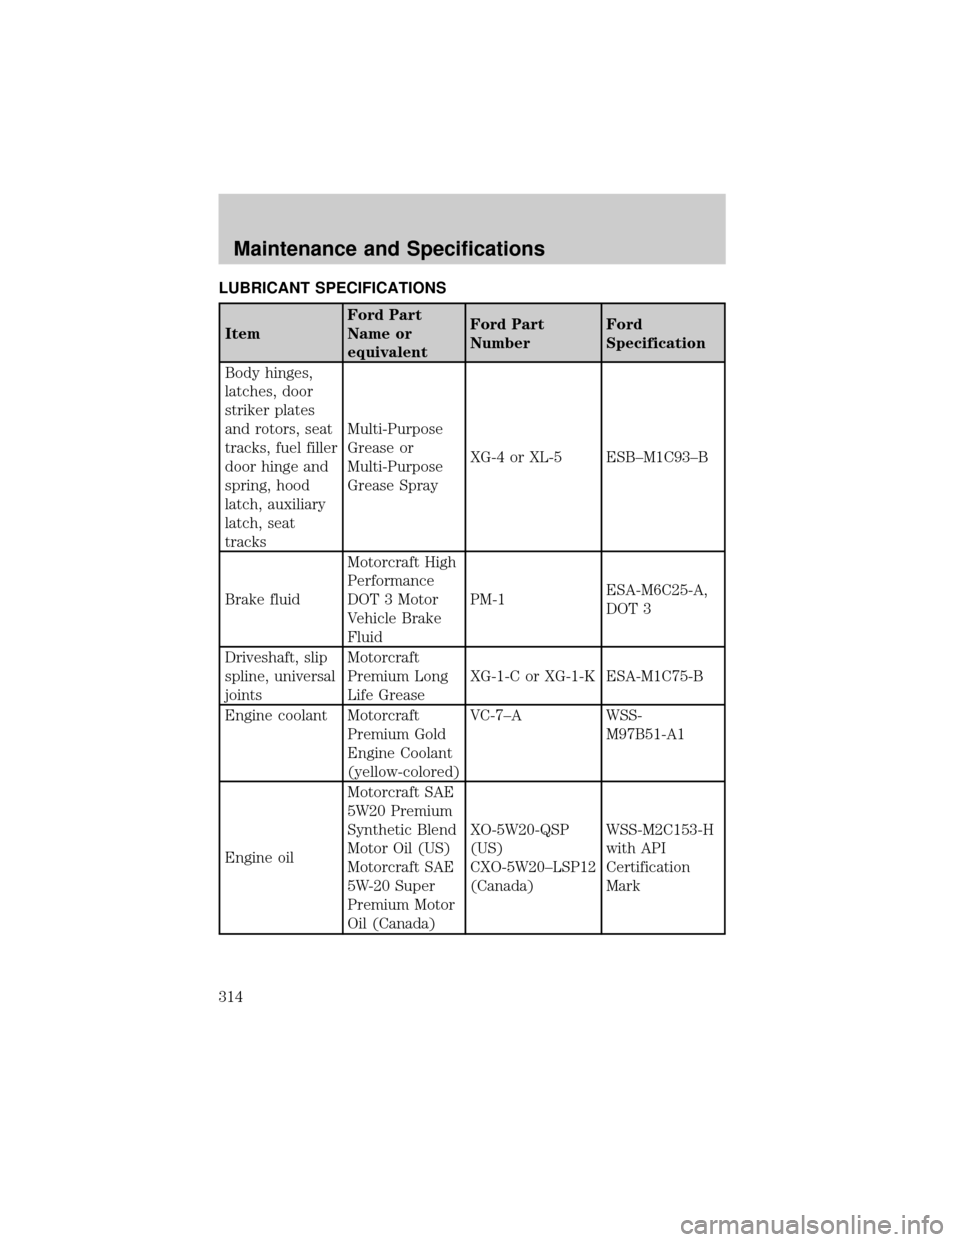
LUBRICANT SPECIFICATIONS
ItemFord Part
Name or
equivalentFord Part
NumberFord
Specification
Body hinges,
latches, door
striker plates
and rotors, seat
tracks, fuel filler
door hinge and
spring, hood
latch, auxiliary
latch, seat
tracksMulti-Purpose
Grease or
Multi-Purpose
Grease SprayXG-4 or XL-5 ESB±M1C93±B
Brake fluidMotorcraft High
Performance
DOT 3 Motor
Vehicle Brake
FluidPM-1ESA-M6C25-A,
DOT 3
Driveshaft, slip
spline, universal
jointsMotorcraft
Premium Long
Life GreaseXG-1-C or XG-1-K ESA-M1C75-B
Engine coolant Motorcraft
Premium Gold
Engine Coolant
(yellow-colored)VC-7±A WSS-
M97B51-A1
Engine oilMotorcraft SAE
5W20 Premium
Synthetic Blend
Motor Oil (US)
Motorcraft SAE
5W-20 Super
Premium Motor
Oil (Canada)XO-5W20-QSP
(US)
CXO-5W20±LSP12
(Canada)WSS-M2C153-H
with API
Certification
Mark
Maintenance and Specifications
314