buttons LINCOLN AVIATOR 2023 Owners Manual
[x] Cancel search | Manufacturer: LINCOLN, Model Year: 2023, Model line: AVIATOR, Model: LINCOLN AVIATOR 2023Pages: 681, PDF Size: 9.33 MB
Page 88 of 681
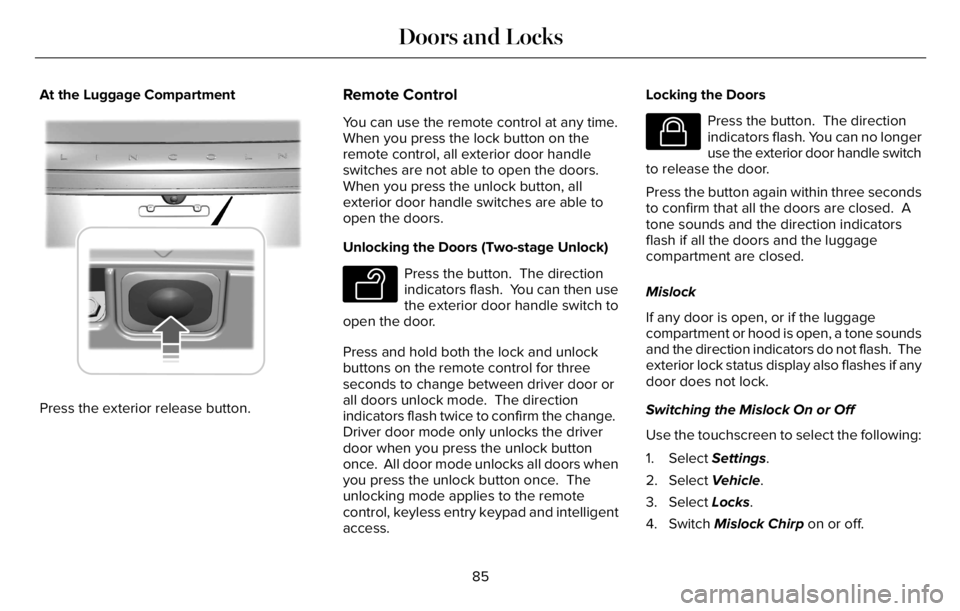
At the Luggage Compartment
E291416E291416
Press the exterior release button.
Remote Control
You can use the remote control at any time.
When you press the lock button on the
remote control, all exterior door handle
switches are not able to open the doors.
When you press the unlock button, all
exterior door handle switches are able to
open the doors.
Unlocking the Doors (Two-stage Unlock)
E138629
Press the button. The direction
indicators flash. You can then use
the exterior door handle switch to
open the door.
Press and hold both the lock and unlock
buttons on the remote control for three
seconds to change between driver door or
all doors unlock mode. The direction
indicators flash twice to confirm the change.
Driver door mode only unlocks the driver
door when you press the unlock button
once. All door mode unlocks all doors when
you press the unlock button once. The
unlocking mode applies to the remote
control, keyless entry keypad and intelligent
access.Locking the Doors
E138623
Press the button. The direction
indicators flash. You can no longer
use the exterior door handle switch
to release the door.
Press the button again within three seconds
to confirm that all the doors are closed. A
tone sounds and the direction indicators
flash if all the doors and the luggage
compartment are closed.
Mislock
If any door is open, or if the luggage
compartment or hood is open, a tone sounds
and the direction indicators do not flash. The
exterior lock status display also flashes if any
door does not lock.
Switching the Mislock On or Off
Use the touchscreen to select the following:
1. Select Settings.
2. Select Vehicle.
3. Select Locks.
4. Switch Mislock Chirp on or off.
85
Doors and Locks
Page 115 of 681
Push the lever away from you to
switch the high beam on.
Push the lever forward again or pull the lever
toward you to switch the high beams off.
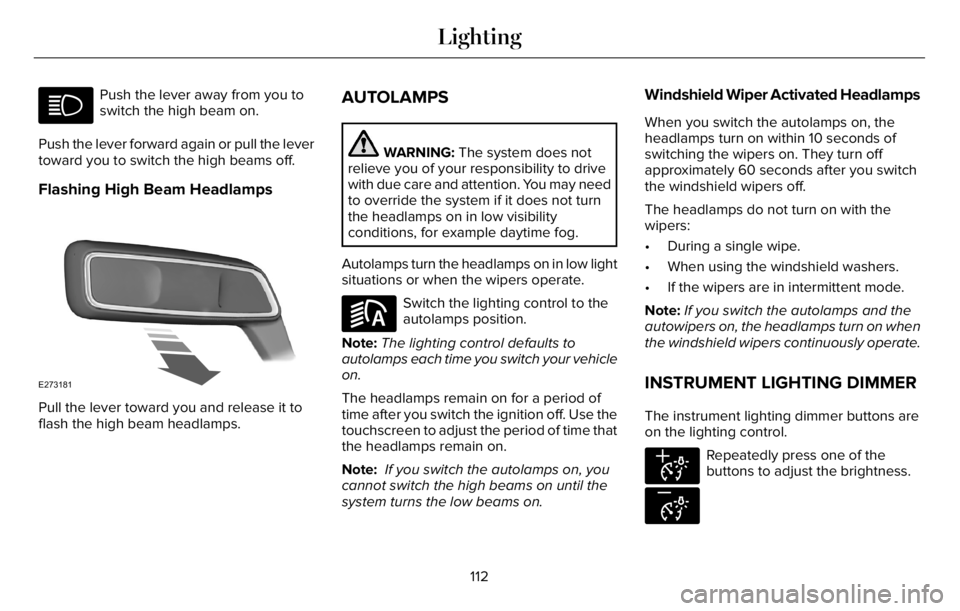
Flashing High Beam Headlamps
E273181
Pull the lever toward you and release it to
flash the high beam headlamps.
AUTOLAMPS
WARNING: The system does not
relieve you of your responsibility to drive
with due care and attention. You may need
to override the system if it does not turn
the headlamps on in low visibility
conditions, for example daytime fog.
Autolamps turn the headlamps on in low light
situations or when the wipers operate.
E281240
Switch the lighting control to the
autolamps position.
Note:The lighting control defaults to
autolamps each time you switch your vehicle
on.
The headlamps remain on for a period of
time after you switch the ignition off. Use the
touchscreen to adjust the period of time that
the headlamps remain on.
Note: If you switch the autolamps on, you
cannot switch the high beams on until the
system turns the low beams on.
Windshield Wiper Activated Headlamps
When you switch the autolamps on, the
headlamps turn on within 10 seconds of
switching the wipers on. They turn off
approximately 60 seconds after you switch
the windshield wipers off.
The headlamps do not turn on with the
wipers:
• During a single wipe.
• When using the windshield washers.
• If the wipers are in intermittent mode.
Note:If you switch the autolamps and the
autowipers on, the headlamps turn on when
the windshield wipers continuously operate.
INSTRUMENT LIGHTING DIMMER
The instrument lighting dimmer buttons are
on the lighting control.
E291299
E296433
Repeatedly press one of the
buttons to adjust the brightness.
112
Lighting
Page 173 of 681
Selecting a Row
Press 2nd Row to control the second row
climate.
Press 3rd Row to control the third row
climate.
Linking the Rows
E282078
Press the button to simultaneously
control the climate of the second
and third row.
Setting the Rear Blower Motor Speed
Press the arrow buttons to adjust
the volume of air circulated in the
rear passenger compartment.
Setting the Rear Temperature
Press the arrow buttons to set the
temperature in the rear passenger
compartment.
Switching the Rear Climate Control On
and Off
Press the button to switch the
selected row controls on or off.
Note:When linked, touch the button to
switch both rows on or off.
Directing Air to the Overhead and Rear
Footwell Air Vents
Press the button to activate the
selection screen.
E244097Press the button to direct airflow
to the overhead air vents.
Press the button to direct airflow
to the rear footwell air vents.
Switching Rear Auto Mode On and Off
Press AUTO switch on rear automatic
operation, then set the temperature.
Rear Climate Control Lock Message
A message displays when the controls are
locked through the front and you try to
operate them.
REAR PASSENGER CLIMATE
CONTROLS - VEHICLES WITH:
TRIPLE ZONE AUTOMATIC
TEMPERATURE CONTROL
Use the rear passenger touchscreen to
select the following:
E283811
Press the climate button on the
feature bar to access the rear
passenger climate control screen.
170
Climate Control
Page 174 of 681
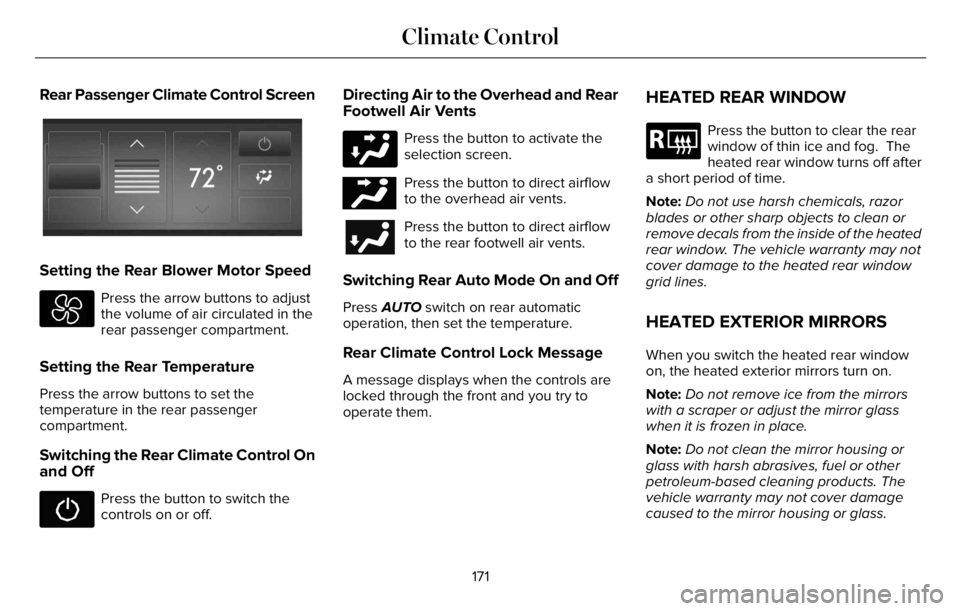
Rear Passenger Climate Control Screen
E368025E368025
Setting the Rear Blower Motor Speed
Press the arrow buttons to adjust
the volume of air circulated in the
rear passenger compartment.
Setting the Rear Temperature
Press the arrow buttons to set the
temperature in the rear passenger
compartment.
Switching the Rear Climate Control On
and Off
Press the button to switch the
controls on or off.
Directing Air to the Overhead and Rear
Footwell Air Vents
Press the button to activate the
selection screen.
E244097Press the button to direct airflow
to the overhead air vents.
Press the button to direct airflow
to the rear footwell air vents.
Switching Rear Auto Mode On and Off
Press AUTO switch on rear automatic
operation, then set the temperature.
Rear Climate Control Lock Message
A message displays when the controls are
locked through the front and you try to
operate them.
HEATED REAR WINDOW
E184884
Press the button to clear the rear
window of thin ice and fog. The
heated rear window turns off after
a short period of time.
Note:Do not use harsh chemicals, razor
blades or other sharp objects to clean or
remove decals from the inside of the heated
rear window. The vehicle warranty may not
cover damage to the heated rear window
grid lines.
HEATED EXTERIOR MIRRORS
When you switch the heated rear window
on, the heated exterior mirrors turn on.
Note:Do not remove ice from the mirrors
with a scraper or adjust the mirror glass
when it is frozen in place.
Note:Do not clean the mirror housing or
glass with harsh abrasives, fuel or other
petroleum-based cleaning products. The
vehicle warranty may not cover damage
caused to the mirror housing or glass.
171
Climate Control
Page 180 of 681
HEAD RESTRAINTS
WARNING: Fully adjust the head
restraint before you sit in or operate your
vehicle. This will help minimize the risk of
neck injury in the event of a crash. Do not
adjust the head restraint when your vehicle
is moving.
WARNING: The head restraint is a
safety device. Whenever possible it should
be installed and properly adjusted when
the seat is occupied. Failure to adjust the
head restraint properly could reduce its
effectiveness during certain impacts.
Note:Adjust the seat backrest to an upright
driving position before adjusting the head
restraint. Adjust the head restraint so that
the top of it is level with the top of your head
and as far forward as possible. Make sure
that you remain comfortable. If you are
extremely tall, adjust the head restraint to
its highest position.
Adjusting the Head Restraints
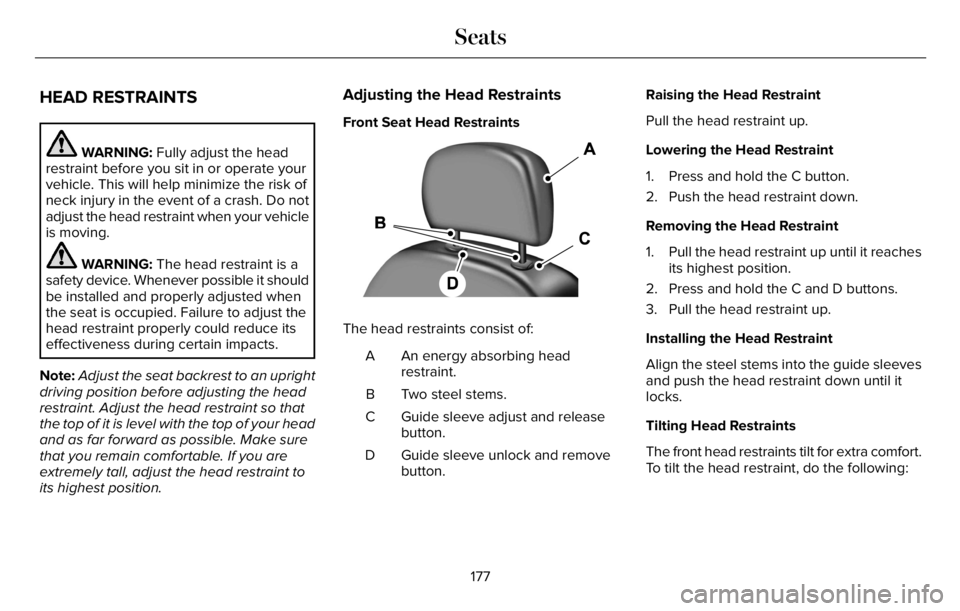
Front Seat Head Restraints
The head restraints consist of:
An energy absorbing head
restraint. A
Two steel stems. B
Guide sleeve adjust and release
button. C
Guide sleeve unlock and remove
button. DRaising the Head Restraint
Pull the head restraint up.
Lowering the Head Restraint
1. Press and hold the C button.
2. Push the head restraint down.
Removing the Head Restraint
1. Pull the head restraint up until it reaches
its highest position.
2. Press and hold the C and D buttons.
3. Pull the head restraint up.
Installing the Head Restraint
Align the steel stems into the guide sleeves
and push the head restraint down until it
locks.
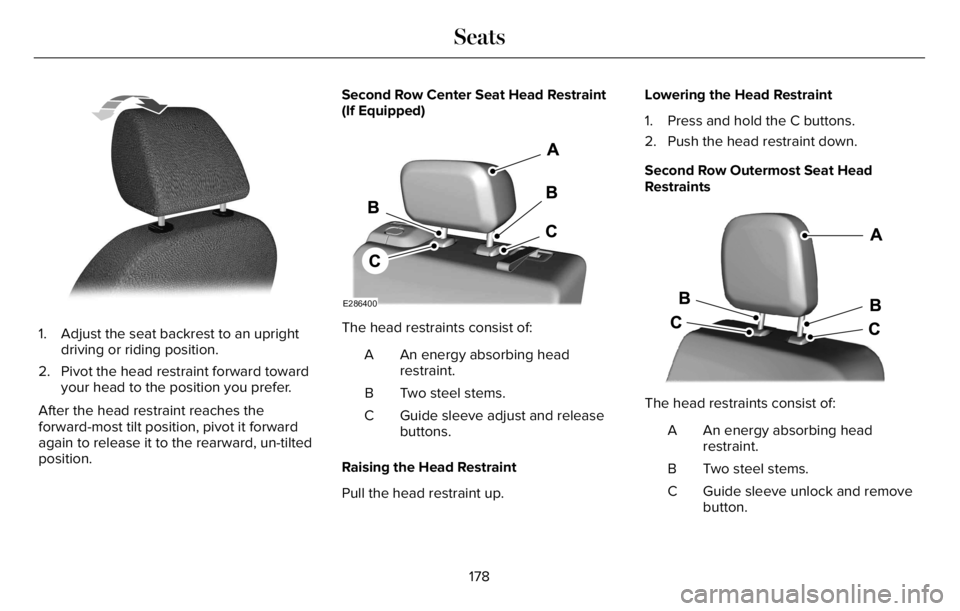
Tilting Head Restraints
The front head restraints tilt for extra comfort.
To tilt the head restraint, do the following:
177
Seats
Page 181 of 681
E144727
1. Adjust the seat backrest to an upright
driving or riding position.
2. Pivot the head restraint forward toward
your head to the position you prefer.
After the head restraint reaches the
forward-most tilt position, pivot it forward
again to release it to the rearward, un-tilted
position.Second Row Center Seat Head Restraint
(If Equipped)
E286400
The head restraints consist of:
An energy absorbing head
restraint. A
Two steel stems. B
Guide sleeve adjust and release
buttons. C
Raising the Head Restraint
Pull the head restraint up.Lowering the Head Restraint
1. Press and hold the C buttons.
2. Push the head restraint down.
Second Row Outermost Seat Head
Restraints
E3333322253E333332222253222222222222253222253225332253232533225333225353
The head restraints consist of:
An energy absorbing head
restraint. A
Two steel stems. B
Guide sleeve unlock and remove
button. C
178
Seats
Page 182 of 681
Removing the Head Restraint
1. Press and hold the C buttons.
2. Pull the head restraint up.
Installing the Head Restraint
Align the steel stems into the guide sleeves
and push the head restraint down until it
locks.
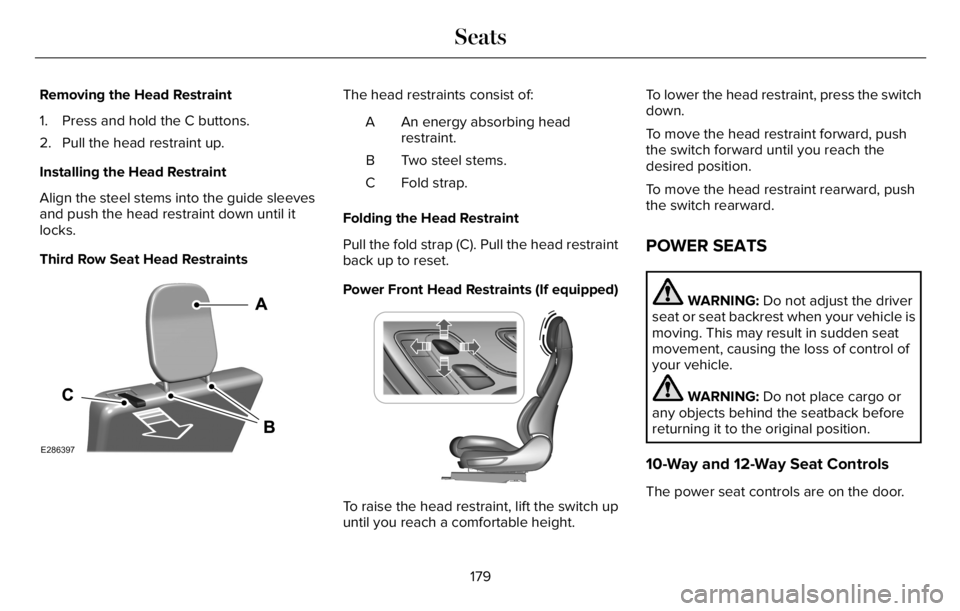
Third Row Seat Head Restraints
E286397
The head restraints consist of:
An energy absorbing head
restraint. A
Two steel stems. B
Fold strap. C
Folding the Head Restraint
Pull the fold strap (C). Pull the head restraint
back up to reset.
Power Front Head Restraints (If equipped)
E222280
To raise the head restraint, lift the switch up
until you reach a comfortable height.To lower the head restraint, press the switch
down.
To move the head restraint forward, push
the switch forward until you reach the
desired position.
To move the head restraint rearward, push
the switch rearward.
POWER SEATS
WARNING: Do not adjust the driver
seat or seat backrest when your vehicle is
moving. This may result in sudden seat
movement, causing the loss of control of
your vehicle.
WARNING: Do not place cargo or
any objects behind the seatback before
returning it to the original position.
10-Way and 12-Way Seat Controls
The power seat controls are on the door.
179
Seats
Page 193 of 681
Adjusting the Third Row Power Seats
WARNING: Do not fold a seat if it is
occupied. Failure to follow this instruction
could result in personal injury.
WARNING: Do not place cargo or
any objects behind the seatback before
returning it to the original position.
WARNING: Do not drive your vehicle
with a seat that is unlatched or in the
folded position. Failure to follow this
instruction could result in personal injury
or death in the event of a sudden stop or
crash.
Note:The power rear seat functions disable
10 minutes after you switch the ignition off.
The transmission must be in park (P) and the
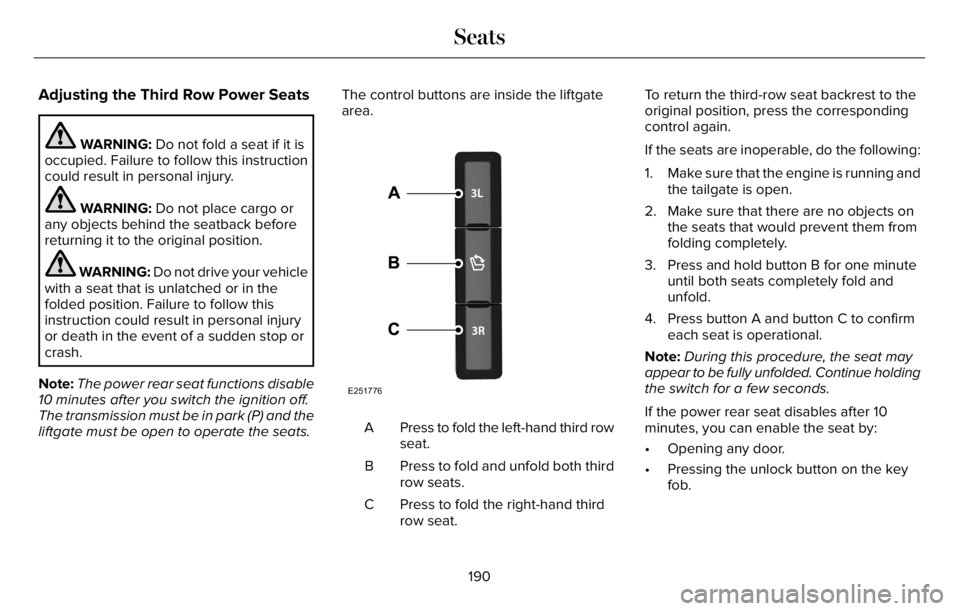
liftgate must be open to operate the seats.The control buttons are inside the liftgate
area.
E251776
Press to fold the left-hand third row
seat. A
Press to fold and unfold both third
row seats. B
Press to fold the right-hand third
row seat. CTo return the third-row seat backrest to the
original position, press the corresponding
control again.
If the seats are inoperable, do the following:
1. Make sure that the engine is running and
the tailgate is open.
2. Make sure that there are no objects on
the seats that would prevent them from
folding completely.
3. Press and hold button B for one minute
until both seats completely fold and
unfold.
4. Press button A and button C to confirm
each seat is operational.
Note:During this procedure, the seat may
appear to be fully unfolded. Continue holding
the switch for a few seconds.
If the power rear seat disables after 10
minutes, you can enable the seat by:
• Opening any door.
• Pressing the unlock button on the key
fob.
190
Seats
Page 199 of 681
FCC and RSS-210 Industry Canada
Compliance
WARNING: Changes or modifications
not expressively approved by the party
responsible for compliance could void the
user's authority to operate the equipment.
The term "IC:" before the radio certification
number only signifies that Industry Canada
technical specifications were met.
This device complies with Part 15 of the FCC
Rules and with RSS-210 of Industry Canada.
Operation is subject to the following two
conditions: (1) this device may not cause
harmful interference, and (2) this device must
accept any interference received, including
interference that may cause undesired
operation.This equipment complies with FCC radiation
exposure limits set forth for an uncontrolled
environment. End Users must follow the
specific operating instructions for satisfying
RF exposure compliance. This transmitter
must be at least 8 in (20 cm) from the user
and must not be co-located or operating in
conjunction with any other antenna or
transmitter.
PROGRAMMING THE GARAGE
DOOR OPENER
To clear all stored codes in the garage door
opener in your vehicle, use the clear
function. To override one button, use the
reprogram function.
Note:Make sure that the garage door and
security device are free from obstruction
when you are programming. Do not program
the system with the vehicle in the garage.
Clearing the Garage Door Opener
E188213E188213
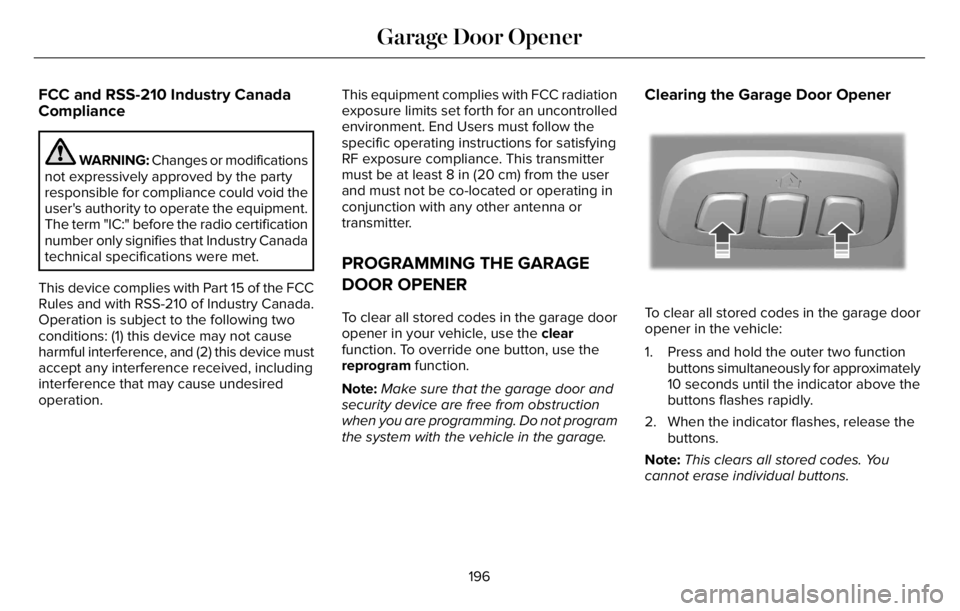
To clear all stored codes in the garage door
opener in the vehicle:
1. Press and hold the outer two function
buttons simultaneously for approximately
10 seconds until the indicator above the
buttons flashes rapidly.
2. When the indicator flashes, release the
buttons.
Note:This clears all stored codes. You
cannot erase individual buttons.
196
Garage Door Opener
Page 200 of 681
Note:You can program a maximum of three
devices. To change or replace any of the
three devices after they have been initially
programmed, you must either clear all codes,
or reprogram each individual button.
Note:We recommend that upon the sale or
lease termination of your vehicle, you erase
the programmed function buttons for security
reasons.
Reprogramming the Garage Door
Opener
If a button on your garage door opener has
already been programmed, you can override
it. To program a device to a previously
trained button:
1. Press and hold the desired button for
approximately 20 seconds until the
indicator begins to flash.
2. Without releasing the button, proceed to
Step 3 of Programming the Garage Door
Opener to your Handheld Transmitter.
Programming the Garage Door Opener
to your Handheld Transmitter
Note:The programming steps below assume
you are programming a HomeLink that was
not previously programmed. If your
HomeLink was previously programmed, you
may need to clear or reprogram your
HomeLink buttons.
Note:Put a new battery in the handheld
transmitter. This allows for quicker training
and accurate transmission of the
radio-frequency signal.
Note:Make sure that the garage door and
security device are free from obstruction
when you are programming. Do not program
the system with the vehicle in the garage.
E188213E188213
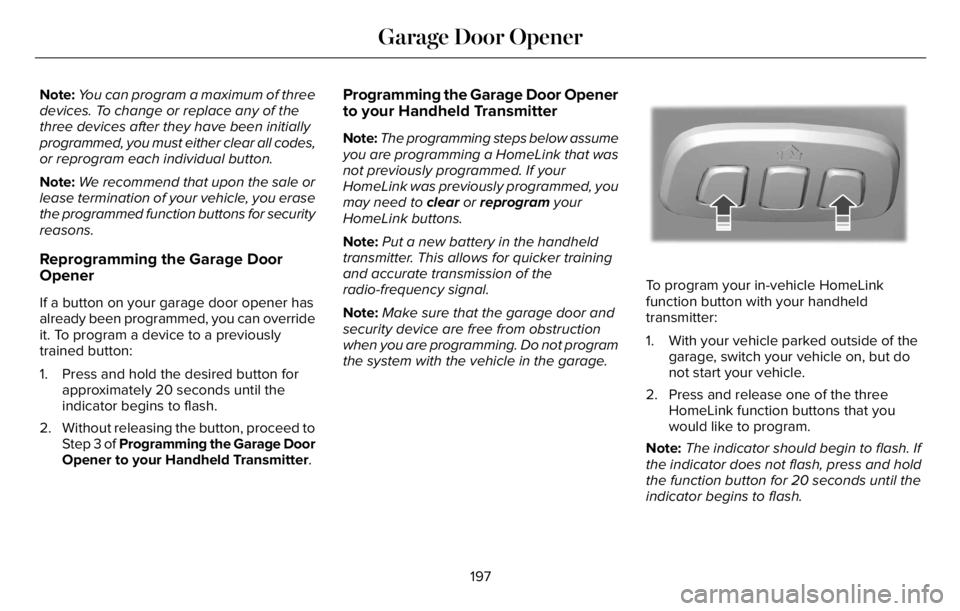
To program your in-vehicle HomeLink
function button with your handheld
transmitter:
1. With your vehicle parked outside of the
garage, switch your vehicle on, but do
not start your vehicle.
2. Press and release one of the three
HomeLink function buttons that you
would like to program.
Note:The indicator should begin to flash. If
the indicator does not flash, press and hold
the function button for 20 seconds until the
indicator begins to flash.
197
Garage Door Opener