check oil LINCOLN MKC 2018 Owners Manual
[x] Cancel search | Manufacturer: LINCOLN, Model Year: 2018, Model line: MKC, Model: LINCOLN MKC 2018Pages: 571, PDF Size: 4.39 MB
Page 7 of 571
Using Cruise Control..................................209
Using Adaptive Cruise Control.................210
Driving Aids
Driver Alert.....................................................217
Lane Keeping System.................................219
Blind Spot Information System................224
Cross Traffic Alert........................................226
Steering.........................................................230
Collision Warning System..........................231
Drive Control................................................234
Load Carrying
Rear Under Floor Storage.........................236
Luggage Covers..........................................236
Roof Racks and Load Carriers.................236
Load Limit......................................................237
Towing
Towing a Trailer............................................242
Trailer Sway Control...................................243
Recommended Towing Weights.............243
Essential Towing Checks..........................246
Towing the Vehicle on Four Wheels......248
Driving Hints
Breaking-In...................................................250
Economical Driving.....................................250
Driving Through Water...............................251
Floor Mats......................................................251
Roadside Emergencies
Roadside Assistance..................................253
Hazard Flashers..........................................254
Fuel Shutoff..................................................254
Jump Starting the Vehicle.........................255
Post-Crash Alert System...........................258
Transporting the Vehicle...........................258
Customer Assistance
Getting the Services You Need...............260
In California (U.S. Only)...............................261
The Better Business Bureau (BBB) AutoLine Program (U.S. Only).......................262
Utilizing the Mediation/Arbitration Program(Canada Only)..........................................263
Getting Assistance Outside the U.S. andCanada......................................................264
Ordering Additional Owner's Literature......................................................................266
Reporting Safety Defects (U.S. Only)......266
Reporting Safety Defects (Canada Only)......................................................................267
Fuses
Fuse Specification Chart...........................268
Changing a Fuse.........................................283
Maintenance
General Information...................................286
Opening and Closing the Hood..............286
Under Hood Overview...............................287
Engine Oil Dipstick.....................................289
Engine Oil Check........................................289
Oil Change Indicator Reset......................290
Engine Coolant Check................................291
Automatic Transmission Fluid Check.....295
Brake Fluid Check......................................295
Washer Fluid Check...................................295
Fuel Filter......................................................296
4
MKC (TME) Canada/United States of America, JJ7J 19A321 AA enUSA, Edition date: 201707, Second Printing
Table of Contents
Page 11 of 571
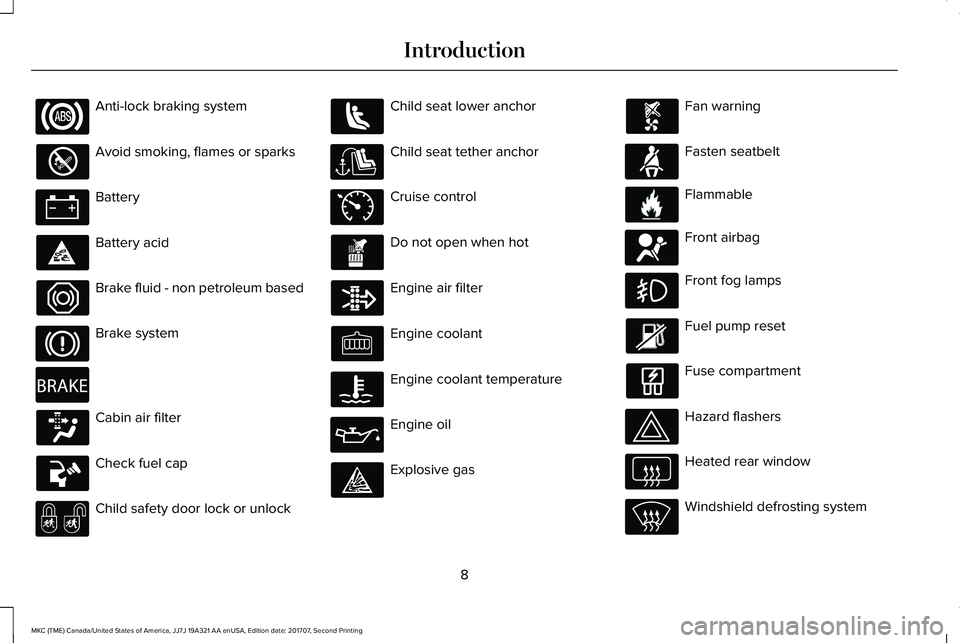
Anti-lock braking system
Avoid smoking, flames or sparks
Battery
Battery acid
Brake fluid - non petroleum based
Brake system
Cabin air filter
Check fuel cap
Child safety door lock or unlock
Child seat lower anchor
Child seat tether anchor
Cruise control
Do not open when hot
Engine air filter
Engine coolant
Engine coolant temperature
Engine oil
Explosive gas
Fan warning
Fasten seatbelt
Flammable
Front airbag
Front fog lamps
Fuel pump reset
Fuse compartment
Hazard flashers
Heated rear window
Windshield defrosting system
8
MKC (TME) Canada/United States of America, JJ7J 19A321 AA enUSA, Edition date: 201707, Second Printing
Introduction E270480 E71340 E71880 E231160 E67017
Page 110 of 571
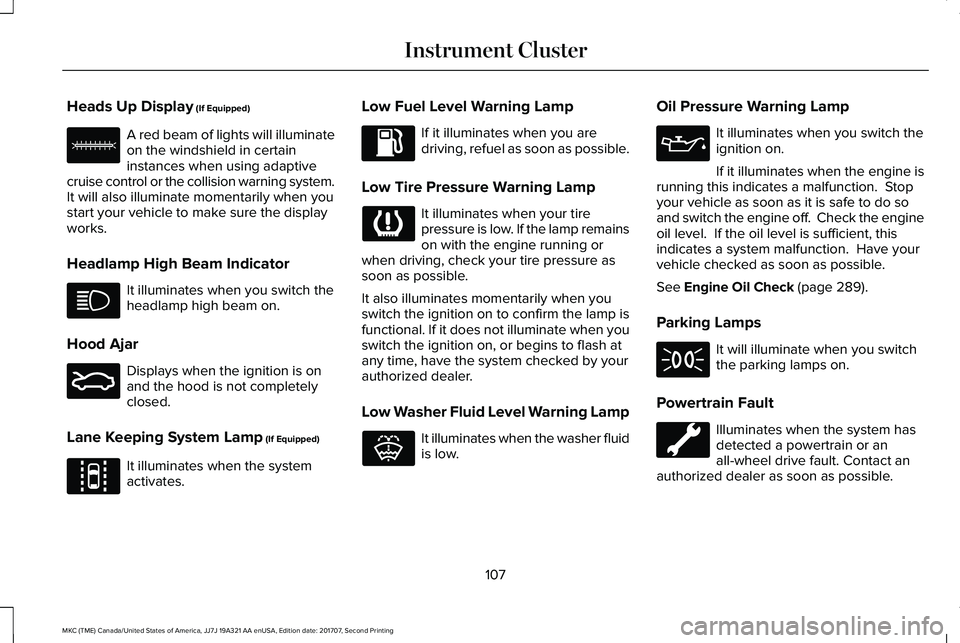
Heads Up Display (If Equipped)
A red beam of lights will illuminateon the windshield in certaininstances when using adaptivecruise control or the collision warning system.It will also illuminate momentarily when youstart your vehicle to make sure the displayworks.
Headlamp High Beam Indicator
It illuminates when you switch theheadlamp high beam on.
Hood Ajar
Displays when the ignition is onand the hood is not completelyclosed.
Lane Keeping System Lamp (If Equipped)
It illuminates when the systemactivates.
Low Fuel Level Warning Lamp
If it illuminates when you aredriving, refuel as soon as possible.
Low Tire Pressure Warning Lamp
It illuminates when your tirepressure is low. If the lamp remainson with the engine running orwhen driving, check your tire pressure assoon as possible.
It also illuminates momentarily when youswitch the ignition on to confirm the lamp isfunctional. If it does not illuminate when youswitch the ignition on, or begins to flash atany time, have the system checked by yourauthorized dealer.
Low Washer Fluid Level Warning Lamp
It illuminates when the washer fluidis low.
Oil Pressure Warning Lamp
It illuminates when you switch theignition on.
If it illuminates when the engine isrunning this indicates a malfunction. Stopyour vehicle as soon as it is safe to do soand switch the engine off. Check the engineoil level. If the oil level is sufficient, thisindicates a system malfunction. Have yourvehicle checked as soon as possible.
See Engine Oil Check (page 289).
Parking Lamps
It will illuminate when you switchthe parking lamps on.
Powertrain Fault
Illuminates when the system hasdetected a powertrain or anall-wheel drive fault. Contact anauthorized dealer as soon as possible.
107
MKC (TME) Canada/United States of America, JJ7J 19A321 AA enUSA, Edition date: 201707, Second Printing
Instrument ClusterE156133 E159324 E144813 E132353
Page 127 of 571
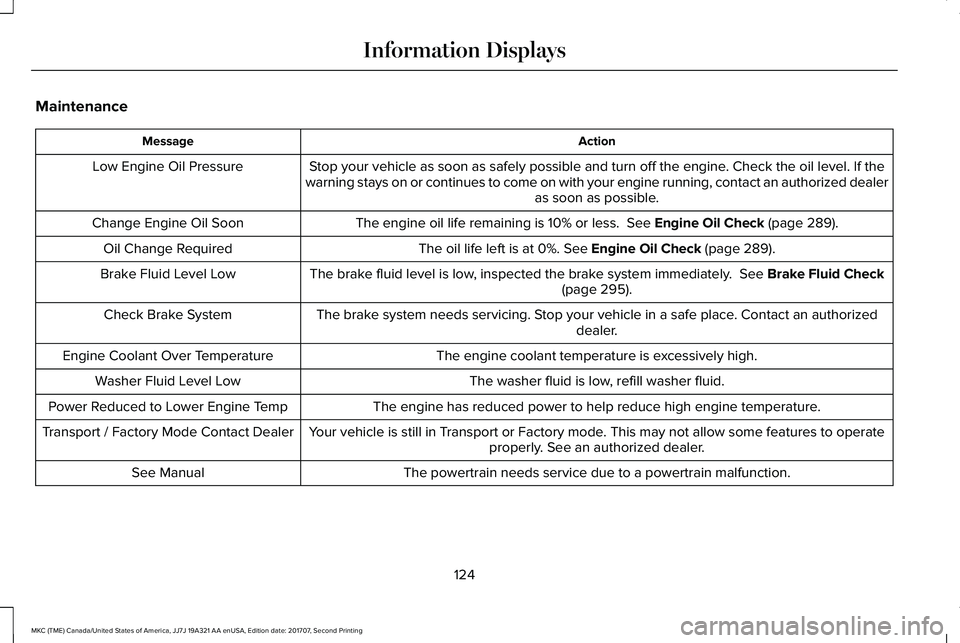
Maintenance
ActionMessage
Stop your vehicle as soon as safely possible and turn off the engine. Check the oil level. If thewarning stays on or continues to come on with your engine running, contact an authorized dealeras soon as possible.
Low Engine Oil Pressure
The engine oil life remaining is 10% or less. See Engine Oil Check (page 289).Change Engine Oil Soon
The oil life left is at 0%. See Engine Oil Check (page 289).Oil Change Required
The brake fluid level is low, inspected the brake system immediately. See Brake Fluid Check(page 295).Brake Fluid Level Low
The brake system needs servicing. Stop your vehicle in a safe place. Contact an authorizeddealer.Check Brake System
The engine coolant temperature is excessively high.Engine Coolant Over Temperature
The washer fluid is low, refill washer fluid.Washer Fluid Level Low
The engine has reduced power to help reduce high engine temperature.Power Reduced to Lower Engine Temp
Your vehicle is still in Transport or Factory mode. This may not allow some features to operateproperly. See an authorized dealer.Transport / Factory Mode Contact Dealer
The powertrain needs service due to a powertrain malfunction.See Manual
124
MKC (TME) Canada/United States of America, JJ7J 19A321 AA enUSA, Edition date: 201707, Second Printing
Information Displays
Page 175 of 571
•An open or pinched sensor hose.
•Incorrect engine oil level.
•Incorrect fuel for climatic conditions.
•Incorrect engine oil viscosity for climacticconditions.
Note:Some vehicles have a lifetime fuel filterthat is integrated with the fuel tank. Regularmaintenance or replacement is not needed.
Note:If these checks do not help you correctthe concern, have your vehicle checked assoon as possible.
Noise Emissions Warranty, ProhibitedTampering Acts and Maintenance
On January 1, 1978, Federal regulationbecame effective governing the noiseemission on trucks over 10,000 lb (4,536 kg)Gross Vehicle Weight Rating (GVWR). Thepreceding statements concerning prohibitedtampering acts and maintenance, and thenoise warranty found in the Warranty Guide,are applicable to complete chassis cabs over10,000 lb (4,536 kg) GVWR.
CATALYTIC CONVERTER
WARNINGS
Do not park, idle or drive your vehicleon dry grass or other dry ground cover.The emission system heats up the enginecompartment and exhaust system, creatingthe risk of fire.
The normal operating temperature ofthe exhaust system is very high. Neverwork around or attempt to repair any part ofthe exhaust system until it has cooled. Usespecial care when working around thecatalytic converter. The catalytic converterheats up to a very high temperature afteronly a short period of engine operation andstays hot after the engine is switched off.
Exhaust leaks may result in entry ofharmful and potentially lethal fumesinto the passenger compartment. If you smellexhaust fumes inside your vehicle, have yourvehicle inspected immediately. Do not driveif you smell exhaust fumes.
Your vehicle has various emission controlcomponents and a catalytic converter thatenables it to comply with applicable exhaustemission standards.
To make sure that the catalytic converter andother emission control components continueto work properly:
•Do not crank the engine for more than10 seconds at a time.
•Do not run the engine with a spark pluglead disconnected.
•Do not push-start or tow-start yourvehicle. Use booster cables. See JumpStarting the Vehicle (page 255).
•Use only the specified fuel listed.
•Do not switch the ignition off when yourvehicle is moving.
•Avoid running out of fuel.
•Have the items listed in scheduledmaintenance information performedaccording to the specified schedule.
Note:Resulting component damage maynot be covered by the vehicle Warranty.
172
MKC (TME) Canada/United States of America, JJ7J 19A321 AA enUSA, Edition date: 201707, Second Printing
Engine Emission Control
Page 292 of 571
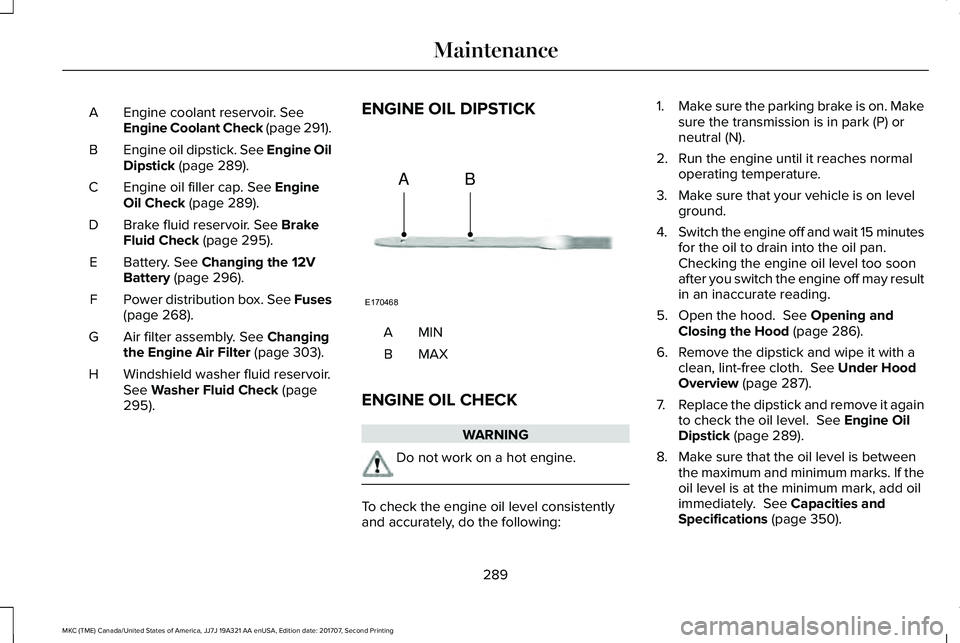
Engine coolant reservoir. SeeEngine Coolant Check (page 291).A
Engine oil dipstick. See Engine OilDipstick (page 289).B
Engine oil filler cap. See EngineOil Check (page 289).C
Brake fluid reservoir. See BrakeFluid Check (page 295).D
Battery. See Changing the 12VBattery (page 296).E
Power distribution box. See Fuses(page 268).F
Air filter assembly. See Changingthe Engine Air Filter (page 303).G
Windshield washer fluid reservoir.See Washer Fluid Check (page295).
H
ENGINE OIL DIPSTICK
MINA
MAXB
ENGINE OIL CHECK
WARNING
Do not work on a hot engine.
To check the engine oil level consistentlyand accurately, do the following:
1.Make sure the parking brake is on. Makesure the transmission is in park (P) orneutral (N).
2. Run the engine until it reaches normaloperating temperature.
3. Make sure that your vehicle is on levelground.
4.Switch the engine off and wait 15 minutesfor the oil to drain into the oil pan. Checking the engine oil level too soonafter you switch the engine off may resultin an inaccurate reading.
5. Open the hood. See Opening andClosing the Hood (page 286).
6. Remove the dipstick and wipe it with aclean, lint-free cloth. See Under HoodOverview (page 287).
7.Replace the dipstick and remove it againto check the oil level. See Engine OilDipstick (page 289).
8. Make sure that the oil level is betweenthe maximum and minimum marks. If theoil level is at the minimum mark, add oilimmediately. See Capacities andSpecifications (page 350).
289
MKC (TME) Canada/United States of America, JJ7J 19A321 AA enUSA, Edition date: 201707, Second Printing
MaintenanceE170468
AB
Page 293 of 571
9. If the oil level is correct, replace thedipstick and make sure it is fully seated.
Note:Do not remove the dipstick when theengine is running.
Note: If the oil level is between themaximum and minimum marks, the oil levelis acceptable. Do not add oil.
Note:The oil consumption of new enginesreaches its normal level after approximately3,000 mi (5,000 km).
Adding Engine Oil
WARNINGS
Do not add engine oil when the engineis hot. Failure to follow this instructioncould result in personal injury.
Do not remove the filler cap when theengine is running.
Do not use supplemental engine oil additivesbecause they are unnecessary and couldlead to engine damage that may not becovered by the vehicle Warranty.
Only use oils certified for gasoline enginesby the American Petroleum Institute (API). An oil with this trademark symbol conformsto the current engine and emission systemprotection standards and fuel economyrequirements of the International LubricantsSpecification Advisory Committee (ILSAC).
To top up the engine oil level do thefollowing:
1. Clean the area surrounding the engineoil filler cap before you remove it.
2. Remove the engine oil filler cap. SeeUnder Hood Overview (page 287). Turnit counterclockwise and remove it.
3. Add engine oil that meets Fordspecifications. See Capacities andSpecifications (page 350). See Capacitiesand Specifications (page 356). You mayhave to use a funnel to pour the engineoil into the opening.
4. Recheck the oil level.
5. If the oil level is correct, replace thedipstick and make sure it is fully seated.
6. Replace the engine oil filler cap. Turn itclockwise until you feel a strongresistance.
Note: Do not add oil further than themaximum mark. Oil levels above themaximum mark may cause engine damage.
Note:Make sure you install the oil filler capcorrectly.
Note:Soak up any spillage with anabsorbent cloth immediately.
OIL CHANGE INDICATOR RESET
Use the information display controls on thesteering wheel to reset the oil changeindicator.
290
MKC (TME) Canada/United States of America, JJ7J 19A321 AA enUSA, Edition date: 201707, Second Printing
MaintenanceE142732
Page 294 of 571
From the main menu scroll to:
Action and descriptionMessage
Press the right arrow button,then from this menu scroll tothe following message.
Settings
Press the right arrow button,then from this menu scroll tothe following message.
Vehicle
Press the right arrow button,then from this menu scroll tothe following message.
Oil Life
Press and hold the OK buttonuntil the instrument clusterdisplays the followingmessage.
Hold OK toReset
Reset Successful
When the oil change indicatorresets the instrument clusterdisplays 100%.
Remaining Life
{00}%
Action and descriptionMessage
If the instrument clusterdisplays one of the followingmessages, repeat theprocess.
Not Reset
Reset Cancelled
ENGINE COOLANT CHECK
Checking the Engine Coolant
WARNINGS
Do not add engine coolant when theengine is hot. Steam and scaldingliquids released from a hot cooling systemcan burn you badly. Also, you can be burnedif you spill coolant on hot engine parts.
Do not put engine coolant in thewindshield washer fluid container. Ifsprayed on the windshield, engine coolantcould make it difficult to see through thewindshield.
WARNINGS
To reduce the risk of personal injury,make sure the engine is cool beforeunscrewing the coolant pressure relief cap.The cooling system is under pressure; steamand hot liquid can come out forcefully whenthe cap is loosened slightly.
Do not add coolant further than theMAX mark.
Note:Automotive fluids are notinterchangeable. Do not use engine coolantor windshield washer fluid outside of itsspecified function and vehicle location.
Note:Do not use stop leak pellets, coolingsystem sealants, or additives as they cancause damage to the engine cooling orheating systems. This damage would not becovered under your vehicle’s warranty.
291
MKC (TME) Canada/United States of America, JJ7J 19A321 AA enUSA, Edition date: 201707, Second Printing
Maintenance
Page 317 of 571
Cooling system
•Protect against freezing temperatures.
•When removing your vehicle fromstorage, check coolant fluid level.Confirm that there are no cooling systemleaks and that fluid is at therecommended level.
Battery
•Check and recharge as necessary. Keepconnections clean.
•If storing your vehicle for more than 30days without recharging the battery, werecommend that you disconnect thebattery cables to maintain battery chargefor quick starting.
Note:It is necessary to reset memoryfeatures if battery cables are disconnected.
Brakes
•Make sure the brakes and parking brakerelease fully.
Tires
•Maintain recommended air pressure.
Miscellaneous
•Make sure all linkages, cables, levers andpins under your vehicle are covered withgrease to prevent rust.
•Move vehicles at least 25 ft (7.5 m) every15 days to lubricate working parts andprevent corrosion.
Removing Vehicle From Storage
When your vehicle is ready to come out ofstorage, do the following:
•Wash your vehicle to remove any dirt orgrease film build-up on window surfaces.
•Check windshield wipers for anydeterioration.
•Check under the hood for any foreignmaterial that may have collected duringstorage such as mice or squirrel nests.
•Check the exhaust for any foreignmaterial that may have collected duringstorage.
•Check tire pressures and set tire inflationper the Tire Label.
•Check brake pedal operation. Drive yourvehicle 15 ft (4.5 m) back and forth toremove rust build-up.
•Check fluid levels (including coolant, oiland gas) to make sure there are no leaks,and fluids are at recommended levels.
•If you remove the battery, clean thebattery cable ends and check fordamage.
Contact an authorized dealer if you have anyconcerns or issues.
BODY STYLING KITS
The distance between the underside of yourvehicle and the ground is less than that ofother models. Drive with extreme care toavoid damage to your vehicle.
314
MKC (TME) Canada/United States of America, JJ7J 19A321 AA enUSA, Edition date: 201707, Second Printing
Vehicle Care
Page 485 of 571
Your vehicle is equipped with the IntelligentOil-Life Monitor system, which displays amessage in the information display at theproper oil change interval. This interval maybe up to one year or 10,000 mi (16,000 km).
When the oil change message appears inthe information display, it is time for an oilchange. Make sure you perform the oilchange within two weeks or 500 mi (800 km)of the message appearing. Make sure youreset the Intelligent Oil-Life Monitor aftereach oil change. See Oil Change IndicatorReset (page 290).
If your information display resets prematurelyor becomes inoperative, you should performthe oil change interval at six months or5,000 mi (8,000 km) from your last oilchange. Never exceed one year or 10,000 mi(16,000 km) between oil change intervals.
Your vehicle is very sophisticated and builtwith multiple, complex, performance systems.Every manufacturer develops these systemsusing different specifications andperformance features. That is why it isimportant to rely upon your dealership toproperly diagnose and repair your vehicle.
Ford Motor Company has recommendedmaintenance intervals for various parts andcomponent systems based upon engineeringtesting. Ford Motor Company relies upon thistesting to determine the most appropriatemileage for replacement of oils and fluids toprotect your vehicle at the lowest overall costto you and recommends againstmaintenance schedules that deviate fromthe scheduled maintenance information.
We strongly recommend the use of onlygenuine Ford, Motorcraft or Ford-authorizedre-manufactured replacement partsengineered for your vehicle.
Additives and Chemicals
This owner's manual and the Ford WorkshopManual list the recommended additives andchemicals for your vehicle. We do notrecommend using chemicals or additives notapproved by us as part of your vehicle’snormal maintenance. Please consult yourwarranty information.
Oils, Fluids and Flushing
In many cases, fluid discoloration is a normaloperating characteristic and, by itself, doesnot necessarily indicate a concern or that thefluid needs to be changed. However, aqualified expert, such as the factory-trainedtechnicians at your dealership, shouldinspect discolored fluids that also show signsof overheating or foreign materialcontamination immediately.
Make sure to change your vehicle’s oils andfluids at the specified intervals or inconjunction with a repair. Flushing is a viableway to change fluid for many vehiclesub-systems during scheduled maintenance.It is critical that systems are flushed only withnew fluid that is the same as that requiredto fill and operate the system or using aFord-approved flushing chemical.
Owner Checks and Services
Make sure you perform the following basicmaintenance checks and inspections everymonth or at six-month intervals.
482
MKC (TME) Canada/United States of America, JJ7J 19A321 AA enUSA, Edition date: 201707, Second Printing
Scheduled Maintenance