LINCOLN MKC 2019 Owners Manual
Manufacturer: LINCOLN, Model Year: 2019, Model line: MKC, Model: LINCOLN MKC 2019Pages: 581, PDF Size: 5.41 MB
Page 301 of 581
When a battery replacement is required, youmust use a recommended replacementbattery that matches the electricalrequirements of the vehicle.
Note:If your vehicle has a battery cover,after cleaning or replacing the battery, makesure you reinstall it.
Note:See an authorized dealer for batteryaccess, testing, or replacement.
To make sure the battery managementsystem works correctly, do not connect anelectrical device ground connection directlyto the battery negative post. This can causeinaccurate measurements of the batterycondition and potential incorrect systemoperation.
Note:If you add electrical accessories orcomponents to the vehicle, it may adverselyaffect battery performance and durability.This may also affect the performance ofother electrical systems in the vehicle.
If you see any corrosion on the battery orterminals, remove the cables from theterminals and clean with a wire brush. Youcan neutralize the acid with a solution ofbaking soda and water.
Because your vehicle’s engine iselectronically-controlled by a computer,some engine control settings are maintainedby power from the battery. Some enginecomputer settings, like the idle trim and fueltrim strategy, optimize the driveability andperformance of the engine. The clock andradio station presets are also maintained inmemory by power from the low-voltagebattery. These settings are erased when atechnician disconnects and connects thelow-voltage battery.
To restore the settings, do the following:
Note:Until you switch the ignition to the onposition, you will receive a message in yourinformation display stating that your vehicleis not in park.
1. Apply the parking brake.
2. Shift into park (P) or neutral (N).
3. Switch off all accessories.
4. Press the brake pedal and start yourvehicle.
5. Run the engine until it reaches normaloperating temperature. While the engineis warming up, complete the following:Reset the clock. See Audio Unit (page368). Reset the power windowsbounce-back feature. See PowerWindows (page 95). Reset the radiostation presets. See Audio Unit (page368).
6. Allow the engine to idle for at least oneminute.
7.Drive the vehicle at least 10 mi (16 km) tocompletely relearn the idle trim and fueltrim strategy.
Note:If you do not allow the engine torelearn the idle and fuel trim strategy, theidle quality of your vehicle may be adverselyaffected until the engine computereventually relearns the idle trim and fuel trimstrategy.
Note:Certain features may not operate ifthe battery monitor system is not reset witha scan tool following a jump start or batteryreplacement. Normal electrical accessoryoperation should resume after your vehicleis left undisturbed for 8 hours.
298
MKC (TME) Canada/United States of America, enUSA, Edition date: 201802, Second-Printing
Maintenance
Page 302 of 581

Make sure that you dispose of old batteriesin an environmentally friendly way. Seekadvice from your local authority aboutrecycling old batteries.
If storing your vehicle for more than 30 dayswithout recharging the battery, werecommend that you disconnect the batterycables to maintain battery charge for quickstarting.
CHECKING THE WIPER BLADES
Run the tip of your fingers over the edge ofthe blade to check for roughness.
Clean the wiper blades with washer fluid orwater applied with a soft sponge or cloth.
CHANGING THE WIPER BLADES
You can improve poor wiper quality bycleaning the wiper blades and thewindshield.
Note:Do not move the wiper arm when theignition is on as it may cause damage to thewiper motor.
Replace the wiper blades at least annuallyfor optimum performance.
Front Wiper Blades
1. Lift the wiper arm and then press thewiper blade locking buttons together.
Note:Do not hold the wiper blade whenlifting the wiper arm.
Note:Make sure that the wiper arm doesnot spring back against the glass when thewiper blade is not attached.
2. Slightly rotate the wiper blade.
3. Remove the wiper blade.
4. Install in the reverse order.
Note:Make sure that the wiper blade locksinto place.
299
MKC (TME) Canada/United States of America, enUSA, Edition date: 201802, Second-Printing
MaintenanceE142463 E129990
1
1 2
Page 303 of 581
Rear Window Wiper Blade
1. Lift the wiper arm.
Note:Do not hold the wiper blade whenlifting the wiper arm.
Note:Make sure that the wiper arm doesnot spring back against the glass when thewiper blade is not attached.
2. Remove the wiper blade.
Note:Make sure that the wiper blade locksinto place.
ADJUSTING THE HEADLAMPS
Vertical Aim Adjustment
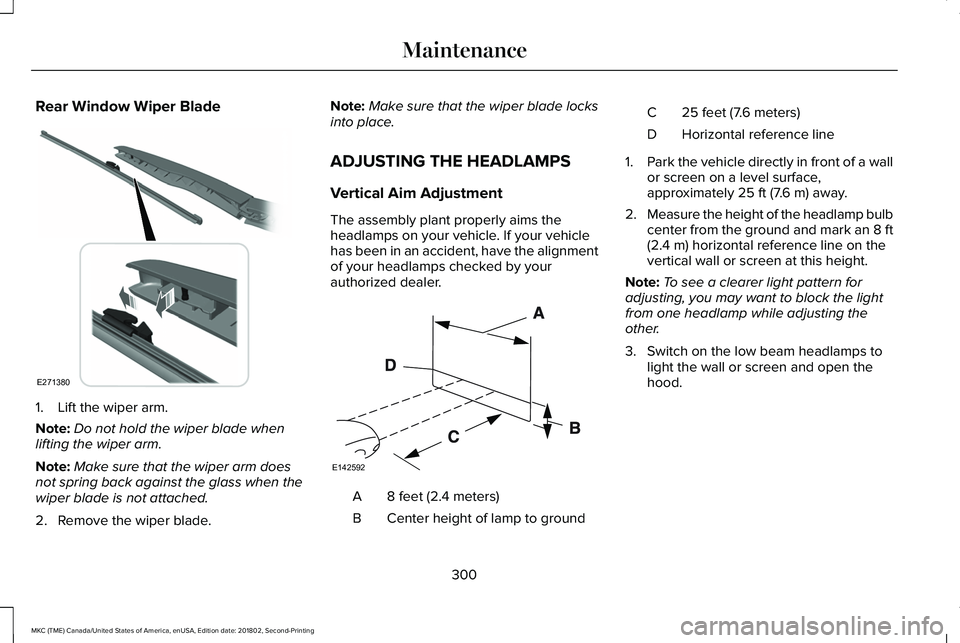
The assembly plant properly aims theheadlamps on your vehicle. If your vehiclehas been in an accident, have the alignmentof your headlamps checked by yourauthorized dealer.
8 feet (2.4 meters)A
Center height of lamp to groundB
25 feet (7.6 meters)C
Horizontal reference lineD
1.Park the vehicle directly in front of a wallor screen on a level surface,approximately 25 ft (7.6 m) away.
2.Measure the height of the headlamp bulbcenter from the ground and mark an 8 ft(2.4 m) horizontal reference line on thevertical wall or screen at this height.
Note:To see a clearer light pattern foradjusting, you may want to block the lightfrom one headlamp while adjusting theother.
3. Switch on the low beam headlamps tolight the wall or screen and open thehood.
300
MKC (TME) Canada/United States of America, enUSA, Edition date: 201802, Second-Printing
MaintenanceE271380 E142592
Page 304 of 581
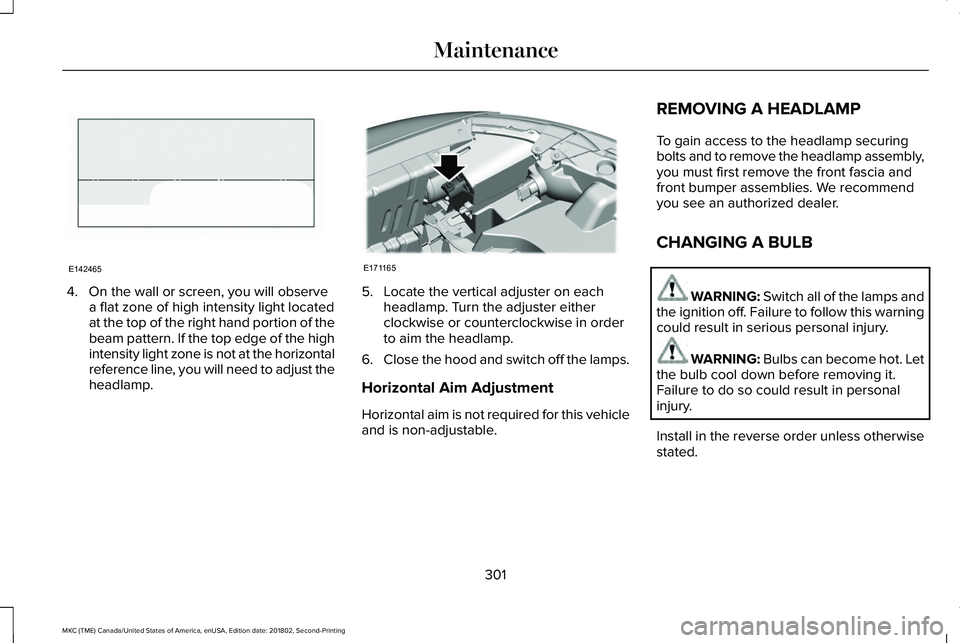
4. On the wall or screen, you will observea flat zone of high intensity light locatedat the top of the right hand portion of thebeam pattern. If the top edge of the highintensity light zone is not at the horizontalreference line, you will need to adjust theheadlamp.
5. Locate the vertical adjuster on eachheadlamp. Turn the adjuster eitherclockwise or counterclockwise in orderto aim the headlamp.
6.Close the hood and switch off the lamps.
Horizontal Aim Adjustment
Horizontal aim is not required for this vehicleand is non-adjustable.
REMOVING A HEADLAMP
To gain access to the headlamp securingbolts and to remove the headlamp assembly,you must first remove the front fascia andfront bumper assemblies. We recommendyou see an authorized dealer.
CHANGING A BULB
WARNING: Switch all of the lamps andthe ignition off. Failure to follow this warningcould result in serious personal injury.
WARNING: Bulbs can become hot. Letthe bulb cool down before removing it.Failure to do so could result in personalinjury.
Install in the reverse order unless otherwisestated.
301
MKC (TME) Canada/United States of America, enUSA, Edition date: 201802, Second-Printing
MaintenanceE142465 E171165
Page 305 of 581
High Intensity Discharge Headlamp (If
Equipped)
These lamps operate at a high voltage. Seean authorized dealer if they fail.
Front Direction Indicator
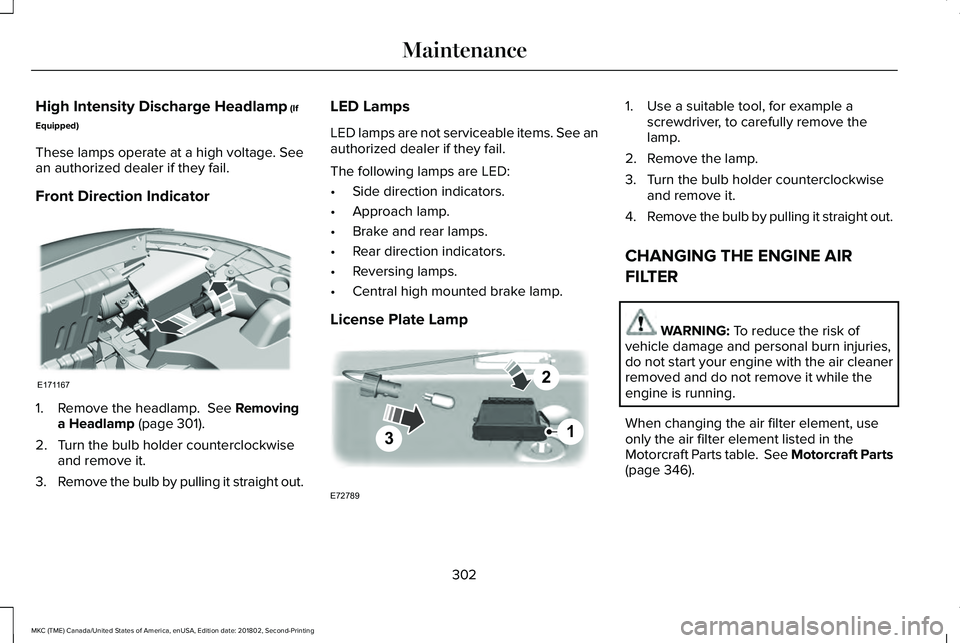
1. Remove the headlamp. See Removinga Headlamp (page 301).
2. Turn the bulb holder counterclockwiseand remove it.
3.Remove the bulb by pulling it straight out.
LED Lamps
LED lamps are not serviceable items. See anauthorized dealer if they fail.
The following lamps are LED:
•Side direction indicators.
•Approach lamp.
•Brake and rear lamps.
•Rear direction indicators.
•Reversing lamps.
•Central high mounted brake lamp.
License Plate Lamp
1. Use a suitable tool, for example ascrewdriver, to carefully remove thelamp.
2. Remove the lamp.
3. Turn the bulb holder counterclockwiseand remove it.
4.Remove the bulb by pulling it straight out.
CHANGING THE ENGINE AIR
FILTER
WARNING: To reduce the risk ofvehicle damage and personal burn injuries,do not start your engine with the air cleanerremoved and do not remove it while theengine is running.
When changing the air filter element, useonly the air filter element listed in theMotorcraft Parts table. See Motorcraft Parts(page 346).
302
MKC (TME) Canada/United States of America, enUSA, Edition date: 201802, Second-Printing
MaintenanceE171167 3
2
1
E72789
Page 306 of 581
When servicing the air cleaner on vehicleswith a turbocharger, it is important that noforeign material enter the air inductionsystem. The engine and turbocharger aresusceptible to damage from even smallparticles.
Change the air filter element at the properinterval. See Scheduled Maintenance (page487).
Note: Failure to use the correct air filterelement may result in severe enginedamage. The customer warranty may bevoid for any damage to the engine if thecorrect air filter element is not used.
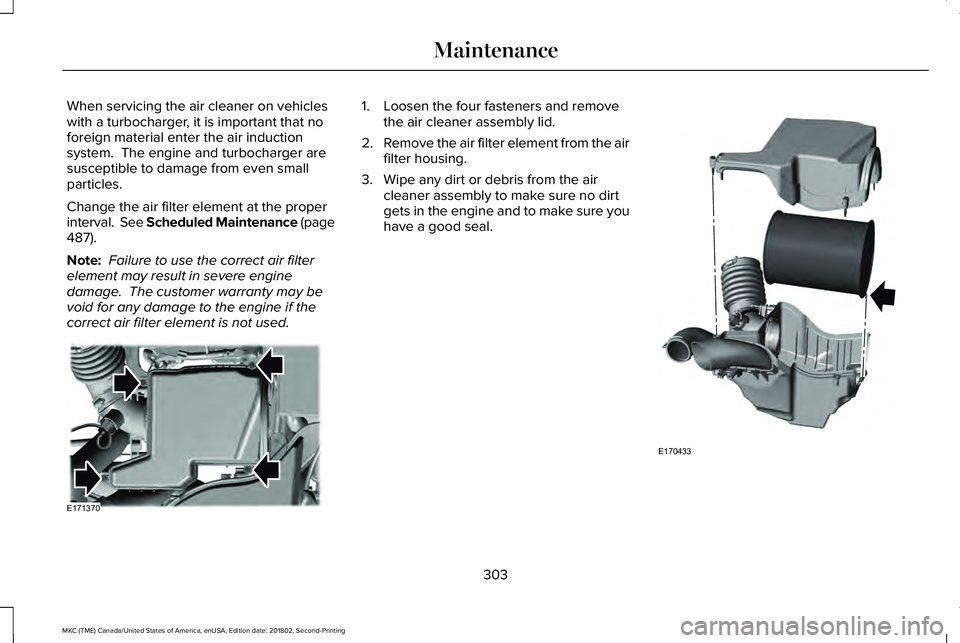
1. Loosen the four fasteners and removethe air cleaner assembly lid.
2.Remove the air filter element from the airfilter housing.
3. Wipe any dirt or debris from the aircleaner assembly to make sure no dirtgets in the engine and to make sure youhave a good seal.
303
MKC (TME) Canada/United States of America, enUSA, Edition date: 201802, Second-Printing
MaintenanceE171370 E170433
Page 307 of 581
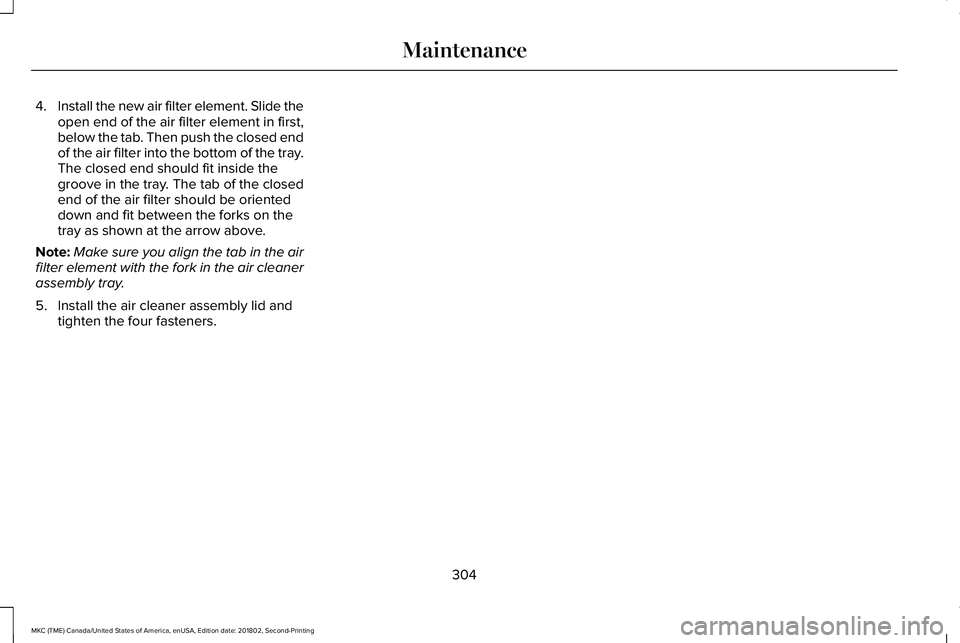
4.Install the new air filter element. Slide theopen end of the air filter element in first,below the tab. Then push the closed endof the air filter into the bottom of the tray.The closed end should fit inside thegroove in the tray. The tab of the closedend of the air filter should be orienteddown and fit between the forks on thetray as shown at the arrow above.
Note:Make sure you align the tab in the airfilter element with the fork in the air cleanerassembly tray.
5. Install the air cleaner assembly lid andtighten the four fasteners.
304
MKC (TME) Canada/United States of America, enUSA, Edition date: 201802, Second-Printing
Maintenance
Page 308 of 581
GENERAL INFORMATION
Your dealer has many quality productsavailable to clean your vehicle and protectits finishes.
CLEANING PRODUCTS
Materials
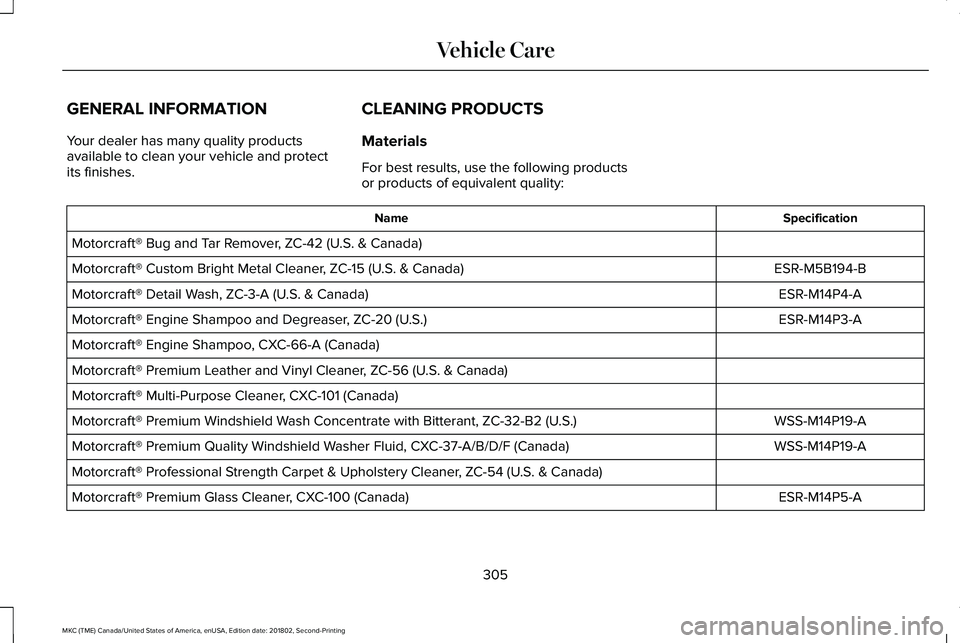
For best results, use the following productsor products of equivalent quality:
SpecificationName
Motorcraft® Bug and Tar Remover, ZC-42 (U.S. & Canada)
ESR-M5B194-BMotorcraft® Custom Bright Metal Cleaner, ZC-15 (U.S. & Canada)
ESR-M14P4-AMotorcraft® Detail Wash, ZC-3-A (U.S. & Canada)
ESR-M14P3-AMotorcraft® Engine Shampoo and Degreaser, ZC-20 (U.S.)
Motorcraft® Engine Shampoo, CXC-66-A (Canada)
Motorcraft® Premium Leather and Vinyl Cleaner, ZC-56 (U.S. & Canada)
Motorcraft® Multi-Purpose Cleaner, CXC-101 (Canada)
WSS-M14P19-AMotorcraft® Premium Windshield Wash Concentrate with Bitterant, ZC-32-B2 (U.S.)
WSS-M14P19-AMotorcraft® Premium Quality Windshield Washer Fluid, CXC-37-A/B/D/F (Canada)
Motorcraft® Professional Strength Carpet & Upholstery Cleaner, ZC-54 (U.S. & Canada)
ESR-M14P5-AMotorcraft® Premium Glass Cleaner, CXC-100 (Canada)
305
MKC (TME) Canada/United States of America, enUSA, Edition date: 201802, Second-Printing
Vehicle Care
Page 309 of 581
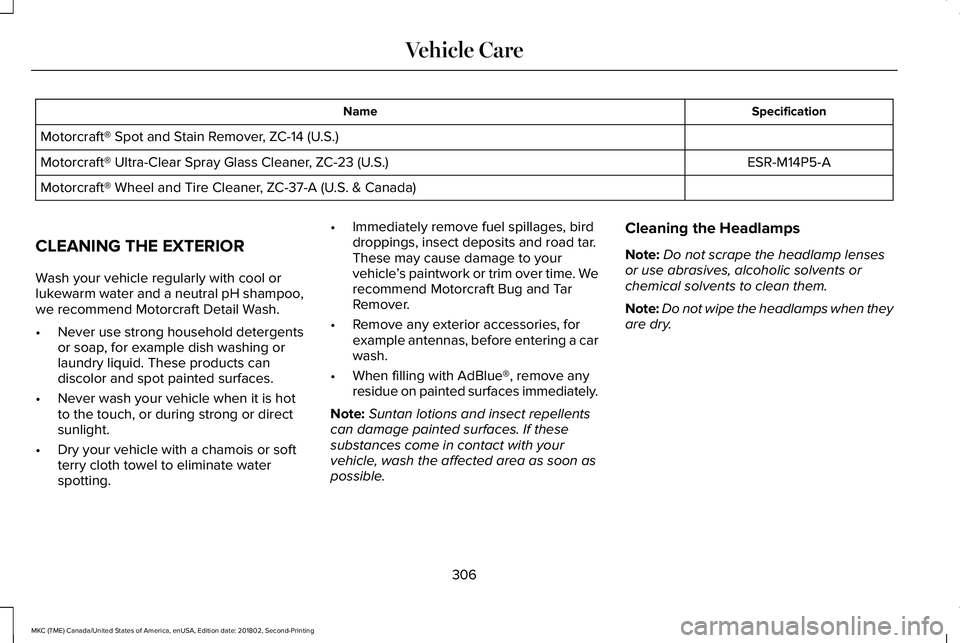
SpecificationName
Motorcraft® Spot and Stain Remover, ZC-14 (U.S.)
ESR-M14P5-AMotorcraft® Ultra-Clear Spray Glass Cleaner, ZC-23 (U.S.)
Motorcraft® Wheel and Tire Cleaner, ZC-37-A (U.S. & Canada)
CLEANING THE EXTERIOR
Wash your vehicle regularly with cool orlukewarm water and a neutral pH shampoo,we recommend Motorcraft Detail Wash.
•Never use strong household detergentsor soap, for example dish washing orlaundry liquid. These products candiscolor and spot painted surfaces.
•Never wash your vehicle when it is hotto the touch, or during strong or directsunlight.
•Dry your vehicle with a chamois or softterry cloth towel to eliminate waterspotting.
•Immediately remove fuel spillages, birddroppings, insect deposits and road tar.These may cause damage to yourvehicle’s paintwork or trim over time. Werecommend Motorcraft Bug and TarRemover.
•Remove any exterior accessories, forexample antennas, before entering a carwash.
•When filling with AdBlue®, remove anyresidue on painted surfaces immediately.
Note:Suntan lotions and insect repellentscan damage painted surfaces. If thesesubstances come in contact with yourvehicle, wash the affected area as soon aspossible.
Cleaning the Headlamps
Note:Do not scrape the headlamp lensesor use abrasives, alcoholic solvents orchemical solvents to clean them.
Note:Do not wipe the headlamps when theyare dry.
306
MKC (TME) Canada/United States of America, enUSA, Edition date: 201802, Second-Printing
Vehicle Care
Page 310 of 581
Exterior Chrome Parts
•Apply a high quality-cleaning product tobumpers and other chrome parts. Followthe manufacturer’s instructions. Werecommend Motorcraft Custom BrightMetal Cleaner.
•Do not apply the cleaning product to hotsurfaces. Do not leave the cleaningproduct on chrome surfaces longer thanthe time recommended.
•Using non-recommended cleaners canresult in severe and permanent cosmeticdamage.
Note:Never use abrasive materials, forexample steel wool or plastic pads as theycan scratch the chrome surface.
Note:Do not use chrome cleaner, metalcleaner or polish on wheels or wheel covers.
Exterior Plastic Parts
For routine cleaning we recommendMotorcraft Detail Wash. If tar or grease spotsare present, we recommend Motorcraft Bugand Tar Remover.
Stripes or Graphics (If Equipped)
Hand washing your vehicle is preferredhowever, pressure washing may be usedunder the following conditions:
•Do not use water pressure higher than2,000 psi (14,000 kPa).
•Do not use water hotter than 179°F (82°C).
•Use a spray with a 40° wide spray anglepattern.
•Keep the nozzle at a 12 in (305 mm)distance and 90° angle to your vehicle'ssurface.
Note:Holding the pressure washer nozzleat an angle to the vehicle's surface maydamage graphics and cause the edges topeel away from the vehicle's surface.
Underbody
Regularly clean the underside of your vehicleusing water. Keep body and door drain holesfree of debris or foreign material.
Under Hood
For removing black rubber marks from underthe hood we recommend Motorcraft Wheeland Tire Cleaner or Motorcraft Bug and TarRemover.
WAXING
Regular waxing is necessary to protect yourcar's paint from the elements. Werecommend that you wash and wax thepainted surface once or twice a year.
When washing and waxing, park your vehiclein a shaded area out of direct sunlight.Always wash your vehicle before applyingwax.
•Use a quality wax that does not containabrasives.
•Follow the manufacturer’s instructions toapply and remove the wax.
•Apply a small amount of wax in aback-and-forth motion, not in circles.
307
MKC (TME) Canada/United States of America, enUSA, Edition date: 201802, Second-Printing
Vehicle Care