LINCOLN MKX 2018 Owners Manual
Manufacturer: LINCOLN, Model Year: 2018, Model line: MKX, Model: LINCOLN MKX 2018Pages: 603, PDF Size: 4.94 MB
Page 101 of 603
Windshield Wiper Activated Headlamps
When you switch the autolamps on, theheadlamps turn on within 10 seconds ofswitching the wipers on. They turn offapproximately 60 seconds after you switchthe windshield wipers off.
The headlamps do not turn on with thewipers:
•During a single wipe.
•When using the windshield washers.
•If the wipers are in intermittent mode.
Note:If you switch the autolamps and theautowipers on, the headlamps turn on whenthe windshield wipers continuously operate.
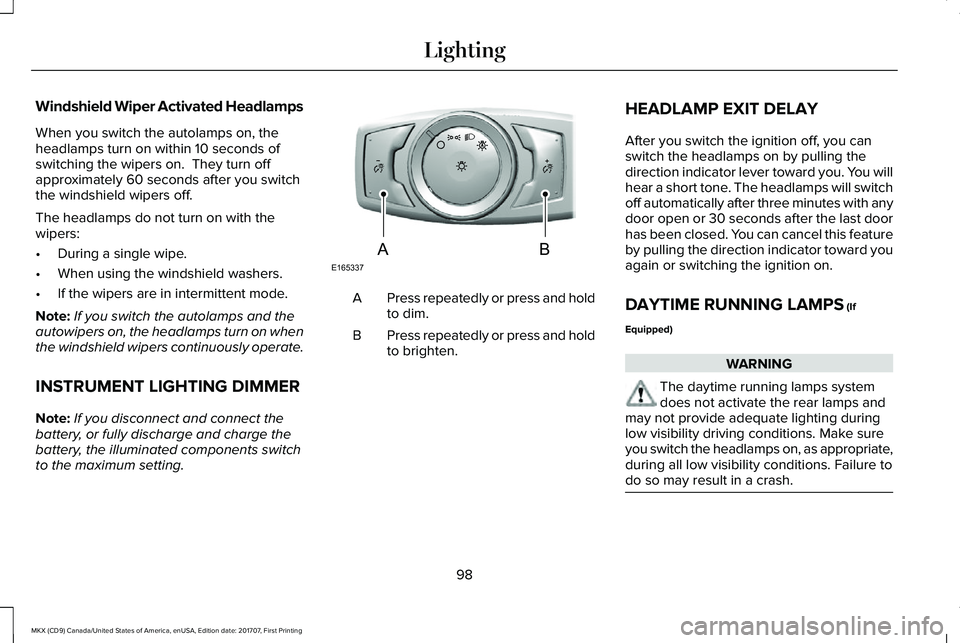
INSTRUMENT LIGHTING DIMMER
Note:If you disconnect and connect thebattery, or fully discharge and charge thebattery, the illuminated components switchto the maximum setting.
Press repeatedly or press and holdto dim.A
Press repeatedly or press and holdto brighten.B
HEADLAMP EXIT DELAY
After you switch the ignition off, you canswitch the headlamps on by pulling thedirection indicator lever toward you. You willhear a short tone. The headlamps will switchoff automatically after three minutes with anydoor open or 30 seconds after the last doorhas been closed. You can cancel this featureby pulling the direction indicator toward youagain or switching the ignition on.
DAYTIME RUNNING LAMPS (If
Equipped)
WARNING
The daytime running lamps systemdoes not activate the rear lamps andmay not provide adequate lighting duringlow visibility driving conditions. Make sureyou switch the headlamps on, as appropriate,during all low visibility conditions. Failure todo so may result in a crash.
98
MKX (CD9) Canada/United States of America, enUSA, Edition date: 201707, First Printing
LightingE165337AB
Page 102 of 603
Type One - Conventional (Non-Configurable)
The daytime running lamps turn on when:
1. Switching the ignition on.
2. The transmission is not in park (P) forvehicles with automatic transmissions, orreleasing the parking brake for vehicleswith manual transmissions.
3. The lighting control is in the off, parkinglamp or autolamps positions.
4. The headlamps are off.
Type Two - Configurable
Switch the daytime running lamps on or offusing the information display. SeeInformation Displays (page 118).
The daytime running lamps turn on when:
1. The lamps are on in the informationdisplay.
2. Switching the ignition on.
3. The transmission is not in park (P) forvehicles with automatic transmissions, orreleasing the parking brake for vehicleswith manual transmissions.
4. The lighting control is in the autolampsposition.
5. The headlamps are off.
The other lighting control switch positionsdo not turn on the daytime running lamps.
If the daytime running lamps are off in theinformation display, the lamps stay off in allswitch positions.
AUTOMATIC HIGH BEAM
CONTROL (If Equipped)
WARNING
The system does not relieve you ofyour responsibility to drive with duecare and attention. You may need to overridethe system if it does not turn the high beamson or off.
The system turns on high beams if it is darkenough and no other traffic is present. If itdetects an approaching vehicle’s headlampsor tail lamps, or street lighting ahead, thesystem turns off high beams before they candistract other road users. Low beams remainon.
Note:The system may not operate properlyif the sensor is blocked. Keep the windshieldfree from obstruction or damage.
Note:The system may not operate properlyin cold or inclement conditions. You canswitch on the high beams by overriding thesystem.
Note:If the system detects a blockage, forexample bird droppings, bug splatter, snowor ice, the system goes into low beam modeuntil you clear the blockage. A message mayappear in the information display if thecamera is blocked.
Note:Using much larger tires or equippingvehicle accessories such as snowplows canmodify your vehicle's ride height anddegrade automatic high beam controlperformance.
99
MKX (CD9) Canada/United States of America, enUSA, Edition date: 201707, First Printing
Lighting
Page 103 of 603
A camera sensor, centrally mounted behindthe windshield of your vehicle, continuouslymonitors conditions to turn the high beamson and off.
Once the system is active, the high beamsturn on if:
•The ambient light level is low enough.
•There is no traffic in front of your vehicle.
•The vehicle speed is greater thanapproximately 32 mph (51 km/h).
The high beams turn off if:
•The ambient light level is high enoughthat high beams are not required.
•The system detects an approachingvehicle's headlamps or tail lamps.
•The vehicle speed falls belowapproximately 27 mph (44 km/h).
•The system detects severe rain, snow orfog.
•The camera is blocked.
Switching the System On and Off
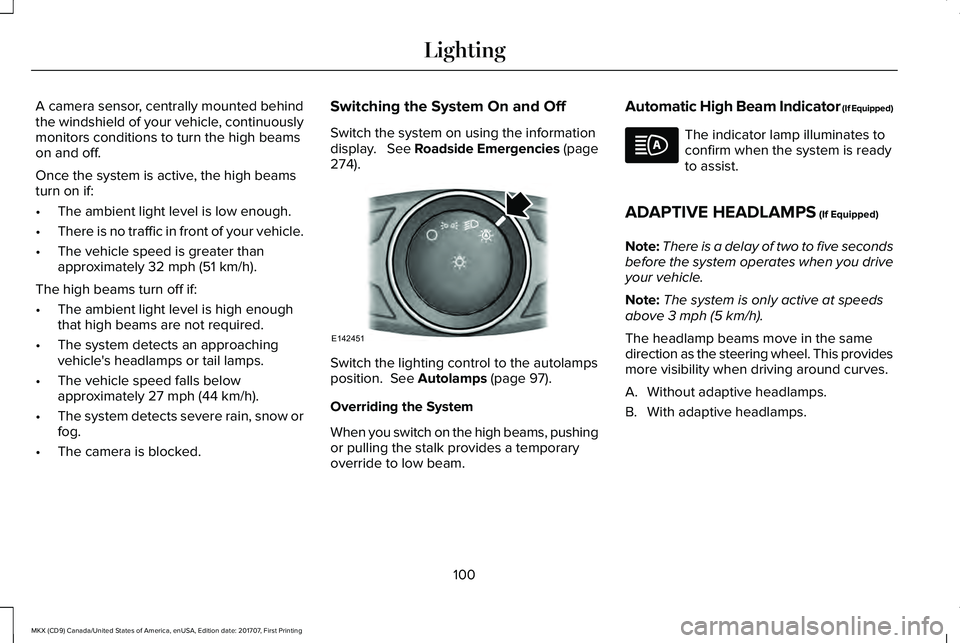
Switch the system on using the informationdisplay. See Roadside Emergencies (page274).
Switch the lighting control to the autolampsposition. See Autolamps (page 97).
Overriding the System
When you switch on the high beams, pushingor pulling the stalk provides a temporaryoverride to low beam.
Automatic High Beam Indicator (If Equipped)
The indicator lamp illuminates toconfirm when the system is readyto assist.
ADAPTIVE HEADLAMPS (If Equipped)
Note:There is a delay of two to five secondsbefore the system operates when you driveyour vehicle.
Note:The system is only active at speedsabove 3 mph (5 km/h).
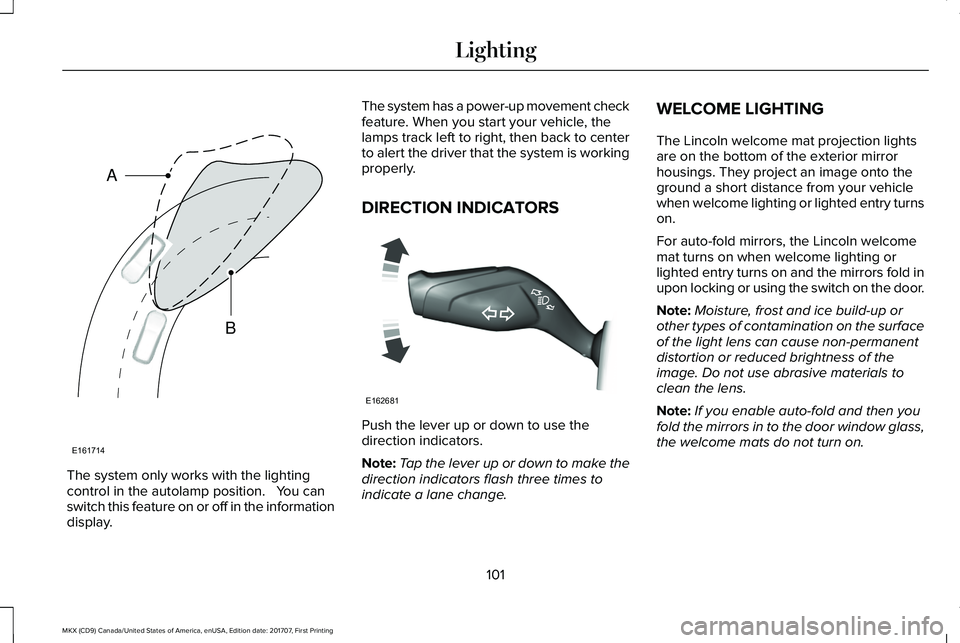
The headlamp beams move in the samedirection as the steering wheel. This providesmore visibility when driving around curves.
A. Without adaptive headlamps.
B. With adaptive headlamps.
100
MKX (CD9) Canada/United States of America, enUSA, Edition date: 201707, First Printing
LightingE142451
Page 104 of 603
The system only works with the lightingcontrol in the autolamp position. You canswitch this feature on or off in the informationdisplay.
The system has a power-up movement checkfeature. When you start your vehicle, thelamps track left to right, then back to centerto alert the driver that the system is workingproperly.
DIRECTION INDICATORS
Push the lever up or down to use thedirection indicators.
Note:Tap the lever up or down to make thedirection indicators flash three times toindicate a lane change.
WELCOME LIGHTING
The Lincoln welcome mat projection lightsare on the bottom of the exterior mirrorhousings. They project an image onto theground a short distance from your vehiclewhen welcome lighting or lighted entry turnson.
For auto-fold mirrors, the Lincoln welcomemat turns on when welcome lighting orlighted entry turns on and the mirrors fold inupon locking or using the switch on the door.
Note:Moisture, frost and ice build-up orother types of contamination on the surfaceof the light lens can cause non-permanentdistortion or reduced brightness of theimage. Do not use abrasive materials toclean the lens.
Note:If you enable auto-fold and then youfold the mirrors in to the door window glass,the welcome mats do not turn on.
101
MKX (CD9) Canada/United States of America, enUSA, Edition date: 201707, First Printing
LightingE161714
B
A E162681
Page 105 of 603
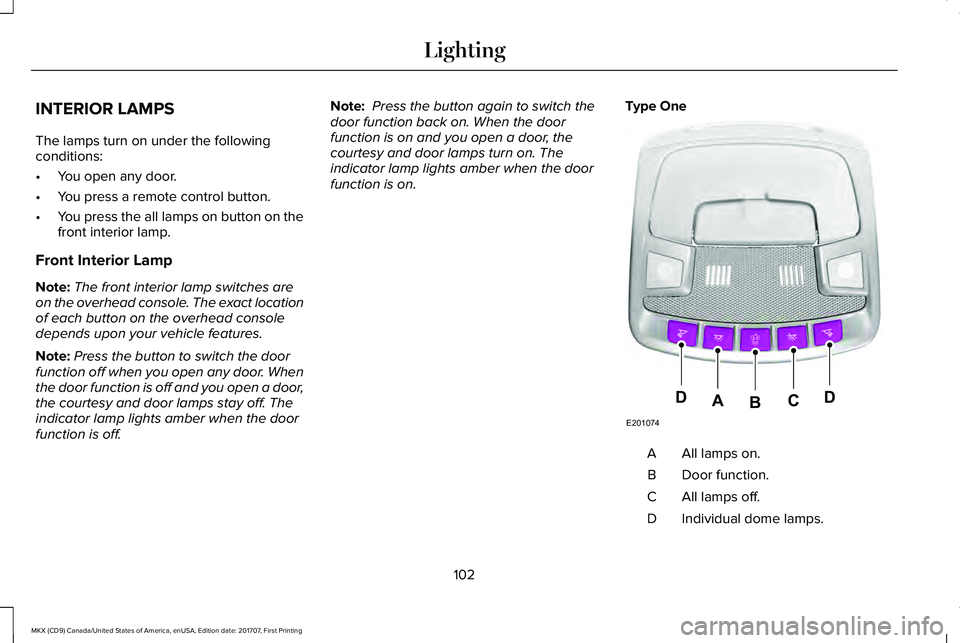
INTERIOR LAMPS
The lamps turn on under the followingconditions:
•You open any door.
•You press a remote control button.
•You press the all lamps on button on thefront interior lamp.
Front Interior Lamp
Note:The front interior lamp switches areon the overhead console. The exact locationof each button on the overhead consoledepends upon your vehicle features.
Note:Press the button to switch the doorfunction off when you open any door. Whenthe door function is off and you open a door,the courtesy and door lamps stay off. Theindicator lamp lights amber when the doorfunction is off.
Note: Press the button again to switch thedoor function back on. When the doorfunction is on and you open a door, thecourtesy and door lamps turn on. Theindicator lamp lights amber when the doorfunction is on.
Type One
All lamps on.A
Door function.B
All lamps off.C
Individual dome lamps.D
102
MKX (CD9) Canada/United States of America, enUSA, Edition date: 201707, First Printing
LightingE201074
DDCAB
Page 106 of 603
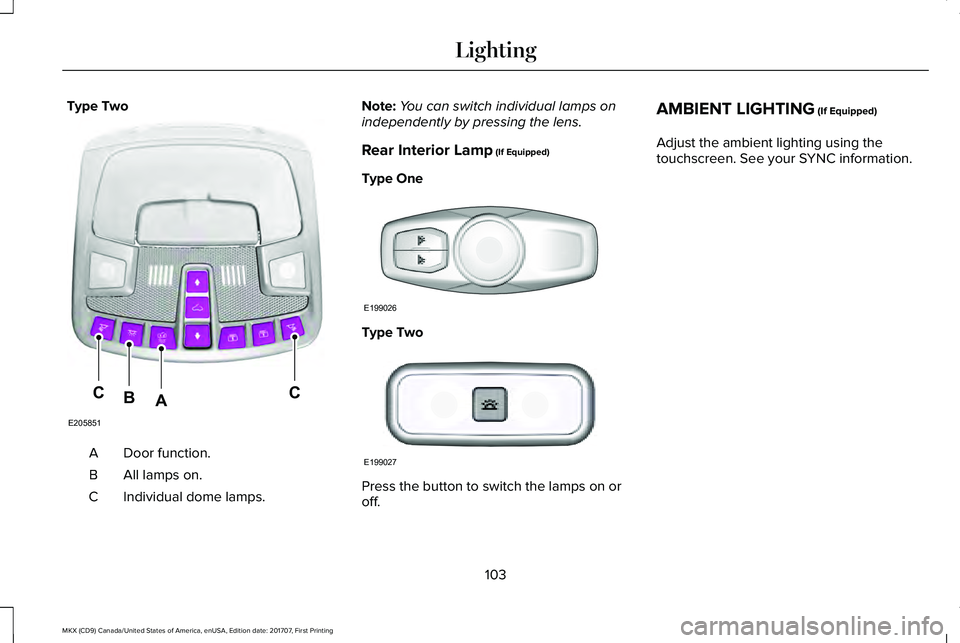
Type Two
Door function.A
All lamps on.B
Individual dome lamps.C
Note:You can switch individual lamps onindependently by pressing the lens.
Rear Interior Lamp (If Equipped)
Type One
Type Two
Press the button to switch the lamps on oroff.
AMBIENT LIGHTING (If Equipped)
Adjust the ambient lighting using thetouchscreen. See your SYNC information.
103
MKX (CD9) Canada/United States of America, enUSA, Edition date: 201707, First Printing
LightingE205851
CCAB E199026 E199027
Page 107 of 603
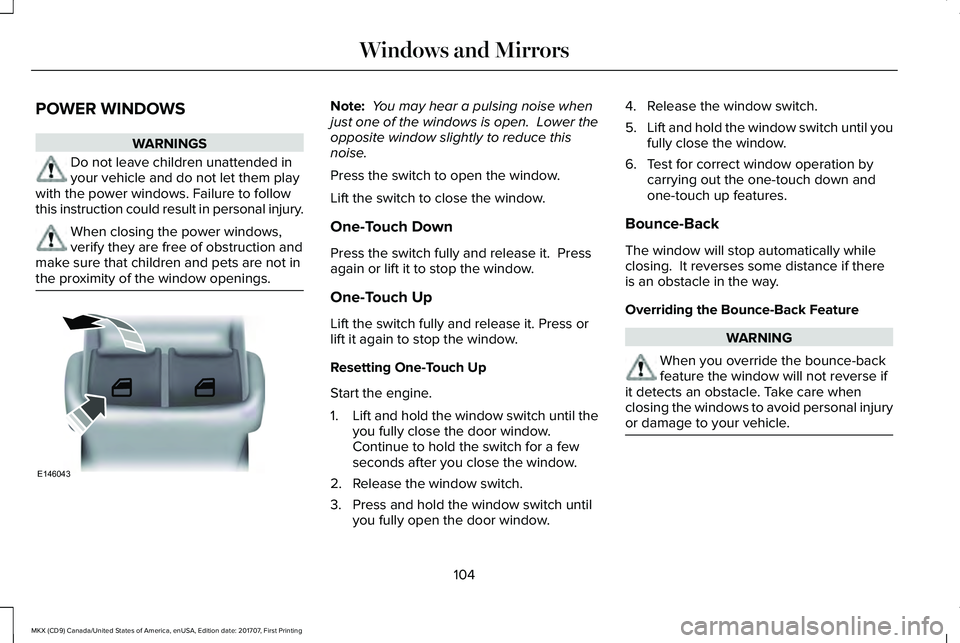
POWER WINDOWS
WARNINGS
Do not leave children unattended inyour vehicle and do not let them playwith the power windows. Failure to followthis instruction could result in personal injury.
When closing the power windows,verify they are free of obstruction andmake sure that children and pets are not inthe proximity of the window openings.
Note: You may hear a pulsing noise whenjust one of the windows is open. Lower theopposite window slightly to reduce thisnoise.
Press the switch to open the window.
Lift the switch to close the window.
One-Touch Down
Press the switch fully and release it. Pressagain or lift it to stop the window.
One-Touch Up
Lift the switch fully and release it. Press orlift it again to stop the window.
Resetting One-Touch Up
Start the engine.
1.Lift and hold the window switch until theyou fully close the door window.Continue to hold the switch for a fewseconds after you close the window.
2. Release the window switch.
3. Press and hold the window switch untilyou fully open the door window.
4. Release the window switch.
5.Lift and hold the window switch until youfully close the window.
6. Test for correct window operation bycarrying out the one-touch down andone-touch up features.
Bounce-Back
The window will stop automatically whileclosing. It reverses some distance if thereis an obstacle in the way.
Overriding the Bounce-Back Feature
WARNING
When you override the bounce-backfeature the window will not reverse ifit detects an obstacle. Take care whenclosing the windows to avoid personal injuryor damage to your vehicle.
104
MKX (CD9) Canada/United States of America, enUSA, Edition date: 201707, First Printing
Windows and MirrorsE146043
Page 108 of 603
Pull up the window switch and hold within afew seconds of the window reaching thebounce-back position. The window travelsup with no bounce-back protection. Thewindow stops if you release the switchbefore the window fully closes.
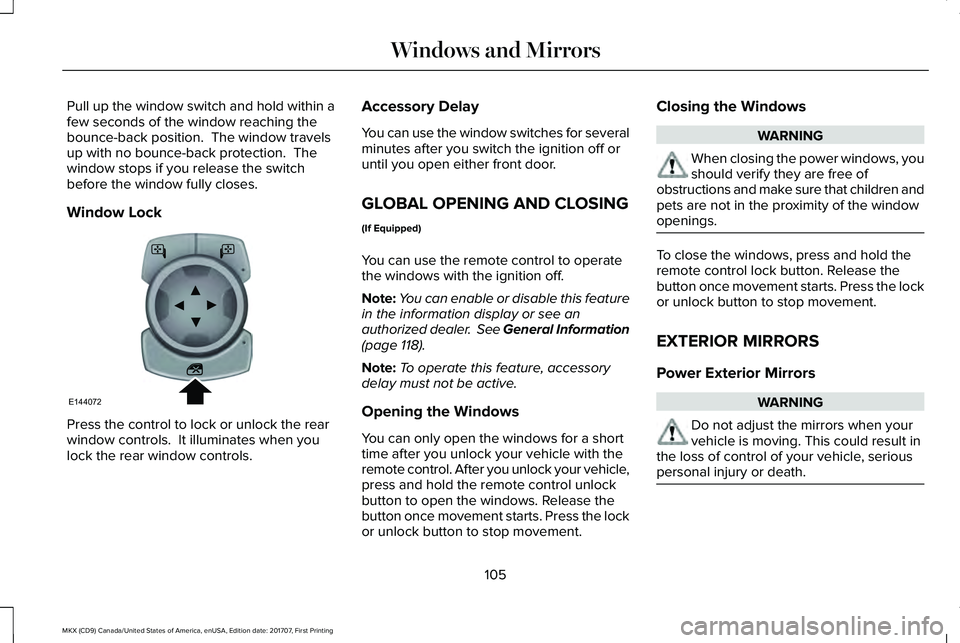
Window Lock
Press the control to lock or unlock the rearwindow controls. It illuminates when youlock the rear window controls.
Accessory Delay
You can use the window switches for severalminutes after you switch the ignition off oruntil you open either front door.
GLOBAL OPENING AND CLOSING
(If Equipped)
You can use the remote control to operatethe windows with the ignition off.
Note:You can enable or disable this featurein the information display or see anauthorized dealer. See General Information(page 118).
Note:To operate this feature, accessorydelay must not be active.
Opening the Windows
You can only open the windows for a shorttime after you unlock your vehicle with theremote control. After you unlock your vehicle,press and hold the remote control unlockbutton to open the windows. Release thebutton once movement starts. Press the lockor unlock button to stop movement.
Closing the Windows
WARNING
When closing the power windows, youshould verify they are free ofobstructions and make sure that children andpets are not in the proximity of the windowopenings.
To close the windows, press and hold theremote control lock button. Release thebutton once movement starts. Press the lockor unlock button to stop movement.
EXTERIOR MIRRORS
Power Exterior Mirrors
WARNING
Do not adjust the mirrors when yourvehicle is moving. This could result inthe loss of control of your vehicle, seriouspersonal injury or death.
105
MKX (CD9) Canada/United States of America, enUSA, Edition date: 201707, First Printing
Windows and MirrorsE144072
Page 109 of 603
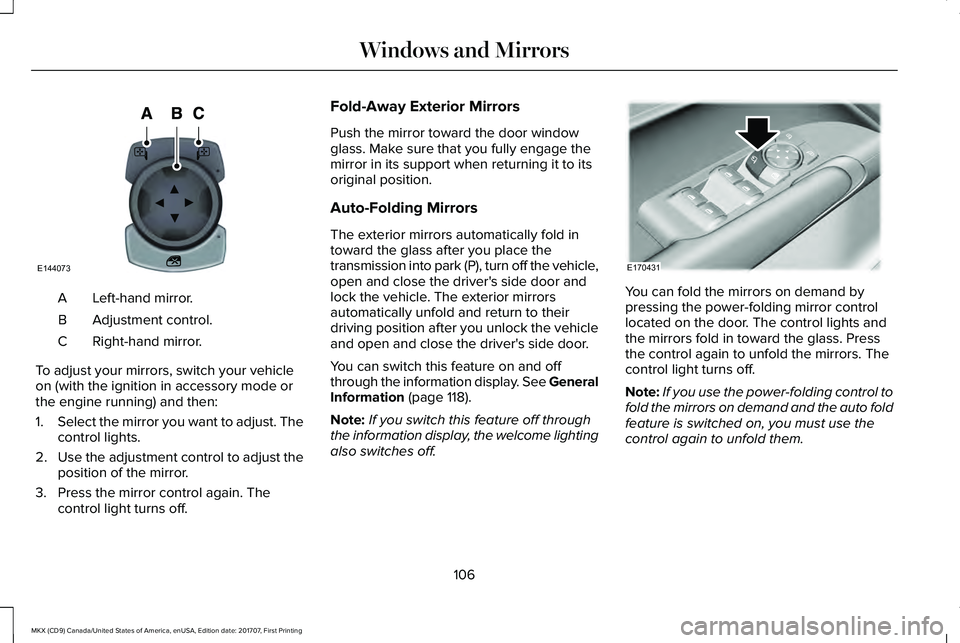
Left-hand mirror.A
Adjustment control.B
Right-hand mirror.C
To adjust your mirrors, switch your vehicleon (with the ignition in accessory mode orthe engine running) and then:
1.Select the mirror you want to adjust. Thecontrol lights.
2.Use the adjustment control to adjust theposition of the mirror.
3. Press the mirror control again. Thecontrol light turns off.
Fold-Away Exterior Mirrors
Push the mirror toward the door windowglass. Make sure that you fully engage themirror in its support when returning it to itsoriginal position.
Auto-Folding Mirrors
The exterior mirrors automatically fold intoward the glass after you place thetransmission into park (P), turn off the vehicle,open and close the driver's side door andlock the vehicle. The exterior mirrorsautomatically unfold and return to theirdriving position after you unlock the vehicleand open and close the driver's side door.
You can switch this feature on and offthrough the information display. See GeneralInformation (page 118).
Note:If you switch this feature off throughthe information display, the welcome lightingalso switches off.
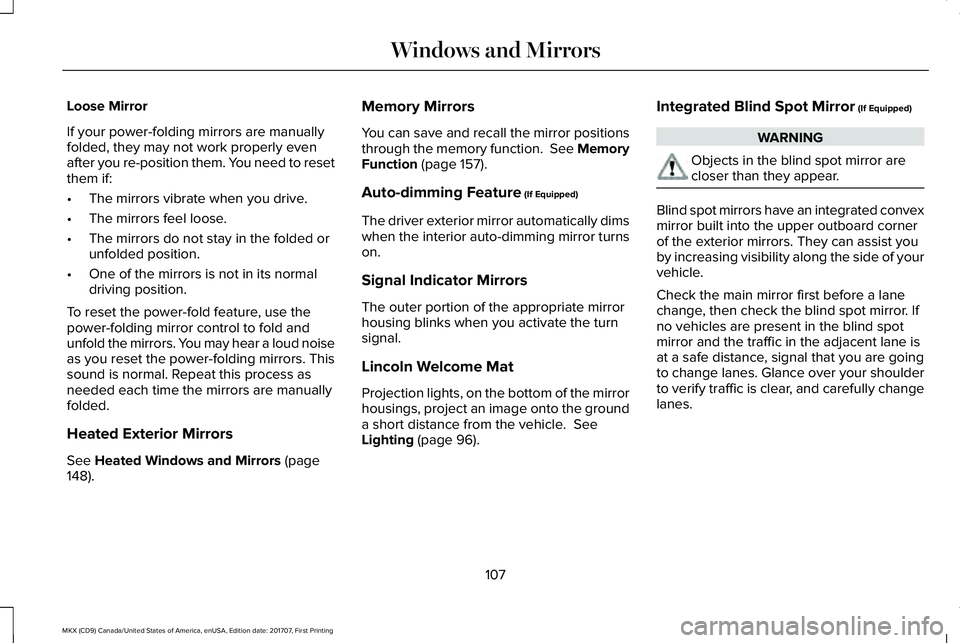
You can fold the mirrors on demand bypressing the power-folding mirror controllocated on the door. The control lights andthe mirrors fold in toward the glass. Pressthe control again to unfold the mirrors. Thecontrol light turns off.
Note:If you use the power-folding control tofold the mirrors on demand and the auto foldfeature is switched on, you must use thecontrol again to unfold them.
106
MKX (CD9) Canada/United States of America, enUSA, Edition date: 201707, First Printing
Windows and MirrorsE144073 E170431
Page 110 of 603
Loose Mirror
If your power-folding mirrors are manuallyfolded, they may not work properly evenafter you re-position them. You need to resetthem if:
•The mirrors vibrate when you drive.
•The mirrors feel loose.
•The mirrors do not stay in the folded orunfolded position.
•One of the mirrors is not in its normaldriving position.
To reset the power-fold feature, use thepower-folding mirror control to fold andunfold the mirrors. You may hear a loud noiseas you reset the power-folding mirrors. Thissound is normal. Repeat this process asneeded each time the mirrors are manuallyfolded.
Heated Exterior Mirrors
See Heated Windows and Mirrors (page148).
Memory Mirrors
You can save and recall the mirror positionsthrough the memory function. See MemoryFunction (page 157).
Auto-dimming Feature (If Equipped)
The driver exterior mirror automatically dimswhen the interior auto-dimming mirror turnson.
Signal Indicator Mirrors
The outer portion of the appropriate mirrorhousing blinks when you activate the turnsignal.
Lincoln Welcome Mat
Projection lights, on the bottom of the mirrorhousings, project an image onto the grounda short distance from the vehicle. SeeLighting (page 96).
Integrated Blind Spot Mirror (If Equipped)
WARNING
Objects in the blind spot mirror arecloser than they appear.
Blind spot mirrors have an integrated convexmirror built into the upper outboard cornerof the exterior mirrors. They can assist youby increasing visibility along the side of yourvehicle.
Check the main mirror first before a lanechange, then check the blind spot mirror. Ifno vehicles are present in the blind spotmirror and the traffic in the adjacent lane isat a safe distance, signal that you are goingto change lanes. Glance over your shoulderto verify traffic is clear, and carefully changelanes.
107
MKX (CD9) Canada/United States of America, enUSA, Edition date: 201707, First Printing
Windows and Mirrors