tow LINCOLN MKX 2018 Owners Manual
[x] Cancel search | Manufacturer: LINCOLN, Model Year: 2018, Model line: MKX, Model: LINCOLN MKX 2018Pages: 603, PDF Size: 4.94 MB
Page 5 of 603
Liftgate
Manual Liftgate................................................80
Power Liftgate...................................................81
Security
Passive Anti-Theft System............................86
Anti-Theft Alarm..............................................88
Steering Wheel
Adjusting the Steering Wheel - VehiclesWith: Power Adjustable SteeringColumn..........................................................89
Adjusting the Steering Wheel - VehiclesWith: Manual Adjustable SteeringColumn..........................................................90
Audio Control....................................................91
Voice Control....................................................91
Cruise Control.................................................92
Information Display Control.........................92
Heated Steering Wheel................................92
Wipers and Washers
Windshield Wipers..........................................93
Autowipers.......................................................94
Windshield Washers......................................94
Rear Window Wiper and Washers..............95
Lighting
General Information.......................................96
Lighting Control..............................................96
Autolamps.........................................................97
Instrument Lighting Dimmer........................98
Headlamp Exit Delay.....................................98
Daytime Running Lamps...............................98
Automatic High Beam Control....................99
Adaptive Headlamps...................................100
Direction Indicators.......................................101
Welcome Lighting..........................................101
Interior Lamps................................................102
Ambient Lighting...........................................103
Windows and Mirrors
Power Windows.............................................104
Global Opening and Closing......................105
Exterior Mirrors..............................................105
Interior Mirror.................................................108
Sun Visors.......................................................109
Moonroof.........................................................109
Instrument Cluster
Gauges...............................................................111
Warning Lamps and Indicators...................113
Audible Warnings and Indicators...............117
Information Displays
General Information.......................................118
Information Messages.................................125
Climate Control
Automatic Climate Control..........................145
Hints on Controlling the InteriorClimate.........................................................147
Heated Windows and Mirrors....................148
Cabin Air Filter...............................................148
Remote Start...................................................149
Seats
Sitting in the Correct Position....................150
Head Restraints.............................................150
Power Seats....................................................154
2
MKX (CD9) Canada/United States of America, enUSA, Edition date: 201707, First Printing
Table of Contents
Page 7 of 603
Using Adaptive Cruise Control.................230
Driving Aids
Driver Alert.....................................................237
Lane Keeping System.................................239
Blind Spot Information System.................244
Cross Traffic Alert.........................................246
Steering..........................................................250
Pre-Collision Assist.......................................251
Drive Control.................................................255
Load Carrying
Rear Under Floor Storage..........................257
Cargo Nets.....................................................257
Luggage Covers...........................................258
Roof Racks and Load Carriers..................258
Load Limit.......................................................259
Towing
Towing a Trailer.............................................264
Trailer Sway Control....................................265
Recommended Towing Weights..............265
Essential Towing Checks............................267
Towing the Vehicle on Four Wheels.......269
Driving Hints
Breaking-In......................................................271
Reduced Engine Performance...................271
Economical Driving.......................................271
Driving Through Water................................272
Floor Mats.......................................................273
Roadside Emergencies
Roadside Assistance...................................274
Hazard Flashers............................................275
Fuel Shutoff....................................................275
Jump Starting the Vehicle..........................276
Post-Crash Alert System.............................278
Transporting the Vehicle............................279
Customer Assistance
Getting the Services You Need................280
In California (U.S. Only)................................281
The Better Business Bureau (BBB) AutoLine Program (U.S. Only)........................282
Utilizing the Mediation/Arbitration Program(Canada Only)...........................................283
Getting Assistance Outside the U.S. andCanada.......................................................284
Ordering Additional Owner'sLiterature....................................................286
Reporting Safety Defects (U.S. Only)......286
Reporting Safety Defects (CanadaOnly)............................................................287
Fuses
Fuse Specification Chart............................288
Changing a Fuse..........................................305
Maintenance
General Information.....................................308
Opening and Closing the Hood...............308
Under Hood Overview - 2.7LEcoBoost™...................................................310
Under Hood Overview - 3.7L......................312
Engine Oil Dipstick - 2.7L EcoBoost™.......314
Engine Oil Dipstick - 3.7L.............................314
Engine Oil Check...........................................314
Oil Change Indicator Reset.........................315
4
MKX (CD9) Canada/United States of America, enUSA, Edition date: 201707, First Printing
Table of Contents
Page 19 of 603
PROTECTING THE ENVIRONMENT
You should play your part in protecting theenvironment. Correct vehicle usage and theauthorized disposal of waste, cleaning andlubrication materials are significant stepstoward this aim.
For details about Ford Motor Company'ssustainability progress and initiatives visit:
Web Address
www.sustainability.ford.com
16
MKX (CD9) Canada/United States of America, enUSA, Edition date: 201707, First Printing
Environment
Page 27 of 603
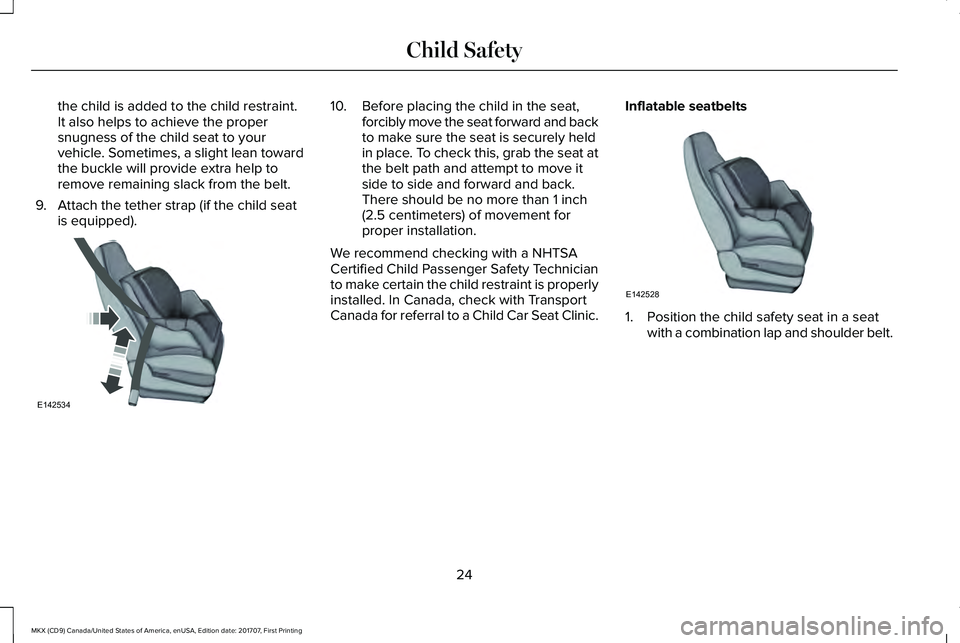
the child is added to the child restraint.It also helps to achieve the propersnugness of the child seat to yourvehicle. Sometimes, a slight lean towardthe buckle will provide extra help toremove remaining slack from the belt.
9. Attach the tether strap (if the child seatis equipped).
10. Before placing the child in the seat,forcibly move the seat forward and backto make sure the seat is securely heldin place. To check this, grab the seat atthe belt path and attempt to move itside to side and forward and back.There should be no more than 1 inch(2.5 centimeters) of movement forproper installation.
We recommend checking with a NHTSACertified Child Passenger Safety Technicianto make certain the child restraint is properlyinstalled. In Canada, check with TransportCanada for referral to a Child Car Seat Clinic.
Inflatable seatbelts
1. Position the child safety seat in a seatwith a combination lap and shoulder belt.
24
MKX (CD9) Canada/United States of America, enUSA, Edition date: 201707, First Printing
Child SafetyE142534 E142528
Page 29 of 603
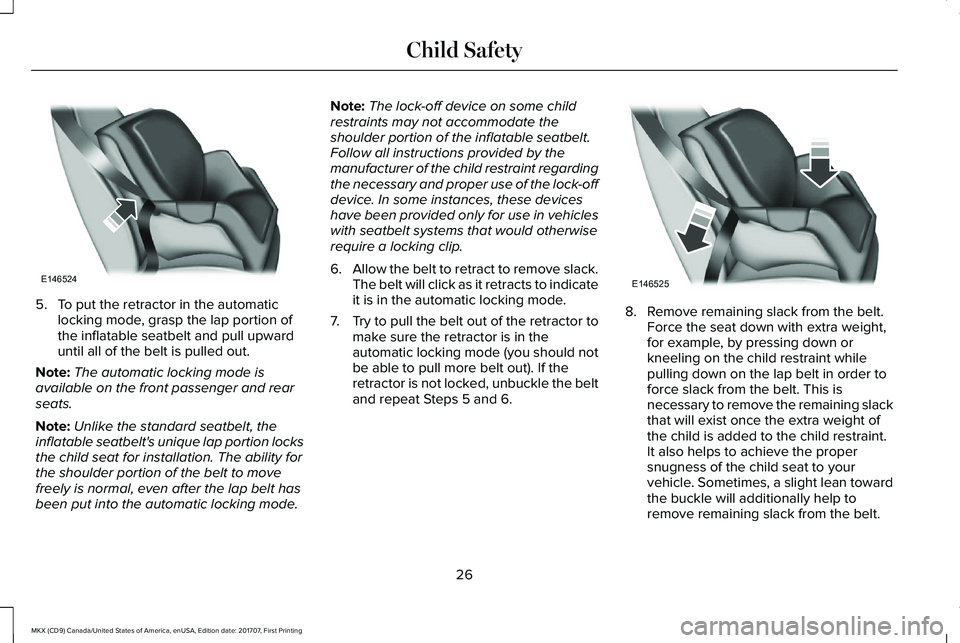
5. To put the retractor in the automaticlocking mode, grasp the lap portion ofthe inflatable seatbelt and pull upwarduntil all of the belt is pulled out.
Note:The automatic locking mode isavailable on the front passenger and rearseats.
Note:Unlike the standard seatbelt, theinflatable seatbelt's unique lap portion locksthe child seat for installation. The ability forthe shoulder portion of the belt to movefreely is normal, even after the lap belt hasbeen put into the automatic locking mode.
Note:The lock-off device on some childrestraints may not accommodate theshoulder portion of the inflatable seatbelt.Follow all instructions provided by themanufacturer of the child restraint regardingthe necessary and proper use of the lock-offdevice. In some instances, these deviceshave been provided only for use in vehicleswith seatbelt systems that would otherwiserequire a locking clip.
6.Allow the belt to retract to remove slack.The belt will click as it retracts to indicateit is in the automatic locking mode.
7.Try to pull the belt out of the retractor tomake sure the retractor is in theautomatic locking mode (you should notbe able to pull more belt out). If theretractor is not locked, unbuckle the beltand repeat Steps 5 and 6.
8. Remove remaining slack from the belt.Force the seat down with extra weight,for example, by pressing down orkneeling on the child restraint whilepulling down on the lap belt in order toforce slack from the belt. This isnecessary to remove the remaining slackthat will exist once the extra weight ofthe child is added to the child restraint.It also helps to achieve the propersnugness of the child seat to yourvehicle. Sometimes, a slight lean towardthe buckle will additionally help toremove remaining slack from the belt.
26
MKX (CD9) Canada/United States of America, enUSA, Edition date: 201707, First Printing
Child SafetyE146524 E146525
Page 36 of 603
If the booster seat slides on the vehicle seatupon which it is being used, placing arubberized mesh sold as shelf or carpet linerunder the booster seat may improve thiscondition. Do not introduce any item thickerthan this under the booster seat. Check withthe booster seat manufacturer's instructions.
CHILD RESTRAINT POSITIONING
WARNINGS
Airbags can kill or injure a child in achild seat. Never place a rear-facingchild seat in front of an active airbag. If youmust use a forward-facing child seat in thefront seat, move the vehicle seat upon whichthe child seat is installed all the way back.When possible, all children age 12 and undershould be properly restrained in a rearseating position. If all children cannot beseated and restrained properly in a rearseating position, properly restrain the largestchild in the front seat.
WARNINGS
Always carefully follow the instructionsand warnings provided by themanufacturer of any child restraint todetermine if the restraint device isappropriate for your child's size, height,weight, or age. Follow the child restraintmanufacturer's instructions and warningsprovided for installation and use inconjunction with the instructions andwarnings provided by your vehiclemanufacturer. A safety seat that is improperlyinstalled or utilized, is inappropriate for yourchild's height, age, or weight or does notproperly fit the child may increase the risk ofserious injury or death.
Never let a passenger hold a child onhis or her lap while your vehicle ismoving. The passenger cannot protect thechild from injury in a crash, which may resultin serious injury or death.
WARNINGS
Never use pillows, books, or towels toboost a child. They can slide aroundand increase the likelihood of injury or deathin a crash.
Always restrain an unoccupied childseat or booster seat. These objectsmay become projectiles in a crash or suddenstop, which may increase the risk of seriousinjury.
Never place, or allow a child to place,the shoulder belt under a child's armor behind the back because it reduces theprotection for the upper part of the body andmay increase the risk of injury or death in acrash.
To avoid risk of injury, do not leavechildren or pets unattended in yourvehicle.
33
MKX (CD9) Canada/United States of America, enUSA, Edition date: 201707, First Printing
Child Safety
Page 42 of 603

Vehicle Sensitive Mode
This is the normal retractor mode, whichallows free shoulder belt length adjustmentto your movements and locking in responseto vehicle movement. For example, if thedriver brakes suddenly or turns a cornersharply, or the vehicle receives an impact ofabout 5 mph (8 km/h) or more, thecombination seatbelts lock to help reduceforward movement of the driver andpassengers.
In addition, the retractor is designed to lockif you pull the webbing out too quickly. If theseatbelt retractor locks, slowly lower theheight adjuster to allow the seatbelt toretract. If the retractor does not unlock, pullthe seatbelt out slowly then feed a smalllength of webbing back toward the stowedposition. For rear seatbelts, recline the rearseat backrest or push the seat backrestcushion away from the seatbelt. Feed a smalllength of webbing back toward the stowedposition.
Automatic Locking Mode
In this mode, the shoulder belt automaticallypre-locks. The belt still retracts to removeany slack in the shoulder belt. The automaticlocking mode is not available on the driverseatbelt.
When to Use the Automatic Locking Mode
Use this mode any time a child safety seat,except a booster, is installed in passengerfront or rear seating positions. Properlyrestrain children 12 years old and under in arear seating position whenever possible.See Child Safety (page 19).
How to Use the Automatic Locking Mode
Non-inflatable seatbelts
1.Buckle the combination lap and shoulderbelt.
2. Grasp the shoulder portion and pulldownward until you pull the entire beltout. As the belt retracts, you will hear aclicking sound. This indicates the seatbeltis now in the automatic locking mode.
Rear outboard inflatable seatbelts (secondrow only–if equipped)
39
MKX (CD9) Canada/United States of America, enUSA, Edition date: 201707, First Printing
SeatbeltsE142591
Page 55 of 603
Note:When the passenger airbag statusindicator off light is illuminated, thepassenger (seat mounted) side airbag maybe disabled to avoid the risk of airbagdeployment injuries.
After all occupants have adjusted their seatsand put on seatbelts, it is very important thatthey continue to sit properly. A properlyseated occupant sits upright, leaning againstthe seatback, and centered on the seatcushion, with their feet comfortably extendedon the floor. Sitting improperly can increasethe chance of injury in a crash event. Forexample, if an occupant slouches, lies down,turns sideways, sits forward, leans forwardor sideways, or puts one or both feet up, thechance of injury during a crash greatlyincreases.
If you think that the status of the passengerairbag off indicator lamp is incorrect, checkfor the following:
•Objects lodged underneath the seat.
•Objects between the seat cushion andthe center console.
•Objects hanging off the seatback.
•Objects stowed in the seatback mappocket.
•Objects placed on the occupant's lap.
•Cargo interference with the seat
•Other passengers pushing or pulling onthe seat.
•Rear passenger feet and knees restingor pushing on the seat.
The conditions listed above may cause theweight of a properly seated occupant to beincorrectly interpreted by the front passengersensing system. The person in the frontpassenger seat may appear heavier or lighterdue to the conditions described in the listabove.
Make sure the front passengersensing system is operatingproperly. See Crash Sensors andAirbag Indicator (page 55).
If the airbag readiness light is lit, do thefollowing:
The driver and adult passengers shouldcheck for objects lodged underneath thefront passenger seat, or cargo interferingwith the seat.
If there are lodged objects, or cargo isinterfering with the seat, take the followingsteps to remove the obstruction:
•Pull the vehicle over.
•Switch the vehicle off.
•Driver and adult passengers shouldcheck for any objects lodged underneaththe front passenger seat or cargointerfering with the seat.
•Remove the obstruction(s) (if found).
•Restart the vehicle.
•Wait at least two minutes and verify thatthe airbag readiness light is no longerilluminated.
•If the airbag readiness light remainsilluminated, this may or may not be aproblem due to the front passengersensing system.
Do not attempt to repair or service thesystem. Take your vehicle immediately to anauthorized dealer.
52
MKX (CD9) Canada/United States of America, enUSA, Edition date: 201707, First Printing
Supplementary Restraints SystemE67017
Page 58 of 603
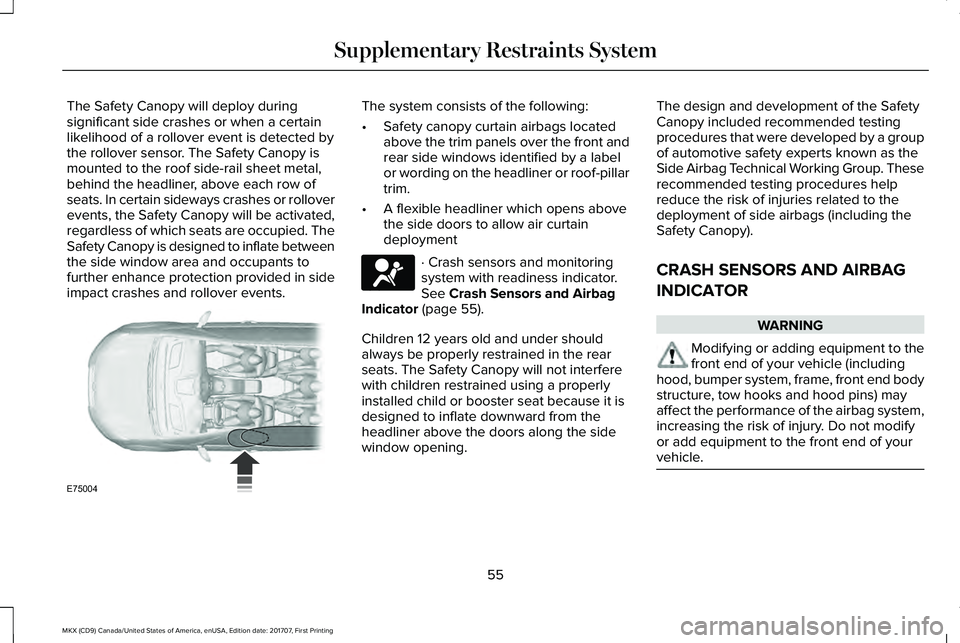
The Safety Canopy will deploy duringsignificant side crashes or when a certainlikelihood of a rollover event is detected bythe rollover sensor. The Safety Canopy ismounted to the roof side-rail sheet metal,behind the headliner, above each row ofseats. In certain sideways crashes or rolloverevents, the Safety Canopy will be activated,regardless of which seats are occupied. TheSafety Canopy is designed to inflate betweenthe side window area and occupants tofurther enhance protection provided in sideimpact crashes and rollover events.
The system consists of the following:
•Safety canopy curtain airbags locatedabove the trim panels over the front andrear side windows identified by a labelor wording on the headliner or roof-pillartrim.
•A flexible headliner which opens abovethe side doors to allow air curtaindeployment
· Crash sensors and monitoringsystem with readiness indicator.See Crash Sensors and AirbagIndicator (page 55).
Children 12 years old and under shouldalways be properly restrained in the rearseats. The Safety Canopy will not interferewith children restrained using a properlyinstalled child or booster seat because it isdesigned to inflate downward from theheadliner above the doors along the sidewindow opening.
The design and development of the SafetyCanopy included recommended testingprocedures that were developed by a groupof automotive safety experts known as theSide Airbag Technical Working Group. Theserecommended testing procedures helpreduce the risk of injuries related to thedeployment of side airbags (including theSafety Canopy).
CRASH SENSORS AND AIRBAG
INDICATOR
WARNING
Modifying or adding equipment to thefront end of your vehicle (includinghood, bumper system, frame, front end bodystructure, tow hooks and hood pins) mayaffect the performance of the airbag system,increasing the risk of injury. Do not modifyor add equipment to the front end of yourvehicle.
55
MKX (CD9) Canada/United States of America, enUSA, Edition date: 201707, First Printing
Supplementary Restraints SystemE75004 E67017
Page 61 of 603
GENERAL INFORMATION ON
RADIO FREQUENCIES
This device complies with Part 15 of the FCCRules and with Licence exempt RSSStandards of Industry Canada. Operation issubject to the following two conditions:
•This device may not cause harmfulinterference, and
•This device must accept any interferencereceived, including interference that maycause undesired operation.
WARNING
Changes or modifications notexpressively approved by the partyresponsible for compliance could void theuser's authority to operate the equipment.The term "IC:" before the radio certificationnumber only signifies that Industry Canadatechnical specifications were met.
The typical operating range for yourtransmitter is approximately 33 ft (10 m).Vehicles equipped with the remote startfeature have a greater range.
One of the following could cause a decreasein operating range:
•Weather conditions.
•Nearby radio towers.
•Structures around your vehicle.
•Other vehicles parked next to yourvehicle.
The radio frequency used by your remotecontrol can also be used by other radiotransmitters, for example amateur radios,medical equipment, wireless headphones,wireless remote controls, cell phones, batterychargers and alarm systems. If thefrequencies are jammed, you will not be ableto use your remote control. You can lock andunlock the doors with the key.
Note:Make sure to lock your vehicle beforeleaving it unattended.
Note:If you are in range, the remote controlwill operate if you press any buttonunintentionally.
Note:The remote control contains sensitiveelectrical components. Exposure to moistureor impact may cause permanent damage.
Intelligent Access
The system uses a radio frequency signal tocommunicate with your vehicle and authorizeyour vehicle to unlock when one of thefollowing conditions are met:
•You activate the front exterior doorhandle switch.
•You press the luggage compartmentbutton.
•You press a button on the transmitter.
If excessive radio frequency interference ispresent in the area or if the transmitterbattery is low, you may need to mechanicallyunlock your door. You can use themechanical key blade in your intelligentaccess key to open the driver door in thissituation. See Remote Control (page 58).
REMOTE CONTROL
Intelligent Access Key
Note:You may not be able to shift out ofpark (P) unless the intelligent access key isinside your vehicle.
58
MKX (CD9) Canada/United States of America, enUSA, Edition date: 201707, First Printing
Keys and Remote Controls