fuel type LINCOLN MKZ 2013 Owners Manual
[x] Cancel search | Manufacturer: LINCOLN, Model Year: 2013, Model line: MKZ, Model: LINCOLN MKZ 2013Pages: 474, PDF Size: 3.79 MB
Page 155 of 474
Once your vehicle has started, it
remains running until you press the
start button, even if it does not detect
a valid key. If you open and close a
door while your vehicle is running, the
system searches for a valid key. You
cannot start your vehicle if it does not
detect a valid key within 20 seconds.
Automatic Engine Shutdown
Your vehicle is equipped with a
feature that automatically shuts down
the engine if it has been idling for an
extended period of time. The ignition
also turns off in order to save battery
power. Before the engine shuts down,
a message appears in the information
display showing a timer counting
down from 30 seconds. If you do not
intervene within 30 seconds, the
engine shuts down. Another message
appears in the information display to
inform you that the engine has shut
down in order to save fuel. Start your
vehicle as you normally do.
Automatic Engine Shutdown
Override
Note:
You cannot permanently switch
off the automatic engine shutdown
feature. When it is temporarily
switched off, it turns on at the next
ignition cycle.
The engine shutdown can be stopped,
or the timer reset, at any point before
the 30 second countdown has expired
by doing any of the following: • • You can reset the timer by
interacting with your vehicle (such
as pressing the brake pedal or
accelerator pedal).
• • You can temporarily switch off the shutdown feature any time the
ignition is on (for the current
ignition cycle only). Use the
information display to do so. See
Information Displays (page 100).
• • During the countdown before engine shutdown, you are
prompted to press OK or RESET
(depending on your type of
information display) to temporarily
switch the feature off (for the
current ignition cycle only).
STARTING A GASOLINE
ENGINE
After you start the engine, the idle
speed increases to warm up the
engine. If the engine idle speed does
not slow down automatically, have
your vehicle checked by your
authorized dealer.
Before starting the engine, check the
following:
• Make sure all occupants have
fastened their safety belts.
• Make sure the headlamps and
electrical accessories are off.
• Make sure the parking brake is on.
• Put the transmission in position P.
Note: Do not touch the accelerator
pedal.
1. Fully press the brake pedal.
152
Starting and Stopping the Engine
Page 164 of 474
5.
Calculate fuel economy by dividing
miles traveled by gallons used (For
Metric: Multiply liters used by 100,
then divide by kilometers traveled).
Keep a record for at least one month
and record the type of driving (city or
highway). This provides an accurate
estimate of the vehicle ’s fuel economy
under current driving conditions.
Additionally, keeping records during
summer and winter show how
temperature impacts fuel economy.
In general, lower temperatures mean
lower fuel economy.
EMISSION CONTROL
SYSTEM WARNINGS
Do not park, idle, or drive your
vehicle in dry grass or other dry
ground cover. The emission system
heats up the engine compartment and
exhaust system, which can start a fire. Exhaust leaks may result in entry
of harmful and potentially lethal
fumes into the passenger
compartment. If you smell exhaust
fumes inside your vehicle, have your
dealer inspect your vehicle
immediately. Do not drive if you smell
exhaust fumes. Your vehicle is equipped with various
emission control components and a
catalytic converter which will enable
your vehicle to comply with applicable
exhaust emission standards. To make
sure that the catalytic converter and
other emission control components
continue to work properly:
To make sure that the catalytic
converter and other emission control
components continue to work
properly:
•
Use only the specified fuel listed.
• Avoid running out of fuel.
• Do not turn off the ignition while
your vehicle is moving, especially
at high speeds.
• Have the items listed in scheduled
maintenance information
performed according to the
specified schedule.
The scheduled maintenance items
listed in scheduled maintenance
information are essential to the life
and performance of your vehicle and
to its emissions system
If other than Ford, Motorcraft® or
Ford-authorized parts are used for
maintenance replacements or for
service of components affecting
emission control, such non-Ford parts
should be equivalent to genuine Ford
Motor Company parts in performance
and durability.
161
Fuel and Refueling
Page 258 of 474
Protected components
Fuse amp rating
Fuse or relay
number
Fuel pump relay
-
40
Horn relay
-
41
Not used
-
42
Not used
-
43
Not used
-
44
Not used
-
45
Alternator
10A 2
46
Brake on/off switch
10A 2
47
Horn
20A 1
48
Mass air flow monitor
5A 1
49
Not used
-
50
Not used
-
51
Not used
-
52
Power seats
10A 1
53
Not used
-
54
Not used
-
55
1 Micro fuse
2 Dual micro fuse
3 M-type fuse
Power Distribution Box - Bottom
There are fuses located on the bottom
of the fuse box. To access the bottom
of the fuse box, do the following:
255
Fuses
Page 279 of 474
Before adding any fluid, make sure the
correct type is used. The type of fluid
used is normally indicated on the
dipstick and also in the Technical
Specifications section in this chapter.
Note:
An overfill condition of
transmission fluid may cause shift or
engagement concerns or possible
damage.
Do not use supplemental transmission
fluid additives, treatments or cleaning
agents. The use of these materials
may affect transmission operation
and result in damage to internal
transmission components. Reinstall
the air filter assembly. After the fluid
level has been checked and adjusted
as necessary, do the following:
1. Shut the engine off.
2. Loosen the clamp holding the air filter assembly to the rubber hose.
3. Rotate the air filter assembly 90 degrees clockwise without
disconnecting the sensor.
4. Seat the air filter assembly back into the grommets by pushing
down on the air filter assembly.
5. Tighten the clamp.
6. Install and tighten two bolts that
attach air filter assembly to the
front of the vehicle. 7.
Install the bolt cover (if equipped).
8. Reinstall the harness retaining clip
into the front of the air filter
assembly.
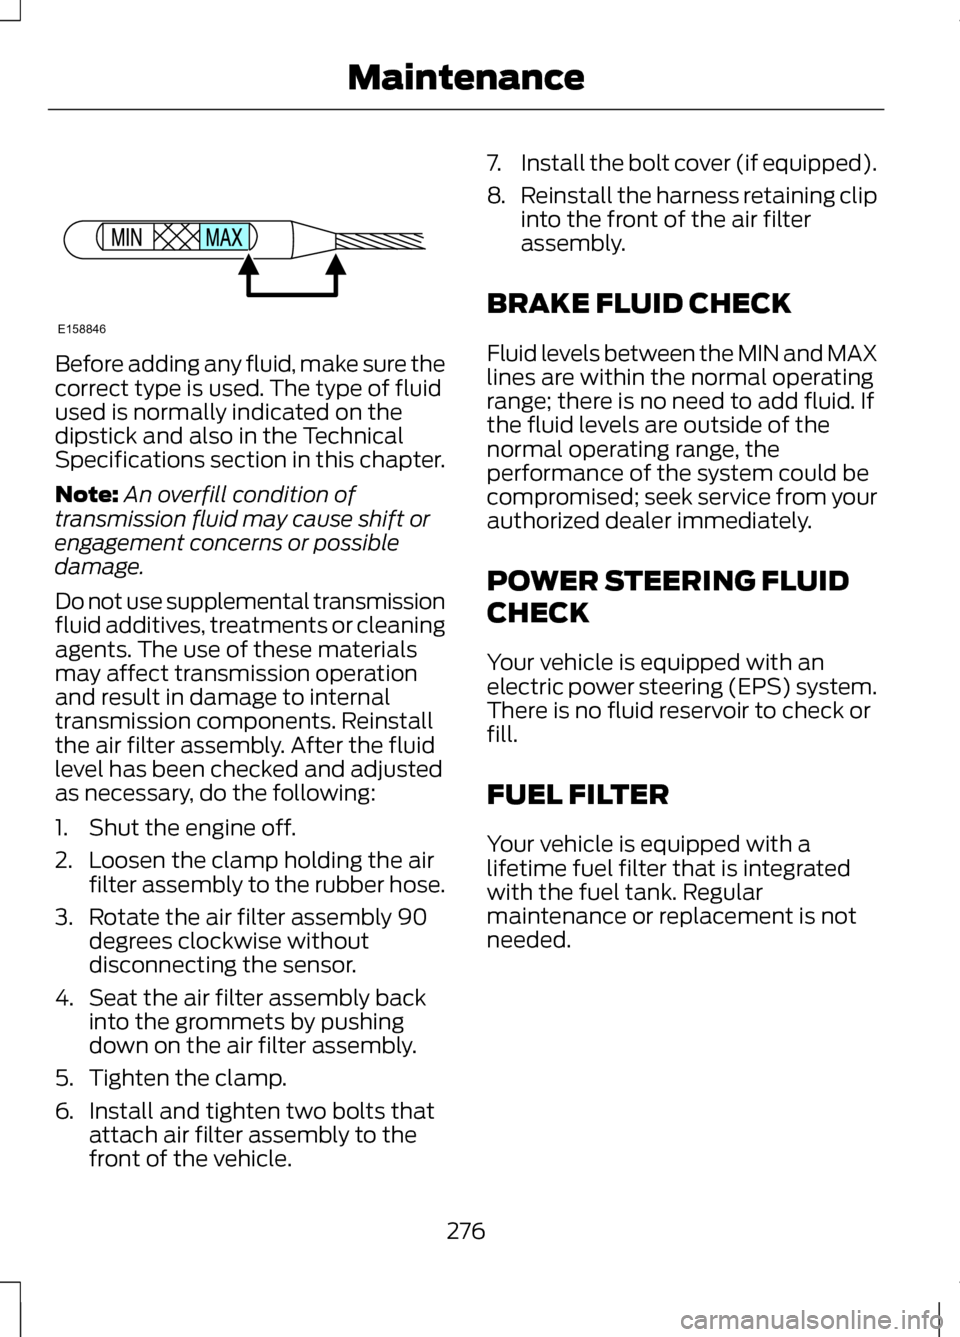
BRAKE FLUID CHECK
Fluid levels between the MIN and MAX
lines are within the normal operating
range; there is no need to add fluid. If
the fluid levels are outside of the
normal operating range, the
performance of the system could be
compromised; seek service from your
authorized dealer immediately.
POWER STEERING FLUID
CHECK
Your vehicle is equipped with an
electric power steering (EPS) system.
There is no fluid reservoir to check or
fill.
FUEL FILTER
Your vehicle is equipped with a
lifetime fuel filter that is integrated
with the fuel tank. Regular
maintenance or replacement is not
needed.
276
MaintenanceE158846
Page 334 of 474
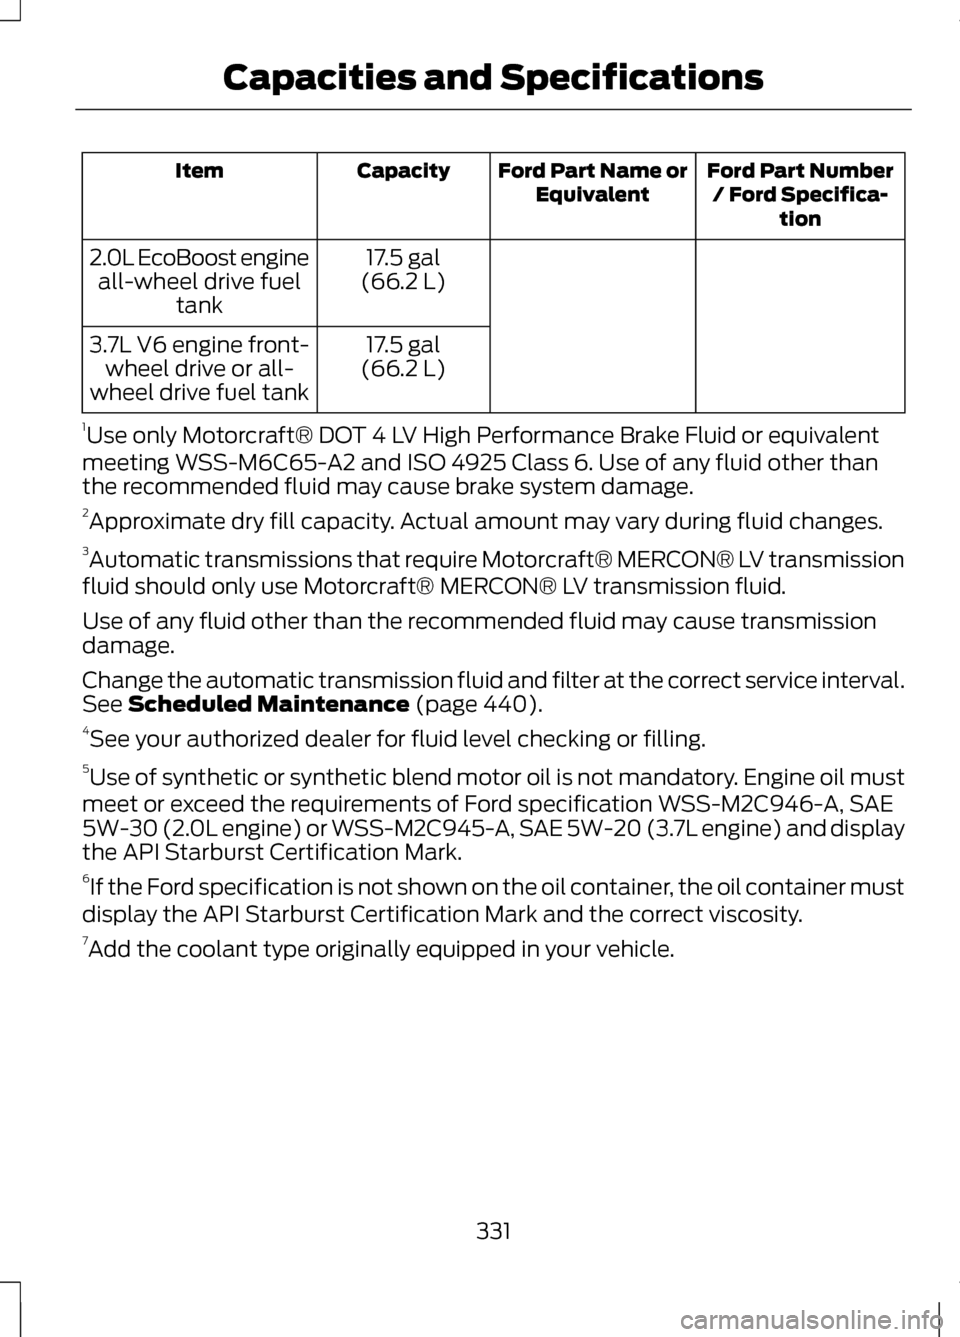
Ford Part Number
/ Ford Specifica- tion
Ford Part Name or
Equivalent
Capacity
Item
17.5 gal
(66.2 L)
2.0L EcoBoost engine
all-wheel drive fuel tank
17.5 gal
(66.2 L)
3.7L V6 engine front-
wheel drive or all-
wheel drive fuel tank
1 Use only Motorcraft® DOT 4 LV High Performance Brake Fluid or equivalent
meeting WSS-M6C65-A2 and ISO 4925 Class 6. Use of any fluid other than
the recommended fluid may cause brake system damage.
2 Approximate dry fill capacity. Actual amount may vary during fluid changes.
3 Automatic transmissions that require Motorcraft® MERCON® LV transmission
fluid should only use Motorcraft® MERCON® LV transmission fluid.
Use of any fluid other than the recommended fluid may cause transmission
damage.
Change the automatic transmission fluid and filter at the correct service interval.
See Scheduled Maintenance (page 440).
4 See your authorized dealer for fluid level checking or filling.
5 Use of synthetic or synthetic blend motor oil is not mandatory. Engine oil must
meet or exceed the requirements of Ford specification WSS-M2C946-A, SAE
5W-30 (2.0L engine) or WSS-M2C945-A, SAE 5W-20 (3.7L engine) and display
the API Starburst Certification Mark.
6 If the Ford specification is not shown on the oil container, the oil container must
display the API Starburst Certification Mark and the correct viscosity.
7 Add the coolant type originally equipped in your vehicle.
331
Capacities and Specifications
Page 411 of 474
1. Enter the necessary information
into the highlighted text fields (in
any order). For address destination
entry, the Go! button appears once
all the necessary information has
been entered. Pressing the Go!
button makes the address location
appear on the map. If you choose
Previous Destination, the last 20
destinations you have selected
appear.
2. Select Set as Dest to make this your destination. You can also
choose to set this as a waypoint
(have the system route to this
point on the way to your current
destination) or save it as a favorite.
Any Avoid Areas selections are
also considered in route
calculation.
3. Choose from up to three different types of routes, then select Start
Route.
• Fastest: Uses the fastest moving
roads possible.
• Shortest: Uses the shortest
distance possible.
• Eco (EcoRoute): Uses the most
fuel efficient route. You can cancel the route or have the
system demo the route for you. Select
Route Prefs to set route preferences
like avoiding freeways, toll roads,
ferries and car trains as well as to use
or not use HOV lanes. (HOV lanes are
High Occupancy Vehicle Lanes also
known as carpool or diamond lanes.
These lanes are reserved for people
who ride in buses, vanpools or
carpools.)
Note:
If Start Route button is not
pressed and the vehicle is driven on a
recognized road, the system defaults
to the fastest route option and begins
guidance.
During route guidance, the talking
bubble icon that appears in the upper
right navigation corner (green bar) can
be pressed if the user wants the
system to repeat a route guidance
instruction. Instructions decrease with
each press.
Point of Interest (POI)
Categories
Your system offers a variety if POI
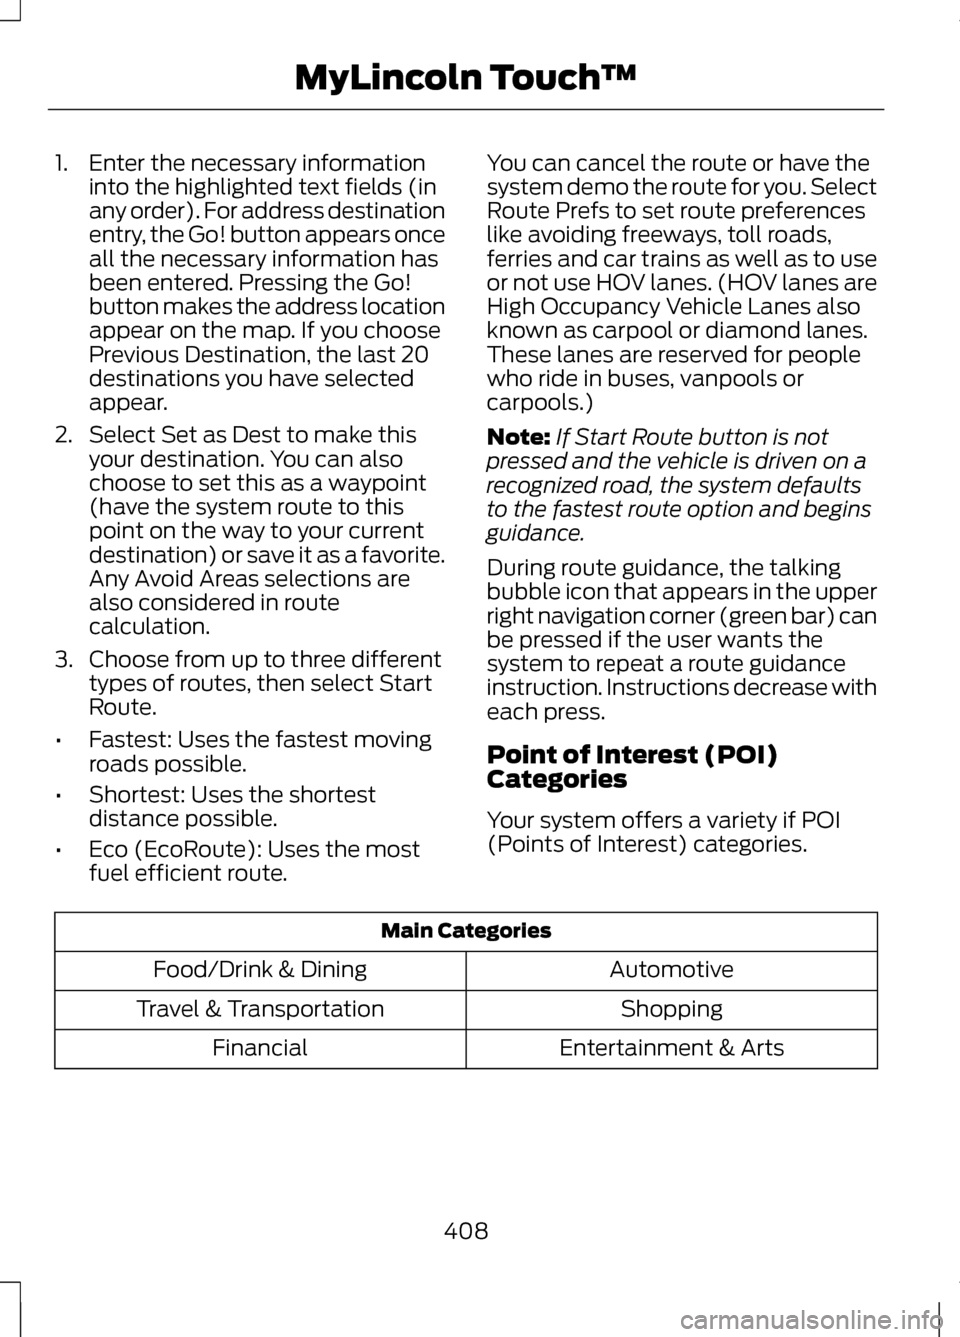
(Points of Interest) categories. Main Categories
Automotive
Food/Drink & Dining
Shopping
Travel & Transportation
Entertainment & Arts
Financial
408
MyLincoln Touch
™