LINCOLN MKZ 2018 Owners Manual
Manufacturer: LINCOLN, Model Year: 2018, Model line: MKZ, Model: LINCOLN MKZ 2018Pages: 595, PDF Size: 5.06 MB
Page 311 of 595
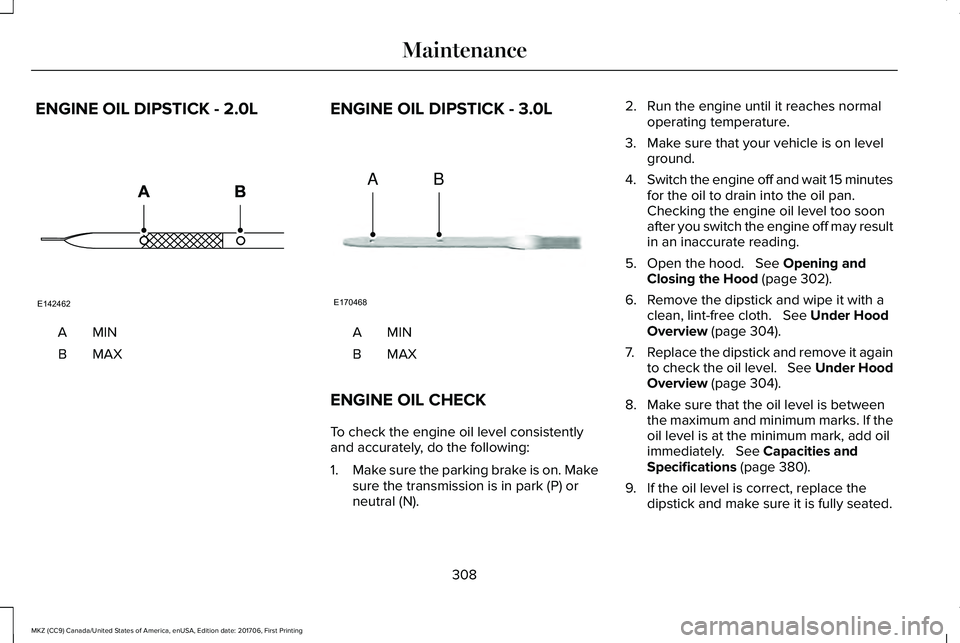
ENGINE OIL DIPSTICK - 2.0L
MINA
MAXB
ENGINE OIL DIPSTICK - 3.0L
MINA
MAXB
ENGINE OIL CHECK
To check the engine oil level consistentlyand accurately, do the following:
1.Make sure the parking brake is on. Makesure the transmission is in park (P) orneutral (N).
2. Run the engine until it reaches normaloperating temperature.
3. Make sure that your vehicle is on levelground.
4.Switch the engine off and wait 15 minutesfor the oil to drain into the oil pan. Checking the engine oil level too soonafter you switch the engine off may resultin an inaccurate reading.
5. Open the hood. See Opening andClosing the Hood (page 302).
6. Remove the dipstick and wipe it with aclean, lint-free cloth. See Under HoodOverview (page 304).
7.Replace the dipstick and remove it againto check the oil level. See Under HoodOverview (page 304).
8. Make sure that the oil level is betweenthe maximum and minimum marks. If theoil level is at the minimum mark, add oilimmediately. See Capacities andSpecifications (page 380).
9. If the oil level is correct, replace thedipstick and make sure it is fully seated.
308
MKZ (CC9) Canada/United States of America, enUSA, Edition date: 201706, First Printing
MaintenanceE142462 E170468
AB
Page 312 of 595
Note:Do not remove the dipstick when theengine is running.
Note: If the oil level is between themaximum and minimum marks, the oil levelis acceptable. Do not add oil.
Note:The oil consumption of new enginesreaches its normal level after approximately3,000 mi (5,000 km).
Adding Engine Oil
WARNING
Do not remove the filler cap when theengine is running.
Do not use supplemental engine oil additivesbecause they are unnecessary and couldlead to engine damage that may not becovered by the vehicle Warranty.
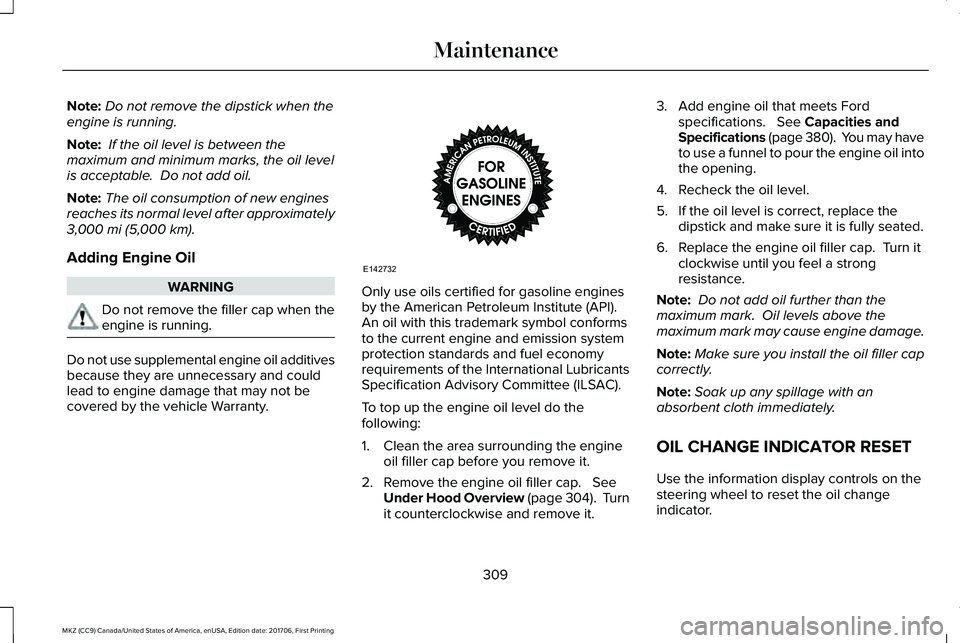
Only use oils certified for gasoline enginesby the American Petroleum Institute (API). An oil with this trademark symbol conformsto the current engine and emission systemprotection standards and fuel economyrequirements of the International LubricantsSpecification Advisory Committee (ILSAC).
To top up the engine oil level do thefollowing:
1. Clean the area surrounding the engineoil filler cap before you remove it.
2. Remove the engine oil filler cap. SeeUnder Hood Overview (page 304). Turnit counterclockwise and remove it.
3. Add engine oil that meets Fordspecifications. See Capacities andSpecifications (page 380). You may haveto use a funnel to pour the engine oil intothe opening.
4. Recheck the oil level.
5. If the oil level is correct, replace thedipstick and make sure it is fully seated.
6. Replace the engine oil filler cap. Turn itclockwise until you feel a strongresistance.
Note: Do not add oil further than themaximum mark. Oil levels above themaximum mark may cause engine damage.
Note:Make sure you install the oil filler capcorrectly.
Note:Soak up any spillage with anabsorbent cloth immediately.
OIL CHANGE INDICATOR RESET
Use the information display controls on thesteering wheel to reset the oil changeindicator.
309
MKZ (CC9) Canada/United States of America, enUSA, Edition date: 201706, First Printing
MaintenanceE142732
Page 313 of 595
From the main menu scroll to:
Action and descriptionMessage
Press the right arrow button,then from this menu scroll tothe following message.
Settings
Press the right arrow button,then from this menu scroll tothe following message.
Vehicle
Press the right arrow button,then from this menu scroll tothe following message.
Oil Life
Press and hold the OK buttonuntil the instrument clusterdisplays the followingmessage.
Hold OK toReset
Reset Successful
When the oil change indicatorresets the instrument clusterdisplays 100%.
Remaining Life
{00}%
Action and descriptionMessage
If the instrument clusterdisplays one of the followingmessages, repeat theprocess.
Not Reset
Reset Cancelled
ENGINE COOLANT CHECK
WARNINGS
Never remove the coolant reservoircap when the engine is running or hot.
Do not put coolant in the windshieldwasher reservoir. If sprayed on thewindshield, coolant could make it difficult tosee through the windshield.
To reduce the risk of personal injury,make sure the engine is cool beforeunscrewing the coolant pressure relief cap.The cooling system is under pressure. Steamand hot liquid can come out forcefully whenyou loosen the cap slightly.
WARNINGS
Do not add coolant further than theMAX mark.
When the engine is cold, check theconcentration and level of the coolant at theintervals listed in the scheduled maintenanceinformation. See Scheduled Maintenance(page 509).
Note:Make sure that the coolant level isbetween the MIN and the MAX marks onthe coolant reservoir.
Note: Coolant expands when it is hot. Thelevel may extend beyond the MAX mark.
Maintain coolant concentration within 48%to 50%, which equates to a freeze pointbetween -30°F (-34°C) and -34°F (-37°C).Coolant concentration should be checkedusing a refractometer. We recommend,Robinair® Coolant and Battery Refractometer75240 (Rotunda tool part number:ROB75240). We do not recommend the useof hydrometers or coolant test strips formeasuring coolant concentration.
310
MKZ (CC9) Canada/United States of America, enUSA, Edition date: 201706, First Printing
Maintenance
Page 314 of 595
Note:Automotive fluids are notinterchangeable. Do not use coolant orwindshield washer fluid outside of itsspecified function and vehicle location.
Note: Do not use stop leak pellets, coolingsystem sealants, or non-specified additivesas they can cause damage to the enginecooling or heating systems. Resultingcomponent damage may not be covered bythe vehicle Warranty.
Adding Coolant
WARNINGS
Do not add engine coolant when theengine is hot. Failure to follow thisinstruction could result in personal injury.
Never remove the coolant reservoircap when the engine is running or hot.
It is very important to use prediluted coolantmeeting the correct specification in order toavoid plugging the small passageways in theengine cooling system. See Capacities andSpecifications (page 380). Incorrectprediluted coolant use can cause damagenot covered by the vehicle Warranty.
If the coolant level is at or below theminimum mark, add prediluted coolantimmediately.
To top up the coolant level do the following:
1. Unscrew the cap slowly. Any pressureescapes as you unscrew the cap.
2. Add prediluted coolant meeting thecorrect specification. See Capacities andSpecifications (page 373).
3.Add enough prediluted coolant to reachthe correct level.
4. Replace the coolant reservoir cap, turnit clockwise until you feel a strongresistance.
5. Check the coolant level in the coolantreservoir the next few times you driveyour vehicle.
Note:During normal vehicle operation, thecoolant may change color from orange topink or light red. As long as the coolant isclear and uncontaminated, this color changedoes not indicate the coolant has degradednor does it require the coolant to be drained,the system to be flushed, or the coolant tobe replaced.
Do not mix different colors or types ofprediluted coolant in your vehicle. Mixing ofprediluted coolant or using an incorrectprediluted coolant may harm the engine orcooling system components and may not becovered by the vehicle Warranty.
In case of emergency, you can add a largeamount of water without engine coolant inorder to reach a vehicle service location. Inthis instance, qualified personnel:
1. Must drain the cooling system.
2. Chemically clean the cooling system.
3. Refill with prediluted coolant as soon aspossible.
Water alone, without prediluted coolant, cancause engine damage from corrosion,overheating or freezing.
Do not use the following as a coolantsubstitute:
•Alcohol.
•Methanol.
•Brine.
•Any coolant mixed with alcohol ormethanol antifreeze.
311
MKZ (CC9) Canada/United States of America, enUSA, Edition date: 201706, First Printing
Maintenance
Page 315 of 595
Alcohol and other liquids can cause enginedamage from overheating or freezing.
Do not add extra inhibitors or additives tothe coolant. These can be harmful andcompromise the corrosion protection of thecoolant.
Recycled Coolant
We do not recommend the use of recycledcoolant as an approved recycling process isnot yet available.
Dispose of used engine coolant in anappropriate manner. Follow yourcommunity's regulations and standards forrecycling and disposing of automotive fluids.
Severe Climates
If you drive in extremely cold climates:
•It may be necessary to increase thecoolant concentration above 50%.
•A coolant concentration of 60% providesimproved freeze point protection. Coolant concentrations above 60%decrease the overheat protectioncharacteristics of the coolant and maycause engine damage.
If you drive in extremely hot climates:
•It may be necessary to decrease thecoolant concentration to 40%.
•A coolant concentration of 40% providesimproved overheat protection. Coolantconcentrations below 40% decrease thefreeze and corrosion protectioncharacteristics of the coolant and maycause engine damage.
Vehicles driven year-round in non-extremeclimates should use prediluted coolant foroptimum cooling system and engineprotection.
Fail-Safe Cooling
Fail-safe cooling allows you to temporarilydrive your vehicle before any incrementalcomponent damage occurs. The fail-safedistance depends on ambient temperature,vehicle load and terrain.
How Fail-Safe Cooling Works
If the engine begins to overheat, the coolanttemperature gauge moves toward the redzone:
A warning lamp illuminates and amessage may appear in theinformation display.
If the engine reaches a presetover-temperature condition, the engineautomatically switches to alternating cylinderoperation. Each disabled cylinder acts as anair pump and cools the engine.
312
MKZ (CC9) Canada/United States of America, enUSA, Edition date: 201706, First Printing
Maintenance
Page 316 of 595
When this occurs, your vehicle still operates,however:
•Engine power is limited.
•The air conditioning system turns off.
Continued operation increases the enginetemperature, causing the engine tocompletely shut down. Your steering andbraking effort increases in this situation.
When the engine temperature cools, you canre-start the engine. Have your vehiclechecked as soon as possible to minimizeengine damage.
When Fail-Safe Mode Is Activated
WARNINGS
Fail-safe mode is for use duringemergencies only. Operate yourvehicle in fail-safe mode only as long asnecessary to bring your vehicle to rest in asafe location and seek immediate repairs.When in fail-safe mode, your vehicle will havelimited power, will not be able to maintain
WARNINGS
high-speed operation, and may completelyshut down without warning, potentially losingengine power, power steering assist, andpower brake assist, which may increase thepossibility of a crash resulting in seriousinjury.
Never remove the coolant reservoircap when the engine is running or hot.
Your vehicle has limited engine power whenin the fail-safe mode, drive your vehicle withcaution. Your vehicle does not maintainhigh-speed operation and the engine mayoperate poorly.
Remember that the engine is capable ofautomatically shutting down to preventengine damage. In this situation:
1. Pull off the road as soon as safelypossible and switch the engine off.
2. If you are a member of a roadsideassistance program, we recommend thatyou contact your roadside assistanceservice provider.
3.If this is not possible, wait a short periodfor the engine to cool.
4. Check the coolant level. If the coolantlevel is at or below the minimum mark,add prediluted coolant immediately.
5.When the engine temperature cools, youcan re-start the engine. Have your vehiclechecked as soon as possible to minimizeengine damage.
Note:If this is not possible, wait a shortperiod for the engine to cool.
Engine Coolant TemperatureManagement (If Equipped)
WARNING
To reduce the risk of crash and injury,be prepared that the vehicle speedmay reduce and the vehicle may not be ableto accelerate with full power until the coolanttemperature reduces.
313
MKZ (CC9) Canada/United States of America, enUSA, Edition date: 201706, First Printing
Maintenance
Page 317 of 595
If you tow a trailer with your vehicle, theengine may temporarily reach a highertemperature during severe operatingconditions, for example ascending a long orsteep grade in high ambient temperatures.
At this time, you may notice the coolanttemperature gauge moves toward the redzone and a message may appear in theinformation display.
You may notice a reduction in vehicle speedcaused by reduced engine power in orderto manage the engine coolant temperature. Your vehicle may enter this mode if certainhigh-temperature and high-load conditionstake place. The amount of speed reductiondepends on vehicle loading, grade andambient temperature. If this occurs, there isno need to pull off the road. You cancontinue to drive your vehicle.
The air conditioning may automatically turnon and off during severe operatingconditions to protect the engine fromoverheating. When the coolant temperaturedecreases to the normal operatingtemperature, the air conditioning turns on.
If the coolant temperature gauge moves fullyinto the red zone, or if the coolanttemperature warning or service engine soonmessages appear in your information display,do the following:
1. Pull off the road as soon as safelypossible and shift the transmission intopark (P).
2. Leave the engine running until thecoolant temperature gauge needlereturns to the normal position. If thetemperature does not drop after severalminutes, follow the remaining steps.
3. Switch the engine off and wait for it tocool. Check the coolant level.
4. If the coolant level is at or below theminimum mark, add prediluted coolantimmediately.
5. If the coolant level is normal, restart theengine and continue.
AUTOMATIC TRANSMISSION
FLUID CHECK
6F35/HF35 transmission (If Equipped)
Note:Transmission fluid should be checkedby an authorized dealer. If required, fluidshould be added by an authorized dealer.
The automatic transmission does not havea transmission fluid dipstick.
Refer to your scheduled maintenanceinformation for scheduled intervals for fluidchecks and changes. Your transmission doesnot consume fluid. However, the fluid levelshould be checked if the transmission is notworking properly, (For example: if thetransmission slips or shifts slowly) or if younotice some sign of fluid leakage. SeeScheduled Maintenance (page 509).
Do not use supplemental transmission fluidadditives, treatments or cleaning agents. Theuse of these materials may affecttransmission operation and result in damageto internal transmission components.
314
MKZ (CC9) Canada/United States of America, enUSA, Edition date: 201706, First Printing
Maintenance
Page 318 of 595
6F50/6F55 Transmission (If Equipped)
WARNINGS
The dipstick cap and surroundingcomponents may be hot; gloves arerecommended.
Use gloves when moving the air filterassembly. Components will be hot.
Note:Automatic transmission fluid expandswhen warmed. To obtain an accurate fluidcheck, drive the vehicle until it is warmed up(approximately 20 miles [30 kilometers]). Ifyour vehicle has been operated for anextended period at high speeds, in city trafficduring hot weather or pulling a trailer, thevehicle should be turned off until normaloperating temperatures are reached to allowthe fluid to cool before checking. Dependingon vehicle use, cooling times could take upto 30 minutes or longer.
Refer to your scheduled maintenanceinformation for scheduled intervals for fluidchecks and changes. Your transmission doesnot consume fluid. However, the fluid levelshould be checked if the transmission is notworking properly. For example, if thetransmission slips or shifts slowly or if younotice some sign of fluid leakage.
1.Drive the vehicle 20 miles (30 kilometers)or until it reaches normal operatingtemperature
2. Park the vehicle on a level surface andengage the parking brake.
3.With the parking brake engaged and yourfoot on the brake pedal, start the engineand move the gearshift lever through allof the gear ranges. Allow a minimum of10 seconds for each gear to engage.
4. Put the gearshift lever in P (Park) andleave the engine running.
Note:You will need to move the air filterassembly to access the transmissiondipstick.
5.Remove the dipstick, wiping it clean witha clean, dry lint free rag. If necessary,refer to Under hood overview in thischapter for the location of the dipstick.
6. Install the dipstick making sure it is fullyseated in the filler tube by turning it tothe locked position.
7.Remove the dipstick and inspect the fluidlevel. The fluid should be in thedesignated areas for normal operatingtemperature.
Moving the Air Filter Assembly (Accessingthe Dipstick)
WARNING
Do not run engine with the air filterdisconnected.
315
MKZ (CC9) Canada/United States of America, enUSA, Edition date: 201706, First Printing
Maintenance
Page 319 of 595
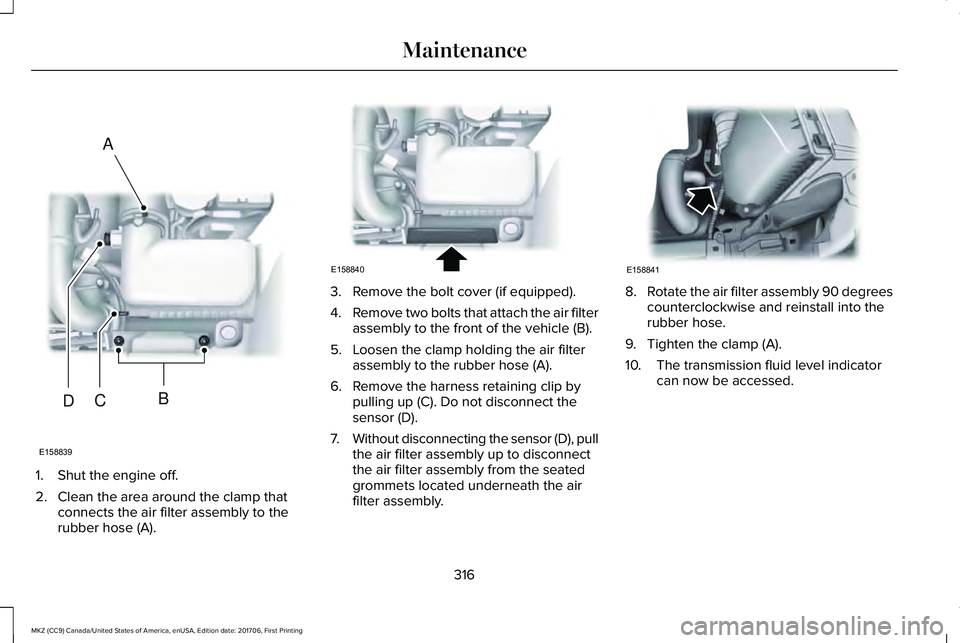
1. Shut the engine off.
2. Clean the area around the clamp thatconnects the air filter assembly to therubber hose (A).
3. Remove the bolt cover (if equipped).
4.Remove two bolts that attach the air filterassembly to the front of the vehicle (B).
5. Loosen the clamp holding the air filterassembly to the rubber hose (A).
6. Remove the harness retaining clip bypulling up (C). Do not disconnect thesensor (D).
7.Without disconnecting the sensor (D), pullthe air filter assembly up to disconnectthe air filter assembly from the seatedgrommets located underneath the airfilter assembly.
8.Rotate the air filter assembly 90 degreescounterclockwise and reinstall into therubber hose.
9. Tighten the clamp (A).
10. The transmission fluid level indicatorcan now be accessed.
316
MKZ (CC9) Canada/United States of America, enUSA, Edition date: 201706, First Printing
MaintenanceE158839
A
BCD E158840 E158841
Page 320 of 595
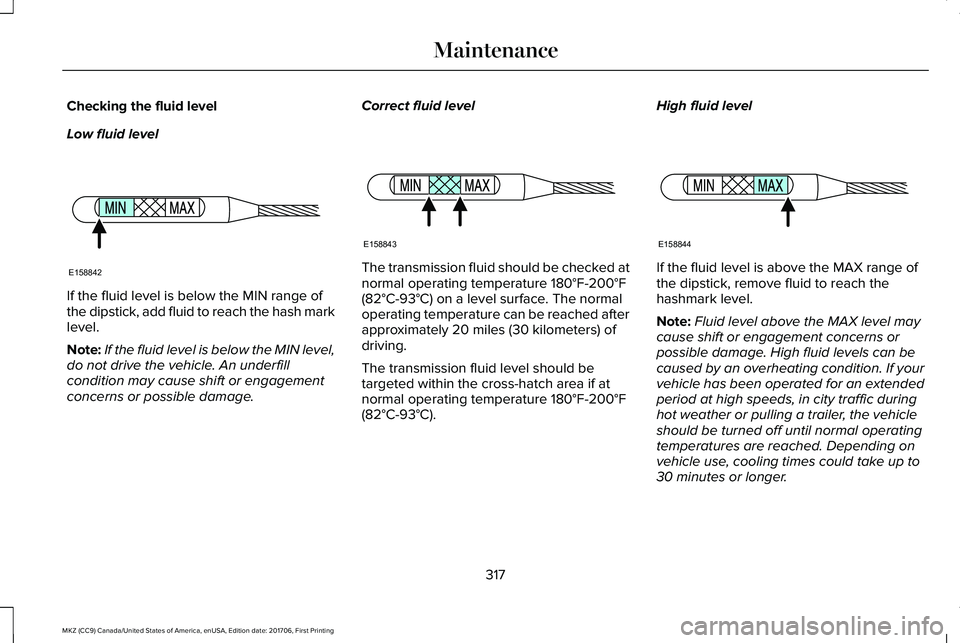
Checking the fluid level
Low fluid level
If the fluid level is below the MIN range ofthe dipstick, add fluid to reach the hash marklevel.
Note:If the fluid level is below the MIN level,do not drive the vehicle. An underfillcondition may cause shift or engagementconcerns or possible damage.
Correct fluid level
The transmission fluid should be checked atnormal operating temperature 180°F-200°F(82°C-93°C) on a level surface. The normaloperating temperature can be reached afterapproximately 20 miles (30 kilometers) ofdriving.
The transmission fluid level should betargeted within the cross-hatch area if atnormal operating temperature 180°F-200°F(82°C-93°C).
High fluid level
If the fluid level is above the MAX range ofthe dipstick, remove fluid to reach thehashmark level.
Note:Fluid level above the MAX level maycause shift or engagement concerns orpossible damage. High fluid levels can becaused by an overheating condition. If yourvehicle has been operated for an extendedperiod at high speeds, in city traffic duringhot weather or pulling a trailer, the vehicleshould be turned off until normal operatingtemperatures are reached. Depending onvehicle use, cooling times could take up to30 minutes or longer.
317
MKZ (CC9) Canada/United States of America, enUSA, Edition date: 201706, First Printing
MaintenanceE158842 E158843 E158844