warning lights LINCOLN MKZ 2018 Owners Manual
[x] Cancel search | Manufacturer: LINCOLN, Model Year: 2018, Model line: MKZ, Model: LINCOLN MKZ 2018Pages: 595, PDF Size: 5.06 MB
Page 49 of 595

The Personal Safety System provides animproved overall level of frontal crashprotection to front seat occupants and isdesigned to help further reduce the risk ofairbag-related injuries. The system is able toanalyze different occupant conditions andcrash severity before activating theappropriate safety devices to help betterprotect a range of occupants in a variety offrontal crash situations.
The Vehicle Personal Safety System consistsof:
•Driver and passenger dual-stage airbagsupplemental restraints.
•Front seat outboard seatbelts withpretensioners, energy managementretractors and seatbelt usage sensors.
•Driver seat position sensor.
•Passenger seat position sensor.
•Front passenger sensing system.
•Passenger airbag off and on indicatorlamp.
•Front crash severity sensors.
•Restraints control module with impactand safing sensors.
•Restraint system warning light andbackup tone.
•The electrical wiring for the airbags, crashsensors, seatbelt pretensioners, frontseatbelt usage sensors, driver seatposition sensor, front passenger sensingsystem and indicator lights.
How Does the Personal Safety SystemWork?
The Personal Safety System can adapt thedeployment strategy of the safety devicesaccording to crash severity and occupantconditions. A collection of crash andoccupant sensors provides information tothe restraints control module. During a crash,the restraints control module may deploy theseatbelt pretensioners, one or both stagesof the dual-stage airbags based on crashseverity and occupant conditions.
46
MKZ (CC9) Canada/United States of America, enUSA, Edition date: 201706, First Printing
Personal Safety System™
Page 77 of 595
Note:Let the power system operate thedecklid after pressing the control. Pushingor pulling the decklid may activate theobstacle detection feature and stop thepower operation.
With the Decklid Close Button
Press the button inside the decklidon the left-hand side.
Obstacle Detection
The decklid will reverse to full open if itdetects an obstacle while closing. Threechimes will sound as the decklid begins toreopen. Remove the obstacle to close thedecklid.
Note:Before driving your vehicle, check theinstrument cluster for a trunk ajar or doorajar message or warning indicator. Failureto do this could result in unintentionallyleaving the decklid open while driving.
The decklid will stop and three chimes willsound if it detects an obstacle while opening.Remove the obstacle to operate the decklid.
Resetting the Power Decklid
The decklid may not operate correctly andyou may need to reset it if:
•The vehicle battery charge is low.
•You disconnect the battery.
•You manually close the decklid and leaveit unlatched.
To reset the power decklid:
1. Disconnect the battery for 20 secondsthen reconnect the battery.
2. Manually close the decklid making sureit is fully closed.
3.Power open the decklid using the remotecontrol or instrument panel button.
KEYLESS ENTRY
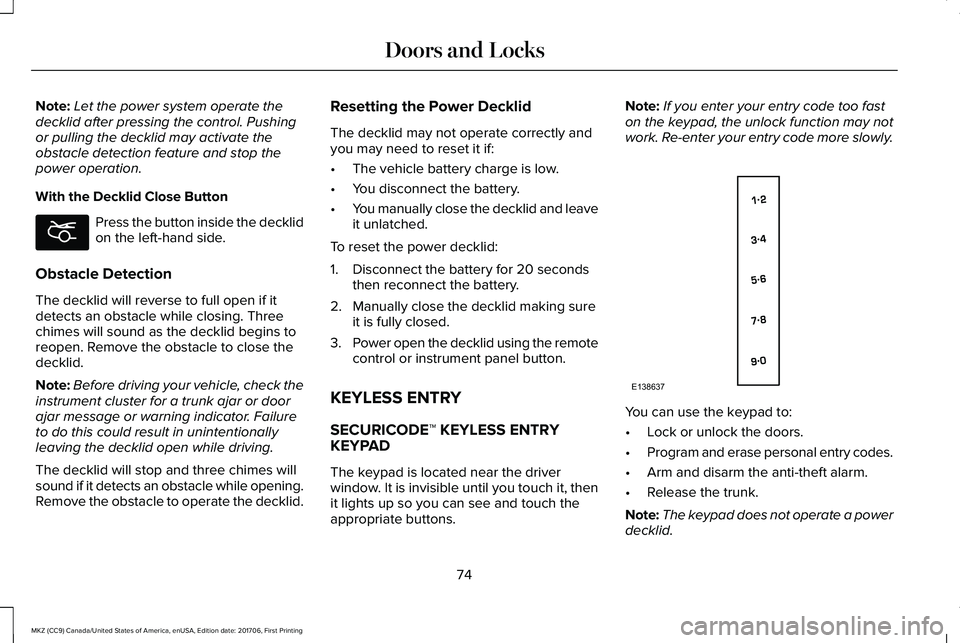
SECURICODE™ KEYLESS ENTRYKEYPAD
The keypad is located near the driverwindow. It is invisible until you touch it, thenit lights up so you can see and touch theappropriate buttons.
Note:If you enter your entry code too faston the keypad, the unlock function may notwork. Re-enter your entry code more slowly.
You can use the keypad to:
•Lock or unlock the doors.
•Program and erase personal entry codes.
•Arm and disarm the anti-theft alarm.
•Release the trunk.
Note:The keypad does not operate a powerdecklid.
74
MKZ (CC9) Canada/United States of America, enUSA, Edition date: 201706, First Printing
Doors and LocksE194407 E138637
Page 92 of 595

Headlamp High Beam
Push the lever away from you to switch thehigh beam on.
Push the lever away from you again or pullthe lever toward you to switch the high beamoff.
Headlamp Flasher
Slightly pull the lever toward you and releaseit to flash the headlamps.
AUTOLAMPS
WARNING
The system does not relieve you ofyour responsibility to drive with duecare and attention. You may need to overridethe system if it does not turn the headlampson in low visibility conditions, for exampledaytime fog.
When the lighting control is in the autolampsposition, the headlamps turn on in low lightsituations, or when the wipers turn on.
The headlamps remain on for a period oftime after you switch the ignition off. Usethe information display controls to adjust theperiod of time that the headlamps remainon.
Note: If you switch the autolamps on, youcannot switch the high beams on until thesystem turns the low beams on.
89
MKZ (CC9) Canada/United States of America, enUSA, Edition date: 201706, First Printing
LightingE222347 E222348 E142451
Page 102 of 595
Loose Mirror
If your power-folding mirrors are manuallyfolded, they may not work properly evenafter you re-position them. You need to resetthem if:
•The mirrors vibrate when you drive.
•The mirrors feel loose.
•The mirrors do not stay in the folded orunfolded position.
•One of the mirrors is not in its normaldriving position.
To reset the power-fold feature, use thepower-folding mirror control to fold andunfold the mirrors. You may hear a loud noiseas you reset the power-folding mirrors. Thissound is normal. Repeat this process asneeded each time the mirrors are manuallyfolded.
Heated Exterior Mirrors
See Heated Windows and Mirrors (page140).
Memory Mirrors
You can save and recall the mirror positionsthrough the memory function. See MemoryFunction (page 149).
Auto-Dimming Feature (If Equipped)
The driver exterior mirror automatically dimswhen the interior auto-dimming mirror turnson.
Signal Indicator Mirrors
The outer portion of the appropriate mirrorhousing blinks when you switch on thedirection indicator.
Lincoln Welcome Mat
Projection lights, on the bottom of the mirrorhousings, project an image onto the grounda short distance from the vehicle. SeeLighting (page 88).
Integrated Blind Spot Mirrors (If Equipped)
WARNING
Objects in the blind spot mirror arecloser than they appear.
Blind spot mirrors have an integrated convexmirror built into the upper outboard cornerof the exterior mirrors. Their design canincrease your visibility along the side of yourvehicle.
Check the main mirror first before a lanechange, then check the blind spot mirror. Ifno vehicles are present in the blind spotmirror and the traffic in the adjacent lane isat a safe distance, signal that you intend tochange lanes. Glance over your shoulder toverify traffic is clear and carefully changelanes.
99
MKZ (CC9) Canada/United States of America, enUSA, Edition date: 201706, First Printing
Windows and Mirrors
Page 103 of 595
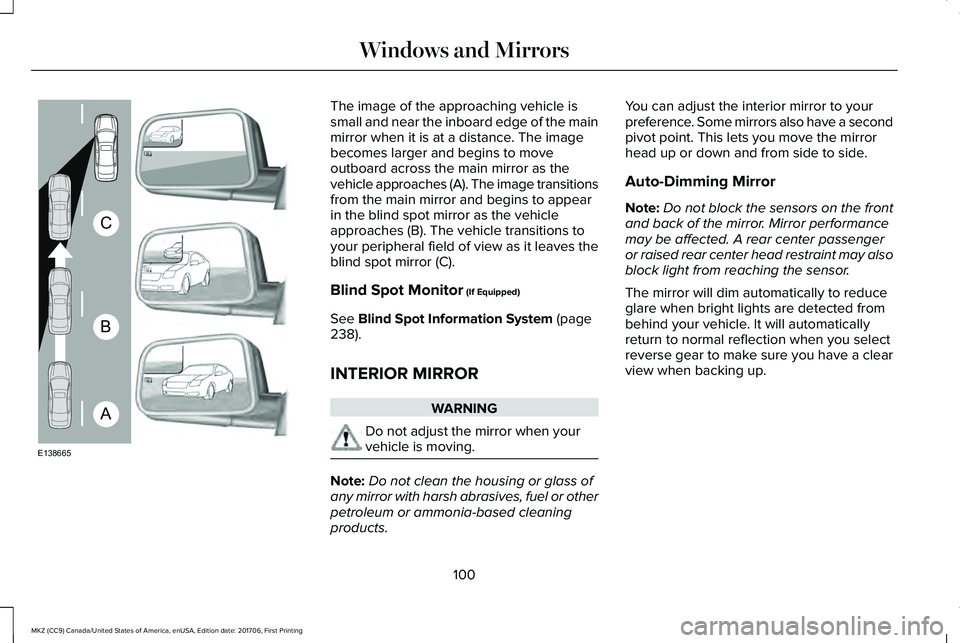
The image of the approaching vehicle issmall and near the inboard edge of the mainmirror when it is at a distance. The imagebecomes larger and begins to moveoutboard across the main mirror as thevehicle approaches (A). The image transitionsfrom the main mirror and begins to appearin the blind spot mirror as the vehicleapproaches (B). The vehicle transitions toyour peripheral field of view as it leaves theblind spot mirror (C).
Blind Spot Monitor (If Equipped)
See Blind Spot Information System (page238).
INTERIOR MIRROR
WARNING
Do not adjust the mirror when yourvehicle is moving.
Note:Do not clean the housing or glass ofany mirror with harsh abrasives, fuel or otherpetroleum or ammonia-based cleaningproducts.
You can adjust the interior mirror to yourpreference. Some mirrors also have a secondpivot point. This lets you move the mirrorhead up or down and from side to side.
Auto-Dimming Mirror
Note:Do not block the sensors on the frontand back of the mirror. Mirror performancemay be affected. A rear center passengeror raised rear center head restraint may alsoblock light from reaching the sensor.
The mirror will dim automatically to reduceglare when bright lights are detected frombehind your vehicle. It will automaticallyreturn to normal reflection when you selectreverse gear to make sure you have a clearview when backing up.
100
MKZ (CC9) Canada/United States of America, enUSA, Edition date: 201706, First Printing
Windows and MirrorsA
B
C
E138665
Page 111 of 595
Engine Coolant Temperature WarningLamp
Illuminates when the enginecoolant temperature is high. Stopthe vehicle as soon as possible,switch off the engine and let cool. SeeEngine Coolant Check (page 310).
Engine Oil
It illuminates when you switch theignition on.
If it illuminates when the engine isrunning this indicates a malfunction. Stopyour vehicle as soon as it is safe to do soand switch the engine off. Check the engineoil level. If the oil level is sufficient, thisindicates a system malfunction. Have yourvehicle checked immediately.
See Engine Oil Check (page 308).
Fasten Seatbelt Warning Lamp
It illuminates and a chime soundsuntil you fasten the seatbelts.
Front Airbag
If it fails to illuminate when youstart your vehicle, continues toflash or remains on, it indicates amalfunction. Have the system checked byyour authorized dealer.
Heads Up Display (If Equipped)
A red beam of lights will illuminateon the windshield in certaininstances when using adaptivecruise control and/or the collision warningsystem. It will also illuminate momentarilywhen you start your vehicle to make sure thedisplay works.
Headlamp High Beam Indicator
It will illuminate when you switchthe high beam headlamps on. Itwill flash when you use theheadlamp flasher.
Hood Ajar
Displays when the ignition is onand the hood is not completelyclosed.
Lane Keeping Aid Warning Lamp (If
Equipped)
It illuminates when the systemactivates.
Low Fuel Level Warning Lamp
It will illuminate when the fuel levelis low or the fuel tank is nearlyempty. Refuel as soon as possible.
Low Tire Pressure Warning Lamp
It illuminates when your tirepressure is low. If the lamp remainson with the engine running orwhen driving, check your tire pressure assoon as possible.
108
MKZ (CC9) Canada/United States of America, enUSA, Edition date: 201706, First Printing
Instrument Cluster E71880 E67017 E156133 E159324 E144813
Page 154 of 595
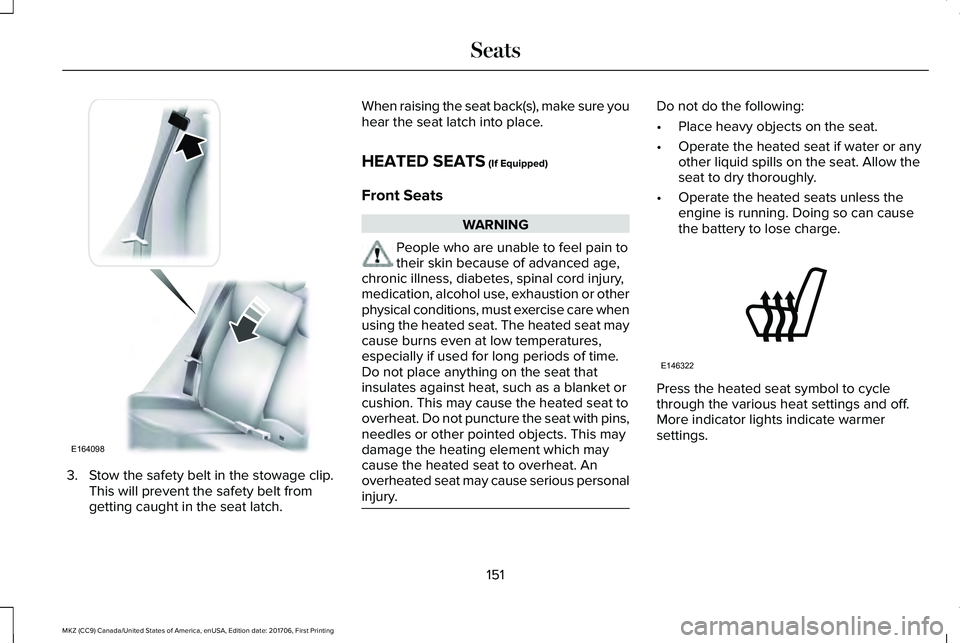
3. Stow the safety belt in the stowage clip.This will prevent the safety belt fromgetting caught in the seat latch.
When raising the seat back(s), make sure youhear the seat latch into place.
HEATED SEATS (If Equipped)
Front Seats
WARNING
People who are unable to feel pain totheir skin because of advanced age,chronic illness, diabetes, spinal cord injury,medication, alcohol use, exhaustion or otherphysical conditions, must exercise care whenusing the heated seat. The heated seat maycause burns even at low temperatures,especially if used for long periods of time.Do not place anything on the seat thatinsulates against heat, such as a blanket orcushion. This may cause the heated seat tooverheat. Do not puncture the seat with pins,needles or other pointed objects. This maydamage the heating element which maycause the heated seat to overheat. Anoverheated seat may cause serious personalinjury.
Do not do the following:
•Place heavy objects on the seat.
•Operate the heated seat if water or anyother liquid spills on the seat. Allow theseat to dry thoroughly.
•Operate the heated seats unless theengine is running. Doing so can causethe battery to lose charge.
Press the heated seat symbol to cyclethrough the various heat settings and off.More indicator lights indicate warmersettings.
151
MKZ (CC9) Canada/United States of America, enUSA, Edition date: 201706, First Printing
SeatsE164098 E146322
Page 155 of 595
Rear Seats
WARNING
Persons who are unable to feel pain tothe skin because of advanced age,chronic illness, diabetes, spinal cord injury,medication, alcohol use, exhaustion, or otherphysical conditions, must exercise care whenusing the seat heater. The seat heater maycause burns even at low temperatures,especially if used for long periods of time.Do not place anything on the seat thatinsulates against heat, such as a blanket orcushion, because this may cause the seatheater to overheat. Do not puncture the seatwith pins, needles, or other pointed objectsbecause this may damage the heatingelement which may cause the seat heater tooverheat. An overheated seat may causeserious personal injury.
Do not do the following:
•Place heavy objects on the seat.
•Operate the seat heater if water or anyother liquid is spilled on the seat. Allowthe seat to dry thoroughly.
•Operate the heated seats unless theengine is running. Doing so can causethe battery to lose charge.
The rear seat heat controls are located onthe rear of the center console.
Press the heated seat symbol to cyclethrough the various heat settings and off.More indicator lights indicate warmersettings.
The heated seat module resets at everyignition run cycle. While the ignition is on,press the high or low heated seat switch toenable heating mode. When activated, theywill turn off automatically when you turn theengine off.
CLIMATE CONTROLLED SEATS (If
Equipped)
Heated Seats
152
MKZ (CC9) Canada/United States of America, enUSA, Edition date: 201706, First Printing
SeatsE146322
Page 156 of 595
WARNING
People who are unable to feel pain totheir skin because of advanced age,chronic illness, diabetes, spinal cord injury,medication, alcohol use, exhaustion or otherphysical conditions, must exercise care whenusing the heated seat. The heated seat maycause burns even at low temperatures,especially if used for long periods of time.Do not place anything on the seat thatinsulates against heat, such as a blanket orcushion. This may cause the heated seat tooverheat. Do not puncture the seat with pins,needles or other pointed objects. This maydamage the heating element which maycause the heated seat to overheat. Anoverheated seat may cause serious personalinjury.
Do not do the following:
•Place heavy objects on the seat.
•Operate the heated seat if water or anyother liquid spills on the seat. Allow theseat to dry thoroughly.
•Operate the heated seats unless theengine is running. Doing so can causethe battery to lose charge.
Touch the heated seat symbol to cyclethrough the various heat settings and off.More indicator lights indicate warmersettings.
Cooled Seats
The cooled seats will only function when theengine is running.
To operate the cooled seats:
Press the cooled seat symbol to cyclethrough the various cooling settings and off.More indicator lights indicate cooler settings.
If the engine falls below 350 RPM while thecooled seats are on, the feature will turn itselfoff. You will need to reactivate it.
Climate controlled seat air filterreplacement
Your vehicle is equipped with lifetime airfilters that are integrated with the seats.Regular maintenance or replacement is notneeded.
153
MKZ (CC9) Canada/United States of America, enUSA, Edition date: 201706, First Printing
SeatsE146322 E146309
Page 198 of 595
GENERAL INFORMATION
Note: Occasional brake noise is normal. Ifa metal-to-metal, continuous grinding orcontinuous squeal sound is present, thebrake linings may be worn-out. Have thesystem checked by an authorized dealer. Ifyour vehicle has continuous vibration orshudder in the steering wheel while braking,have it checked by an authorized dealer.
Note:Brake dust may accumulate on thewheels, even under normal drivingconditions. Some dust is inevitable as thebrakes wear and does not contribute tobrake noise. See Cleaning the Wheels(page 333).
Note:Depending on applicable laws andregulations in the country for which yourvehicle was originally built, your brake lampsmay flash during heavy braking. Followingthis, your hazard lights may also flash whenyour vehicle comes to a stop.
See Warning Lamps andIndicators (page 106).
Wet brakes result in reduced brakingefficiency. Gently press the brake pedal afew times when driving from a car wash orstanding water to dry the brakes.
Brake Over Accelerator
In the event the accelerator pedal becomesstuck or entrapped, apply steady and firmpressure to the brake pedal to slow thevehicle and reduce engine power. If youexperience this condition, apply the brakesand bring your vehicle to a safe stop. Movethe transmission to park (P), switch theengine off and apply the parking brake. Inspect the accelerator pedal for anyinterference. If none are found and thecondition persists, have your vehicle towedto the nearest authorized dealer.
Brake Assist
Brake assist detects when you brake rapidlyby measuring the rate at which you press thebrake pedal. It provides maximum brakingefficiency as long as you press the pedal,and can reduce stopping distances in criticalsituations.
Anti-lock Brake System
This system helps you maintain steeringcontrol during emergency stops by keepingthe brakes from locking.
This lamp momentarily illuminateswhen you turn the ignition on. Ifthe light does not illuminate duringstart up, remains on or flashes, the systemmay be disabled. Have the system checkedby an authorized dealer. If the anti-lock brakesystem is disabled, normal braking is stilleffective.
If the brake warning lampilluminates when you release theparking brake, have the systemchecked by an authorized dealer.
195
MKZ (CC9) Canada/United States of America, enUSA, Edition date: 201706, First Printing
BrakesE138644 E138644