ECO mode LINCOLN MKZ 2020 Owner's Guide
[x] Cancel search | Manufacturer: LINCOLN, Model Year: 2020, Model line: MKZ, Model: LINCOLN MKZ 2020Pages: 561, PDF Size: 5.7 MB
Page 139 of 561
Auto Mode Indicator Status
Description
Auto Mode Indicator Status
One indicator illuminated. •The blower motor speed is reduced.
•Use this setting to minimize the amount of noise from the blower motor.
• This setting increases the time taken to cool the interior.
Two indicators illuminated. •The blower motor speed is moderate.
Three indicators illuminated. •The blower motor speed is increased.
•This setting increases the amount of noise from the blower motor.
• Use this setting to reduce the time taken to cool the interior.
Switching Defrost On and Off Press and release the button to
distribute air through the
windshield air vents and de-mister.
Air directed to the instrument panel and
footwell air vents turns off. You can also use
this setting to defog and clear the windshield
of a thin covering of ice. Switching the Air Conditioning On and
Off Press and release the button.
Use air conditioning with recirculated air to
improve cooling performance and efficiency. Note:
In certain conditions, for example,
maximum defrost, the air conditioning
compressor may continue to operate even
though you switch off the air conditioning.
Switching the Climate Control On and
Off Press and release the button.
136
MKZ (CC9) Canada/United States of America, enUSA, Edition date: 201905, Second-Printing Climate Control
Page 140 of 561
Switching Dual Zone Mode On and Off
Press and release the button to
switch on temperature control for
the right-hand side of the vehicle.
Switching Maximum Air Conditioning
On and Off Press and release the button for
maximum cooling.
The left-hand and right-hand settings set to
LO, recirculated air flows through the
instrument panel air vents, air conditioning
turns on and the blower motor adjusts to the
highest speed.
Switching Maximum Defrost On and
Off Press and release the button for
maximum defrosting.
The left-hand and right-hand settings set to
HI, air flows through the windshield air vents,
and the blower motor adjusts to the highest
speed. You can also use this setting to defog and
clear the windshield of a thin covering of ice.
Note:
To prevent window fogging, you
cannot select recirculated air when
maximum defrost is on.
Note: The heated rear window also turns on
when you select maximum defrost.
Switching Recirculated Air On and Off Press and release the button to
switch between outside air and
recirculated air.
The air currently in the passenger
compartment recirculates. This may reduce
the time needed to cool the interior, when
used with A/C, and reduce unwanted odors
from entering your vehicle.
Note: Recirculated air may turn off, or
prevent you from switching on, in all air flow
modes except MAX A/C to reduce the risk
of fogging. Recirculation may also turn on
and off in various air distribution control
combinations during hot weather to improve
cooling efficiency. HINTS ON CONTROLLING THE
INTERIOR CLIMATE
General Hints
Note:
Prolonged use of recirculated air may
cause the windows to fog up.
Note: You may feel a small amount of air
from the footwell air vents regardless of the
air distribution setting.
Note: To reduce humidity build-up inside
your vehicle, do not drive with the system
switched off or with recirculated air always
switched on.
Note: Do not place objects under the front
seats as this may interfere with the airflow
to the rear seats.
Note: Remove any snow, ice or leaves from
the air intake area at the base of the
windshield.
Note: To improve the time to reach a
comfortable temperature in hot weather,
drive with the windows open until you feel
cold air through the air vents.
137
MKZ (CC9) Canada/United States of America, enUSA, Edition date: 201905, Second-Printing Climate ControlE265280
Page 141 of 561
Automatic Climate Control
Note:
Adjusting the settings when your
vehicle interior is extremely hot or cold is not
necessary. Automatic mode is best
recommended to maintain set temperature.
Note: The system adjusts to heat or cool the
interior to the temperature you select as
quickly as possible.
Note: For the system to function efficiently,
the instrument panel and side air vents
should be fully open.
Note: If you select AUTO during cold outside
temperatures, the system directs air flow to
the windshield and side window air vents. In
addition, the blower motor may run at a
slower speed until the engine warms up.
Note: If you select
AUTO during hot
temperatures and the inside of the vehicle
is hot, the system uses recirculated air to
maximize interior cooling. Blower motor
speed may also reduce until the air cools.
Quickly Heating the Interior
1. Press and release
AUTO. 2. Adjust the temperature function to the
setting you prefer.
Recommended Settings for Heating
1. Press and release
AUTO.
2. Adjust the temperature function to the setting you prefer. Use
72°F (22°C) as a
starting point, then adjust the setting as
necessary.
Quickly Cooling the Interior
1. Press and release
MAX A/C.
Recommended Settings for Cooling
1. Press and release
AUTO.
2. Adjust the temperature function to the setting you prefer. Use
72°F (22°C) as a
starting point, then adjust the setting as
necessary.
Defogging the Side Windows in Cold
Weather
1. Press and release defrost or maximum defrost. 2. Adjust the temperature control to the
setting you prefer. Use
72°F (22°C) as a
starting point, then adjust the setting as
necessary.
HEATED REAR WINDOW Press the button to clear the rear
window of thin ice and fog. The
heated rear window turns off after
a short period of time.
Note: Do not use harsh chemicals, razor
blades or other sharp objects to clean or
remove decals from the inside of the heated
rear window. The vehicle warranty may not
cover damage to the heated rear window
grid lines.
HEATED EXTERIOR MIRRORS
When you switch the heated rear window
on, the heated exterior mirrors turn on.
Note: Do not remove ice from the mirrors
with a scraper or adjust the mirror glass
when it is frozen in place.
138
MKZ (CC9) Canada/United States of America, enUSA, Edition date: 201905, Second-Printing Climate ControlE184884
Page 142 of 561
Note:
Do not clean the mirror housing or
glass with harsh abrasives, fuel or other
petroleum-based cleaning products. The
vehicle warranty may not cover damage
caused to the mirror housing or glass.
CABIN AIR FILTER
Your vehicle is equipped with a cabin air
filter, which gives you and your passengers
the following benefits:
• It improves your driving comfort by
reducing particle and odor concentration.
• It improves the interior compartment
cleanliness.
• It protects the climate control
components from particle deposits.
You can locate the cabin air filter behind the
glove box.
Note: Make sure you have a cabin air filter
installed at all times. This prevents foreign
objects from entering the system. Running
the system without a filter in place could
result in degradation or damage to the
system. Replace the filter at regular intervals. See
Scheduled Maintenance (page 475).
For additional cabin air filter information, or
to replace the filter, see a qualified
technician.
REMOTE START
You can switch this feature on or off and
adjust the settings using the information
display controls.
See Information Displays
(page 109).
The climate control system adjusts the
interior temperature during remote start.
You cannot adjust the climate control setting
during remote start operation. Switch the
ignition on to make adjustments.
Based on your remote start settings, the
following vehicle-dependent features may
or may not remain on after remote starting
your vehicle:
• Climate controlled seats.
• Heated steering wheel.
• Heated mirrors. •
Heated rear window.
• Windshield wiper de-icer.
Note: For dual zone climate controlled seats,
the passenger seat setting defaults to match
the driver seat during remote start.
Automatic Settings
If
Auto is on, the system sets the interior
temperature to 72°F (22°C) and heats or
cools the vehicle interior as required to
achieve comfort.
Note: In cold weather, the heated rear
window and heated mirrors turn on.
Last Settings
If
Last Settings is on, the system uses the
settings last selected before you turned off
the vehicle.
Heated and Cooled Features
In
Auto mode, certain heated features may
switch on during cold weather, and cooled
features during hot weather.
139
MKZ (CC9) Canada/United States of America, enUSA, Edition date: 201905, Second-Printing Climate Control
Page 147 of 561

Adjusting the Lumbar Support Adjusting the Four-Way Lumbar
Support (If Equipped)
Press to increase upper lumbar
only.
A
Press to decrease upper and lower
lumbar.
B
Press to increase lower lumbar
only.
C
Press to increase upper and lower
lumbar.
D Adjusting the Multi-Contour Front
Seats With Active Motion (If Equipped)
Note: The engine must be running or the
vehicle must be in accessory mode to
activate the seats.
Note: Allow a few seconds for any selection
to activate. The seat backrest and cushion
massage cannot function at the same time. 144
MKZ (CC9) Canada/United States of America, enUSA, Edition date: 201905, Second-Printing SeatsE165608 E223345 E156301
Page 148 of 561
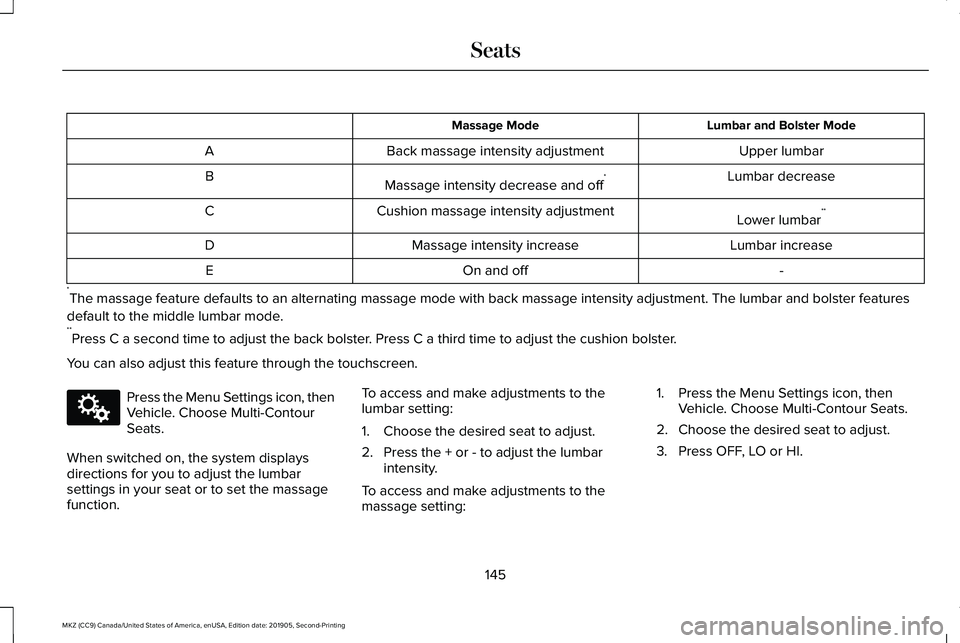
Lumbar and Bolster Mode
Massage Mode
Upper lumbar
Back massage intensity adjustment
A
Lumbar decrease
Massage intensity decrease and off *
B
Lower lumbar**
Cushion massage intensity adjustment
C
Lumbar increase
Massage intensity increase
D
-
On and off
E
* The massage feature defaults to an alternating massage mode with back ma\
ssage intensity adjustment. The lumbar and bolster features
default to the middle lumbar mode.
** Press C a second time to adjust the back bolster. Press C a third time to adjust the cushion bolster.
You can also adjust this feature through the touchscreen. Press the Menu Settings icon, then
Vehicle. Choose Multi-Contour
Seats.
When switched on, the system displays
directions for you to adjust the lumbar
settings in your seat or to set the massage
function. To access and make adjustments to the
lumbar setting:
1. Choose the desired seat to adjust.
2. Press the + or - to adjust the lumbar
intensity.
To access and make adjustments to the
massage setting: 1. Press the Menu Settings icon, then
Vehicle. Choose Multi-Contour Seats.
2. Choose the desired seat to adjust.
3. Press OFF, LO or HI.
145
MKZ (CC9) Canada/United States of America, enUSA, Edition date: 201905, Second-Printing SeatsE142607
Page 152 of 561
Rear Seats
WARNING: Persons who are unable
to feel pain to the skin because of
advanced age, chronic illness, diabetes,
spinal cord injury, medication, alcohol use,
exhaustion, or other physical conditions,
must exercise care when using the seat
heater. The seat heater may cause burns
even at low temperatures, especially if
used for long periods of time. Do not place
anything on the seat that insulates against
heat, such as a blanket or cushion,
because this may cause the seat heater to
overheat. Do not puncture the seat with
pins, needles, or other pointed objects
because this may damage the heating
element which may cause the seat heater
to overheat. An overheated seat may
cause serious personal injury. Do not do the following:
•
Place heavy objects on the seat.
• Operate the seat heater if water or any
other liquid is spilled on the seat. Allow
the seat to dry thoroughly.
• Operate the heated seats unless the
engine is running. Doing so can cause
the battery to lose charge.
The rear seat heat controls are located on
the rear of the center console. Press the heated seat symbol to cycle
through the various heat settings and off.
More indicator lights indicate warmer
settings.The heated seat module resets at every
ignition run cycle. While the ignition is on,
press the high or low heated seat switch to
enable heating mode. When activated, they
will turn off automatically when you turn the
engine off.
CLIMATE CONTROLLED SEATS
(IF
EQUIPPED)
Heated Seats WARNING:
People who are unable
to feel pain to their skin because of
advanced age, chronic illness, diabetes,
spinal cord injury, medication, alcohol use,
exhaustion or other physical conditions,
must exercise care when using the heated
seat. The heated seat may cause burns
even at low temperatures, especially if
used for long periods of time. Do not place
anything on the seat that insulates against
heat, such as a blanket or cushion. This
may cause the heated seat to overheat.
149
MKZ (CC9) Canada/United States of America, enUSA, Edition date: 201905, Second-Printing SeatsE146322
Page 157 of 561
2.
The indicator light will begin to flash after
20 seconds. Without releasing the
button, follow Step 1 in the Programming
section.
For questions or comments, contact
HomeLink at www.homelink.com,
www.youtube.com/HomeLinkGentex or
1-800-355-3515.
Programming to a Genie Intellicode 2
Garage Door Opener
Note: The Genie Intellicode 2 transmitter
must already be programmed to operate
with the garage door opener.
Note: To program HomeLink to the
transmitter you must first put the transmitter
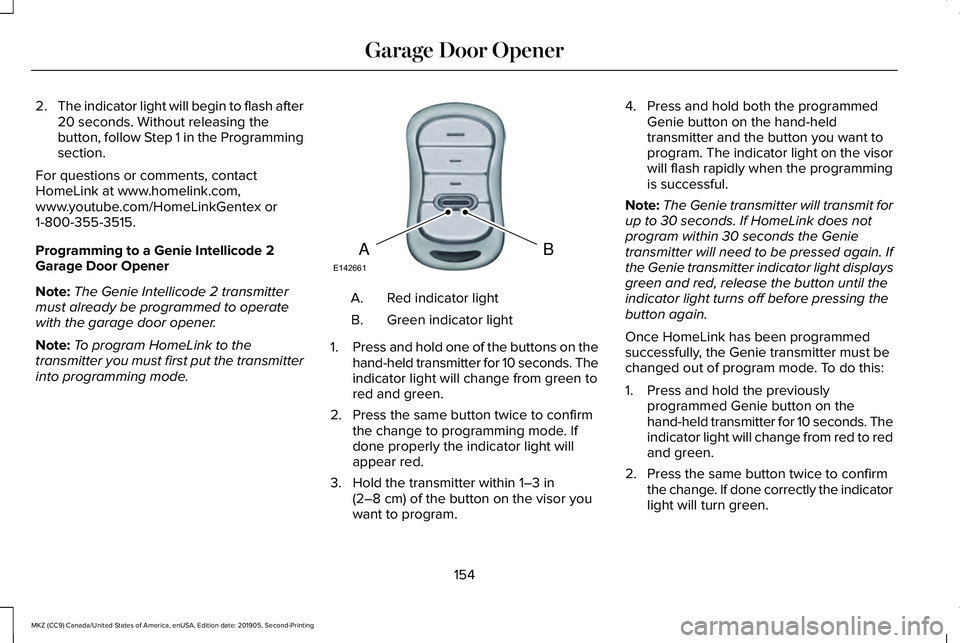
into programming mode. Red indicator light
A.
Green indicator light
B.
1. Press and hold one of the buttons on the
hand-held transmitter for 10 seconds. The
indicator light will change from green to
red and green.
2. Press the same button twice to confirm the change to programming mode. If
done properly the indicator light will
appear red.
3. Hold the transmitter within 1–3 in
(2–8 cm) of the button on the visor you
want to program. 4. Press and hold both the programmed
Genie button on the hand-held
transmitter and the button you want to
program. The indicator light on the visor
will flash rapidly when the programming
is successful.
Note: The Genie transmitter will transmit for
up to 30 seconds. If HomeLink does not
program within 30 seconds the Genie
transmitter will need to be pressed again. If
the Genie transmitter indicator light displays
green and red, release the button until the
indicator light turns off before pressing the
button again.
Once HomeLink has been programmed
successfully, the Genie transmitter must be
changed out of program mode. To do this:
1. Press and hold the previously programmed Genie button on the
hand-held transmitter for 10 seconds. The
indicator light will change from red to red
and green.
2. Press the same button twice to confirm the change. If done correctly the indicator
light will turn green.
154
MKZ (CC9) Canada/United States of America, enUSA, Edition date: 201905, Second-Printing Garage Door OpenerBAE142661
Page 158 of 561
Programming HomeLink to the Genie
Intellicode Garage Door Opener Motor
Note:
You may need a ladder to access the
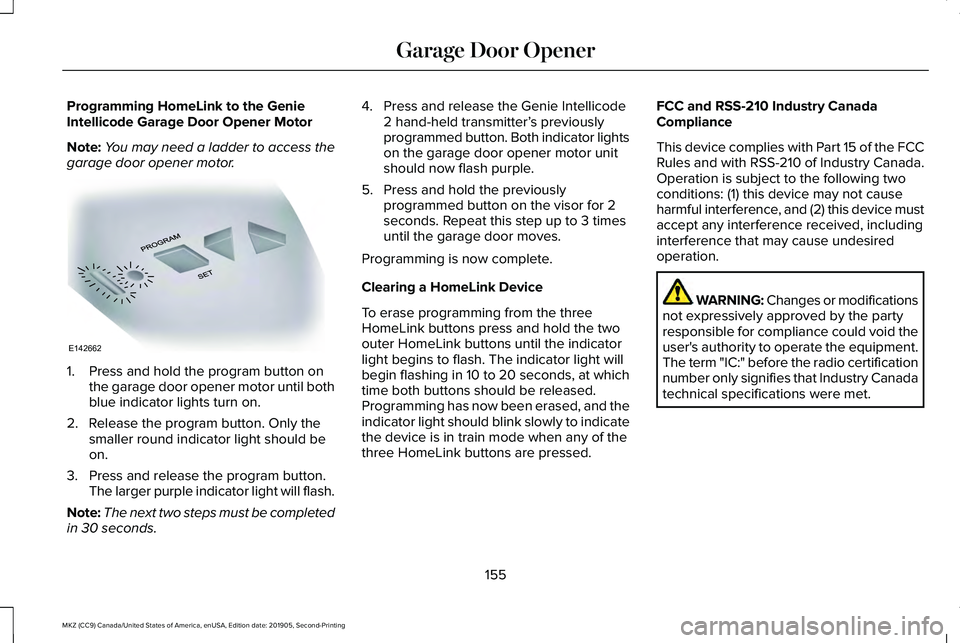
garage door opener motor. 1. Press and hold the program button on
the garage door opener motor until both
blue indicator lights turn on.
2. Release the program button. Only the smaller round indicator light should be
on.
3. Press and release the program button. The larger purple indicator light will flash.
Note: The next two steps must be completed
in 30 seconds. 4. Press and release the Genie Intellicode
2 hand-held transmitter’ s previously
programmed button. Both indicator lights
on the garage door opener motor unit
should now flash purple.
5. Press and hold the previously programmed button on the visor for 2
seconds. Repeat this step up to 3 times
until the garage door moves.
Programming is now complete.
Clearing a HomeLink Device
To erase programming from the three
HomeLink buttons press and hold the two
outer HomeLink buttons until the indicator
light begins to flash. The indicator light will
begin flashing in 10 to 20 seconds, at which
time both buttons should be released.
Programming has now been erased, and the
indicator light should blink slowly to indicate
the device is in train mode when any of the
three HomeLink buttons are pressed. FCC and RSS-210 Industry Canada
Compliance
This device complies with Part 15 of the FCC
Rules and with RSS-210 of Industry Canada.
Operation is subject to the following two
conditions: (1) this device may not cause
harmful interference, and (2) this device must
accept any interference received, including
interference that may cause undesired
operation.
WARNING: Changes or modifications
not expressively approved by the party
responsible for compliance could void the
user's authority to operate the equipment.
The term "IC:" before the radio certification
number only signifies that Industry Canada
technical specifications were met.
155
MKZ (CC9) Canada/United States of America, enUSA, Edition date: 201905, Second-Printing Garage Door OpenerE142662
Page 161 of 561
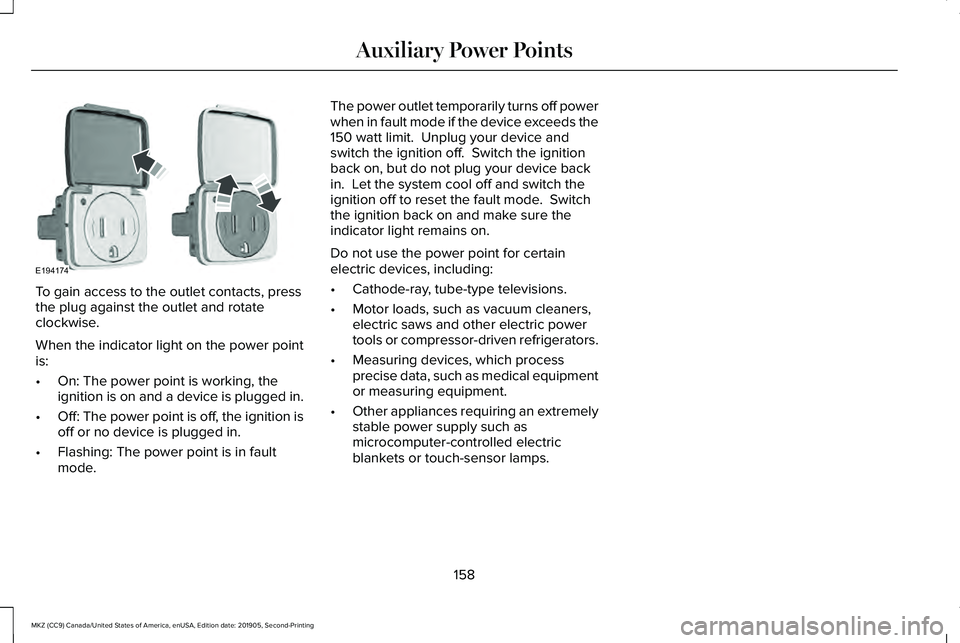
To gain access to the outlet contacts, press
the plug against the outlet and rotate
clockwise.
When the indicator light on the power point
is:
•
On: The power point is working, the
ignition is on and a device is plugged in.
• Off: The power point is off, the ignition is
off or no device is plugged in.
• Flashing: The power point is in fault
mode. The power outlet temporarily turns off power
when in fault mode if the device exceeds the
150 watt limit. Unplug your device and
switch the ignition off. Switch the ignition
back on, but do not plug your device back
in. Let the system cool off and switch the
ignition off to reset the fault mode. Switch
the ignition back on and make sure the
indicator light remains on.
Do not use the power point for certain
electric devices, including:
•
Cathode-ray, tube-type televisions.
• Motor loads, such as vacuum cleaners,
electric saws and other electric power
tools or compressor-driven refrigerators.
• Measuring devices, which process
precise data, such as medical equipment
or measuring equipment.
• Other appliances requiring an extremely
stable power supply such as
microcomputer-controlled electric
blankets or touch-sensor lamps.
158
MKZ (CC9) Canada/United States of America, enUSA, Edition date: 201905, Second-Printing Auxiliary Power PointsE194174